Nmap is a popular, powerful and cross-platform command-line network security scanner and exploration tool. It can also help you get an overview of systems that connected your network; you can use it to find out all IP addresses of live hosts, scan open ports and services running on those hosts, and so much more.
One of the interesting features of Nmap is the Nmap Script Engine (NSE), which brings even more flexibility and efficiency to it. It enables you to write your own scripts in Lua programming language, and possibly share these scripts with other Nmap users out there.
Read Also: 29 Practical Examples of Nmap Commands for Linux
There are four types of NSE scripts, namely:
- Prerule scripts – are scripts that run before any of Nmap’s scan operations, they are executed when Nmap hasn’t gathered any information about a target yet.
- Host scripts – are scripts executed after Nmap has performed normal operations such as host discovery, port scanning, version detection, and OS detection against a target host.
- Service scripts – are scripts run against specific services listening on a target host.
- Postrule scripts – are scripts run after Nmap has scanned all of its target hosts.
Then these scripts are grouped under various categories including those for authentication (auth), discovering of hosts (broadcast), brute force attacks to guess authentication credentials (brute), discovering more about a network (discovery), causing a denial of service (dos), exploiting some vulnerability (exploit), etc. A number of scripts belong to the default category.
Note: Before we move any further, you should take a note of these key points:
- Do not execute scripts from third parties without critically looking through them or only if you trust the authors. This is because these scripts are not run in a sandbox and thus could unexpectedly or maliciously damage your system or invade your privacy.
- Secondly, many of these scripts may possibly run as either a prerule or postrule script. Considering this, it is recommend to use a prerule for purposes of consistency.
- Nmap uses the scripts/script.db database to figure out the available default scripts and categories.
To see the location of all available NSE scripts, run the locate utility on the terminal, like this:
$ locate *.nse

/usr/share/nmap/scripts/acarsd-info.nse
/usr/share/nmap/scripts/address-info.nse
/usr/share/nmap/scripts/afp-brute.nse
/usr/share/nmap/scripts/afp-ls.nse
/usr/share/nmap/scripts/afp-path-vuln.nse
/usr/share/nmap/scripts/afp-serverinfo.nse
/usr/share/nmap/scripts/afp-showmount.nse
/usr/share/nmap/scripts/ajp-auth.nse
/usr/share/nmap/scripts/ajp-brute.nse
/usr/share/nmap/scripts/ajp-headers.nse
/usr/share/nmap/scripts/ajp-methods.nse
/usr/share/nmap/scripts/ajp-request.nse
/usr/share/nmap/scripts/allseeingeye-info.nse
/usr/share/nmap/scripts/amqp-info.nse
/usr/share/nmap/scripts/asn-query.nse
...
NSE scripts are loaded using the --script flag, which also allows you to run your own scripts by providing categories, script file names, or the name of directories where your scripts are located.
The syntax for enabling scripts is as follows:
$ namp -sC target     #load default scripts
OR
$ nmap --script filename|category|directory|expression,...   target
You can view a description of a script with the --script-help option. Additionally, you can pass arguments to some scripts via the --script-args and --script-args-file options, the later is used to provide a filename rather than a command line arg.
To perform a scan with most of the default scripts, use the -sC flag or alternatively use --script=defaultas shown.
$ nmap -sC scanme.nmap.org
OR
$ nmap --script=default scanme.nmap.org
OR
$ nmap --script default scanme.nmap.org
Sample Output
Starting Nmap 7.01 ( https://nmap.org ) at 2017-11-15 10:36 IST
Nmap scan report for scanme.nmap.org (45.33.32.156)
Host is up (0.0027s latency).
Not shown: 999 filtered ports
PORT   STATE SERVICE
80/tcp open  http
|_http-title: Go ahead and ScanMe!

Nmap done: 1 IP address (1 host up) scanned in 11.74 seconds
To use a script for the appropriate purpose, you can first of all get a brief description of what it actually does, for instance http-headers.
$ nmap --script-help http-headers scanme.nmap.org
Sample Output
Starting Nmap 7.01 ( https://nmap.org ) at 2017-11-15 10:37 IST

http-headers
Categories: discovery safe
https://nmap.org/nsedoc/scripts/http-headers.html
  Performs a HEAD request for the root folder ("/") of a web server and displays the HTTP headers returned.
Loading NSE Scripts To Perform Nmap Scans
You can select or load scripts to perform a scan in different methods explained below.
Using Script Name
Once you know what a script does, you can perform a scan using it. You can use one script or enter a comma-separated list of script names. The command below will enable you view the HTTP headers configured on the web server at the target host.
$ nmap --script http-headers scanme.nmap.org
Starting Nmap 7.01 ( https://nmap.org ) at 2017-11-15 10:39 IST
Nmap scan report for scanme.nmap.org (45.33.32.156)
Host is up (0.27s latency).
Not shown: 996 closed ports
PORT      STATE    SERVICE
22/tcp    open     ssh
80/tcp    open     http
| http-headers:
|   Date: Wed, 15 Nov 2017 05:10:04 GMT
|   Server: Apache/2.4.7 (Ubuntu)
|   Accept-Ranges: bytes
|   Vary: Accept-Encoding
|   Connection: close
|   Content-Type: text/html
|
|_  (Request type: HEAD)
179/tcp   filtered bgp
31337/tcp open     Elite

Nmap done: 1 IP address (1 host up) scanned in 20.96 seconds
Using Categories
You can also load scripts from one category or from a comma-separated list of categories. In this example, we are using all scripts in the default and broadcast category to carry out a scan on the host 192.168.56.1.
$ nmap --script default,broadcast 192.168.56.1
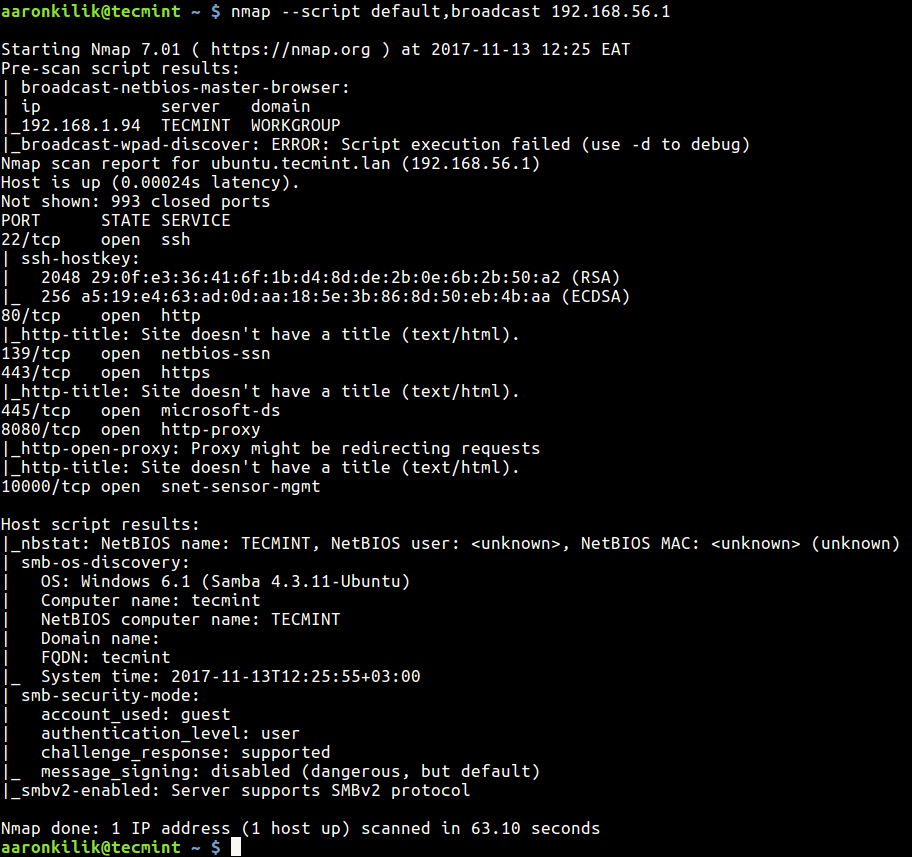
Scan a Host
Using * Wildcard
This is useful when you want to select scripts with a given name pattern. For example to load all scripts with names starting with ssh, run the command below on the terminal:
$ nmap --script "ssh-*" 192.168.56.1
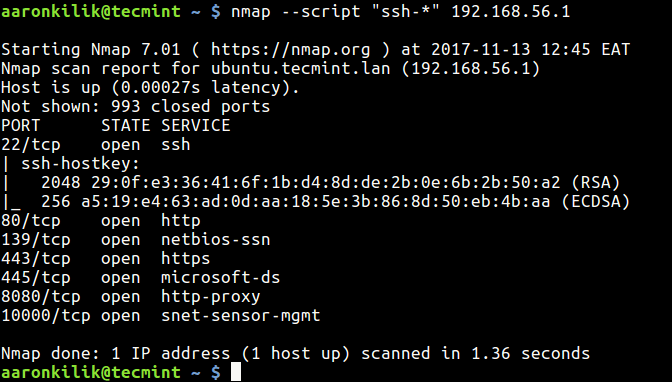
Load Scripts Using Wildcards-
Using Boolean Expressions
You can also select scripts using boolean expressions which you can build using the and, or, and not operators. And names in a Boolean expression may be a category, a filename from script.db, or all.
The following command will load scripts from the default or broadcast categories.
$ nmap --script "default or broadcast" 192.168.56.10
Which is equivalent to:
$ nmap --script default,broadcast 192.168.56.10
To load all scripts omitting those in the vuln category, run this command on the terminal.
$ nmap --script "not vuln" 192.168.56.10
The next command looks a little complicated but it is easy to understand, it selects scripts in the default, or broadcast categories, leaving out those with names starting with ssh-:
$ nmap --script "(default or broadcast) and not ssh-*" 192.168.56.10
Importantly, it is possible to combine categories, script names, a directory containing your custom scripts or a boolean expression to load scripts, like this:
$ nmap --script broadcast,vuln,ssh-auth-methods,/path/to/custom/scripts 192.168.56.10
Passing Arguments to NSE Scripts
Below is an example showing how to pass arguments to scripts with the –script-args option:
$ nmap --script mysql-audit --script-args "mysql-audit.username='root', \
mysql-audit.password='password_here', mysql-audit.filename='nselib/data/mysql-cis.audit'"
To pass a port number, use the -p nmap option:
$ nmap -p 3306 --script mysql-audit --script-args "mysql-audit.username='root', \
mysql-audit.password='password_here' , mysql-audit.filename='nselib/data/mysql-cis.audit'"
This above command runs an audit of the MySQL database server security configuration against parts of the CIS MySQL v1.0.2 benchmark. You can as well create your own useful custom audit files for other MySQL audits.
That’s it for now. You can find more information in the nmap man page or check out NSE Usage.
To get started with writing your own NSE scripts, check out this guide: https://nmap.org/book/nse-tutorial.html
Conclusion
Nmap is a really powerful and useful tool that every system or network administrator needs in his/her security arsenal – NSE simply adds more efficiency to it.
In this article, we introduced you to the Nmap Script Engine, and looked at how to find and use the various available scripts under different categories. If you have any questions, do not hesitate to write back to us via the comment form below.