Feb 7, 2019 12:45 PM PT
If you need a task manager application to run on your Linux operating system, tap into a software category filled with options that go far beyond the to-do list app you have stuffed into your smartphone.
Keeping up to date with multiple daily activity calendars, tons of information, and never-ending must-do lists can become a never-ending challenge. This week’s Linux Picks and Pans reviews the top open source task management and to-do apps that will serve you well on most Linux distributions.
Over the years, I have used these task management/to-do list applications on my own Linux computers. Few of them were capable of easily syncing their information to my tablet and my smartphone. The number of project management and to-do list tools have proliferated for Android devices in the last few years, but that is not the case with similar apps for Linux.
In fact, several of the better-known Linux apps in this category that I previously used or reviewed have disappeared. Most of the others have not had a feature update in years.
Task management and to-do list apps for Linux are a mixed bag. This category reflects an overlapping of features and functions. These standalone solutions go beyond the integration in Google Calendar provided by
Google Tasks.
Several of the products in this roundup offer complex interfaces that let you take the information with you on other devices. Some of the applications have sparser features and show signs of aging.
The applications included in this roundup are not presented in any ranked order. Some are readily available in distro repositories. Other packages require manual installation.
Task Coach Masters Details
How a task manager app handles details determines its real usefulness.
Task Coach goes out of its way to help you keep track of the details. Version 1.4.4, released on Dec. 2, 2018, is simply the latest example of this app’s ability to keep you on target and in control of your projects.
TaskCoach is actually two tools in one. It is both a personal task tracker and a to-do manager. It does both routines well. Other apps in this category usually excel at doing one or the other.
It is a master in combining composite functions with a basic task list. Its features include tracking time on task, categorizing activities, and keeping tabs on subevents aligned with larger projects.
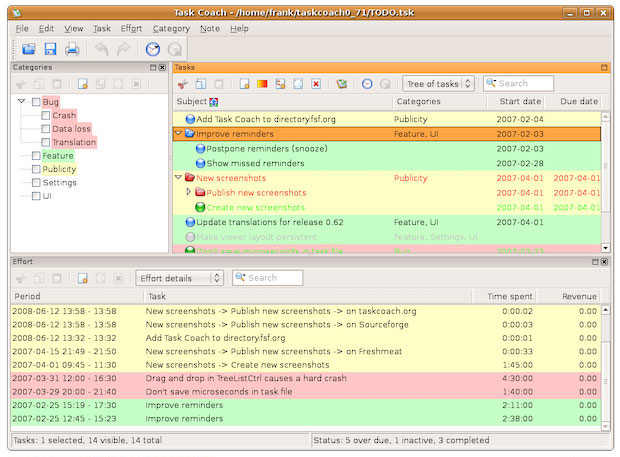
Task Coach lacks an inviting or intuitive user interface, but it is still very functional.
If Task Coach did just those things, it would be a nearly perfect solution. Its additional two tricks put this app over the top in usability. You can add notes to each task and include attachments.
Task Coach makes it easy to maintain a variety of task lists on multiple computers, mobile devices and operating systems. Versions exist for Windows, OS X, Linux, BSD, iPhone, iPod touch and Android.
Task Coach lacks an inviting or intuitive user interface, but it is still very functional. Its detailed configuration panel gives you numerous choices to fine-tune the way it works.
For example, you get about nine tabs with multiple choices on each to set up the application’s general look and feel. These tabs include Window behavior, Files, Language, Task Dates, Task Reminders, Task Appearance, Features and Font Editor options.
The window display shows existing tasks on the left side of the application window. Next to the task name are the planned start and due dates for each task. Right-click the task name line to access available actions. Click the desired action or use that option’s keyboard shortcut.
You can double-click the task name line to access subcategories for entering additional sub-levels of information about the task. These categories contain the most important detail controls for getting Task Coach to manage and organize your tasks’ activities.
The right side of the application window shows categories and sub-categories you create for a task. This is where you can search for specifics in all of your tasks using filters.
Use Task Coach’s progress slider to track your ongoing completion stages. Double-click on a category to provide a detailed description, add notes about each task, and attach supporting documents to the file package.
The crowning glory of the Task Coach tracking system is the Budget tab. It lets you assign the maximum amount of time you allot for a task. It displays a bar showing the time spent on a task and the time remaining to complete it on schedule.
The Revenue option lets you calculate your billing or earning amounts. This budget feature can eliminate the need for any separate billing calculation tool.
Task Coach is a very useful application to help you drill deep down into sub-tasks and multiple categories. It becomes even more valuable if you work on different computers and need an app that lets you store its data file on a portable drive or in the cloud.
GNOME ToDo: Listicles and More
Gnome ToDo version 3.28 is a task management application that is designed to integrate with the GNOME desktop. Fear not if you run something else. It fits in perfectly with many Linux distros without regard to desktop flavor.
It is a simple app that in many ways mimics the look and feel of Google’s Notes app, but it is not embedded into the Chrome browser. gToDo creates multiple lists, sets alarm notifications when tasks are due, automatically purges completed tasks if you desire, exports tasks to HTML format, and sorts them according to priority.
This app also shows the upcoming due date or status of tasks, and can highlight or hide your tasks until their due time is reached.

Gnome ToDo has a simple interface showing little more than a single pane with tasks and related information.
This app’s real beauty lies in its simple interface. It has little more than a single pane that shows tasks and related information.
The interface also shows add/remove buttons and a category filter dropdown box. Otherwise, it is devoid of overlapping right-click menus.
Everything you need is found in a few dropdown menus. The design is simple with high functionality.
gToDo automatically purges old tasks. It also highlights past due items and upcoming tasks.
Hovering over the tray icon displays scheduled tasks and provides for quick updates. It is easy to set up several different categories within a list.
If you prefer to keep separate lists for different activities, you can — and it is just as easy to set alarms and priority notifications, regardless of how you configure one or more lists.
AKIEE: Abandoned Potential
The game plan that drives most ToDo lists and task manager apps is a two-part thought process. Either you have a task to do or you are done with it.
Akiee adds a third part to that plan: doing It.
Akiee has a few other things going for it as well. It makes it easier to stay focused on your next task. Its unique algorithm-based ranking system helps you decide what to do next.
It avoids letting you waste time pondering inconclusive priorities. This approach to ordering your tasks makes it easy to decide what to do next. This, in turn, makes it a reliable tool to build your projects one step at a time.
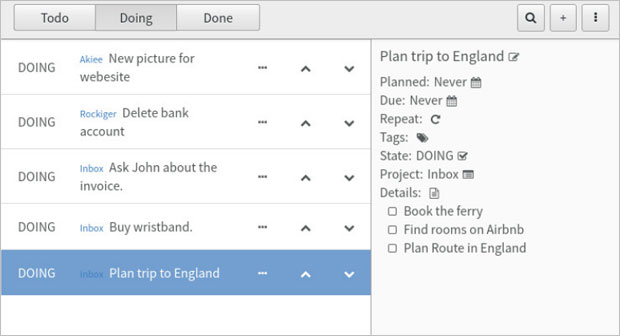
Akiee adds an in-progress element (Doing) as part of its simple-to-use user interface.
One of Akiee’s best features is its universal access. Akiee does not hide your to-do list in a database. You can store your Akiee task file in your cloud account — think Google or Dropbox — to access it over the Web.
Rather than impose its own platform, Akiee stores your task lists in a Markdown file that is readable in any text editor you use. This gives you access to your tasks on all of your computers and on your smartphone as well. You can arrange the order of your tasks easily, instead of just changing priorities and due dates of your tasks.
It is built with Node-Webkit, Clojurescript and React. It is available for Linux, Mac and Windows.
Akiee’s tasks have three states: To-do, Doing and Done. This way you can focus on the tasks you are currently working on.
Akiee has one major drawback, however. Its developer has not updated the application in more than four years. It is barely into beta phase and may not be compatible with every Linux distro.
To use it, download from here, Unpack the binaries files, and then click on the Akiee file to run it.
Remember the Milk: Forgets Nothing
Remember the Milk used to be one of my favorite to-do apps — but until recently, it was not an app, at least not for Linux users. It was a nifty smartphone and tablet tool. I had to piggyback the RTM service in my browser when I ran my Linux-powered desktop or laptop computers.
Now RTM is available for Linux as a standalone app. However, it is available only in 32-bit and 64-bit versions for Fedora and Ubuntu so far.
The app lets you see your tasks with one click of the cow launcher icon. You also can keep a thin version of the app on your screen at all times. Plus, desktop notifications appear in the notification center to make sure that you do not forget what you need to do.
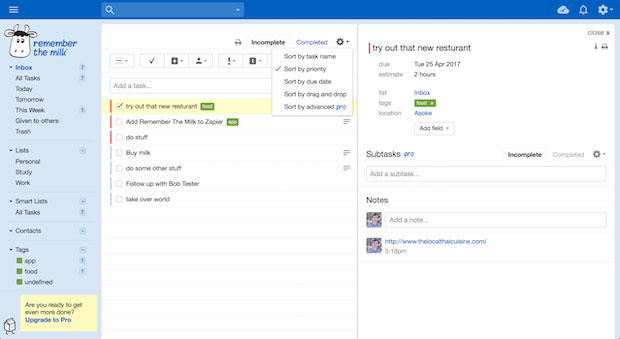
Remember the Milk sports a somewhat cluttered user interface. Tasks and other features are accessible with a single click in most cases.
The Smart Add feature makes it fast and easy to add your tasks. Enter in a single line the task and its due date, priority, repeat reminder and tags. The app sorts the details and displays them in the appropriate locations within the window display.
The RTM app sends you reminders as you direct by email, text, IM, Twitter and mobile devices. Track your to-do items your way. You can create multiple lists and even organize them with colors and tags.
RTM’s project management feature lets you set subtasks to break down tasks into segments to give you a step-by-step description of what the task entails. Create any number of subtasks for a task, and even add subtasks to your subtasks.
The app makes it easy to track tasks in a project involving a team of collaborators. You easily can send entire task lists or delegated subtasks to your cohorts.
Easily plan and track multipart projects by attaching files to your tasks. The RTM app connects to Google Drive or Dropbox to keep all related information in one place. The supporting data can be documents, spreadsheets, presentations or photos.
RTM’s search wizard lets you search your tasks easily to find what you assigned to a particular person, or subtasks due by a certain date. You can search for tasks by the priority number or tag you assigned.
Two other features make Remember the Milk a top-notch task management tool. One is Smart Lists. These are special lists based on search criteria. Keeping on task is close to foolproof with some 50 different search operators. The other is the ability to synchronize with other tools you use.
For instance, you can integrate your lists with Gmail, Google Calendar, Twitter, Evernote, If This Than That (IFTTT), and more.
If the app is not compatible with your Linux distro, go to the
Remember the Milk website and sign up for the free Web-based service. You will have access to most of the same features as the RTM app
GnoTime: Not Just a Tracking Tool
The GnoTime Tracking Tool, formerly known as “GTT,” comes close to doing it all: keep to-do lists on target, organize your ideas, and track your projects.
GnoTime also can serve as your diary or work journal. Even better, it can track how much time you spend on projects, and generate reports and invoices based on that time log.
The graphical user interface in GnoTime takes some getting used to, however. This is especially the case if you keep a lot of open panels. The top row of the main application window is typical of a traditional GUI design.
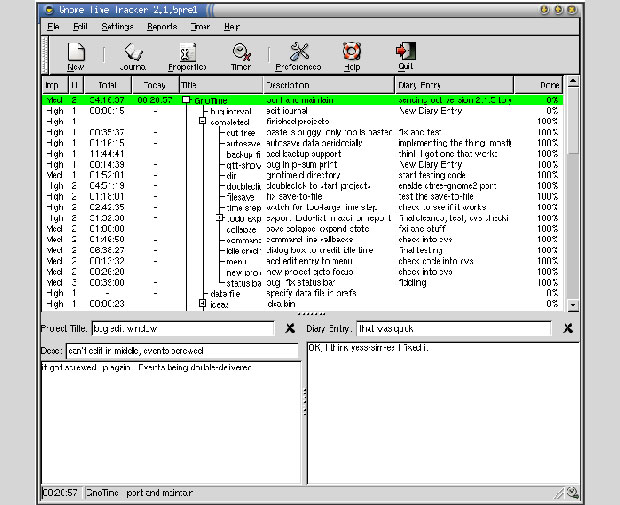
GnoTime’s user interface is a familiar sight with clickable icons for the app’s features.
The similarity ends there, however. Access to all program features is available from the top row of dropdown menus. A limited toolbar provides quick access to some of the same functions. The categories make a lot of sense.
A limited toolbar row is located below the dropdown menus. You can click icons to open a New Entry, Activity Journal, Timer Stop and Start, Help and Quit. These serve as default shortcuts to the most essential menu options.
The app suffers from a busy interface. Tracking several projects fills in a lot of data in the various display panels of the main application window. For instance, the currently active projects display in a large window under the toolbar row. It shows details that include importance, urgency, status, total time spent, current working time, project title, description, and new diary entry.
Each line contains the summary data for a particular project. Click on a project line to see more specific data in two resizable panels under the project summary window. The Properties menu opens a tabbed panel that lists Projects, Rates, Intervals and Planning. Each tab has even more precise billing and time tracking options to regulate calculations for billing and reporting.
The Journal panel is a dizzying array of links to other panels and windows in the tracking system. The Journal panel presents a series of diary entries. Each one can be a short or long note about a project, a to-do list entry, or any comment you want to add to the mix.
The Journal lists each entry as a hot link that shows in blue the date of the entry and the starting and stopping time of the item. Elapsed time is shown but is not a link. Clicking on any of the linked elements opens a larger window with the related details.
Select Reports/Query to open the Custom Report Generator for the active project. Then select from the dropdown menu the custom report you want to generate. The options are Journal, Big Journal, Invoice, Daily, Status and ToDo. You can refine the date range for the compiled data. Or you can select a Daily, Monthly or Custom activity report. When you have completed all selections, click the Generate Report button. The results display in an XML file format in yet another window that pops open.
More cool features include the ability to maintain multiple to-do lists. This is a huge advantage over having tasks for different activities scrunched together in one list manager.
The Running Timer tallies time totals for each project or task viewable by day, week, month or year. It measures the amount of time that I sit at the computer actually working. When the keyboard or mouse is idle, the clock stops. If it stays stopped for too long, the program nags me to start it up again.
The Gnome Time Tracker is a very flexible and comprehensive tracking toolbox that auto-saves as I work. Despite GnoTime’s propensity for desktop clutter, its interface is simple to use.
GnoTime comes in pre-compiled binaries/packages for Debian, Ubuntu, RedHat/Fedora, Suse and Gentoo Linux families. Check your distro’s package manager tool. Otherwise, you will have to download a tarball file and manually compile from source. That is the only way to get the latest version, which was last updated on April 17, 2017. In that case,
go here.
Toodledo: Cloud-based Organizer Extraordinaire
One of the more modern and highly advanced options for managing your projects and keeping your task lists on schedule is
Toodledo. This highly customizable service lives in the clouds and syncs to all of your devices. It is platform-agnostic and connects from your browser to apps on your other supported devices.
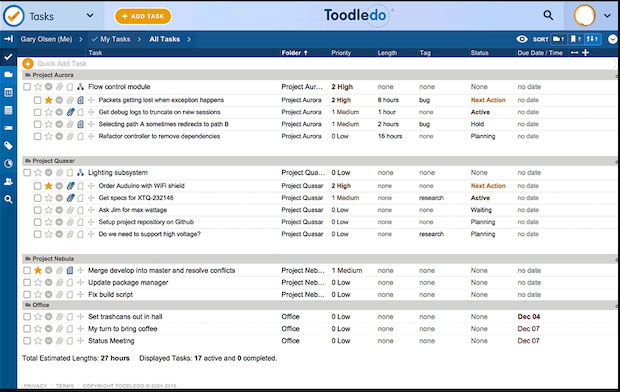
Toodledo’s expansive user interface shows a highlighted view of all data for each module. Each component is a click away in the left panel.
Toodledo is a detailed solution that you might find more of an overkill approach. The interface provides labels, infinite lists that you can subdivide into categories, and much more.
Toodledo combines to-do lists with project management features with an added ability to tack on notes and attach files. Among this solution’s many talents is the ability to make custom to-do lists, create structured outlines, track your habits, write long notes, and comment on goals and projects.
One of its unique features is the Schedule module. It helps you to make the most of your free time and create repeating tasks. It can send you reminders based on your current location and let you view tasks on a calendar.
It is a great digital assistant for your personal needs. It is a superior method to stay connected and scheduled with your collaborators. You can assign tasks to your associates and track time spent on a project.
You can use Toodledo to record your ideas in the notes section. You can set and track goals. The entire system is based on the Get Things Done (GTD) method developed by David Allen. This approach organizes tasks to focus your energy and creativity on completing those tasks in a stress-free manner.
The basic version is free. It provides most of the core features but places a limitation of 30 items per list or outline. Other limitations also exist when using the basic version. Standard tier (US$2.99/month and Plus tier ($4.99/month) are also available.
Bottom Line
Task management applications for Linux offer an overlapping range of features and user interfaces. I deliberately avoided ranking these Linux products. I also suspended the usual star rating for each one in this roundup.
Task management and to-do List software for Linux is a software category being overshadowed by cloud services and dedicated apps on portable devices. That is one reason open source applications available for the Linux platform lack many new contenders.
The titles in this roundup offer a variety of options. They have a range of functionality that may take time to learn and use effectively. Compare the features and find the best choice for your needs.
Source