Sometimes it takes more than a few tweaks to turn an old-style desktop design into a fresh new Linux distribution. That is the case with the public release of Blue Collar Linux.
“The guidance and design were shaped by real people — blue collar people,” Blue Collar developer Steven A. Auringer told LinuxInsider. “Think useful and guided by Joe and Jane Whitebread in Suburbia.”
Blue Collar Linux has been under development for the last four years. Until its public release this week, it has circulated only through an invitation for private use by the developer’s family, friends and associates looking for an alternative to the Windows nightmare.
Another large part of his user base is the University of Wisconsin, where he engages with the math and computer science departments.
This new release is anything but a just-out-of-beta edition. It is very polished and is constantly updated and improved. A growing cadre of users submit bug reports and contribute feature suggestions based on real-world user requests.
Auringer does as not bother with versioning each release, however. Average people do not care about those things, he claims.
“You don’t hear them talking about Windows 10-1824-06b-build257. They use Windows 10,” he noted.
That view in part led Auringer to develop a Linux distro with a goal that responded to typical users who had no interest in learning computer technology. The distro’s goal is to be easy to use and be useful for Joe and Jane Whitebread.
“There are Millions of home systems. Most are not powerful state-of-the-art office systems. There are a lot of older systems sitting on closet shelves waiting to be brought back to life. Some are hand-me-downs. Is Joe or Jane going to spend money to use Windows 10?” asked Auringer.
From Shell Script to OS
Auringer is a retired U.S. Marine with a doctoral degree in applied mathematics and a master’s in computer science. He worked 10-plus years as a senior software engineer.
He started developing Blue Collar Linux as a shell script that would add/delete and configure software/fonts/colors/drivers, etc. He used the scripts and shared them for simplifying automated installation routines. That led to developing his own Linux alternative to the Microsoft Windows nightmare.
Auringer was determined to avoid the frustrations nontechnical users experienced with so many Linux distros — overwhelming software packages and the daunting maze of desktops choices. To remove those barriers, Auringer selected easy, yet powerful, Linux applications. He adopted a one-of-each approach.
“I have looked at over 75 Distros. Most — even the supposed easy ones — assume some level of Linux geekiness. I spent a lot of time listening to my beta users. They want to point, click and go,” he said. “They don’t want to search the Net comparing six programs, downloading and polluting their systems just to solve an easy problem.”
Auringer learned from his beta users that they did NOT want three music players, three video players, four text editors, two video editors, three photo editors, a large complex office suite and Visual Studio IDE to develop software.
Most average people are not going to burn an evening trying to get a program to work, he explained. They are not going to log into blogs, ask questions, try six different answers they don’t understand, and still have a broken system.
For example, they have no idea why removing program A broke program B, or why reinstalling program A does not fix program B. They do not know that it also may have broken program C, Auringer added.
Most average people do not know or care about Xfce, KDE, Gnome or Unity desktops. They do not know or care about what a window manager is, he said.
“They want to turn it on and use it to accomplish a goal without turning it into a hobby,” Auringer maintained.
That is precisely what Blue Collar Linux gives nontechnical users. It is difficult not to love Blue Collar Linux. It has all of the usability boxes checked. It does just what the developer designed it to do: make computing simplified!
Blue Collar Overview
Blue Collar Linux offers both home and small business users an ideal computing platform. They are the developer’s intended user base.
What makes Blue Collar ideal? Installation is uncomplicated. When the process is finished, no tools or setup are required.
The desktop has a simple uncluttered look. You have plenty of options to change the default settings. Personalizing the desktop is easy.
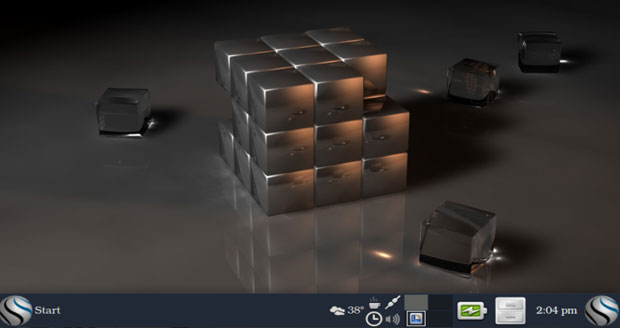
Blue Collar Linux’s modified Xfce desktop design has a panel bar with multiple menu buttons, system icons, and a collection of applets to display information on the bar.
Out of the box, everything works. Nothing is confusing. No time must be spent reading online how-to documents.
Blue Collar is Gnome 3.10/GTK-based and runs the Xfce 4.10-based desktop. However, the modifications Auringer built in specifically for his distro are responsible for the tremendous difference in how Xfce works and looks.
For example, the applications and controls/buttons look like they belong together. Unlike other desktop designs, each application’s appearance reinforces the design and gives users the feeling that it is part of a complete system.
Older Code Base vs. New
Blue Collar has one slight downside that might only be a concern for more tech-savvy users. This distro is based on Ubuntu 14.04.5 LTS, the Trusty Tahr series released in August 2016. Its long-term support ends this April. That means the developer will be issuing an updated release on a newer code base eventually.
In fact, Auringer is working on using Ubuntu 16.04 as a replacement base for Blue Collar Linux. Ubuntu supports 16.04, dubbed “Xenial Xerus,” until April 2021.
Still, he is happy with the continued performance of 14.04.5 and is not rushing to swap it out. Trusty Tahr code works well today and is not going to drop dead on any certain date in the near future, according to the developer. He plans to support critical issues himself if any develop when the long-term support from Ubuntu runs out, rather than rushing to change the code base.
A major advantage of 14.04.5 is the solid support by third-party drivers. Manufacturers and developers of printers, scanners, wireless and other systems have well-developed and tested drivers. Maintaining existing stability counts more than change.
“That is more of a concern to my user base than bleeding edge. They generally don’t know and don’t care what the base version is. All they know is that it never crashes — or worse, locks their box and loses their work,” Auringer said.
He prefers the Xenial Xerus code base to the current 18.04 LTS, AKA Bionic Beaver, released last year and supported to April 2023. The 18.04 code base is “squirrelly, unfinished and generally not recommended, or recommended [only] to experienced users.”
Only experienced users will put up with Bionic Beaver, just to be bleeding edge, he said.
The code base was impressive when it was released. It included an updated kernel and X stack for new installations to support new hardware. Since it has been an integral part of Blue Collar from the start, stability and reliability are of no concern.
Why Xfce Instead of Other Desktops?
There are several answers to the “Why Xfce?” question, noted Auringer, but they all have to do with Xfce having better desktop functionality and adaptability. Since Blue Collar must run on a wide range of legacy computers, a lightweight but powerful desktop environment is essential.
For example, newer options such as LXDE and LXLE are light, but the menus are sparse. Plus, their configuration is limited. Auringer sees the Cinnamon desktop as bloated, slow, buggy, and difficult to configure.
The Mate desktop lacks comments in the menu for new/beginning users — something Xfce’s Whisker Menu provides. Plus, the Whisker menu in Blue Collar Linux lets you add, delete or rearrange your favorite applications in the main menu. You also can resize the main menu.
MenuLibre, a menu-editing tool included in Xfce, makes it easy for Blue Collar users to arrange menu content their way. Xfce is mature; it runs well on minimal hardware and is fast.
Plankless and Dockless
Another major user benefit with the Xfce desktop is the ability to add or remove application launchers on the panel or the desktop itself. An even nicer feature that you will not find in other Xfce systems is the ability to unlock the panel and move it to the top or side if you prefer.
Some Linux distros use both panel bars and a Cairo-style dock or plank-style application launcher. You will not find modifications in Blue Collar Linux built around docks or planks.
They do not work well in general, according to Auringer. Some distros tried Awn or Plank and then dropped it. The Cairo dock has lots of bells and whistles, but nothing to add in terms of functionality or ease of use.
“I have also found that depending on the version and settings, Cairo can be a little unpredictable,” he said.
One more great feature with Blue Collar’s modified Xfce desktop is the triple menu system. Finding and launching applications is fast, thanks to an application search field built into each menu.
The menus live at either end of the panel bar. On the far left is the Whisker menu. At the far right end of the panel is a GNOME-style full-screen display of application icons. With either menu, hover the mouse over an icon to see a brief explanation of what the application does.
Right-click anywhere on the desktop not covered by a window to launch a third style menu. The bottom label cascades a list of installed applications. the rest of the column lists various system actions such as creating folders, UL links and application launchers.
Massive Software Inventory
Auringer’s decision to bundle a single software title for each computing task is a win-win. It actually lets the developer bundle more diverse applications without creating bloat.
His goal is not to make Blue Collar Linux minimalist in terms of its software inventory. To the contrary, this distro comes with more preinstalled titles than I see in most distros, whether they are Xfce systems or not.
The included applications are solid choices. They do not require hours of learning how to use them.
For example, typical users do not need feature-heavy office suites with separate components like spreadsheets and database managers they will never use, argues Auringer. So he includes the Abiword word processor with plugins already enabled.
Preinstalled applications include Homebank for personal finance management; LibreCAD, a professional-strength drafting program; Diagram for creating and editing designs; and RedNoteBook — a tool for keeping notes and daily journal entries and calendar.
Specialty Tools Included
This distro also has Wine, an emulator that lets you run Microsoft Windows programs within the Linux environment. I have used Linux for so many years that I no longer rely on Wine.
However, having Wine preinstalled in Blue Collar Linux gives newcomers to the Linux OS an added comfort zone that lets them continue using familiar programs until they find better Linux alternatives.
It creates a pseudo C: Drive in the Blue Collar directory to show Wine-installed Windows programs. It comes with tools to install and uninstall windows programs as if you were running them on an actual Windows computer
Another great find in Blue Collar Linux is the Parental Controls feature. I test and review hundreds of Linux distros. This is my first time seeing a parental control application. What a great idea for helping children learn responsible computer behavior.
It is as simple to use as creating an alarm in a computer calendar. You can set the number of hours per day a user can access the computer. You can add a check for the approved days of usage in general, as well as allotted times and days to use the Web browser, email client and Instant Messaging applications.
Using It
One of the essential features that a well-designed operating system can provide is access to virtual workspaces. This functionality lets you view different applications or sets of open application windows on separate screens. Some distros make navigating among workspaces confusing and difficult.
Not Blue collar Linux. The standard Xfce desktop does a nice job of handling virtual workspaces. Blue Collar Linux goes well beyond the normal functionality.
This distro includes the Brightside Properties tool, which enhances navigation options for workspace switching.
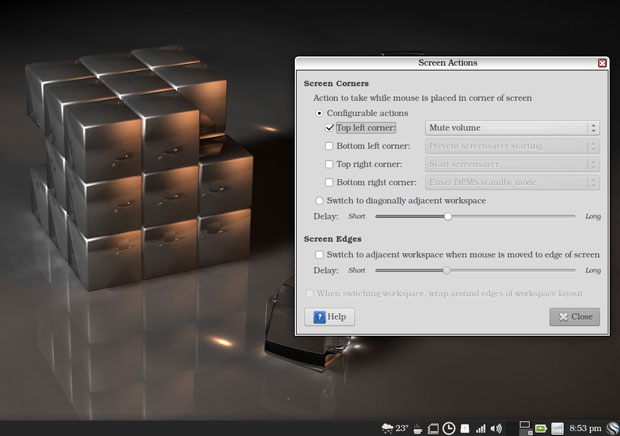
The Brightside Properties Tool is very handy for adding new features to the Xfce desktop for controlling workspace navigation and hot corner actions.
For instance, rolling the wheel in the workspace switcher moves to other workspaces. So does this keyboard shortcut: CTRL-ALT and left/right or up/down arrow keys.
Other options let you change workstations by moving the mouse pointer off the left or right screen edges, or clicking the mouse wheel down or using the middle mouse button to display a switcher panel on the screen.
With the Brightside tool, you can set a different wallpaper for each workspace. The tool also lets you turn on hot corners, which usually is not a function available with the Xfce desktop.
You can select special actions from a dropdown list that activates when you push the mouse pointer into a chosen corner of the screen. You also can create your own action command using the custom option in the dropdown list.
One more need trick is rolling the mouse wheel on the sound icon in the system tray to raise or lower the volume.

Click the mouse wheel down or use the middle mouse button to display a switcher panel on the screen.
Bottom Line
Blue Collar Linux is a seasoned operating system that will not disappoint you. It runs well on older computers with less-than-modest resources. It runs superbly on more recent hardware.
Even if you are not a fan of the Xfce desktop environment, give this modified iteration a try. What you find in Blue Collar Linux is not the same old thing. This distro is feature-rich. It is easy to install and easier to use.
Source


 Axiomtek announced a “CEM700” COM Express Type 7 Basic module with 5th Gen Intel Xeon or Pentium CPUs, 2x 10GBASE-KR, 2x SATA III, plenty of PCIe, extended temperature support, and a new Type 7 carrier board.