|
Oracle® Application Server 10g Installation Guide
10g (9.0.4) for hp HP-UX PA-RISC (64-bit) and Linux x86 Part No. B10842-03 |
|
|
|
|
|
Oracle® Application Server 10g Installation Guide
10g (9.0.4) for hp HP-UX PA-RISC (64-bit) and Linux x86 Part No. B10842-03 |
|
|
|
|
Before installing Oracle Application Server, ensure that your computer meets the requirements described in this chapter.
Contents of this chapter:
Depending on your operating system, see one of the following sections for information on checking the hardware requirements:
The tables list the system requirements for running Oracle Application Server. The installer checks many of these requirements at the start of the installation process and will warn you if any of them is not met. Hence, to save time, you can manually check only the remaining requirements. Refer to the appropriate table to see which requirements are not checked by the installer.
You can also run the system checks performed by the installer without doing an installation, by running the following command, where the runInstaller executable is on the Oracle Application Server CD-ROM (Disk 1) or DVD (in the application_server directory).
prompt> mount_point/runInstaller -executeSysPrereqs
DVD:
prompt> mount_point/application_server/runInstaller -executeSysPrereqs
The results are displayed on the screen as well as written to a log file. For more information on the types of checks performed, see Section 4.10, "Prerequisite Checks Performed by the Installer".
Table 4-1 Hardware Requirements for HP-UX Systems
| Item | Minimum Requirement | Checked by Installer |
|---|---|---|
| Processor type | 64-bit HP-UX PA-RISC processor
If the processor is 64-bit the following command returns the value # /bin/getconf KERNEL_BITS |
No |
| Processor speed | 240 MHz or faster | Yes |
| Network | The computer must be connected to a network. You cannot install Oracle Application Server on a "standalone" computer that is not connected to a network.
Installing Oracle Application Server on standalone computers is supported for Linux and Microsoft Windows. |
No |
| IP | The computer’s IP address must be static. Oracle Application Server does not support HP-UX systems using DHCP.
DHCP is supported on Linux and Microsoft Windows. |
No |
| Memory
. |
The memory requirements provided for the various installation types represents enough physical memory to install and run Oracle Application Server. However, for most production sites, you should configure at least 1 GB of physical memory. For sites with substantial traffic, increasing the amount of memory further may improve your performance. For Java applications, you should either increase the maximum heap allocated to the OC4J processes, or configure additional OC4J processes to utilize this memory. See the Oracle Application Server 10g Performance Guide for details.
In determining the optimal amount of memory for your installation, the best practice is to load test your site. Resource requirements can vary substantially for different applications and different usage patterns. In addition, some operating system utilities for monitoring memory can overstate memory usage (partially due to the representation of shared memory). The preferred method for determining memory requirements is to monitor the improvement in performance resulting from the addition of physical memory in your load test. Refer to your platform vendor documentation for information on how to configure memory and processor resources for testing purposes. OracleAS Infrastructure 10g:
Oracle Application Server middle tier:
OracleAS Developer Kits 10g: 256 MB, but 512 MB recommended To determine the amount of memory, enter the following # /usr/sbin/dmesg | grep "Physical:" |
Yes |
| Disk space | OracleAS Infrastructure 10g: 3.60 GB
Oracle Application Server middle tier:
OracleAS Developer Kits 10g: 1.10 GB The installer may display inaccurate disk space requirement figures. Refer to the figures listed above for disk space requirements. To determine the amount of free disk space, use the prompt> bdf dir Replace dir with the Oracle home directory or with the parent directory if the Oracle home directory does not exist yet. For example, if you plan to install Oracle Application Server in |
No |
| Space in /tmp directory | 250 MB
To determine the amount of free disk space in the prompt> bdf /tmp If the |
Yes |
| Swap space | 1.5 GB of available swap space
To determine the amount of available swap space, enter the following command: # /usr/sbin/swapinfo -a If necessary, see your operating system documentation for information on how to configure additional swap space. |
Yes |
| Monitor | 256 color display
To determine your monitor’s display capabilities, run the following command: prompt> /usr/X11R6/bin/xdpyinfo Look for the "depths" line. You need a depth of at least 8 (bits per pixel). |
Yes |
Table 4-2 Hardware Requirements for Linux Systems
| Item | Minimum Requirement | Checked by Installer |
|---|---|---|
| Processor type | Pentium (32-bit) | No |
| Processor speed | 450 MHz or faster | Yes |
| Network | You can install Oracle Application Server on a "standalone" computer that is not connected to a network. If you later change the network configuration, see the Oracle Application Server 10g Administrator's Guide for information on reconfiguring Oracle Application Server. | No |
| IP | The computer’s IP address can be static or allocated using DHCP. If you later change the IP configuration, see the Oracle Application Server 10g Administrator's Guide for information on reconfiguring Oracle Application Server. | No |
| Memory
. |
The memory requirements provided for the various installation types represents enough physical memory to install and run Oracle Application Server. However, for most production sites, you should configure at least 1 GB of physical memory. For sites with substantial traffic, increasing the amount of memory further may improve your performance. For Java applications, you should either increase the maximum heap allocated to the OC4J processes, or configure additional OC4J processes to utilize this memory. See the Oracle Application Server 10g Performance Guide for details.
In determining the optimal amount of memory for your installation, the best practice is to load test your site. Resource requirements can vary substantially for different applications and different usage patterns. In addition, some operating system utilities for monitoring memory can overstate memory usage (partially due to the representation of 7shared memory). The preferred method for determining memory requirements is to monitor the improvement in performance resulting from the addition of physical memory in your load test. Refer to your platform vendor documentation for information on how to configure memory and processor resources for testing purposes. OracleAS Infrastructure 10g:
Oracle Application Server middle tier:
OracleAS Developer Kits 10g: 256 MB, but 512 MB recommended To determine the amount of memory, enter the following # grep MemTotal /proc/meminfo |
Yes |
| Disk space | OracleAS Infrastructure 10g: 2.50 GB
Oracle Application Server middle tier:
OracleAS Developer Kits 10g: 600 MB The installer may display inaccurate disk space requirement figures. Refer to the figures listed above for disk space requirements. To determine the amount of free disk space, use the prompt> df -k dir Replace dir with the Oracle home directory or with the parent directory if the Oracle home directory does not exist yet. For example, if you plan to install Oracle Application Server in |
No |
Space in /tmp directory
|
250 MB
To determine the amount of free disk space in the prompt> df -k /tmp If the |
Yes |
| Swap space | 1.5 GB of available swap space
To determine the amount of available swap space, enter the following command: # grep SwapTotal /proc/meminfo If necessary, see your operating system documentation for information on how to configure additional swap space. |
Yes |
| Monitor | 256 color display
To determine your monitor’s display capabilities, run the following command: prompt> /usr/X11R6/bin/xdpyinfo Look for the "depths" line. You need a depth of at least 8 (bits per pixel). |
Yes |
If you plan to run OracleAS Infrastructure 10g plus a middle tier on the same computer, ensure the computer meets the memory requirements listed in Table 4-3.
Note that these values have been tested against a small number of users. If you have many users, you might have to increase the amount of memory.
If you need to reduce memory consumption:
Configure only the components that you need.
Choose the smallest middle tier type that contains the components that you need.
After installation, start up only the components that you need. See the Oracle Application Server 10g Administrator's Guide for details.
After installation, if you installed multiple instances on the same computer, you can consolidate the Oracle Enterprise Manager component. For example, if you installed an OracleAS Infrastructure 10g and a middle tier on the same computer, you can configure one Oracle Enterprise Manager component to manage both OracleAS Infrastructure 10g and middle tier (instead of having two Oracle Enterprise Manager components, one for the infrastructure and one for the middle tier). See the Oracle Application Server 10g Administrator's Guide for details.
Depending on your operating system, see one of the following sections for information on checking the software requirements:
Section 4.2.1, "Checking the Software Requirements for HP-UX"
Section 4.2.2, "Checking the Software Requirements for Linux"
The installer also checks that your computer contains the required patches. If it determines that some required patches are missing, it displays an error.
In addition to the software requirements for the computer, you must have a compatible browser.
The following browsers are supported:
Microsoft Internet Explorer 5.5, 6.0 and higher
Netscape 4.78, 4.79, 7 and higher
Mozilla 1.3.1 and higher
However, Oracle Enterprise Manager is optimized for the following browsers:
Microsoft Internet Explorer 5.5, 6.0 and higher
Netscape 7 and higher
Mozilla 1.3.1 and higher
For the most current list of supported browsers, check the OracleMetaLink site (http://metalink.oracle.com).
Depending on the version of HP-UX, check that the software listed in Table 4-4 or Table 4-5 is installed on the system. The procedure that follows the tables describes how to ensure the correct software is installed on the system.
|
Note: Oracle Application Server 10g (9.0.4) is certified with the following Operating System specific software. For the most current list of supported Operating System specific software, for example JDK version, Operating System vesion, check OracleMetaLink (http://metalink.oracle.com).
|
Table 4-4 Software Requirements for HP-UX 11.0 Systems
| Item | Requirement |
|---|---|
| Operating System | HP-UX 11.0 (64-bit) |
| JDK | JDK 1.4.1.05 or higher |
| Patches required for JDK | Install all patches required for JDK 1.4.1.05. This list is constantly under review and is published on the JDK download page on the HP web site. |
| Quality Pack | Sept 2002 Quality Pack (QPK1100 B.11.00.58.5) or higher |
| Patches (or higher versions) |
|
| Package | Motif 2.1 Development Environment X11MotifDevKit.MOTIF21-PRG:B.11.00.01
Note: This package is not required if you create the symbolic links described in step 6 of the next section. |
|
Note: Oracle Application Server 10g (9.0.4) is certified with the following Operating System specific software. For the most current list of supported Operating System specific software, for example JDK version, Operating System vesion, check OracleMetaLink (http://metalink.oracle.com).
|
Table 4-5 Software Requirements for HP-UX 11i Systems
| Item | Requirement |
|---|---|
| Operating System | HP-UX 11i (11.11) PA-RISC or higher |
| JDK | JDK 1.4.1.05 or higher |
| Patches required for JDK | Install all patches required for JDK 1.4.1.05. This list is constantly under review and is published on the JDK download page on the HP web site. |
| Quality Pack | Dec 2001 Consolidate Patches (Dec01GQPK11i_Aux_Patch B.03.02.06) or higher |
| Patches (or higher versions) |
|
| Package | Motif 2.1 Development Environment (X11MotifDevKit.MOTIF21-PRG) B.11.11.01
Note: This package is not required if you create the symbolic links described in step 6 of the next section. |
To ensure that the system meets these requirements, follow these steps:
To determine which version of HP-UX is installed, enter the following command:
# uname -a
HP-UX hostname B.11.11 U 9000/800 109444686 unlimited-user license
In this example, the version of HP-UX 11i is 11.11.
To determine which JDK is installed, enter the following command:
# JDK_location/bin/java -fullversion
If the version displayed is less than 1.4.1.05, download JDK 1.4.1.05 or higher from the following Web site and install it:
http://www.hp.com/products1/unix/java/index.html
To determine whether the Quality Pack is installed, enter the following command:
# /usr/sbin/swlist | grep QPK
If the quality pack is not installed, download it from the following web site and install it:
http://www.software.hp.com/SUPPORT_PLUS/qpk.html
To determine whether a bundle or product is installed, enter the following command:
# /usr/sbin/swlist -l product | more
If a required product is not installed, you must install it. See your operating system or software documentation for information on installing products.
To determine whether a patch is installed, enter a command similar to the following:
# /usr/sbin/swlist -l patch | grep PHKL_27813
Alternatively, to list all installed patches, enter the following command:
# /usr/sbin/swlist -l patch | more
If a required patch is not installed, download it from the following URL and install it:
http://itresourcecenter.hp.com
If the Motif package listed in Table 4-5 and Table 4-4 is not installed on the computer, create the following symbolic links:
Log in as root.
Change to the /usr/lib directory:
# cd /usr/lib
Create the required links:
# ln -s libX11.3 libX11.sl
# ln -s libXIE.2 libXIE.sl
# ln -s libXext.3 libXext.sl
# ln -s libXhp11.3 libXhp11.sl
# ln -s libXi.3 libXi.sl
# ln -s libXm.4 libXm.sl
# ln -s libXp.2 libXp.sl
# ln -s libXt.3 libXt.sl
# ln -s libXtst.2 libXtst.sl
Depending on your distribution of Linux, see one of the following sections for information on checking the software requirements:
Oracle does not support customized kernels or modules not supported by the Linux vendor.
You can install Oracle Application Server 10g (9.0.4) on a Linux system that is not on a network and you can install Oracle Application Server 10g (9.0.4) on a Linux system that is configured to use DHCP. If you want to install Oracle Application Server on a computer that is not on a network you must configure the computer to use either a static IP address or a loopback IP address. Configure the computer to resolve the hostname of the computer to either a static IP address or a loopback IP address.
Table 4-6 lists the software requirements for Red Hat 2.1 systems and the procedure that follows the table describes how to ensure your system meets these requirements and any additonal requirements for installing Oracle Application Server.
|
Note: Oracle Application Server 10g (9.0.4) is certified with the following Operating System specific software. For the most current list of supported Operating System specific software, for example JDK version, Operating System vesion, check OracleMetaLink (http://metalink.oracle.com).
|
Table 4-6 Software Requirements for Red Hat 2.1 Systems
| Item | Requirement |
|---|---|
| Operating System | Red Hat Enterprise Linux AS/ES 2.1
For more information on Red Hat, see: http://www.redhat.com |
| Red Hat Patches | Errata 25 kernel or a higher errata patch approved by Red Hat
For example, one of the following, depending on the type of Red Hat installation:
The minimum supported version of the glibc package is glibc-2.2.4-32. |
| Software packages
(check that these versions or |
gcc-2.96-108.1
pdksh-5.2.14-13 openmotif-2.1.30 sysstat-4.0.1 compat-glibc-6.2-2.1.3.2 libstdc++-2.96-108.1 |
To ensure that the system meets all the requirements, follow these steps:
Log in as the root user.
To determine which distribution and version of Linux is installed, enter the following command:
# cat /etc/issue
Red Hat Linux Advanced Server release 2.1AS/\m (Pensacola)
|
Note: Red Hat Enterprise Linux AS/ES 2.1, 3.0 and UnitedLinux 1.0 are certified and supported. For the most current list of supported Linux Operating Systems, check OracleMetaLink (http://metalink.oracle.com).
|
To determine which version of the Red Hat Linux kernel is installed, enter the following command
# uname -r
kernel-smp-2.4.9-e.25
In this example, the version shown is 2.4.9 with errata 25. If necessary, see your operating system documentation for information on upgrading the kernel.
For more information on Red Hat patches, see:
http://www.redhat.com
To determine whether any other package is installed, enter a command similar to the following:
# rpm -q package_name
If a package is missing, download it and install it using the following command:
# rpm -i package_name
Table 4-7 lists the software requirements for Red Hat 3.0 systems and the procedure that follows the table describes how to ensure your system meets these requirements and any additonal requirements for installing Oracle Application Server.
|
Note: Oracle Application Server 10g (9.0.4) is certified with the following Operating System specific software. For the most current list of supported Operating System specific software, for example JDK version, Operating System vesion, check OracleMetaLink (http://metalink.oracle.com).
|
Table 4-7 Software Requirements for Red Hat 3.0 Systems
| Item | Requirement |
|---|---|
| Operating System | Red Hat Enterprise Linux AS/ES 3.0
For more information on Red Hat, see: http://www.redhat.com The minimum supported kernel and glibc versions are:
|
| Software packages
(check that these versions or |
gcc-3.2.3-20
setarch-1.3-1 pdksh-5.2.14 openmotif21-2.1.30-8 gnome-libs-1.4.1.2.90-34.1 compat-glibc-7.x-2.2.4.32.5 compat-gcc-7.3-2.96.122 compat-libstdc++-7.3-2.96.122 compat-libstdc++-devel-7.3-2.96.122 compat-gcc-c++-7.3-2.96.122 sysstat-4.0.7 Note: For Redhat 3.0, the equivalent version of openmotif 2.1.30-8 is openmotif21-2.1.30-8. The openmotif21-2.1.30-8 package can be installed from disk number 3 of the Redhat 3.0 distribution by entering: $ rpm -ivh openmotif21-2.1.30-8 |
To ensure that the system meets all the requirements, follow these steps:
Log in as the root user.
To determine which distribution and version of Linux is installed, enter the following command:
# cat /etc/issue
Red Hat Enterprise Linux AS release 3 (Taroon)
|
Note: Red Hat Enterprise Linux AS/ES 2.1, 3.0 and UnitedLinux 1.0 are certified and supported. For the most current list of supported Linux Operating Systems, check OracleMetaLink (http://metalink.oracle.com).
|
To determine whether any other package is installed, enter a command similar to the following:
# rpm -q package_name
If a package is missing, download it and install it using the following command:
# rpm -i package_name
Check whether the following symbolic links exist:
# cd /usr/bin
# ls -l gcc g++
gcc -> gcc296
g++ -> g++296
If these links do not exist, create them as follows:
Create a backup of the existing files:
# mv /usr/bin/gcc /usr/bin/gcc.backup
# mv /usr/bin/g++ /usr/bin/g++.backup
Create the symbolic links:
# ln -s /usr/bin/gcc296 /usr/bin/gcc
# ln -s /usr/bin/g++296 /usr/bin/g++
You can restore the original files if required, however you must recreate the links as described in this procedure for Oracle Application Server to relink properly.
If the hugemem kernel is used, set the architecture using following command:
prompt> setarch i386
Apply patch no. 3006854. You can download this patch from OracleMetaLink (http://metalink.oracle.com). This patch creates the /etc/libcwait.so file and appends the following line to the /etc/ld.so.preload file:
/etc/libcwait.so
Table 4-8 lists the software requirements for UnitedLinux 1.0 systems and the procedure that follows the table describes how to ensure your system meets these requirements and any additonal requirements for installing Oracle Application Server.
|
Note: Oracle Application Server 10g (9.0.4) is certified with the following Operating System specific software. For the most current list of supported Operating System specific software, for example JDK version, Operating System vesion, check OracleMetaLink (http://metalink.oracle.com).
|
Table 4-8 Software Requirements for UnitedLinux Systems
| Item | Requirement |
|---|---|
| Operating System | UnitedLinux 1.0
For more information on United Linux, see: http://www.unitedlinux.com SP2a and SP3 are certified for Oracle Application Server 10g (9.0.4). For UnitedLinux 1.0 SP2a, the minimum supported kernel and glibc versions are:
For UnitedLinux 1.0 SP3, the minimum supported kernel and glibc versions are:
|
| Software packages
(check that these versions or |
gcc_old-2.95.3
pdksh-5.2.14 openmotif-2.1.30MLI4 sysstat-4.0.3 libstdc++-3.2.2-38 |
To ensure that the system meets all the requirements, follow these steps:
Log in as the root user.
To determine which distribution and version of Linux is installed, enter the following command:
# cat /etc/issue
Welcome to UnitedLinux 1.0 (i586) - Kernel \r (\l)
|
Note: Red Hat Enterprise Linux AS/ES 2.1, 3.0 and UnitedLinux 1.0 are certified and supported. For the most current list of supported Linux Operating Systems, check OracleMetaLink (http://metalink.oracle.com).
|
To determine the service pack version, enter the following command:
# rpm -qf /boot/vmlinuz
If the kernel version contains the string 2.4.19, SP2a is installed. If the kernel version contains the string 2.4.21, SP3 is installed.
To determine whether any other package is installed, enter a command similar to the following:
# rpm -q package_name
If a package is missing, download it and install it using the following command:
# rpm -i package_name
Create the following symbolic link for the Perl executable if it does not already exist:
# ln -sf /usr/bin/perl /usr/local/bin/perl
Create the following symbolic link for the fuser executable if it does not already exist:
# ln -sf /bin/fuser /sbin/fuser
Create the correct compiler environment on UniteLinux 1.0:
Install the gcc_old package. This provides the old compiler GCC 2.95.3 in the /opt/gcc295 directory.
Check whether the following symbolic links exist:
# cd /usr/bin
# ls -l gcc cc
gcc -> /opt/gcc295/bin/gcc
cc -> /opt/gcc295/bin/gcc
If these links do not exist, create a backup of the existing files:
# mv /usr/bin/gcc /usr/bin/gcc.backup
# mv /usr/bin/cc /usr/bin/cc.backup
Create the symbolic links:
# ln -s /opt/gcc295/bin/gcc /usr/bin/gcc
# ln -s /opt/gcc295/bin/gcc /usr/bin/cc
You can restore the original files if required, however you must recreate the links as described in this procedure for Oracle Application Server to relink properly.
Create the following symbolic link if it does not already exist:
prompt> ln -s /opt/gcc295/lib/gcc-lib/i486-suse-linux/2.95.3/libgcc.a \
/lib/libgcc.a
Depending on the UnitedLinux distribution, the first path in the previous command may contain a string other than suse.
If the orarun package was installed on a UnitedLinux system, complete the following steps as the oracle user to reset the environment:
Enter the following commands:
prompt> cd /etc/profile.d
prompt> mv oracle.csh oracle.csh.bak
prompt> mv oracle.sh oracle.sh.bak
prompt> mv alljava.sh alljava.sh.bak
prompt> mv alljava.csh alljava.csh.bak
Use any text editor to comment out the following line from the $HOME/.profile file:
. ./.oracle
Log out of the oracle user account.
Log into the oracle user account for the changes to take effect.
If any Java packages are installed on the system, unset the Java environment variables, for example JAVA_HOME.
|
Note: Oracle recommends that you do not install any of the Java packages supplied with the UnitedLinux distribution. |
Check the /etc/services file to make sure that the following port ranges are available on the system:
ports 3060-3129 required for Oracle Internet Directory
ports 3130-3199 required for Oracle Internet Directory (SSL)
ports 1812-1829 required for Oracle Enterprise Manager (console)
ports 1830-1849 required for Oracle Enterprise Manager (agent)
ports 1850-1869 required for Oracle Enterprise Manager (RMI)
If necessary, remove entries from the /etc/services file and reboot the system. To remove the entries, you can use the perl script included with the patch 3167528. This patch is available from:
http://metalink.oracle.com
If these ports are not available, the associated configuration assistants will fail during the installation.
If you use Network Information Service (NIS):
Make sure that the following line exists in the /etc/yp.conf file:
hostname.domainname broadcast
Make sure that the following line exists in the /etc/nsswitch.conf file:
hosts: files nis dns
Depending on your operating system, see one of the following sections for information on checking the software requirements:
|
Notes:
|
Verify that the kernel parameters shown in the following table are set either to the formula shown, or to values greater than or equal to the recommended value shown. The procedure following the table describes how to verify and set the values.
| Parameter | Recommended Formula or Value |
|---|---|
| ksi_alloc_max | (nproc*8) |
| max_thread_proc | 3000 |
| maxdsiz | 2063835136 |
| maxdsiz_64bit | 2147483648 |
| maxfiles | 2048 |
| maxfiles_lim | 2048 |
| maxssiz | 134217728 |
| maxssiz_64bit | 1073741824 |
| maxswapchunks | 16384 |
| maxuprc | ((nproc*9)/10) |
| maxusers | 512 |
| msgmap | (2+msgmni) |
| msgmni | 4096 |
| msgseg | 32767 |
| msgtql | 4096 |
| ncallout | 6000 |
| ncsize | ((8*nproc+2048)+vx_ncsize) |
| nfile | 3000 |
| nflocks | 4096 |
| ninode | (8*nproc+2048) |
| nkthread | 6000 |
| nproc | 2048 |
| semmap | (semmni+2) |
| semmni | 4096 |
| semmns | (semmni*2) |
| semmnu | (nproc-4) |
| semvmx | 32767 |
| shmmax | The size of physical memory or 0X40000000 (1073741824), whichever is greater.
Note: To avoid performance degradation, the value should be greater than or equal to the size of the SGA. |
| shmmni | 512 |
| shmseg | 32 |
| tcp_conn_request_max | 2048 |
| vps_ceiling | 64 |
|
Note: If the current value for any parameter is higher than the value listed in this table, do not change the value of that parameter. |
To view the current value or formula specified for these kernel parameters, and to change them if necessary, follow these steps:
Optionally, set the DISPLAY environment variable to specify the display of the local system:
Bourne, Bash, or Korn shell:
$ DISPLAY=localhost:0.0 ; export DISPLAY
C shell:
$ setenv DISPLAY localhost:0.0
Start System Administration Manager (SAM):
# /usr/sbin/sam
Choose the Kernel Configuration area, then choose the Configurable Parameters area.
Check the value or formula specified for each of these parameters and, if necessary, modify that value or formula.
If necessary, see the SAM online help for more information on completing this step.
Exit from SAM.
If you modified the value specified for any parameter, reboot the system:
# /sbin/shutdown -r now
If necessary, when the system restarts, log in and switch user to root.
Verify that the kernel parameters shown in the following table are set either to the formula shown, or to values greater than or equal to the recommended value shown. The procedures following the table describe how to verify and set the values.
|
Note: The Linux threads model creates a process for each thread. Oracle Application Server is highly multi-threaded to improve performance. On Linux, this requires that the kernel can handle many hundreds of processes. |
| Parameter | Value | File |
|---|---|---|
| semmsl semmnsFoot 1 semopm semmni |
256 32000 100 142 |
/proc/sys/kernel/sem
|
| shmall | 2097152 | /proc/sys/kernel/shmall
|
| shmmax | 2147483648 | /proc/sys/kernel/shmmax
|
| shmmni | 142 | /proc/sys/kernel/shmmni
|
| msgmax | 8192 | /proc/sys/kernel/msgmax
|
| msgmnb | 65535 | /proc/sys/kernel/msgmnb
|
| msgmni | 2878 | /proc/sys/kernel/msgmni
|
| file-max | 131072 | /proc/sys/fs/file-max
|
| ip_local_port_range | 20000 65000 | /proc/sys/net/ipv4/ip_local_port_range
|
|
Note: If the current value for any parameter is higher than the value listed in this table, do not change the value of that parameter. |
To view the current value specified for these kernel parameters, and to change them if necessary, follow these steps:
Enter commands similar to the following to view the current values of the kernel parameters:
|
Note: Make a note of the current values and identify any values that you must change. |
| Parameter | Command |
|---|---|
| semmsl, semmns, semopm, and semmni | # /sbin/sysctl -a | grep sem
This command displays the value of the semaphore parameters in the order listed. |
| shmall, shmmax, and semmni | # /sbin/sysctl -a | grep shm
|
| msgmax, msgmnb, and msgmni | # /sbin/sysctl -a | grep msg
|
| file-max | # /sbin/sysctl -a | grep file-max
|
| ip_local_port_range | # /sbin/sysctl -a | grep ip_local_port_range
This command displays a range of port numbers. |
If the value of any kernel parameter is different to the recommended value, complete the following steps:
Using any text editor, create or edit the /etc/sysctl.conf file and add or edit lines similar to the following:
|
Note: Include lines only for the kernel parameter values that you want to change. For the semaphore parameters (kernel.sem), you must specify all four values. However, if any of the current values are larger than the recommended value, specify the larger value.
|
kernel.shmall = 2097152
kernel.shmmax = 2147483648
kernel.shmmni = 142
# semaphores: semmsl, semmns, semopm, semmni
kernel.sem = 256 32000 100 142
fs.file-max = 131072
net.ipv4.ip_local_port_range = 20000 65000
kernel.msgmni = 2878
kernel.msgmax = 8192
kernel.msgmnb = 65535
By specifying the values in the /etc/sysctl.conf file, they persist when you reboot the system.
Enter the following command to change the current values of the kernel parameters.
# /sbin/sysctl -p
Review the output from this command to verify that the values are correct. If the values are incorrect, edit the /etc/sysctl.conf file, then enter this command again.
On UnitedLinux only, enter the following command to cause the system to read the /etc/sysctl.conf file when it reboots:
# chkconfig boot.sysctl on
To improve the performance of the software on Linux systems, you must increase the following shell limits for the oracle user, depending on the user’s default shell:
| Bourne or Bash Shell Limit | Korn Shell Limit | C or tcsh Shell Limit | Hard Limit |
|---|---|---|---|
| nofile | nofile | descriptors | 16384 |
| noproc | processes | maxproc | 16384 |
To increase the shell limits:
Add the following lines to /etc/security/limits.conf file where -> represents the tab character:
* -> -> soft -> nproc -> -> 2047
* -> -> hard -> nproc -> -> 16384
* -> -> soft -> nofile -> -> 2048
* -> -> hard -> nofile -> -> 16384
Add the following line to the /etc/pam.d/login file, if it does not already exist:
session required /lib/security/pam_limits.so
Depending on the oracle user's default shell, make the following changes to the default shell start-up file:
For the Bourne, Bash, or Korn shell, add the following lines to the /etc/profile file:
if [ $USER = "oracle" ]; then
        if [ $SHELL = "/bin/ksh" ]; then
              ulimit -p 16384
              ulimit -n 16384
        else
              ulimit -u 16384 -n 16384
        fi
fi
For the C or tcsh shell, add the following lines to the /etc/csh.login file:
if ( $USER == "oracle" ) then
        limit maxproc 16384
        limit descriptors 16384
endif
Many Oracle Application Server components, such as Oracle HTTP Server, OracleAS Web Cache, and Oracle Enterprise Manager, use ports. You can have the installer assign default port numbers, or use port numbers that you specify.
If you want to use the default port numbers for such components, you do not have to do anything. See Appendix E, " Default Port Numbers" for a list of default port numbers that the installer will assign to components.
|
Note: In the default configuration of the operating system, the/etc/services file includes ports 389 and 636 (for LDAP and LDAP/SSL). These happen to be the default ports for Oracle Internet Directory. This means that if you want to use these port numbers for Oracle Internet Directory, you must either delete or comment out these lines in the /etc/services file. To comment out a line, add a # at the beginning of the line:
# ldap   389/tcp   # Lightweight Directory Access Protocol
# ldap   389/udp   # Lightweight Directory Access Protocol
# ldaps  636/tcp   # LDAP protocol over TLS/SSL (was sldap)
# ldaps  636/udp   # LDAP protocol over TLS/SSL (was sldap)
If you do not comment out or remove the lines from |
To instruct the installer to assign custom port numbers for components:
Create a file containing the component names and port numbers. Section 4.4.2.1, "Format of the staticports.ini File" describes the file format. This file is typically called the staticports.ini file, but you can name it anything you want.
When you start up the installer, specify the appropriate parameter and the full path to the staticports.ini file on the command line.
Table 4-9 shows the parameters for specifying the static ports file on the command line. The text in bold highlights the differences in the names.
|
Note: The static ports parameters on the command line are different for each installation type. Be sure you use the parameter that matches the installation type you are doing. If the parameter you specify does not match the installation type, the installer assigns default ports for all components. |
Table 4-9 Parameters for Specifying Static Port File on the Command Line
| Installation Type | Parameter for Specifying Static Ports File |
|---|---|
| OracleAS Infrastructure 10g
|
oracle.iappserver.infrastructure:s_staticPorts=/fullpath/to/local/ staticports.ini |
| Middle tier |
oracle.iappserver.iapptop:s_staticPorts=/fullpath/to/local/ staticports.ini |
| OracleAS Developer Kits 10g
|
oracle.iappserver.devcorner:s_staticPorts=/fullpath/to/local/ staticports.ini |
For example, if you are installing OracleAS Infrastructure 10g, use the following syntax (enter the command on one line):
prompt> mount_point/904disk1/runInstaller
   oracle.iappserver.infrastructure:s_staticPorts=/fullpath/to/local/
   staticports.ini
Note that you always have to specify the full path to the staticports.ini file. The reason is that the installer changes the current directory to a directory different from the one where you started the installer from.
If you do not specify the full path to the file, the installer will not be able to find the file. The installer will then assign default ports for all the components, and it will do this without displaying any warning.
The staticports.ini file has the following format. Replace port_num with the port number that you want to use for the component.
# J2EE and Web Cache
Oracle HTTP Server port = port_num
Oracle HTTP Server Listen port = port_num
Oracle HTTP Server SSL port = port_num
Oracle HTTP Server Listen (SSL) port = port_num
Oracle HTTP Server Diagnostic port = port_num
Oracle HTTP Server Jserv port = port_num
Java Object Cache port = port_num
DCM Java Object Cache port = port_num
Oracle Notification Server Request port = port_num
Oracle Notification Server Local port = port_num
Oracle Notification Server Remote port = port_num
Application Server Control port = port_num
Application Server Control RMI port = port_num
Oracle Management Agent port = port_num
Web Cache HTTP Listen port = port_num
Web Cache HTTP Listen (SSL) port = port_num
Web Cache Administration port = port_num
Web Cache Invalidation port = port_num
Web Cache Statistics port = port_num
Log Loader port = port_num

# Business Intelligence and Forms
Discoverer OSAgent port = port_num
Reports Services SQL*Net port = port_num

# Infrastructure
Oracle Internet Directory port = port_num
Oracle Internet Directory (SSL) port = port_num
Oracle Certificate Authority SSL Server Authentication port = port_num
Oracle Certificate Authority SSL Mutual Authentication port = port_num
The easiest way to create the file is to use the staticports.ini file on the CD-ROM (Disk 1) or DVD as a template:
Copy the staticports.ini file from the disc to your hard disk.
Edit the local copy (the file on the hard disk) to include the desired port numbers.
You do not need to specify port numbers for all components in the staticports.ini file. If a component is not listed in the file, the installer uses the default port number for that component.
You cannot change the port used by the OracleAS Metadata Repository (port 1521) during installation, but you can do so after installation. See the Oracle Application Server 10g Administrator's Guide for details.
The following example sets the Application Server Control port and the some ports for OracleAS Web Cache. For components not specified, the installer will assign the default port numbers.
Application Server Control port = 2000
Web Cache Administration port = 2001
Web Cache Invalidation port = 2002
Web Cache Statistics port = 2003
When installation is complete, you can check the ORACLE_HOME/install/portlist.ini file to see the assigned ports.
|
Notes on Choosing Port Numbers:
|
The installer verifies that the ports specified in the file are available by checking memory. This means that it can only detect ports that are being used by running processes. It does not look in configuration files to determine which ports an application is using.
If the installer detects that a specified port is not available, it displays an alert. The installer will not assign a port that is not available. To fix this:
Edit the staticports.ini file to specify a different port, or shut down the application that is using the port.
Click Retry. The installer re-reads the staticports.ini file and verifies the entries in the file again.
|
Tip: Thestaticports.ini file uses the same format as the ORACLE_HOME/install/portlist.ini file, which is created after an Oracle Application Server installation. If you have installed Oracle Application Server and you want to use the same port numbers in another installation, you can use the portlist.ini file from the first installation as the staticports.ini file for subsequent installations.
|
Check your staticports.ini file carefully because a mistake can cause the installer to use default ports without displaying any warning. Here are some things that you should check:
If you specify the same port for more than one component, the installer will use the specified port for the first component, but for the other components, it will use the components’ default ports. The installer does not warn you if you have specified the same port for multiple components.
If you have syntax errors in the staticports.ini file (for example, if you omitted the = character for a line), the installer ignores the line. For the components specified on such lines, the installer assigns the default ports. The installer does not display a warning for lines with syntax errors.
If you misspell a component name, the installer assigns the default port for the component. Names of components in the file are case sensitive. The installer does not display a warning for lines with unrecognized names.
If you specify a non-numeric value for the port number, the installer ignores the line and assigns the default port number for the component. It does this without displaying any warning.
If you misspell the parameter on the command line, the installer does not display a warning. It continues and assigns default ports to all components.
If you specify a relative path to the staticports.ini file (for example, "./staticports.ini") on the command line, the installer will not find the file. The installer continues without displaying a warning and it will assign default ports to all components. You must specify a full path to the staticports.ini file.
If the parameter you specify on the command line does not match the installation type that you are performing (for example, if you specify the parameter for middle tier but you are installing the infrastructure), the installer does not give a warning. It continues and assigns default ports to all components.
Be sure you understand the following when setting ports for these components.
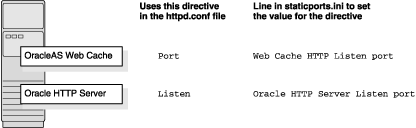
In the httpd.conf file for Oracle HTTP Server, the Port and the Listen directives specify the ports used by OracleAS Web Cache and Oracle HTTP Server. The correct lines in the staticports.ini file for setting these ports depend on which components you are configuring.
Set the port for OracleAS Web Cache.
OracleAS Web Cache uses the port specified by the Port directive (Figure 4-1). To set this port, use this line in the staticports.ini file:
Web Cache HTTP Listen port = port_number
To configure the SSL port for OracleAS Web Cache, use the following line:
Web Cache HTTP Listen (SSL) port = port_number
You cannot set the port number using the "Oracle HTTP Server port" line in this case. If your staticports.ini file contains both "Oracle HTTP Server port" and "Web Cache HTTP Listen port", the "Oracle HTTP Server port" line is ignored. For example, if you have these lines in staticports.ini:
Web Cache HTTP Listen port = 7979
Oracle HTTP Server port = 8080
the Port directive would be set to 7979.
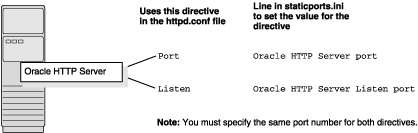
Set the port for Oracle HTTP Server.
Oracle HTTP Server uses the port specified by the Listen directive. To set this port, use this line in the staticports.ini file:
Oracle HTTP Server Listen port = port_number
To configure the SSL Listen port, use the following line:
Oracle HTTP Server Listen (SSL) port = port_number
Figure 4-1 Configuring Both OracleAS Web Cache and Oracle HTTP Server
If you are configuring Oracle HTTP Server only, then Oracle HTTP Server uses both Port and Listen directives (Figure 4-2). In this case, you must set both directives to use the same port number.
To set these ports, use the "Oracle HTTP Server port" and "Oracle HTTP Server Listen port" lines in the staticports.ini file. For example:
Oracle HTTP Server port = 8080
Oracle HTTP Server Listen port = 8080
To set the SSL version of these ports, use the following lines. As in the non-SSL version, the port numbers must be the same.
Oracle HTTP Server SSL port = 443
Oracle HTTP Server Listen (SSL) port = 443
If you also specify the Web Cache lines in staticports.ini, they will be ignored because you are not configuring OracleAS Web Cache.
This section describes some common scenarios for using staticports.ini.
Section 4.4.2.4.2, "Configure Oracle HTTP Server to Use Ports 80 and 443 Without OracleAS Web Cache"
In this scenario, create a staticports.ini file that includes the following lines:
Web Cache HTTP Listen port = 80
Oracle HTTP Server Listen port = 81
Web Cache HTTP Listen (SSL) port = 443
Oracle HTTP Server Listen (SSL) port = 444
The ports for Oracle HTTP Server Listen and SSL Listen can be any available port. The example uses ports 81 and 444. These port numbers do not have to be less than 1024. If you select port numbers less than 1024, you have to start up Oracle HTTP Server and OracleAS Web Cache as the root user.
|
Note: Because you are using ports less than 1024, you have to configure Oracle HTTP Server and OracleAS Web Cache to run as the root user. You can perform the configuration during installation or after installation.
For details, see these guides: Oracle HTTP Server Administrator's Guide and Oracle Application Server Web Cache Administrator's Guide. |
In this scenario, create a staticports.ini file that includes the following lines:
Oracle HTTP Server port = 80
Oracle HTTP Server Listen port = 80
Oracle HTTP Server SSL port = 443
Oracle HTTP Server Listen (SSL) port = 443
|
Note: Because you are using ports less than 1024, you have to configure Oracle HTTP Server to run as the root user. See the Note for details. |
The installer configures port 1521 for the OracleAS Metadata Repository listener (version 9.0.1.5). This port cannot be changed through the staticports.ini file.
If port 1521 on your computer is already in use by an existing application, such as Oracle9i database listener or some other application, you might have to take some action before running the installer. See the following sections for details.
Section 4.4.3.1, "If Port 1521 Is In Use by an Existing Oracle9i Database"
Section 4.4.3.2, "If Port 1521 Is In Use by Some Other Application"
If you are installing a new database for the OracleAS Metadata Repository on a computer that is already running an Oracle9i database, ensure that the listeners for both databases do not conflict.
You might be able to use the same listener for both the existing database and the OracleAS Metadata Repository database. You have to consider the version of the existing listener as well as the port number. Table 4-11 shows scenarios and outcomes.
You can change the OracleAS Metadata Repository listener to use a different port after installation. See the Oracle Application Server 10g Administrator's Guide for details.
Table 4-11 Scenarios and Outcomes if You Have an Existing Database on the Computer Where You Want to Install the OracleAS Metadata Repository
| Version of the Existing Listener | Existing Listener Uses Port 1521 | Existing Listener Uses a Port Other Than 1521 |
|---|---|---|
| Earlier than 9.0.1 | The OracleAS Metadata Repository listener supports both the existing database and the OracleAS Metadata Repository. | You will end up with two listeners.
See Section 4.4.3.1.3, "Scenario 3: Existing Listener Uses a Port Other Than 1521". |
| 9.0.1 or later | The existing listener supports both the existing database and the OracleAS Metadata Repository. | You will end up with two listeners.
See Section 4.4.3.1.3, "Scenario 3: Existing Listener Uses a Port Other Than 1521". |
To check the listener version, run the following command:
prompt> $ORACLE_HOME/bin/lsnrctl VERSION
where ORACLE_HOME is the home directory for your database.
You can also use the same command to check the listener port.
Here is an example of the command’s output:
$ lsnrctl VERSION
LSNRCTL for UNIX: Version 9.0.1.5.0 - Production on 29-APR-2003 19:26:18

Copyright (c) 1991, 2001, Oracle.  All rights reserved.

Connecting to (DESCRIPTION=(ADDRESS=(PROTOCOL=TCP)(HOST=test.mydomain.com)(PORT=1521)))
TNSLSNR for UNIX: Version 9.0.1.5.0 - Production
        TNS for UNIX: Version 9.0.1.5.0 - Production
        Unix Domain Socket IPC NT Protocol Adaptor for UNIX: Version 9.0.1.5.0 - Production
        Oracle Bequeath NT Protocol Adapter for UNIX: Version 9.0.1.5.0 - Production
The command completed successfully
Listeners earlier than version 9.0.1 are incompatible with the OracleAS Metadata Repository. What you can do is to install the OracleAS Metadata Repository, which installs a version 9.0.1.5 listener, and use this new listener for both databases.
Stop the existing listener before you install the OracleAS Metadata Repository.
prompt> $ORACLE_HOME/bin/lsnrctl stop
ORACLE_HOME is the home directory for your existing database.
If you do not stop the existing listener, the installation will fail.
Install the OracleAS Metadata Repository.
See any of the procedures that install an OracleAS Metadata Repository in Chapter 6, " InstallingOracleAS Infrastructure 10g" (for example, Section 6.17, "Installing OracleAS Infrastructure 10g" or Section 6.18, "Installing OracleAS Infrastructure 10g Against an Existing Oracle Internet Directory").
Update the configuration file of the new listener, as necessary. The name of the listener configuration file is listener.ora, located in the ORACLE_HOME/network/admin directory.
Check network address entries in the existing listener’s configuration file.
If the existing listener’s configuration file contains only the following network addresses:
TCP Port 1521
IPC key EXTPROC
you do not have to edit the version 9.0.1.5 listener’s configuration file for network addresses.
If the configuration file contains other network addresses, you need to add them to the new listener’s configuration file.
Check SID_DESC entries in the existing listener’s configuration file.
If the existing listener’s configuration file contains SID_DESC entries for the existing database, you need to add these entries to the new listener’s configuration file.
Do not start the existing listener (version earlier than 9.0.1). Now that the new listener supports both databases, you do not need to run the existing listener any more.
|
Note: Step c above is very important. You only need to run one listener (the new listener) to support both databases. |
The existing listener will support both the existing database and the OracleAS Metadata Repository. The installer will perform this configuration automatically. You do not have to do anything.
The existing listener must be stopped during installation.
You will end up running two listeners: one for the existing database and one for the OracleAS Metadata Repository, regardless of the version of the existing listener.
The existing listener can be running during installation, because it is not using port 1521.
If you have some other application listening on port 1521, you need to reconfigure it to listen on a different port. If that is not possible, shut it down while you install the OracleAS Metadata Repository. After installation, you can reconfigure the OracleAS Metadata Repository to use a port other than 1521. See the Oracle Application Server 10g Administrator's Guide for instructions on how to do this.
You need to create operating system groups in these situations:
If you plan to install Oracle Application Server on a computer that does not have Oracle products, create a group to own the "inventory" directory. See Section 4.5.1, "Create a Group for the Inventory Directory".
If you plan to install the OracleAS Metadata Repository in a new database (that is, one created by the installer), create groups for database administrators. See Section 4.5.2, "Create Groups for Database Administrators".
To create a local operating system group:
Switch to the root user.
prompt> su
Enter the following command to create the oinstall group:
prompt> /usr/sbin/groupadd oinstall
For more information about operating system users and groups, see your operating system documentation or contact your system administrator.
Group IDs are important if you are setting up an OracleAS Active Failover Cluster environment because you need to set up identical groups on each node. See Section 9.3.1.5, "Create Identical Users and Groups on All Nodes in the Cluster" for details.
If you plan to install Oracle Application Server on a computer that does not have Oracle products, create a group to own the inventory directory. The installer writes its files in the inventory directory to keep track of the Oracle products installed on the computer.
This guide uses the name oinstall for this operating system group.
By having a separate group for the inventory directory, you allow different users to install Oracle products on the computer. Users need write permission for the inventory directory. They can achieve this by belonging to the oinstall group.
For the first time installation of any Oracle product on a computer, the installer displays a screen where you enter a group name for the inventory directory, and a screen where you enter the location of the inventory directory.
The default name of the inventory directory is oraInventory.
If you are unsure if there is already an inventory directory on the computer, look in the /var/opt/oracle/oraInst.loc file for HP systems and the /etc/oraInst.loc file on Linux systems. This file lists the location of the inventory directory and the group who owns it. If the file does not exist, the computer does not have Oracle products installed on it.
This section applies only if you plan to install the OracleAS Metadata Repository in a new database created by the installer.
When the database is not mounted and database authentication is unavailable, the database uses operating system groups to determine user privileges. The database recognizes these groups and privileges:
Table 4-12 Privileges for the OSOPER and OSDBA Groups
| Group | Description |
|---|---|
| OSDBA | This is the database administrator group. Users in this group are granted SYSDBA privileges. |
| OSOPER | Users in this group are granted SYSOPER privileges, which comprise privileges required for basic maintenance. These include database startup and shutdown, and other privileges required for database operation. SYSOPER privileges are a subset of SYSDBA privileges. |
You need to create operating system groups for these groups.
If you want an operating system group called dba to have SYSDBA privileges:
Create the dba group.
Ensure that the user running the installer is a member of the dba group.
If you want a different operating system group to have SYSDBA privileges, or if you want to associate SYSDBA and SYSOPER privileges with different groups, ensure the user running the installer does not belong to the dba group.
If the user running the installer does not belong to the dba group, the installer displays a screen where you can enter the names of groups to have the database administrator privileges. The screen has two fields: one for the OSDBA group and one for the OSOPER group (see Table 4-12). You can enter the same operating system group for both fields.
Create an operating system user to install and upgrade Oracle products. The operating system user running the installer must have write permission for these directories:
the Oracle home directory, which contains files for the product you are installing
the inventory directory, which is used by the installer for all Oracle products
If the computer contains other Oracle products, you might already have a user for this purpose. Look in the /var/opt/oracle/oraInst.loc file for HP-UX systems and the /etc/oraInst.loc file on Linux systems. This file lists the location of the inventory directory and the group who owns it. If the file does not exist, the computer does not have Oracle products installed on it.
If you do not already have a user for installing Oracle products, create a user with the following properties:
Table 4-13 Properties of the Operating System User Who Runs the Installer
| Item | Description |
|---|---|
| Login name | You can use any name for the user. This guide refers to the user as the oracle user.
|
| Group identifier | The primary group of the oracle user must have write permission for the oraInventory directory. See Section 4.5.1, "Create a Group for the Inventory Directory" for more information about this group.
You can use any name for the group. This guide uses the name |
| Home directory | The home directory for the oracle user can be consistent with the home directories of other users.
|
| Login shell | The default login shell can be the C, Bourne, or Korn shell. |
|
Note: Use theoracle user only for installing and maintaining Oracle products. Never use it for purposes unrelated to the installer. Do not use root as the oracle user.
|
To create a local operating system user:
Switch to the root user.
prompt> su
To create the oracle user, enter a command similar to the following:
# /usr/sbin/useradd -g oinstall oracle
In this command the -g option specifies the primary group, which must be the group that owns the Oracle Inventory, for example, oinstall.
Use the -G option to specify the secondary groups, which can include the OSDBA group, and the OSOPER group if necessary, for example, dba or dba, oper
Set the password of the oracle user:
# passwd oracle
To check which groups an operating system user belongs to, run the groups command with the name of the user. For example:
prompt> groups oracle
For more information about operating system users and groups, see your operating system documentation or contact your system administrator.
User IDs are important if you are setting up an OracleAS Active Failover Cluster environment because you need to set up identical users on each node. See Section 9.3.1.5, "Create Identical Users and Groups on All Nodes in the Cluster" for details.
The operating system user who will be installing Oracle Application Server needs to set (or unset) the following environment variables. Table 4-14 summarizes whether you set or unset an environment variable.
Table 4-14 Environment Variable Summary
| Environment variable | Set or Unset |
|---|---|
| ORACLE_HOME and ORACLE_SID
|
Does not matter (the installer unsets these two environment variables). |
| PATH, CLASSPATH, and Shared Library Path Environment Variables
|
Must not contain references to directories in any Oracle home directories |
| DISPLAY
|
Set it to the monitor where you want to the installer window to appear. |
| TMP and TMPDIR
|
Optional. If unset, defaults to /tmp.
|
| TNS_ADMIN
|
Unset |
| ORA_NLS
|
Unset |
| LD_BIND_NOW (Linux Only)
|
Unset |
Here are some tips when working with environment variables:
If you set environment variables in the .profile file, they might not be read. To ensure environment variables are set to the correct values, check their values in the shell where you will be running the installer.
To check the value of environment variables, use the env command. This displays all the currently defined environment variables and their values.
% env
If you use the su command to switch users (for example, switching from the root user to the oracle user), check the environment variables when you are the new user because the environment variables might not be passed to the new user. This can happen even if you run su with the - option (su - user).
# /* root user */ #su - oracle%env
It does not matter if these environment variables are set or unset when you start up the installer because the installer unsets these environment variables.
Edit your PATH, CLASSPATH, and shared library path environment variables so that they do not reference any Oracle home directories.
Table 4-15 lists the shared library path environment variables for different platforms
Set the DISPLAY environment variable to point to the X server that will display the installer. The format of the DISPLAY environment variable is:
hostname:display_number.screen_number
Example (C shell):
% setenv DISPLAY test.mydomain.com:0.0
Example (Bourne or Korn shell):
$ DISPLAY=test.mydomain.com:0.0; export DISPLAY
You can test the display by running the xclock program:
$ /usr/openwin/bin/xclock &
Oracle Application Server requires a running X server during installation only. The frame buffer X server installed with your operating system requires that you remain logged in and have the frame buffer running during installation. If you do not wish to do this, then you must use a virtual frame buffer, such as X Virtual Frame Buffer (XVFB) or Virtual Network Computing (VNC).
Visit Oracle Technology Network (http://otn.oracle.com) for information about obtaining and installing XVFB or other virtual frame buffer solutions. Search OTN for "frame buffer".
The installer uses a temporary directory for swap space. The installer checks for the TMP and TMPDIR environment variables to locate the temporary directory. If this environment variable does not exist, the installer uses the /tmp directory.
If you want the installer to use a temporary directory other than /tmp, set the TMP and TMPDIR environment variables to the full path of an alternate directory. The oracle user must have right permission for this directory and the directory must meet the requirements listed in Section 4.1, "Check Hardware Requirements".
Example (C shell):
% setenv TMP /tmp2
% setenv TMPDIR /tmp2
Example (Bourne or Korn shell):
$ TMP=/tmp2; export TMP
$ TMPDIR=/tmp2; export TMPDIR
This section describes two requirements:
The TNS_ADMIN environment variable must not be set.
The /etc and the /var/opt/oracle directories must not contain a tnsnames.ora file.
These requirements are necessary to prevent conflicts between the Net configuration files for different Oracle products.
If you need to set TNS_ADMIN or if you have the tnsnames.ora file in /etc or /var/opt/oracle, do the following steps before installing Oracle Application Server.
If you have the tnsnames.ora file in /etc or /var/opt/oracle, move the file from these directories to a different directory. Alternatively, you can rename the file.
Make sure the TNS_ADMIN environment variable is not set.
Example (C shell):
% unsetenv TNS_ADMIN
Example (Bourne or Korn shell):
$ unset TNS_ADMIN
After installation, you can merge the contents of the newly created tnsnames.ora file with your existing tnsnames.ora file.
To make sure that the Oracle Application Server installation completes successfully, unset this environment variable.
Example:
$ unset ORA_NLS
Although the /etc/hosts file affects these items:
the installer provides alternative methods for you to enter the values that you want without editing the /etc/hosts file. See the following subsections for details.
The installer reads the /etc/hosts file to construct the location of the default Identity Management realm. It displays this location in the "Specify Namespace in Internet Directory" screen.
The /etc/hosts file should use the following format:
ip_address fully_qualified_hostname short_hostname
Example:
123.45.67.89 primaryHost.mydomain.com primaryHost
In the previous example, the location of the default Identity Management realm would look like "dc=mydomain,dc=com".
If the file uses a different format, the installer displays an incorrect value in the screen. For example, if the /etc/hosts contains:
123.45.67.89 primaryHost primaryHost.mydomain.com <--- incorrect format
the installer would display "dc=primaryHost,dc=com" as the default Identity Management realm. This is probably not the value that you want for the default Identity Management realm.
|
Tip: If you need the/etc/hosts file to use a different format, you can edit the file to use the required format, perform the installation, then revert the file back to its original format after installation.
If you are unable, or unwilling, to edit the |
If you are installing OracleAS Single Sign-On, and your /etc/hosts file contains only the hostname of your computer, without the domain name, then you will only be able to sign on to the Single Sign-On server using the hostname by itself (without the domain name).
If you want to require a domain name when connecting to the Single Sign-On server, you can edit the /etc/hosts file to include the domain name. If you do not want to edit the file, you can use the OUI_HOSTNAME command-line parameter to the installer to override the value in /etc/hosts. For example:
prompt> mount_point/904disk1/runInstaller OUI_HOSTNAME=myserver.mydomain.com
Typically, the computer on which you want to install Oracle Application Server is connected to the network, has local storage to contain the Oracle Application Server installation, has a display monitor, and has an appropriate disc drive.
This section describes how to install Oracle Application Server on computers that do not meet the typical scenario. It covers the following cases:
Section 4.9.1, "Installing on Computers With Multiple Network Cards"
Section 4.9.3, "Running Multiple Instances from One Installation"
Section 4.9.4, "Copying the Discs to Hard Drive, and Installing from the Hard Drive"
Section 4.9.5, "Installing on a Computer Without the Appropriate Disc Drive"
If you are installing Oracle Application Server on a computer with multiple network cards, the installer uses the first name in the /etc/hosts file. You may need to re-order the lines in this file so the desired hostname appears first. You can change the file back to its original state after installation.
Currently, Oracle Application Server is certified to run on the following NFS-mounted storage system:
The NFS-mounted system should be exported to at least the remote install user and remote root user.
To check the latest certification list for any updates, visit Oracle Technology Network (http://otn.oracle.com).
If you use NFS (for example, NAS or NetApp) and you want to install OracleAS Infrastructure 10g on UnitedLinux, you must configure the system using one of the following methods:
Mount the NFS partition with the nolock option.
Start the locking daemon on the NFS server and clients using the following commands:
# chkconfig nfslock on; chkconfig nfs on
# rcnfslock start; rcnfs start
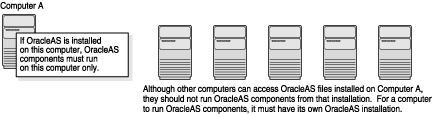
Oracle Application Server components are intended to be run only on the computer where they are installed. You cannot run the components on remote computers, even though the computers can access the files through NFS.
Figure 4-3 Run Oracle Application Server Only on the Computer Where It Is Installed
Instead of installing from the Oracle Application Server discs, you can copy the contents of the discs to a hard drive and install from there. This might be easier if you plan to install many instances of Oracle Application Server on your network, or if the computers where you want to install Oracle Application Server do not have the correct drives.
Ensure that the computers on which you want to install Oracle Application Server can access the hard drive where you copied the discs. You run the installer from the computers that will run Oracle Application Server.
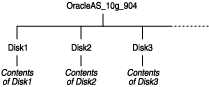
When you install from the hard drive, the installer does not prompt you to swap discs. It can find all the files if they are in the proper locations (see Figure 4-4).
Space requirement: Ensure that the hard drive contains enough space to hold the contents of the discs. Each CD-ROM contains approximately 650 MB. This means that if you are copying four CD-ROMs, you need approximately 2.6 GB of disk space. This space is in addition to the space required for installing Oracle Application Server (listed in Section 4.1).
To copy the contents of the discs, follow these steps:
Create a directory structure on your hard drive as shown in Figure 4-4. You need to create a parent directory (called OracleAS_10g_904 in the example, but you can name it anything you like), and, under the parent directory, create subdirectories called Disk1, Disk2, and so on. The names of the subdirectories must be DiskN, where N is the disc number.
Figure 4-4 Directory Structure for Copying CD-ROMs to Disk
Copy the contents of each disc into the corresponding directory.
prompt> cp -pr /cdrom_mount_point/* /path/to/hard/drive/Disk1/
prompt> cp -pr /cdrom_mount_point/* /path/to/hard/drive/Disk2/
... Repeat for each disc.
To run the installer from the copied files, invoke the runInstaller executable from the Disk1 directory. Run it from the computer that will be running Oracle Application Server.
prompt> /path/to/hard/drive/Disk1/runInstaller
If the computer where you want to install Oracle Application Server does not have the appropriate disc drive, you can copy the discs to the hard drive of a computer with the proper disc drive as described in Section 4.9.4 and then perform a remote installation from that computer using the instructions described in Section 4.9.6.
You can run the installer on a remote computer ("remote_computer"), but have the installer screens display on your local computer ("local_computer"). The installer will install Oracle Application Server on the remote computer.
Allow remote_computer to display on local_computer. You need to run this command on the local computer’s console.
local_computer> xhost +remote_computer
If you do not run xhost, you might get an Xlib error similar to "Failed to connect to server", "Connection refused by server," or "Can’t open display" when starting the installer.
On local_computer, perform a remote login (using telnet or rlogin) to remote_computer. Log in as the oracle user, as described in Section 4.6, "Operating System User". Ensure that the user has set the environment variables correctly, as described in Section 4.7, "Environment Variables".
local_computer> rlogin -l oracle remote_computer.mydomain.com
- OR -
local_computer> telnet remote_computer.mydomain.com
Set the DISPLAY environment variable on remote_computer to point to local_computer.
Example (C shell):
remote_computer> setenv DISPLAY local_computer.mydomain.com:0.0
Example (Bourne or Korn shell):
remote_computer> DISPLAY=local_computer.mydomain.com:0.0; export DISPLAY
Run the installer. See Section 5.15, "Starting the Oracle Universal Installer".
|
Note: You can use a PC X emulator to run the installer if it supports a PseudoColor color model or PseudoColor visual. Set the PC X emulator to use a PseudoColor visual, and then start the installer. Refer to the X emulator documentation for instructions on how to change the color model or visual settings. |
If you are installing Oracle Application Server in a DHCP network you must use a loopback configuration. To access the Oracle Application Server, you need to use a local browser. Perform the following steps to install Oracle Application Server in a DHCP network:
Find the IP address allocated from the DHCP server by running the following command:
$ /sbin/ifconfig -a
The IP address is associated with the interface configured to use DHCP.
Configure the host to resolve hostname to loopback IP address:
Configure the host to resolve hostname to loopback IP address, by modifying the /etc/hosts file to contain the following entries:
127.0.0.1 hostname.domainname hostname
127.0.0.1 localhost.localdomain localhost
Check that the hostname resolves to the loopback IP address by entering the following command:
$ /bin/ping hostname.domainname
Complete the Oracle Application Server installation as described in this guide using the hostname used in step 2.
Table 4-16 lists the checks performed by the installer:
Table 4-16 Prerequisite Checks Performed by the Installer
| Item | Description |
|---|---|
| CPU Speed | The installer checks that the CPU meets the minimum speed requirement. |
| Monitor | The installer checks that the monitor is configured to display at least 256 colors. |
| Display permission | The installer checks that the user has permissions to display on the monitor specified by the DISPLAY environment variable. |
| Operating system version | See Section 4.2, "Check the Software Requirements" for supported versions. |
| Operating system patches | See Section 4.2, "Check the Software Requirements" for a list of required patches. |
| Operating system kernel parameters | See Section 4.3, "Check Kernel Parameters" for a list of required kernel parameters. |
| Memory | See Section 4.1, "Check Hardware Requirements" for recommended values. |
| Swap space | See Section 4.1, "Check Hardware Requirements" for recommended values. |
| TMP space | See Section 4.1, "Check Hardware Requirements" for recommended values. |
| Oracle home directory name | The installer checks that the Oracle home directory name does not contain any spaces. |
| Path to the Oracle home directory | The installer checks that the path to the Oracle home directory is not longer than 127 characters. |
| Oracle home directory contents | The installer checks that the Oracle home directory does not contain any files that might interfere with the installation. |
| Oracle home directory | You should always install Oracle Application Server in a new directory, unless you are expanding a middle tier. See Section 7.14, "Expanding a MiddleTier". Here are some examples of installations that are not allowed:
|
| Port 1521 | The installer displays a warning if port 1521 is in use by any application, including database listeners of any version. You need to stop the application that is using port 1521, then click Retry in the warning dialog.
If it is a database listener that is using port 1521, you might be able to use it for the metadata repository database. See Section 4.4.3, "If Port 1521 Is in Use" for details. If it is another application that is using port 1521, you need to stop it or configure it to use a different port. Alternatively, you can change the database listener to use a port other than 1521, but you can do this only after installation. See the Oracle Application Server 10g Administrator's Guide for details. |
| Static port conflicts | The installer checks the ports listed in the staticports.ini file, if specified. See Section 4.4, "Ports".
|
| DISPLAY environment variable | The installer checks that the DISPLAY environment variable is set. |
| TNS_ADMIN environment variable | The TNS_ADMIN environment variable must not be set.
There must not be a |
| DBCA_RAW_CONFIG environment variable | If you are installing the OracleAS Infrastructure 10g in a Real Application Clusters or OracleAS Active Failover Cluster environment, you need to set this environment variable to point to a file that describes the locations of your raw partitions. See Chapter 9 for information about installing Oracle Application Server in a high availability environment. |
| Cluster file system | The installer checks that you are not installing Oracle Application Server in a cluster file system (CFS). |
| Oracle Enterprise Manager directories are writable | The installer runs this check only if you are expanding a middle tier or if you are reinstalling Oracle Application Server in the same Oracle home. The installer checks that these directories are writable by the operating system user running the installer:
|
| Oracle Enterprise Manager files exist | The installer runs this check only if you are expanding a middle tier or if you are reinstalling Oracle Application Server in the same Oracle home. The installer checks that these files exist:
|
| Kernel check on Linux systems | The installer runs this check only if you are installing on Linux. The installer makes sure that the kernel version contains the string 2.4.9-e.25 or higher for Red Hat 21, the string 2.4.21-4.EL for Red Hat3.0 and the string 2.4.19 for UnitedLinux 1.0..
|
| glibc version check on Linux | The installer runs this check only if you are installing on Linux. The installer makes sure that the glibc version is glibc-2.2.4-32 or higher on Red Hat AS/ES 2.1, glibc-2.2.5 or higher on UnitedLinux 1.0, and glibc-2.3.2-95.3 or higher on Red Hat 3.0. |
| Packages check on Linux | The installer runs this check only if you are installing on Linux.The installer makes sure that the mandatory packages are installed. For example, it checks the gcc, sysstat and openmotif packages as specified in Table 4–6 for Red Hat AS/ES 2.1, Table 4–7 for Red Hat 3.0 and Table 4–8 for UnitedLinux 1.0. |