| Oracle® Enterprise Manager Ops Center Feature Reference Guide 12c Release 1 (12.1.1.0.0) Part Number E27511-04 |
|
|
PDF · Mobi · ePub |
| Oracle® Enterprise Manager Ops Center Feature Reference Guide 12c Release 1 (12.1.1.0.0) Part Number E27511-04 |
|
|
PDF · Mobi · ePub |
This chapter includes the following information:
Oracle Enterprise Manager Ops Center provides the platform to consolidate the physical resources in your data center, and to build and operate your cloud services. The physical resources such as virtualization servers, storage, and network are pooled which are accessed by users to build their applications.
Oracle Enterprise Manager Ops Center provides comprehensive management solution to deploy, configure, and manage the virtualization servers, storage resources, and network fabrics. You can also pool the virtualization resources that share the storage and network resources. All these features are leveraged and can be deployed as Infrastructure-as-a-Service (IaaS) cloud platform service model in Oracle Enterprise Manager Ops Center.
In Oracle Enterprise Manager Ops Center, the provision to setup the IaaS cloud platform service is available as vDC Management. Virtual Datacenter or vDC is a collection of the server pools that share the common storage and network resources. A cloud administrator sets up the infrastructure and provide access to cloud users. The cloud users use the allocated resources to create guest and install an OS of different flavours, deploy applications, monitor, and manage the applications. The cloud user is provided the access to Oracle Enterprise Manager Ops Center UI to view and manage their applications.
Oracle Enterprise Manager exposes APIs and Command Line Interface (CLI) to enable the access to a subset of the Virtual Datacenter functionality. The cloud user can also manage the allocated resources programmatically by calling the IaaS web services directly.
The features accessible through the Cloud Infrastructure API and CLI are available for a Cloud User. The features that are restricted to the Cloud Administrator, such as infrastructure configuration and setup are not available through the Cloud Infrastructure API and CLI except for listing the accessible accounts and to create key based access to cloud users who have access to the accounts already. All the functions that are available for a Cloud User are also available for the Cloud Administrator.
When you log into Oracle Enterprise Manager Ops Center, the views and access for different sections of the UI are different for a cloud administrator and a cloud user.
If you are a cloud user looking for more information about creating and managing virtual servers, then go to the section Overview of Cloud Users.
See Oracle Enterprise Manager Ops Center Cloud Infrastructure API and CLI Reference Guide for more information about using Cloud Web Service and Cloud Infrastructure API and CLI.
If you are a cloud administrator, continue with the following sections that describe to create and manage the virtual datacenters in Oracle Enterprise Manager Ops Center.
When Oracle Enterprise Manager Ops Center is installed on Oracle Engineered systems and you want to create and manage a virtual datacenter built upon on the engineered systems, then the procedures described here for setting up the infrastructure and the virtual datacenter might not be suitable.
The infrastructure setup is different and a default virtual datacenter is configured during installation and configuration of Oracle Engineered systems. Refer to the Chapter 20, "Oracle Engineered Systems" for more information.
In Oracle Enterprise Manager Ops Center, you can consolidate the virtualization servers, storage, and network resources, and enable those resources to be utilized optimally and securely for mixed and dynamic workloads. This optimization of your resources is done by creating a Virtual Datacenter (vDC) in Oracle Enterprise Manager Ops Center.
The physical resources allocated of a vDC are entitled to accounts as virtual resources under quotas set by the cloud administrator. Accounts provide the required capabilities to manage the allocated resources. An account entitles designated cloud users the right to use its virtual computing, network, and storage resources.
A cloud user with access to different accounts can create virtual servers, known as vServers, and host or access applications.
A cloud administrator is involved in setting up the infrastructure for the vDC, creating and managing vDCs, creating and managing accounts, and managing access to cloud users.
The following table lists the tasks and the role required to complete the task. Contact your administrator if you do not have the necessary role or privilege to complete a task. See Oracle Enterprise Manager Ops Center Administration Guide for information about the different roles and the permissions they grant.
Table 18-1 Virtual Datacenter Roles and Permissions
| Task | Role |
|---|---|
|
Create and Manage Virtual Datacenters |
Cloud Administrator |
|
Create and Manage Accounts |
Cloud Administrator |
|
Create and Manage vServer Types |
Cloud Administrator |
|
Add and Manage Cloud Users |
Cloud Administrator |
A cloud administrator can create and manage the virtual datacenters, accounts, and cloud users. The cloud administrator has the role of Asset Admin and Network Admin to setup and manage the virtual datacenter infrastructure.
To access an already created vDC as a cloud administrator, you must have the proper privileges set to view and manage it. Creating only the cloud admin role is not enough, you must have the privileges for the vDCs to be managed. Contact the Ops Center administrator for more information.
The virtual datacenter configuration involves the setup of the infrastructure, managing the resource workloads, and understanding cloud user requirements. The user with the cloud administrator role has the following actions:
Create and manage virtual datacenters
Create and manage accounts
Manage access to accounts
Manage physical resources of virtual datacenter
Create and manage vServer types
Virtual datacenter (vDC) is a consolidation of your physical resources that share the network and storage resources. The physical resources that form a virtual datacenter are:
Homogenous server pools
The server pools are groups of virtualization supported servers that share compatible chip architecture. The supported virtualization types are:
Oracle Solaris Zones
Oracle VM Server for x86
Oracle VM Server for SPARC
In a vDC, you cannot have mixture of server pools that have different virtualization technology. A vDC is based on any one of the supported virtualization technology. This infrastructure difference brings in some major differences in using the vDC. The cloud user might not be aware of the background infrastructure but the cloud administrator ensures that the vDC resources are always highly available to a cloud user. See Server Pool Setup for more information about the server pool setup required for virtual datacenter.
Storage
The storage is inherited from the server pools. The storage is used for storing rootdisk of the virtual server created in the accounts, virtual server configuration data, templates, ISO images, FLAR images, and also used as volumes. While creating a vDC, you can allocate some storage resources that are used only for volumes. Volumes are used to attach to the vServers. See Storage Setup for more information about the storage resources required for virtual datacenter.
Networks
Plan the network requirements and attach the network to the server pools. vDC inherits the network resources from the server pools. See Network Setup for more information about setting up your network resources for virtual datacenter.
You can create vDC with server pools based on the following types of virtualization technology:
Oracle VM Server for x86
Oracle Solaris Zones
Oracle VM Server for SPARC
See Chapter 17, "Server Pools" for more information about how to create server pools.
Ensure all the required networks are assigned to the user-defined network domain that is associated with the server pool. The vDC creation wizard displays the list of available server pools in Oracle Enterprise Manager Ops Center. The list includes the server pools that conform to the following characteristics:
There are virtualization servers in the server pool and the server pool is not empty.
The server pool is associated with a user-defined network domain.
Server pools of supported virtualization technology.
There are compatible storage resources to be used as root disk and volumes for the vServers.
There are compatible storage resources for saving vServer metadata.
For Oracle Solaris Zones server pool, the pool members must not be a mixture of Oracle Solaris 10 and 11 operating system.
The vDC inherits the storage resources allocated for the server pool. The virtualization type of the server pool defines all the possible types of storage resources available for the vDC. Oracle VM Server for x86 based server pools can have the following type of storage resources:
Oracle VM Storage Repositories
LUNs allocated from Static Block Storage libraries
LUNs from Dynamic Block Storage libraries
For Oracle VM Server for x86 server pools, the Oracle VM Storage repositories must be associated with the server pool.
The Oracle Solaris Zones server pools can have the following types of storage resources:
NAS libraries
LUNs allocated from Static Block Storage libraries
LUNs from Dynamic Block Storage libraries
The Oracle VM Server for SPARC server pools can have the following types of storage:
NAS libraries
LUNs allocated from Static Block Storage libraries
LUNs from Dynamic Block Storage libraries
You require the Oracle Solaris Zones and Oracle VM Server for SPARC server pool to be associated with NAS libraries if they are associated only with Block Storage libraries. NAS libraries are required for storing guest metadata details.
When you create a vDC, you allocate the storage resources to be used for all the accounts created in the vDC. The allocated storage resources are used as root disks of the vServers and volumes. Volumes are additional storages that you can attach to the vServers. For volumes, the storage is allocated from the storage libraries that are associated with the server pools. A cloud user can also import external volumes into the account.
Oracle Enterprise Manager Ops Center provides comprehensive network management options that enables secure management of the virtual datacenter.
The server pools must be associated with user-defined network domain to be added to the vDC.
Understanding Network Domain Implementation
The network domain is a logical grouping of related networking components in Oracle Enterprise Manager Ops Center. You can build the network on the following type of fabrics:
Fully-managed switched fabrics
The switches and the fabrics they support are discovered and managed in Oracle Enterprise Manager Ops Center and you can create VLANs or InfiniBand partitions. The network domain created from fully-managed fabrics provides the option to create dynamic private networks.
Host-managed fabrics
Set VLAN IDs to unmanaged Ethernet fabrics and make it host-managed fabrics. Though the switches are not managed in Oracle Enterprise Manager Ops Center, you can assign VLAN IDs to the Ethernet fabrics. You have to manually enable the VLAN IDs on the switch ports connected to the hosts in that fabric. Host-managed fabrics allow you to create dynamic private networks.
Oracle Enterprise Manager Ops Center uses the VLAN IDs set for the creation of dynamic private networks.
Unmanaged fabrics
Neither the switches are managed nor the VLAN IDs are available in Oracle Enterprise Manager Ops Center to create the network. The networks are declared or discovered while discovering an asset in Oracle Enterprise Manager Ops Center. The network domain created out of these networks does not provide the option to create dynamic private networks. You can set aside the networks created on the unmanaged fabrics as private while creating a network domain.
You must ensure that these networks assigned as private are not in use and there is no routing between the selected networks and other networks. These private networks are defined as static private networks. For vDC, a network domain only with unmanaged fabrics can be assigned to a server pool if there are static private networks in it.
Each dynamic private network created is allocated a subnet address according to the standards specified in IETF RFC1918. While creating network domains, you can select the option to select the fabric on which you want to create the network, limit the number of networks to be created on the fabric, and the network addresses to be excluded from use.
The number of private networks that you can create on a fully-managed fabric depends on the type of physical fabric. Each port on an Ethernet switch can support 128 logical fabrics. Each partition on an InfiniBand switch can support 32000 logical fabrics. The number of logical fabrics determines how many private networks you can create. For an InfiniBand fabric, each P-key can support a private network. For an Ethernet fabric, each VLAN ID can support a private network.
When you create a network domain, you can set the network creation limit for each selected fabric. This determines how many private vNets that can be created in an account. You can spread the number of private networks across all of the accounts in the vDC.
The network setup must be implemented in such a way that the cloud user has the required network resources available to allocate to the virtual servers created in the accounts. The cloud user must be able to create private networks. The networks must be created upon either fully-managed switched fabrics, host-managed fabrics or unmanaged fabrics.
Create a network domain, assign the managed networks, and associate it with the server pool which must be added to the vDC. The vDC inherits the network domain from the server pool. From the available networks in the network domain, attach the required networks to the server pool. These managed networks form the public external networks for the vDC. You can assign these networks to the accounts created in vDC.
The vDC enables cloud users to create virtual machines and run applications. The cloud user provides networking to its virtual machines from the public networks that are allocated to each account or by creating private networks. The cloud user can use the public networks, or create a private vNet for use in the account. When the cloud users create a private vNet, either a dynamic private network is created or the static private network is available for use in that account.
You must allocate the IP addresses in the public networks and static private networks. This will enable the cloud users to use the allocated IP addresses.
Note:
All the server pools in the vDC must be associated with the same user-defined network domain.When the cloud user creates a private vNet, it is listed under the network domain of the vDC.
See Chapter 7, "Networks" for more information about managing fabrics, creating network domains, and private networks.
Before you create the vDC, it is important to have your server pools, network, and storage set up. When they are set up properly, you can select the required resources for the vDC.
To Create a Virtual Datacenter
Select vDC Management in the Navigation pane.
Click Create Virtual Datacenter in the Actions pane.
The Create Virtual Datacenter wizard displays.
The first step provides a introduction to the vDC and the prerequisites for creating a vDC.
You can select to skip this step in the future when you create a vDC again. Click Next to specify identification details for the vDC.
In the Specify Virtual Datacenter Details, enter the following information:
Provide a name and description for the vDC.
Enter tags for better identification and classification of the vDC in Oracle Enterprise Manager Ops Center.
Click Next to select the server pools.
Select a server pool from the list.
Select whether you want to add more compatible server pools as that of the selected server pool.
Select the compatible server pools that you want to assign to the vDC.
Click Next to configure the volume storage.
Designate some of the storage resources to be used for volumes. You can designate the following storage resources as volume:
Oracle VM Server for x86 based vDC
Oracle VM Storage Repositories
Dynamic Block Storage Libraries
Oracle Solaris Zone based vDC
NAS Libraries
Block Storage Libraries that include both Dynamic and Static
Oracle VM Server for SPARC based vDC
NAS Libraries
Block Storage Libraries that include both Dynamic and Static
Click Next to specify the vCPU sizing.
Select the minimum and maximum share of the physical CPU threads that are available for each vCPU.
The virtual datacenter resources are allocated to the accounts. Each account has a quota defined for the usage of vCPU, memory and storage resources. You must specify the share of the physical CPU that each vCPU must receive. Through timesharing of the CPU cycles, you can allocate more vCPUs than the existing physical CPU threads.
For zone based vDCs, you can set the minimum and maximum share of the physical CPU threads. When vServers (zones) are created, the Fair Share Scheduler is the default scheduler. The physical CPU allocation for each vServer is provided by the Fair Share Scheduler.
This option will not be available for Oracle VM Server for SPARC based vDCs as there is one to one relationship between the vCPU and the physical CPU thread.
Click Next to view the summary.
The summary lists the total resources that are allocated for the vDC. The summary lists the following:
Virtualization type – The virtualization technology of the server pool.
Total CPUs – The physical CPU threads available from all the virtualization servers in the selected server pools of the vDC.
Total memory – The total RAM allocated to the management domains of the selected server pool. For example, Oracle Solaris Zones based vDC, it is the total memory of the global zones in the server pool. For Oracle VM Server for x86 based server pools, it is the total memory of the Oracle VM Servers in which the virtual machines run.
Total disk space – The sum of all the disk spaces allocated from the storage libraries associated with the selected server pools.
vCPU sizing cap values – The minimum and maximum share of the physical CPU for each vCPU must receive.
Confirm the vDC configuration and click Finish to create the vDC.
You can perform the following actions for managing the vDC:
You can update the following details of vDC:
vDC identification and tags.
Assign more server pools or remove server pools that are not used.
Assign more storage for volume. You cannot remove the storage already assigned for volume.
Modify the vCPU sizing.
Select a vDC and click the Update Virtual Datacenter option in the Actions pane. Modify the required attributes and complete the wizard.
Oracle Enterprise Manager provides a complete view of the resources in the vDC and monitors the utilization of the virtualization servers, network, and storage. The cloud administrator gets a good picture of the utilization of the resources which helps to manage the under-utilized and over-utilized resources.
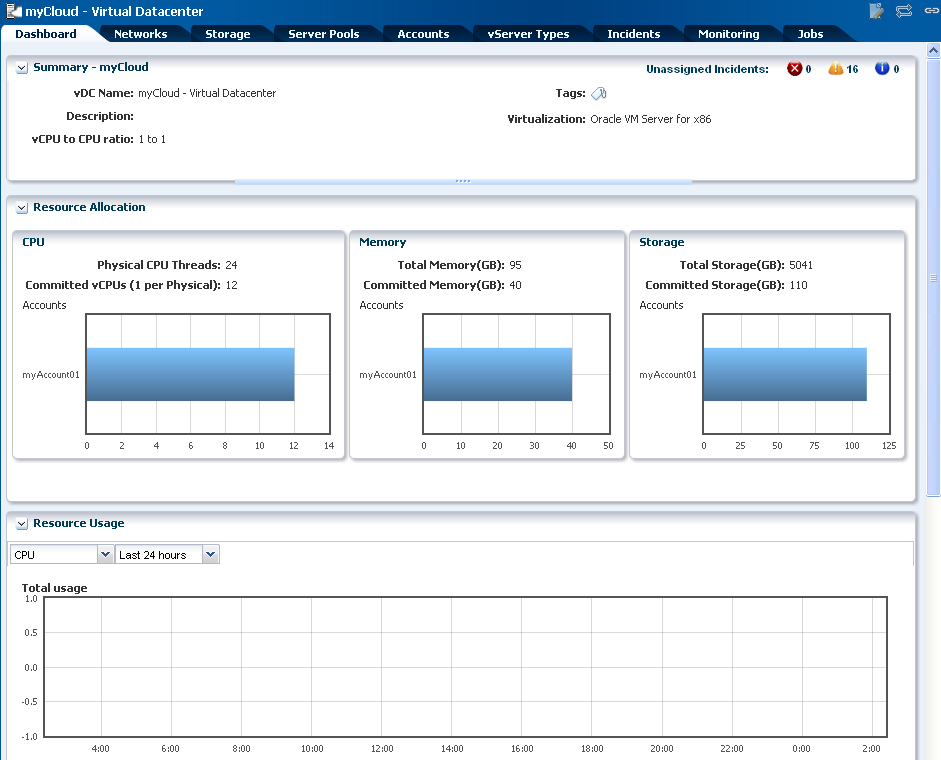
The following figure shows the Dashboard view when you select a vDC.
The Dashboard shows the total resources available for a vDC and the amount allocated for different accounts. The committed resources indicate the total resources entitled to all the accounts in the vDC.
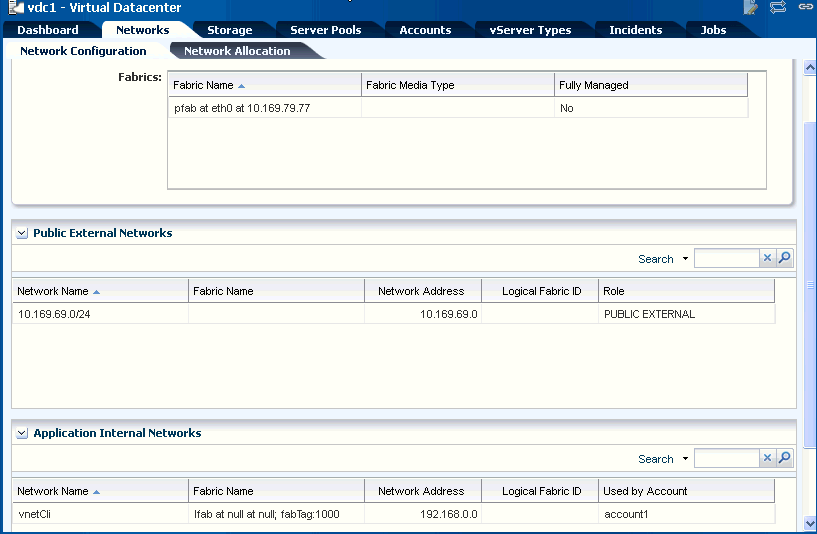
The Network tab displays detailed network usage in the vDC. It lists the fabric and public networks of the vDC, and all of the private networks created by the cloud user. You can see on which fabric the private vNets are created.
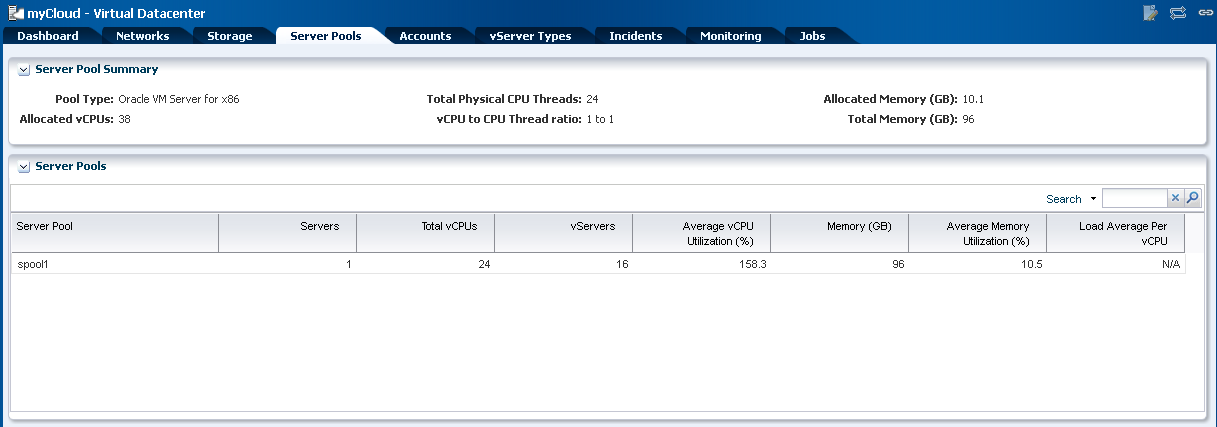
The Server Pools tab shows the usage of the server pool resources. This lists the server pools that are in the vDC. The total and committed resources of vCPU, memory and storage are displayed. This helps you to plan whether you must add more resources to the vDC.
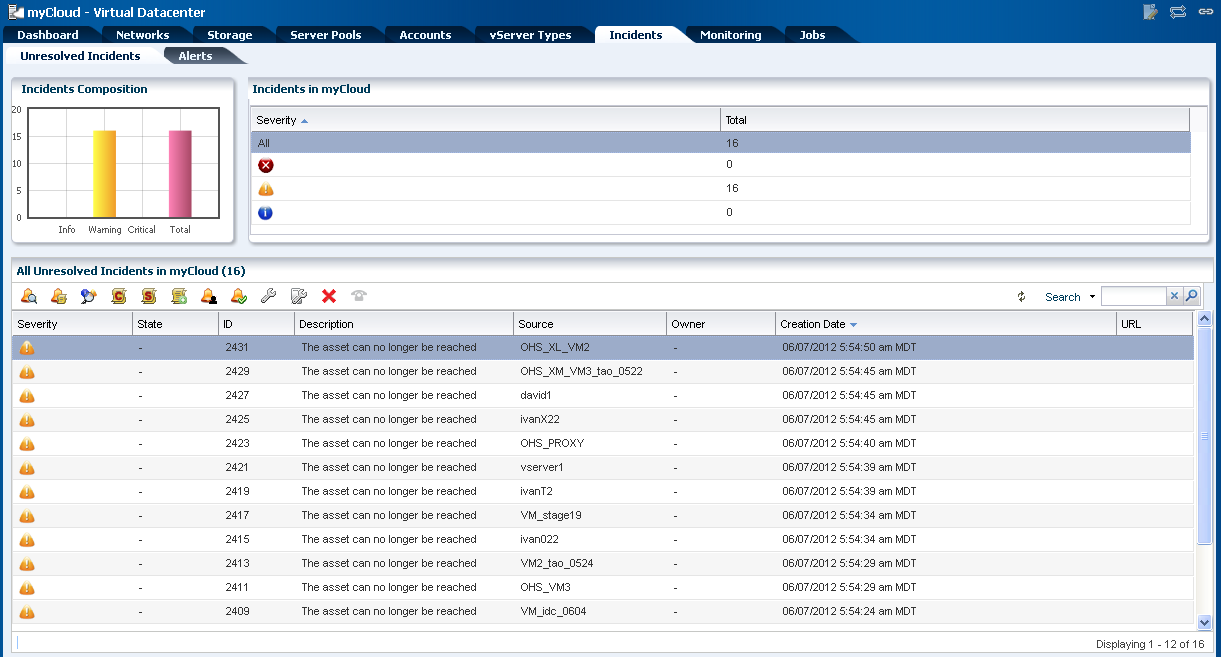
The Incident tab lists all the incidents reported from all the infrastructure components in the vDC. For each incident, view the source of the incident which will help you to identify the component and the source of the problem. The incidents also covers the warnings issued when the vDC resources are over-utilized.
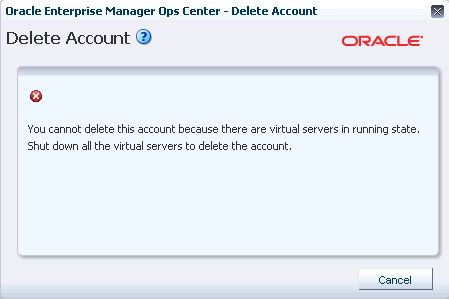
You can delete a virtual datacenter and release all of the resources attached to it. To delete a virtual datacenter, ensure the following conditions:
No vServers are in the running state in the virtual datacenter.
Shut down all the vServers in the virtual datacenter.
When you delete a virtual datacenter, all of the suspended or shut down vServers are deleted and the resources are released.
An account entitles designated cloud users the right to use computing, network, and storage resources of vDC. The account provides the required capabilities to manage these resources.
The prerequisites for creating an account are:
Estimate the resource quotas to be allocated for the account
Identify the cloud users to be assigned to the account
The quota for vCPU, memory and storage resources are defined during account creation. The Resource Quota Information display in the account wizard creation indicates how much of the corresponding vDC resources are used. It also displays whether the vDC resources are oversubscribed or undersubscribed.
You can create a maximum of 4096 private vNets in an account. You can set the limit of number of private vNets that can be created in an account.
During account creation, the public networks that are available in the vDC are listed. You can set the number of public IP addresses allocated to the account from the resource. A cloud user can assign the public IP address to a vServer, as needed.
Assign the cloud users to the account during account creation or separately. Cloud users have access to only specific accounts. As a cloud administrator, you can manage the access of the cloud users to all the accounts.
You provide an entitlement to the virtual resources for an account. You allocate the resources from the vDC to an account. The resource allocation for all the accounts in a vDC can be more than the actual resources in a vDC. This oversubscription of the resources must be identified and planned for a vDC. You must configure the virtual resources for an account properly and update the resource configuration when the requirement increases. When an account does not have enough resources, the cloud user receives notifications that they cannot create vServers due to unavailability of resources.
As a cloud administrator watch the resource usage and properly configure the resources for an account.
Select the vDC in which you want to create the account.
Click Create Accounts in the Actions pane.
The Create Account wizard displays.
The first step provides a introduction to accounts and the prerequisites for creating an account.
You can skip this step in the future when you create an account again. Click Next to specify identification details for the account.
Enter the name and description for the account.
Add tags for categorizing and identifying the account. Click Next.
Specify the resource quotas for vCPU, memory and storage to the account.
The available resources from vDC are allocated to the vDC. You can over-subscribe the resources. The Resource Quota Information displays whether the vDC resources are undersubscribed or oversubscribed. This gives a complete picture of the vDC resource usage.
Select the number of private vNets a cloud user can create in an account.
The maximum number of private vNets that you can create in an account is 4096.
Select the public networks from the vDC that you can allocate to the account.
For each network, the available number of IP addresses is displayed. Enter the number of IP addresses that will be allocated to the account. Click Next.
Select the cloud users who can access the account. You must assign a cloud user while creating the account. Thereafter, use Add Users option to add more users.
Review the account information and click Finish to create the account.
You have the following options to manage the account configuration in a vDC:
Update account resource configuration
Assign cloud users to accounts
Delete an account
As a cloud administrator, you can modify the identification, and resources allocated to an account. When you want to increase the resources allocated to an account, you can modify by selecting an account and click Update Account in the Actions pane. Modify the resources and complete the wizard.
You cannot remove the resources allocated to an account. Also, you cannot remove the public network or reduce the limit of public addresses assigned to an account.
You can add cloud users to the account and give them the right to use the resources allocated to an account. You can add the cloud users while you create an account or using the option Add Users.
Select the account and click Add Users in the Actions pane.
The Add Users wizard displays.
The list of available cloud users and already assigned cloud users to the account are displayed. Select the users to whom you want to assign to the account and move it to the Assigned Users.
Click Next to view the summary.
View the summary and click Finish to add the user to the account.
For vDCs based on Oracle VM Server for SPARC virtualization technology, you must manage OS provisioning profiles that the cloud user can use for creating vServers in their environment. The Oracle Solaris 10 ISO or FLAR images must be imported in the NAS libraries associated with the server pools placed in the vDCs.
Configure your Oracle Solaris 11 Software Update Library in the Enterprise Controller to synchronize with the Oracle Solaris 11 Package Repository. The cloud user can use all the profiles for Oracle Solaris 11 OS.
Ensure to configure DHCP in your environment so that the cloud user can install Oracle Solaris 10 ISO image.
OS provisioning profiles that are based on Oracle Solaris 10 FLAR images and Oracle Solaris 11 OS, use WAN boot and do not require DHCP configuration.
See Chapter 5, "Software Libraries" for more information.
vServer Type are profiles of virtual machines that defines the computing resources such as virtual CPU, memory, and storage size. A cloud user can use this to implement and create vServers.
Note:
For vDCs based on Oracle VM Server for x86, the storage size defined in the vServer type does not limit the vServer storage. Instead, the storage size is defined from the server template of the vServer.A vServer type created is available for all the accounts in a virtual datacenter.
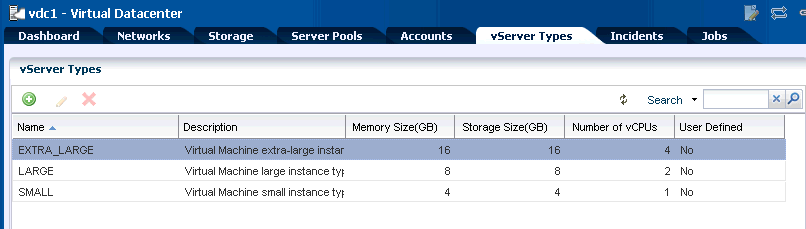
As a cloud administrator, you can capture the user requirements and create different vServer Types. Cloud users can use this to create vServers. By default, there are three system-defined vServer types that define the computing resources.
There are three system-defined vServer types provided for all vDCs. The three vServer types are:
Extra Large
Large
Small
The vServer type configuration varies depending on the virtualization technology on which the vDC is constructed.
When you create a vServer type, the VM hosting details display the following information in the wizard based on the resources defined:
The number of virtualization servers in the vDC that have sufficient physical resources to host a vServer with the selected resources.
An estimation of number of vServers that can be hosted with the total number of physical resources of the vDC.
A warning when the current value of the memory size exceeds the selected storage size.
The procedure to create a vServer type is as follows:
Select the vDC and click Create vServer Type in the Actions pane.
The Create vServer Type wizard displays.
Enter the name and description for the vServer type.
Add tags for identification and classification of the vServer type. Click Next.
Specify the vCPU, memory and storage resources for the vServer type.
As you enter the values, the VM Hosting displays the following information:
The number of virtualization servers that have sufficient resources in the vDC to host a vServer of this type.
The number of vServers that the vDC can host with the total number of physical resources of the vDC.
A warning message is displayed when the current memory size is more than the storage size. The existing vServer types are displayed with the configuration details. You can avoid creating duplicate vServer types.
Provide the values for the resources and click Next.
Review the information provided and click Finish to create the vServer type.
You can modify the following details of a vServer type:
Name and description
Modify, or add new tags
Modify the resource configuration
Use the option Update vServer Type to launch the Update vServer Type wizard. Modify the configuration and complete e the wizard.
You cannot the delete the system-defined vServer types. You can delete only the vServer types that you have created.
A cloud user with access to an account is entitled to manage and use computing, network, and storage resources allocated in a vDC within the limits of the account quotas.
Cloud users can create and manage the life cycle of vServers for their applications. Creation and management of vServers involve the setup of virtual resources, the management of virtual resource workloads, and understanding application requirements.
Cloud Users can manage the following virtual resources:
Virtual Networks (vNets) – Used to connect and restrict network access of vServers.
Server Templates – Provide pre-built images for creating vServers.
Virtual Storage – Includes volumes that you can attach to vServers, and snapshots to capture the current state of a volume for different purposes.
vServers – An entity that provides the outward interface of a stand-alone operating system. A vServer has its own identity, local storage, interfaces, and configuration that exist for the full lifetime of the vServer.
Availability and management of some of these virtual resources vary depending on the virtualization technology of the vDC or resource type supported by the vDC.
Oracle Enterprise Manager Ops Center offers to cloud users the option to perform their tasks using its browser interface or through:
APIs – A Web service API and a Java API to programmatically manage the allocated resources in a vDC account for automation or integration purposes.
CLI – To manage allocated resources in a vDC account from a text-based console that can be also used for automation or integration purposes.
The following sections in this guide describe the tasks a cloud user can perform in Oracle Enterprise Manager Ops Center using the UI. For more information about the use of APIs and CLI, refer to Oracle Enterprise Manager Ops Center Cloud Infrastructure API and CLI Reference Guide.
Table 18-2 lists the tasks and the role required to complete the task. Contact your administrator if you do not have the necessary role or privilege to complete a task. See Oracle Enterprise Manager Ops Center Administration Guide for information about the different roles and the permissions they grant.
Table 18-2 Cloud User Tasks and Roles
| Task | Role |
|---|---|
|
View Account Quotas and Virtual Resources |
Cloud User |
|
Create and Manage vServers |
Cloud User |
|
Create and Manage Virtual Networks |
Cloud User |
|
Create and Manage Volumes |
Cloud User |
|
Create and Manage Snapshots |
Cloud User |
|
Create and Manage Server Templates |
Cloud User |
A cloud user can perform different actions to use and manage the allocated resources in a vDC account. This section lists the actions a cloud user can perform for each type of resource. It also indicates if the action is a available for the different vDC account types.
View account quotas and virtual resources
Create and manage vServers
Create and manage virtual networks
Create and manage volumes
Create and manage snapshots
Create and manage server templates
Based on the virtualization technology on which the vDC and its accounts are created, there might be differences in the availability of the options in the cloud user view. The following tables provide a detailed list of options that are available for a cloud user when the vDC is based on different virtualization technology.
| Action | Oracle VM Server for x86 based vDC | Oracle VM Server for SPARC based vDC | Oracle Solaris Zones based vDC |
|---|---|---|---|
| View account quotas and resources | Yes | Yes | Yes |
| View account Incidents | Yes | Yes | Yes |
| View Account Jobs | Yes | Yes | Yes |
| Action | Oracle VM Server for x86 based vDC | Oracle VM Server for SPARC based vDC | Oracle Solaris Zones based vDC |
|---|---|---|---|
| Create vServer | Yes | Yes | Yes |
| Stop and start vServer | Yes | Yes | Yes |
| Pause and Resume vServer | Yes | No | No |
| Update vServer | Yes | Yes | Yes |
| Launch Virtual Console | Yes | No | No |
| Shutdown All vServers | Yes | Yes | Yes |
| Attach and Detach Volume | Yes | Yes | Yes |
| Delete vServer | Yes | Yes | Yes |
| Action | Oracle VM Server for x86 based vDC | Oracle VM Server for SPARC based vDC | Oracle Solaris Zones based vDC |
|---|---|---|---|
| Create private vNet | Yes | Yes | Yes |
| Update private vNet | Yes | Yes | Yes |
| Delete private vNet | Yes | Yes | Yes |
| Allocate vIP | Yes | Yes | Yes |
| Deallocate vIP | Yes | Yes | Yes |
| View allocated vIPs | Yes | Yes | Yes |
| Action | Oracle VM Server for x86 based vDC | Oracle VM Server for SPARC based vDC | Oracle Solaris Zones based vDC |
|---|---|---|---|
| Create Volume | Yes | Yes | Yes |
| Create Volume from Snapshot | Yes | No | No |
| Import Volume | Yes | No | No |
| Update Volume | Yes | Yes | Yes |
| Delete Volume | Yes | Yes | Yes |
| Create Snapshot | Yes | No | No |
| Action | Oracle VM Server for x86 based vDC | Oracle VM Server for SPARC based vDC | Oracle Solaris Zones based vDC |
|---|---|---|---|
| Upload Server Template | Yes | No | No |
| Create Server Template | No | Yes | No |
| Update Server Template | Yes | Yes | No |
| Delete Server Template | Yes | Yes | No |
| Register and Unregister Server Template | Yes | Yes | No |
| Action | Oracle VM Server for x86 based vDC | Oracle VM Server for SPARC based vDC | Oracle Solaris Zones based vDC |
|---|---|---|---|
| Create Distribution Group | No | Yes | No |
| Update Distribution Group | No | Yes | No |
| Delete Distribution Group | No | Yes | No |
Account quotas limit the creation of new virtual resources in the account. A cloud user must be aware of the account quotas and manage the workloads of the virtual resources.
To see the quotas and virtual resources of an account, expand vDC Management in the Navigation pane.
This lists all the accounts to which a cloud user has access under vDC Accounts.
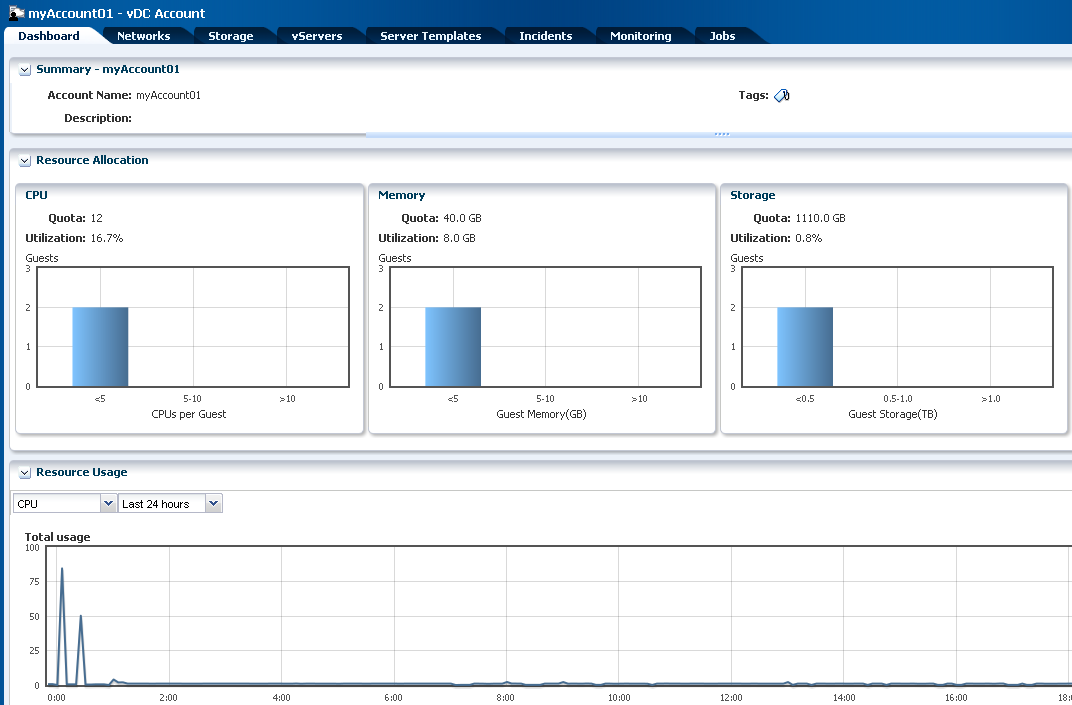
You can select a listed account to display general account information and quotas in the Dashboard tab of the center pane. The Dashboard tab displays general information about the selected account and a summary of the virtual resources status and usage.
Virtual resources details appear in the other tabs across the center pane:
Networks – Shows the vNets quotas. Lists and displays information for each private vNet and public network available for the account. Also displays the actions bar for the actions that you can perform for a vNet.
Storage – Shows the storage quotas. Lists and displays information for each vServer root disk, volume, and snapshot available for the account. Also displays the actions bar for the actions that you can perform for a storage resource.
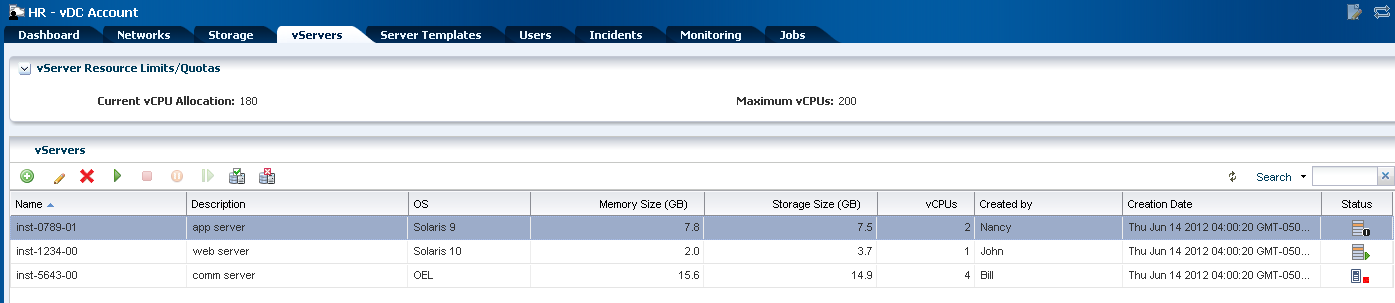
vServers – Shows the CPU quotas. Lists and displays information for each vServer available for the account. Also displays the actions bar for the actions that you can perform for a vServer.
Server Templates – Lists and displays information for each server template available for the account. Also displays the actions bar for the actions that you can perform for a server template.
A vServer is an entity that provides the outward interface of a stand-alone operating system that consumes CPU, storage, and memory resources. A vServer has its own identity, local storage, interfaces, and configuration that exist for the full lifetime of the vServer.
You determine the creation of new vServers according to the account quota limits and applications requirements.
You must complete the following tasks as prerequisites for creating vServers:
Define the memory, storage, and number of CPUs required for the vServers
After memory, storage, and number of CPUs are defined, you can select the best suitable vServer type from those available for the account. vServer types are visible to cloud users during the vServer creation process. Contact your cloud administrator when you require a vServer type.
Define the operating system and configuration for the vServers
You must define the OS and configuration for the vServers. Based on that, you can choose the correct server template. The proper server template must exist before creating a vServer. You can either select a server template from those that exist for the account or create a new server template. Actions to use or create server templates vary based on the virtualization technology used in the vDC. For more information about server templates, see Manage Server Templates
Define the virtual networks to attach to vServers for connectivity
Plan the network connectivity of the vServers. vServers are only assigned to virtual networks at vServer creation time. You must choose one or more vNets from the available vNets or create new ones before creating a vServer. For more information about vNets, see vNets Creation
Define the IP address assignment method
You can choose from two different methods for IP address assignment to vServers:
Static method – Used to assign a specific IP address to a vServer. When using this method you must allocate in advance an IP address from the selected virtual networks. You must consider using this method when creating a single vServer at a time.
Automatic method – This method dynamically assign an IP address from each selected virtual network. When creating a multiple vServer at a time, only the use of the automatic IP address assignment method is allowed.
Define the number of vServers to create
You can create single or multiple vServers at a time. When creating multiple vServers at a time, vServers are created with the same configuration and a suffix is added to each vServer's name. You must also consider the IP address assignment method when defining the number of vServers.
Define the use of the high availability support option for vServers
Choose to use the high availability support option for vServers. When a high availability is enabled, the vServer is available uninterruptedly. The vServer is not shutdown when the backend infrastructure fails and it is migrated to another server and started. When high availability is not enabled, the vServer starts only after the backend infrastructure is available. Cloud administrator takes care of server pool settings to provide high availability feature in a vDC.
Determine the use of the vServers access control mechanism
You must determine the access mechanism to log into your systems. An option available as an alternative secure method is to use a public key to authenticate SSH root access to the vServer without the use of a password. This option is available to all cloud users, other options to create local user account or provide password for remote SSH access might be present based on the virtualization technology of the vDC.
Determine the use of distribution groups for vServers
You can determine if a vServer needs to be added to a distribution group. This feature is available for vDCs based on Oracle VM Server for SPARC virtualization technology and Oracle Exalogic systems. Distribution group ensures that two vServers are not running in the same Oracle VM Server. If you choose to assign a vServer to a distribution group, the distribution group must exist before creating the vServer. For more information about distribution group, see Distribution Group Creation.
Some of the other additional tasks that you can perform before or after creating a vServer:
Define the use of additional storage for vServers
When you require additional storage for vServers, attach volumes to vServers. You might attach volumes to vServers at vServers creation time, in that case, volumes must exist before creating the vServers. For more information about creating volume, see Volume Creation.
You can skip this option at vServer creation time, you can also attach volumes at a later time.
Oracle Enterprise Manager Ops Center provides a wizard that walks you through a series of steps to collect information and resources to create vServers. It is important to have your planning tasks completed before running the wizard.
Expand vDC Management in the Navigation pane.
Select the account from the vDC Accounts list.
Click Create vServer in the Actions pane.
The Create vServer wizard displays.
Enter the following information in the vServer Details step:
Name and description for the vServer.
Tags for better identification and classification of the vServer.
Number of vServers to create.
Check the High Availability Support option if required.
Click Next to select a server template.
Select a server template from the list.
Click Next to select a vServer type.
Select a vServer type from the list and click Next.
Select one or more volumes from the Available Volumes list. Use the arrow keys to move the selected volumes to the Attached Volumes list.
You can skip this step as the volumes can also be attached after creating a vServer. Click Next to continue.
Select one or more vNets from the list.
Click Next to select the IP address assignment method.
Select the IP address assignment method for each vNet and click Next.
When the static method is selected, choose an IP address from the list.
When the Distribution Group Selection step is present, select a distribution group from the list if required.
You can skip this step. Click Next to provide a public key.
In the vServer Access step, you can choose from one of the available options to get remote SSH access to the vServer:
Provide a public key to authenticate the SSH root access to the vServer. You can use either of the following options to register the public key:
Check the Upload Local Key option to upload the public key from a local file, then click Next to view the Summary.
Paste the public key directly into the Public Key text area, then click Next to view the Summary.
Provide login credentials to authenticate the SSH access to the vServer. This is only available for cloud users using Zones or Oracle OVM for SPARC as virtualization technology in the vDC.You can use one or both of the following options:
Check the option to supply the password for the remote SSH root access, and click Next.
You will be directed to the Login Credentials step. Enter the password and confirm it, then click Next to view the Summary.
Check the option to create a local user account and password for remote SSH access, then click Next.
You will be directed to the Login Credentials step. Enter the local user name and the password, then click Next to view the Summary.
You can also skip this step and click Next to view the summary.
Confirm the vServer information provided in the Summary and click Finish to create the vServer.
After creating a vServer, you can manage the vServer life cycle by executing the available actions for vServer management.
To locate all the actions available for managing a vServer:
Expand vDC Management in the Navigation pane.
Select the account from the vDC Accounts list.
Select the vServer tab in the Center Pane.
You can then select a vServer from the vServers list and then choose one of the actions displayed.
Cloud users can perform the following actions to manage a vServer life cycle. The availability of some of the actions depends on the cloud infrastructure. See Actions Available for a Cloud User for available actions under different cloud infrastructure:
Update a vServer – To modify the current name or description of a vServer. This action also allows the creation or deletion of vServer tags.
Stop a vServer – To stop a running vServer. When a vServer is stopped, the guest operating system is shutdown. A stopped vServer can be started later.
Start a vServer – To start a stopped or shutdown vServer. The restarted vServer might not get the same IP address as the original vServer.
Pause a vServer – To suspend a running vServer.
Resume vServer – To start a suspended vServer.
Shutdown all vServers – To shutdown all vServers listed for an account. This action is only available in the Actions pane.
Attach vServer volumes – To attach one or more new volumes to a vServer. You must stop the vServer before executing this action.
Detach vServer volumes – To detach one or more volumes from a vServer. You must stop the vServer before executing this action.
Delete a vServer – To delete a vServer from a vDC account. Deleting a vServer results in shutting down the vServer followed by the deletion of the vServer.
vServers are bound to one or more vNets to restrict network connectivity. There are different types of vNets a cloud user can use:
Public networks – Created by cloud administrators. Cloud users cannot create, update, or delete this type of vNet. Cloud administrators can also share this type of vNet among a number of accounts in a vDC. vServers that are members of public vNets have also external communication beyond vDCs. You can also use the vServer to host public services.
Private vNets – Created by cloud users according to their requirements and within the limits of the account quota. A private vNet is created based on the private network from the network domain of the vDC. Private vNets are only accessible within an account. All vServers that have membership to a private vNet in common can communicate freely through that subnet.
Cloud users define which vNets are associated with a vServer. You can specify the membership of a vServer to one or more vNets when you create a vServer. Once a vNet is associated with a vServer, the association persists until the vServer is deleted.
A cloud user can release a reserved IP address that is not allocated to a vServer. Allocated IP addresses are only released when the vServer is deleted.
Cloud users can create private vNets. To create a private vNet, you must:
Plan vServers connectivity.
Define the number of vServer that can be part of a Private vNet.
Private vNet is a private virtual network set up exclusively for an account. The vServers associated with this vNet have private virtual IP address for internal communication.
Expand vDC Management in the Navigation pane.
Select the account from the vDC Accounts list.
Click Create Private vNet in the Actions pane.
The Create Private vNet wizard displays.
Enter the following information in the Private vNet Details step:
Name and description for the private vNet.
Tags for better identification and classification of the private vNet.
Click Next to configure the private vNet.
Select the number of elements for the private vNet.
This is the maximum number of vServers that can be part of this vNet. Use the slide bar to set the value. The values entered are rounded to the next value of 2, 6, 14, 30, 62, 126, 254, 510, 1022, 2046, 4094, and 8190.
Click Next to view the summary.
Confirm the private vNet information and click Finish to create the private vNet.
Virtual network management involves the necessary actions to connect and restrict network access to vServers. After a vNet is created, cloud users can perform the following actions for virtual networks management:
Allocate vIP – To allocate one or more IP addresses from a private or public vNet. IP addresses are dynamically allocated from those available IP addresses that have not been assigned to a vServer or allocated previously. You can use allocated vIP addresses for static assignment to vServers.
View allocated IP addresses – To see a complete list of the allocated IP addresses from a public or private vNet. This list includes all allocated IP addresses that are not assigned to a vServer.
Deallocate vIP – To release an IP address that was previously allocated from a public or private vNet. IP addresses assigned to a vServer are not listed and they cannot be deallocated. Once an IP address is deallocated, the IP address is available to the account.
Update a private vNet – To modify the name or description of a private vNet. This action also allows the creation or deletion of vNet tags.
Delete private vNets – To delete a private vNet. You cannot delete vNets associated with a vServer.
Server templates designate the operating system and how it will be installed while creating a vServer. Server templates are specific to processor architecture of the server pool and virtualization type and can be pre-built images or identifies the OS distribution.
Server templates are loaded into the storage libraries associated with the vDC and cannot be changed later. By default, a server template is bound to a specific account.
The proper server template must exist before creating vServers. Depending on the virtualization type of the vDC account, cloud users can have the following options:
Use a default server template provided by the system for creating vServers. This is available only for Zones based cloud infrastructure.
Upload a new server template to be used for creating vServers. This is available only for Oracle VM Server for x86 based cloud infrastructure.
Create a new server template for installing vServers. This is available only for Oracle VM Server for SPARC based cloud infrastructure.
To upload a server template, you can choose from two different server templates sub types:
Template – Single virtual machine template that is ready to be deployed into virtualized platforms. Templates can be of format .tgz, .tar or other file types.
Assembly – Collection of interrelated software appliances that can include a configuration of multiple virtual machines with their virtual disks and their inter connectivity. An assembly is contained in a single .ova (Open Virtualization Format Archive) file. When uploading an assembly, you can also create snapshots.
You can either select the server templates stored in the local host machines or from other locations that you can access. Use FTP, HTTP, or HTTPS protocols to upload the server templates from other locations.
Before uploading a server template, you must:
Decide on a suitable server template sub type.
Make sure the file for the server template is of the correct format.
Check whether the file is accessible when uploading the server template from a file in other location.
Expand vDC Management in the Navigation pane.
Select the account from the vDC Accounts list.
Click Upload Server Template in the Actions pane.
The Upload Server Template wizard displays.
Enter the following information in the Identify Server Template step:
Name and description for the server template.
Tags for better identification and classification of the server template.
Click Next to specify server template details.
Choose a server template sub type.
Choose an option to upload the server template file.
When the URL option is selected, enter the complete URL.
Click Next to view the summary.
Confirm the server template information and click Finish to create the server template.
The option to create a server template is available only when the vDC is built on Oracle VM Server for SPARC virtualization technology. You can create server templates from existing OS provisioning profiles. The list of profiles is filtered to display only the distribution which are available to vDC. If a required profile is not available, contact your cloud administrator for required OS provisioning profiles to install your vServers. The OS profiles that have been created for a selected ISO image is made available to create the server template.
Select the Account in the vDC Management section.
Click Create Server Template in the Actions pane.
The Create Server Template wizard is displayed.
Skip the introduction and click Next.
Enter the name and description for the server template.
If required, enter tags for easy classification and categorization.
Click Next.
Select a profile that provisions Oracle Solaris OS.
You can install Oracle Solaris 10 or Oracle Solaris 11 OS on the vServer. Click Next.
Review the information and click Finish to create the server template.
The new template will be created and will be available to be used to create a vServer.
You can perform the following actions for server templates management:
Update Server Template – To modify the name or description of a server template. This action also allows the creation or deletion of server template tags.
Register Server Template – To register a server template for public use. Registering a server template make the server template available to other accounts in the vDC.
Unregister Server Template – To unregister a server template is accessible for public use. Unregistering a server template make the server template available to only to the vDC account from which the server template was created.
Delete Server Template – To delete a registered or unregistered server template. Deletion of a server template does not influence a vServer that was created based on the server template.
These options are disabled when the vDC is built on Zones virtualization technology.
A volume is a virtual block storage device that you can attach or detach from vServers. Volumes are bound to an account. Storage space for volumes is limited by the account's quota.
You can attach one or more volumes to a vServer at vServer creation time or at a later time.
To create a volume, you can:
Create a new empty volume specifying only the size.
Create a volume from a snapshot. A volume created from a snapshot can be empty or not. The size of the volume is defined by the snapshot. Availability of this action depends of the virtualization type of the vDC account. This action might be disabled for some cloud users.
Import volume from another location. Volumes must be contained in a file of the format .img. Volume files must be accessible by the Enterprise Controller, using HTTP, HTTPS or FTP protocols. This action is available only when the vDC is built on Oracle VM Server for x86 based virtualization technology.
Volumes can be shared at volume's creation time. When a volume is shared, the volume is available for all the cloud users of the account.
Before creating a volume a cloud user must:
Verify the storage space available for the account and plan accordingly.
Decide for a suitable option to create the volume.
When importing a volume, check for file accessibility and format.
Define whether the volume must be shared.
You can create or import volumes. The procedures to create and import volumes are described in this section.
Expand vDC Management in the Navigation pane.
Select the account from the vDC Accounts list.
Click Create Volume in the Actions pane.
The Create Volume wizard displays.
Enter the following information in the Volume Details step:
Name and description for the volume.
Tags for better identification and classification of the volume.
Click Next to configure the volume.
Check the Shared option if required.
Enter the size of the volume.
Click Next to view the summary.
Confirm the volume information and click Finish to create the volume.
To Create a Volume from a Snapshot
Select the account from the vDC Accounts list.
Select the Storage tab in the center pane.
Select the Snapshot sub tab in the center pane.
Select a Snapshot for the Snapshots list.
Click the Create Volume from Snapshot action.
The Create Volume From Snapshot wizard displays.
Enter the following information in the Volume Details step:
Name and description for the volume.
Tags for better identification and classification of the volume.
Check the Shared option if required.
Click Create to create the volume.
Select the account from the vDC Accounts list.
Click Import Volume in the Action action.
The Import Volume wizard displays.
Enter the following information in the Volume Details step:
Name and description for the volume.
Tags for better identification and classification of the volume.
Enter the URL in which the external volume resides.
Check the Shared option if required.
Click Import to import the volume.
After a volume is created, you can perform the following actions for volume management.
Update Volume – To modify the name or description of a volume. This action also allows the creation or deletion of volume tags.
Delete Volume – To delete a volume from a vDC account. Only volumes that are not currently attached to a vServer can be deleted. Deleting a volume results in releasing storage space. The process of deletion of a volume does not influence a snapshot that has been created previously based on that volume.
A snapshot is an image of a volume at a given time. A snapshot captures the current state of the volume and is immutable. You can create snapshots for the following purposes:
Backup of data stored on a volume
Creation of new volumes based on a snapshot.
Snapshots availability and management are possible only when supported by the storage of the vDC. Contact a cloud administrator for verification.
You can create a snapshot from:
An existing volume.
Uploading an assembly. See Manage Server Templates.
There are four types of exposed disks in an assembly's template. Three of them are presented to cloud users as snapshots, this allows cloud users to optionally create a shared volume from the snapshot. The types of disk created as snapshots are:
You can create a volume from a snapshot and attach those volumes to vServers.
Before creating a volume, you must:
Verify the storage space available for the account and plan accordingly.
Decide for a suitable option to create the snapshot: from a volume or from an assembly.
To Create a Snapshot from Volume
Select the account from the vDC Accounts list.
Click Create Snapshot in the Actions pane.
The Create Snapshot wizard displays.
Enter the following information in the Snapshot Details step:
Name and description for the snapshot.
Tags for better identification and classification of the snapshot.
Click Next to select a volume.
Select a volume from the list.
Click Next to view the summary.
Confirm the snapshot information and click Finish.
You can perform the following actions for storage management
Update Snapshot – To modify the name or description of a snapshot. This action also allows the creation or deletion of snapshot tags.
Create Volume from a Snapshot – To create a volume base on a snapshot, see Volume Creation
Delete Snapshot – To delete a snapshot from a vDC account. Deleting a snapshot does not affect volumes, snapshots exist independently of the volume.
Distribution groups are necessary for properties similar to anti-affinity scaling. Distribution groups are available for vDCs based on Oracle VM Server for SPARC virtualization technology and Oracle Exalogic systems. The action to create a distribution group might be disabled to some cloud users.
Distribution groups are bound to a specific account. You can only assign a vServer to a distribution group when you create the vServer. All vServers that are created within a distribution group are placed on a separate server of the server pool the account uses. When a spare server is not available, the create vServer task fails.
The size of the distribution group define the maximum number of vServers that you can associate with a distribution group. The size of the distribution group is limited by the actual number of Oracle VM Servers available in the server pools of the vDC.
Before creating a distribution group, you must:
Be aware of the size limit for creating a distribution groups. Contact a cloud administrator to verify it.
Plan the creation and vServers distribution for the distribution groups.
To Create a Distribution Group
Expand vDC Management in the Navigation pane.
Select the account from the vDC Accounts list.
Click Create Distribution Group in the Actions pane.
The Create Distribution Group wizard displays
Enter the following information in the Distribution Group Details step:
Name and description for the distribution group.
Tags for better identification and classification of the distribution group.
Click Next to configure the distribution group.
Define the size of the distribution group.
Click Next to view the summary.
Confirm the distribution group information and click Finish.
For instructions in performing actions or to learn more about the role of this feature, go to one of the following resources:
|
Copyright © 2007, 2012, Oracle and/or its affiliates. All rights reserved. Legal Notices |
|