| Oracle® Enterprise Manager Cloud Administration Guide 12c Release 2 (12.1.0.2) Part Number E28814-03 |
|
|
PDF · Mobi · ePub |
| Oracle® Enterprise Manager Cloud Administration Guide 12c Release 2 (12.1.0.2) Part Number E28814-03 |
|
|
PDF · Mobi · ePub |
This chapter describes the steps required to setup the Database Cloud Infrastructure. In particular, it contains the following sections:
This section helps you get started by providing an overview of the steps involved in setting up a Private Database Cloud. Before you set up the database cloud, you must download and deploy the required plug-ins. For more details, see Installing Virtualization and the Cloud Plug-ins.
Table 12-1 Getting Started with DBaaS
| Step | Task | Role |
|---|---|---|
|
1 |
Define roles for administrators and self service users. See Defining Roles and Assigning Users. |
Super Administrator |
|
2 |
Install the Management Agent on unmanaged hosts so that they can be monitored by Enterprise Manager. Adding Hosts. |
Cloud Administrator |
|
3 |
Configure Privilege Delegation Settings on your managed hosts. Configuring Privilege Delegation Settings. |
Super Administrator |
|
4 |
Configure the storage location for the Software Library. See Configuring the Software Library |
Cloud Administrator |
|
5 |
Set up provisioning credentials. See Setting Up Credentials for Provisioning. |
Self Service Administrator |
|
6 |
Configure the Listener. See Creating Oracle Home and Configuring the Oracle Listener. |
Self Service Administrator |
|
7 |
Provision the database software or create Oracle Homes. See Provisioning Database Software. |
Self Service Administrator |
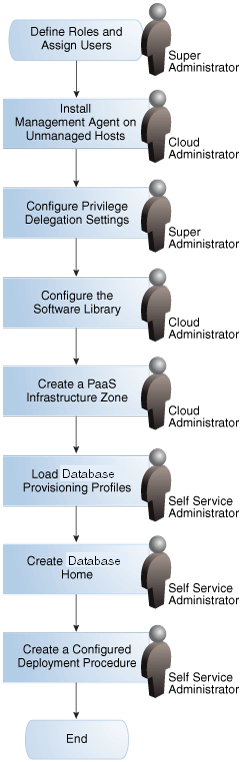
Figure 12-1 shows the sequence of steps required to enable database as a service.
Roles are named groups of related system and object privileges. You can create roles and then assign them to users and to other roles. You can assign any of the existing roles to a new role and the associated privileges. Enterprise Manager contains three built-in roles for the Database Cloud Service Portal, namely:
EM_CLOUD_ADMINISTRATOR: Users with this role can set up and manage the cloud infrastructure. This role is responsible for deploying the cloud infrastructure (servers, zones, storage, and networks) and infrastructure cloud operations for performance and configuration management.
EM_SSA_ADMINISTRATOR: Users with this role can define quotas and constraints for the self service users and grant them access privileges. Users with this role also have provisioning and patching designer privileges that allow them to create and save deployment procedures, create and view patch plans, and support the plug-in lifecycle on the Management Agent.
EM_SSA_USER: Users with this role, by default, can only access the Self Service Portal. An administrator with the EM_SSA_ADMINISTRATOR role can provide additional privileges that allow users with the EM_SSA_USER role to access other features in Enterprise Manager.
The table below lists the roles associated with each user.
| User Profile | EM_CLOUD_ADMINISTRATOR | EM_SSA_ADMINISTRATOR | EM_SSA_USER |
|---|---|---|---|
| Minimum roles required to create a user |
|
|
EM_SSA_USER |
| Roles to be removed when creating a user | NONE | NONE |
|
| Additional roles may be added as required | |||
The Cloud Management Self Service Portal allows self service users to provision and manage their own cloud services. Self service users need access only to the Self Service Portal and the resources allocated to them. These capabilities are inherent in the predefined EM_SSA_USER role. Since the functions performed by the EM_CLOUD_ADMINISTRATOR and EM_SSA_ADMINISTRATOR roles are consistent across Enterprise Manager, these ready-to-use roles can be used as they are. On the other hand, the EM_SSA_USER role is used for quota assignment, and to limit access to Database Pools and Service Templates. Hence the predefined role needs to be modified to create custom SSA user roles that are based on the standard EM_SSA_ROLE role. Typically, you need to create new SSA User roles either for different functional groups like developers, testers, production DBAs, or for different customer teams like Siebel DBA team, BRM DBA team, operations team for hosting custom Java applications, and so on. To create a custom SSA user role, follow these steps:
Log in to Enterprise Manager as a Super Administrator user.
From the Setup menu, select Security, then select Roles.
Click Create in the Roles page to launch the Create Role wizard.
Provide a name and description (SSA_DEV_ROLES) for the role and click Next.
From the list of Available Roles, select the EM_SSA_USER role and move it to the Selected Roles table. Click Next.
Accept the default target privileges and click Next.
Accept the default resource privileges and click Next.
Skip the Create Role: Administrators step and click Next.
Review the changes and click Finish to create the custom SSA user (SSA_DEV_USERS) role.
To create a user called SSA_USER1 and grant the custom role created earlier (SSA_DEV_USERS), follow these steps:
Log in to Enterprise Manager as a Super Administrator user.
From the Setup menu, select Security, then select Administrators.
Click Create in the Administrators page to launch the Create Administrator wizard.
Enter the name and password for the user (SSA_USER1) and create Next.
From the list of Available Roles, select the SSA_DEV_USERS role and move it to the Selected Roles table. Remove the EM_USER and PUBLIC roles from the Selected Roles table. Click Next.
Accept the default target privileges and click Next.
Accept the default resource privileges and click Next.
Review all the changes and click Finish to create the SSA_USER1 user.
Note:
Repeat these steps to create other users. For the Cloud Administrator and SSA Administrator users, theEM_USER and PUBLIC roles must not be removed.Oracle Management Agent (Management Agent) is one of the core components of Enterprise Manager Cloud Control. It works in conjunction with the plug-ins to monitor the targets running on a managed host.
You must install Oracle Management Agents on your unmanaged hosts to monitor them in Enterprise Manager. To install the Management Agent on an unmanaged server, follow these steps:
Log in to Enterprise Manager as an EM_CLOUD_ADMINISTRATOR user.
From the Setup menu, select Add Target, then select Add Target Manually.
Select the Add Host Targets option and click Add Host.
Add the host names and select the platform. Check the Self Update console, if the Agent software for the desired platform is listed as not available, click Next.
Provide the Agent Install Location, click in the Instance directory field to auto-generate the path, create a named credential for the agent user (provide access to root user either by using sudo or pbrun), and clear the value in the port field (this will enable automatic selection of the port), click Next.
Review all entered values, and click Deploy Agent.
Track the progress of agent deployment on the Add Host Status page. The agent deployment takes between 5-10 minutes.
Select Targets, then select Hosts to navigate to the Hosts page. Confirm if all the hosts are listed on the page. For a detailed description of this procedure, see Adding Hosts.
Note:
You can deploy the Management Agent on a maximum of 16 servers at a time. The total time required will thus increase if the Management Agent is deployed to a large number of servers.Privilege delegation allows a logged-in user to perform an activity with the privileges of another user. Sudo and PowerBroker are privilege delegation tools that allow a logged-in user to be assigned these privileges. These privilege delegation settings will be used for all provisioning and patching activities on these hosts.
To configure privilege delegation settings on cloud hosts, follow these steps:
Create a Privilege Setting Template.
Log in to Enterprise Manager as a Super Administrator user.
From the Setup menu, select Security, then select Privilege Delegation.
Under the Related Links section, click the Manage Privilege Delegation Setting Templates link.
Select Sudo or PowerBroker from the Create list and click Go.
Enter a template name, and the Sudo or PowerBroker command to be used on the target hosts. Sample values are provided in the description for the command fields. For example, the command for sudo is /usr/bin/sudo -u %RUNAS% %COMMAND%
Click Save.
Note:
If you select the PowerBroker option, you can specify an optional value in the PowerBroker Password Prompt field.
Check the path to the sudo or pbrun executable. For example, if you are using sudo, you can check this by opening a terminal to one of the hosts and run the command which sudo. The command returns the path to the executable.
Deploy the template to the hosts.
From the Setup menu, select Security, then select Privilege Delegation.
Click Manage Privilege Delegation Settings Templates in the Related Links section.
Select the template that you have created and click Apply.
Click Add Targets and choose the hosts for which the template is to be applied.
Click Select to select the hosts and click Apply.
On the Past Apply Operations page, check the Status column for all hosts. A job has been submitted to all hosts to apply this privilege delegation setting.
Refresh the page using the browser refresh button, or click Go on this page to refresh the status for all hosts.
From the Setup menu, select Security, then select Privilege Delegation to navigate to the Privilege Delegation page. Click the Show link in the Status column to confirm that the privilege delegation settings have been applied on all hosts.
You can install on a maximum of 16 servers at a time. The total time required will increase if the Management Agent is installed on a large number of servers.
Oracle Software Library (Software Library) is a repository that stores software patches, virtual appliance images, reference gold images, application software and their associated directive scripts. It allows maintaining versions, maturity levels, and states of entities.
The software entities can be automatically mass-deployed to provision software, software updates, and servers using Enterprise Manager Cloud Control in a reliable and repeatable manner. These provisioning operations, which are unattended and can be scheduled, lead to substantial cost savings.Besides acting as a repository for certified software entities, the Software Library is a logical interface between the deployment models and the automation framework required to perform a large number of patching and provisioning tasks. To configure the storage location for the Software Library, follow these steps:
Log in to Enterprise Manager as an EM_CLOUD_ADMINISTRATOR user.
From the Setup menu, select Provisioning and Patching, then select Software Library.
Select OMS Shared File System in the Storage Type list and click Add...
If you are using the OMS Agent Filesystem location, see the note in Creating a PaaS Infrastructure Zone for setting up credentials for administrators.
Specify a Name and Location that is accessible to all OMSes and click OK.
Note:
Because the storage location for the Software Library must be accessible to all OMSes as local directories, in a multi-OMS scenario, you must set up a clustered file system using OCFS2, NFS, ACFS, or DBFS. For single OMS systems, any local directory is sufficient. Ensure that sufficient storage space (more than 100 GB for production deployment of Enterprise Manager) has been allocated for the Software Library as this storage space is used to store all the cloud components.A job is executed to upload all the ready-to-use content. This may take 15 to 30 minutes depending on your disk speed.
Before you perform any operations on the Managed Servers or databases, you must define the credentials that will be used by Enterprise Manager to connect to the targets.
You need to set up two types of credentials:
Normal credentials are the host operating system credentials used to install the database software. For example, oracle/oracle.
Privileged credentials are the host operating system credentials used to perform privileged actions like executing root scripts. For example, oracle/oracle with sudo to root.
'Note:
It is recommended that the same OS user who owns the Oracle Home on the host, creates the database.To create named credentials, follow these steps:
Log in to Enterprise Manager as an administrator with the EM_SSA_ADMINISTRATOR role.
From the Setup menu, select Security, then select Named Credentials.
Click Create in the Named Credentials page.
Enter the Credential Name and Credential Description. Set the Authenticating Target Type field to Host and Scope field to Global. Enter the user name and password in the Credential Properties section. If you need to set privileged credentials, select Sudo or PowerBroker in the Run Privilege field and enter values in the Run As and Profile fields.
Click Test and Save.
Verify this credential against a host target and click OK.
Before you can enable database as a service, the database software must already be provisioned on all hosts. Database software can be provisioned by an administrator with the EM_SSA_ADMINISTRATOR role in the following ways:
Provisioning Profile
Create a snapshot of an existing database using a Provisioning Profile. See the Enterprise Manager Lifecycle Management Administrator's Guide for details.
Use the Provisioning Profile to provision the Clusterware/ASM or Grid Infrastructure (for Real Application Cluster databases), and Database Oracle Home.
Note: Do not create a new database as part of this deployment procedure.
Using the Database Installer
Run the Clusterware/ASM or Grid Infrastructure installer to set up the cluster and ASM (for RAC databases).
Run the Database Installer with the software only option on all hosts.
Add the database Oracle Homes as Enterprise Manager targets. See Creating Oracle Home and Configuring the Oracle Listener for details.
For more details on provisioning the database software, see the Enterprise Manager Lifecycle Management Administrator's Guide.
You need to configure an Oracle Home and the Oracle Listener before you can add them as Enterprise Manager targets.
To set up the Oracle Listener (Listener) for the database hosts, follow these steps:
Log in as a user with the EM_SSA_ADMINISTRATOR role and perform mass deployment of database homes on the newly added hosts as described in Adding Hosts.
To configure a Listener running from the same Oracle Home on which the database instance is to be created, launch a Bash shell and enter the following commands:
<AGENT_BASE>/agent_inst/bin/emctl stop agent
export TNS_ADMIN=<DB_HOME_LOCATION>/network/admin
<AGENT_BASE>/agent_inst/bin/emctl start agent
export ORACLE_HOME=<DB_HOME_LOCATION>
Run $ORACLE_HOME/bin/netca and create the listener. Make sure you have the same Listener name and Listener port on all the hosts.
To configure a Listener running from the Single Instance High Availability (SIHA) Oracle Home, launch a Bash shell and enter the following commands:
export ORACLE_HOME=<SIHA_HOME_LOCATION>
Run $ORACLE_HOME/bin/netca and create the listener. Make sure you have the same listener name and listener port on all the hosts
Log in as the user with the DBAAS_ADMIN_ROLE and discover the newly added Listener target on all the hosts. From the Setup menu, select Add Target, then select Add Target Manually.
Select the Add Non-Host Targets Using Guided Process option and select Target Type as Oracle Database, Listener, and Automatic Storage Management and click Add Guided Discovery and follow the steps in the wizard. Before you add the new Listener target, ensure the ORACLE_HOME for the Listener is pointing to the correct ORACLE_HOME location.
|
Copyright © 2011, 2012, Oracle and/or its affiliates. All rights reserved. Legal Notices |
|