| Oracle® Enterprise Manager Cloud Administration Guide 12c Release 2 (12.1.0.2) Part Number E28814-03 |
|
|
PDF · Mobi · ePub |
| Oracle® Enterprise Manager Cloud Administration Guide 12c Release 2 (12.1.0.2) Part Number E28814-03 |
|
|
PDF · Mobi · ePub |
This chapter describes the process to set up and use the database self service application. In particular, it contains the following sections:
A Database Deployment Procedure is a series of steps that is used to create a database. With the Database Self Service Portal, users can select a service template that closely resembles their requirements which identifies the size and configuration of the database to be created.
To customize the database deployment procedure, follow these steps:
Log in to Enterprise Manager as an administrator with the EM_SSA_ADMINISTRATOR role.
From the Enterprise menu, select Provisioning and Patching, then select Database Provisioning.
Select the Create Database Procedure option and click Launch.
Select or enter appropriate values for procedure inputs, and click the lock icon once the values are finalized.
Note:
You must lock the variables as specified in the table below. If any of these variables are not locked, the database deployment procedure cannot be used.| Field | Description | Locked Y/N? |
|---|---|---|
| Version | Select from a list of supported database versions | Y |
| Database Type | Select among different database configurations | Y |
| Hosts (Oracle Home + Credential) | Select a single sample host, Oracle Home and credentials. While creating Real Application Cluster databases, select a cluster, the desired Oracle Home, credentials for the cluster, and a sample node.
Note: These inputs will be ignored when the procedure is published as a service template. |
N |
| Database Template | Select the database template location. The location can be Software Library or Oracle Home. The template selected must be compatible with the selected Oracle Home version. If you have selected Oracle Home, select the template from the Oracle Home. The default location is ORACLE_HOME/assistants/dbca/templates.
Note: Due to a known issue, when this field is locked, it may be difficult to identify the template selected from the Oracle Home. |
Y |
| Cluster Database Configuration Type (RAC Only) | Select the configuration type as Administrator Managed and suitable nodes are selected by default. | NA |
| Global Database Name | Enter a dummy value. This value will be auto-generated when this procedure is published as a service template. | N |
| SID | Enter a dummy value. This value will be auto-generated when this procedure is published as a service template. | N |
| Passwords (SYS, SYSTEM, DBSNMP) | Specify all three passwords here. The SYS password is used and the SYSTEM and DBSNMP are displayed. | Y |
| Storage Type | Select the storage type, whether File System or Automatic Storage Management (ASM). | Y |
| Database File Location | Specify the location or disk group where data files, temporary files, redo logs, and control files will be stored. | N |
| Recovery File Location | To enable backup and restore for Self Service users, check the Use Fast Recovery Area and Enable Archiving check boxes. When you check the Use Fast Recovery Area check box, you are prompted for the location or disk group and size required for storing recovery related files.
If these check boxes are selected, the Self Service user can schedule Oracle recommended RMAN backups for the database. |
Y |
| Memory Parameters | Specify this value according to your database size definition. For example, small = 1 GB, medium= 2 GB, large = 4 GB, and so on. | Y |
| Database Sizing | Specify the Block Size and number of Processes. If you have selected a database template with data files in the Database Template page, you cannot edit the Block Size. | Y |
| Host CPU Count | Specify this value according to your database size definition. For example, small = 1 CPU, medium=2 CPU, large= 4 CPU, and so on. | Y |
| Character Set | Select the required character set. The default character set is based on the locale and operating system. | Y |
| Database Connection Mode | Select the server mode. For shared server mode, specify the number of shared servers. | Y |
| Listener Configuration | As part of the prerequisites, the listener has to be configured for each host and Oracle Home. After it has been configured, select the correct listener and lock the value. | Y |
| Custom Script | Optional custom script that will be executed after the database has been created. | Y |
| Schedule | This field will be ignored. The schedule is specified by the Self Service user as part of the database request. | NA |
| Review | Review all the inputs provided in the deployment procedure. | NA |
On the Review page, click Save and enter a meaningful name for the deployment procedure.
Note:
Do not click Submit on the Review page.After the deployment procedure has been saved, click Cancel to exit the wizard.
The Self Service Portal is a Web page where Cloud users can request, monitor, and manage their own databases using Enterprise Manager.
An administrator with the EM_SSA_ADMINISTRATOR role can configure and set up the database self service portal by defining database pools, service templates, and so on.
DBaaS must be enabled by following the steps described in Chapter 12, "Setting Up Database as a Service".
PaaS Infrastructure Zone must have been created. See Creating a PaaS Infrastructure Zone.
Follow this process to set up the database cloud self service portal:
Log in to Enterprise Manager Grid Control as an administrator with the EM_SSA_ADMINISTRATOR role.
From the Setup menu, select Cloud, then select Database.
The Database Cloud Self Service Portal Setup page appears. Click Database Pools. A database pool is a collection of servers or clusters with database software installed.
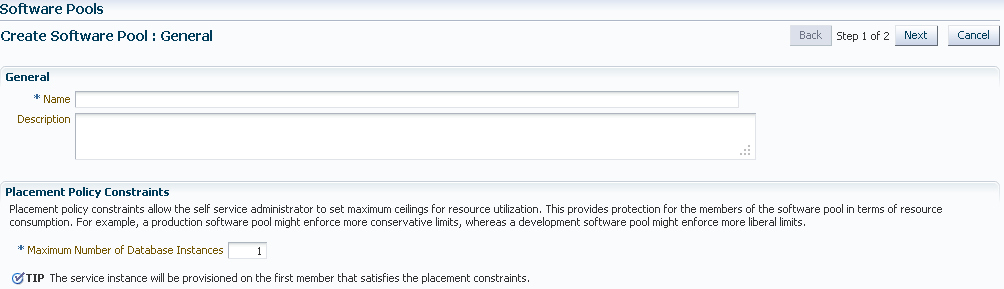
Click Create. The Create Software Pool: General page appears. Enter a name and description for the database pool.
Enter the placement policy constraints. In the Maximum Number of Database Instances (per host), enter the maximum number of database instances that can be running on each host in the pool.
Click Next. The Create Software Pool: Targets page appears. In this page, you can add one or more Oracle homes to the database pool being created.
In the Zone Name drop box, select the PaaS Infrastructure Zone in which the middleware pool is to be created. See Creating a PaaS Infrastructure Zone for details.
Specify the Version of the Oracle home being added to the database pool.
Click Add and select one or more Oracle homes to be added to the database pool. Click Submit.
The newly created pool will appear in the Database Cloud Self Service Portal Setup: Database Pools page. The database pool can now be added to the Service Template.
Click the Request Settings tab. Specify the following:.
Future Reservation: How far in advance can a request be made.
Request Archive Retention: Period for which archived requests are stored before they are automatically deleted by the system.
Request Duration: Maximum duration for which requests can be made.
Click Apply.
Click the Quotas tab. Quota is the aggregate amount of resources that can be granted to each self service user belonging to a certain role. This quota applies only to the database provisioned through the Self Service Application.
Note:
Quota validation ensures that a request is executed only if the user's current usage is within the limits specified for the roles to which the user belongs. Only the direct roles are considered for the quota determination, and not nested ones.Click Create. In the Create New Quota window, select the Role Name for which the quota is to be granted. Specify the quota limits for the role as follows:
Total allocated memory that can be assigned for all the databases owned by a specific user.
Total allocated storage that can be assigned for all the databases owned by a user.
The number of databases that can be owned by a user at any point in time.
Note:
Only roles that have theEM_SSA_USER privileges are displayed in the Select Roles dialog box.Click Create. In the Create New Quota window, select the Role Name for which the quota is to be granted.
Note:
Only roles that have theEM_SSA_USER privileges are displayed in the Select Roles dialog box.The quota limits for each of the attributes would be determined based on all the roles to which a user directly belongs. For example, if a user has 3 roles with quota setup for each role as shown in the table below:
| Role Name | Attribute | Value |
|---|---|---|
| Dev Role | Memory | 2 GB |
| Storage | 15 GB | |
| DB Count | 10 | |
| Test Role | Memory | 5 GB |
| Storage | 10 GB | |
| DB Count | 12 | |
| PM Role | Memory | Quota not set |
| Storage | Quota not set | |
| DB Count | Quota not set |
The quota is calculated as the absolute maximum across the roles for each attribute value. For the user who belongs to the Dev, Test, and PM Role, the Quota is calculated as:
Value for Memory = MAX (Dev, Test, PM) = MAX (2, 5, NA) = 5 GB
Value for Storage = MAX (Dev, Test, PM) = MAX (15, 10, NA) = 15 GB
Value for DB Count = MAX (Dev, Test, PM) = MAX (10, 12, NA) = 12 Databases
A sample quota validation log generated by the user request follows:
************** UserName - SSA_USER
******* Quota Limits:
*** Memory: 10
*** Storage: 10
*** Instances: 10
*** Memory Used: 6.732421875
******* Current Usage:
*** Storage Used: 5.28
*** Instances Used: 5
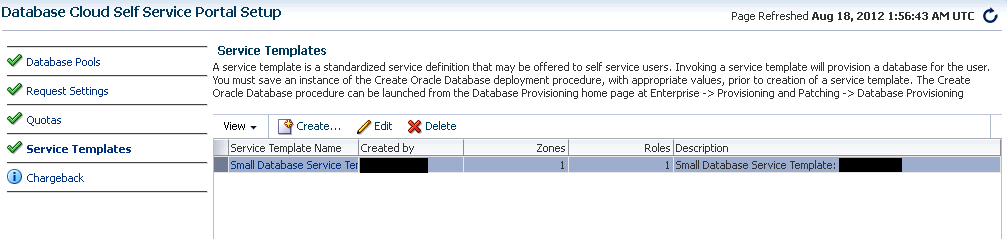
Click the Service Templates tab. A service template is a standardized service definition that can be selected by self service users when requesting a new database. You can create service templates that can be used to provision databases in a set of selected zones.
Click Create in the Service Templates page to launch the Create New Service Template Wizard.
Enter a name and description for the service. Select a saved deployment procedure that is to be used to create the service template. Click Next. The service template description appears, and you can select the right template. Sample service template descriptions are shown in Figure 13-3.
Click Add to add one or more roles. Users belonging to the roles selected here can access the service template. Click Submit. The newly created service template can now be accessed through the self service portal while requesting databases.
To edit an existing service template, follow these steps:
Click Edit in the Service templates page to launch to the Edit Service Template wizard.
In this mode, you can modify the description, user name, password, and port range of the database instance being provisioned, add or remove PaaS Infrastructure Zones, Software Pools into which the template is being deployed, and add or remove users who can access this template.
Click the Chargeback tab. On this page, you can determine chargeback zones, services, items, and prices. After the Chargeback is setup, you can view charges and plan details. For more details on setting up the Chargeback Service, see Chapter 4, "Chargeback Administration".
The Database Self Service Portal allows self service users to view, monitor, and deploy databases on selected zones. Users can request databases using any of the predefined service templates or database specifications that closely resemble their requirements. Users can provision databases easily without being aware of the hardware and software infrastructure details. The entire database lifecycle of creation, maintenance and retirement can be done by the self service users with zero or minimal intervention from an official Database Administrator.
The Database Cloud Self Service Portal Home page displays the following details:
Home: This is the Home page for the Database Self Service Portal. It contains the following sections:
Notifications: This section shows the number of databases that are expiring in the next 7 days.
Usage: This region displays the quota that you currently have and how much has been used.
Databases: This table lists the services that you currently own. You can request more databases by clicking Request Database. You can also delete any databases you own to release it prior to expiration. Click on a Service Name link to drill down to the database details page.
Requests: This table tracks the requests that you have created. You can also cancel requests that have been scheduled but not executed.
Chargeback: This page displays all the chargeback break-up data for the databases and pricing for different zones. The charge incurred will be calculated from the database requested date to current date. This page contains the following sections:
Charge Trend: Shows the charges across a date range for various metrics. You can set a date range and click Go to recalculate charges.
Details: This section shows charge details for the specified date range. You can reorder the data by selecting an option from the Detail Level menu. Click Export to export the details of the charge plan to a .csv file.
Aggregate By: You can aggregate the charge back data for the database by resources or metrics. You can export this data to an external application such as a spreadsheet.
Charge Plans: The charge plans that have been assigned to each PaaS Infrastructure Zone are displayed. Select a zone to view the pricing. The rate for each metric in the zone for a specific time period appears.
Click My Preferences. Before you request resources using SSA, you can set up your user profile by specifying the following details:
Default Host Password: The default password for the host.
Default Zone: The default zone for the requests.
Default Source Software: The default location in which the assemblies, templates, and deployment plans are present.
Default Email Address for Notifications: The default email address to be used to receive notifications.
Days Before the First / Second Notification: The number of days before the first and second notifications are sent.
Enable Quota Related Notification: If you select this checkbox, notifications are sent when the quota reaches a specified threshold.
Quota Threshold for Receiving Notifications: If you have selected the Enable Quota Related Notification checkbox, specify the quota threshold in this field.
Database Preferences
Default Zone: Select the default zone for the requests.
My Middleware Preferences
Default Zone: Select the default middleware zone for the requests.
My Servers Preferences
Default Server Root Password
Default Zone for New Requests
Default Source Software
Click Apply to save the preferences. The values specified here will be used when you request resources using SSA.
You can deploy databases to a specific zone with a selected service template. To request a database, follow these steps:
Log in to Enterprise Manager as a user with EM_SSA_USER role or any role that includes EM_SSA_USER role.
On the Self Service Portal Homepage, click Databases on the upper right corner of the screen.
The Home page of the Database Cloud Self Service Portal appears. Click Request Database in the Home page.
Note:
If the Infrastructure Cloud Self Service Portal appears, click the Databases option at the top left-hand corner of the page to toggle to the Database Cloud Self Portal page.Choose a service template from the list and click Select. If you have only one template, it will be automatically selected. Typically, the service template description should provide the configuration details for the database.
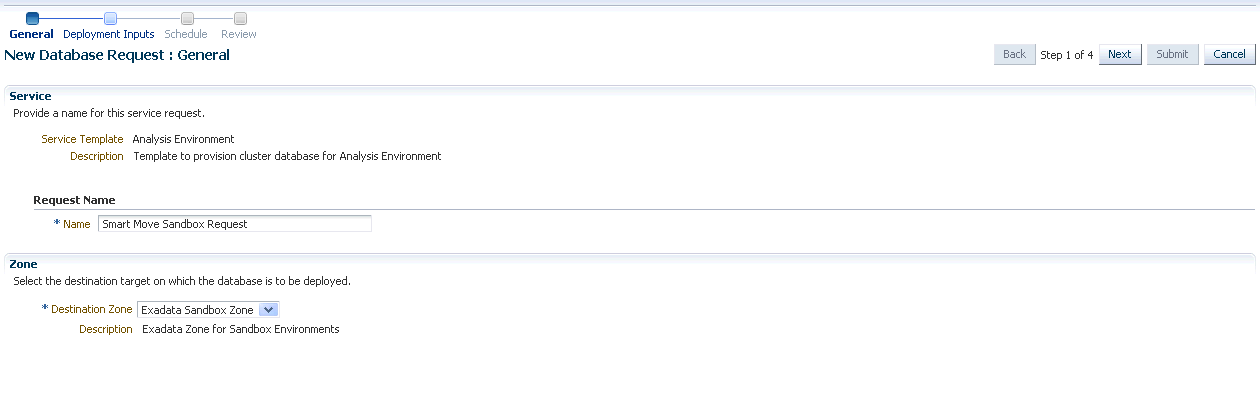
In the New Database Request: General page, enter a meaningful name for the request and select a zone on which the database is to be deployed. The request is tied to the provisioned database until the database is retired. This is indicated by the status of the request.
Click Next. In the New Database Request: Deployment Inputs page, specify the custom variables. Click Next.
Currently, the only inputs are the set of credentials for the database. For security reasons, users do not get access to SYS and SYSTEM accounts, instead a custom master account is created for the user, and this is the primary administrative account for the database. The master account is granted the DBA role, and following privileges are revoked from it:
Alter database
Alter system
Create any directory
Drop any directory
Grant any object privilege
Grant any privilege
Grant any cycle
Note: You cannot use any of the default Oracle user names for the master account. The user name is case insensitive. The following user names cannot be used as the master account user name:
USER
SYS
SYSTEM
DBSNMP
OUTLN
MGMT_VIEW
FLOWS_FILES
MDSYS
ORDSYS
EXFSYS
WMSYS
APPQOSSYS
APEX_030200
OWBSYS_AUDIT
ORDDATA
CTXSYS
ANONYMOUS
SYSMAN
XDB
ORDPLUGINS
OWBSYS
SI_INFORMTN_SCHEMA
OLAPSYS
SCOTT
ORACLE_OCM
XS$NULL
MDDATA
DIP
APEX_PUBLIC_USER
SPATIAL_CSW_ADMIN_USR
SPATIAL_WFS_ADMIN_USR
If a default Oracle user name is used, an error message appears.
Specify the schedule for the request. The Start Date (immediate or deferred) determines when the database will be provisioned, while the End Date determines when the database will be retired.
Review the details of the request.
Click Submit to deploy the database to the selected zone. You are directed back to the Database Self Service Portal where you can monitor the progress of your request. The process can take 5 to 10 minutes, depending on the performance and load profile of the Cloud Infrastructure. The resource usage (against your quota limit) charts will also be updated once the database has been created.
Once the request has been completed, the new database is visible in the My Databases table. You can click the database name to view its Home page.
This troubleshooting section can be used to determine the possible cause of a database request failure and to take suitable remedial actions.
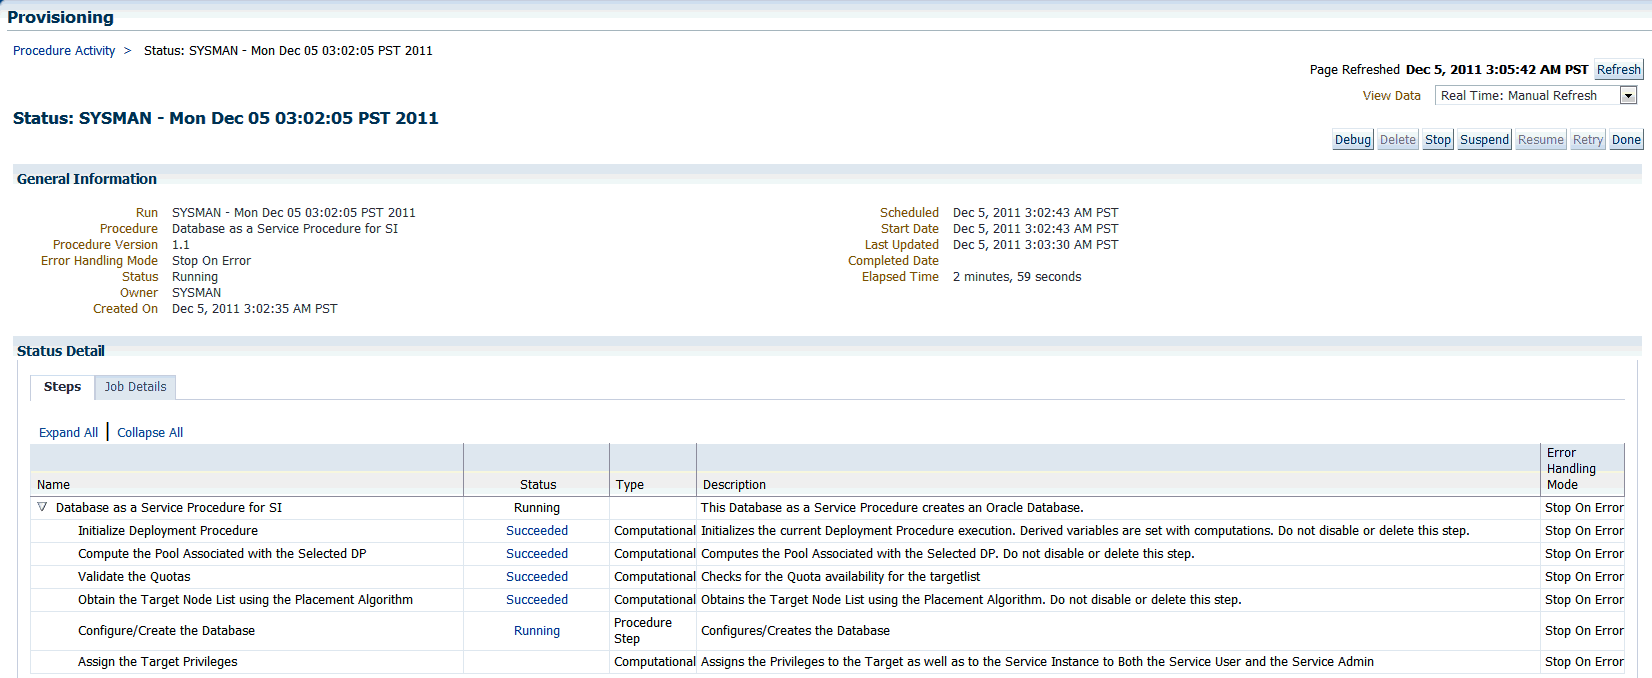
Submitting a database request involves the following steps:
Pre-processing
Initialization
User Quota Validation
Placement logic execution to find a suitable host
Database Creation
Post Processing
Each of these steps is executed sequentially and each step must be successfully completed before the consecutive step can be executed. Failure in any one of the steps causes the database request to fail.
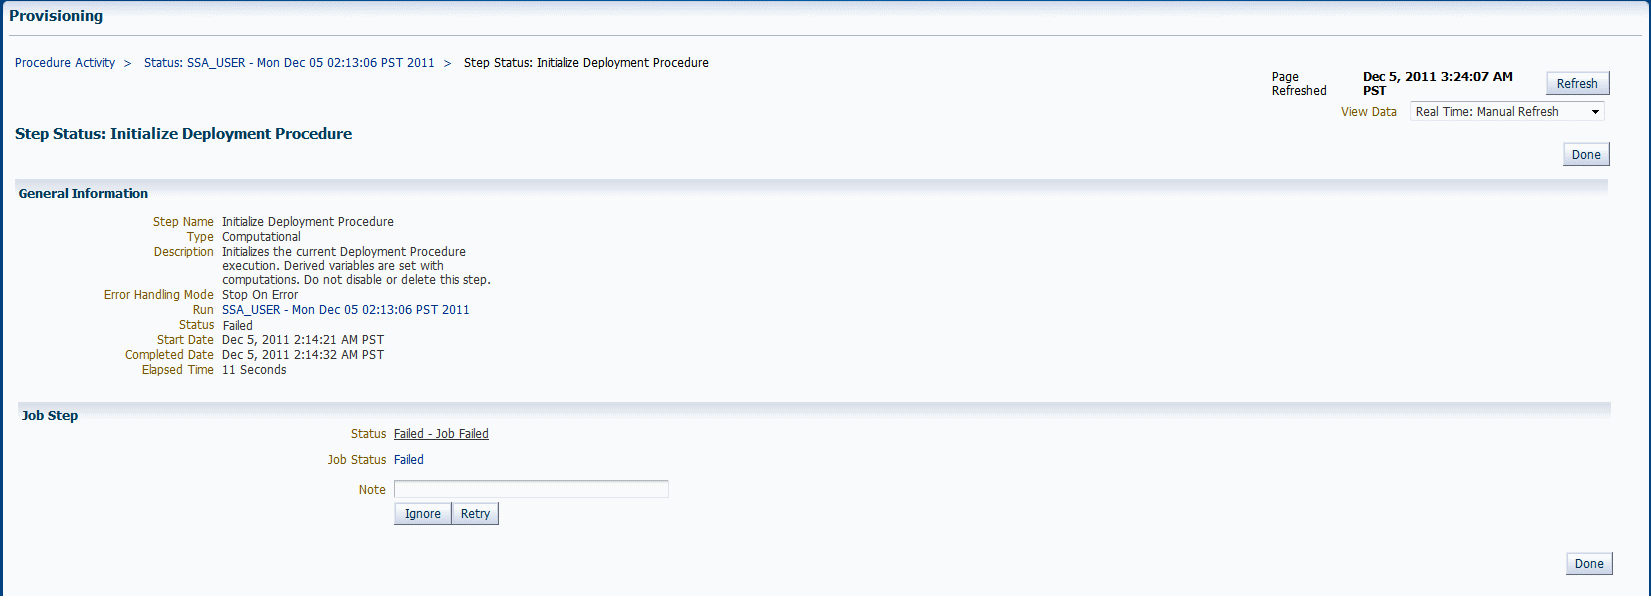
To view the output log, follow these steps:
Follow the steps listed in the Viewing the Middleware and Database Request Dashboard Page section and select the Deployment Procedure associated with the request to view the execution details.
The Name column lists all the steps for the request. Click the hyperlink for the step with the Failed status.
Click the hyperlink next to Status field, and view the output log for the step.
The initialization step focuses mainly on the database master account validation. It checks that the master account user name to ensure that none of the default Oracle user names listed below are used. The user names are case insensitive.
USER
SYS
SYSTEM
DBSNMP
OUTLN
MGMT_VIEW
FLOWS_FILES
MDSYS
ORDSYS
EXFSYS
WMSYS
APPQOSSYS
APEX_030200
OWBSYS_AUDIT
ORDDATA
CTXSYS
ANONYMOUS
SYSMAN
XDB
ORDPLUGINS
OWBSYS
SI_INFORMTN_SCHEMA
OLAPSYS
SCOTT
ORACLE_OCM
XS$NULL
MDDATA
DIP
APEX_PUBLIC_USER
SPATIAL_CSW_ADMIN_USR
SPATIAL_WFS_ADMIN_USR
If any of these default user names have been used, a message indicating that the user name is invalid appears.
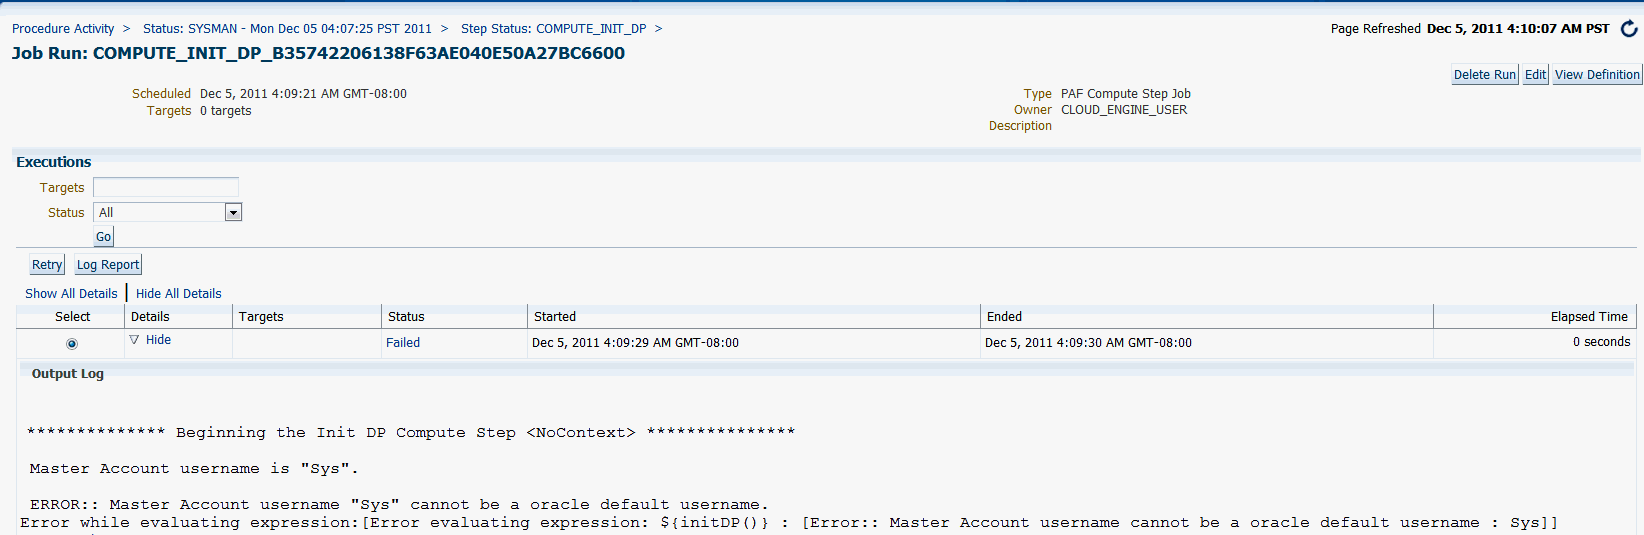
If this request was made using EMCLI, the Initialize Deployment Procedure step will fail and specify the default Oracle user name in the error message as follows:
Error: The master account user name '<user specified value>' cannot be an Oracle default name.
Solution: View the output log for the Initialize Deployment Step by following the steps listed in Viewing the Output Log of a Request. Resubmit the request and specify a user name that is not in the list of Oracle default user names.
Quota validation errors occur if the user's usage exceeds the ceiling on any of the quota attributes. Users can view their current usage against the quota limits on the Database Self Service Portal Home page. A database request may fail if the user's usage is close to their quota limits.
Solution: View the output log for the User Quota Validation Step by following the steps listed in Viewing the Output Log of a Request. Follow these steps to reduce quota:
Retire (relinquish) any databases requested through the DBaaS Console to free up resources and lower their current usage. It may take up to 30 minutes before the effect of the retirement is visible.
If no databases can be retired, additional databases may need to be granted.
A user with the EM_CLOUD_ADMINISTRATOR role may consider creating a new temporary EM_SSA_USER role, and assigning it a higher quota limit especially for the affected quota attribute. This approach will ensure that the other users will remain unaffected by the quota changes.
A user with the EM_CLOUD_ADMINISTRATOR role may alter the quota limits for the particular role assigned to the affected user. This increases the quota limits for all users associated with that role.
Placement logic is used to locate a suitable host, within the selected Database Zone, where a new database can be created. A host is deemed suitable if it satisfies all of the placement constraints. The suitable host must be compliant with the placement constraints and can be used to create the new database. Placement logic will fail if a suitable host cannot be found with a selected zone.
While locating a suitable host, placement logic:
Uses a 7 day average (lesser if total duration of metric collection for the host is under 7 days) for Memory and CPU.
Provides instantaneous instance count.
Places a predictive block on any service request under execution to account for concurrent requests.
Does not delete or alter any databases already running on the host if its usage exceeds the placement constraint's ceiling value.
Since Placement relies on 7 day average of metrics such as Memory, CPU, and so on, the resources may not be released immediately.
Solution: View the output log for the Obtain the Target Node List using the Placement Algorithm step by following the steps listed in Viewing the Output Log of a Request. Follow these steps:
Determine the current load on the hosts, and free up resources by shutting down unused or unnecessary applications or databases.
As a user with the EM_SSA_ADMINISTRATOR role, navigate to the Database Zone Home page on which the database request failed. Here you will find the Placement constraint values for the current zone, and the current load on the hosts by way of bar graphs for memory and CPU.
The execution details for the deployment procedure associated with the failed database request, shows the summary for how the hosts under the current zone fared against the given placement constraints.
Assuming the resource constraints are due to increasing popularity of this service and not due to a runaway database service, more hosts may have to be added to the zone to increase its capacity.
The following table lists the various scenarios and their sample execution logs.
| Scenario | Sample Execution Log for a Zone Containing 100 Hosts | Comments |
|---|---|---|
|
******** Placement Algorithm analyzing Zone "ABC Zone" 20 members are currently below the CPU threshold of "80%" 20 members are currently below the Memory threshold of "80%" 25 members are currently below the DB Instance threshold of "20" Placement Algorithm Found "20" suitable hosts for Placement (Pending the current service requirements). HOST_CREDS=SYSMAN:AIME_NORMAL SID is "DB5ad5a8" Analyzing suitable hosts that would satisfy the current service request requirements ... Analyzing host "unsuitable.us.myorg.com" – NOT suitable Analyzing host "unsuitable1.us.myorg.com" – NOT suitableAnalyzing host "unsuitable2.us.myorg.com" – NOT suitableAnalyzing host "unsuitable3.us.myorg.com" – NOT suitable
|
There is more than one host in the selected zone that satisfies all of the constraints. |
|
|
Failing CPU |
******** Placement Algorithm analyzing Zone "ABC Zone" : 0 members are currently below the CPU threshold of "80%" 10 members are currently below the Memory threshold of "80%" 12 members are currently below the DB Instance threshold of "10" ******** Placement Algorithm did not find any suitable target |
There are no hosts under the selected zone which currently satisfy the CPU Constraint of MAX CPU 80%. Hence no suitable target in the zone satisfies all the placement constraints. |
|
Failing Instance Count |
******** Placement Algorithm analyzing Zone " ABC Zone " : 12 members are currently below the CPU threshold of "80%" 10 members are currently below the Memory threshold of "80% 10 members are currently below the DB Instance threshold of "10" ******** Placement Algorithm did not find any suitable target |
There are no members under the selected zone which currently satisfy the DB Instance constraint of MAX 10. Hence no suitable target in the zone satisfies all the placement constraints. |
The Database Creation step, as the name suggests, is responsible for creating the requested database on the host selected by the placement logic. Typically, this step may fail due to conditions beyond the control of Enterprise Manager like hardware, network, storage, and operating system issues. The execution details for the deployment procedure will provide the cause of failure.
Next is the Post Processing step. Most steps will rollback all changes made by them in case of failure; except this step. This step can be retried multiple times once the cause of failure has been fixed. Consequently, the database created in the prior step is not deleted automatically, and instead the DBaaS administrator has the opportunity to fix the issue and retry the Post Processing step.
Solution:
If the Database Creation step completed successfully, then find the cause of failure for the Post Processing step by reviewing the execution details for that step, and retry once the issue has been resolved. To do this, navigate to the deployment procedure associated with the request and click Retry. This will re-execute the Post Processing steps.
If the request cannot be salvaged, and the Post Processing step continues to fail, the database must be deleted.
Determine the host, Oracle Home, and SID for the database using the Database Target Home page, or the Placement Logic step of the deployment procedure.
Login to the host and navigate to the ORACLE_HOME directory. Execute the following steps to delete the database from the server
setenv ORACLE_HOME <ORACLE_HOME>
$ORACLE_HOME/bin/dbca -silent -deleteDatabase -sourceDB <Database SID>
Optionally, you can run DBCA in graphical mode and delete the database as well.
Next, delete the Database target from Enterprise Manager 12c. This can be done by locating the target using the target search, and then using the right click menu to remove the target.
|
Copyright © 2011, 2012, Oracle and/or its affiliates. All rights reserved. Legal Notices |
|