| Oracle® Enterprise Manager Lifecycle Management Administrator's Guide 12c Release 2 (12.1.0.2) Part Number E27046-08 |
|
|
PDF · Mobi · ePub |
| Oracle® Enterprise Manager Lifecycle Management Administrator's Guide 12c Release 2 (12.1.0.2) Part Number E27046-08 |
|
|
PDF · Mobi · ePub |
This chapter provides an overview of Deployment Procedures and describes the key aspects you need to know about them. In particular, this chapter covers the following:
This section describes the following:
Enterprise Manager provides a framework for automating, orchestrating, and tracking tasks that can be run on multiple Oracle homes. You can perform complex software life cycle management activities such as provisioning, patching, upgrade, and so on from the Cloud Control console. The workflow of all the tasks that need to be performed for a particular life cycle management activity is encapsulated in a Procedure. A Procedure is a hierarchal sequence of provisioning steps, where each step may contain a sequence of other steps. It provides a framework where specific applications and procedures can be built.
Oracle Enterprise Manager Cloud Control (Cloud Control) comes with a set of default Procedures that help you accomplish common provisioning and patching-related tasks. Each Procedure is unique, and is designed to perform a particular operation according to the source being provisioned or target being patched. For example, the Procedure to patch a single instance database differs from the one to patch an Oracle RAC environment or an application server.
The Provisioning page has three tabs: Procedure Library, Procedure Activity, and Recycle Bin.
Procedure Library Tab: This tab lists all available procedures. Procedures created by Oracle Corporation cannot be edited or deleted. For information about the tasks that can be performed from the Procedure Library page, refer to Managing Deployment Procedures.
Procedure Activity Tab: This tab lists all the procedures that have been submitted to be executed. Currently, after a procedure is submitted, you can track the instance in a couple of ways, for details refer to Table 32-1.
Recycle Bin Tab: You can delete procedures and runs. When procedures or runs are deleted, they will be internally marked as deleted and will be displayed in the Recycle Bin tab.
Figure 32-1 shows you how you can access the Provisioning screen from within Cloud Control.
The current Procedure Activity page provides the status of all the steps executed in a deployment procedure. This page also gives you information of the failed step and the necessary action to be taken to rectify it.
Before you understand the new Procedure Activity page, take a moment to review the challenges you might be facing while using the current Procedure Activity Page:
Table 32-1 Comparison Between the Existing Procedure Activity Page and the New Procedure Activity Page.
| Category | Existing Procedure Activity Page | New Procedure Activity Page |
|---|---|---|
|
Screen Design |
The screen design allows you to access one step at a time. |
Optimal screen design which allows you to access all the steps and targets from the same page without having to drill down |
|
Multiple Selects |
Multiple selects are not supported. |
Multiple selects are possible from a single page. For example, if you want to select only the failed steps you can do so using the new design. |
|
Target-Centric Design |
Step-centric approach restricts your access to all the targets from a single screen. Which means that in the earlier approach you could drill down to only one failed step at a time, and would have to repeat the whole procedure for the other failed steps |
Target-centric design with the introduction of filters have made it easy to analyze all failed steps from the same page and perform the required action on the step. |
|
Step Output |
The step-centric design requires traversing through a number of pages to drill down to the actual step. |
Target-centric design now allows you to view all the step details from the same page. unlike the earlier step-centric. |
|
Detailed Output |
Detailed Output for a step was not available in the earlier design. You had to download the entire log. |
Detailed Output is a new option available at step-level which captures the log information pertaining to that step selected, only making it easy to view and debug the step in case of a failure. |
|
Incident Creation |
Incident Creation was not available in the earlier design. |
Incident Creation is a new feature that has been introduced at Procedure-Level which enables you to create an incident for the execution which can later be used to debug the procedure in case of a failure. |
Note:
Enterprise Manager provides you the flexibility of switching between the Existing Procedure Activity Page and the New Procedure Activity Page. To do so, follow these steps:In Cloud Control, from the Enterprise menu, select Provisioning and Patching, select Procedure Activity.
On the Deployment Procedure Manager page, select the procedure.
On the Procedure Activity page, click Switch to Classic View to go back to the Existing Procedure Activity Page.
To switch to the New Procedure Activity Page, click Switch to Advanced View.
Cloud Control addresses the challenges of the existing Procedure Activity page with its much-improved target-centric procedure management solution that allows access to all the targets and steps from one single page with maximum ease and minimum time. The new Procedure Activity page offers the following benefits
The Procedure Activity page primarily helps you track the execution of the procedure instance submitted. Click any instance running to view the new Procedure Instance Execution page which is broadly divided into the following regions as shown in Figure 32-2:
Note:
For information about the tasks that can be performed from the Procedure Instance Execution Page, refer to Executing Procedure Instance Tasks.Enables you to go back to the Procedure Activity page with a single click.
Enables you to refresh the page after making some procedure-level or step-level updates. To do so, you must select the refresh options available in the View Data menu. To run the procedure refresh in the background, you can select any of the auto refresh options like: 30 seconds Refresh, 1 minute Refresh, or 5 minute Refresh and continue to work on other areas.
Enables you to display the instance execution details like execution name, the procedure name, the owner of the procedure, the status of the procedure, the start date, the time elapsed since the procedure started, the scheduled time for the procedure execution, the last time the procedure was updated, the execution ID of the procedure, and the last filed incident if any. The details in this section are mostly static except for the Elapsed Time field which is constantly updated till the procedure is running.
If the procedure has successfully completed with a status Succeeded, then the Procedure Actions menu items are greyed out, you can not perform any actions on a successful procedure. However, if the procedure was stopped or suspended for some reason, then corresponding menu items are enabled so that you can control the procedure execution.
At Procedure-level, you can perform the following actions:
| Action | Description |
|---|---|
| Debug | Debugs the errors in the procedure. This is a one time action, which means that the menu is disabled after using this option the first time. |
| Stop | Stops the procedure execution. |
| Suspend | Suspends the procedure execution. |
| Resume | Resumes the procedure from the stage it was stopped or suspended. |
| Retry | Executes all the failed steps and phases in the deployment procedure instance once again. |
| Incident | Creates an incident for the execution which enables you to debug / understand all the steps and phases executed as a part of the deployment procedure. |
Enables you to view all the steps that are run when the procedure instance is submitted for execution. From the View menu, select Expand All to view the step details like: step name, the type of step, and the status of the step.
For example, if the first step is a computational step called “Initialize Deployment Procedure”. When this step is selected, its corresponding execution details are displayed in the Execution Details section. If the step has failed, then you can select the action you want to perform on the step from the Actions menu.
Enables you to view the details of the selected step. Essentially, information like Step Type, Start date, Completed Date, and Elapsed Time for the step is displayed. However, the template for each step type is not the same. For example, the manual step requires user intervention, which means you might need to confirm some details for the job to proceed. Closing the step window, deselects the step from the Procedure Steps section.
The Detailed Output option allows you to view the log information for the selected step provided it has completed execution successfully.
Note:
If a step has failed to complete execution or if a step is of type host or manual, then the Detailed Output option is not displayed in the Step Details section.If a step has failed, then you can perform the following actions on the step using the Actions menu:
| Action | Description |
|---|---|
| Ignore | Ignore the failure of a step, and continue with the other steps in the deployment procedure. |
| Retry | Executes the step once again |
| Update and Retry | Enables you to edit the step, and then executes the step when submitted. |
Administrators are Enterprise Manager users who can login to Enterprise Manager to perform management tasks. The breadth of management tasks available in Enterprise Manager depends on the privileges and roles assigned to the administrators. Roles allow grouping of Enterprise Manager secure resource privileges and can be granted to administrators or to other roles. Based on the roles, and privileges granted to an Administrator, they can be broadly classified into Designers, and Operators. Normally, the roles and privileges are granted to users or other roles at deployment procedure level, and Software Library level.
This section describes how administrators are granted the predefined roles and privileges that Oracle provides:
Granting Roles and Privileges to Administrators on the Deployment Procedure
Granting Roles and Privileges to Administrators on Software Library
In a typical data center, the main users of Deployment Procedures are Designers (Lead Administrators) and Operators. Deployment Procedure privileges enable users to perform some design-time activities like setting Privilege Delegation, customizing Deployment Procedure, and run-time activities like running the Deployment Procedure to provision or patch software applications.
Following are the primary users/roles predefined by Oracle for a Deployment procedure, and their associated privileges:
Super Administrator role allows you to perform all the Administrative operations, and provides full privileges on all the targets.
EM_ALL_DESIGNER (Designer): This role allows you to perform design time operations on entities. For example, Creating and Monitoring Deployment Procedure templates.
The following table lists all the roles predefined for Designers, and their corresponding descriptions:
Table 32-2 Predefined Roles for Designers
| Roles | Description |
|---|---|
|
Role has privileges for creating and viewing any patch plan |
|
|
Role has privileges for provisioning designer |
|
|
Role has privileges for creating Template Collections |
Users can be granted any of the following Target Privileges:
Create Privilege Propagating Group. Privileges granted on a privilege propagating group will be automatically granted to the members of the group.
Add any target in Enterprise Manager.
Users can be granted any of the following Resource Privileges:
Create Compliance Entity.
Create Enterprise Rule Set, basically collection of rules that apply to Enterprise Manager elements, for example, targets and job.
Create Metric Extension. Metric Extensions allows extending monitoring for a target type by adding new metrics.
Create new Named Credential that are required to perform Enterprise Manager Administrative Operations.
Create Any Software Library Entity, Import Any Software Library Entity, Export Any Software Library Entity, and so on.
Create Template Collection.
Note:
For information aboutEM_PATCH_DESIGNER see Table 24-3, and for information about EM_PROVISIONING_DESIGNER see Table 4-3.EM_ALL_OPERATOR (Operator): This role has restricted access, and allows you to perform only the run-time activities. For example, Launching a Deployment Procedure.
The following table lists all the roles predefined for Operators, and their corresponding descriptions:
Table 32-3 Predefined Roles for Operators
| Roles | Description |
|---|---|
|
Role Desc |
|
|
Role has privileges to execute host discovery |
|
|
Role for deploying patch plans |
|
|
Role has privileges for provisioning operator |
|
|
Role has privileges to execute target discovery |
|
|
|
Role Desc |
Users can be granted any of the following Target Privileges:
Connect and manage any of the viewable target.
Add any target in Enterprise Manager.
Perform administrative operations on all managed targets
Run any Operating System Command at any Management Agent
Users can be granted any of the following Resource Privileges:
Application Replay Operator. Application Replay Entities include captures, replay tasks, and replays.
Manage custom configurations owned by the user
Create new Named Credential that are required to perform Enterprise Manager Administrative Operations.
Note:
For information aboutEM_PATCH_OPERATOR see Table 24-3, and for information about EM_PROVISIONING_OPERATOR see Table 4-3.Software Library is a centralized media storage for all Enterprise Manager entities. Super Administrator is responsible for configuring the Software Library, once the Enterprise Manager installation is complete. After the Software Library is configured with Storage Locations, it becomes usable to store entities. Designers and Operators are the main users of Software Library who perform the design-time and run-time activities respectively. The design-time activities include Customizing entities, Creating entities, Importing entities, Exporting entities, and so on. The run-time activities performed by Operators include running deployment procedures which in turn use any the entities stored in the Software Library.
For more information about Software Library users, roles, and their associates privileges, see Oracle Enterprise Manager Cloud Control Administrator's Guide.
Note:
To run the procedure on a Windows host which involves executing some Software Library entities (for example, directive scripts), you (the Windows user) must be granted the following privileges:Act as part of the operating system
Adjust memory quotas for a process
Logon as batch job
Replace a process level token
If not, the execution of the directive steps in the procedure may fail.
This section describes the following:
Target List is a pre-populated list of targets on which you can run your job. Phases operate on a set of Enterprise Manager targets, collectively known as a target list. Each phase must be associated with a target list. When the Deployment Procedure is selected for execution, the Deployment Procedure Manager will prompt the user to assign targets to the target list.
Starting with Enterprise Manager 12c (12.1.0.2), Custom Target Lists have been introduced. In addition to the default target list, you can now have your own customized lists of targets on which designated Phases can run. The advantage of this approach is that you can have multiple custom target lists, and assign it to the different phases in your procedure. This allows you to choose the Target List on which you want the Phase to iterate.
The following examples describes the various scenarios which employs one, two, or more target lists in a procedure:
For copying a jar file to multiple hosts, you will need just one target list. You may choose to use the default target list for this purpose.
For cloning an Oracle Home, and provisioning it on multiple targets, you will need a minimum of two target lists: one target list for the source which contains only a single target, and a second target list which contains all the destination targets.
For provisioning or patching a WebLogic Server, you might require three separate target lists one for the Administration Server, one for the Managed Servers, and one for the Database.
Procedure Variables are user-defined variables that can be used while customizing a procedure. Normally, when you add a custom step to a User-owned procedure or customize an Oracle-owned procedure, then you might need to declare procedure variables that you can later use in your custom step or phase.
To access the Procedure Variable tab, from the Enterprise menu, select Provisioning and Patching and then select Procedure Library. On Provisioning page, select a Deployment Procedure, and click Create Like. A page similar to the following appears:

To declare the Procedure Variable, you must enter a unique name, a description for it. Optionally, you can select the password check box to make the variable secure.
You can create two types of Procedure Variables that can be later used while launching the deployment procedure. They are as follows:
String: This variable once declared at design-time, can be used by operator to specify the values at run time. For example, DBVER (the version of the database).
Software Library Entity: This variable allows you the flexibility of binding the variable to Software Library Directive or Component at the time of launching the procedure. Earlier these values had to be specified at design-time while creating the procedure, now with the introduction of Software Library entity variable you can specify the values dynamically at the time of launching the procedure.
For information about adding Software Library variables, see Adding Component Step or Adding Directive Step.
Note:
You cannot add Procedure Variables to a Deployment Procedure that is owned by Oracle.Deployment Procedures comprise various phases and steps that run serially or in parallel to perform a particular provisioning or patching operation.
A phase contains steps or more phases. The different types of phases are:
Rolling phase is a phase where steps are run serially across targets.

Parallel phase is a phase where steps are run in parallel across targets.

A step is an abstraction of a unit of work. For example, starting the database is a step. It is either part of a phase or independent. The different types of steps are:
Manual Step is that task that requires user interaction and cannot be automated. Typically, Deployment Manager would display the instructions that need to be performed by the user. After the operation is performed, the user proceeds to the next step.
Examples of a Manual Step:
Log on to a system and update the kernel parameter.
Reboot a system.
Provide special privileges to the user. For example, SSH Setup.

Computational Step is that task whose operations are performed within the Deployment Engine and does not require any user intervention. This step gathers additional information for executing a procedure. This step cannot be inserted by a user, and only Oracle Corporation can insert this step.
Examples of Computational Step:
Executing SQL query against an Enterprise Manager schema to gather more data for other steps to run.
Retrieving target properties from the repository and updating the runtime information.

File Transfer Step is a step used for copying files and/or directories from one host to one or more hosts. You can archive files and directories transferred from a source host to the destination hosts. When this step is inserted within a phase, you can set the Source and Destination Targets using existing variables.
For example, to copy a directory from a host X to the hosts associated with the phase, then for Source Target select "Set Value" and assign host X, and for Destination Target select "Choose Variable" and assign it to the option "TargetVariable:Current Target".
Action step is a task that performs some operations run on one or more targets. They must be enclosed within a phase. The Deployment Procedure maps the Action Step and target pair to a job in the Enterprise Manager Job System. The Deployment Procedure can schedule, submit, and run a job per Action Step per target. For example, running a script, applying a patch, upgrading an Oracle home, and so on.
Also note that an Action Step is said to have completed successfully only when all its associated jobs have completed successfully. If a job fails, then the Action Step also fails. You may then manually restart the job in question or ignore and instruct the Deployment Procedure to proceed.
The different types of Action Steps include:
Job Step is a special type of Action Step that executes a predefined job type on a target. This is used if you want to execute a job type as a part of a Deployment Procedure. You need to pass job parameters for a step.
Examples of Job Step:
Cloning an existing Oracle home.
Staging a patch.
Starting a database.

Directive Step is a special type of Action Step to deploy a directive alone. This is useful when users want to store their custom scripts in the Software Library and reuse them in a Deployment Procedure.
For more information about Directives, see Oracle Enterprise Manager Cloud Control Administrator's Guide.
Examples of Directive Step:
Executing root scripts.
Applying catpatch.sql and restarting the database.
Confirming if the prerequisites have been met.

A Component Step is a special type of Action Step to deploy a Software Library Component and the associated Directive. Deployment Procedure Manager executes the directive with respect to the component. Components used for Generic Component Step generally has one directive associated with it. This association is done by selecting both the component and directive while creating the step. All directives that you associate with the component while uploading to the software library will be ignored while executing the step.
For more information about Components, see Oracle Enterprise Manager Cloud Control Administrator's Guide.
Examples of Component Step:
Applying a patch.
Performing prerequisites before performing an installation.
Installing Oracle software on target machines.
Host Command Step is a special type of Action Step that encapsulates simple host commands. This step allows the user to enter a command line or a script (multiple commands) to be executed on the target host.
Examples of Host Command Step:
Starting a Management Agent (emctl start agent)
Shutting down OPMN (opmnctl stopall)
Restarting OID
Creating a procedure from scratch by inserting the required phases, steps, variables, and so on is possible with User Defined Deployment Procedure. This functionality has been introduced in Enterprise Manager 12c to allow users to completely customize a procedure to suit their requirements. Broadly the process can be divided into two subcategories as follows:
Step 2: Saving and Launching User Defined Deployment Procedure with Default Inputs
Step 3: Launching and Running the Saved User Defined Deployment Procedure
Step 4: Tracking the Submitted User Defined Deployment Procedure
Note:
For a workflow example on User Defined Deployment Procedure with illustrations on how to provision JRE6 on a Linux hostabc.example.com, see Provisioning User Defined Deployment Procedure.Log in to Enterprise Manager Cloud Control with designer privileges to create a UDDP template. To do so, follows these steps:
In Cloud Control, from the Enterprise menu, select Provisioning and Patching, select Procedure Library.
On the Provisioning page, from the list of actions, select Create New, and click Go.
On the Create New Procedure page, in the General Information tab, provide a unique name and description for your procedure.
In the Target Lists tab, you can use the default host_target_list variable or add any number of new custom target lists. Adding new custom target lists enables you to group the targets which in turn allows phases to use separate target lists (targets) that they can iterate on.
In the Procedure Variables tab, click Add Row to define procedure variables. In addition to String type, you can add Software Library Entity variable. For more information about this, refer to Procedure Variables.
Specify the Variable Name, Display Name, Description, and Type from the drop down menu. Also define whether the variable is a password and a mandatory field.
In the Procedure Steps tab, select the default phase, and do the following:
Select Default Phase, and click Insert. For information on inserting a phase, see Adding Rolling or Parallel Phase.
Note:
Without declaring a Target List, you can not proceed with the creation of a phase.Select the phase you created, and then click Insert to insert steps. For information on inserting steps, see Adding Phases or Steps.
Repeat steps 6 to insert steps and phases according to the procedure you want to create.
Click Save and Close to save the procedure. You can run the configuration for future deployments.
Log in to Enterprise Manager Cloud Control with Operator privileges to save the saved UDDP with default values. To do so, follows these steps:
In Cloud Control, from the Enterprise menu, select Provisioning and Patching, select Procedure Library.
On the Provisioning page, select the saved UDDP, and click Launch.
On the Select Targets page, select the target list from the drop down menu, and click Add to populate the target list. Click Next.
If you declared variables that you did not define during the procedure creation, then you will have to provide the details in the Set variable page. All the unbound variables are displayed, enter appropriate values for the same.
If you have declared a Software Library Entity variable, then you could search and select the desired entity from Software Library. Once the value is populated, you may even choose to lock this value so that any other Operator who does not have privileges on your procedure will not be able to update this values. For more information on different types of variables, see Procedure Variables. Click Next.
On the Set Credentials page, you need to set the credentials for the target host machines that you have included as a part of the host_target_list variable. Click Next.
On the Set Schedule and Notification page, you can schedule the job to run immediately or at a later preferred time.
Click Save, and provide a configuration name to save the job template with default values.
Some of the procedures allow you to not just save the procedure with default values, but also lock them. For example, the following Database Provisioning procedure describes how to save and launch a procedure with lock downs.
Lock Down is a new feature introduced in Oracle Enterprise Manager Cloud Control 12c that enables administrators with Designer privileges to standardize the Deployment Procedures across the enterprise. If Designers with Super Administrator privileges create Deployment Procedure templates with lock downs, and save them, then these templates can be used by Operators who can launch the saved Deployment Procedures, make changes to the editable fields, and then run them.
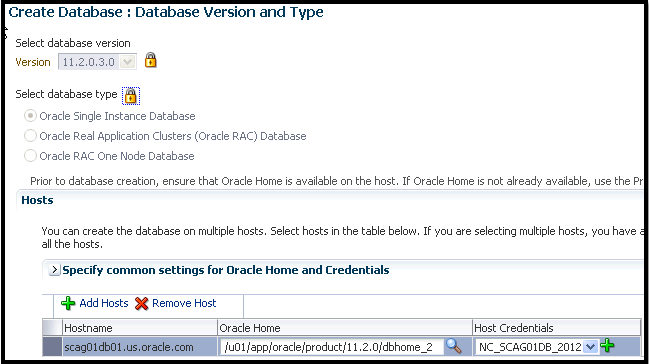
To create a Deployment Procedure with lock downs, an administrator logs in with designer privileges, and launches a Deployment Procedure. In the interview wizard of the Deployment Procedure, the designer enters the values for certain fields and locks them so that they cannot be edited when accessed by other users. For example, in the following graphic, fields like Database Version, Database type are locked by the designer, and when an operator launches the same deployment procedure, these fields will be grayed out, and cannot be edited:
In the following use case, user logs in with designer privileges to provision a Single Instance Database on a Linux host. Designer updates most of the values prompted in the wizard and locks them as he/she does not want other users like Operators to have edit privileges on them. Some of the fields like adding targets, and some additional configuration details are not locked. The Deployment Procedure is then saved with a unique procedure name, but not submitted. A user with Operator privileges logs in and runs the saved procedure after updating all the editable fields, like adding targets, additional configuration details.
Broadly, it is a two-step process as follows:
Step 1: Saving a Single Instance Database Deployment Procedure with Lock Downs
Step 2: Launching the Saved Single Instance Database Deployment Procedure
Step 1: Saving a Single Instance Database Deployment Procedure with Lock Downs
In the following section user logs in to Cloud Control as a designer (ATBARBOZ1), and provisions a Single Instance Database with lock downs as follows:
From the Enterprise menu, select Provisioning and Patching, then select Database Provisioning.
On the Database Provisioning page, select Provision Oracle Database, and click Launch.
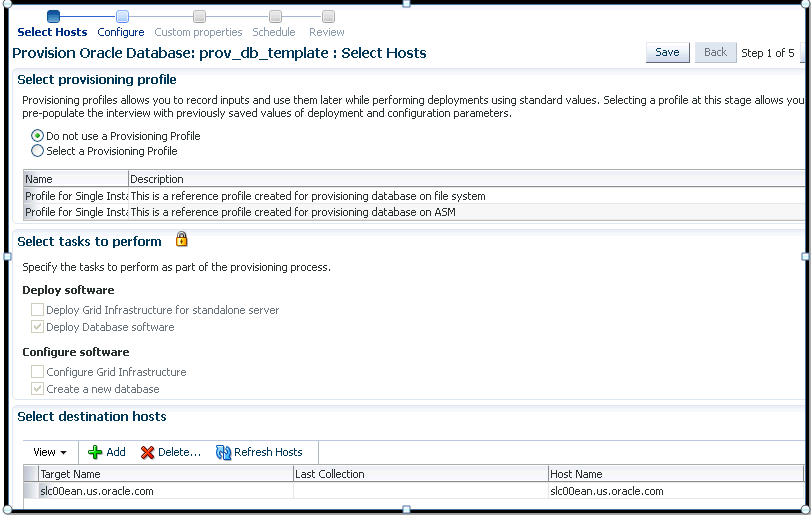
In the Select Hosts page, in the Select hosts section, click Add to select the destination host where you want to deploy and configure the software.
If you want to use a provisioning profile for the deployment, choose Select a Provisioning Profile and then select the profile with previously saved configuration parameters.
In the Select Tasks to Perform section, do the following and lock the values:
Select Deploy Database software to provision single instance databases
Select Create a New Database to create a new database and configure it after installing the standalone Oracle Database
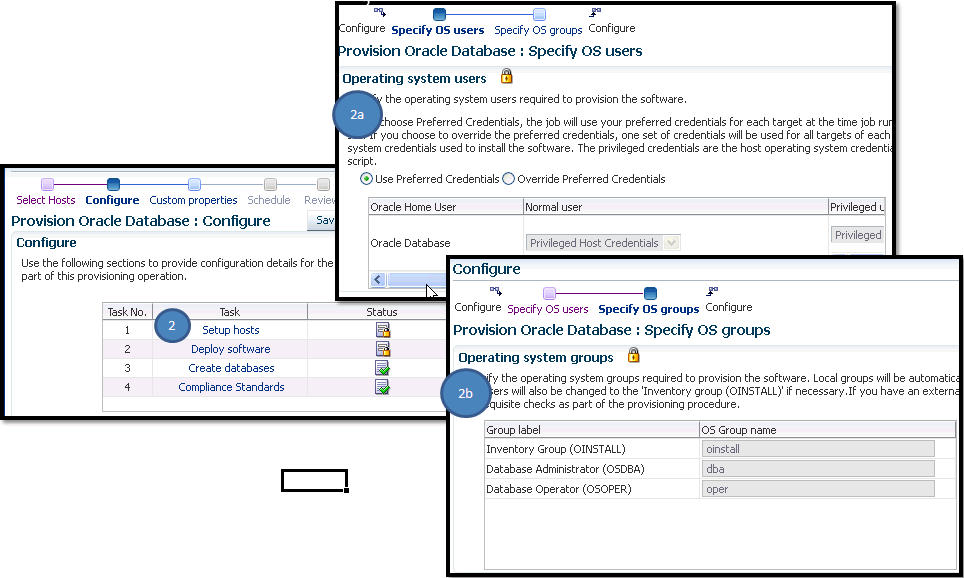
On the Configure page, the following configuration options appear:
On the Configure page, click Setup Hosts. On the Operating System Users page, specify the operating system user for the Oracle Home for the database. For Oracle Home User for the database, select the Normal User and Privileged User to be added to the OS group, and lock the values. Click Next to proceed. On the Specify Operating System groups page, specify the OS Groups to use for operating system authentication and lock the values, as appears in the following graphic
Click Next to come back to the Configure page.
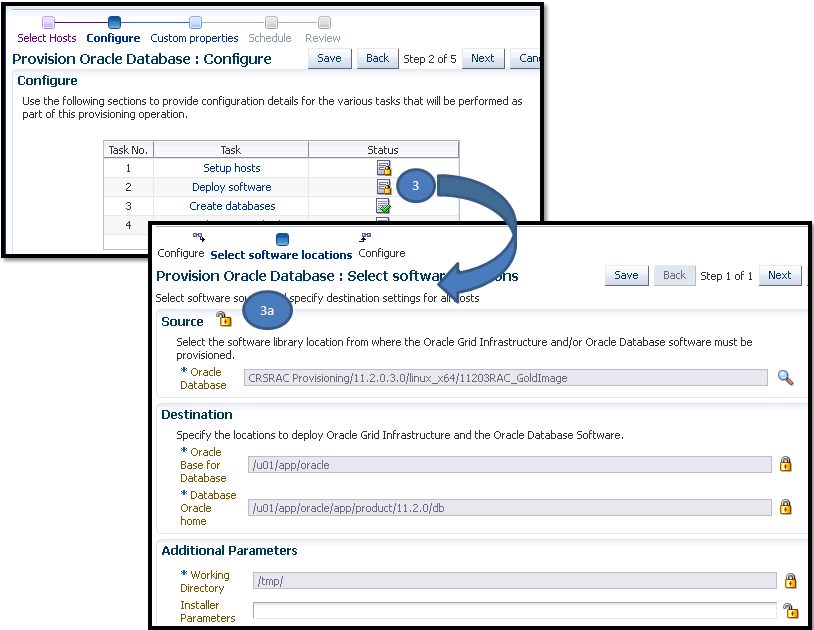
On the Configure page, click Deploy Software. On the Select Software Locations page, specify the source and destination locations for the software binaries of Oracle Database. Update the values for all the fields, and click the Lock icon so that the fields can not be edited by a user with Operator privileges, as appears in the following graphic:
Click Next to come back to the Configure page.
On the Configure page, click Create Databases, the following screen appears. Update only the mandatory fields, and click Next to proceed. Do no lock any of the values in this wizard:
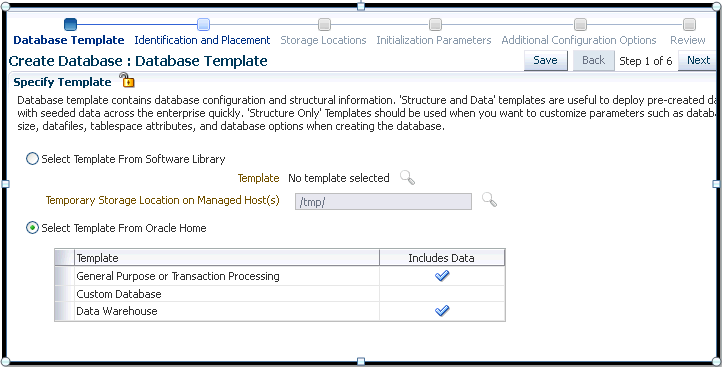
On the Configure page, click Compliance Standards. On the Configuration Standards Target Association page, select a Compliance Standard to be associated with the database. Click Next. Do not lock the values.

On the Schedule page, specify a Deployment Instance name. In the Schedule section, select Immediately. You can set the notification preferences according to deployment procedure status, and click Next.
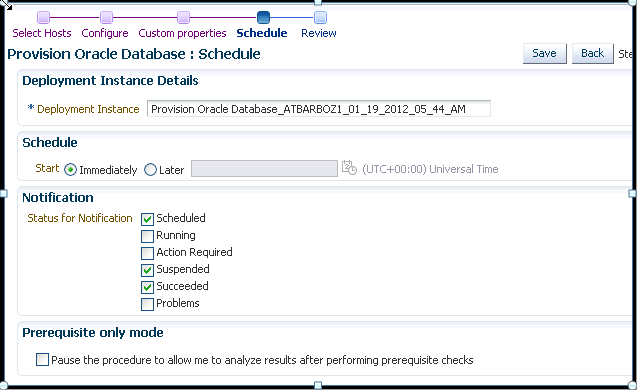
In the Review page, review the details you have provided for the deployment procedure. Click Save to save the deployment procedure with a unique name prov_db_template, and then click Cancel. The Procedure library page appears with the saved procedure

Step 2: Launching the Saved Single Instance Database Deployment Procedure
In the following section user logs in as a Operator (SSIRAJUD1), and runs the saved Deployment Procedure prov_db_template to provision a Single Instance Database.
In Cloud Control, from the Enterprise menu, select Provisioning and Patching, then select Procedure Library.
In the Procedure Library, select a procedure prov_db_template, and click Launch.

On the Select Hosts page, in the Select hosts section, click Add to select the destination host where you want to deploy and configure the software, and then click Next.
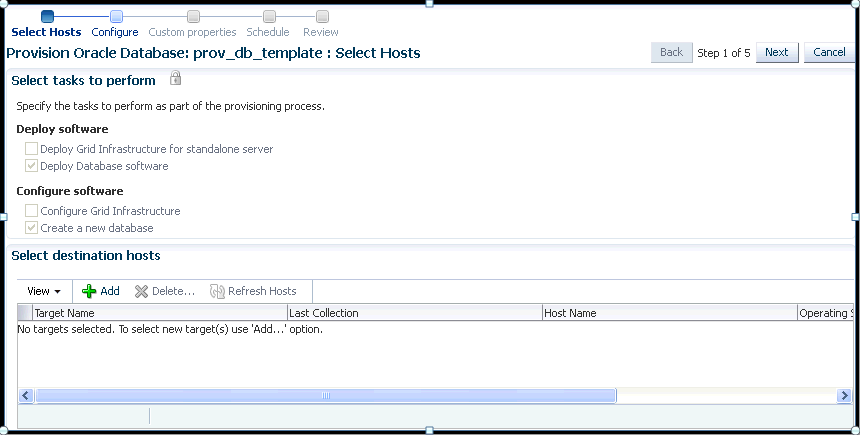
On the Configure page, the following configuration options appear:
On the Configure page, click Setup Hosts. Since the values here are locked by the designer, you will not be able to edit them. Click Next to come back to the Configure page.
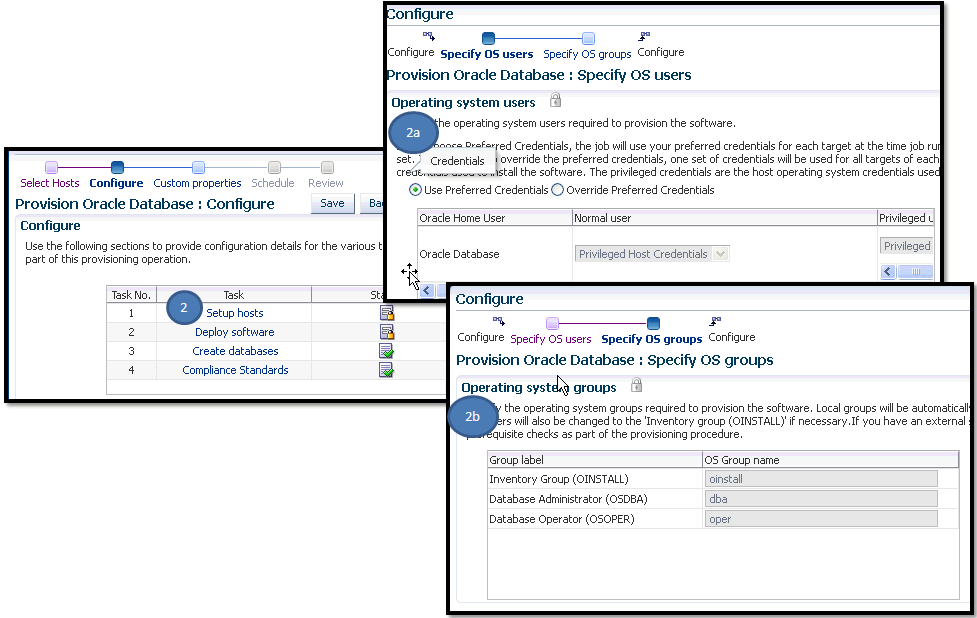
On the Configure page, click Deploy Software. Since the values here are locked by the designer, you will not be able to edit them. Click Next to come back to the Configure page.
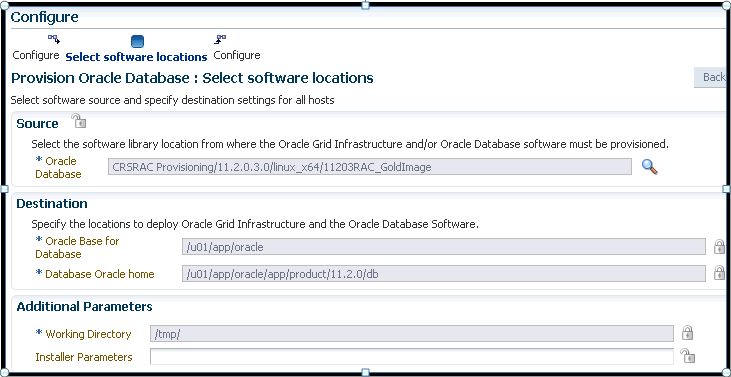
On the Configure page, click Create Databases. The following screen appears. Update all the fields, and click Next to proceed.
For information about updating the Creating Database wizard, see Provisioning and Creating Oracle Databases.

On the Configure page, click Compliance Standards. On the Configuration Standards Target Association page, select a Compliance Standard to be associated with the database. Click Next.

On the Schedule page, specify a Deployment Instance name. In the Schedule section, select Immediately. You can set the notification preferences according to deployment procedure status, and click Next.
In the Review page, review the details you have provided for the deployment procedure and if you are satisfied with the details, then click Finish to run the deployment procedure according to the schedule set.
Log in to Enterprise Manager Cloud Control with Operator privileges to run the saved UDDP. To do so, follows these steps:
In Cloud Control, from the Enterprise menu, select Provisioning and Patching, select Procedure Library.
On the Provisioning page, select the saved UDDP configuration template that you saved as a part of the previous step, and click Launch.
Note:
While creating the UDDP template, if you have locked any of the values, then they will appear greyed out since they are read-only values that cannot be edited now.On the Select Targets page, select the target list from the drop down menu, and click Add to populate the target list. Click Next.
If you declared variables that you did not define during the procedure creation, then you will have to provide the details in the Set variable page.
If you have declared a Software Library Entity variable, then you could search and select the desired entity from Software Library. Once the value is populated, you may even choose to lock this value so that any other Operator who does not have privileges on your procedure will not be able to update this values. For more information on different types of variables, see Procedure Variables. Click Next.
On the Set Credentials page, you need to set the credentials for the target host machines that you have included as a part of the host_target_list variable. Click Next.
On the Set Schedule and Notification page, you can schedule the job to run immediately or at a later preferred time.
Click Submit, and provide a unique Submission Name for your job.
Follow these steps:
In Cloud Control, from the Enterprise menu, select Provisioning and Patching, select Procedure Activity.
On the Procedure Activity page, click the job that you submitted.
The new Instance Execution page for the job is displayed which will give you information about the success or failure of your job for on all the targets.
For more information about the new Instance Execution page, see Overview of the Procedure Management Solution.
This section contains the following:
To view, edit, or delete an existing procedure, follow these steps:
In Cloud Control, from the Enterprise menu, select Provisioning and Patching, then select Procedure Library.
On the Provisioning page, do the following:
For Viewing the procedure, select the deployment procedure, and from the actions menu, click View Procedure Definition.
For Editing the procedure, select a user-defined procedure, and from the actions menu, select Edit Procedure Definition and click Go. If you want to customize an Oracle-provided procedure, from the actions menu, select Create Like and click Go. Save the procedure, and then customize it.
For Deleting the procedure, select the deployment procedure, and from the actions menu, click Delete.
A designer with Super Administrator privileges has the access to edit the permissions of a Deployment Procedure, and save it.
To edit the permissions on a Deployment, follow these steps:
In Cloud Control, from the Enterprise menu select Provisioning and Patching, then select Procedure Library.
On the Provisioning page, from the actions menu select Edit Permissions, and then click Go.
On the Edit Permissions: <target name> page, click Add. From the Search and Select Administrator or Role dialog box, select the administrators or roles to which you want to grant the permissions, and click Select.
On the Edit Permissions: <target name> page, select the Role and the privileges that you want to grant to each of these roles. A full privilege will let the Operator edit the Deployment Procedure, and a Launch privilege will only allow an Operator to view and run the Deployment Procedure. Click OK to save these grants.

After you have submitted a Deployment Procedure, you can track its status from the Procedure Completion Status page. To access this page, follow these steps:
In Cloud Control, from the Enterprise menu, select Provisioning and Patching, then select Procedure Library.
On the Provisioning page, click the Procedure Activity tab.
On the Procedure Activity page, click the procedure to view the status of all deployment procedures in various stages of their lifecycle.
Table 32-4 Deployment Procedure Status
| Status | Description |
|---|---|
|
Scheduled |
implies that the Deployment Procedure is scheduled to be executed at the date and time that you have specified. |
|
Running |
implies that the Deployment Procedure is currently being executed. |
|
Action Required |
Implies that the Deployment Procedure has stopped running as user interaction is required. |
|
Suspended |
Implies that the Deployment Procedure has been temporarily stopped from execution. You can resume from the paused step later. |
|
Failed |
Implies that the Deployment Procedure has failed and cannot execute the remaining steps. However, you always have the option of retrying the failed steps. Alternatively, you can ignore the error, and proceed further. |
|
Succeeded |
Implies that the Deployment Procedure has successfully completed its execution. |
|
Skipped |
Implies that the Deployment procedure has skipped the execution of this step. Primarily, a step is skipped when the condition attached to the step evaluates to false. |
|
Stopped |
Implies that the Deployment Procedure has been permanently stopped from execution by the user. |
|
Saved |
Implies that the Deployment Procedure has not been submitted for execution, and has been saved. |
|
Completed with Errors |
Indicates that the Deployment Procedure completed, but completed with errors possibly because some of the steps within it might have failed and the steps might have the Skip target/Continue on Error flag enabled. |
You can also perform the following actions:
Search for a particular Deployment Procedure using the Search section. Click Search to refine your search criteria.
View the status of all Deployment Procedures. You can also manually refresh the page and view the updated status by clicking Refresh.
View real-time status information based on a particular refresh period such as 30 seconds, 1 minute, or 5 minutes.
Stop or suspend any Deployment Procedure by selecting them and clicking Stop or Suspend, respectively. You can resume at any point by clicking Resume or Retry.
Delete any Deployment Procedure by selecting them and clicking Delete.
Note:
For more information on tracking the jobs, seeThe following tasks can be performed from the Procedure Instance Execution page:
Now that the design is target-centric, which means that all the targets and its corresponding steps are listed in the Procedure Steps section, you can select one target or a set of target (multiple select) from the same page to view the status of the step. To do so, perform the followings steps:
In Cloud Control, from the Enterprise menu, select Provisioning and Patching, then select Procedure Activity.
On the Procedure Activity page, click the procedure name to select the procedure.
In the Procedure Steps section, from the View menu, click Expand All.
All the steps and its corresponding status are displayed.
From the list select one or more targets which have a status Fail that you would like to investigate.
As you select the targets, the corresponding details are displayed on the Step Details section. You can perform one or more actions on these failed steps to proceed with the procedure execution.
To retry a failed step, perform the following steps:
In Cloud Control, from the Enterprise menu, select Provisioning and Patching, then select Procedure Activity.
On the Procedure Activity page, click the procedure name to select the procedure.
Select the failed step from the Procedure Steps section.
The details of the step are displayed in the Setup Details section.
In the Setup Details section, from the Actions menu, click Retry. However, if you want to make changes to the step, select Update and Retry option.
In the Retry confirmation dialog box, click OK to run the step again.
To create an incident for the procedure execution, perform the following steps:
In Cloud Control, from the Enterprise menu, select Provisioning and Patching, then select Procedure Activity.
On the Procedure Activity page, click the procedure name to select the procedure.
In the Procedure Instance Execution page, from the Procedure Actions menu, select Incident.
In the incident confirmation dialog box, click OK to create an incident for your execution.
A confirmation dialog box appears once the incident is created. For more information about creating, packaging, and uploading an incident to an SR, see Oracle Database Administrator's Guide.
The execution time of the deployment procedure is displayed on top of the page in the Procedure Actions section as Elapsed Time. The time elapsed continues to be updated until the procedure has successfully completed or has been stopped. You can resume a stopped procedure by selecting Resume from the Procedure Actions menu.
To search for a step that is embedded deep inside, you can use the Expand All option available in the View menu. Once the expanded list is displayed in the Procedure Step section, you can easily find the step you are looking for.
To view all the failed steps, perform the following:
In Cloud Control, from the Enterprise menu, select Provisioning and Patching, then select Procedure Activity.
On the Procedure Activity page, click the procedure name to select the procedure.
In the Procedure Steps section, from the View menu, select Filters, and then click Failed Status.
All the steps that have failed are displayed in the Procedure Steps section. You can now select the steps that you want to retry, ignore, or update, and the corresponding details are displayed in the Step Details section.
To download a step output, perform the following:
In Cloud Control, from the Enterprise menu, select Provisioning and Patching, then select Procedure Activity.
On the Procedure Activity page, click the procedure name to select the procedure.
In the Procedure Steps section, select a step. The Step Details section displays the details of the selected step. From the Step Output menu, select Download, as shown in the following graphic to download the step output:
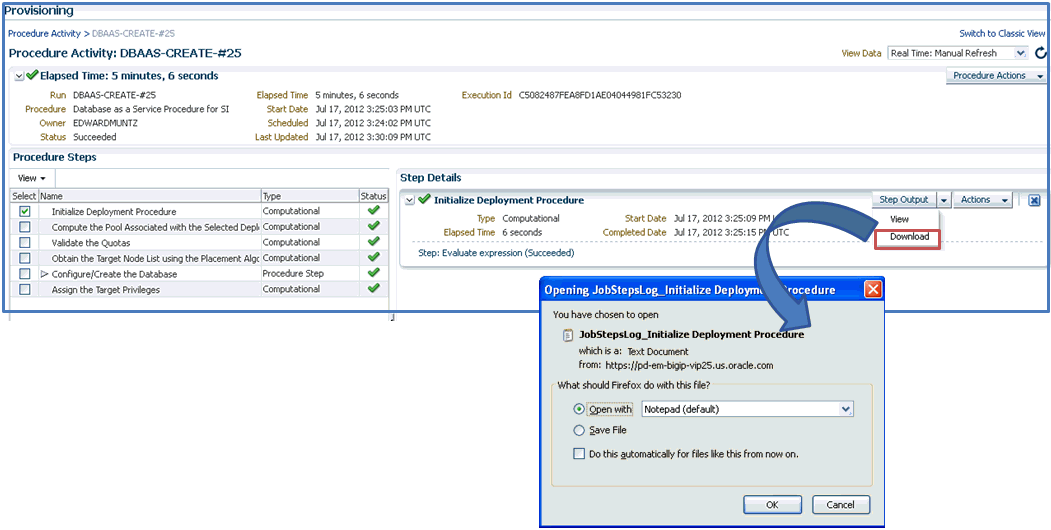
From the Step output menu, select View to view the complete output.