| Oracle® Enterprise Manager Lifecycle Management Administrator's Guide 12c Release 2 (12.1.0.2) Part Number E27046-08 |
|
|
PDF · Mobi · ePub |
| Oracle® Enterprise Manager Lifecycle Management Administrator's Guide 12c Release 2 (12.1.0.2) Part Number E27046-08 |
|
|
PDF · Mobi · ePub |
This chapter explains how to use Enterprise Manager Command Line Interface (EM CLI) to deploy patches using Patch Plans, provision procedures, and perform some of the Software Library tasks.
In particular, this chapter covers the following:
Note:
The entire EM CLI implementation for running the various Deployment Procedures has been revamped in Oracle Enterprise Manager Cloud Control (Cloud Control).Enterprise Manager Command Line Interface (EM CLI) is a command line utility available for power users in Oracle Enterprise Manager Cloud Control (Cloud Control) that enables you to perform most of the console-based operations. It enables you to access Cloud Control functionality from text-based consoles (shells and command windows) for a variety of operating systems.
Perform various command line operations such as monitoring and managing targets, jobs, running deployment procedures, patching Enterprise Manager targets, and so on.
Use the functions available with EM CLI called verbs, to build your custom scripts on various programming environments like Operating System shell, Perl, Python, and so on. This in turn allows you to closely integrate Oracle Enterprise Manager functionality with your own enterprise business process.
Carry out operations with the same security and confidentiality as the Cloud Control console.
Before using EM CLI, ensure that you meet the following requirements:
EM CLI client must be set up. To do so, see Oracle Enterprise Manager Command Line Interface.
Targets that will be supplied to the Deployment Procedures should be managed by Enterprise Management 12c Management Agents.
If you are patching in the offline mode, with no internet connectivity, then ensure that the patches are available in the Software Library before running the EM CLI commands.
This section primarily lists all the EM CLI verbs used for accomplishing the various patching and provisioning tasks. Primarily, it contains:
Note:
For information about Enterprise Manager 12c verb usage, syntax, and examples, see Oracle Enterprise Manager Command Line InterfaceThis section describes the usage of EM CLI verbs to run Deployment Procedures in Enterprise Manager 12c:
The new EM CLI verbs introduced in Cloud Control are:
The EM CLI verb that has been modified to support additional arguments in Enterprise Manager 12c is submit_procedure. The following table compares the old and the current arguments supported by the submit_procedure verb:
| submit_procedure arguments (as in EM 11g) | submit_procedure arguments (as in EM 12c) |
|---|---|
emcli submit_procedure
-procedure='guid of the procedure'
-input_file="data:file_path"
[-instance_name="name of the procedure instance"]
[-schedule=start_time:yyyy/MM/dd HH:mm;tz:{java timezone ID}]
|
emcli submit_procedure
[-name={name of the procedure}]
[-owner={owner of the procedure}]
[-procedure={guid of the procedure}]
-input_file={data:{file_path}/file name}
[-instance_name={name of the procedure instance}]
[-notifications={procedure status}]
[-grants={users and their corresponding accessing levels}]
[-schedule=start_time:yyyy/MM/dd HH:mm;tz:{java timezone ID}]
Note: All the new arguments have been highlighted in bold font. |
| Submitting the procedure was possible only using the procedure GUID | Starting with Enterprise Manager 12c, procedure can be submitted either using the procedure GUID or using the procedure name /owner pair. |
The following EM CLI verbs are included for backward compatibility, however they are deprecated and Oracle recommends you move to the new commands:
get_instance_data_xml
set_instance_jobgrants
Note:
For information about the Enterprise Manager 11g verbs, see Enterprise Manager Command Line Interface available in the following doc library:Here is a list of all the EM CLI verbs used for running deployment procedures:
Table A-1 EM CLI Provisioning Verbs and their Usage
| Verb | Usage | Example |
|---|---|---|
|
|
|
|
|
|
|
|
|
|
|
|
|
|
|
|
|
|
|
|
|
|
|
|
|
|
|
|
|
|
|
|
|
|
|
|
|
|
|
|
|
|
|
|
|
|
|
|
|
|
|
|
|
|
|
|
|
|
|
|
|
|
|
|
|
|
|
|
|
|
|
|
|
|
|
|
|
|
|
Support for patching any number of targets from the same single patch plan using command line interface is now supported. Following are some of the important EM CLI verbs used for patching.
Table A-2 EM CLI Patching Verbs and their Usage
| Verbs | Usage | Example |
|---|---|---|
|
|
|
|
|
|
|
|
|
|
|
|
|
|
|
|
|
|
|
|
|
|
|
|
|
|
|
|
|
|
|
|
|
|
|
|
|
|
|
|
|
|
|
|
|
|
|
|
|
|
|
|
|
|
|
|
|
|
|
|
|
|
|
|
|
|
|
|
|
|
|
|
|
|
|
|
|
|
|
|
|
|
|
|
|
|
|
|
|
|
|
|
|
|
|
|
Support for configuring Software Library, creating entities, and using them has been introduced in Oracle Enterprise Manager Cloud Control 12c Release 2 (12.1.0.2).
Note:
You can either use Enterprise Manager UI or the command line utility (EM CLI) to retrieve the folder id and the entity revision id. To do so, and for a comprehensive example on how to effectively use the EM CLI verbs to perform a number of Software Library tasks listed in the following table, see the workflow example Creating a New Generic Component by Associating a Zip File.Following are some of the important EM CLI verbs used to perform some Software Library actions:
Table A-3 Software Library EM CLI Verbs and Their Usage
| Verb | Usage | Example |
|---|---|---|
|
(Adding a Software Library storage location) |
|
|
|
(Creating a Software Library folder) |
|
|
|
(Creating a Software Library entity) |
|
|
|
(Listing the Software Library entities) |
|
|
|
(Listing Software Library entity subtypes) |
|
|
|
(Listing Software Library entity types) |
|
|
|
(Listing Software Library folders) |
|
|
|
(Listing Software Library storage locations) |
|
|
|
(Referring files from a Software Library entity) |
|
|
|
(Re-Importing Software Library metadata) |
|
|
|
(Removing a Software Library storage location) |
|
|
|
(Modifying a Software Library entity) |
|
|
|
(Uploading files to a Software Library entity) |
|
|
Deployment Procedures can be run from the command line using EM CLI or from Cloud Control UI. Launching a procedure either from command line or from GUI requires a set of inputs to be provided. However, the mode of entering these inputs differ in both the cases. While running a Deployment Procedure from the UI, you can use a wizard to enter all the inputs required to run the procedure. However, in EM CLI, you use Properties File for entering the inputs. Properties File is a file which contains all the inputs required to run a Deployment Procedure. The following sections describe how to create properties file from scratch and use it in procedures, how to use properties file of a procedure that has already been executed, and how to create a template using a properties file and a few other attributes to run the deployment procedures.
Note:
The-swlib argument works for cloning only Oracle Database 9i Release 2. Do NOT use this argument for later releases.This section covers the following scenarios:
Creating the Properties File to Submit a Deployment Procedure
Using Properties File from an Existing Execution of a Deployment Procedure
This graphic illustrates how to create a template properties file, update values into the file, and then submit the procedure with the updated properties file as the input.
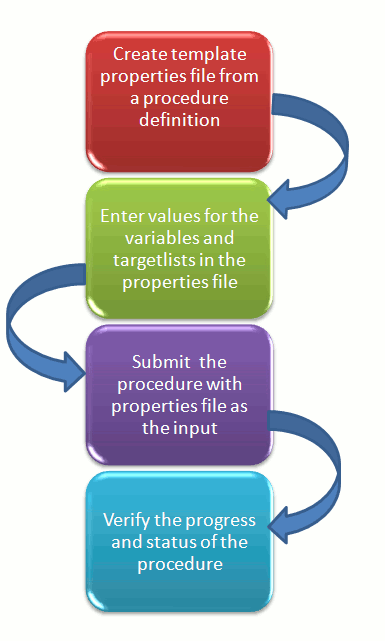
Step1: Create Template Properties File From a Procedure Definition
All the details required for the selected Deployment Procedure like variable names, targets, credentials, and so on are provided in this step to successfully submit the procedure from the command line. Generating the Properties file is a two-step process as follows:
To retrieve the GUID or the Name of the procedure, run the following command:
emcli get_procedures
[-type={procedure type}]

Example:
./emcli get_procedures -type=DBPROV

Output:
B3FCE84B1ED96791E040578CD7810EC5, DBPROV, Prov_112_db_using_SH_locked_acc_without_env_shift_ssubbura11, Prov_112_db_using_SH_locked_acc_without_env_shift_ssubbura11, 1.0, SSUBBURA1, SIHA_SIDB_PROC
B35E10B1F430B4EEE040578CD78179DC, DBPROV, DBREPLAYCLIENTDP_NG, Provision Oracle Database Client, 6.1, ORACLE
B35E10B1F427B4EEE040578CD78179DC, DBPROV, SIHA_SIDB_PROC, Provision Oracle Database, 1.0, ORACLE
Use the GUID or the name in the following command to generate a template properties file. Use the following command when you are running the Deployment Procedure for the first time, or when you do not have too many variables in your procedure to update:
emcli describe_procedure_input
[-procedure={procedure GUID}]
[-name={procedure name or procedure configuration}]
[-owner={owner of the procedure or procedure configuration}][-parent_proc={procedure of the procedure configuration. this only applies to describe a procedure configuration with the same name}]

The following examples describe how to use the procedure GUID to generate the properties file template:

./emcli describe_procedure_input -procedure=B35E10B1F427B4EEE040578CD78179DC > procConfiguration.properties
This EM CLI verb describes the input data of a deployment procedure or a procedure configuration in a name-value pair format, which is also called as the properties file format. The advantage of this name-value file format for a procedure is that it is flexible enough to accept multiple destination targets.
Step 2: Entering New Values in The Properties File
Use any editor to open the properties file and enter values against the names. After updating all the fields, save and close the properties file.
The main goal of this step is to create a library of property files where the most common input values have been set as defaults, this in turn reduces the chances of operator errors, and also reduces the number of inputs expected from the operators.
For example, vi procConfiguration.properties
Note:
For example properties file, see sections Provisioning Oracle Database Software or Provisioning Oracle WebLogic Server.Step 3: Submitting the Procedure With The Updated Properties File as Input
Once the properties file is ready with the correct name-value pair required to run the Deployment procedure, you must use the EM CLI verb submit_procedure, which accepts the edited properties file as the input.
emcli submit_procedure
[-name={name of the procedure}]
[-owner={owner of the procedure}]
[-procedure={guid of the procedure}]
-input_file={data:{file_path}/file name"  [-instance_name={name for the procedure instance}] [-notification={procedure status}]
[-grants={users and their corresponding accessing levels}]  [-schedule=start_time:yyyy/MM/dd HH:mm; tz:{java timezone ID}]
Starting with Cloud Control 12c, you can submit the procedure either using the procedure GUID or using the procedure name/owner pair, as described in the following example:
Submitting the properties file using the GUID of the procedure:
emcli submit_procedure -input_file=data:procConfiguration.properties -procedure=B35E10B1F427B4EEE040578CD78179DC -schedule="start_time:2006/6/21 21:23; tz:America/New_York" -grants="user1:VIEW_JOB; user2:FULL_JOB" -notification="scheduled, action required, running"
Submitting the properties file using the procedure name/owner pair:
emcli submit_procedure -input_file=data:procConfiguration.properties -name=SIHA_SIDB_PROC -owner=sysman -schedule="start_time:2006/6/21 21:23; tz:America/New_York" -grants="user1:VIEW_JOB; user2:FULL_JOB" -notification="scheduled, action required, running"
Output:
Verifying parameters ...
B35E10B1F427B4EEE040578CD78179DC
Deployment procedure submitted successfully
Note: The instanceId is B35E10B1F427B4EEE040578CD78179F1
This verb functions in a non-waiting mode, which means it submits the procedure for execution and returns without waiting for it to complete. The output of this verb indicates if the submission of the procedure was successful or if any errors were encountered. A successful submission displays the Instance GUID as the output.
Step 4: Verifying The Status Of the Procedure
The final step lets you to track the progress and status of the procedure. This is especially important since the submit procedure verb does not wait for the completion of the Deployment Procedure:
emcli get_instance_status
[-instance={instance guid}]
[-exec=execution guid]
[-xml
[-details]
[-showJobOutput]
[-tailLength={last N characters}]]]

Example:

emcli get_instance_status -instance=B35E10B1F427B4EEE040578CD78179F1 -details -showJobOutput

Output:
B35E10B1F427B4EEE040578CD78179F1, WEBLOGIC_WSM, DANS_SCALEUP_WSM12, FAILED
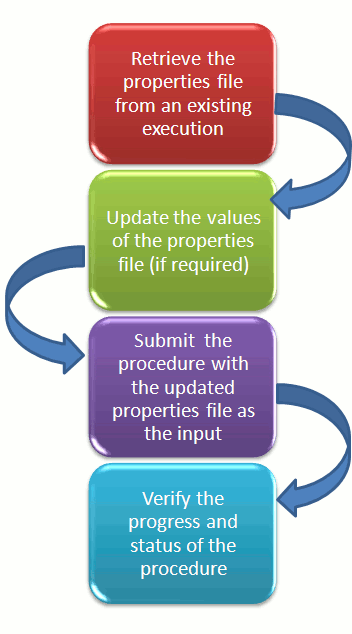
This graphic illustrates how to retrieve the properties file of a deployment procedure that has already been executed, update values into the file, and then submit the procedure with the updated properties file as the input.
Retrieving Properties File From an Existing Execution
All the inputs required for the selected Deployment Procedure like variable names, targets, credentials, and so on are provided in this step to successfully submit the procedure from the command line. Generating the Properties file is a two-step process as follows:
To retrieve the GUID or the Name of the procedure, run the following command:
emcli get_procedures
[-type={procedure type}]
[-parent_proc={procedure associate with procedure configuration}]

Example:
./emcli get_procedures -parent_proc=SIHA_SIDB_PROC

Output:
B3FCE84B1ED96791E040578CD7810EC5, DBPROV, Prov_112_db_using_SH_locked_acc_without_env_shift_ssubbura11, Prov_112_db_using_SH_locked_acc_without_env_shift_ssubbura11, 1.0, SSUBBURA1, SIHA_SIDB_PROC
Use the GUID to retrieve the Instance ID of the procedure:
emcli get_instances
[-type={procedure type}]

Example:
./emcli get_instances -type=DBPROV

Output:
B3FE0C8302EA4A4CE040578CD781133C, B3FE0C8302F64A4CE040578CD781133C, DBPROV, Prov_112_db_using_SH_locked_acc_without_env_shift_ssubbur, Failed
B3FE34D472C00AD9E040578CD781107B, B3FE34D472CC0AD9E040578CD781107B, DBPROV, Prov_112_db_using_SH_locked_acc_without_env_shift_ssubbura1, Failed
Use the Instance ID in the following command to retrieve the input properties file of the instance:
emcli get_instance_data
[-instance={instance guid}]
[-exec=execution guid]

The following examples describe how to use the procedure GUID to generate the properties file template:

emcli get_instance_data -instance=B3FE0C8302EA4A4CE040578CD781133C > instanceData.properties
Step 2: Updating the Existing Values in the Properties File
The main goal of this step is to update the values in the properties file (if required). To do so, use any editor to open the properties file and enter the updated values against the names. After updating the required fields, save and close the properties file.
Example:
vi instanceData.properties
Step 3: Submitting the Procedure with the Updated Properties File as Input
To run the procedures from the command line you must use the EM CLI verb submit_procedure as described in Step 3: Submitting the Procedure With The Updated Properties File as Input
Step 4: Verifying the Status of the Procedure
To verify the status of the procedure, see Step 4: Verifying The Status Of the Procedure.
Procedures that are used repeatedly can be saved along with the properties file, job grants, schedules, and notifications, and so on with a unique name. This specially packaged procedure can be run using the unique name whenever required. This is especially useful when the procedure must be executed multiple number of times, and helps in saving a lot of time and effort. Running the verb emcli get_procedures fetches all the procedures which also include the Procedure Configurations.
To launch a procedure using an Existing Procedure Configuration File, do the following:
Run the verb emcli get_procedures to fetch an existing Procedure Configuration file.
Update the properties file if required.
Save the Procedure Configuration with the updated Properties file, and the other attributes like job grants, schedules, and notifications. To do so, see Saving a Procedure Configuration of a Procedure.
Submitting the Procedure Configuration file as described in Step 3: Submitting the Procedure With The Updated Properties File as Input
Note:
You can update the Procedure Configuration using theupdate_procedure_input verb as described in Updating the Procedure Configuration of a Procedure. After Updating the Procedure Configuration, follow step 4 to resubmit the procedure.To verify the status of the procedure, see Step 4: Verifying The Status Of the Procedure.
If you have to use a properties file repeatedly to run a procedure, then Oracle recommends that you save this Procedure with the properties file and give the saved procedure a name. Every time you want to run the procedure with the same properties file, you can run the saved Procedure by giving its name. To save the procedure, run the following command:
emcli save_procedure_input -name={name of procedure configuration} -procedure={Procedure name}
[-owner={owner of procedure}]
-input_file=data:/file path/file name
[-grants={users and their corresponding accessing levels}] [-notification={procedure status}]
[-schedule=start_time:yyyy/MM/dd HH:mm;tz:{java timezone id};grace_period:xxx]

Example:
emcli save_procedure_input -name=procConfiguration -procedure=ComputeStepTest -input_file=data:/tmp/instanceData.properties -grants="user1:VIEW_JOB;
user2:FULL_JOB" -notification="scheduled, action required, running" -schedule="start_time:2012/12/25 00:00;tz:American/New York;grace_period:60"
To update the existing values in a saved procedure, run the following command:
emcli update_procedure_input -name={name of procedure configuration} -input_file="data:/file path/file name"
[-notification={procedure status}]
[-grants={users and their corresponding accessing levels}]
[-schedule=start_time:yyyy/MM/dd HH:mm;tz:{java timezone id};grace_period:xxx]

Example:
emcli update_procedure_input -name=procConfiguration -input_file=data:/tmp/instanceData.properties -grants="user1:VIEW_JOB;user2:FULL_JOB"
 -notification="scheduled, action required, running" -schedule="start_time:2012/12/25 00:00;tz:American/New York;grace_period:60"
This section contains the following:
Keep the following points in mind before patching the targets using EM CLI:
Target information like : target name, target type, target version, release number, platform, product and so on ready.
Patch information like: Patch Name (Patch Number), Release ID, Platform ID, and Language ID ready.
Set at least one of the following credentials on the Oracle home of the target host machines before beginning the patching process:
Oracle Home Named Credentials
Privileged Oracle Home Named Credentials
Setup Privilege Delegation through Sudo or PowerBroker, and apply the templates to the host target when you do not have the access (Username/Password) for the Oracle account or root account.
Set one of the following modes before patching:
Online Mode: This mode is helpful when you have internet connectivity. However, to search and download the patches from My Oracle Support, you need to set the preferred credentials for My Oracle Support.
Offline Mode: This mode can be used for patching provided you have already downloaded the patches to the Software Library. You can then search for them on Software Library.
Starting with Enterprise Manager 12c, targets can be patched using Enterprise Manager Command Line Interface. You do not necessarily need Cloud Control to download and apply patches.
The following table describes EM CLI patching scenarios:
Table A-4 EM CLI Patching Scenarios
| Case No | Scenario | Hign Level Steps |
|---|---|---|
|
Case 1 |
Creating a new properties file for patching targets. |
To patch targets using a fresh properties file, follow these steps:
For details about how to use the EM CLI commands to perform each of the steps see Creating a New Properties File for Patching Targets. |
|
Case 2 |
Updating the properties file of an existing patch plan to patch the targets. |
To update a properties file retrieved from an existing patch plan, follow these steps:
For details about how to use the EMCLI commands to perform each of the steps see Using the Properties File of an Existing Patch Plan to Patch the targets. |
If you are creating the patch plan from scratch, then you need to create the properties file afresh, and submit this properties file as input for creating the plan. To do so, follow these steps:
Select the targets that need to be patched. To do so, run the following EM CLI command:
emcli get_targets
        [-targets="[name1:]type1;[name2:]type2;..."]

For example:
emcli get_targets -targets=oracle_emd

Output:
Displays all the Management Agent targets.
| Status ID | Status | Target Type | Target Name |
|---|---|---|---|
| 2 | Metric collection on Error | oracle_emd | h1.us.example.com:5125 |
| 2 | Metric collection on Error | oracle_emd | h2.us.example.com:5125 |
| 1 | Up | oracle_emd | slc01nha.us.example.com:11852 |
| 1 | Up | oracle_emd | slc00bng.us.example.com:1833 |
| 1 | Up | oracle_emd | adc2101349.us.example.com:1832 |
Search for the patches that you want to apply. To find the relevant patches for your plan, you either need to use the Patch ID (Basic Search), or use a combination of Release ID, Platform ID, and Product ID (Advanced Search) and drill down to the patches required. To do so, run the following EM CLI command:
emcli search_patches
        [-swlib]
        [-patch_name="patch_name"]
        [-product="product id" [-include_all_products_in_family]]
        [-release="release id"]
        [-platform="platform id" | -language="language id"]
        [-type="patch | patchset"]
        [-noheader]
        [-script | -xml | -format=
                                  [name:<pretty|script|csv>];
                                  [column_separator:"column_sep_string"];
                                  [row_separator:"row_sep_string"];
        ]
Note:
You can search for patches in one of the following locations:• ARU Site
• Software Library
If you have internet connectivity, then you are in online mode, and by default can look for patches on the ARU site. However, if you are in offline mode, then you must ensure that the patches are already uploaded to Software Library so you can use them.
You can perform searches in one of the following modes using EM CLI:
• Simple Search: This mode allows you to search the ARU site or Software Library using the patch ID information.
• Advanced Search: This mode allows you to provide a combination of key values like platform ID, Language ID, Release ID, and/or product ID to drill down to the patch that you are looking for.
You can use the following syntax, and the corresponding examples to perform simple and advanced searh using EM CLI commands:
(Basic Search) To search for the patches using the Patch ID, do the following:
emcli search_patches
        [-swlib]
        [-patch_name="patch_name"]
        [-product="product id" [-include_all_products_in_family]]
        [-release="release id"]
        [-platform="platform id" | -language="language id"]
        [-type="patch | patchset"]
        [-noheader]
        [-script | -xml | -format=
                                  [name:<pretty|script|csv>];
                                  [column_separator:"column_sep_string"];
                                  [row_separator:"row_sep_string"];
        ]
Example 1: Basic Search (Online Mode)
To search for patches on My Oracle Support using the Patch ID:
emcli search_patches -patch_name=11993573

Output:
11993573        Agent Plugin PATCH      Cloud Control (Agent) 12.1.0.1.0        Linux x86-64    American English        General Enterprise Manager Base Platform - Plugin

Example 2: Basic Search (Offline Mode)
To search for patches on Software Library using the patch ID:
emcli search_patches -patch_name=11993573 -swlib -script

Output:
11993573        Agent Plugin PATCH      Cloud Control (Agent) 12.1.0.1.0        Linux x86-64    American English        General Enterprise Manager Base Platform - Plugin
(Advanced Search) Use the Product ID, Release ID, and Plaform ID (or Language ID) to get the patch details that you want to add to the patch plan.
Example:
To search for patches using a combination of Product ID, Release ID, and Platform ID (obtained from the earlier steps):
emcli search_patches -product=12383 -release=9800371121010   -platform=226

Output:
13491785        ENTERPRISE MANAGER BASE PLATFORM  - AGENT 12.1.0.1.0 BP1 (PORT) Cloud Control (Agent) 12.1.0.1.0        Linux x86-64    American English        Recommended     Enterprise Manager Base Platform13481721        WRONG ERROR MESSAGE RETURNED FROM NMO   Cloud Control (Agent) 12.1.0.1.0        Linux x86-64    American English        General Enterprise Manager Base Platform
Create a patch-target map (stored in the properties file) using any editor, and supply information like Patch ID, Release ID, Platform ID, and Language ID. Here is a sample properties file:
vi demo.props

patch.0.patch_id=13426630
patch.0.release_id=9800371121010
patch.0.platform_id=2000
patch.0.language_id=0
patch.0.target_name=slc00bng.us.example.com:1836
patch.0.target_type=oracle_emd
patch.1.patch_id=13426630
patch.1.release_id=9800371121010
patch.1.platform_id=2000
patch.1.language_id=0
patch.1.target_name=slc01nha.us.example.com:1839
patch.1.target_type=oracle_emd
Run the create_patch_plan command to create the plan, and supply the newly created properties file (demo.props) as input:
emcli create_patch_plan
        -name="name"
        -input_file=data:"file_path"
        [-impact_other_targets="add_all | add_original_only | cancel"]

Example:
emcli create_patch_plan -name=demo_agent -input_file=data:demo.props -impact_other_targets=add_all
Note:
If the selected target impacts other targets, then you need to addimpact_other_targets with the value "add_all". For example, if one of the agents running on the NFS home is selected for patching, other agent based on the same NFS home will also be impacted while patching, so they are all required to present in the patch plan.After you have created the patch plan with all the relevant data, you can submit your patch plan in the Analyze mode to verify if the plan is deployable or not. To do so, run the follwing command:
emcli submit_patch_plan -name=demo_agent -action=analyze

Output:
The action "analyze" is successfully submitted on the Patch Plan "demo_agent", now "analyze" is in progress.
The Analyze mode facilitates the plan to perform all the validations to ensure that the plan is deployable. Only once the analysis is successful you should deploy the plan.
To verify the status of the patch plan, run the following EM CLI command:
emcli show_patch_plan -name=demo_agent -info | grep plan_status

Output:
<plan_status>CONFLICTS</plan_status>
If you see any conflicts, then you must resolve them before deploying the plan. You can use the User Interface to resolve the issues, and then rerun the plan until the status is CLEAN.
After a successful analysis, you can deploy the patch plan. To do so, run the following command with action deploy:
emcli submit_patch_plan -name=agent_demo -action=deploy

Output:
The action "deploy" is successfully submitted on the Patch Plan "demo_agent", now "deploy" is in progress
To verify the status of the plan, run the EM CLI command show_patch_plan as mentioned in step 6. Only when the output of the command is is DEPLOY_SUCCESS, it means that the plan has been successfully deployed, and the targets mentioned in the patch plan have been patched.
emcli show_patch_plan -name=demo_agent -info

Output:
<plan>
  <planDetails>
<plan_id>79CAF6A6DAFCFEE6654C425632F19411</plan_id>
<name>demo</name>
<type>PATCH</type>
<description/>
<conflict_check_date>Tue Feb 21 18:04:04 PST 2012</conflict_check_date>
<conflict_check_date_ms>1329876244000</conflict_check_date_ms>
<is_deployable>1</is_deployable>
<plan_status>CONFLICTS</plan_status>
<review_status>CONFLICT_FREE</review_status>
<created_date>Tue Feb 21 17:40:47 PST 2012</created_date>
<created_date_ms>1329874847000</created_date_ms>
<created_by>SYSMAN</created_by>
<last_updated_date>Tue Feb 21 17:58:29 PST 2012</last_updated_date>
<last_updated_date_ms>1329875909000</last_updated_date_ms>
<last_updated_by>SYSMAN</last_updated_by>
<grant_priv>yes</grant_priv>
<user_plan_privilege>FULL</user_plan_privilege>
<see_all_targets>N</see_all_targets>
<homogeneousGroupLabel>Database Instance 10.2.0.1.0 (Linux x86-64)</homogeneousGroupLabel>
<executeGuid/>
<executeUrl/>
<planDetails/>
To get the details of the patching procedure/job that you submitted, use the GUID of the execution in the command get_job_execution_details as follows:
emcli get_job_execution_detail
        -execution={execution_id}
        [-xml  [-showOutput [-tailLength={length}]]]

For Example:
emcli get_job_execution_detail -execution=79CAF6A6DAFCFEE6654C425632F19411 -xml
To edit an existing patch plan after it has been created for updating the patch-target pairs or generic information or deployment options, you can follow the steps listed here:
To view the user-editable fields of an existing plan, run the get_patch_plan_data command, and save the output to a properties file as follows:
$ emcli get_patch_plan_data -name=demo_agent >demo_agent.props

Output:
name=demo_agent
description=
deployment_date=
planPrivilegeList=VIEWER:ADMIN:VIEW;OPER:ADMIN:VIEW;DESIGNER:ADMIN:VIEW
patch.0.patch_id=13426630
patch.0.release_id=9800371121010
patch.0.platform_id=2000
patch.0.language_id=0
patch.0.target_name=slc00bng.us.example.com:1836
patch.0.target_type=oracle_emd
patch.1.patch_id=13426630
patch.1.release_id=9800371121010
patch.1.platform_id=2000
patch.1.language_id=0
patch.1.target_name=slc00aoe.us.example.com:4473
patch.1.target_type=oracle_emd
deploymentOptions.StageLocation=%emd_emstagedir%
deploymentOptions.AdvancedOPatchOptions=null
deploymentOptions.StagePatches=true
Edit the properties file (demo_agent.props) using any editor. You can change the storage location as follows:
name=demo_agent
description=
deployment_date=
planPrivilegeList=VIEWER:ADMIN:VIEW;OPER:ADMIN:VIEW;DESIGNER:ADMIN:VIEW
patch.0.patch_id=13426630
patch.0.release_id=9800371121010
patch.0.platform_id=2000
patch.0.language_id=0
patch.0.target_name=slc00bng.us.example.com:1836
patch.0.target_type=oracle_emd
patch.1.patch_id=13426630
patch.1.release_id=9800371121010
patch.1.platform_id=2000
patch.1.language_id=0
patch.1.target_name=slc00aoe.us.example.com:4473
patch.1.target_type=oracle_emd
deploymentOptions.StageLocation=%emd_emstagedir%/demo
deploymentOptions.AdvancedOPatchOptions=null
deploymentOptions.StagePatches=true
To save the patch plan with the new edited data, run set_patch_plan_data command as follows:
emcli set_patch_plan_data -name=demo_agent -input_file=data:demo_agent.props

Output:
It is successfully on updating deployment options from the patch plan.
Note:
If the selected target impacts other targets, then you need to addimpact_other_targets with the value "add_all". For example, if one of the agents running on the NFS home is selected for patching, other agent based on the same NFS home will also be impacted while patching, so they are all required to present in the patch plan.Follow steps 5, 6, 7, 8, and 9 mentioned in the Creating a New Properties File for Patching Targets to complete the patching process.
The following sections describe some of the provisioning, patching, and Software Library tasks that can be performed using EM CLI commands:
This use case describes how to provision an Oracle Database Software using the EM CLI commands available in Cloud Control. The first step is to filter out the database procedures running in your enterprise, from the list, select the Single Instance Database procedure and its corresponding GUID. For the SI DB procedure, a new properties file is created from scratch. Initially, the name-value pair in the template will be empty, you must edit the attributes in the properties file to update the values. Following which the procedure is submitted with the updated properties file as the input, and tracked to completion.
Note:
The following verb clones only Oracle Database 9i Release 2:emcli clone_database_home -swlib true.Here is the step-by-step procedure with the outputs:
To retrieve the GUID of the Deployment Procedure, run the following command:
./emcli get_procedures | grep DB_

For Example:
./emcli get_procedures | grep DB
B3F.CE84B1ED96791E040578CD7810EC5, DBPROV, Prov_112_db_using_SH_1ocked_acc_without_env_shift_ssubbura11, Prov_112_db_using_SH_1ocked_acc_without_env_shift_ssubbura11, 1.0, SSUBBURA1, SIHA_SIDB_PROC
B35E10B1F42AB4EEE040578CD78179DC, DB_PROV_UPGRADE, DbProvUpgradeDP, Upgrade Oracle Database, 1.0, ORACLE
B35E10B1F427B4EEE040578CD78179DC, DBPROV, SIHA_SIDB_PROC, Provision Oracle Database, 1.0, ORACLE

Select the GUID corresponding to the SIHA_SIDB_PROC , which is B35E10B1F427B4EEE040578CD78179DC
Create the Properties File template using the following command:
./emcli describe_procedure_input -procedure=B35E10B1F427B4EEE040578CD78179DC > sihasidb.properties
Use an editor to open the generated properties file sihasidb.properties file, and enter the required values.
For example, here is a sample properties file used with the values updated in them:
# The Procedure Configuration with name emcli_11202 has input and arguments as follows:
# Input properties are:
DB_COMPONENT=11SSUBBURA/Oracle Database Installation Media
DB_HOST_NORMAL_CREDNAMES=AIME_USER1:PGURUSWA1
DB_HOST_ROOT_CREDNAMES=AIME_ROOT:PGURUSWA1
DB_ORACLE_BASE_LOC=/scratch/db11202
DB_ORACLE_HOME_LOC=/scratch/db11202/app/product/11.2.0/db
DB_PRODUCT_VERSION=11.2.0.2.0
DEPLOY_MODE=DEPLOY_DB
OINSTALL_GROUP=svrtech
OSDBA_GROUP=dba
OSOPER_GROUP=oper
PAUSE_AFTER_PREREQ=false
RAC_HOME_SHARED=false
SOURCE_TYPE=SOFTWARE_LIBRARY
TARGET_HOST_LIST=sta123.us.example.com
WORK_DIR_LOC=/tmp
Submit the procedure using the following command:
./emcli submit_procedure -input_file=data:sihasidb.properties
-instance="emcli_db1" -procedure=B35E10B1F427B4EEE040578CD78179DC
Verifying parameters ...
Schedule not specified, defaults to immediate
A8F7700333BAE9FAE040E40A45D866F1
Deployment procedure submitted successfully
This use case describes how to provision an Oracle WebLogic Server, and how to Scale up and Scale out Middleware procedures using the EM CLI commands available in Cloud Control.
Cloud Control supports the following usecases for provisioning Oracle WebLogic Server using EM CLI commands:
Ensure that you have setup a WebLogic Domain with Administrator Server and Managed Server, and registered your targets with the OMS so that your host target is discovered on the Middleware Provisioning Page.
Create the WebLogic Domain Provisioning Profile, this ensures that the domain selected and its Middleware Home are archived and stored in the software library for future cloning operations. You can use this profile while cloning a WebLogic domain.
Provisioning Oracle WebLogic Server Using the Provisioning Profile
The first step is to filter out the FMW procedures running in your enterprise, from the list, select the FMWPROV procedure and its corresponding GUID. For the FMWPROV procedure, a new properties file template is created from scratch. Initially, the name-value pair in the template will be empty, you must edit the attributes in the properties file to update the values. Following which the procedure is submitted with the updated properties file as the input, and tracked to completion.
Follow these steps:
To retrieve the GUID of the Deployment Procedure, run the following command:
./emcli get_procedures | grep FMWPROV_

The output appears in the following format:
<proc_guid>, <procedure_type>, <Procedure_name>, <Dsplay name>, <version>, <Parent procedure name>

For example:
./emcli get_procedures | grep FMWPROV_
B35E10B1F154B4EEE040578CD78179DC, FMW Provisioning, FMWPROV_DP, Provision Middleware, 2.0, ORACLE
Use the GUID retrieved in the previous step to prepare the Properties File template using the following command:
./emcli describe_procedure_input - procedure=<proc_guid> -name = <proc_name>

For example:

./emcli describe_procedure_input -procedure=B35E10B1F154B4EEE040578CD78179DC > instanceFMWData.properties
A properties file with the name instanceFMWData.properties is created
Use an editor to open the generated properties file instanceFMWData.properties, and enter the required values.
For example, here is a sample properties file used with the values updated in them:
# Input properties are:

APPS_GOLD_IMAGE_FILENAME=apps.zip
ARCHIVE_FILE_NAME=archive.jar
CLONING_JAR_NAME=cloningclient.jar
CONFIG_PLAN_OBJECT_DP_VARIABLE=Type:JDBCSystemResource;Action:Set; Attributes[Name:mds-owsm~Target:Cluster_1,Cluster_2]<BR>
CREATE_DOMAIN=true
DEST_ADMIN_HOST.0.ADMIN_SQL_HOME=
DEST_ADMIN_HOST.0.DATASOURCE_PROPERTY_FILE_DIR=
DEST_ADMIN_HOST.0.DATASOURCE_PROPERTY_FILE_NAME=
DEST_ADMIN_HOST.0.DOMAIN_HOME_DEST_ADMIN_HOST=/scratch/FFT4_EMCLI
DEST_ADMIN_HOST.0.DOMAIN_NAME_DEST_ADMIN_HOST=FFT4_EMCLI
DEST_ADMIN_HOST.0.FMW_HOME_DEST_ADMIN_HOST=/scratch/fmwprov
DEST_ADMIN_HOST.0.HAS_MANAGED_SERVER_REMOTE=false
DEST_ADMIN_HOST.0.MS_TEMPLATE_DEST_ADMIN_HOST=testMA.jar
DEST_ADMIN_HOST.0.MS_TEMPLATE_NAME=mytemplate
DEST_ADMIN_HOST.0.ORACLE_HOME_DEST_ADMIN_HOST=
DEST_ADMIN_HOST.0.PORT_DETAILS_DEST_ADMIN_HOST=7001:Listen Port,7002:SSL Listen Port
DEST_ADMIN_HOST.0.PRODUCT_TYPE_DEST_ADMIN_HOST=SOA
DEST_ADMIN_HOST.0.SERVER_NAME_DEST_ADMIN_HOST=AdminServer
DEST_ADMIN_HOST.0.START_SERVER_REQUIRED_DEST_ADMIN_HOST=true
DEST_ADMIN_HOST.0.WLS_HOME_DEST_ADMIN_HOST=/scratch/fmwprov/wlserver_10.3
DEST_ADMIN_HOST.0.WLS_PASSWORD_DEST_ADMIN_HOST=welcome1
DEST_ADMIN_HOST.0.WLS_USERNAME_DEST_ADMIN_HOST=weblogic
DEST_ADMIN_HOST.0.WORK_DIR_LOC_DEST_ADMIN_HOST=/tmp/fmwProvDest
DEST_ADMIN_HOST.0.defaultHostCred=PREF:HostCredsNormal
DEST_ADMIN_HOST.0.name=slc00ave.us.example.com
DEST_ADMIN_HOST.0.type=host
DEST_ADMIN_HOST_NAME=slc00ave.us.example.com
DEST_ADMIN_PORT=7001
DEST_ADMIN_WORK_DIR_LOC=/tmp/fmwProvDest
DEST_FMW_HOST.0.FMW_HOME_DEST_FMW_HOST=/scratch/fmwprov
DEST_FMW_HOST.0.JDK_HOME_DEST_FMW_HOST=
DEST_FMW_HOST.0.JRE_LOC=%emd_root%/jdk
DEST_FMW_HOST.0.LOG_DIR=
DEST_FMW_HOST.0.ORACLE_HOME_DEST_FMW_HOST=
DEST_FMW_HOST.0.OUI_HOME=
DEST_FMW_HOST.0.PREREQ_PATH=
DEST_FMW_HOST.0.WLS_HOME_DEST_FMW_HOST=/scratch/fmwprov/wlserver_10.3
DEST_FMW_HOST.0.WORK_DIR_LOC_DEST_FMW_HOST=/tmp/fmwProvDest
DEST_FMW_HOST.0.defaultHostCred=PREF:HostCredsNormal
DEST_FMW_HOST.0.name=slc00ave.us.example.com
DEST_FMW_HOST.0.type=host
DEST_MANAGED_SERVERS.0.ADMIN_HOST_NAME_DEST_MANAGED_SERVERS=slc00ave.us.example.com
DEST_MANAGED_SERVERS.0.ADMIN_HOST_PASSWORD_DEST_MANAGED_SERVERS=welcome1
DEST_MANAGED_SERVERS.0.ADMIN_HOST_USERNAME_DEST_MANAGED_SERVERS=weblogic
DEST_MANAGED_SERVERS.0.ADMIN_PORT_DEST_MANAGED_SERVERS=7001
DEST_MANAGED_SERVERS.0.DOMAIN_HOME_DEST_MANAGED_SERVERS=/scratch/FFT4_EMCLI
DEST_MANAGED_SERVERS.0.FMW_HOME_DEST_MANAGED_SERVERS=/scratch/fmwprov
DEST_MANAGED_SERVERS.0.MACHINE_NAME_DEST_MANAGED_SERVERS=Machine_1
DEST_MANAGED_SERVERS.0.MANAGED_SERVER_REMOTE_DEST_MANAGED_SERVERS=false
DEST_MANAGED_SERVERS.0.MS_PORT_DETAILS_DEST_MANAGED_SERVERS=9001:Listen Port,9002:SSL Listen Port
DEST_MANAGED_SERVERS.0.MS_TEMPLATE_DEST_MANAGED_SERVERS=testMA.jar
DEST_MANAGED_SERVERS.0.NM_LISTEN_ADDRESS=localhost
DEST_MANAGED_SERVERS.0.NM_LISTEN_PORT=5556
DEST_MANAGED_SERVERS.0.NM_PORT_DETAILS_DEST_MANAGED_SERVERS=5556:Listen Port
DEST_MANAGED_SERVERS.0.ORACLE_HOME_DEST_MANAGED_SERVERS=
DEST_MANAGED_SERVERS.0.SERVER_NAME_DEST_MANAGED_SERVERS=bam_server1
DEST_MANAGED_SERVERS.0.START_NM=true
DEST_MANAGED_SERVERS.0.START_SERVER_REQUIRED_DEST_MANAGED_SERVERS=true
DEST_MANAGED_SERVERS.0.WLS_HOME_DEST_MANAGED_SERVERS=/scratch/fmwprov/wlserver_10.3
DEST_MANAGED_SERVERS.0.WORK_DIR_LOC_DEST_MANAGED_SERVERS=/tmp/fmwProvDest
DEST_MANAGED_SERVERS.0.defaultHostCred=PREF:HostCredsNormal
DEST_MANAGED_SERVERS.0.name=slc00ave.us.example.com
DEST_MANAGED_SERVERS.0.type=host
DEST_MANAGED_SERVERS.1.ADMIN_HOST_NAME_DEST_MANAGED_SERVERS=slc00ave.us.example.com
DEST_MANAGED_SERVERS.1.ADMIN_HOST_PASSWORD_DEST_MANAGED_SERVERS=welcome1
DEST_MANAGED_SERVERS.1.ADMIN_HOST_USERNAME_DEST_MANAGED_SERVERS=weblogic
DEST_MANAGED_SERVERS.1.ADMIN_PORT_DEST_MANAGED_SERVERS=7001
DEST_MANAGED_SERVERS.1.DOMAIN_HOME_DEST_MANAGED_SERVERS=/scratch/FFT4_EMCLI
DEST_MANAGED_SERVERS.1.FMW_HOME_DEST_MANAGED_SERVERS=/scratch/fmwprov
DEST_MANAGED_SERVERS.1.MACHINE_NAME_DEST_MANAGED_SERVERS=
DEST_MANAGED_SERVERS.1.MANAGED_SERVER_REMOTE_DEST_MANAGED_SERVERS=false
DEST_MANAGED_SERVERS.1.MS_PORT_DETAILS_DEST_MANAGED_SERVERS=8001:Listen Port,8002:SSL Listen Port
DEST_MANAGED_SERVERS.1.MS_TEMPLATE_DEST_MANAGED_SERVERS=testMA.jar
DEST_MANAGED_SERVERS.1.NM_LISTEN_ADDRESS=
DEST_MANAGED_SERVERS.1.NM_LISTEN_PORT=
DEST_MANAGED_SERVERS.1.NM_PORT_DETAILS_DEST_MANAGED_SERVERS=
DEST_MANAGED_SERVERS.1.ORACLE_HOME_DEST_MANAGED_SERVERS=
DEST_MANAGED_SERVERS.1.SERVER_NAME_DEST_MANAGED_SERVERS=soa_server1
DEST_MANAGED_SERVERS.1.START_NM=false
DEST_MANAGED_SERVERS.1.START_SERVER_REQUIRED_DEST_MANAGED_SERVERS=true
DEST_MANAGED_SERVERS.1.WLS_HOME_DEST_MANAGED_SERVERS=/scratch/fmwprov/wlserver_10.3
DEST_MANAGED_SERVERS.1.WORK_DIR_LOC_DEST_MANAGED_SERVERS=/tmp/fmwProvDest
DEST_MANAGED_SERVERS.1.defaultHostCred=PREF:HostCredsNormal
DEST_MANAGED_SERVERS.1.name=slc00ave.us.example.com
DEST_MANAGED_SERVERS.1.type=host
DEST_TEMPLATE_FILE_NAME=testMA.jar
DOMAIN_GOLD_IMAGE_FILENAME=DomainTemplate.jar
DO_EXTERNAL_APPS=false
DO_SQL_SCRIPTS=false
EXTRA_FILES_ARCHIVE=extra_files.jar
FARM_PREFIX=Farm01_EMCLI
FMWPROV_ISCLONE=false
FMWPROV_ISDBPROV=false
FMWPROV_ISGOLD=true
FMWPROV_ISINSTALL=false
FMW_COMPONENT=DANS_FFT4/Dans_FFT4_GI_FMWHome
FMW_COMPONENT_FILE=archive.jar
GOLD_IMAGE_FILE_NAME=archive.jar
INSTALL_FMW=true
INSTALL_PRODUCT=false
INSTALL_RCU=false
IS_EXTERNAL_FILE=false
NOT_WINDOWS=true
PREREQ_ONLY_DP=false
PROVISION_MODE=GOLD
RCU_COMPONENT=n/a
REF_SIZE_FILE=sizeprereq
REF_TARGET_ZIP=prereq.zip
REF_TEMPLATE_FILE_NAME=template.jar
REF_TEMPLATE_NAME=mytemplate
RUNNING_WITH_INTERVIEW=true
RUN_RCU=false
SECURE_CONFIG_PROPERTIES=.PasswordEncrypted:welcome1,welcome1,welcome1,welcome1,welcome1,welcome1,welcome1,welcome1
SESSION_TS_LOC=//20110711090737
SIZE_STRING=mw_home_size=1635861705,work_dir_size=3271723410
SQL_ARCHIVE_FILE_NAME=sql-files.zip
START_MODE=ALL
TEMPLATE_COMPONENT=DANS_FFT4/Dans_FFT4_GI_Domain
TEMPLATE_COMPONENT_FILE=DomainTemplate.jar
USE_OWNER_CREDENTIALS=true
USE_SHARED_FMW_HOME=false
Submit the procedure with the generated instanceFMWData.properties properties file as the input:
emcli submit_procedure -input_file=data:<input_properties_file> -procedure=<proc_guid> -instance_name=<optional_DP_Instance_Name>

./emcli submit_procedure -input_file=data:instanceFMWData.properties -procedure=B35E10B1F154B4EEE040578CD78179DC
Scaling Up or Scaling Out Middleware Deployment Procedure
The process of increasing a cluster's capacity by adding additional server instances to the cluster on an existing machine, or adding machines to the cluster to host the new server instance, is called Scaling up. Scaling Up and Scaling Out Managed Server can be achieved through the command line using EM CLI commands available in Enterprise Manager 12c.
In this use case, the Instance GUID of the SCALEUP procedure is retrieved, which in turn is used to retrieve the input properties file of this instance of the procedure. After making necessary updates to the properties file, like adding another user-friendly so on, the procedure is submitted with the updated properties file as the input:
Here is the step-by-step process:
To retrieve the GUID of the Deployment Procedure, run the following command:
./emcli get_procedures | grep SCALEUP_

The output appears in the following format:
<proc_guid>, <procedure_type>, <Procedure_name>, <Dsplay name>, <version>, <Parent procedure name>

For example:
./emcli get_procedure | grep SCALEUP
B35E10B1F154B4EEE040578CD78179DC, FMW Provisioning, SCALEUP DP, Scale up/Scale out Middleware, 2.0, ORACLE
Use the Instance GUID retrieved in the previous step to get input properties of an instance of the procedure:
./emcli get_instance_data -instance=<instance_guid> -exec=<execution_guid>

For example:

emcli get_instance_data -instance=B35E10B1F140B4EEE040578CD78179DC > instanceData.properties
A properties file with the name instanceData.properties is created.
Note:
This step is valid only if the instances of the procedure is available, which means that the procedure should have been submitted at least once in the past. If you have never submitted the procedure, then you may see an error message as follows:Instance with GUID=<guid> is not found in repository. Please make sure the value is correct and try again.
Use an editor to open the generated properties file instanceData.properties, and update the existing values in the properties file.
Submit the procedure with the generated properties file as the input:
./emcli submit_procedure -input_file=data:<input_properties_file> -procedure=<proc_guid> -instance_name=<optional_DP_Instance_Name>

./emcli submit_procedure -input_file=data:instanceData.properties -procedure=B35E10B1F140B4EEE040578CD78179DC
This use case describes how to provision a User Defined Deployment Procedure (UDDP) using the EM CLI commands available in Cloud Control. This use case essentially covers, creating the UDDP using the Cloud Control UI, and then submitting the UDDP using the EM CLI commands.
In this use case, a User Defined Deployment Procedure to provision JRE6 on a linux host abc.example.com is created using the Cloud Control UI. Steps like Transfer JRE and Check JRE Version are added to the procedure, and the procedure is submitted with a unique submission name. EM CLI command is then used to retrieve the instance GUID of the procedure submitted. Minor modfications are made to the properties file, and then submitted through EM CLI.
Ensure that you meet the following prerequisites:
Log in to Cloud Control as a designer.
Create Software Library directive to install JRE6 on Linux in the following directory: /software_library/provisioning/install_jre6_linux32. Note, you can choose any directory that you want.
Create Software Library component containing hotspot JRE6 for Linux in the following directory: /software_library/provisioning/hotspot_jre6_linux32.
To add phases and steps to User Defined Deployment Procedure (UDDP), log in to Cloud Control as a Designer, and follow these steps:
In Cloud Control, from the Enterprise menu, select Provisioning and Patching, then select Procedure Library.
On the Provisioning page, from the Actions menu select Create New, and click Go.
Provide a unique name for your procedure UDDPTest , and click Procedure Steps tab.
On the Procedure Variables tab, add a procedure variable called destination_path.
Select the Default Phase, and click Insert to add a new step to the phase. On the Create wizard select Type as Library:Component. The page refreshes, and a five-step wizard appears.
On the Create page, enter a unique name Transfer JRE, and then click Next.
On the Select Component page, select the Component hotspot_jre6_linux32.
On the Select Directive page, select the directive install_jre6_linux32.
On the Map Properties page, map the directive properties with the variables defined. For example, set the destination_path directive property to Choose Variable, and then choose the procedure variable that you set destination_path.
On the review page, review the details, and click Finish.
Select the step Transfer JRE, and click Insert. On the Create Wizard, select Type Host Command. The page refreshes, and a three-step wizard appears.
On the Create page, enter a unique name Check JRE Version, and then click Next.
On the Enter Command page, enter the following command:
${data.destination_path}/jre1.6.0_23/bin/java -version
On the review page, review the details, and click Finish.
Go back to the Procedure Library page, and select the UDDPTest procedure that you just created, and click Launch. To complete the wizard enter the following details: target where you want to provision your procedure, variable (destination path: /tmp), credential info, and notification information.
Once you have provided all the details, click Submit. Enter the a unique Submission name FirstUDDP.
After the procedure has run, verify the output of the Check JRE Version step. Ideally the version should be JRE6.
Use EM CLI commands to submit the procedure instance:
Run the following command to retrieve a list of all the procedures that you have submitted, and note down the instance ID:
emcli get_instances
For example: emcli get_instances -type=DemoNG
Run the following command to get a list of inputs submitted for your procedure:
emcli get_instance_data - instance=<procedure_instance_ID>
For example: emcli get_instance_data -instance=16B15CB29C3F9E6CE040578C96093F61 > mydp.properties
Edit the file (mydp.properties), and change the values of the property destination path to /scratch.
Submit the procedure with the modified properties file as the input:
emcli submit_procedure -input_file=data:<input_file> -name=<procedure_name> -procedure=<procedure_guid>
For example: emcli submit_procedure -input_file=data:mydp.properties -name=UDDPTest -procedure=16B15CB29C3F9E6CE040578C96093F61
This procedure describes how to create a patch plan, update the values in them, and submit them to deploy patches on the selected targets. This workflow captures end-to-end steps on patching WLS targets. The process of patching is the same irrespective of the targets selected.
To patch WebLogic Server targets, follow these steps:
Run the following command to search for the release ID of the Oracle WebLogic Release 10.3.5:
emcli list_aru_releases -name="10.3.5"
Output:
Release ID     Release Name    Long Release Name
8191035020     10.3.5.0.2      WLS 10.3.5.0.2
8191035010     10.3.5.0.1      WLS 10.3.5.0.1
8191035000     10.3.5          WLS 10.3.5
95103500       10.3.5          WLS 10.3.5
Run the following command to search for the produc ID of Oracle WebLogic:
emcli list_aru_products -name="Oracle WebLogic Server"
Output:
Product ID    Product Name
15991         Oracle WebLogic Server
16725         Oracle WebLogic Server Virtual Edition
Run the following command to search for the platform ID of a Generic Platform:
emcli list_aru_platform -name="Generic Platform"
Output:
Platform ID    Platform Name
2000            Generic Platform
1204            NLS Generic Platform
Search for the Patch ID using the product, release, and platform details that you have from the previous steps as followings:
emcli search_patches -product=15991 -release=8191035000   -platform=2000

Output:
9561331    Generic PLATFORM  -  10.3.5 Oracle WebLogic Server 10.3.5    Generic    American English        Recommended     Generic Platform
Create a patch-target map (properties) file using the vi editor, and supply information like Patch ID, Release ID, and Platform ID, Language ID, and so on. Here is a sample properties file:
vi create.props

patch.0.patch_id=9561331
patch.0.release_id=8191035000
patch.0.platform_id=2000
patch.0.language_id=0
patch.0.target_name=/Farm01_soa_domain/soa_domain
patch.0.target_type=weblogic_domain
Run the following command to create the plan, and supply the newly created properties file (create.props) as input:
emcli create_patch_plan -name=demo1 -input_file=data:create.props

Output:
The Patch Plan "demo1" is successfuly created.
To view the user-editable fields of an existing plan, and save the output to a properties file run the following command:
emcli get_patch_plan_data -name=demo1 >set.props

vi set.props
Output:
name=demo1
description=
deployment_date=
planPrivilegeList=VIEWER:ADMIN:VIEW;OPER:ADMIN:VIEW;DESIGNER:ADMIN:VIEW

patch.0.patch_id=9561331
patch.0.release_id=8191035000
patch.0.platform_id=2000
patch.0.language_id=0
patch.0.target_name=/Farm01_soa_domain/soa_domain
patch.0.target_type=weblogic_domain

deploymentOptions.StageLocation=%emd_emstagedir%
deploymentOptions.AdvancedOPatchOptions=AllNodes
deploymentOptions.StagePatches=true
deploymentOptions.rollbackMode=false
Edit the properties file (set.props) using any editor to change the rollback mode to true:
name=demo1
description=
deployment_date=
planPrivilegeList=VIEWER:ADMIN:VIEW;OPER:ADMIN:VIEW;DESIGNER:ADMIN:VIEW

patch.0.patch_id=9561331
patch.0.release_id=8191035000
patch.0.platform_id=2000
patch.0.language_id=0
patch.0.target_name=/Farm01_soa_domain/soa_domain
patch.0.target_type=weblogic_domain

deploymentOptions.StageLocation=%emd_emstagedir%
deploymentOptions.AdvancedOPatchOptions=AllNodes
deploymentOptions.StagePatches=true
deploymentOptions.rollbackMode=true
To save the patch plan with the new edited data, run the following command:
emcli set_patch_plan_data -name=demo1 -input_file=data:set.props

Output:
It is successfully updating deployment options from the patch plan.
To verify the status of the patch plan, run the following EM CLI command:
emcli show_patch_plan -name=demo1 -info

Output:
<plan>
  <planDetails>
<plan_id>EDD74FFF006DD0EE6D28394B8AAE</plan_id>
<name>demo1</name>
<type>PATCH</type>
<description/>
<conflict_check_date>Tue Feb 21 18:04:04 PST 2012</conflict_check_date>
<conflict_check_date_ms>1329876244000</conflict_check_date_ms>
<is_deployable>1</is_deployable>
<plan_status>CONFLICTS</plan_status>
<review_status>CONFLICT_FREE</review_status>
<created_date>Tue Feb 21 17:40:47 PST 2012</created_date>
<created_date_ms>1329874847000</created_date_ms>
<created_by>SYSMAN</created_by>
<last_updated_date>Tue Feb 21 17:58:29 PST 2012</last_updated_date>
<last_updated_date_ms>1329875909000</last_updated_date_ms>
<last_updated_by>SYSMAN</last_updated_by>
<grant_priv>yes</grant_priv>
<user_plan_privilege>FULL</user_plan_privilege>
<see_all_targets>N</see_all_targets>
<homogeneousGroupLabel>Oracle WebLogic Domain 10.3.5.0 (Linux x86-64)</homogeneousGroupLabel>
<executeGuid/>
<executeUrl/>
<planDetails/>
After you have created and updated the patch plan with all the relevant data, you can submit your patch plan in the following sequence of modes. The EM CLI command used to submit the patch plan is:
emcli submit_patch_plan -name=demo1 -action=analyze

Output:
The action "analyze" is successfully submitted on the Patch Plan "demo1", now "analyze" is in progress.
To verify the status of the patch plan submitted, run the following EM CLI command:
emcli show_patch_plan -name=demo1 -info

Output:
<plan>
  <planDetails>
<plan_id>EDD74FFF006DD0EE6D28394B8AAE</plan_id>
<name>demo1</name>
<type>PATCH</type>
<description/>
<conflict_check_date>Tue Feb 21 18:04:04 PST 2012</conflict_check_date>
<conflict_check_date_ms>1329876244000</conflict_check_date_ms>
<is_deployable>1</is_deployable>
<plan_status>CONFLICTS</plan_status>
<review_status>CONFLICT_FREE</review_status>
<created_date>Tue Feb 21 17:40:47 PST 2012</created_date>
<created_date_ms>1329874847000</created_date_ms>
<created_by>SYSMAN</created_by>
<last_updated_date>Tue Feb 21 17:58:29 PST 2012</last_updated_date>
<last_updated_date_ms>1329875909000</last_updated_date_ms>
<last_updated_by>SYSMAN</last_updated_by>
<grant_priv>yes</grant_priv>
<user_plan_privilege>FULL</user_plan_privilege>
<see_all_targets>N</see_all_targets>
<homogeneousGroupLabel>Oracle WebLogic Domain 10.3.5.0 (Linux x86-64)</homogeneousGroupLabel>
<executeGuid/>
<executeUrl/>
<planDetails/>
To check if there are any conflicts, run the following command:
emcli show_patch_plan -name=planName -analysisResults

Output:
<plan_status>CONFLICTS</plan_status>
You can verify the plan you have created by logging in to Enterprise Manager Cloud Control, from Enterprise menu, select Provisioning and Patching, then select Patches and Updates. On the home page, you will see the patch plan demo1 that you have created using the command line as follows:

You can resolve the conflicts using the UI, and then submit the patch plan.
Run the command show_patch_plan after resolving the conflicts to verify the status of the plan as follows:
Output:
<plan>
  <planDetails>
<plan_id>EDD74FFF006DD0EE6D28394B8AAE</plan_id>
<name>demo</name>
<type>PATCH</type>
<description/>
<conflict_check_date>Tue Feb 21 18:04:04 PST 2012</conflict_check_date>
<conflict_check_date_ms>1329876244000</conflict_check_date_ms>
<is_deployable>1</is_deployable>
<plan_status>INPROGRESS</plan_status>
<review_status>CONFLICT_FREE</review_status>
<created_date>Tue Feb 21 17:40:47 PST 2012</created_date>
<created_date_ms>1329874847000</created_date_ms>
<created_by>SYSMAN</created_by>
<last_updated_date>Tue Feb 21 17:58:29 PST 2012</last_updated_date>
<last_updated_date_ms>1329875909000</last_updated_date_ms>
<last_updated_by>SYSMAN</last_updated_by>
<grant_priv>yes</grant_priv>
<user_plan_privilege>FULL</user_plan_privilege>
<see_all_targets>N</see_all_targets>
<homogeneousGroupLabel>Oracle WebLogic Domain 10.3.5.0 (Linux x86-64)</homogeneousGroupLabel>
<executeGuid>BA8E3904DDB36CFFE040F00A5E644D13</executGuid>
<executeUrl>/em/console/paf/procedureStatus?executionGUID=BA8E3904DDB36CFFE040F00A5E644D13</executeUrl>
<planDetails/>
Run the following command to determine the status of the patch plan execution:
emcli get_instance_status -instance=BA8E3904DDB36CFFE040F00A5E644D13

Output:
BA8E3904DDB36CFFE040F00A5E644D13, PatchOracleSoftware, demo1_Analysis_Tue Mar 06 02:08:02 PST 012, EXECUTING
After a successful analysis, you can deploy/prepare the patch plan. To do so, run the following command with action deploy:
emcli submit_patch_plan -name=demo1 -action=deploy

Output:
The action "deploy" is successfully submitted on the Patch Plan "demo1", now "deploy" is in progress
Use the Cloud Control UI to see of the submitted plan has successfully been deployed. Alternately, you can verify the same using the EM CLI command:
emcli get_job_execution_detail -execution=79CAF6A6DAFCFEE6654C425632F19411 -xml
To upload a zip file as a new component, follow these steps:
Any new entity created in Software Library must be placed in a folder. You can either choose an existing folder, or create a new one. To do so, follow these sections:
To create a new folder, the parent folder should be identified. If the parent folder is the root folder (displayed as the top level "Software Library" folder), then use the following EM CLI verb:
emcli create_swlib_folder
-name="myFolder"
-desc="myFolder description"
-parent_id=ROOT
Output:
Folder myFolder is created in Software Library folder, identifier is oracle:defaultService:em:provisioning:1:cat:C771B5A38A484CE3E40E50AD38A69D2.
You can use the identifier of the newly created folder that is part of the output message when creating or modifying entities, or for creating other sub-folders.
To choose an existing folder, you can use either of the following approaches:
Approach 1: Using Enterprise Manager UI
Follow these steps:
From the Enterprise menu, select Provisioning and Patching, then select Software Library.
On the Software Library home page, from View menu select Columns, and then select Internal ID. By default, the Internal ID column is hidden.
Copy the Internal ID column value of the folder you want.
Approach 2: Using Enterprise Manager Command Line Interface
Use the following EM CLI verb:
emcli list_swlib_folders
-parent_id=ROOT
-show_folder_id
Output:
Java EE Provisioning,Java EE Application Provisioning Entities,oracle:defaultService:em:provisioning:1:cat:C771B5AAF4A4EED9E040E50AD38A6E98
MultiOMS,List of Oracle shipped Directives,oracle:defaultService:em:provisioning:1:cat:C771B5AAF1ACEED9E040E50AD38A6E98
myFolder,myFolder description,oracle:defaultService:em:provisioning:1:cat:C771B5A38A484CE3E040E50AD38A69D2
OSBProvisioning,OSBProvisioning Entities,oracle:defaultService:em:provisioning:1:cat:C771B5AAF3F1EED9E040E50AD38A6E98
..........
If the folder you want to access is a sub-folder of myFolder, then use the following verb to list the sub-folders by specifying the identifier of myFolder, as follows:
emcli list_swlib_folders
-parent_id='oracle:defaultService:em:provisioning:1:cat:C771B5A38A484CE3E040E50AD38A69D2'
-show_folder_id
Output:
mySubFolder,mySubFolder description,oracle:defaultService:em:provisioning:1:cat:C771B5A38A494CE3E040E50AD38A69D2
To create an entity of type Component and subtype Generic Component under mySubFolder folder, follow these sections:
Step 1a. Identifying the Entity Type
To list all the available types in Software Library, use the following verb:
emcli list_swlib_entity_types
-show_type_id
Output:
Component, COMP_Component
Directives, COMP_Directives
Bare Metal Provisioning, BMPType
Virtualization, Virtualization
Step 1b. Identifying the Entity Subtype
To list all the subtypes for the component type, use the following verb:
emcli list_swlib_entity_subtypes
-entity_type_id=COMP_Component
-show_subtype_id
Output:
Generic Component, SUB_Generic
Oracle Database Software Clone, SUB_OracleDB
Configuration Template, SUB_ConfigTmpl
Oracle Application Server, SUB_OracleAS
Self Update, SUB_SelfUpdate
Oracle Clusterware Clone, SUB_OracleCRS
OSB Resource, SUB_OSBResource
Oracle Software Update, SUB_OraSoftUpdate
Java EE Application, SUB_JavaEEApplication
Installation Media, SUB_InstallationMedia
Database Template, SUB_DbCreateTemplate
Database Provisioning Profile, SUB_DbProfile
WebLogic Domain Provisioning Profile, SUB_FMWBundle
WebLogic Domain Clone, SUB_WLSTemlpate
Oracle Middleware Home Gold Image, SUB_FMWImage
Step 2. Creating a Generic Component Entity
To create a generic component, run the following verb:
emcli create_swlib_entity
-name=myEntity
-type=COMP_Component
-subtype=SUB_Generic
-folder_id='oracle:defaultService:em:provisioning:1:cat:C771B5A38A494CE3E040E50AD38A69D2'
-desc='myEntity description'
-attr="PRODUCT:Example"
-attr="PRODUCT_VERSION:3.1"
-attr="VENDOR:Example Corp"
-note='first comment for myEntity
Note:
The type and subtype options are optional when creating a Generic Component, but has been used explicitly for this illustration.Output:
Entity 'myEntity' is created in 'mySubFolder' folder, identifier is 'oracle:defaultService:em:provisioning:1:cmp:COMP_Component:SUB_Generic:C77200CA9DC1E7AAE040E50AD38A1599:0.1'
Note:
You can use the identifier of the newly created entity that is part of the output message when uploading files or modifying the entity.To verify the newly created entity, use the following verb:
emcli list_swlib_entities
-name=myEntity
-folder_id='oracle:defaultService:em:provisioning:1:cat:C771B5A38A494CE3E040E50AD38A69D2'
Output:
myEntity,0.1,myEntity description,Ready,Component,Generic Component,Untested,SYSMAN
To upload a zip file to an existing entity myEntity, use the following verb:
emcli upload_swlib_entity_files
-entity_rev_id='oracle:defaultService:em:provisioning:1:cmp:COMP_Component:SUB_Generic:C77200CA9DC1E7AAE040E50AD38A1599:0.1'
-file="/scratch/user1/patch13653908.zip;newfile1.zip"
-host="adc2190533.us.example.com"
-credential_name=mycred11
-credential_owner=sysman
Note:
A new revision of the entitymyEntity will be created after the upload is complete.Output:
Upload of file(s) initiated, this may take some time to complete...
Upload of file(s) completed successfully.
Entity 'myEntity (0.2)' in 'mySubFolder' folder has been created, identifier is 'oracle:defaultService:em:provisioning:1:cmp:COMP_Component:SUB_Generic:C77200CA9DC1E7AAE040E50AD38A1599:0.2'.
Alternately, to refer to a zip file present in an HTTP reference location, say myScripts, use the following verb:
emcli refer_swlib_entity_files
-entity_rev_id='oracle:defaultService:em:provisioning:1:cmp:COMP_Component:SUB_Generic:C77200CA9DC1E7AAE040E50AD38A1599:0.1'
-file='scripts/perl/script1.pl;new_script.pl'
-refer_storage='myScripts;Http'
Output:
Entity 'myEntity (0.2)' in 'mySubFolder' folder has been created, identifier is 'oracle:defaultService:em:provisioning:1:cmp:COMP_Component:SUB_Generic:C77200CA9DC1E7AAE040E50AD38A1599:0.2'.
To verify the newly created entity, use the following verb:
emcli list_swlib_entities
-name=myEntity
-folder_id='oracle:defaultService:em:provisioning:1:cat:C771B5A38A494CE3E040E50AD38A69D2'
Output:
myEntity,0.1,myEntity description,Ready,Component,Generic Component,Untested,SYSMAN
Following are the limitations of using EM CLI for running the deployment procedures:
You cannot add or edit steps and phases using EM CLI commands. To do so, you must log in to Cloud Control, and follow the steps described in the section Adding Phases or Steps.
You cannot define new variables to be used in the deployment procedures through EM CLI, this can be done only through the Cloud Control UI. For more information about procedure variables, see Procedure Variables.
You cannot track the detailed execution info (such as failures) of an instance through EM CLI, which is possible through the Cloud Control UI.
To set the My Oracle Support preferred credentials, you must log in to the Enterprise Manager Cloud Control. There is no command line option to do so.
Patches can be uploaded to Software Library only through Cloud Control, you can not do the same using the EM CLI.
|
Copyright © 2012, Oracle and/or its affiliates. All rights reserved. Legal Notices |
|