| Oracle® Enterprise Manager Lifecycle Management Administrator's Guide 12c Release 2 (12.1.0.2) Part Number E27046-08 |
|
|
PDF · Mobi · ePub |
| Oracle® Enterprise Manager Lifecycle Management Administrator's Guide 12c Release 2 (12.1.0.2) Part Number E27046-08 |
|
|
PDF · Mobi · ePub |
This appendix describes the settings you must make on the hosts before you can use them for provisioning and patching tasks. In particular, this appendix covers the following:
To use a host for provisioning a database, you must ensure that groups such as oinstall, dba, oper, and asmadmin are set up. Also, the user running these provisioning tasks must be added to these groups. To create the following groups, and ensure that the host user is part of these groups, you can run the following commands:
To create the database groups:
groupadd oinstall
groupadd dba
groupadd oper
groupadd asmadmin
To add a host user to these groups, run the following command, and enter the password when prompted.
useradd -u 500 -g oinstall -G dba,oper,asmdba oracle
Where,
-u option specifies the user ID.
-g option specifies the primary group, which must be the Oracle Inventory group, for example oinstall.
-G option specifies the secondary groups, which must include the OSDBA group, and, if required, the OSOPER and ASMDBA groups, for example, dba, asmdba, or oper.
To improve the performance of the software on Linux systems, increase the following shell limits for the Oracle software owner users such as crs, oracle, asm, and so on. To do so, run the following commands:
Add the following values into the limits.conf file located under the /etc/security/ directory:
oracle soft nproc 2047
oracle hard nproc 16384
oracle soft nofile 1024
oracle hard nofile 65536
Add the following line into the /etc/pam.d/login file, or edit the /etc/pam.d/login file to include the following if it does not exist already:
session required pam_limits.so
Provisioning Applications require some of the scripts to be run as a super user. To do so, you must ensure that host user has root privileges. To authorize other users' root privileges, you can use the authentication utilities such as SUDO, PowerBroker, and so on. This support is offered in Cloud Control using the Privilege Delegation mechanism. Technically, Privilege Delegation is a framework that allows you to use either SUDO or PowerBroker to perform an activity with the privileges of another user (locked accounts).
For more information about configuring Privilege Delegation Settings, see Configuring Privilege Delegation Settings.
Meet the following recommended host settings before proceeding with the provisioning tasks:
Note:
For details about all the recommended parameters, refer the following link:http://www.oracle.com/technetwork/topics/linux/validated-configurations-085828.htmlEnter the commands displayed in the following table to view the current values of the kernel parameters. Make a note of the current values and identify any values that you must change. To change any of the existing values, you will have to add or edit the variable values in the /etc/sysctl.conf file.
Note:
To change the current kernel parameters, run the following command with root user privileges:/sbin/sysctl -p
| Parameter | Command |
|---|---|
| semmsl, semmns, semopm, and semmni | # /sbin/sysctl -a | grep sem
This command displays the value of the semaphore parameters in the order listed. |
| shmall, shmmax, and shmmni | # /sbin/sysctl -a | grep shm
This command displays the details of the shared memory segment sizes. |
| file-max | # /sbin/sysctl -a | grep file-max
This command displays the maximum number of file handles. |
| ip_local_port_range | # /sbin/sysctl -a | grep ip_local_port_range
This command displays a range of port numbers. |
| rmem_default | # /sbin/sysctl -a | grep rmem_default |
| rmem_max | # /sbin/sysctl -a | grep rmem_max |
| wmem_default | # /sbin/sysctl -a | grep wmem_default |
| wmem_max | # /sbin/sysctl -a | grep wmem_max |
Note:
For more information about the Kernel requirements, see the Oracle Database Installation Guide available in the following location:http://www.oracle.com/pls/db112/portal.portal_db?selected=11&frame=#linux_installation_guidesIn case of a clustered environment, ensure that each member node of the cluster is set as closely as possible to the same date and time. To do so, Oracle recommends using the Network Time Protocol (NTP) feature available in you operating systems, with all nodes using the same reference Network Time Protocol server.
For Oracle Cluster Time Synchronization Service (ctssd) to synchronize the times of the Oracle RAC nodes, NTP must be configured. If you are using NTP, then do the following:
Add the -x option to the /etc/sysconfig/ntpd file, and restart ntpd as follows:
OPTIONS="-x -u ntp:ntp -p /var/run/ntpd.pid"
Restart Network Time Protocol server:
# service ntpd restart
Check the configuration level as follows:
chkconfig --level 35 nscd on
Start the Name Service Cache Daemon (nscd):
service nscd start
Run the following command as a root user to ensure that you have the required packages installed:
rpm -q binutils elfutils-libelf elfutils-libelf-devel glibc glibc-common glibc-devel gcc gcc-c++ libaio libaio-devel libstdc++ libstdc++-devel make compat-libstdc++ sysstat unixODBC unixODBC-devel iscsi-initiator-utils libgcc
If the packages are not installed, then refer the following link to download and install the required packages:
http://www.oracle.com/technetwork/topics/linux/validated-configurations-085828.html
Ensure that the host meets the following memory requirements:
A minimum of least 1 GB of physical RAM should be available. To determine the current physical RAM size on your host, run the following command:
grep MemTotal /proc/meminfo
The following table describes the relationship between the installed RAM and the configured swap space recommendation:
| Available RAM | Swap Space Requirements |
|---|---|
| Between 1 GB and 2 GB | 1.5 times the size of RAM |
| Between 2 GB and 8 GB | Equal to the size of RAM |
| More than 8 GB | 0.75 times the size of RAM |
To determine the amount of disk space available in the /tmp directory, run the following command:
df -kh /tmp
In case of a clustered environment, ensure that each node has at least two network adapters or network interface cards (NICs). One for the public network interface, and the other for the private network interface (the interconnect)
Following are the network configuration requirements:
| Public Network Interface | Private Network Interface |
|---|---|
| The public interface names associated with the network adapters for each network must be the same on all nodes. | The private interface names associated with the network adaptors should be the same on all nodes. |
| Each network adapter must support TCP/IP | The interconnect must support the user datagram protocol (UDP) using high-speed network adapters and switches that support TCP/IP (Gigabit Ethernet or better required).
Note: For the private network, the endpoints of all designated interconnect interfaces must be completely reachable on the network. There should be no node that is not connected to every private network interface. You can test whether an interconnect interface is reachable using a ping command. |
Before starting the installation, you must have the following IP addresses available for each node:
An IP address with an associated host name (or network name) registered in the DNS for the public interface. If you do not have an available DNS, then record the host name and IP address in the system hosts file, /etc/hosts.
One virtual IP (VIP) address with an associated host name registered in a DNS. If you do not have an available DNS, then record the host name and VIP address in the system hosts file, /etc/hosts.
A private IP address with a host name for each private interface.
For example, for a two node cluster where each node has one public and one private interface, you might have the configuration shown in the following table for your network interfaces, where the hosts file is /etc/hosts:
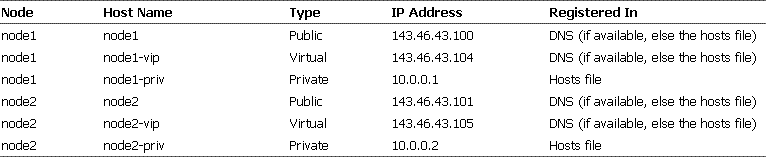
To enable VIP failover, the configuration shown in the preceding table defines the public and VIP addresses of both nodes on the same subnet, 143.46.43.
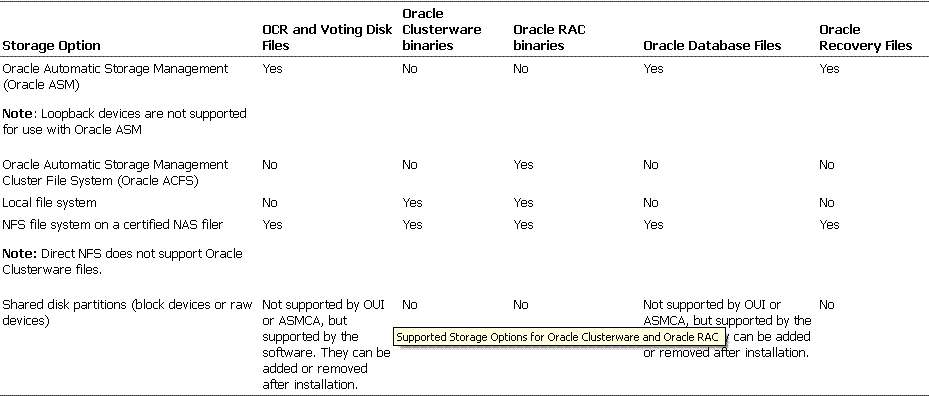
There are two ways of storing Oracle Clusterware files:
Oracle Automatic Storage Management (Oracle ASM): You can install Oracle Clusterware files (Oracle Cluster Registry and voting disk files) in Oracle ASM disk groups.
A supported shared file system: Supported file systems include the NFS & OCFS.
The following table describes the various storage options for Oracle Clusterware and Oracle RAC:
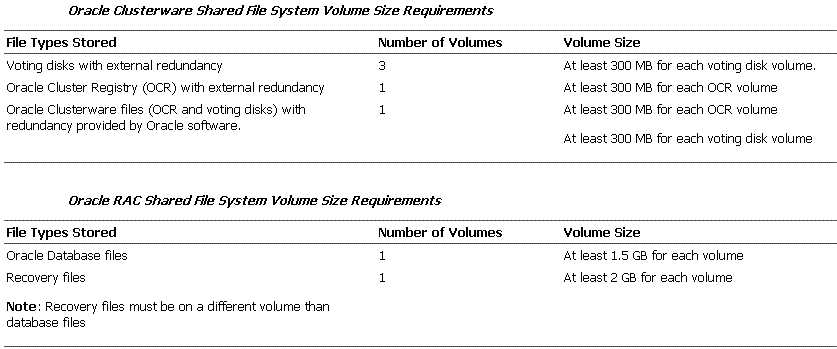
The following table displays the File System Volume Size requirements:
Ensure that the installation directories where you plan to provision the Oracle Products are clean. As per Optimal Flexible Architecture (OFA) standards, Oracle base directory should be available in the following path:
/mount_point/app/oracle_sw_owner
Where, mount_point is the mount point directory for the file system that will contain the Oracle software.
Note:
Ensure that the user performing the installation has write access on the mount points. To verify that the user has the required permissions, run the following command:chown -R oracle:oinstall <mount point>
For example:
If the permission is denied while mounting:
[root@node2-pub ~]# mkdir -p /u01/app/test
[root@node2-pub ~]# permission denied
To resolve the permission issue, run the following command:
[root@node2-pub root]# chown -R oracle:oinstall /u01
|
Copyright © 2012, Oracle and/or its affiliates. All rights reserved. Legal Notices |
|