
Version Control (revision control or source control) is a way of recording changes to a file or collection of files over time so that you can recall specific versions later. A version control system (or VCS in short) is a tool that records changes to files on a filesystem.
There are many version control systems out there, but Git is currently the most popular and frequently used, especially for source code management. Version control can actually be used for nearly any type of file on a computer, not only source code.
Version control systems/tools offer several features that allow individuals or a group of people to:
- create versions of a project.
- track changes accurately and resolve conflicts.
- merge changes into a common version.
- rollback and undo changes to selected files or an entire project.
- access historical versions of a project to compare changes over time.
- see who last modified something that might be causing a problem.
- create a secure offsite backup of a project.
- use multiple machines to work on a single project and so much more.
A project under a version control system such as Git will have mainly three sections, namely:
- a repository: a database for recording the state of or changes to your project files. It contains all of the necessary Git metadata and objects for the new project. Note that this is normally what is copied when you clone a repository from another computer on a network or remote server.
- a working directory or area: stores a copy of the project files which you can work on (make additions, deletions and other modification actions).
- a staging area: a file (known as index under Git) within the Git directory, that stores information about changes, that you are ready to commit (save the state of a file or set of files) to the repository.
There are two main types of VCSs, with the main difference being the number of repositories:
- Centralized Version Control Systems (CVCSs): here each project team member gets their own local working directory, however, they commit changes to just a single central repository.
- Distributed Version Control Systems (DVCSs): under this, each project team member gets their own local working directory and Git directory where they can make commits. After an individual makes a commit locally, other team members can’t access the changes until he/she pushes them to the central repository. Git is an example of a DVCS.
In addition, a Git repository can be bare (repository that doesn’t have a working directory) or non-bare (one with a working directory). Shared (or public or central) repositories should always be bare – all Github repositories are bare.
Learn Version Control with Git
Git is a free and open source, fast, powerful, distributed, easy to use, and popular version control system that is very efficient with large projects, and has a remarkable branching and merging system. It is designed to handle data more like a series of snapshots of a mini filesystem, which is stored in a Git directory.
The workflow under Git is very simple: you make modifications to files in your working directory, then selectively add just those files that have changed, to the staging area, to be part of your next commit.
Once you are ready, you do a commit, which takes the files from staging area and saves that snapshot permanently to the Git directory.
To install Git in Linux, use the appropriate command for your distribution of choice:
$ sudo apt install git [On Debian/Ubuntu]
$ sudo yum install git [On CentOS/RHEL]
After installing Git, it is recommended that you tell Git who you are by providing your full name and email address, as follows:
$ git config –global user.name “Aaron Kili”
$ git config –global user.email “[email protected]”
To check your Git settings, use the following command.
$ git config –list

View Git Settings
Creates a New Git Repository
Shared repositories or centralized workflows are very common and that is what we will demonstrate here. For example, we assume that you have been tasked to setup a remote central repository for system administrators/programmers from various departments in your organization, to work on a project called bashscripts, which will be stored under /projects/scritpts/ on the server.
SSH into the remote server and create the necessary directory, create a group called sysadmins (add all project team members to this group e.g user admin), and set the appropriate permissions on this directory.
# mkdir-p /projects/scripts/
# groupadd sysadmins
# usermod -aG sysadmins admin
# chown :sysadmins -R /projects/scripts/
# chmod 770 -R /projects/scripts/
Then initialize a bare project repository.
# git init –bare /projects/scripts/bashscripts

Initialize Git Shared Repository
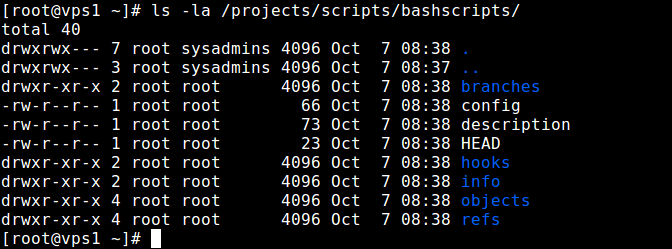
At this point, you have successfully initialized a bare Git directory which is the central storage facility for the project. Try to do a listing of the directory to see all the files and directories in there:
# ls -la /projects/scripts/bashscripts/
List Git Shared Repository
Clone a Git Repository
Now clone the remote shared Git repository to your local computer via SSH (you can also clone via HTTP/HTTPS if you have a web server installed and appropriately configured, as is the case with most public repositories on Github), for example:
$ git clone ssh://[email protected]_server_ip:/projects/scripts/bashscripts
To clone it to a specific directory (~/bin/bashscripts), use the command below.
$ git clone ssh://[email protected]_server_ip:/projects/scripts/bashscripts ~/bin/bashscripts
Clone Shared Git Repository to Local
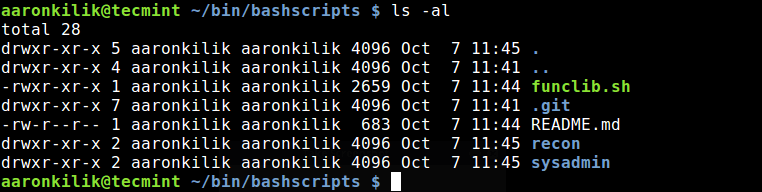
You now have a local instance of the project in a non-bare repository (with a working directory), you can create the initial structure of the project (i.e add a README.md file, sub-directories for different categories of scripts e.g recon to store reconnaissance scripts, sysadmin ro store sysadmin scripts etc.):
$ cd ~/bin/bashscripts/
$ ls -la
Create Git Project Structure
Check a Git Status Summary
To display the status of your working directory, use the status command which will shows you any changes you have made; which files are not being tracked by Git; those changes that have been staged and so on.
$ git status
Check Git Status
Git Stage Changes and Commit
Next, stage all the changes using the add command with the -A switch and do the initial commit. The -a flag instructs the command to automatically stage files that have been modified, and -m is used to specify a commit message:
$ git add -A
$ git commit -a -m “Initial Commit”
Do Git Commit
Publish Local Commits to Remote Git Repository
As the project team lead, now that you have created the project structure, you can publish the changes to the central repository using the push command as shown.
$ git push origin master
Push Commit to Centrol Git Repository
Right now, your local git repository should be up-to-date with the project central repository (origin), you can confirm this by running the status command once more.
$ git status
Check Git Status
You can also inform you colleagues to start working on the project by cloning the repository to their local computers.
Create a New Git Branch
Branching allows you to work on a feature of your project or fix issues quickly without touching the codebase (master branch). To create a new branch and then switch to it, use the branch and checkout commands respectively.
$ git branch latest
$ git checkout latest
Alternatively, you can create a new branch and switch to it in one step using the checkout command with the -b flag.
$ git checkout -b latest
You can also create a new branch based on another branch, for instance.
$ git checkout -b latest master
To check which branch you are in, use branch command (an asterisk character indicates the active branch):
$ git branch
Check Active Branch
After creating and switching to the new branch, make some changes under it and do some commits.
$ vim sysadmin/topprocs.sh
$ git status
$ git commit add sysadmin/topprocs.sh
$ git commit -a -m ‘modified topprocs.sh’
Merge Changes From One Branch to Another
To merge the changes under the branch test into the master branch, switch to the master branch and do the merge.
$ git checkout master
$ git merge test
Merge Test Branch into Master
If you no longer need a particular branch, you can delete it using the -d switch.
$ git branch -d test
Download Changes From Remote Central Repository
Assuming your team members have pushed changes to the central project repository, you can download any changes to your local instance of the project using the pull command.
$ git pull origin
OR
$ git pull origin master #if you have switched to another branch
Pull Changes from Central Repository
Inspect Git Repository and Perform Comparisons
In this last section, we will cover some useful Git features that keep track of all activities that happened in your repository, thus enabling you to view the project history.
The first feature is Git log, which displays commit logs:
$ git log
View Git Commit Logs
Another important feature is the show command which displays various types of objects (such as commits, tags, trees etc..):
$ git show
Git Show Objects
The third vital feature you need to know is the diff command, used to compare or show difference between branches, display changes between the working directory and the index, changes between two files on disk and so much more.
For instance to show the difference between the master and latest branch, you can run the following command.
$ git diff master latest
Show Difference Between Branches
Read Also: 10 Best Git Alternatives to Host Open Source Projects
Summary
Git allows a team of people to work together using the same file(s), while recording changes to the file(s) over time so that they can recall specific versions later.
This way, you can use Git for managing source code, configuration files or any file stored on a computer. You may want to refer to the Git Online Documentation for further documentation.