
New content management Connect server APIs are easy to integrate with programmatic deployment workflows.
Have you heard!? RStudio Connect 1.7.0 has support for programmatic deployment in the RStudio Connect Server API. These new APIs let your deployment engineers craft custom deployment workflows like these:
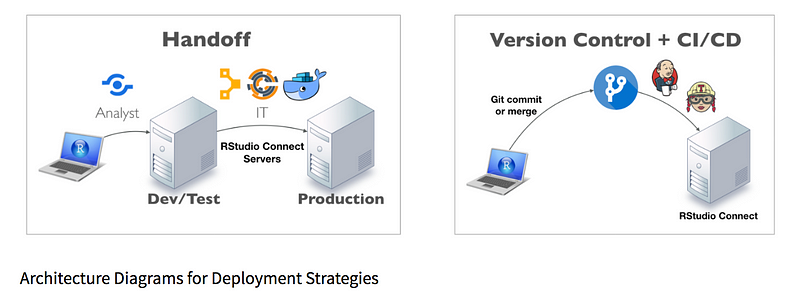
This article demonstrates programmatic deployment of a Shiny application with GitHub webhooks and a Jenkins Freestyle project.
What are we trying to build?
I have a data product (in this case a shiny application) deployed to my RStudio Connect server. I also have a GitHub repository for the application where I’ve version controlled the app code. I want to link and automate the application update process with my GitHub workflow, i.e. every time I push a code change to GitHub, I’d like the deployed application on Connect to automatically be updated with those changes.

This workflow assumes that the content has already been deployed to my Connect Server at least once. The initial deployment could be achieved programmatically or through traditional IDE push-button / rsconnect deployment methods. The content management API for RStudio Connect can be leveraged to perform the initial bundle upload programmatically.
To read more about the content management APIs and view existing recipes, please see the following resources:
- RStudio Connect API Reference
- User Guide API Cookbook (Deploying Content)
- Example deployment scripts and workflow considerations
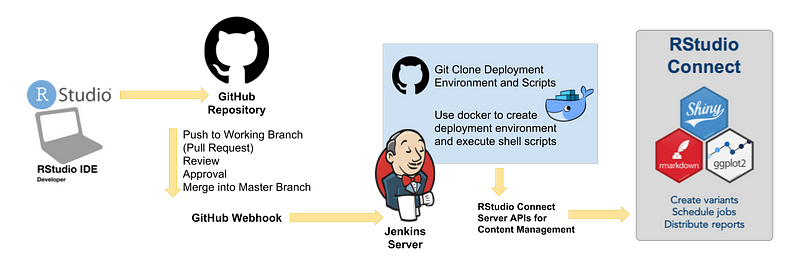
After reviewing the API documentation and example scripts, flesh out your plan to include actionable steps and tools. My updated diagram shows each process and the required resources for defining functional automation:
Note: I started this project with a brand new, clean Jenkins Server. I use Ansible to create (and tear down) small Jenkins servers that live for the duration of my experiments. This article will not cover the basics of installing and configuring a Jenkins server.
Development and Git Branching
Application development occurs in the RStudio IDE. I plan to create a git branching strategy so that new changes can be kept separate from the master branch and reviewed before merging. The GitHub repository I created to keep the application code can be viewed here:
GitHub repository for the Shiny application
– deployment-bundle: app.R, manifest.json
– README.md
This repository contains a README file (not required) and a single directory with all the application code (in this case only an app.R file) as well as the manifest file which can be generated with the rsconnect package in the RStudio IDE: rsconnect::rsconnect::writeManifest()
GitHub Webhooks
The next step of GitHub set up is to create a Webhook so that the Jenkins server can be notified of all new changes to Master.
In the GitHub repository, navigate to the Settings page, then select Webhooksfrom the left sidebar. Add a new webhook to see the management form as shown here:

For the Payload URL field, provide the URL of your Jenkins server with /github-webhook/ appended to it. These are the selections I set for the webhook:
Payload URL: http://[EXAMPLE-AWS-INSTANCE]/github-webhook/
Content type: application/json
Secret: [blank] — I did not use this
Event triggers: Just the push event
Active: Check
Jenkins GitHub Integration Plugin
Now that the webhook is in place, the next step is to configure the receiving end. Jenkins needs the GitHub Integration plugin to receive POST payloads coming from GitHub every time the push event triggers.
Add the GitHub plugin to Jenkins:
- Manage Jenkins > Manage Plugins

Check the Installed tab to see if the GitHub Integration Plugin already exists. If not, search for it in the Available tab, download and install.
Docker in Jenkins
In order to streamline the deployment build process for this project, I’ve chosen to use Docker image provided in the programmatic deployment example repo provided here: rstudio/connect-api-deploy-shiny.
There are many ways to incorporate the use of Docker containers into Jenkins projects. Rather than leverage an eternal container registry and a Jenkins-Docker plugin, I’ll show quick-and-dirty way, invoking it directly with shell commands.
Note: My Jenkins server is built with the Docker service installed, so this will work for my project, but it might not work for yours. Take the time to investigate what Docker integrations exist and are considered best practices if you are working on a shared or pre-existing Jenkins installation.
In a second GitHub repository, I’ve version controlled all the pieces of the deployment environment as well as the upload-and-deploy.sh script that will be used to interact with the RStudio Connect content management API. This repository is separate from the Shiny application code repo so that I can have a singular, centralized location for keeping just these pieces of the process.
GitHub repository for the dockerfile and deployment scripts:
– docker: Dockerfile
– upload-and-deploy.sh (modified from rstudio/connect-api-deploy-shiny)
– README.md
Create a Jenkins Project
All the parts are in place, so finally it’s time to put everything together in Jenkins.
Start a New Item > Freestyle Project
- Give your project a name (e.g. “basic-app-deploy”)
- I plan on linking this project to only one piece of content, so the name of the Jenkins project can reference my specific Shiny application.

Sidebar: Why Jenkins Freestyle?
If there were a crawl-walk-run strategy for working with Jenkins, Freestyle projects might be the crawl step. If you’re already familiar with Jenkins, you might be more interested in setting up a pipeline project or using a Jenkinsfile to structure the workflow.
Pros and Cons of Jenkins Freestyle:
Pro: New to Jenkins ?— low learning curve
Pro: Nice way to learn the Jenkins web interface
Pro: Quick way to accomplish simple jobs (this is not a complex build)
Con: Way too much clicking through web forms
Con: Job is not defined as code
Navigate the Freestyle Project Webform
Once you have a new project set up, step through the freestyle webform complete the configuration:
General
- Check: GitHub project
Project url: https://github.com/kellobri/basic-deploy-app.git/
Source Code Management
- Git — Repositories:
– Repository URL: https://github.com/kellobri/basic-deploy-app.git
– Branches to build: */master
Build Triggers
- Check: GitHub hook trigger for GITScm polling
Build Environment > Bindings
Programmatic deployment requires an RStudio Connect API key. Generate an API key through the Connect user interface:
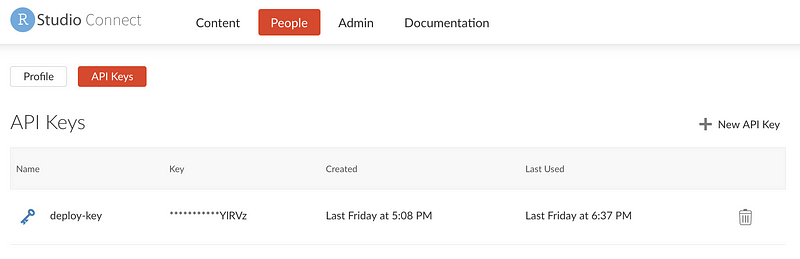
Add Credentials: Save the API key as a Secret Text in Jenkins Credentials Provider:
You can expose secret texts to the Build Environment through the Bindings option:
- Check: Use secret texts or files
Secret text:
– Variable: PUBLISHER_KEY (choose a name) - Credentials: Add > Jenkins > Add Credentials

Build
The build pane allows for many different types of task selections. For simplicity, I chose the Execute Shell Commands option. I created three blocks of Shell Command build tasks, but the separation was only for readability:
Execute Shell Block 1: Read in the Dockerfile and deployment shell script from GitHub
rm -rf prog-deploy-jenkins
git clone https://github.com/kellobri/prog-deploy-jenkins.git
stat prog-deploy-jenkins/docker/Dockerfile
chmod 755 prog-deploy-jenkins/upload-and-deploy.sh
Execute Shell Block 2: Build the Docker image
cd prog-deploy-jenkins/
docker build -t rstudio-connect-deployer:latest docker
Execute Shell Block 3: Run the Docker container and deployment script
docker run --rm \
--privileged=true \
-e CONNECT_SERVER="http://ec2-52-90-255-153.compute-1.amazonaws.com:3939/" \
-e CONNECT_API_KEY=$PUBLISHER_KEY \
-v $(pwd):/content \
-w /content \
rstudio-connect-deployer:latest \
/content/prog-deploy-jenkins/upload-and-deploy.sh 5c276b83-2eeb-427b-95a6-ac8915e22bfd /content/deployment-bundle
In this block, I reference the PUBLISHER_KEY credential created in the Build Environment step earlier.
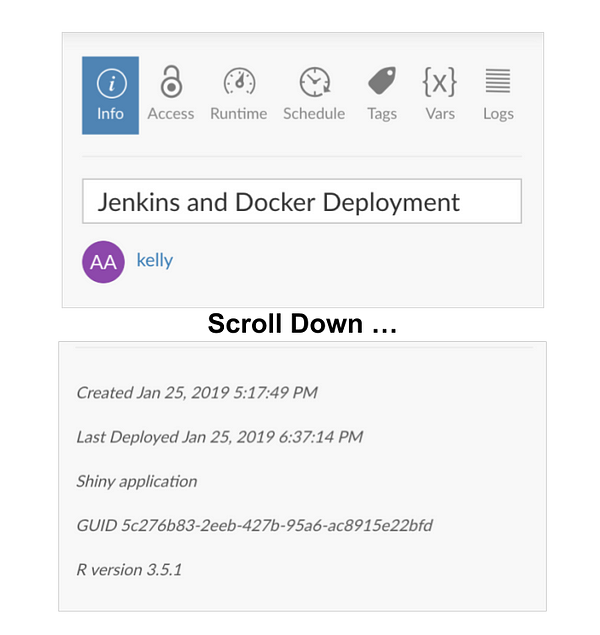
I have also hard-coded two additional important pieces of information: the CONNECT_SERVER address, and the application GUID. You could easily create a secret text credential for the server address like we made for the the API key. The application GUID is an identifying piece of information that you’ll have to look up from the RStudio Connect User Interface.
The app GUID is listed at the bottom of the Info settings tab of the deployed content on RStudio Connect.
Project Finishing Touches:
- Save your Jenkins freestyle project
- Test it by pushing a change to GitHub!
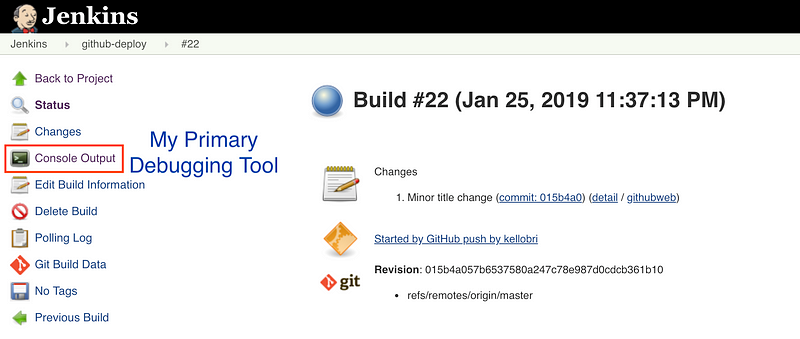
Useful Jenkins Debugging Areas
From the Jenkins dashboard, click on your project. Here you can go back to the webform and change something by clicking the ‘Configure’ link. To see details about the last build, click on that build link; from here you can access the console output for the build — this is usually the first place I go when a build fails.
Also great for iteration and debugging: You can always schedule and run build tests directly from Jenkins without pushing random code changes to GitHub.
Success — What’s Next?
Congrats! Here are some places to explore next:
What if I need to do this for five more shiny apps?
Use this working freestyle project as a template for a new project!
From the Jenkins Dashboard, Select: New Item > Name the project > Then scroll to the bottom of the project type selection options and use auto-complete to find the project you’d like to copy from:

Great — But what if I need to do this for 100 more shiny apps?
Remember that crawl-walk-run strategy that I mentioned earlier? If you need to put CI/CD in place for 100 shiny applications, you’re probably going to want to consider some of the other methods for interacting with Jenkins.
Freestyle projects are a great learning tool — and can be helpful for getting small projects off the ground quickly. But I wouldn’t recommend using them long term unless clicking around in webforms is your favorite thing ever.
If you’re looking to do large-scale programmatic deployments with Jenkins, I recommend moving toward a workflow structured on pipeline projects and Jenkinsfiles.
Key Resources in this Article:
- RStudio Connect API Reference
- User Guide API Cookbook (Deploying Content)
- Example deployment scripts and workflow considerations
RStudio Community is a great place to start conversations and share your ideas about how to grow and adapt these workflows.