

Virtualization is one of the most discussed topic in the field of Linux and IT in general. In the list of 10 HOT IT Skills in demand Virtualization (Vmware) stands at the top of the list.
We will be taking you to a quick note of what virtualization is, several virtualization tools before a complete guide on downloading, installing and configuring Virtualbox and PhpVirtualBox which is a web based virtual box front end.
The download, installation and configuration of Virtualbox and PhpVirtualBox will follow for Debian and CentOS based Distributions.
What is Virtualization
Virtualization is the process of creating non-real (virtual) version of operating system, storage, network resource and hardware. Virtualization is achieved by creating virtual machines which powers an Operating System. A host physical server can host one or more virtual machine, which may power different OS (Windows, Linux, UNIX, BSD).
There are several virtualization tools available. A few of them are platform specific and rest of them are available to be use on any platform.
- Microsoft Virtual Server 2005 R2 – available for x86 and x86_64 bit platform. Support: Windows only.
- Q – open source virtualization tool available for windows, mac and Linux.
- Vmware – Available for Windows and Linux.
- VirtualBox – Open source application available for Windows, Mac, Linux and Solaris.
- Xen – Supports Windows as well as Linux distros.
What is VirtualBox
VirtualBox initially was released under proprietary License but later (2007) Oracle Corporation started releasing it under GNU General Public License. Written completely in C, C++ and Assembly Language it is available for Windows, OS X, Linux and Solaris.
VirtualBox is claimed to be the only professional virtualization solution that is freely available and is open source. It is able to support 64 bit guest OS as well as creating Snapshot of the virtual OS.
VirtualBox lets you run virtualised application along with real desktop Application. Moreover it can be configured to share host clipboards and folders. Special drivers are available for smooth switching between systems. It is available for X86 as well as X86_64 bit platform. High on feature and performance and low on resource is a big plus point of VirtualBox.
This article will walk through the installation and configuration of VirtualBox and PhpVirtualBox to manage virtual machines under RHEL/CentOS/Fedora and Debian/Ubuntu system.
Installation of VirtualBox and PhpVirtualBox in Linux
For this article, we will be using Minimal Installation of Debian and CentOS as platform of installation. All the Installation, configuration and examples are tested on Debian 8.0 and CentOS 7.1 Minimal.
1. Before installing VirtualBox and PhpVirtualBox, you need to updated system package database and install prerequisites such as Apache, PHP and other needed dependencies as shown below.
On Debian based Distributions
# apt-get update && apt-get upgrade && apt-get autoremove
# apt-get install apache2
# apt-get install php5 php5-common php-soap php5-gd
# apt-get install build-essential dkms unzip wget
After installing all above required packages, you can proceed further to add one of the following VirtualBox PPA lines to /etc/apt/sources.list file, according to your Linux distribution.
deb http://download.virtualbox.org/virtualbox/debian raring contrib
deb http://download.virtualbox.org/virtualbox/debian quantal contrib
deb http://download.virtualbox.org/virtualbox/debian precise contrib
deb http://download.virtualbox.org/virtualbox/debian lucid contrib non-free
deb http://download.virtualbox.org/virtualbox/debian wheezy contrib
deb http://download.virtualbox.org/virtualbox/debian jessie contrib
deb http://download.virtualbox.org/virtualbox/debian squeeze contrib non-free
Next download and add Oracle public key using following commands.
# wget www.virtualbox.org/download/oracle_vbox.asc
# apt-key add oracle_vbox.asc
On RedHat based Distributions
# yum update && yum autoremove
# yum install httpd
# yum install php php-devel php-common php-soap php-gd
# yum groupinstall 'Development Tools' SDL kernel-devel kernel-headers dkms wget
After installing all above required packages, download Oracle public key and import into your system.
# wget www.virtualbox.org/download/oracle_vbox.asc
# rpm –import oracle_vbox.asc
2. Next, restart the Apache service with the help of following commands, as per your Linux distribution.
# /etc/init.d/apache2 restart				[On Older Debian based systems]
# /etc/init.d/httpd restart				[On Older RedHat based systems]

OR

# systemctl restart apache2.service			[On Newer Debian based systems]
# systemctl restart httpd.service			[On Newer RedHat based systems]
Point your browser to your Private IP Address or your loopback address, you should see your apache default testing page.
http://ip-address
OR
http://localhost
3. Now it’s time to install VirtualBox.
# apt-get install virtualbox-4.3		[On Debian based systems]
# yum install virtualbox-4.3   			[On RedHat based systems]
4. Next download and install PhpVirtualBox.
# wget http://sourceforge.net/projects/phpvirtualbox/files/phpvirtualbox-4.3-1.zip
# unzip phpvirtualbox-4.3-1.zip
5. Next, move the extracted ‘phpvirtualbox-4.3-1‘ folder to the default root folder of the http web server (/var/www/ or /var/www/html).
# mv phpvirtualbox-4.3-1 /var/www/html
6. Rename the directory ‘phpvirtualbox-4.3-1‘ to phpvb or anything, so that it is easy to point to them. Next there is a configuration file config.php-example under ‘phpvb‘ directory, rename it to config.php as shown below.
# mv /var/www/html/phpvb/config.php-example /var/www/html/phpvb/config.php
7. Create a new user account (or add an existing user) and add it to vboxusers group and change phpvbdirectory ownership to avi user.
# useradd avi
# passwd avi
# usermod -aG vboxusers avi
# chown -R avi:avi /var/www/html/phpvb
8. Now open ‘config.php‘ file and add newly created user and password.
# vi / var/www/html/phpvb/config.php
/* Username / Password for system user that runs VirtualBox */
var $username = 'avi';
var $password = 'avi123';
9. Now Download and install virtualbox extension.
# wget http://download.virtualbox.org/virtualbox/4.3.12/Oracle_VM_VirtualBox_Extension_Pack-4.3.12-93733.vbox-extpack
# VboxManage extpack install Oracle_VM_VirtualBox_Extension_Pack-4.3.12-93733.vbox-extpack
10. Now start Virtualbox-websrv as the user ‘avi‘ defined in config file.
$ vboxwebsrv -H 127.0.0.1
11. Now point your browser to ip_where_phpvirtualbox_is_installed/phpvb or 127.0.0.1/phpvb, if it was installed on the native server.
The default username is admin
The default pasword is admin
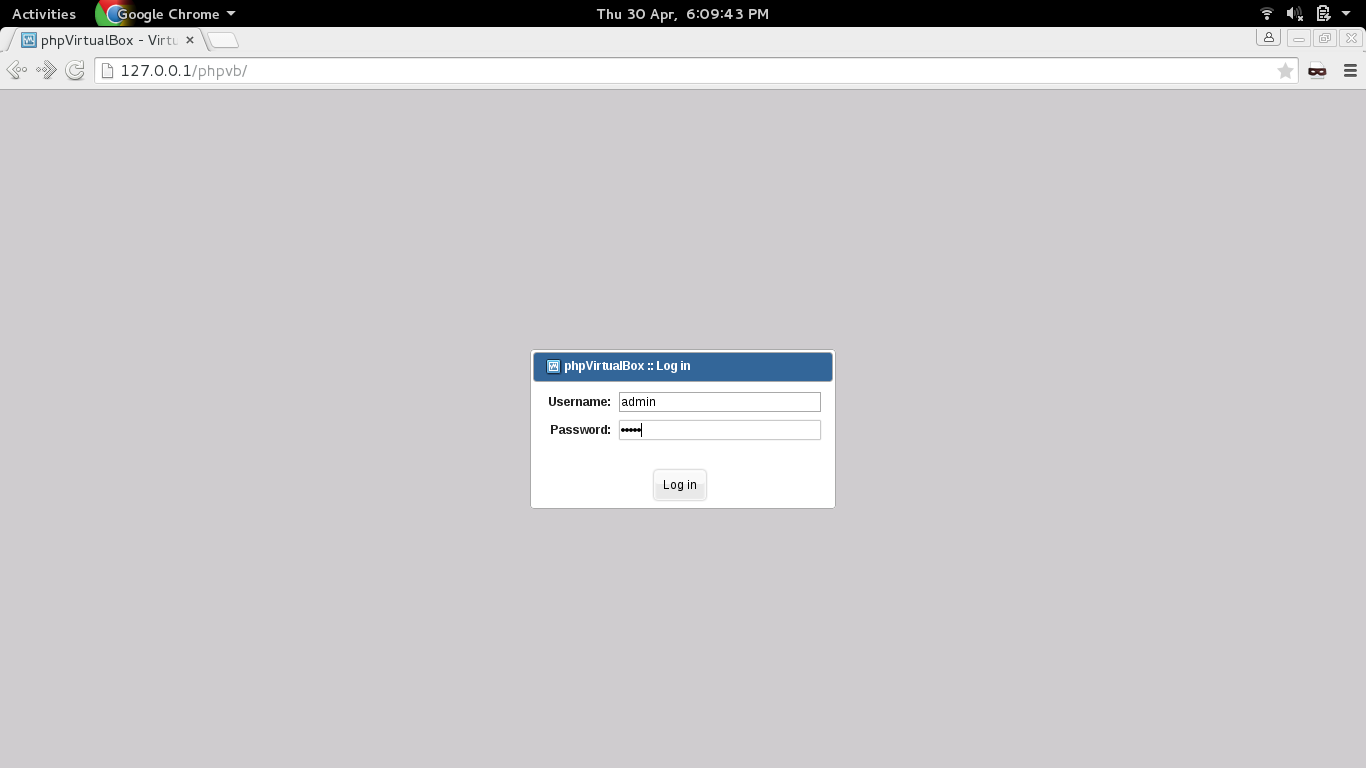
PHPVirtualbox Login
If you get error similar to the below image. You might have to start certain services.

PhpVirtualBox Login Error
# /etc/init.d/virtualbox start
# /etc/init.d/vboxdrv  start
# /etc/init.d/vboxweb-service start
Now again try login and you will see the below interface.
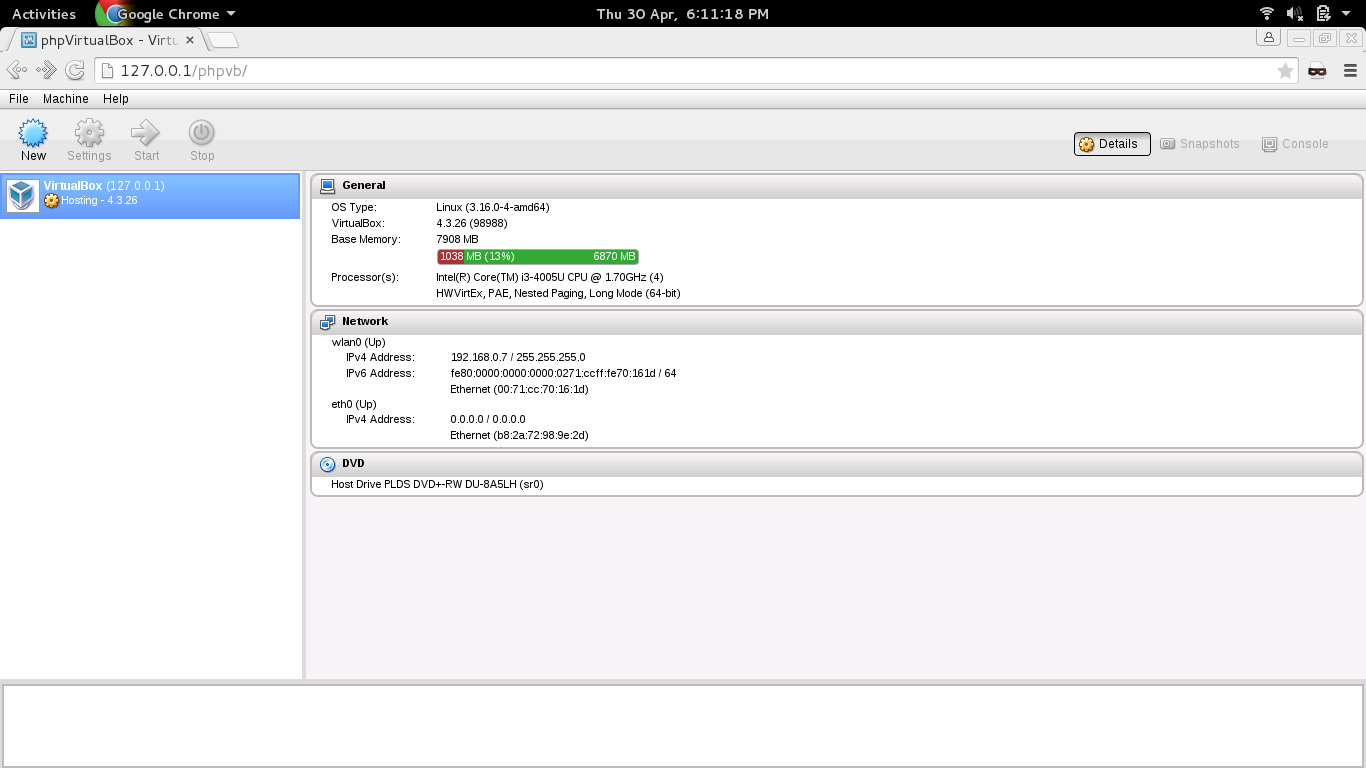
PhpVirtualBox Dashboard
You may install any OS in Virtual box. Click on New, give name and select architecture and version.
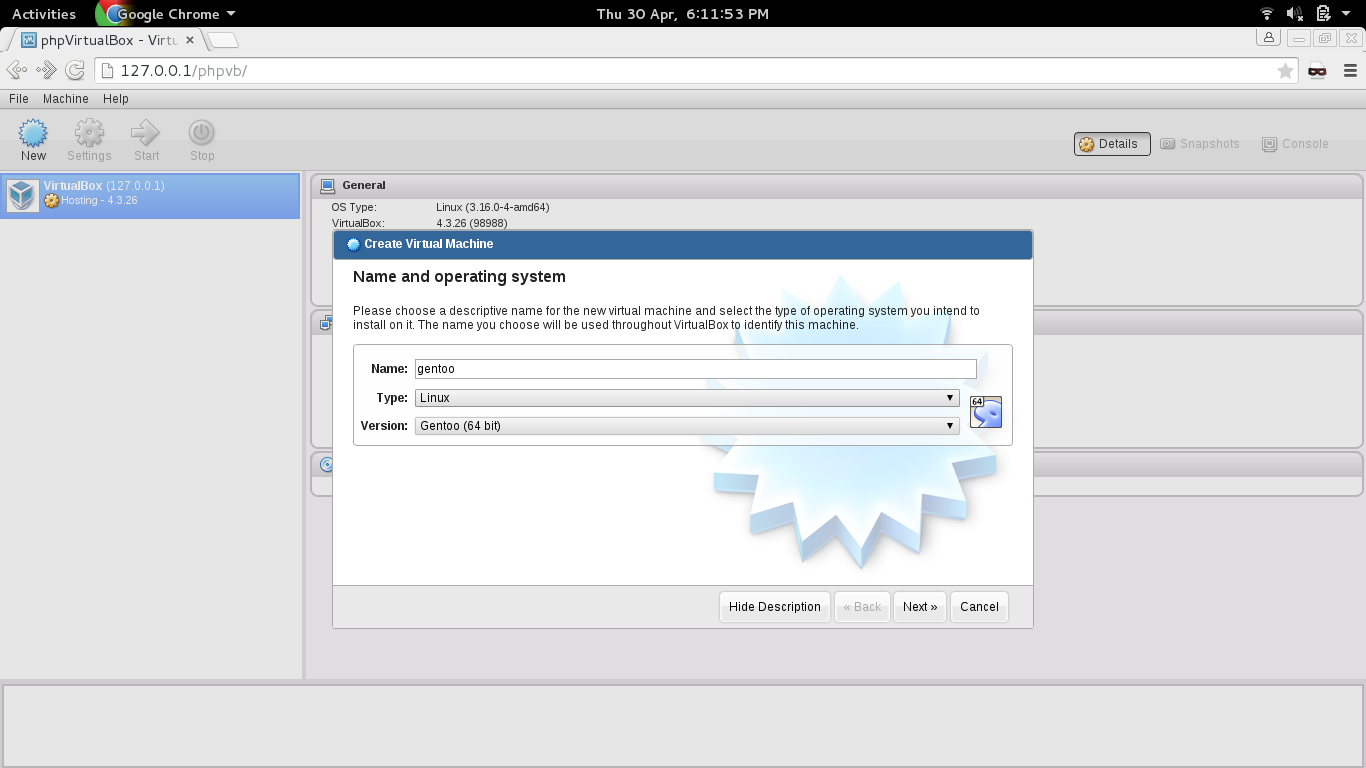
Create New Virtual Machine
Give the amount of RAM virtual OS may use.
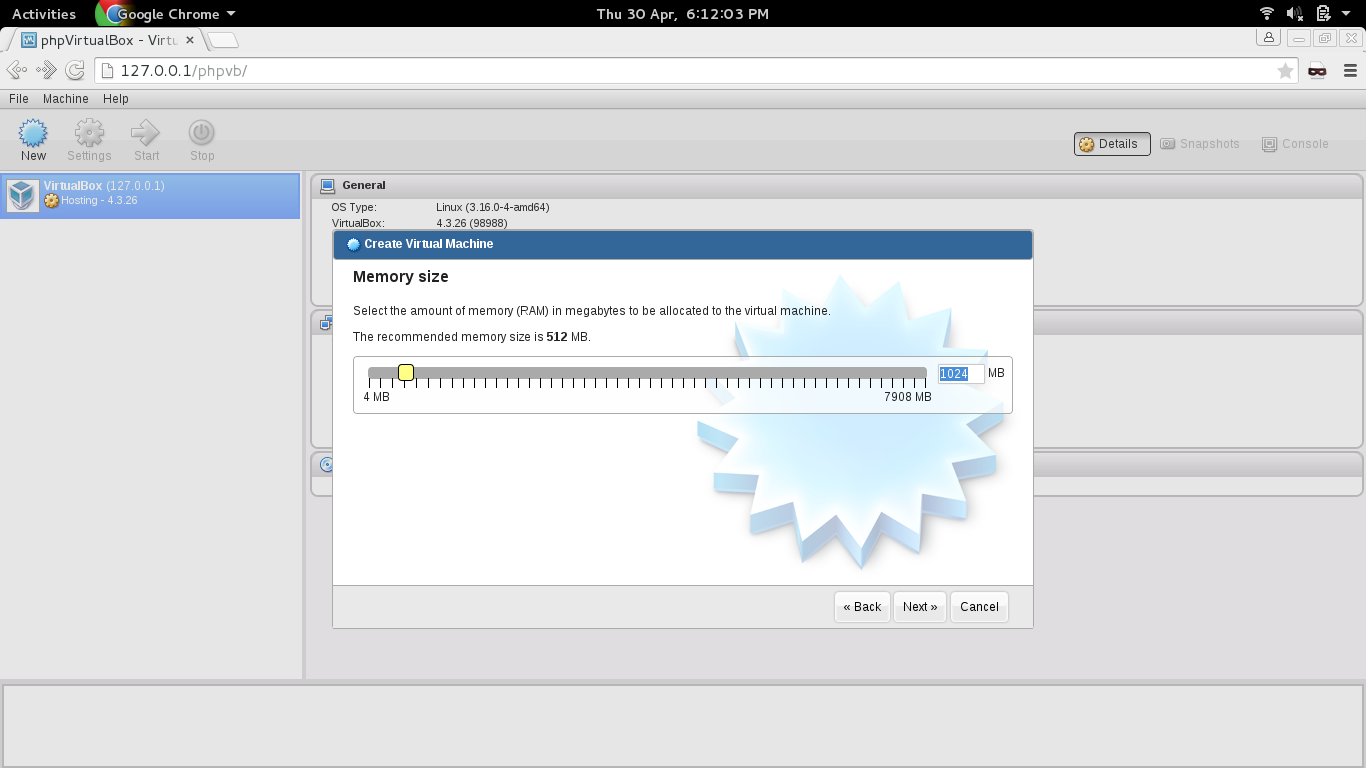
Add Virtual Machine RAM
Add new virtual hard drive to new virtual machine.
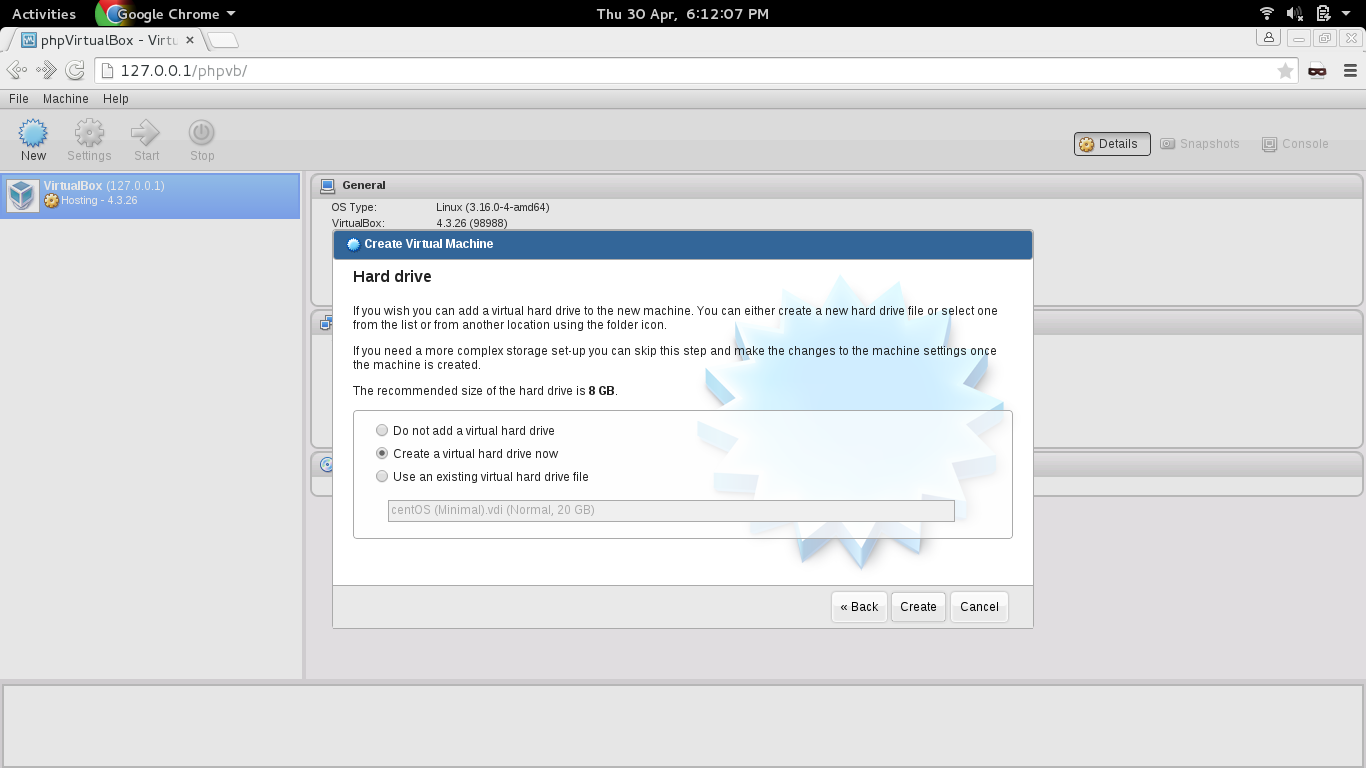
Add Hard Drive to VM
Select type of Hard Drive.
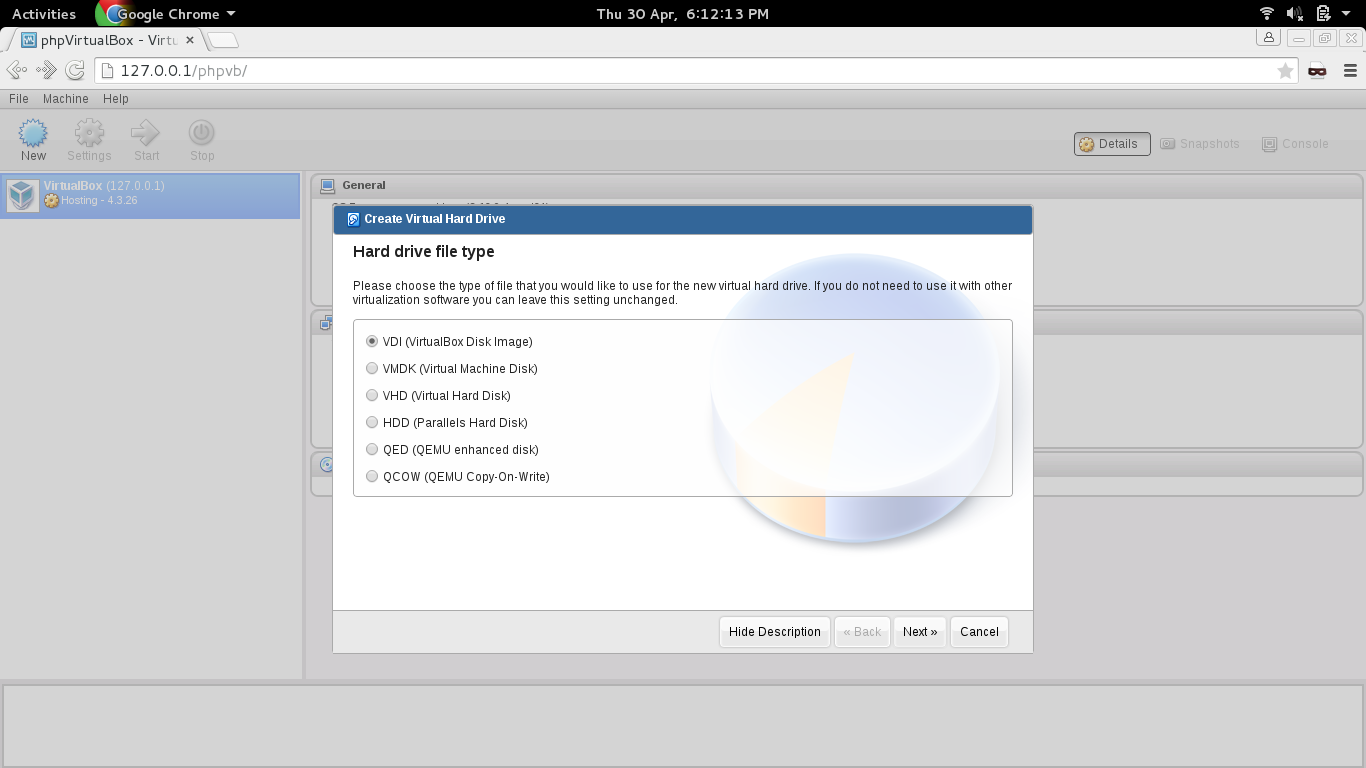
Select VM Hard Drive Type
Select type of storage disk allocation.
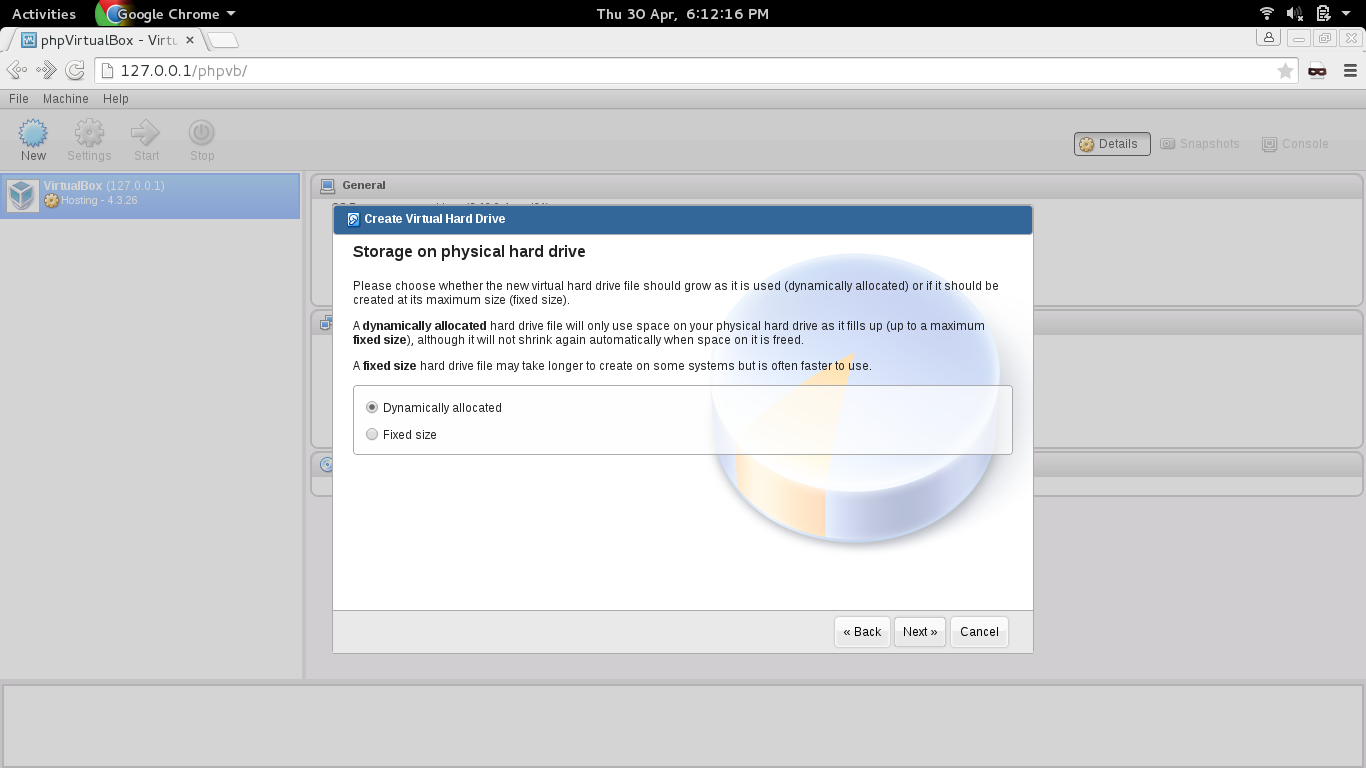
VM Storage Disk
Choose size of Hard Drive and click create.
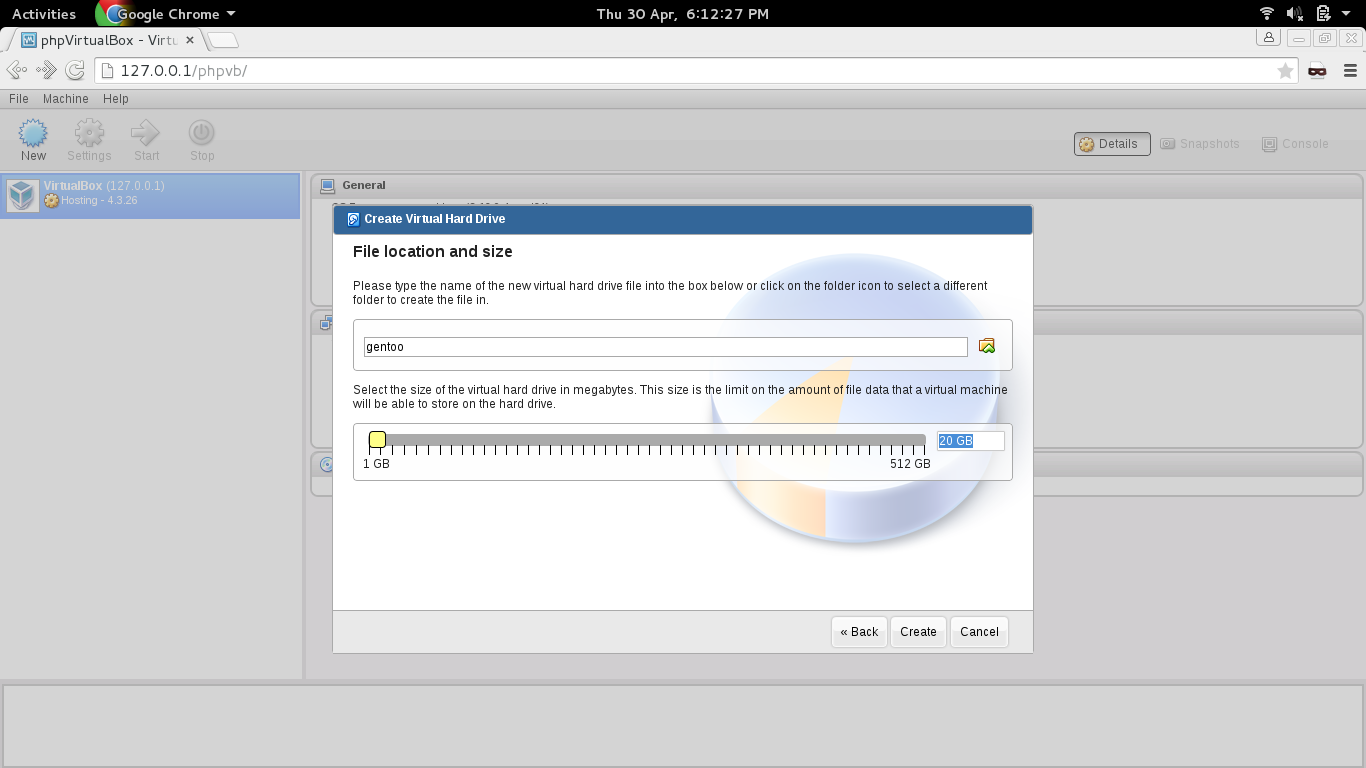
Add Virtual Machine Size
You may see your Virtual disk is created and ready to host virtual OS.
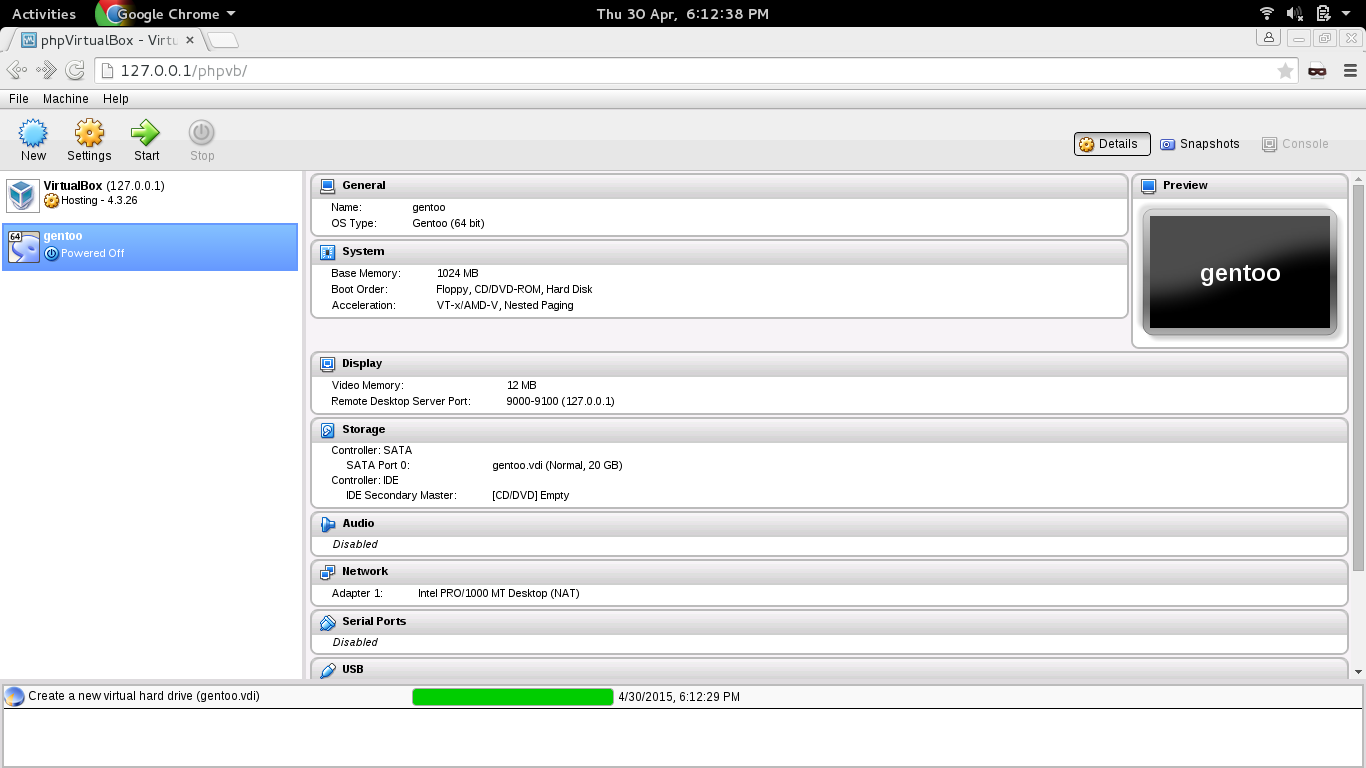
New Virtual Machine
Click on storage and add virtual Image (iso), or select your machine physical CD Drive. Finally click start to start installing.
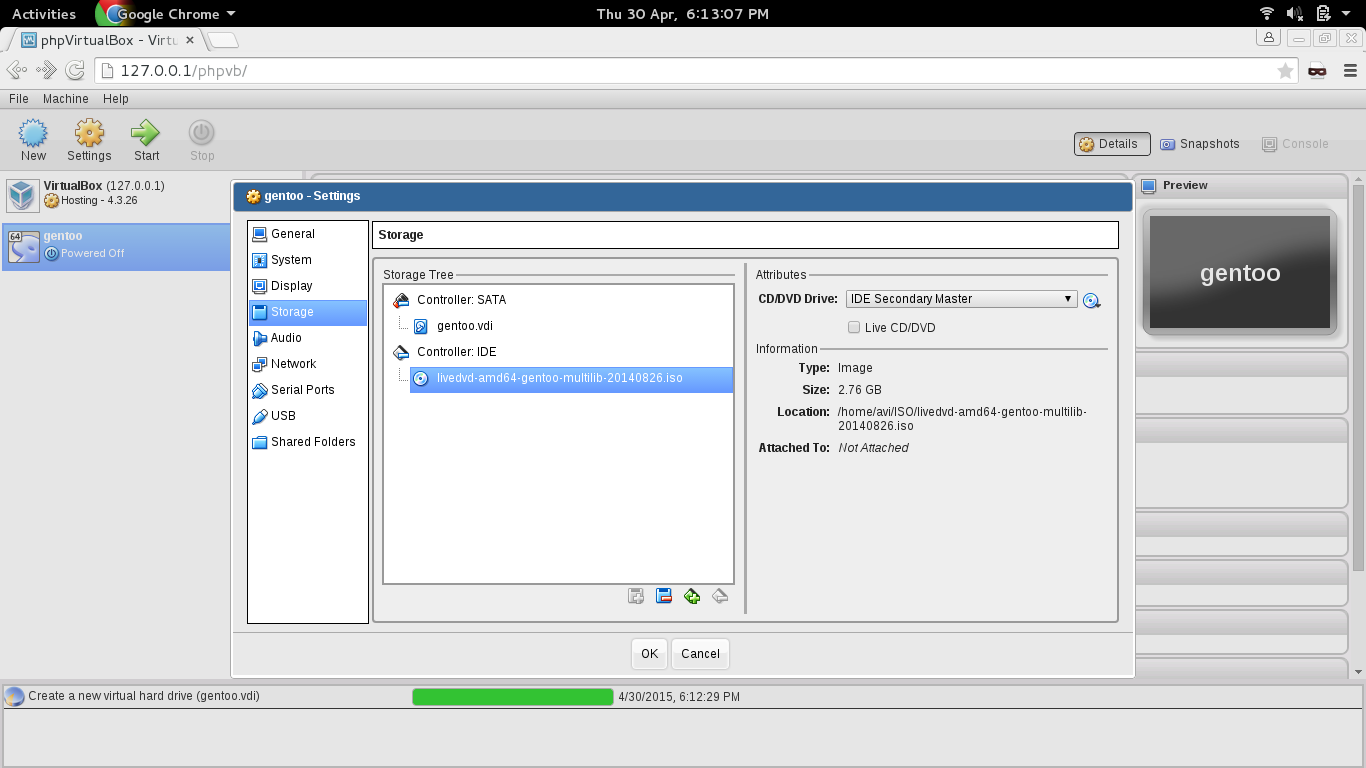
Select VM Installation Media
Click on Network and select correct network Adapter.

Select VM Network Adapter
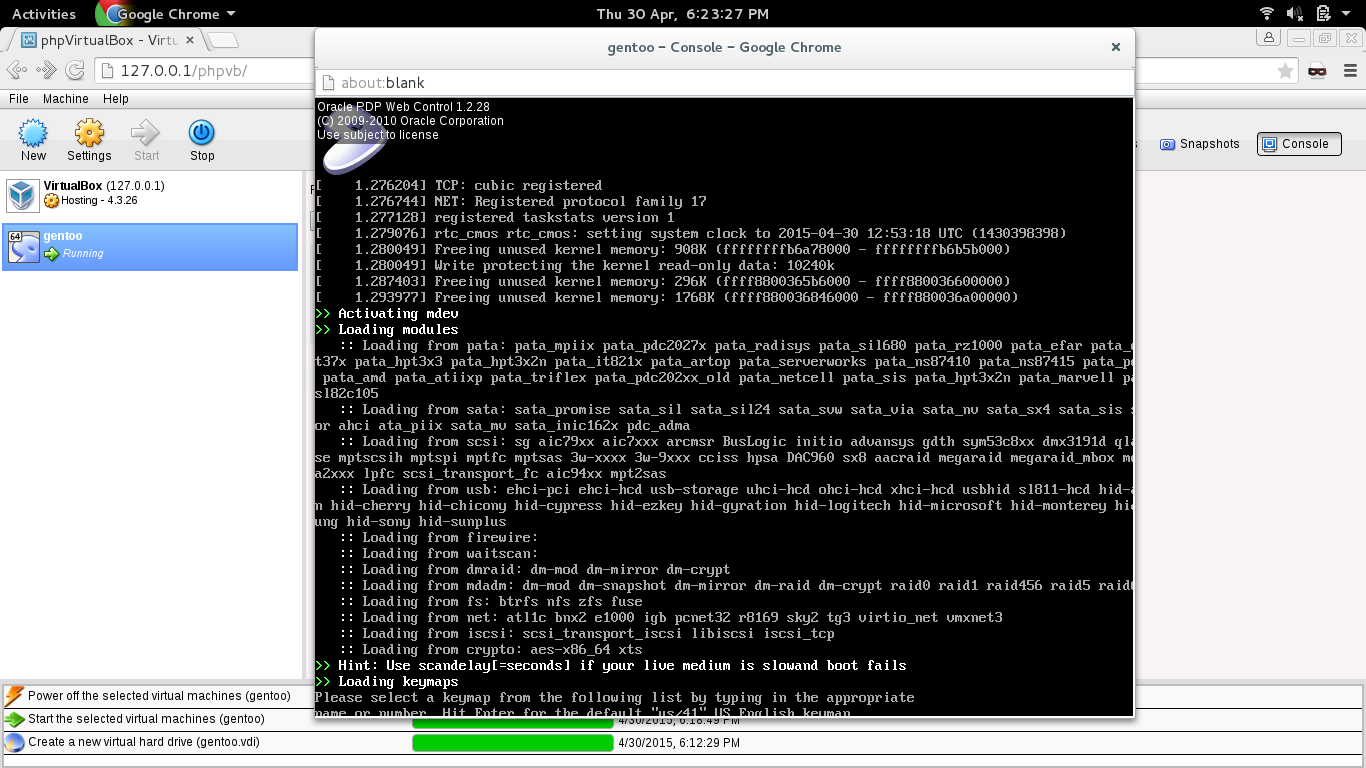
Click on console on the top right corner select desktop size and connect. If the console option is not highlighted you may have to enable it under Settings → Display → Remote Display → Enable Server and Click OK.

VM Console
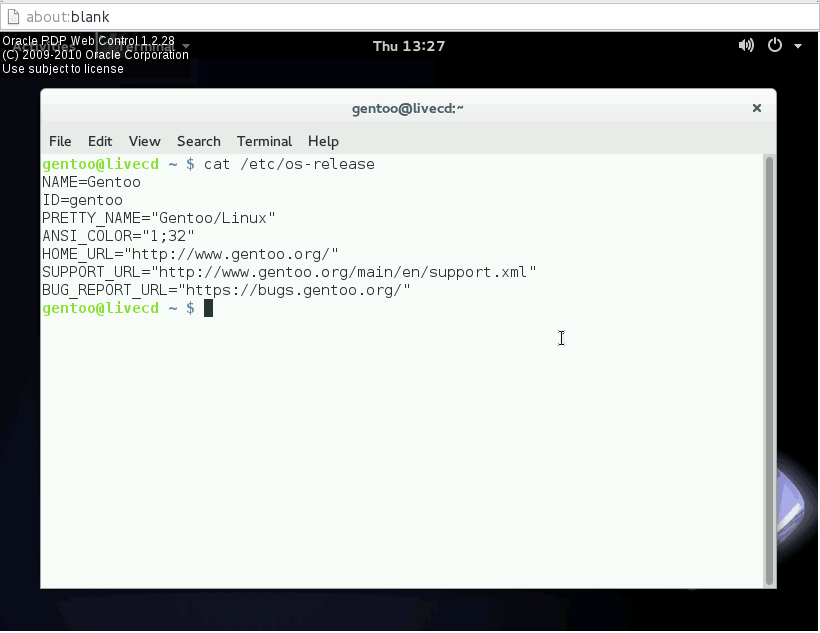
You may see the virtual OS in action.

VM Terminal in Action
You may Detach it by clicking ‘detach‘.

Detach VM
The booting and Rest of the Installation process is pretty simple as if you are installing on Local Machine.
VM Booting and Insallation
Once installation is Finished, your virtual OS is ready to host anything virtually. Be it OS, Network, Device or anything else.
Enjoy your local Virtual Server and Front-end PHPVirtualBox to access it. You may implement it in the production after a little more configuration.
That’s all from my side for now. Let me know if you liked the application or not also I will here to help you if you face any problem. Keep connected to tecmint. Bye!