
LFCE: Installing Network Services and Configuring Automatic Startup at Boot – Part 1
A Linux Foundation Certified Engineer (LFCE) is prepared to install, configure, manage, and troubleshoot network services in Linux systems, and is responsible for the design and implementation of system architecture.

Linux Foundation Certified Engineer – Part 1
Introducing The Linux Foundation Certification Program.
In this 12-article series, titled Preparation for the LFCE (Linux Foundation Certified Engineer) exam, we will cover the required domains and competencies in Ubuntu, CentOS, and openSUSE:
Installing Network Services
When it comes to setting up and using any kind of network services, it is hard to imagine a scenario that Linux cannot be a part of. In this article we will show how to install the following network services in Linux (each configuration will be covered in upcoming separate articles):
- NFS (Network File System) Server
- Apache Web Server
- Squid Proxy Server + SquidGuard
- Email Server (Postfix + Dovecot), and
- Iptables
In addition, we will want to make sure all of those services are automatically started on boot or on-demand.
We must note that even when you can run all of these network services in the same physical machine or virtual private server, one of the first so-called “rules” of network security tells system administrators to avoid doing so to the extent possible. What is the judgement that supports that statement? It’s rather simple: if for some reason a network service is compromised in a machine that runs more than one of them, it can be relatively easy for an attacker to compromise the rest as well.
Now, if you really need to install multiple network services on the same machine (in a test lab, for example), make sure you enable only those that you need at a certain moment, and disable them later.
Before we begin, we need to clarify that the current article (along with the rest in the LFCS and LFCE series) is focused on a performance-based perspective, and thus cannot examine every theoretical detail about the covered topics. We will, however, introduce each topic with the necessary information as a starting point.
In order to use the following network services, you will need to disable the firewall for the time being until we learn how to allow the corresponding traffic through the firewall.
Please note that this is NOT recommended for a production setup, but we will do so for learning purposes only.
In a default Ubuntu installation, the firewall should not be active. In openSUSE and CentOS, you will need to explicitly disable it:
# systemctl stop firewalld
# systemctl disable firewalld
or
# or systemctl mask firewalld
That being said, let’s get started!
Installing A NFSv4 Server
NFS in itself is a network protocol, whose latest version is NFSv4. This is the version that we will use throughout this series.
A NFS server is the traditional solution that allows remote Linux clients to mount its shares over a network and interact with those file systems as though they are mounted locally, allowing to centralize storage resources for the network.
On CentOS
# yum update && yum install nfs-utils
On Ubuntu
# aptitude update && aptitude install nfs-kernel-server
On OpenSUSE
# zypper refresh && zypper install nfsserver
For more detailed instructions, read our article that tells how to Configuring NFS Server and Client on Linux systems.
Installing Apache Web Server
The Apache web server is a robust and reliable FOSS implementation of a HTTP server. As of the end of October 2014, Apache powers 385 million sites, giving it a 37.45% share of the market. You can use Apache to serve a standalone website or multiple virtual hosts in one machine.
# yum update && yum install httpd		[On CentOS]
# aptitude update && aptitude apache2 		[On Ubuntu]
# zypper refresh && zypper apache2		[On openSUSE]
For more detailed instructions, read our following articles that shows on how to create Ip-based & Name-based Apache virtual hosts and how to secure Apache web server.
Installing Squid and SquidGuard
Squid is a proxy server and web cache daemon and, as such, acts as intermediary between several client computers and the Internet (or a router connected to the Internet), while speeding up frequent requests by caching web contents and DNS resolution at the same time. It can also be used to deny (or grant) access to certain URLs by network segment or based on forbidden keywords, and keeps a log file of all connections made to the outside world on a per-user basis.
Squidguard is a redirector that implements blacklists to enhance squid, and integrates seamlessly with it.
# yum update && yum install squid squidGuard			[On CentOS]
# aptitude update && aptitude install squid3 squidguard		[On Ubuntu]
# zypper refresh && zypper install squid squidGuard 		[On openSUSE]
Installing Postfix and Dovecot
Postfix is a Mail Transport Agent (MTA). It is the application responsible for routing and delivering email messages from a source to a destination mail servers, whereas dovecot is a widely used IMAP and POP3 email server that fetches messages from the MTA and delivers them to the right user mailbox.
Dovecot plugins for several relational database management systems are also available.
# yum update && yum install postfix dovecot 				[On CentOS]
# aptitude update && aptitude postfix dovecot-imapd dovecot-pop3d 	[On Ubuntu]
# zypper refresh && zypper postfix dovecot				[On openSUSE]
About Iptables
In few words, a firewall is a network resource that is used to manage access to or from a private network, and to redirect incoming and outgoing traffic based on certain rules.
Iptables is a tool installed by default in Linux and serves as a frontend to the netfilter kernel module, which is the ultimate responsible for implementing a firewall to perform packet filtering / redirection and network address translation functionalities.
Since iptables is installed in Linux by default, you only have to make sure it is actually running. To do that, we should check that the iptables modules are loaded:
# lsmod | grep ip_tables
If the above command does not return anything, it means the ip_tables module has not been loaded. In that case, run the following command to load the module.
# modprobe -a ip_tables
Read Also: Basic Guide to Linux Iptables Firewall
Configuring Services Automatic Start on Boot
As discussed in Managing System Startup Process and Services – Part 7 of the 10-article series about the LFCS certification, there are several system and service managers available in Linux. Whatever your choice, you need to know how to start, stop, and restart network services on-demand, and how to enable them to automatically start on boot.
You can check what is your system and service manager by running the following command:
# ps --pid 1
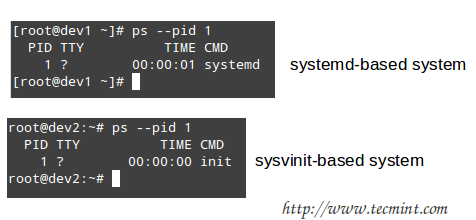
Check Linux Service Manager
Depending on the output of the above command, you will use one of the following commands to configure whether each service should start automatically on boot or not:
On systemd-based
----------- Enable Service to Start at Boot -----------
# systemctl enable [service]
----------- Prevent Service from Starting at Boot -----------
# systemctl disable [service] # prevent [service] from starting at boot
On sysvinit-based
----------- Start Service at Boot in Runlevels A and B -----------
# chkconfig --level AB [service] on
-----------  Don’t Start Service at boot in Runlevels C and D -----------
# chkconfig --level CD service off
On upstart-based
Make sure the /etc/init/[service].conf script exists and contains the minimal configuration, such as:
# When to start the service
start on runlevel [2345]
# When to stop the service
stop on runlevel [016]
# Automatically restart process in case of crash
respawn
# Specify the process/command (add arguments if needed) to run
exec /absolute/path/to/network/service/binary arg1 arg2
You may also want to check Part 7 of the LFCS series (which we just referred to in the beginning of this section) for other useful commands to manage network services on-demand.
Summary
By now you should have all the network services described in this article installed, and possibly running with the default configuration. In later articles we will explore how to configure them according to our needs, so make sure to stay tuned! And please feel free to share your comments (or post questions, if you have any) on this article using the form below.
Reference Links
Setting Up Standard Linux File Systems and Configuring NFSv4 Server – Part 2
A Linux Foundation Certified Engineer (LFCE) is trained to set up, configure, manage, and troubleshoot network services in Linux systems, and is answerable for the design and implementation of system architecture and solving everyday related issues.

Linux Foundation Certified Engineer – Part 2
Introducing The Linux Foundation Certification Program (LFCE).
In Part 1 of this series we explained how to install a NFS (Network File System) server, and set the service to start automatically on boot. If you haven’t already done so, please refer to that article and follow the outlined steps before proceeding.
I will now show you how to properly configure your NFSv4 server (without authentication security) so that you can set up network shares to use in Linux clients as if those file systems were installed locally. Note that you can use LDAP or NIS for authentication purposes, but both options are out of the scope of the LFCE certification.
Configuring a NFSv4 server
Once the NFS server is up and running, we will focus our attention on:
- specifying and configuring the local directories that we want to share over the network, and
- mounting those network shares in clients automatically, either through the /etc/fstab file or the automount kernel-based utility (autofs).
We will explain later when to choose one method or the other.
Before we being, we need to make sure that the idmapd daemon is running and configured. This service performs the mapping of NFSv4 names (user@mydomain) to user and group IDs, and is required to implement a NFSv4 server.
Edit /etc/default/nfs-common to enable idmapd.
NEED_IDMAPD=YES
And edit /etc/idmapd.conf with your local domain name (the default is the FQDN of the host).
Domain = yourdomain.com
Then start idmapd.
# service nfs-common start 	[sysvinit / upstart based systems]
# systemctl start nfs-common 	[systemd based systems]
Exporting Network Shares
The /etc/exports file contains the main configuration directives for our NFS server, defines the file systems that will be exported to remote hosts and specifies the available options. In this file, each network share is indicated using a separate line, which has the following structure by default:
/filesystem/to/export client1([options]) clientN([options])
Where /filesystem/to/export is the absolute path to the exported file system, whereas client1 (up to clientN) represents the specific client (hostname or IP address) or network (wildcards are allowed) to which the share is being exported. Finally, options is a list of comma-separated values (options) that are taken into account while exporting the share, respectively. Please note that there are no spaces between each hostname and the parentheses it precedes.
Here is a list of the most-frequent options and their respective description:
- ro (short for read-only): Remote clients can mount the exported file systems with read permissions only.
- rw (short for read-write): Allows remote hosts to make write changes in the exported file systems.
- wdelay (short for write delay): The NFS server delays committing changes to disk if it suspects another related write request is imminent. However, if the NFS server receives multiple small unrelated requests, this option will reduce performance, so the no_wdelay option can be used to turn it off.
- sync: The NFS server replies to requests only after changes have been committed to permanent storage (i.e., the hard disk). Its opposite, the async option, may increase performance but at the cost of data loss or corruption after an unclean server restart.
- root_squash: Prevents remote root users from having superuser privileges in the server and assigns them the user ID for user nobody. If you want to “squash” all users (and not just root), you can use the all_squashoption.
- anonuid / anongid: Explicitly sets the UID and GID of the anonymous account (nobody).
- subtree_check: If only a subdirectory of a file system is exported, this option verifies that a requested file is located in that exported subdirectory. On the other hand, if the entire file system is exported, disabling this option with no_subtree_check will speed up transfers. The default option nowadays is no_subtree_check as subtree checking tends to cause more problems than it is worth, according to man 5 exports.
- fsid=0 | root (zero or root): Specifies that the specified file system is the root of multiple exported directories (only applies in NFSv4).
In this article we will use the directories /NFS-SHARE and /NFS-SHARE/mydir on 192.168.0.10 (NFS server) as our test file systems.
We can always list the available network shares in a NFS server using the following command:
# showmount -e [IP or hostname]
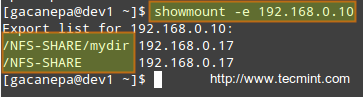
Check NFS Shares
In the output above, we can see that the /NFS-SHARE and /NFS-SHARE/mydir shares on 192.168.0.10 have been exported to client with IP address 192.168.0.17.
Our initial configuration (refer to the /etc/exports directory on your NFS server) for the exported directory is as follows:
/NFS-SHARE  	192.168.0.17(fsid=0,no_subtree_check,rw,root_squash,sync,anonuid=1000,anongid=1000)
/NFS-SHARE/mydir    	192.168.0.17(ro,sync,no_subtree_check)
After editing the configuration file, we must restart the NFS service:
# service nfs-kernel-server restart 		[sysvinit / upstart based system]
# systemctl restart nfs-server			[systemd based systems]
Mounting exported network shares using autofs
You may want to refer to Part 5 of the LFCS series (“How to Mount/Unmount Local and Network (Samba & NFS) Filesystems in Linux”) for details on mounting remote NFS shares on-demand using the mount command or permanently through the /etc/fstab file.
The downside of mounting a network file system using these methods is that the system must allocate the necessary resources to keep the share mounted at all times, or at least until we decide to unmount them manually. An alternative is to mount the desired file system on-demand automatically (without using the mountcommand) through autofs, which can mount file systems when they are used and unmount them after a period of inactivity.
Autofs reads /etc/auto.master, which has the following format:
[mount point] [map file]
Where [map file] is used to indicate multiple mount points within [mount point].
This master map file (/etc/auto.master) is then used to determine which mount points are defined, and then starts an automount process with the specified parameters for each mount point.
Mounting exported NFS shares using autofs
Edit your /etc/auto.master as follows:
/media/nfs /etc/auto.nfs-share --timeout=60
and create a map file named /etc/auto.nfs-share with the following contents:
writeable_share  -fstype=nfs4 192.168.0.10:/
non_writeable_share  -fstype=nfs4 192.168.0.10:/mydir
Note that the first field in /etc/auto.nfs-share is the name of a subdirectory inside /media/nfs. Each subdirectory is created dynamically by autofs.
Now, restart the autofs service:
# service autofs restart 			[sysvinit / upstart based systems]
# systemctl restart autofs 			[systemd based systems]
and finally, to enable autofs to start on boot, run the following command:
# chkconfig --level 345 autofs on
# systemctl enable autofs 			[systemd based systems]
Examining mounted file systems after starting the autofs daemon
When we restart autofs, the mount command shows us that the map file (/etc/auto.nfs-share) is mounted on the specified directory in /etc/auto.master:
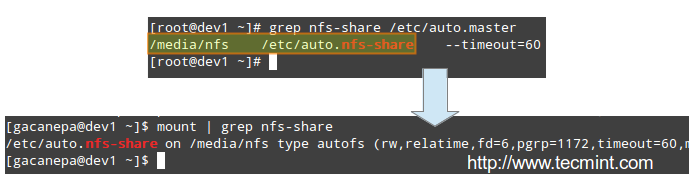
NFS Share Mounted
Please note that no directories have actually been mounted yet, but will be automatically when we try to access the shares specified in /etc/auto.nfs-share:
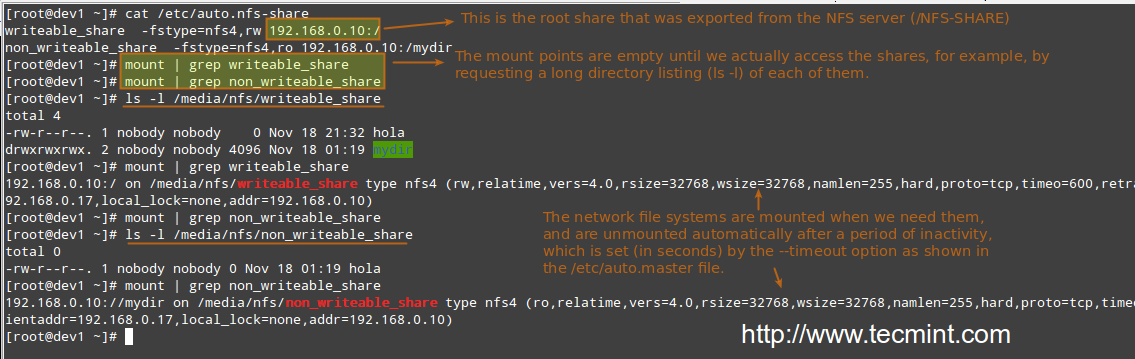
Automount NFS Shares
As we can see, the autofs service “mounts” the map file, so to speak, but waits until a request is made to the file systems to actually mount them.
Performing write tests in exported file systems
The anonuid and anongid options, along with the root_squash as set in the first share, allow us to map requests performed by the root user in the client to a local account in the server.
In other words, when root in the client creates a file in that exported directory, its ownership will be automatically mapped to the user account with UID and GID = 1000, provided that such account exists on the server:
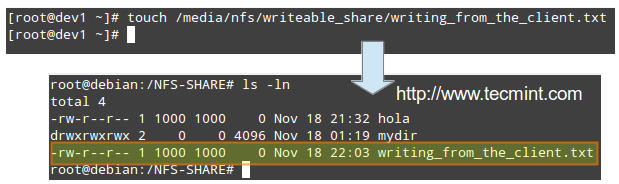
Perform NFS Write Tests
Conclusion
I hope you were able to successfully setup and configure a NFS server fit for your environment using this article as a guide. You may also want to refer to the relevant man pages for further help (man exports and man idmapd.conf, for example).
Feel free to experiment with other options and test cases as outlined earlier and do not hesitate to use the form below to send your comments, suggestions, or questions. We will be glad to hear from you.
How to Setup Encrypted Filesystems and Swap Space Using ‘Cryptsetup’ Tool in Linux – Part 3
A LFCE (short for Linux Foundation Certified Engineer) is trained and has the expertise to install, manage, and troubleshoot network services in Linux systems, and is in charge of the design, implementation and ongoing maintenance of the system architecture.

Linux Filesystem Encryption
Introducing The Linux Foundation Certification Program (LFCE).
The idea behind encryption is to allow only trusted persons to access your sensitive data and to protect it from falling into the wrong hands in case of loss or theft of your machine / hard disk.
In simple terms, a key is used to “lock” access to your information, so that it becomes available when the system is running and unlocked by an authorized user. This implies that if a person tries to examine the disk contents (plugging it to his own system or by booting the machine with a LiveCD/DVD/USB), he will only find unreadable data instead of the actual files.
In this article we will discuss how to set up encrypted file systems with dm-crypt (short for device mapper and cryptographic), the standard kernel-level encryption tool. Please note that since dm-crypt is a block-level tool, it can only be used to encrypt full devices, partitions, or loop devices (will not work on regular files or directories).
Preparing A Drive / Partition / Loop Device for Encryption
Since we will wipe all data present in our chosen drive (/dev/sdb), first of all, we need to perform a backup of any important files contained in that partition BEFORE proceeding further.
Wipe all data from /dev/sdb. We are going to use dd command here, but you could also do it with other tools such as shred. Next, we will create a partition on this device, /dev/sdb1, following the explanation in Part 4 – Create Partitions and Filesystems in Linux of the LFCS series.
# dd if=/dev/urandom of=/dev/sdb bs=4096
Testing for Encryption Support
Before we proceed further, we need to make sure that our kernel has been compiled with encryption support:
# grep -i config_dm_crypt /boot/config-$(uname -r)
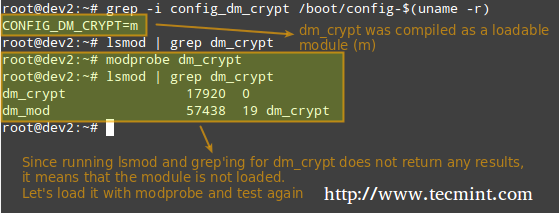
Check Encryption Support
As outlined in the image above, the dm-crypt kernel module needs to be loaded in order to set up encryption.
Installing Cryptsetup
Cryptsetup is a frontend interface for creating, configuring, accessing, and managing encrypted file systems using dm-crypt.
# aptitude update && aptitude install cryptsetup 		[On Ubuntu]
# yum update && yum install cryptsetup 				[On CentOS]
# zypper refresh && zypper install cryptsetup 			[On openSUSE]
Setting Up an Encrypted Partition
The default operating mode for cryptsetup is LUKS (Linux Unified Key Setup) so we’ll stick with it. We will begin by setting the LUKS partition and the passphrase:
# cryptsetup -y luksFormat /dev/sdb1
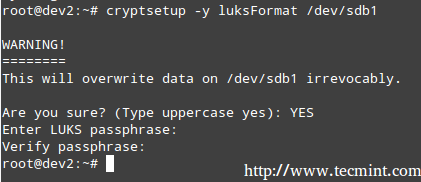
Creating an Encrypted Partition
The command above runs cryptsetup with default parameters, which can be listed with,
# cryptsetup --version

Cryptsetup Parameters
Should you want to change the cipher, hash, or key parameters, you can use the –cipher, –hash, and –key-sizeflags, respectively, with the values taken from /proc/crypto.
Next, we need to open the LUKS partition (we will be prompted for the passphrase that we entered earlier). If the authentication succeeds, our encrypted partition will be available inside /dev/mapper with the specified name:
# cryptsetup luksOpen /dev/sdb1 my_encrypted_partition

Encrypted Partition
Now, we’ll format out partition as ext4.
# mkfs.ext4 /dev/mapper/my_encrypted_partition
and create a mount point to mount the encrypted partition. Finally, we may want to confirm whether the mount operation succeeded.
# mkdir /mnt/enc
# mount /dev/mapper/my_encrypted_partition /mnt/enc
# mount | grep partition

Mount Encrypted Partition
When you are done writing to or reading from your encrypted file system, simply unmount it
# umount /mnt/enc
and close the LUKS partition using,
# cryptesetup luksClose my_encrypted_partition
Testing Encryption
Finally, we will check whether our encrypted partition is safe:
1. Open the LUKS partition
# cryptsetup luksOpen /dev/sdb1 my_encrypted_partition
2. Enter your passphrase
3. Mount the partition
# mount /dev/mapper/my_encrypted_partition /mnt/enc
4. Create a dummy file inside the mount point.
# echo “This is Part 3 of a 12-article series about the LFCE certification” > /mnt/enc/testfile.txt
5. Verify that you can access the file that you just created.
# cat /mnt/enc/testfile.txt
6. Unmount the file system.
# umount /mnt/enc
7. Close the LUKS partition.
# cryptsetup luksClose my_encrypted_partition
8. Try to mount the partition as a regular file system. It should indicate an error.
# mount /dev/sdb1 /mnt/enc
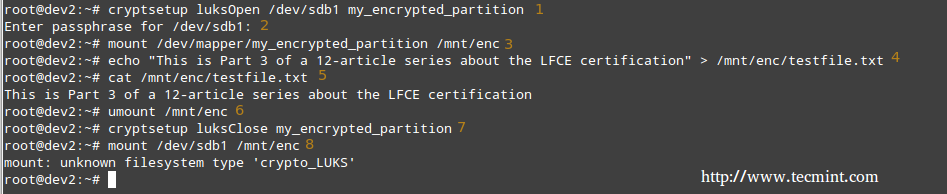
Test Encryption on Partition
Encryptin the Swap Space for Further Security
The passphrase you entered earlier to use the encrypted partition is stored in RAM memory while it’s open. If someone can get his hands on this key, he will be able to decrypt the data. This is especially easy to do in the case of a laptop, since while hibernating the contents of RAM are kept on the swap partition.
To avoid leaving a copy of your key accessible to a thief, encrypt the swap partition following these steps:
1 Create a partition to be used as swap with the appropriate size (/dev/sdd1 in our case) and encrypt it as explained earlier. Name it just “swap” for convenience.’
2.Set it as swap and activate it.
# mkswap /dev/mapper/swap
# swapon /dev/mapper/swap
3. Next, change the corresponding entry in /etc/fstab.
/dev/mapper/swap none swap sw 0 0
4. Finally, edit /etc/crypttab and reboot.
swap /dev/sdd1 /dev/urandom swap
Once the system has finished booting, you can verify the status of the swap space:
# cryptsetup status swap
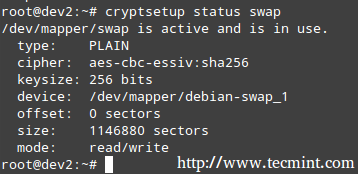
Check Swap Encryption Status
Summary
In this article we have explored how to encrypt a partition and swap space. With this setup, your data should be considerably safe. Feel free to experiment and do not hesitate to get back to us if you have questions or comments. Just use the form below – we’ll be more than glad to hear from you!
How to Setup Standalone Apache Server with Name-Based Virtual Hosting with SSL Certificate – Part 4
A LFCE (short for Linux Foundation Certified Engineer) is a trained professional who has the expertise to install, manage, and troubleshoot network services in Linux systems, and is in charge of the design, implementation and ongoing maintenance of the system architecture.
In this article we will show you how to configure Apache to serve web content, and how to set up name-based virtual hosts and SSL, including a self-signed certificate.

Linux Foundation Certified Engineer – Part 4
Introducing The Linux Foundation Certification Program (LFCE).
Note: That this article is not supposed to be a comprehensive guide on Apache, but rather a starting point for self-study about this topic for the LFCE exam. For that reason we are not covering load balancing with Apache in this tutorial either.
You may already know other ways to perform the same tasks, which is OK considering that the Linux Foundation Certification are strictly performance-based. Thus, as long as you ‘get the job done’, you stand good chances of passing the exam.
Requirements
Please refer to Part 1 of the current series (“Installing Network Services and Configuring Automatic Startup at Boot”) for instructions on installing and starting Apache.
By now, you should have the Apache web server installed and running. You can verify this with the following command.
# ps -ef | grep -Ei '(apache|httpd)' | grep -v grep
Note: That the above command checks for the presence of either apache or httpd (the most common names for the web daemon) among the list of running processes. If Apache is running, you will get output similar to the following.
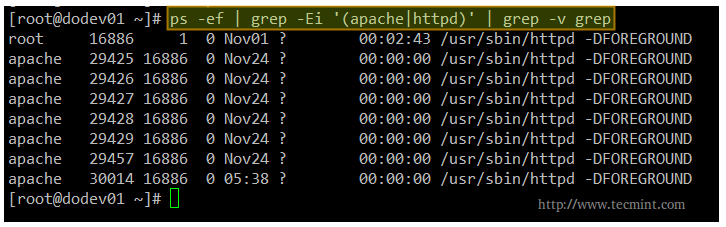
Check Apache Processes
The ultimate method of testing the Apache installation and checking whether it’s running is launching a web browser and point to the IP of the server. We should be presented with the following screen or at least a message confirming that Apache is working.
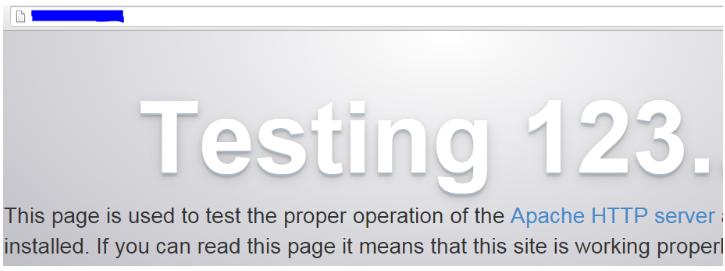
Check Apache Webpage
Configuring Apache
The main configuration file for Apache can be located in different directories depending on your distribution.
/etc/apache2/apache2.conf 		[For Ubuntu]
/etc/httpd/conf/httpd.conf		[For CentOS]
/etc/apache2/httpd.conf 		[For openSUSE]
Fortunately for us, the configuration directives are extremely well documented in the Apache project web site. We will refer to some of them throughout this article.
Serving Pages in a Standalone Server with Apache
The most basic usage of Apache is to serve web pages in a standalone server where no virtual hosts have been configured yet. The DocumentRoot directive specifies the directory out of which Apache will serve web pages documents.
Note that by default, all requests are taken from this directory, but you can also use symbolic links and / or aliases may be used to point to other locations as well.
Unless matched by the Alias directive (which allows documents to be stored in the local filesystem instead of under the directory specified by DocumentRoot), the server appends the path from the requested URL to the document root to make the path to the document.
For example, given the following DocumentRoot:
![]()
Apache DocumentRoot
When the web browser points to [Server IP or hostname]/lfce/tecmint.html, the server will open /var/www/html/lfce/tecmint.html (assuming that such file exists) and save the event to its access log with a 200 (OK) response.
The access log is typically found inside /var/log under a representative name, such as access.log or access_log. You may even find this log (and the error log as well) inside a subdirectory (for example, /var/log/httpd in CentOS). Otherwise, the failed event will still be logged to the access log but with a 404 (Not Found) response.

Apache Access Log
In addition, the failed events will be recorded in the error log:

Apache Error Log
The format of the access log can be customized according to your needs using the LogFormat directive in the main configuration file, whereas you cannot do the same with the error log.
The default format of the access log is as follows:
LogFormat "%h %l %u %t \"%r\" %>s %b" [nickname]
Where each of the letters preceded by a percent sign indicates the server to log a certain piece of information:
| String | Description |
| %h | Remote hostname or IP address |
| %l | Remote log name |
| %u | Remote user if the request is authenticated |
| %t | Date and time when the request was received |
| %r | First line of request to the server |
| %>s | Final status of the request |
| %b | Size of the response [bytes] |
and nickname is an optional alias that can be used to customize other logs without having to enter the whole configuration string again.
You may refer to the LogFormat directive [Custom log formats section] in the Apache docs for further options.
Both log files (access and error) represent a great resource to quickly analyze at a glance what’s happening on the Apache server. Needless to say, they are the first tool a system administrator uses to troubleshoot issues.
Finally, another important directive is Listen, which tells the server to accept incoming requests on the specified port or address/port combination:
If only a port number is defined, the apache will listens to the given port on all network interfaces (the wildcard sign * is used to indicate ‘all network interfaces’).
If both IP address and port is specified, then the apache will listen on the combination of given port and network interface.
Please note (as you will see in the examples below) that multiple Listen directives can be used at the same time to specify multiple addresses and ports to listen to. This option instructs the server to respond to requests from any of the listed addresses and ports.
Setting Up Name-Based Virtual Hosts
The concept of virtual host defines an individual site (or domain) that is served by the same physical machine. Actually, multiple sites / domains can be served off a single “real” server as virtual host. This process is transparent to the end user, to whom it appears that the different sites are being served by distinct web servers.
Name-based virtual hosting allows the server to rely on the client to report the hostname as part of the HTTP headers. Thus, using this technique, many different hosts can share the same IP address.
Each virtual host is configured in a directory within DocumentRoot. For our case, we will use the following dummy domains for the testing setup, each located in the corresponding directory:
- ilovelinux.com – /var/www/html/ilovelinux.com/public_html
- linuxrocks.org – /var/www/html/linuxrocks.org/public_html
In order for pages to be displayed correctly, we will chmod each VirtualHost’s directory to 755:
# chmod -R 755 /var/www/html/ilovelinux.com/public_html
# chmod -R 755 /var/www/html/linuxrocks.org/public_html
Next, create a sample index.html file inside each public_html directory:
<html>
  <head>
    <title>www.ilovelinux.com</title>
  </head>
  <body>
    <h1>This is the main page of www.ilovelinux.com</h1>
  </body>
</html>
Finally, in CentOS and openSUSE add the following section at the bottom of /etc/httpd/conf/httpd.conf or /etc/apache2/httpd.conf, respectively, or just modify it if it’s already there.
<VirtualHost *:80>
     ServerAdmin admin@ilovelinux.com
     DocumentRoot /var/www/html/ilovelinux.com/public_html
     ServerName www.ilovelinux.com
     ServerAlias www.ilovelinux.com ilovelinux.com
     ErrorLog /var/www/html/ilovelinux.com/error.log
     LogFormat "%v %l %u %t \"%r\" %>s %b" myvhost
     CustomLog /var/www/html/ilovelinux.com/access.log	myvhost
</VirtualHost>
<VirtualHost *:80>
     ServerAdmin admin@linuxrocks.org
     DocumentRoot /var/www/html/linuxrocks.org/public_html
     ServerName www.linuxrocks.org
     ServerAlias www.linuxrocks.org linuxrocks.org
     ErrorLog /var/www/html/linuxrocks.org/error.log
     LogFormat "%v %l %u %t \"%r\" %>s %b" myvhost
     CustomLog /var/www/html/linuxrocks.org/access.log	myvhost
</VirtualHost>
Please note that you can also add each virtual host definition in separate files inside the /etc/httpd/conf.ddirectory. If you choose to do so, each configuration file must be named as follows:
/etc/httpd/conf.d/ilovelinux.com.conf
/etc/httpd/conf.d/linuxrocks.org.conf
In other words, you need to add .conf to the site or domain name.
In Ubuntu, each individual configuration file is named /etc/apache2/sites-available/[site name].conf. Each site is then enabled or disabled with the a2ensite or a2dissite commands, respectively, as follows.
# a2ensite /etc/apache2/sites-available/ilovelinux.com.conf
# a2dissite /etc/apache2/sites-available/ilovelinux.com.conf
# a2ensite /etc/apache2/sites-available/linuxrocks.org.conf
# a2dissite /etc/apache2/sites-available/linuxrocks.org.conf
The a2ensite and a2dissite commands create links to the virtual host configuration file and place (or remove) them in the /etc/apache2/sites-enabled directory.
To be able to browse to both sites from another Linux box, you will need to add the following lines in the /etc/hosts file in that machine in order to redirect requests to those domains to a specific IP address.
[IP address of your web server]	www.ilovelinux.com
[IP address of your web server]	www.linuxrocks.org
As a security measure, SELinux will not allow Apache to write logs to a directory other than the default /var/log/httpd.
You can either disable SELinux, or set the right security context:
# chcon system_u:object_r:httpd_log_t:s0 /var/www/html/xxxxxx/error.log
where xxxxxx is the directory inside /var/www/html where you have defined your Virtual Hosts.
After restarting Apache, you should see the following page at the above addresses:
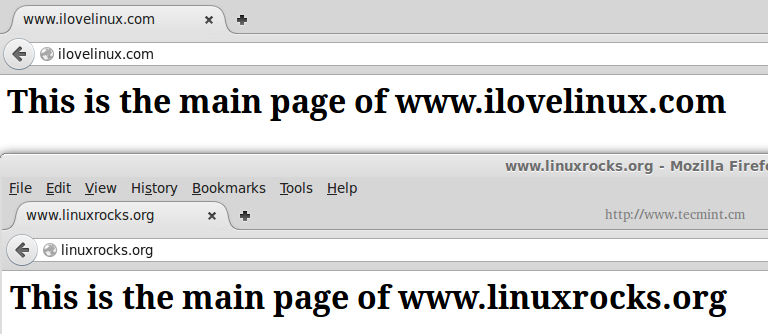
Check Apache VirtualHosts
Installing and Configuring SSL with Apache
Finally, we will create and install a self-signed certificate to use with Apache. This kind of setup is acceptable in small environments, such as a private LAN.
However, if your server will expose content to the outside world over the Internet, you will want to install a certificate signed by a 3rd party to corroborate its authenticity. Either way, a certificate will allow you to encrypt the information that is transmitted to, from, or within your site.
In CentOS and openSUSE, you need to install the mod_ssl package.
# yum update && yum install mod_ssl 		[On CentOS]
# zypper refresh && zypper install mod_ssl	[On openSUSE]
Whereas in Ubuntu you’ll have to enable the ssl module for Apache.
# a2enmod ssl
The following steps are explained using a CentOS test server, but your setup should be almost identical in the other distributions (if you run into any kind of issues, don’t hesitate to leave your questions using the comments form).
Step 1 [Optional]: Create a directory to store your certificates.
# mkdir /etc/httpd/ssl-certs
Step 2: Generate your self signed certificate and the key that will protect it.
# openssl req -x509 -nodes -days 365 -newkey rsa:2048 -keyout /etc/httpd/ssl-certs/apache.key -out /etc/httpd/ssl-certs/apache.crt
A brief explanation of the options listed above:
- req -X509 indicates we are creating a x509 certificate.
- -nodes (NO DES) means “don’t encrypt the key”.
- -days 365 is the number of days the certificate will be valid for.
- -newkey rsa:2048 creates a 2048-bit RSA key.
- -keyout /etc/httpd/ssl-certs/apache.key is the absolute path of the RSA key.
- -out /etc/httpd/ssl-certs/apache.crt is the absolute path of the certificate.
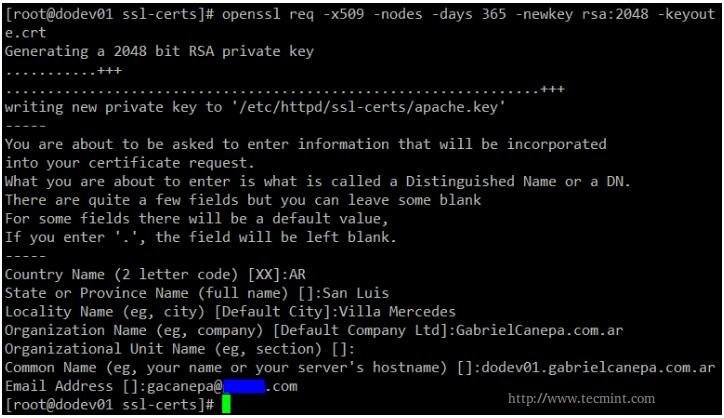
Create Apache SSL Certificate
Step 3: Open your chosen virtual host configuration file (or its corresponding section in /etc/httpd/conf/httpd.conf as explained earlier) and add the following lines to a virtual host declaration listening on port 443.
SSLEngine on
SSLCertificateFile /etc/httpd/ssl-certs/apache.crt
SSLCertificateKeyFile /etc/httpd/ssl-certs/apache.key
Please note that you need to add.
NameVirtualHost *:443
at the top, right below
NameVirtualHost *:80
Both directives instruct apache to listen on ports 443 and 80 of all network interfaces.
The following example is taken from /etc/httpd/conf/httpd.conf:
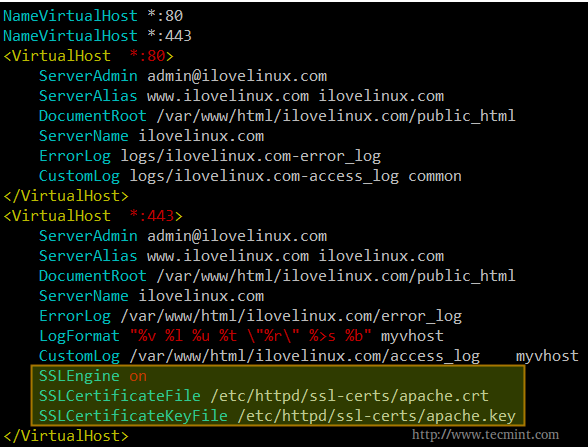
Apache VirtualHost Directives
Then restart Apache,
# service apache2 restart 			[sysvinit and upstart based systems]
# systemctl restart httpd.service 		[systemd-based systems]
And point your browser to https://www.ilovelinux.com. You will be presented with the following screen.
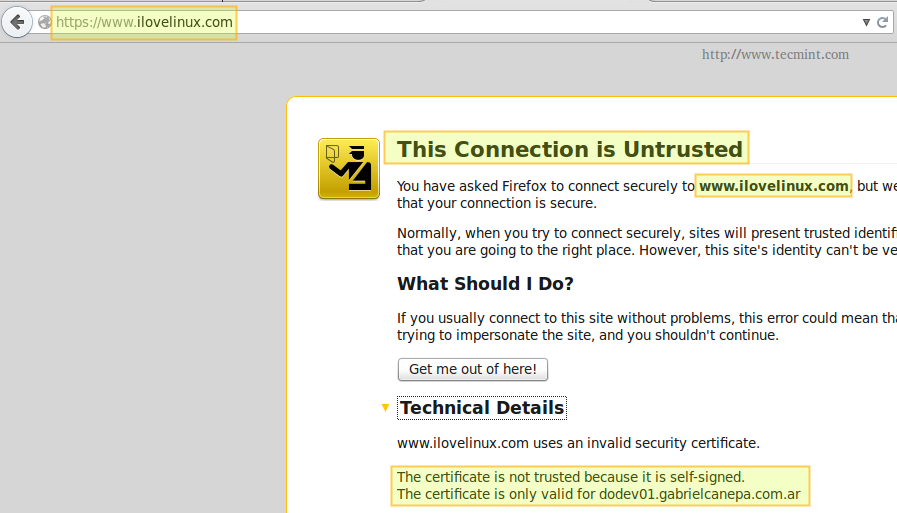
Check Apache SSl Certificate
Go ahead and click on “I understand the risks” and “Add exception”.
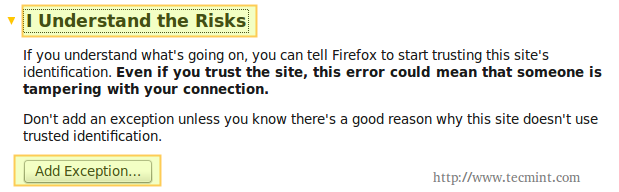
Apache Ceritficate Warning
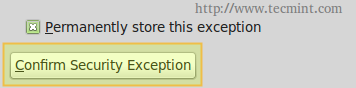
Finally, check “Permanently store this exception” and click “Confirm Security Exception”.
Add SSl Ceritficate
And you will be redirected to your home page using https.

Apache HTTPS Enabled
Summary
In this post we have shown how to configure Apache and name-based virtual hosting with SSL to secure data transmission. If for some reason you ran into any issues, feel free to let us know using the comment form below. We will be more than glad to help you perform a successful set up.
Read Also
- Apache IP Based and Name Based Virtual Hosting
- Creating Apache Virtual Hosts with Enable/Disable Vhosts Options
- Monitor “Apache Web Server” Using “Apache GUI” Tool
Configuring Squid Proxy Server with Restricted Access and Setting Up Clients to Use Proxy – Part 5
A Linux Foundation Certified Engineer is a skilled professional who has the expertise to install, manage, and troubleshoot network services in Linux systems, and is in charge of the design, implementation and ongoing maintenance of the system-wide architecture.

Linux Foundation Certified Engineer – Part 5
Introducing The Linux Foundation Certification Program.
In Part 1 of this series, we showed how to install squid, a proxy caching server for web clients. Please refer to that post (link given below) before proceeding if you haven’t installed squid on your system yet.
In this article, we will show you how to configure the Squid proxy server in order to grant or restrict Internet access, and how to configure an http client, or web browser, to use that proxy server.
My Testing Environment Setup
Squid Server
Operating System :	Debian Wheezy 7.5
IP Address 	 :	192.168.0.15
Hostname	 :	dev2.gabrielcanepa.com.ar
Client Machine 1
Operating System :	Ubuntu 12.04
IP Address 	 :	192.168.0.104
Hostname	 :	ubuntuOS.gabrielcanepa.com.ar
Client Machine 2
Operating System :	CentOS-7.0-1406
IP Address 	 :	192.168.0.17
Hostname	 :	dev1.gabrielcanepa.com.ar
Let us remember that, in simple terms, a web proxy server is an intermediary between one (or more) client computers and a certain network resource, the most common being access to the Internet. In other words, the proxy server is connected on one side directly to the Internet (or to a router that is connected to the Internet) and on the other side to a network of client computers that will access the World Wide Web through it.
You may be wondering, why would I want to add yet another piece of software to my network infrastructure?
Here are the top 3 reasons:
1. Squid stores files from previous requests to speed up future transfers. For example, suppose client1downloads CentOS-7.0-1406-x86_64-DVD.iso from the Internet. When client2 requests access to the same file, squid can transfer the file from its cache instead of downloading it again from the Internet. As you can guess, you can use this feature to speed up data transfers in a network of computers that require frequent updates of some kind.
2. ACLs (Access Control Lists) allow us to restrict the access to websites, and / or monitor the access on a per user basis. You can restrict access based on day of week or time of day, or domain, for example.
3. Bypassing web filters is made possible through the use of a web proxy to which requests are made and which returns requested content to a client, instead of having the client request it directly to the Internet.
For example, suppose you are logged on in client1 and want to access www.facebook.com through your company’s router. Since the site may be blocked by your company’s policies, you can instead connect to a web proxy server and have it request access to www.facebook.com. Remote content is then returned to you through the web proxy server again, bypassing your company’s router’s blocking policies.
Configuring Squid – The Basics
The access control scheme of the Squid web proxy server consists of two different components:
- The ACL elements are directive lines that begin with the word “acl” and represent types of tests that are performed against any request transaction.
- The access list rules consist of an allow or deny action followed by a number of ACL elements, and are used to indicate what action or limitation has to be enforced for a given request. They are checked in order, and list searching terminates as soon as one of the rules is a match. If a rule has multiple ACL elements, it is implemented as a boolean AND operation (all ACL elements of the rule must be a match in order for the rule to be a match).
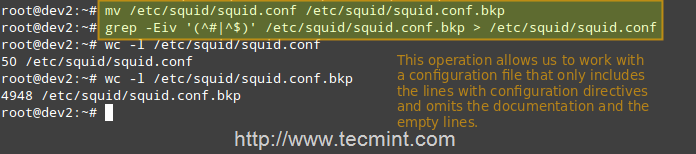
Squid’s main configuration file is /etc/squid/squid.conf, which is ~5000 lines long since it includes both configuration directives and documentation. For that reason, we will create a new squid.conf file with only the lines that include configuration directives for our convenience, leaving out empty or commented lines. To do so, we will use the following commands.
# mv /etc/squid/squid.conf /etc/squid/squid.conf.bkp
And then,
# grep -Eiv '(^#|^$)' /etc/squid/squid.conf.bkp

OR

# grep -ve ^# -ve ^$ /etc/squid/squid.conf.bkp > /etc/squid/squid.conf
Backup Squid Configuration File
Now, open the newly created squid.conf file, and look for (or add) the following ACL elements and access lists.
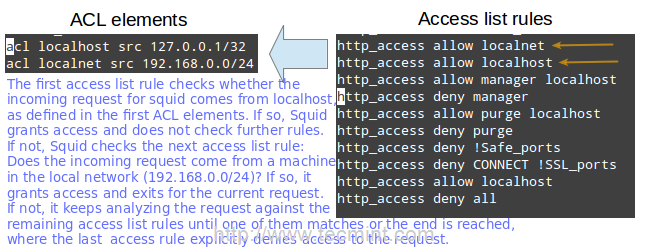
acl localhost src 127.0.0.1/32
acl localnet src 192.168.0.0/24
The two lines above represent a basic example of the usage of ACL elements.
- The first word, acl, indicates that this is a ACL element directive line.
- The second word, localhost or localnet, specify a name for the directive.
- The third word, src in this case, is an ACL element type that is used to represent a client IP address or range of addresses, respectively. You can specify a single host by IP (or hostname, if you have some sort of DNS resolution implemented) or by network address.
- The fourth parameter is a filtering argument that is “fed” to the directive.
The two lines below are access list rules and represent an explicit implementation of the ACL directives mentioned earlier. In few words, they indicate that http access should be granted if the request comes from the local network (localnet), or from localhost. Specifically what is the allowed local network or local host addresses? The answer is: those specified in the localhost and localnet directives.
http_access allow localnet
http_access allow localhost
Squid ACL Allow Access List
At this point you can restart Squid in order to apply any pending changes.
# service squid restart 		[Upstart / sysvinit-based distributions]
# systemctl restart squid.service 	[systemd-based distributions]
and then configure a client browser in the local network (192.168.0.104 in our case) to access the Internet through your proxy as follows.
In Firefox
1. Go to the Edit menu and choose the Preferences option.
2. Click on Advanced, then on the Network tab, and finally on Settings…
3. Check Manual proxy configuration and enter the IP address of the proxy server and the port where it is listening for connections.
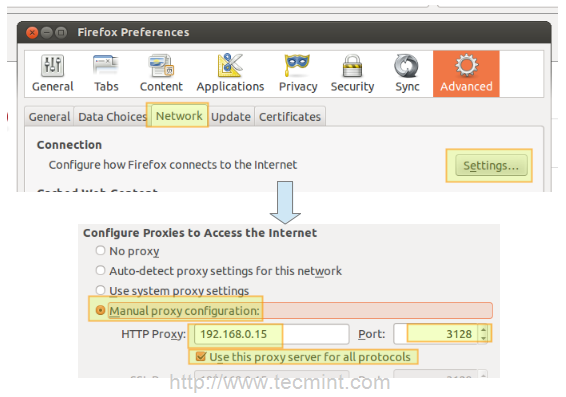
Configure Proxy in Firefox
Note That by default, Squid listens on port 3128, but you can override this behaviour by editing the access listrule that begins with http_port (by default it reads http_port 3128).
4. Click OK to apply the changes and you’re good to go.
Verifying that a Client is Accessing the Internet
You can now verify that your local network client is accessing the Internet through your proxy as follows.
1. In your client, open up a terminal and type,
# ip address show eth0 | grep -Ei '(inet.*eth0)'
That command will display the current IP address of your client (192.168.0.104 in the following image).
2. In your client, use a web browser to open any given web site (www.tecmint.com in this case).
3. In the server, run.
# tail -f /var/log/squid/access.log
and you’ll get a live view of requests being served through Squid.
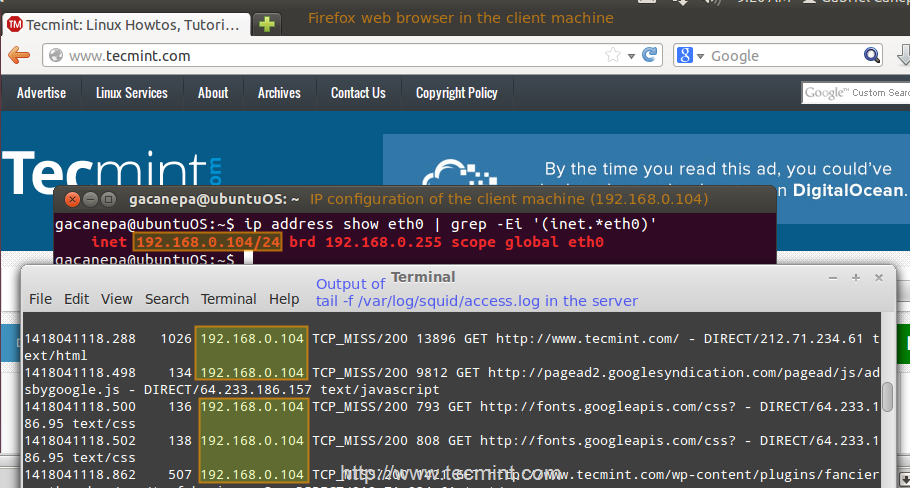
Check Proxy Browsing
Restricting Access By Client
Now suppose you want to explicitly deny access to that particular client IP address, while yet maintaining access for the rest of the local network.
1. Define a new ACL directive as follows (I’ve named it ubuntuOS but you can name it whatever you want).
acl ubuntuOS src 192.168.0.104
2. Add the ACL directive to the localnet access list that is already in place, but prefacing it with an exclamation sign. This means, “Allow Internet access to clients matching the localnet ACL directive except to the one that matches the ubuntuOS directive”.
http_access allow localnet !ubuntuOS
3. Now we need to restart Squid in order to apply changes. Then if we try to browse to any site we will find that access is denied now.
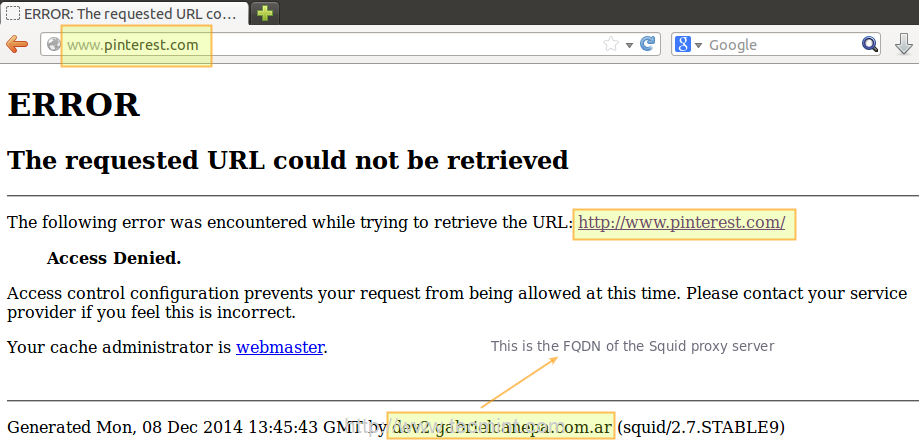
Block Internet Access
Configuring Squid – Fine Tuning
Restricting access by domain and / or by time of day / day of week
To restrict access to Squid by domain we will use the dstdomain keyword in a ACL directive, as follows.
acl forbidden dstdomain "/etc/squid/forbidden_domains"
Where forbidden_domains is a plain text file that contains the domains that we desire to deny access to.
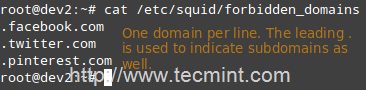
Block Access to Domains
Finally, we must grant access to Squid for requests not matching the directive above.
http_access allow localnet !forbidden
Or maybe we will only want to allow access to those sites during a certain time of the day (10:00 until 11:00 am) only on Monday (M), Wednesday (W), and Friday (F).
acl someDays time MWF 10:00-11:00
http_access allow forbidden someDays
http_access deny forbidden
Otherwise, access to those domains will be blocked.
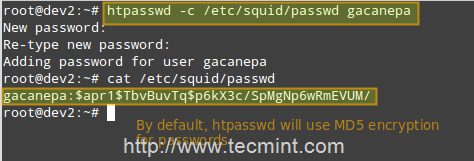
Restricting access by user authentication
Squid support several authentication mechanisms (Basic, NTLM, Digest, SPNEGO, and Oauth) and helpers (SQL database, LDAP, NIS, NCSA, to name a few). In this tutorial we will use Basic authentication with NCSA.
Add the following lines to your /etc/squid/squid.conf file.
auth_param basic program /usr/lib/squid/ncsa_auth /etc/squid/passwd
auth_param basic credentialsttl 30 minutes
auth_param basic casesensitive on
auth_param basic realm Squid proxy-caching web server for Tecmint's LFCE series
acl ncsa proxy_auth REQUIRED
http_access allow ncsa
Note: In CentOS 7, the NCSA plugin for squid can be found in /usr/lib64/squid/basic_nsca_auth, so change accordingly in above line.

Enable NCSA Authentication
A few clarifications:
- We need to tell Squid which authentication helper program to use with the auth_param directive by specifying the name of the program (most likely, /usr/lib/squid/ncsa_auth or /usr/lib64/squid/basic_nsca_auth), plus any command line options (/etc/squid/passwd in this case) if necessary.
- The /etc/squid/passwd file is created through htpasswd, a tool to manage basic authentication through files. It will allow us to add a list of usernames (and their corresponding passwords) that will be allowed to use Squid.
- credentialsttl 30 minutes will require entering your username and password every 30 minutes (you can specify this time interval with hours as well).
- casesensitive on indicates that usernames and passwords are case sensitive.
- realm represents the text of the authentication dialog that will be used to authenticate to squid.
- Finally, access is granted only when proxy authentication (proxy_auth REQUIRED) succeeds.
Run the following command to create the file and to add credentials for user gacanepa (omit the -c flag if the file already exists).
# htpasswd -c /etc/squid/passwd gacanepa
Restrict Squid Access to Users
Open a web browser in the client machine and try to browse to any given site.

Enable Squid Authentication
If authentication succeeds, access is granted to the requested resource. Otherwise, access will be denied.
Using Cache to Sped Up Data Transfer
One of Squid’s distinguishing features is the possibility of caching resources requested from the web to disk in order to speed up future requests of those objects either by the same client or others.
Add the following directives in your squid.conf file.
cache_dir ufs /var/cache/squid 1000 16 256
maximum_object_size 100 MB
refresh_pattern .*\.(mp4|iso) 2880
A few clarifications of the above directives.
- ufs is the Squid storage format.
- /var/cache/squid is a top-level directory where cache files will be stored. This directory must exist and be writeable by Squid (Squid will NOT create this directory for you).
- 1000 is the amount (in MB) to use under this directory.
- 16 is the number of 1st-level subdirectories, whereas 256 is the number of 2nd-level subdirectories within /var/spool/squid.
- The maximum_object_size directive specifies the maximum size of allowed objects in the cache.
- refresh_pattern tells Squid how to deal with specific file types (.mp4 and .iso in this case) and for how long it should store the requested objects in cache (2880 minutes = 2 days).
The first and second 2880 are lower and upper limits, respectively, on how long objects without an explicit expiry time will be considered recent, and thus will be served by the cache, whereas 0% is the percentage of the objects’ age (time since last modification) that each object without explicit expiry time will be considered recent.
Case study: downloading a .mp4 file from 2 different clients and testing the cache
First client (IP 192.168.0.104) downloads a 71 MB .mp4 file in 2 minutes and 52 seconds.
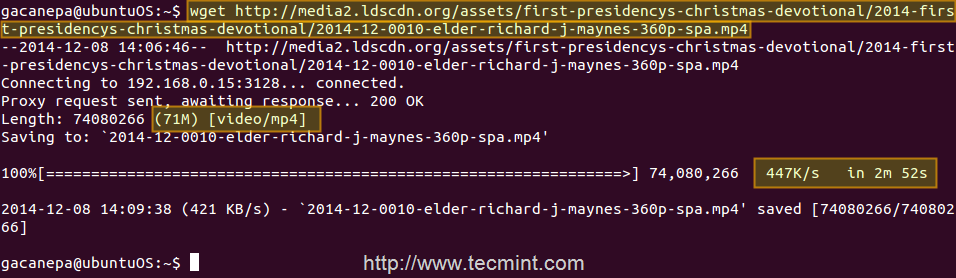
Enable Caching on Squid
Second client (IP 192.168.0.17) downloads the same file in 1.4 seconds!
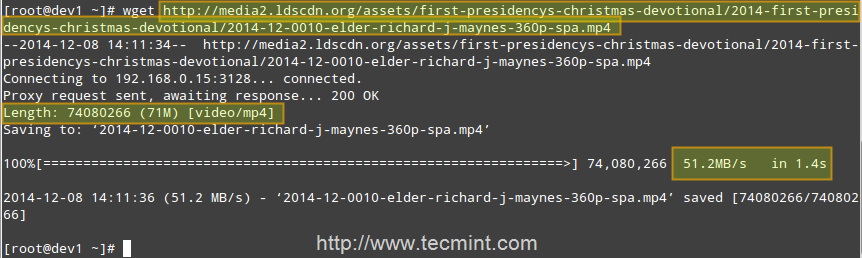
Verify Squid Caching
That is because the file was served from the Squid cache (indicated by TCP_HIT/200) in the second case, as opposed to the first instance, when it was downloaded directly from the Internet (represented by TCP_MISS/200).
The HIT and MISS keywords, along with the 200 http response code, indicate that the file was served successfully both times, but the cache was HIT and Missed respectively. When a request cannot be served by the cache for some reason, then Squid attempts to serve it from the Internet.

Squid HTTP Codes
Conclusion
In this article we have discussed how to set up a Squid web caching proxy. You can use the proxy server to filter contents using a chosen criteria, and also to reduce latency (since identical incoming requests are served from the cache, which is closer to the client than the web server that is actually serving the content, resulting in faster data transfers) and network traffic as well (reducing the amount of used bandwidth, which saves you money if you’re paying for traffic).
You may want to refer to the Squid web site for further documentation (make sure to also check the wiki), but do not hesitate to contact us if you have any questions or comments. We will be more than glad to hear from you!
Configuring SquidGuard, Enabling Content Rules and Analyzing Squid Logs – Part 6
A LFCE (Linux Foundation Certified Engineer) is a professional who has the necessary skills to install, manage, and troubleshoot network services in Linux systems, and is in charge of the design, implementation and ongoing maintenance of the system architecture in its entirety.

Linux Foundation Certified Engineer – Part 6
Introducing The Linux Foundation Certification Program.
In previous posts we discussed how to install Squid + squidGuard and how to configure squid to properly handle or restrict access requests. Please make sure you go over those two tutorials and install both Squid and squidGuard before proceeding as they set the background and the context for what we will cover in this post: integrating squidguard in a working squid environment to implement blacklist rules and content control over the proxy server.
Requirements
- Install Squid and SquidGuard – Part 1
- Configuring Squid Proxy Server with Restricted Access – Part 5
What Can / Cannot I use SquidGuard For?
Though squidGuard will certainly boost and enhance Squid’s features, it is important to highlight what it can and what it cannot do.
squidGuard can be used to:
- limit the allowed web access for some users to a list of accepted/well known web servers and/or URLs only, while denying access to other blacklisted web servers and/or URLs.
- block access to sites (by IP address or domain name) matching a list of regular expressions or words for some users.
- require the use of domain names/prohibit the use of IP address in URLs.
- redirect blocked URLs to error or info pages.
- use distinct access rules based on time of day, day of the week, date etc.
- implement different rules for distinct user groups.
However, neither squidGuard nor Squid can be used to:
- analyze text inside documents and act in result.
- detect or block embedded scripting languages like JavaScript, Python, or VBscript inside HTML code.
BlackLists – The Basics
Blacklists are an essential part of squidGuard. Basically, they are plain text files that will allow you to implement content filters based on specific keywords. There are both freely available and commercial blacklists, and you can find the download links in the squidguard blacklists project’s website.
In this tutorial I will show you how to integrate the blacklists provided by Shalla Secure Services to your squidGuard installation. These blacklists are free for personal / non-commercial use and are updated on a daily basis. They include, as of today, over 1,700,000 entries.
For our convenience, let’s create a directory to download the blacklist package.
# mkdir /opt/3rdparty
# cd /opt/3rdparty
# wget http://www.shallalist.de/Downloads/shallalist.tar.gz
The latest download link is always available as highlighted below.
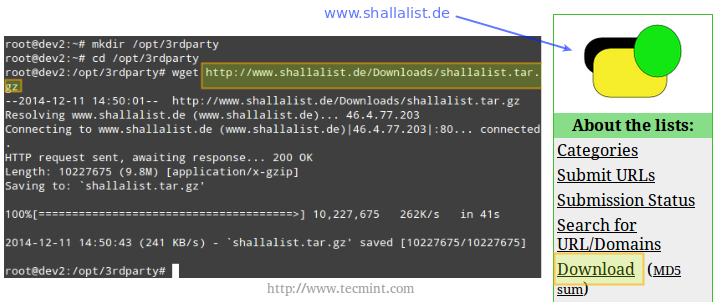
Download Squidguard Blacklist
After untarring the newly downloaded file, we will browse to the blacklist (BL) folder.
# tar xzf shallalist.tar.gz
# cd BL
# ls
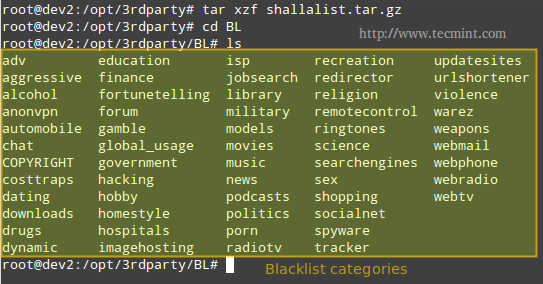
Squidguard Blacklist Domains
You can think of the directories shown in the output of ls as backlist categories, and their corresponding (optional) subdirectories as subcategories, descending all the way down to specific URLs and domains, which are listed in the files urls and domains, respectively. Refer to the below image for further details.
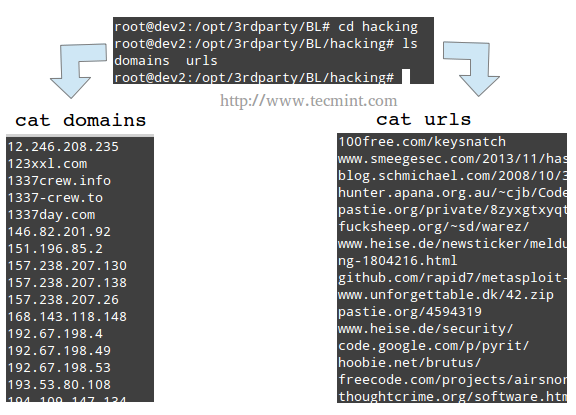
SquidGuard Blacklist Urls Domains
Installing Blacklists
Installation of the whole blacklist package, or of individual categories, is performed by copying the BL directory, or one of its subdirectories, respectively, to the /var/lib/squidguard/db directory.
Of course you could have downloaded the blacklist tarball to this directory in the first place, but the approach explained earlier gives you more control over what categories should be blocked (or not) at a specific time.
Next, I will show you how to install the anonvpn, hacking, and chat blacklists and how to configure squidGuard to use them.
Step 1: Copy recursively the anonvpn, hacking, and chat directories from /opt/3rdparty/BL to /var/lib/squidguard/db.
# cp -a /opt/3rdparty/BL/anonvpn /var/lib/squidguard/db
# cp -a /opt/3rdparty/BL/hacking /var/lib/squidguard/db
# cp -a /opt/3rdparty/BL/chat /var/lib/squidguard/db
Step 2: Use the domains and urls files to create squidguard’s database files. Please note that the following command will work for creating .db files for all the installed blacklists – even when a certain category has 2 or more subcategories.
# squidGuard -C all
Step 3: Change the ownership of the /var/lib/squidguard/db/ directory and its contents to the proxy user so that Squid can read the database files.
# chown -R proxy:proxy /var/lib/squidguard/db/
Step 4: Configure Squid to use squidGuard. We will use Squid’s url_rewrite_program directive in /etc/squid/squid.conf to tell Squid to use squidGuard as a URL rewriter / redirector.
Add the following line to squid.conf, making sure that /usr/bin/squidGuard is the right absolute path in your case.
# which squidGuard
# echo "url_rewrite_program $(which squidGuard)" >> /etc/squid/squid.conf
# tail -n 1 /etc/squid/squid.conf
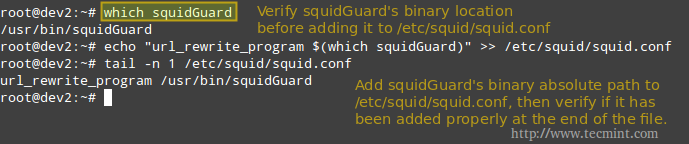
Configure Squid to use SquidGuard
Step 5: Add the necessary directives to squidGuard’s configuration file (located in /etc/squidguard/squidGuard.conf).
Please refer to the screenshot above, after the following code for further clarification.
src localnet {
        ip      192.168.0.0/24
}

dest anonvpn {
        domainlist      anonvpn/domains
        urllist         anonvpn/urls
}
dest hacking {
        domainlist      hacking/domains
        urllist         hacking/urls
}
dest chat {
        domainlist      chat/domains
        urllist         chat/urls
}

acl {
        localnet {
                        pass     !anonvpn !hacking !chat !in-addr all
                        redirect http://www.lds.org
                }
        default {
                        pass     local none
        }
}
Step 6: Restart Squid and test.
# service squid restart 		[sysvinit / Upstart-based systems]
# systemctl restart squid.service 	[systemctl-based systems]
Open a web browser in a client within local network and browse to a site found in any of the blacklist files (domains or urls – we will use http://spin.de/ chat in the following example) and you will be redirected to another URL, www.lds.org in this case.
You can verify that the request was made to the proxy server but was denied (301 http response – Moved permanently) and was redirected to www.lds.org instead.

Analyze Squid Logs
Removing Restrictions
If for some reason you need to enable a category that has been blocked in the past, remove the corresponding directory from /var/lib/squidguard/db and comment (or delete) the related acl in the squidguard.conf file.
For example, if you want to enable the domains and urls blacklisted by the anonvpn category, you would need to perform the following steps.
# rm -rf /var/lib/squidguard/db/anonvpn
And edit the squidguard.conf file as follows.
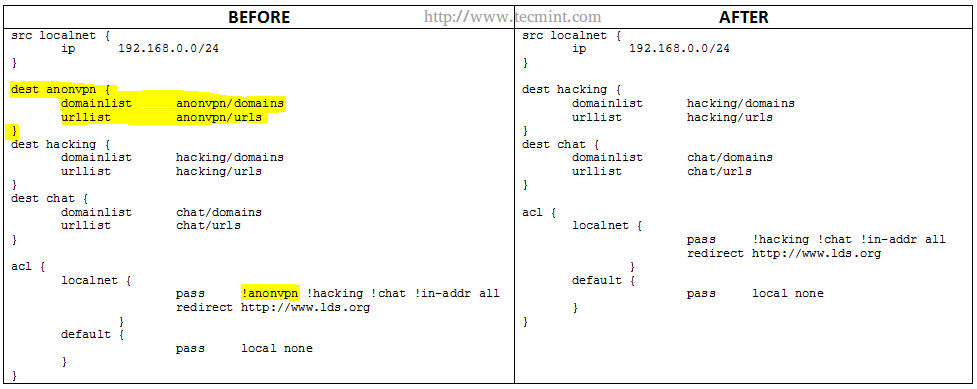
Remove Squid Blacklist
Please note that parts highlighted in yellow under BEFORE have been deleted in AFTER.
Whitelisting Specific Domains and URL’s
On occasions you may want to allow certain URLs or domains, but not an entire blacklisted directory. In that case, you should create a directory named myWhiteLists (or whatever name you choose) and insert the desired URLs and domains under /var/lib/squidguard/db/myWhiteLists in files named urls and domains, respectively.
Then, initialize the new content rules as before,
# squidGuard -C all
and modify the squidguard.conf as follows.
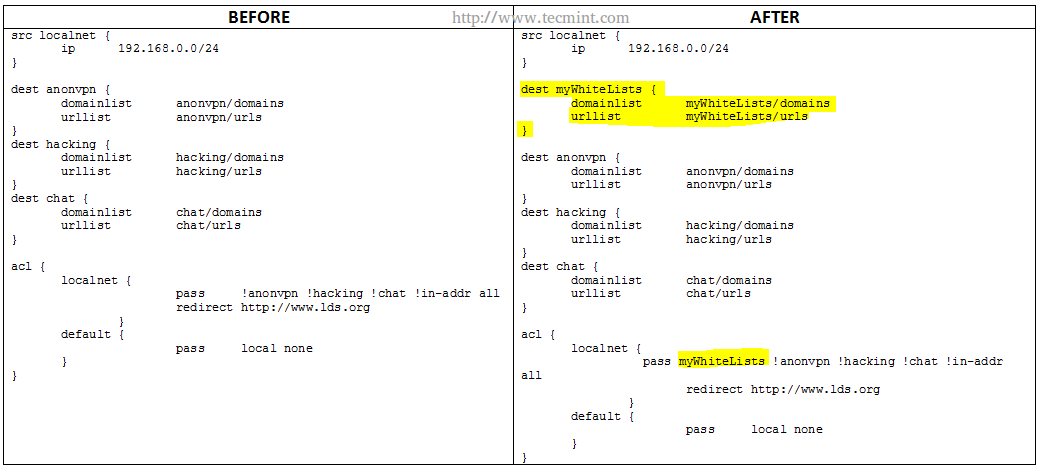
Remove Domains Urls in Squid Blacklist
As before, the parts highlighted in yellow indicate the changes that need to be added. Note that the myWhiteLists string needs to be first in the row that starts with pass.
Finally, remember to restart Squid in order to apply changes.
Conclusion
After following the steps outlined in this tutorial you should have a powerful content filter and URL redirector working hand in hand with your Squid proxy. If you experience any issues during your installation / configuration process or have any questions or comments, you may want to refer to squidGuard’s web documentation but always feel free to drop us a line using the form below and we will get back to you as soon as possible.
Setting Up Email Services (SMTP, Imap and Imaps) and Restricting Access to SMTP – Part 7
A LFCE (Linux Foundation Certified Engineer) is a trained professional who has the skills to install, manage, and troubleshoot network services in Linux systems, and is in charge of the design, implementation and ongoing maintenance of the system architecture and user administration.

Linux Foundation Certified Engineer – Part 7
Introducing The Linux Foundation Certification Program.
In a previous tutorial we discussed how to install the necessary components of a mail service. If you haven’t installed Postfix and Dovecot yet, please refer to Part 1 of this series for instructions to do so before proceeding.
Requirement
In this post, I will show you how to configure your mail server and how to perform the following tasks:
- Configure email aliases
- Configure an IMAP and IMAPS service
- Configure an smtp service
- Restrict access to an smtp server
Note: That our setup will only cover a mail server for a local area network where the machines belong to the same domain. Sending email messages to other domains require a more complex setup, including domain name resolution capabilities, that is out of the scope of the LFCE certification.
But first off, let’s start with a few definitions.
Components Of a Mail Sending, Transport and Delivery Process
The following image illustrates the process of email transport starting with the sender until the message reaches the recipient’s inbox:
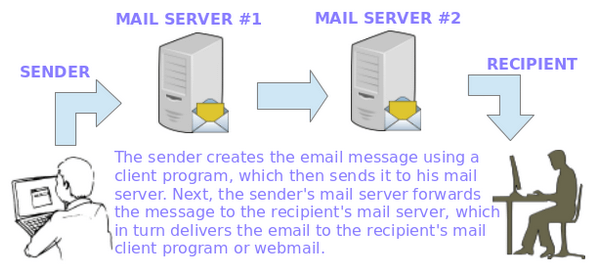
Process of Email Transport
To make this possible, several things happen behind the scenes. In order for an email message to be delivered from a client application (such as Thunderbird, Outlook, or webmail services such as Gmail or Yahoo! Mail) to his / her mail server and from there to the destination server and finally to its intended recipient, a SMTP (Simple Mail Transfer Protocol) service must be in place in each server.
When talking about email services, you will find the following terms mentioned very often:
Message Transport Agent – MTA
MTA (short for Mail or Message Transport Agent), aka mail relay, is a software that is in charge of transferring email messages from a server to a client (and the other way around as well). In this series, Postfix acts as our MTA.
Mail User Agent – MUA
MUA, or Mail User Agent, is a computer program used to access and manage the user’s email inboxes. Examples of MUAs include, but are not limited to, Thunderbird, Outlook, and webmail interfaces such as Gmail, Outlook.com, to name a few. In this series, we will use Thunderbird in our examples.
Mail Delivery Agent
MDA (short for Message or Mail Delivery Agent) is the software part that actually delivers email messages to user’s inboxes. In this tutorial, we will use Dovecot as our MDA. Dovecot will also will handle user authentication.
Simple Mail Transfer Protocol – SMTP
In order for these components to be able to “talk” to each other, they must “speak” the same “language” (or protocol), namely SMTP (Simple Mail Transfer Protocol) as defined in the RFC 2821. Most likely, you will have to refer to that RFC while setting up your mail server environment.
Other protocols that we need to take into account are IMAP4 (Internet Message Access Protocol), which allows to manage email messages directly on the server without downloading them to our client’s hard drive, and POP3(Post Office Protocol), which allows to download the messages and folders to the user’s computer.
Our Testing Environment
Our testing environment is as follows:
Mail Server Setup
Mail Server OS	: 	Debian Wheezy 7.5
IP Address	:	192.168.0.15
Local Domain	:	example.com.ar
User Aliases	:	sysadmin@example.com.ar is aliased to gacanepa@example.com.ar and jdoe@example.com.ar
Client Machine Setup
Mail Client OS	: 	Ubuntu 12.04
IP Address	:	192.168.0.103
On our client, we have set up elementary DNS resolution adding the following line to the /etc/hosts file.
192.168.0.15 example.com.ar mailserver
Adding Email Aliases
By default, a message sent to a specific user should be delivered to that user only. However, if you want to also deliver it to a group of users as well, or to a different user, you can create a mail alias or use one of the existing ones in /etc/postfix/aliases, following this syntax:
user1: user1, user2
Thus, emails sent to user1 will be also delivered to user2. Note that if you omit the word user1 after the colon, as in
user1: user2
the messages sent to user1 will only be sent to user2, and not to user1.
In the above example, user1 and user2 should already exist on the system. You may want to refer to Part 8 of the LFCS series if you need to refresh your memory before adding new users.
In our specific case, we will use the following alias as explained before (add the following line in /etc/aliases).
sysadmin: gacanepa, jdoe
And run the following command to create or refresh the aliases lookup table.
postalias /etc/postfix/aliases
So that messages sent to sysadmin@example.com.ar will be delivered to the inbox of the users listed above.
Configuring Postfix – The SMTP Service
The main configuration file for Postfix is /etc/postfix/main.cf. You only need to set up a few parameters before being able to use the mail service. However, you should become acquainted with the full configuration parameters (which can be listed with man 5 postconf) in order to set up a secure and fully customized mail server.
Note: That this tutorial is only supposed to get you started in that process and does not represent a comprehensive guide on email services with Linux.
Open /etc/postfix/main.cf file with your choice of editor and do following changes as explained.
# vi /etc/postfix/main.cf
1. myorigin specifies the domain that appears in messages sent from the server. You may see the /etc/mailname file used with this parameter. Feel free to edit it if needed.
myorigin = /etc/mailname
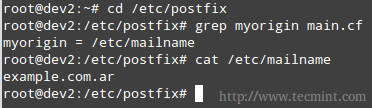
Configure Myorigin
If the value above is used, mails will be sent as user@example.com.ar, where user is the user sending the message.
2. mydestination lists what domains this machine will deliver email messages locally, instead of forwarding to another machine (acting as a relay system). The default settings will suffice in our case (make sure to edit the file to suit your environment).

Configure Mydestination
Where the /etc/postfix/transport file defines the relationship between domains and the next server to which mail messages should be forwarded. In our case, since we will be delivering messages to our local area network only (thus bypassing any external DNS resolution), the following configuration will suffice.
example.com.ar    local:
.example.com.ar    local:
Next, we need to convert this plain text file to the .db format, which creates the lookup table that Postfix will actually use to know what to do with incoming and outgoing mail.
# postmap /etc/postfix/transport
You will need to remember to recreate this table if you add more entries to the corresponding text file.
3. mynetworks defines the authorized networks Postfix will forward messages from. The default value, subnet, tells Postfix to forward mail from SMTP clients in the same IP subnetworks as the local machine only.
mynetworks = subnet

Configure Mynetworks
4. relay_domains specifies the destinations to which emails should be sent to. We will leave the default value untouched, which points to mydestination. Remember that we are setting up a mail server for our LAN.
relay_domains = $mydestination
Note that you can use $mydestination instead of listing the actual contents.

Configure Relay Domains
5. inet_interfaces defines which network interfaces the mail service should listen on. The default, all, tells Postfix to use all network interfaces.
inet_interfaces = all

Configure Network Interfaces
6. Finally, mailbox_size_limit and message_size_limit will be used to set the size of each user’s mailbox and the maximum allowed size of individual messages, respectively, in bytes.
mailbox_size_limit = 51200000
message_size_limit = 5120000
Restricting Access to the SMTP Server
The Postfix SMTP server can apply certain restrictions to each client connection request. Not all clients should be allowed to identify themselves to the mail server using the smtp HELO command, and certainly not all of them should be granted access to send or receive messages.
To implement these restrictions, we will use the following directives in the main.cf file. Though they are self-explanatory, comments have been added for clarification purposes.
# Require that a remote SMTP client introduces itself with the HELO or EHLO command before sending the MAIL command or other commands that require EHLO negotiation.
smtpd_helo_required = yes

# Permit the request when the client IP address matches any network or network address listed in $mynetworks
# Reject the request when the client HELO and EHLO command has a bad hostname syntax
smtpd_helo_restrictions = permit_mynetworks, reject_invalid_helo_hostname

# Reject the request when Postfix does not represent the final destination for the sender address
smtpd_sender_restrictions = permit_mynetworks, reject_unknown_sender_domain

# Reject the request unless 1) Postfix is acting as mail forwarder or 2) is the final destination
smtpd_recipient_restrictions = permit_mynetworks, reject_unauth_destination
The Postfix configuration parameters postconf page may come in handy in order to further explore the available options.
Configuring Dovecot
Right after installing dovecot, it supports out-of-the-box for the POP3 and IMAP protocols, along with their secure versions, POP3S and IMAPS, respectively.
Add the following lines in /etc/dovecot/conf.d/10-mail.conf file.
# %u represents the user account that logs in
# Mailboxes are in mbox format
mail_location = mbox:~/mail:INBOX=/var/mail/%u
# Directory owned by the mail group and the directory set to group-writable (mode=0770, group=mail)
# You may need to change this setting if postfix is running a different user / group on your system
mail_privileged_group = mail
If you check your home directory, you will notice there is a mail subdirectory with the following contents.
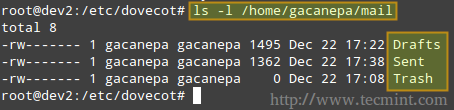
Configure Dovecot
Also, please note that the /var/mail/%u file is where the user’s mails are store on most systems.
Add the following directive to /etc/dovecot/dovecot.conf (note that imap and pop3 imply imaps and pop3s as well).
protocols = imap pop3
And make sure /etc/conf.d/10-ssl.conf includes the following lines (otherwise, add them).
ssl_cert = </etc/dovecot/dovecot.pem
ssl_key = </etc/dovecot/private/dovecot.pem
Now let’s restart Dovecot and verify that it listens on the ports related to imap, imaps, pop3, and pop3s.
# netstat -npltu | grep dovecot

Check Listening Ports
Setting Up a Mail Client and Sending/Receving Mails
On our client computer, we will open Thunderbird and click on File → New → Existing mail account. We will be prompted to enter the name of the account and the associated email address, along with its password. When we click Continue, Thunderbird will then try to connect to the mail server in order to verify settings.
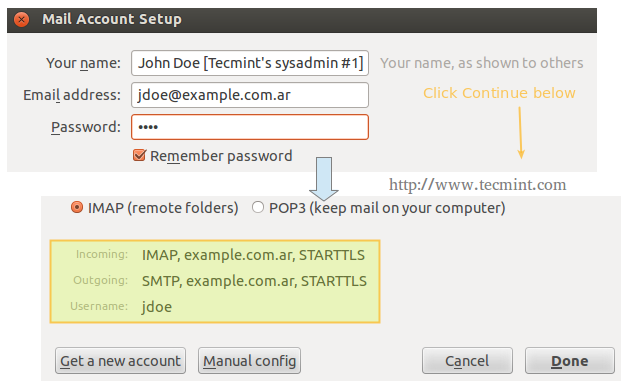
Configure Mail Client
Repeat the process above for the next account (gacanepa@example.com.ar) and the following two inboxes should appear in Thunderbird’s left pane.
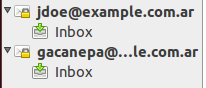
User Mail Inbox
On our server, we will write an email message to sysadmin, which is aliased to jdoe and gacanepa.
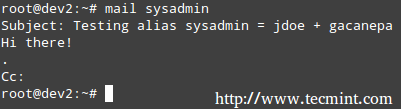
Send Mail from Commandline
The mail log (/var/log/mail.log) seems to indicate that the email that was sent to sysadmin was relayed to jdoe@example.com.ar and gacanepa@example.com.ar, as can be seen in the following image.

Check Mail Status Delivery
We can verify if the mail was actually delivered to our client, where the IMAP accounts were configured in Thunderbird.
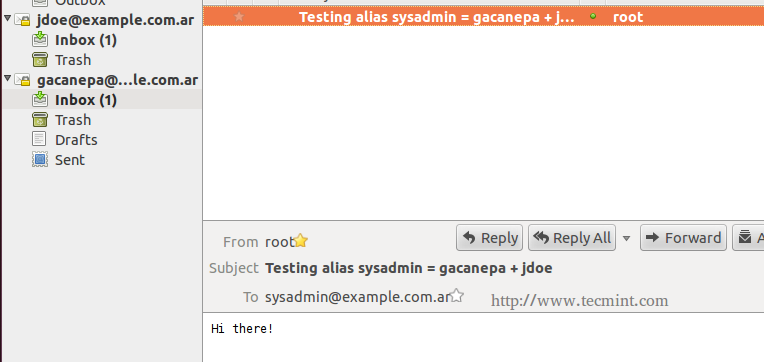
Verify Email Messages
Finally, let’s try to send a message from jdoe@example.com.ar to gacanepa@example.com.ar.
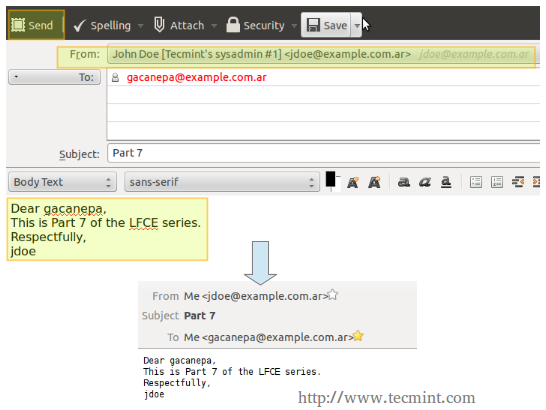
Send Message to User
In the exam you will be asked to work exclusively with command-line utilities. This means you will not be able to install a desktop client application such as Thunderbird, but will be required to use mail instead. We have used Thunderbird in this chapter for illustrative purposes only.
Conclusion
In this post we have explained how to set up an IMAP mail server for your local area network and how to restrict access to the SMTP server. If you happen to run into an issue while implementing a similar setup in your testing environment, you will want to check the online documentation of Postfix and Dovecot (specially the pages about the main configuration files, /etc/postfix/main.cf and /etc/dovecot/dovecot.conf, respectively), but in any case do not hesitate to contact me using the comment form below. I will be more than glad to help you.
How To Setup an Iptables Firewall to Enable Remote Access to Services in Linux – Part 8

Linux Foundation Certified Engineer – Part 8
Introducing The Linux Foundation Certification Program
You will recall from Part 1 – About Iptables of this LFCE (Linux Foundation Certified Engineer) series that we gave a basic description of what a firewall is: a mechanism to manage packets coming into and leaving the network. By “manage” we actually mean:
- To allow or prevent certain packets to enter or leave our network.
- To forward other packets from one point of the network to another.
based on predetermined criteria.
In this article we will discuss how to implement basic packet filtering and how to configure the firewall with iptables, a frontend to netfilter, which is a native kernel module used for firewalling.
Please note that firewalling is a vast subject and this article is not intended to be a comprehensive guide to understanding all that there is to know about it, but rather as a starting point for a deeper study of this topic. However, we will revisit the subject in Part 10 of this series when we explore a few specific use cases of a firewall in Linux.
You can think of a firewall as an international airport where passenger planes come and go almost 24/7. Based on a number of conditions, such as the validity of a person’s passport, or his / her country of origin (to name a few examples) he or she may, or may not, be allowed to enter or leave a certain country.
At the same time, airport officers can instruct people to move from one place of the airport to another if necessary, for example when they need to go through Customs Services.
We may find the airport analogy useful during the rest of this tutorial. Just keep in mind the following relations as we proceed:
- Persons = Packets
- Firewall = Airport
- Country #1 = Network #1
- Country #2 = Network #2
- Airport regulations enforced by officers = firewall rules
Iptables – The Basics
At the low level, it is the kernel itself which “decides” what to do with packets based on rules grouped in chains, or sentences. These chains define what actions should be taken when a package matches the criteria specified by them.
The first action taken by iptables will consist in deciding what to do with a packet:
- Accept it (let it go through into our network)?
- Reject it (prevent it from accessing our network)?
- Forward it (to another chain)?
Just in case you were wondering why this tool is called iptables, it’s because these chains are organized in tables, with the filter table being the most well know and the one that is used to implement packet filtering with its three default chains:
1. The INPUT chain handles packets coming into the network, which are destined for local programs.
2. The OUTPUT chain is used to analyze packets originated in the local network, which are to be sent to the outside.
3. The FORWARD chain processes the packets which should be forwarded to another destination (as in the case of a router).
For each of these chains there is a default policy, which dictates what should be done by default when packets do not match any of the rules in the chain. You can view the rules created for each chain and the default policy by running the following command:
# iptables -L
The available policies are as follows:
- ACCEPT → lets the packet through. Any packet that does not match any rules in the chain is allowed into the network.
- DROP → drops the packet quietly. Any packet that does not match any rules in the chain is prevented from entering the network.
- REJECT → rejects the packet and returns an informative message. This one in particular does not work as a default policy. Instead, it is meant to complement packet filtering rules.

Linux Iptables Policies
When it comes to deciding which policy you will implement, you need to consider the pros and cons of each approach as explained above – note that there is no one-size-fits-all solution.
Adding Rules
To add a rule to the firewall, invoke the iptables command as follows:
# iptables -A chain_name criteria -j target
where,
- -A stands for Append (append the current rule to the end of the chain).
- chain_name is either INPUT, OUTPUT, or FORWARD.
- target is the action, or policy, to apply in this case (ACCEPT, REJECT, or DROP).
- criteria is the set of conditions against which the packets are to be examined. It is composed of at least one (most likely more) of the following flags. Options inside brackets, separated by a vertical bar, are equivalent to each other. The rest represents optional switches:
[--protocol | -p] protocol: specifies the protocol involved in a rule.
[--source-port | -sport] port:[port]: defines the port (or range of ports) where the packet originated.
[--destination-port | -dport] port:[port]: defines the port (or range of ports) to which the packet is destined.
[--source | -s] address[/mask]: represents the source address or network/mask.
[--destination | -d] address[/mask]: represents the destination address or network/mask.
[--state] state (preceded by -m state): manage packets depending on whether they are part of a state connection, where state can be NEW, ESTABLISHED, RELATED, or INVALID.
[--in-interface | -i] interface: specifies the input interface of the packet.
[--out-interface | -o] interface: the output interface.
[--jump | -j] target: what to do when the packet matches the rule.
Our Testing Environment
Let’s glue all that in 3 classic examples using the following test environment for the first two:
Firewall: Debian Wheezy 7.5
Hostname: dev2.gabrielcanepa.com
IP Address: 192.168.0.15
Source: CentOS 7
Hostname: dev1.gabrielcanepa.com
IP Address: 192.168.0.17
And this for the last example
NFSv4 server and firewall: Debian Wheezy 7.5
Hostname: debian
IP Address: 192.168.0.10
Source: Debian Wheezy 7.5
Hostname: dev2.gabrielcanepa.com
IP Address: 192.168.0.15
EXAMPLE 1: Analyzing the difference between the DROP and REJECT policies
We will define a DROP policy first for input pings to our firewall. That is, icmp packets will be dropped quietly.
# ping -c 3 192.168.0.15
# iptables -A INPUT --protocol icmp --in-interface eth0 -j DROP
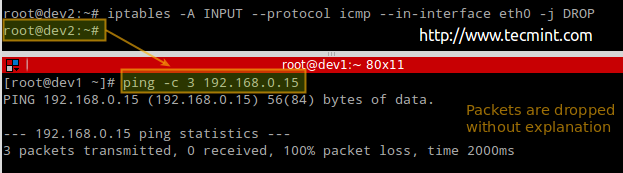
Drop ICMP Ping Request
Before proceeding with the REJECT part, we will flush all rules from the INPUT chain to make sure our packets will be tested by this new rule:
# iptables -F INPUT
# iptables -A INPUT --protocol icmp --in-interface eth0 -j REJECT
# ping -c 3 192.168.0.15
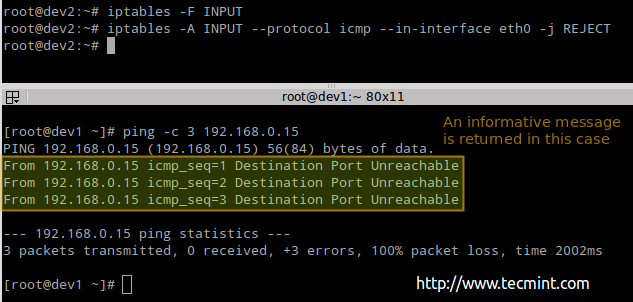
Reject ICMP Ping Request in Firewall
EXAMPLE 2: Disabling / re-enabling ssh logins from dev2 to dev1
We will be dealing with the OUTPUT chain as we’re handling outgoing traffic:
# iptables -A OUTPUT --protocol tcp --destination-port 22 --out-interface eth0 --jump REJECT

Block SSH Login in Firewall
EXAMPLE 3: Allowing / preventing NFS clients (from 192.168.0.0/24) to mount NFS4 shares
Run the following commands in the NFSv4 server / firewall to close ports 2049 and 111 for all kind of traffic:
# iptables -F
# iptables -A INPUT -i eth0 -s 0/0 -p tcp --dport 2049 -j REJECT
# iptables -A INPUT -i eth0 -s 0/0 -p tcp --dport 111 -j REJECT
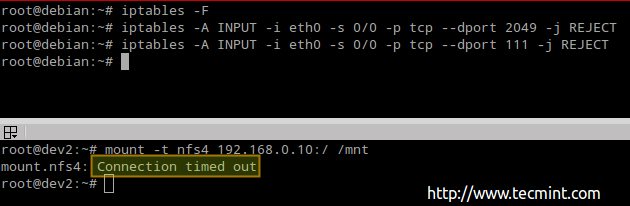
Block NFS Ports in Firewall
Now let’s open those ports and see what happens.
# iptables -A INPUT -i eth0 -s 0/0 -p tcp --dport 111 -j ACCEPT
# iptables -A INPUT -i eth0 -s 0/0 -p tcp --dport 2049 -j ACCEPT

Open NFS Ports in Firewall
As you can see, we were able to mount the NFSv4 share after opening the traffic.
Inserting, Appending and Deleting Rules
In the previous examples we showed how to append rules to the INPUT and OUTPUT chains. Should we want to insert them instead at a predefined position, we should use the -I (uppercase i) switch instead.
You need to remember that rules will be evaluated one after another, and that the evaluation stops (or jumps) when a DROP or ACCEPT policy is matched. For that reason, you may find yourself in the need to move rules up or down in the chain list as needed.
We will use a trivial example to demonstrate this:
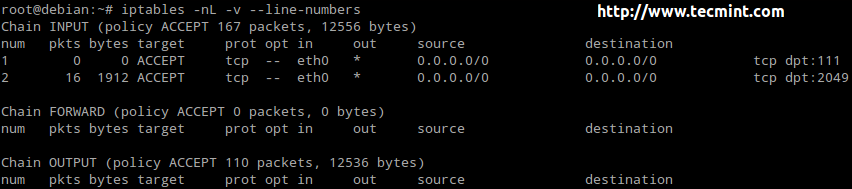
Check Rules of Iptables Firewall
Let’s place the following rule,
# iptables -I INPUT 2 -p tcp --dport 80 -j ACCEPT
at position 2) in the INPUT chain (thus moving previous #2 as #3)
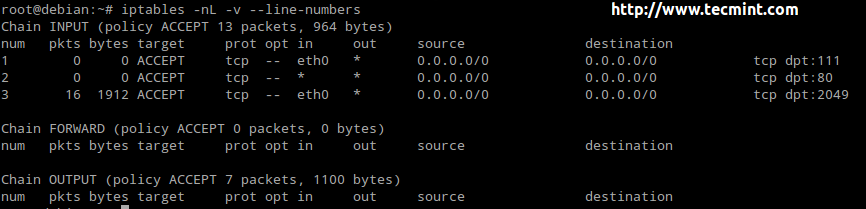
Iptables Accept Rule
Using the setup above, traffic will be checked to see whether it’s directed to port 80 before checking for port 2049.
Alternatively, you can delete a rule and change the target of the remaining rules to REJECT (using the -R switch):
# iptables -D INPUT 1
# iptables -nL -v --line-numbers
# iptables -R INPUT 2 -i eth0 -s 0/0 -p tcp --dport 2049 -j REJECT
# iptables -R INPUT 1 -p tcp --dport 80 -j REJECT
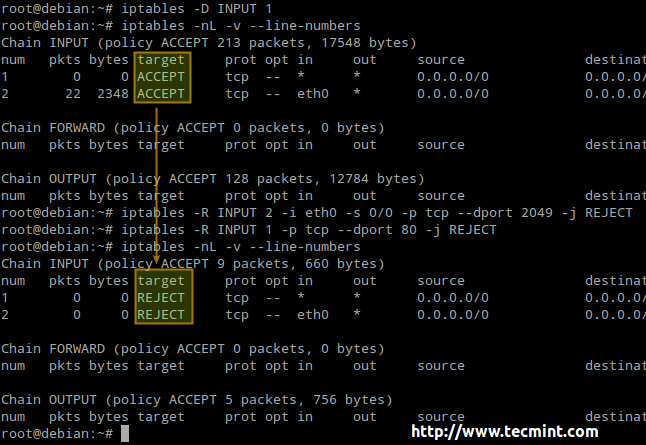
Iptables Drop Rule
Last, but not least, you will need to remember that in order for the firewall rules to be persistent, you will need to save them to a file and then restore them automatically upon boot (using the preferred method of your choice or the one that is available for your distribution).
Saving firewall rules:
# iptables-save > /etc/iptables/rules.v4		[On Ubuntu]
# iptables-save > /etc/sysconfig/iptables		[On CentOS / OpenSUSE]
Restoring rules:
# iptables-restore < /etc/iptables/rules.v4		[On Ubuntu]
# iptables-restore < /etc/sysconfig/iptables		[On CentOS / OpenSUSE]
Here we can see a similar procedure (saving and restoring firewall rules by hand) using a dummy file called iptables.dump instead of the default one as shown above.
# iptables-save > iptables.dump
Dump Linux Iptables
To make these changes persistent across boots:
Ubuntu: Install the iptables-persistent package, which will load the rules saved in the /etc/iptables/rules.v4 file.
# apt-get install iptables-persistent
CentOS: Add the following 2 lines to /etc/sysconfig/iptables-config file.
IPTABLES_SAVE_ON_STOP="yes"
IPTABLES_SAVE_ON_RESTART="yes"
OpenSUSE: List allowed ports, protocols, addresses, and so forth (separated by commas) in /etc/sysconfig/SuSEfirewall2.
For more information refer to the file itself, which is heavily commented.
Conclusion
The examples provided in this article, while not covering all the bells and whistles of iptables, serve the purpose of illustrating how to enable and disable traffic incoming or outgoing traffic.
For those of you who are firewall fans, keep in mind that we will revisit this topic with more specific applications in Part 10 of this LFCE series.
Feel free to let me know if you have any questions or comments.
How to Monitor System Usage, Outages and Troubleshoot Linux Servers – Part 9
Although Linux is very reliable, wise system administrators should find a way to keep an eye on the system’s behaviour and utilization at all times. Ensuring an uptime as close to 100% as possible and the availability of resources are critical needs in many environments. Examining the past and current status of the system will allow us to foresee and most likely prevent possible issues.

Linux Foundation Certified Engineer – Part 9
Introducing The Linux Foundation Certification Program
In this article we will present a list of a few tools that are available in most upstream distributions to check on the system status, analyze outages, and troubleshoot ongoing issues. Specifically, of the myriad of available data, we will focus on CPU, storage space and memory utilization, basic process management, and log analysis.
Storage Space Utilization
There are 2 well-known commands in Linux that are used to inspect storage space usage: df and du.
The first one, df (which stands for disk free), is typically used to report overall disk space usage by file system.
Example 1: Reporting disk space usage in bytes and human-readable format
Without options, df reports disk space usage in bytes. With the -h flag it will display the same information using MB or GB instead. Note that this report also includes the total size of each file system (in 1-K blocks), the free and available spaces, and the mount point of each storage device.
# df
# df -h
Disk Space Utilization
That’s certainly nice – but there’s another limitation that can render a file system unusable, and that is running out of inodes. All files in a file system are mapped to an inode that contains its metadata.
Example 2: Inspecting inode usage by file system in human-readable format with
# df -hTi
you can see the amount of used and available inodes:
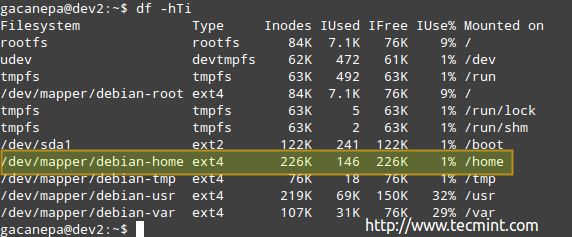
Inode Disk Usage
According to the above image, there are 146 used inodes (1%) in /home, which means that you can still create 226K files in that file system.
Example 3: Finding and / or deleting empty files and directories
Note that you can run out of storage space long before running out of inodes, and vice-versa. For that reason, you need to monitor not only the storage space utilization but also the number of inodes used by file system.
Use the following commands to find empty files or directories (which occupy 0B) that are using inodes without a reason:
# find  /home -type f -empty
# find  /home -type d -empty
Also, you can add the -delete flag at the end of each command if you also want to delete those empty files and directories:
# find  /home -type f -empty --delete
# find  /home -type f -empty
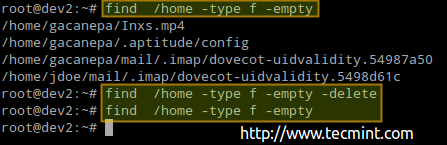
Find and Delete Empty Files in Linux
The previous procedure deleted 4 files. Let’s check again the number of used / available nodes again in /home:
# df -hTi | grep home

Check Linux Inode Usage
As you can see, there are 142 used inodes now (4 less than before).
Example 4: Examining disk usage by directory
If the use of a certain file system is above a predefined percentage, you can use du (short for disk usage) to find out what are the files that are occupying the most space.
The example is given for /var, which as you can see in the first image above, is used at its 67%.
# du -sch /var/*
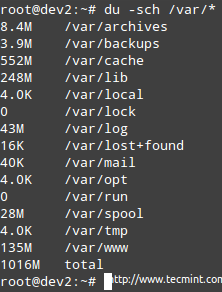
Check Disk Space Usage by Directory
Note: That you can switch to any of the above subdirectories to find out exactly what’s in them and how much each item occupies. You can then use that information to either delete some files if there are not needed or extend the size of the logical volume if necessary.
Read Also
- 12 Useful “df” Commands to Check Disk Space
- 10 Useful “du” Commands to Find Disk Usage of Files and Directories
Memory and CPU Utilization
The classic tool in Linux that is used to perform an overall check of CPU / memory utilization and process management is top command. In addition, top displays a real-time view of a running system. There other tools that could be used for the same purpose, such as htop, but I have settled for top because it is installed out-of-the-box in any Linux distribution.
Example 5: Displaying a live status of your system with top
To start top, simply type the following command in your command line, and hit Enter.
# top
Let’s examine a typical top output:

List All Running Processes in Linux
In rows 1 through 5 the following information is displayed:
1. The current time (8:41:32 pm) and uptime (7 hours and 41 minutes). Only one user is logged on to the system, and the load average during the last 1, 5, and 15 minutes, respectively. 0.00, 0.01, and 0.05 indicate that over those time intervals, the system was idle for 0% of the time (0.00: no processes were waiting for the CPU), it then was overloaded by 1% (0.01: an average of 0.01 processes were waiting for the CPU) and 5% (0.05). If less than 0 and the smaller the number (0.65, for example), the system was idle for 35% during the last 1, 5, or 15 minutes, depending where 0.65 appears.
2. Currently there are 121 processes running (you can see the complete listing in 6). Only 1 of them is running (top in this case, as you can see in the %CPU column) and the remaining 120 are waiting in the background but are “sleeping” and will remain in that state until we call them. How? You can verify this by opening a mysql prompt and execute a couple of queries. You will notice how the number of running processes increases.
Alternatively, you can open a web browser and navigate to any given page that is being served by Apache and you will get the same result. Of course, these examples assume that both services are installed in your server.
3. us (time running user processes with unmodified priority), sy (time running kernel processes), ni (time running user processes with modified priority), wa (time waiting for I/O completion), hi (time spent servicing hardware interrupts), si (time spent servicing software interrupts), st (time stolen from the current vm by the hypervisor – only in virtualized environments).
4. Physical memory usage.
5. Swap space usage.
Example 6: Inspecting physical memory usage
To inspect RAM memory and swap usage you can also use free command.
# free

Check Linux Memory Usage
Of course you can also use the -m (MB) or -g (GB) switches to display the same information in human-readable form:
# free -m

View Linux Memory Usage
Either way, you need to be aware of the fact that the kernel reserves as much memory as possible and makes it available to processes when they request it. Particularly, the “-/+ buffers/cache” line shows the actual values after this I/O cache is taken into account.
In other words, the amount of memory used by processes and the amount available to other processes (in this case, 232 MB used and 270 MB available, respectively). When processes need this memory, the kernel will automatically decrease the size of the I/O cache.
Read Also: 10 Useful “free” Command to Check Linux Memory Usage
Taking a Closer Look at Processes
At any given time, there many processes running on our Linux system. There are two tools that we will use to monitor processes closely: ps and pstree.
Example 7: Displaying the whole process list in your system with ps (full standard format)
Using the -e and -f options combined into one (-ef) you can list all the processes that are currently running on your system. You can pipe this output to other tools, such as grep (as explained in Part 1 of the LFCS series) to narrow down the output to your desired process(es):
# ps -ef | grep -i squid | grep -v grep
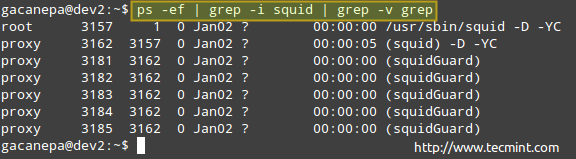
Monitoring Processes in Linux
The process listing above shows the following information:
owner of the process, PID, Parent PID (the parent process), processor utilization, time when command started, tty (the ? indicates it’s a daemon), the cumulated CPU time, and the command associated with the process.
Example 8: Customizing and sorting the output of ps
However, perhaps you don’t need all that information, and would like to show the owner of the process, the command that started it, its PID and PPID, and the percentage of memory it’s currently using – in that order, and sort by memory use in descending order (note that ps by default is sorted by PID).
# ps -eo user,comm,pid,ppid,%mem --sort -%mem
Where the minus sign in front of %mem indicates sorting in descending order.
Monitor Linux Process Memory Usage
If for some reason a process starts taking too much system resources and it’s likely to jeopardize the overall functionality of the system, you will want to stop or pause its execution passing one of the following signals using the kill program to it. Other reasons why you would consider doing this is when you have started a process in the foreground but want to pause it and resume in the background.
| Signal name | Signal number | Description |
| SIGTERM | 15 | Kill the process gracefully. |
| SIGINT | 2 | This is the signal that is sent when we press Ctrl + C. It aims to interrupt the process, but the process may ignore it. |
| SIGKILL | 9 | This signal also interrupts the process but it does so unconditionally (use with care!) since a process cannot ignore it. |
| SIGHUP | 1 | Short for “Hang UP”, this signals instructs daemons to reread its configuration file without actually stopping the process. |
| SIGTSTP | 20 | Pause execution and wait ready to continue. This is the signal that is sent when we type the Ctrl + Z key combination. |
| SIGSTOP | 19 | The process is paused and doesn’t get any more attention from the CPU cycles until it is restarted. |
| SIGCONT | 18 | This signal tells the process to resume execution after having received either SIGTSTP or SIGSTOP. This is the signal that is sent by the shell when we use the fg or bg commands. |
Example 9: Pausing the execution of a running process and resuming it in the background
When the normal execution of a certain process implies that no output will be sent to the screen while it’s running, you may want to either start it in the background (appending an ampersand at the end of the command).
process_name &
or,
Once it has started running in the foreground, pause it and send it to the background with
Ctrl + Z
# kill -18 PID
Kill Process in Linux
Example 10: Killing by force a process “gone wild”
Please note that each distribution provides tools to gracefully stop / start / restart / reload common services, such as service in SysV-based systems or systemctl in systemd-based systems.
If a process does not respond to those utilities, you can kill it by force by sending it the SIGKILL signal to it.
# ps -ef | grep apache
# kill -9 3821
Forcefully Kill Linux Process
So.. What Happened / Is Happening?
When there has been any kind of outage in the system (be it a power outage, a hardware failure, a planned or unplanned interruption of a process, or any abnormality at all), the logs in /var/log are your best friends to determine what happened or what could be causing the issues you’re facing.
# cd /var/log

View Linux Logs
Some of the items in /var/log are regular text files, others are directories, and yet others are compressed files of rotated (historical) logs. You will want to check those with the word error in their name, but inspecting the rest can come in handy as well.
Example 11: Examining logs for errors in processes
Picture this scenario. Your LAN clients are unable to print to network printers. The first step to troubleshoot this situation is going to /var/log/cups directory and see what’s in there.
You can use the tail command to display the last 10 lines of the error_log file, or tail -f error_log for a real-time view of the log.
# cd /var/log/cups
# ls
# tail error_log
Monitor Log Files in Real Time
The above screenshot provides some helpful information to understand what could be causing your issue. Note that following the steps or correcting the malfunctioning of the process still may not solve the overall problem, but if you become used right from the start to check on the logs every time a problem arises (be it a local or a network one) you’ll be definitely on the right track.
Example 12: Examining the logs for hardware failures
Although hardware failures can be tricky to troubleshoot, you should check the dmesg and messages logs and grep for related words to a hardware part presumed faulty.
The image below is taken from /var/log/messages after looking for the word error using the following command:
# less /var/log/messages | grep -i error
We can see that we’re having a problem with two storage devices: /dev/sdb and /dev/sdc, which in turn cause an issue with the RAID array.

Troubleshooting Linux Problems
Conclusion
In this article we have explored some of the tools that can help you to always be aware of your system’s overall status. In addition, you need to make sure that your operating system and installed packages are updated to their latest stable versions. And never, ever, forget to check the logs! Then you will be headed in the right direction to find the definitive solution to any issues.
Feel free to leave your comments, suggestions, or questions -if you have any- using the form below.
How to Turn a Linux Server into a Router to Handle Traffic Statically and Dynamically – Part 10
As we have anticipated in previous tutorials of this LFCE (Linux Foundation Certified Engineer) series, in this article we will discuss the routing of IP traffic statically and dynamically with specific applications.

Linux Foundation Certified Engineer – Part 10
Introducing The Linux Foundation Certification Program
First things first, let’s get some definitions straight:
- In simple words, a packet is the basic unit that is used to transmit information within a network. Networks that use TCP/IP as network protocol follow the same rules for transmission of data: the actual information is split into packets that are made of both data and the address where it should be sent to.
- Routing is the process of “guiding” the data from source to destination inside a network.
- Static routing requires a manually-configured set of rules defined in a routing table. These rules are fixed and are used to define the way a packet must go through as it travels from one machine to another.
- Dynamic routing, or smart routing (if you wish), means that the system can alter automatically, as needed, the route that a packet follows.
Advanced IP and Network Device Configuration
The iproute package provides a set of tools to manage networking and traffic control that we will use throughout this article as they represent the replacement of legacy tools such as ifconfig and route.
The central utility in the iproute suite is called simply ip. Its basic syntax is as follows:
# ip object command
Where object can be only one of the following (only the most frequent objects are shown – you can refer to man ip for a complete list):
- link: network device.
- addr: protocol (IP or IPv6) address on a device.
- route: routing table entry.
- rule: rule in routing policy database.
Whereas command represents a specific action that can be performed on object. You can run the following command to display the complete list of commands that can be applied to a particular object:
# ip object help
For example,
# ip link help
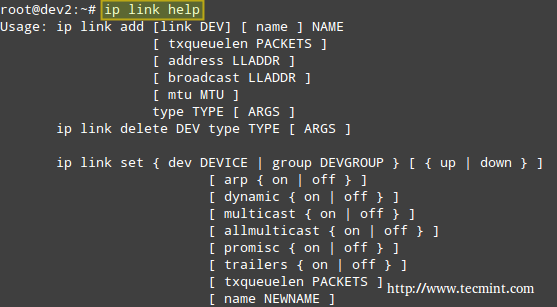
IP Command Help
The above image shows, for example, that you can change the status of a network interface with the following command:
# ip link set interface {up | down}
For such more examples of ‘ip‘ command, read 10 Useful ‘ip’ Commands to Configure IP Address
Example 1: Disabling and enabling a network interface
In this example, we will disable and enable eth1:
# ip link show
# ip link set eth1 down
# ip link show

Disable eth0 Interface
If you want to re-enable eth1,
# ip link set eth1 up
Instead of displaying all the network interfaces, we can specify one of them:
# ip link show eth1
Which will return all the information for eth1.
Example 2: Displaying the main routing table
You can view your current main routing table with either of the following 3 commands:
# ip route show
# route -n
# netstat -rn
Check Linux Route Table
The first column in the output of the three commands indicates the target network. The output of ip route show (following the keyword dev) also presents the network devices that serve as physical gateway to those networks.
Although nowadays the ip command is preferred over route, you can still refer to man ip-route and man route for a detailed explanation of the rest of the columns.
Example 3: Using a Linux server to route packets between two private networks
We want to route icmp (ping) packets from dev2 to dev4 and the other way around as well (note that both client machines are on different networks). The name of each NIC, along with its corresponding IPv4 address, is given inside square brackets.
Our test environment is as follows:
Client 1: CentOS 7 [enp0s3: 192.168.0.17/24] - dev1
Router: Debian Wheezy 7.7 [eth0: 192.168.0.15/24, eth1: 10.0.0.15/24] - dev2
Client 2: openSUSE 13.2 [enp0s3: 10.0.0.18/24] - dev4
Let’s view the routing table in dev1 (CentOS box):
# ip route show
and then modify it in order to use its enp0s3 NIC and the connection to 192.168.0.15 to access hosts in the 10.0.0.0/24 network:
# ip route add 10.0.0.0/24 via 192.168.0.15 dev enp0s3
Which essentially reads, “Add a route to the 10.0.0.0/24 network through the enp0s3 network interface using 192.168.0.15 as gateway”.
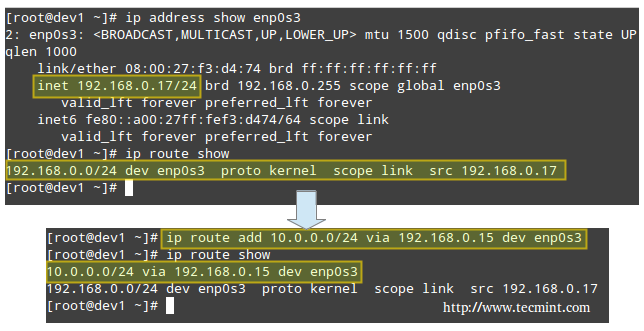
Route Network in Linux
Likewise in dev4 (openSUSE box) to ping hosts in the 192.168.0.0/24 network:
# ip route add 192.168.0.0/24 via 10.0.0.15 dev enp0s3

Network Routing in Linux
Finally, we need to enable forwarding in our Debian router:
# echo 1 > /proc/sys/net/ipv4/ip_forward
Now let’s ping:
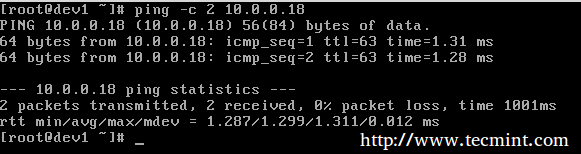
Check Network Routing
and,
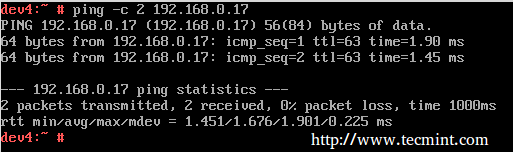
Route Ping Status
To make these settings persistent across boots, edit /etc/sysctl.conf on the router and make sure the net.ipv4.ip_forward variable is set to true as follows:
net.ipv4.ip_forward = 1
In addition, configure the NICs on both clients (look for the configuration file within /etc/sysconfig/network on openSUSE and /etc/sysconfig/network-scripts on CentOS – in both cases it’s called ifcfg-enp0s3).
Here’s the configuration file from the openSUSE box:
BOOTPROTO=static
BROADCAST=10.0.0.255
IPADDR=10.0.0.18
NETMASK=255.255.255.0
GATEWAY=10.0.0.15
NAME=enp0s3
NETWORK=10.0.0.0
ONBOOT=yes
Example 4: Using a Linux server to route packages between a private networks and the Internet
Another scenario where a Linux machine can be used as router is when you need to share your Internet connection with a private LAN.
Router: Debian Wheezy 7.7 [eth0: Public IP, eth1: 10.0.0.15/24] - dev2
Client: openSUSE 13.2 [enp0s3: 10.0.0.18/24] - dev4
In addition to set up packet forwarding and the static routing table in the client as in the previous example, we need to add a few iptables rules in the router:
# iptables -t nat -A POSTROUTING -o eth0 -j MASQUERADE
# iptables -A FORWARD -i eth0 -o eth1 -m state --state RELATED,ESTABLISHED -j ACCEPT
# iptables -A FORWARD -i eth1 -o eth0 -j ACCEPT
The first command adds a rule to the POSTROUTING chain in the nat (Network Address Translation) table, indicating that the eth0 NIC should be used for outgoing packages.
MASQUERADE indicates that this NIC has a dynamic IP and that before sending the package to the “wild wild world” of the Internet, the private source address of the packet has to be changed to that of the public IP of the router.
In a LAN with many hosts, the router keeps track of established connections in /proc/net/ip_conntrack so it knows where to return the response from the Internet to.
Only part of the output of:
# cat /proc/net/ip_conntrack
is show in the following screenshot.
![]()
Route Packages in Linux
Where the origin (private IP of openSUSE box) and destination (Google DNS) of packets is highlighted. This was the result of running:
# curl www.tecmint.com
on the openSUSE box.
As I’m sure you can already guess, the router is using Google’s 8.8.8.8 as nameserver, which explains why the destination of outgoing packets points to that address.
Note: That incoming packages from the Internet are only accepted is if they are part of an already established connection (command #2), while outgoing packages are allowed “free exit” (command #3).
Don’t forget to make your iptables rules persistent following the steps outlined in Part 8 – Configure Iptables Firewall of this series.
Dynamic Routing with Quagga
Nowadays, the tool most used for dynamic routing in Linux is quagga. It allows system administrators to implement, with a relatively low-cost Linux server, the same functionality that is provided by powerful (and costly) Cisco routers.
The tool itself does not handle the routing, but rather modifies the kernel routing table as it learns new best routes to handle packets.
Since it’s a fork of zebra, a program whose development ceased a while ago, it maintains for historical reasons the same commands and structure than zebra. That is why you will see a lot of reference to zebra from this point on.
Please note that it is not possible to cover dynamic routing and all the related protocols in a single article, but I am confident that the content presented here will serve as a starting point for you to build on.
Installing Quagga in Linux
To install quagga on your chosen distribution:
# aptitude update && aptitude install quagga 				[On Ubuntu]
# yum update && yum install quagga 					[CentOS/RHEL]
# zypper refresh && zypper install quagga 				[openSUSE]
We will use the same environment as with Example #3, with the only difference that eth0 is connected to a main gateway router with IP 192.168.0.1.
Next, edit /etc/quagga/daemons with,
zebra=1
ripd=1
Now create the following configuration files.
# /etc/quagga/zebra.conf
# /etc/quagga/ripd.conf
and add these lines (replace for a hostname and password of your choice):
service quagga restart
hostname    	dev2
password    	quagga
# service quagga restart

Start Quagga Service
Note: That ripd.conf is the configuration file for the Routing Information Protocol, which provides the router with the information of which networks can be reached and how far (in terms of amount of hops) they are.
Note that this is only one of the protocols that can be used along with quagga, and I chose it for this tutorial due to easiness of use and because most network devices support it, although it has the disadvantage of passing credentials in plain text. For that reason, you need to assign proper permissions to the configuration file:
# chown quagga:quaggavty /etc/quagga/*.conf
# chmod 640 /etc/quagga/*.conf
Example 5: Setting up quagga to route IP traffic dynamically
In this example we will use the following setup with two routers (make sure to create the configuration files for router #2 as explained previously):
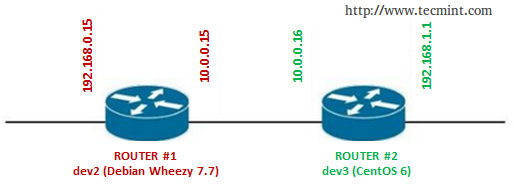
Configure Quagga
Important: Don’t forget to repeat the following setup for both routers.
Connect to zebra (listening on port 2601), which is the logical intermediary between the router and the kernel:
# telnet localhost 2601
Enter the password that was set in the /etc/quagga/zebra.conf file, and then enable configuration:
enable
configure terminal
Enter the IP address and network mask of each NIC:
inter eth0
ip addr 192.168.0.15
inter eth1
ip addr 10.0.0.15
exit
exit
write
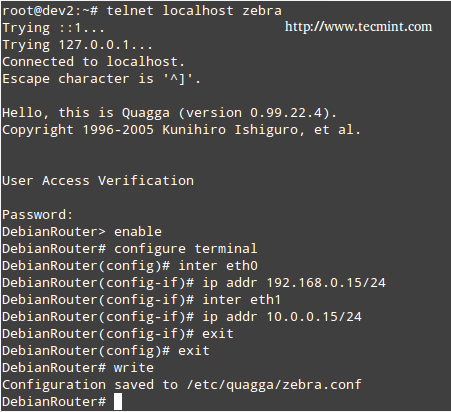
Configure Router
Now we need to connect to the RIP daemon terminal (port 2602):
# telnet localhost 2602
Enter username and password as configured in the /etc/quagga/ripd.conf file, and then type the following commands in bold (comments are added for the sake of clarification):
enable turns on privileged mode command.
configure terminal changes to configuration mode. This command is the first step to configuration
router rip enables RIP.
network 10.0.0.0/24 sets the RIP enable interface for the 10.0.0.0/24 network.
exit
exit
write writes current configuration to configuration file.
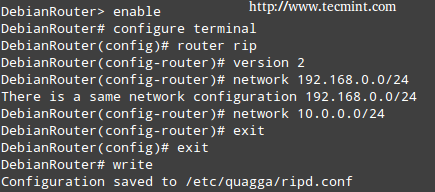
Enable Router
Note: That in both cases the configuration is appended to the lines that we added previously (/etc/quagga/zebra.conf and /etc/quagga/ripd.conf).
Finally, connect again to the zebra service on both routers and note how each one of them has “learned” the route to the network that is behind the other, and which is the next hop to get to that network, by running the command show ip route:
# show ip route
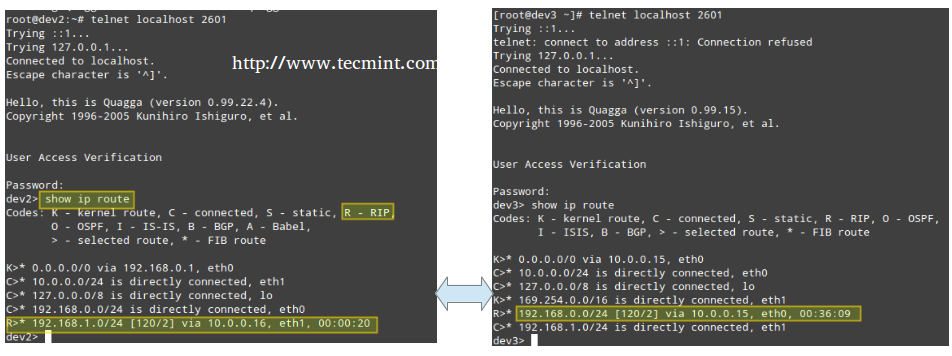
Check IP Routing
If you want to try different protocols or setups, you may want to refer to the Quagga project site for further documentation.
Conclusion
In this article we have explained how to set up static and dynamic routing, using a Linux box router(s). Feel free to add as many routers as you wish, and to experiment as much as you want. Do not hesitate to get back to us using the contact form below if you have any comments or questions.
How to Setup a Network Repository to Install or Update Packages – Part 11
Installing, updating, and removing (when needed) installed programs are key responsibilities in a system administrator’s daily life. When a machine is connected to the Internet, these tasks can be easily performed using a package management system such as aptitude (or apt-get), yum, or zypper, depending on your chosen distribution, as explained in Part 9 – Linux Package Management of the LFCE (Linux Foundation Certified Engineer) series. You can also download standalone .deb or .rpm files and install them with dpkg or rpm, respectively.

Linux Foundation Certified Engineer – Part 11
Introducing The Linux Foundation Certification Program
However, when a machine does not have access to the world wide web, another methods are necessary. Why would anyone want to do that? The reasons range from saving Internet bandwidth (thus avoiding several concurrent connections to the outside) to securing packages compiled from source locally, and including the possibility of providing packages that for legal reasons (for example, software that is restricted in some countries) cannot be included in official repositories.
That is precisely where network repositories come into play, which is the central topic of this article.
Our Testing Environment
Network Repository Server:	CentOS 7 [enp0s3: 192.168.0.17] - dev1
Client Machine:			CentOS 6.6 [eth0: 192.168.0.18] - dev2
Setting Up a Network Repository Server on CentOS 7
As a first step, we will handle the installation and configuration of a CentOS 7 box as a repository server [IP address 192.168.0.17] and a CentOS 6.6 machine as client. The setup for openSUSE is almost identical.
For CentOS 7, follow the below articles that explains a step-by-step instructions of CentOS 7 installation and how to setup a static IP address.
As for Ubuntu, there is a great article on this site that explains, step by step, how to set up your own, private repository.
Our first choice will be the way in which clients will access the repository server – FTP and HTTP are the most well used. We will choose the latter as the Apache installation was covered in Part 1 – Installing Apache of this LFCE series. This will also allow us to display the package listing using a web browser.
Next, we need to create directories to store the .rpm packages. We will create subdirectories within /var/www/html/repos accordingly. For our convenience, we may also want to create other subdirectories to host packages for different versions of each distribution (of course we can still add as many directories as needed later) and even different architectures.
Setting Up the Repository
An important thing to take into consideration when setting up your own repository is that you will need a considerable amount of available disk space (~20 GB). If you don’t, resize the filesystem where you’re planning on storing the repository’s contents, or even better add an extra dedicated storage device to host the repository.
That being said, we will begin by creating the directories that we will need to host the repository:
# mkdir -p /var/www/html/repos/centos/6/6
After we have created the directory structure for our repository server, we will initialize in /var/www/html/repos/centos/6/6 the database that keeps tracks of packages and their corresponding dependencies using createrepo.
Install createrepo if you haven’t already done so:
# yum update && yum install createrepo
Then initialize the database,
# createrepo /var/www/html/repos/centos/6/6
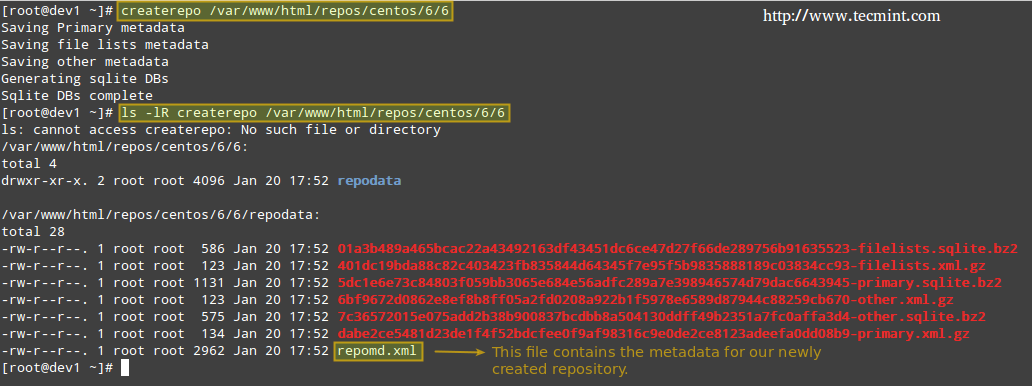
Createrepo Repository Initialization
Updating the Repository
Assuming that the repository server has access to the Internet, we will pull an online repository to get the latest updates of packages. If that is not the case, you can still copy the entire contents of the Packages directory from a CentOS 6.6 installation DVD.
In this tutorial we will assume the first case. In order to optimize our download speed, we will choose a CentOS 6.6 mirror from a location near us. Go to CentOS download mirrorand pick the one that is closer to your location (Argentina in my case):
Select CentOS Download Mirror
Then, navigate to the os directory inside the highlighted link and then choose the appropriate architecture. Once there, copy the link in the address bar and download the contents to the dedicated directory in the repository server:
Download CentOS Mirror
# rsync -avz rsync://centos.ar.host-engine.com/6.6/os/x86_64/ /var/www/html/repos/centos/6/6/
In case that the chosen repository turns out to be offline for some reason, go back and choose a different one. No big deal.
Now is the time when you may want to relax and maybe watch an episode of your favourite TV show, because mirroring the online repository may take quite a while.
Once the download has completed, you can verify the usage of disk space with:
# du -sch /var/www/html/repos/centos/6/6/*
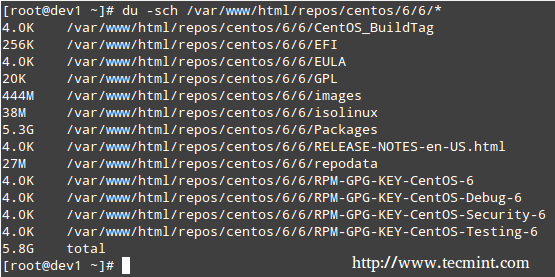
Check CentOS Mirror Size
Finally, update the repository’s database.
# createrepo --update /var/www/html/repos/centos/6/6
You may also want to launch your web browser and navigate to the repos/centos/6/6 directory so as to verify that you can see the contents:
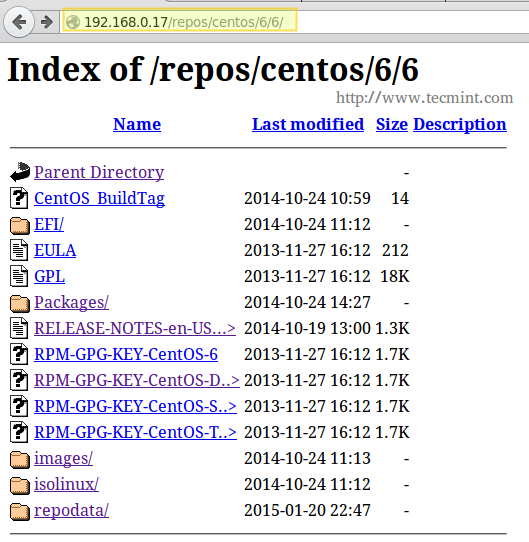
Verify CentOS Packages
And you’re ready to go – now it’s time to configure the client.
Configuring the Client Machine
You can add the configuration files for custom repositories in the /etc/yum.repos.d directory. Configuration files need to end in .repo and follow the same basic structure.
[repository_name]
Description
URL
Most likely, there will be already other .repo files in /etc/yum.repos.d. To properly test your repository, you can either delete those configuration files (not really recommended, since you may need them later) or rename them, as I did, by appending .orig to each file name:
# cd /etc/yum.repos.d
# for i in $(ls *.repo); do mv $i $i.orig; done

Backup Yum Repositories
In our case, we will name our configuration file as tecmint.repo and insert the following lines:
[tecmint]
name=Example repo for Part 11 of the LFCE series on Tecmint.com
baseurl=http://192.168.0.17/repos/centos/6/6/
gpgcheck=1
gpgkey=http://mirror.centos.org/centos/RPM-GPG-KEY-CentOS-6
In addition, we have enabled GPG signature-checking for all packages in our repository.
Using the Repository
Once the client has been properly configured, you can issue the usual yum commands to query the repository. Note how yum info subversion indicates that the information about the package is coming from our newly created repository:
# yum info subversion
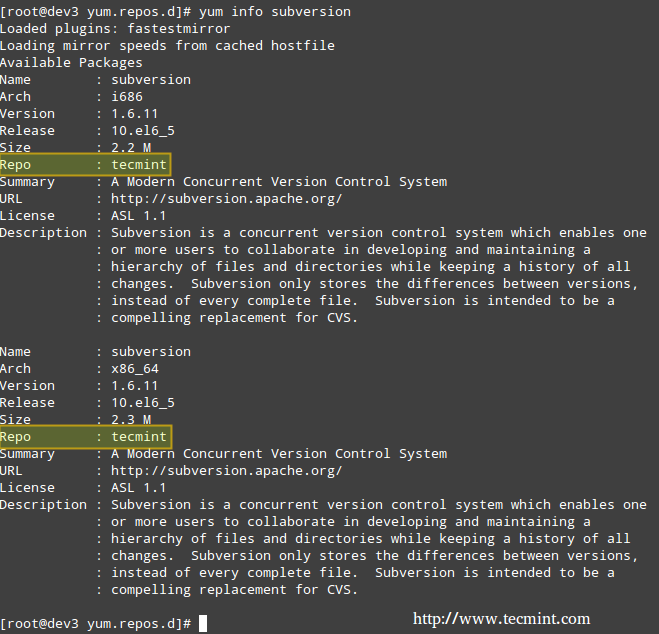
Check Yum Repository Info
Or you can install or update an already installed package:
# yum { install | update } package
For example,
# yum update && yum install subversion
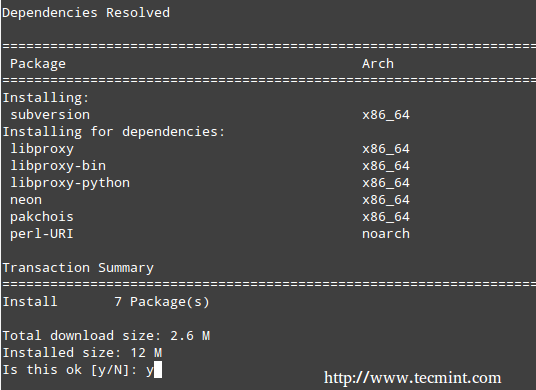
Yum Install Package
Keeping the Repository Up-to-date
To make sure our repository is always current, we need to synchronize it with the online repositories on a periodic basis. We can use rsync for this task as well (as explained in Part 6 of the LFCS series.
rsync allows us to synchronize two directories, one local and one remote). Run the rsync command that was used to initially download the repository through a cron job and you’re good to go. Remember to set the cron job to a time of the day when the update will not cause a negative impact in the available bandwidth.
For example, if you want to update your repository every day beginning at 2:30 AM:
30 2 * * * rsync -avz rsync://centos.ar.host-engine.com/6.6/os/x86_64/ /var/www/html/repos/centos/6/6/
Important: Make sure to execute above command on the CentOS 7 server to keep your repository.
Of course, you can put that line inside a script to do more complex and customized tasks before or after performing the update. Feel free to experiment and tell me about the results.
Conclusion
You should never underestimate the importance of a local or network repository given the many benefits it brings as I explained in this article. If you can afford the disk space, this is definitely the way to go. I look forward to hearing from you and don’t hesitate to let me know if you have any questions.
How to Audit Network Performance, Security, and Troubleshooting in Linux – Part 12
A sound analysis of a computer network begins by understanding what are the available tools to perform the task, how to pick the right one(s) for each step of the way, and last but not least, where to begin.
This is the last part of the LFCE (Linux Foundation Certified Engineer) series, here we will review some well-known tools to examine the performance and increase the security of a network, and what to do when things aren’t going as expected.

Linux Foundation Certified Engineer – Part 12
Introducing The Linux Foundation Certification Program
Please note that this list does not pretend to be comprehensive, so feel free to comment on this post using the form at the bottom if you would like to add another useful utility that we could be missing.
What Services are Running and Why?
One of the first things that a system administrator needs to know about each system is what services are running and why. With that information in hand, it is a wise decision to disable all those that are not strictly necessary and shun hosting too many servers in the same physical machine.
For example, you need to disable your FTP server if your network does not require one (there are more secure methods to share files over a network, by the way). In addition, you should avoid having a web server and a database server in the same system. If one component becomes compromised, the rest run the risk of getting compromised as well.
Investigating Socket Connections with ss
ss is used to dump socket statistics and shows information similar to netstat, though it can display more TCP and state information than other tools. In addition, it is listed in man netstat as replacement for netstat, which is obsolete.
However, in this article we will focus on the information related to network security only.
Example 1: Showing ALL TCP ports (sockets) that are open on our server
All services running on their default ports (i.e. http on 80, mysql on 3306) are indicated by their respective names. Others (obscured here for privacy reasons) are shown in their numeric form.
# ss -t -a

Check All Open TCP Ports
The first column shows the TCP state, while the second and third column display the amount of data that is currently queued for reception and transmission. The fourth and fifth columns show the source and destination sockets of each connection.
On a side note, you may want to check RFC 793 to refresh your memory about possible TCP states because you also need to check on the number and the state of open TCP connections in order to become aware of (D)DoS attacks.
Example 2: Displaying ALL active TCP connections with their timers
# ss -t -o

Check all Active Connections
In the output above, you can see that there are 2 established SSH connections. If you notice the value of the second field of timer:, you will notice a value of 36 minutes in the first connection. That is the amount of time until the next keepalive probe will be sent.
Since it’s a connection that is being kept alive, you can safely assume that is an inactive connection and thus can kill the process after finding out its PID.
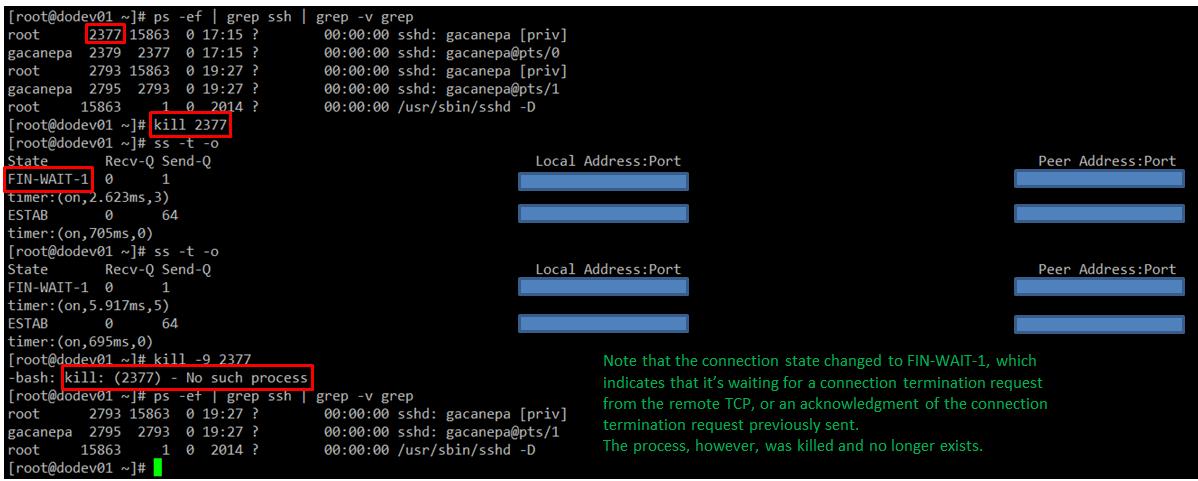
Kill Active Process
As for the second connection, you can see that it’s currently being used (as indicated by on).
Example 3: Filtering connections by socket
Suppose you want to filter TCP connections by socket. From the server’s point of view, you need to check for connections where the source port is 80.
# ss -tn sport = :80
Resulting in..

Filter Connections by Socket
Protecting Against Port Scanning with NMAP
Port scanning is a common technique used by crackers to identify active hosts and open ports on a network. Once a vulnerability is discovered, it is exploited in order to gain access to the system.
A wise sysadmin needs to check how his or her systems are seen by outsiders, and make sure nothing is left to chance by auditing them frequently. That is called “defensive port scanning”.
Example 4: Displaying information about open ports
You can use the following command to scan which ports are open on your system or in a remote host:
# nmap -A -sS [IP address or hostname]
The above command will scan the host for OS and version detection, port information, and traceroute (-A). Finally, -sS sends a TCP SYN scan, preventing nmap to complete the 3-way TCP handshake and thus typically leaving no logs on the target machine.
Before proceeding with the next example, please keep in mind that port scanning is not an illegal activity. What IS illegal is using the results for a malicious purpose.
For example, the output of the above command run against the main server of a local university returns the following (only part of the result is shown for sake of brevity):
Check Open Ports
As you can see, we discovered several anomalies that we should do well to report to the system administrators at this local university.
This specific port scan operation provides all the information that can also be obtained by other commands, such as:
Example 5: Displaying information about a specific port in a local or remote system
# nmap -p [port] [hostname or address]
Example 6: Showing traceroute to, and finding out version of services and OS type, hostname
# nmap -A [hostname or address]
Example 7: Scanning several ports or hosts simultaneously
You can also scan several ports (range) or subnets, as follows:
# nmap -p 21,22,80 192.168.0.0/24
Note: That the above command scans ports 21, 22, and 80 on all hosts in that network segment.
You can check the man page for further details on how to perform other types of port scanning. Nmap is indeed a very powerful and versatile network mapper utility, and you should be very well acquainted with it in order to defend the systems you’re responsible for against attacks originated after a malicious port scan by outsiders.
Reporting Usage and Performance on Your Network
Although there are several available tools to analyze and troubleshoot network performance, two of them are very easy to learn and user friendly.
To install both of them on CentOS, you will need to enable the EPEL repository first.
1. nmon utility
nmon is a system tuner and benchmark tool. As such, it can display the CPU, memory, network, disks, file systems, NFS, top processes, and resources (Linux version & processors). Of course, we’re mainly interested in the network performance feature.
To install nmon, run the following command on your chosen distribution:
# yum update && yum install nmon 				[On CentOS]
# aptitude update && aptitude install nmon 		[On Ubuntu]
# zypper refresh && and zypper install nmon 		[On openSUSE]
Network Reporting Usage and Performance
Make it a habit to look at the network traffic in real time to ensure that your system is capable of supporting normal loads and to watch out for unnecessary traffic or suspicious activity.
Vnstat Utility
vnstat is a console-based network traffic monitor that keeps a log of hourly (daily or monthly as well) network traffic for the selected interface(s).
# yum update && yum install vnstat				[On CentOS]
# aptitude update && aptitude install vnstat		[On Ubuntu]
# zypper refresh && and zypper install vnstat		[On openSUSE]
After installing the package, you need to enable the monitoring daemon as follows:
# service vnstat start 					[On SysV-based systems (Ubuntu)]
# systemctl start vnstat 				[On systemd-based systems (CentOS / openSUSE)]
Once you have installed and enabled vnstat, you can initialize the database to record traffic for eth0 (or other NIC) as follows:
# vnstat -u -i eth0
As I have just installed vnstat in the machine that I’m using to write this article, I still haven’t gathered enough data to display usage statistics:

Network Traffic Monitor
The vnstatd daemon will continue running in the background and collecting traffic data. Until it collects enough data to produce output, you can refer to the project’s web site to see what the traffic analysis looks like.
Transferring Files Securely Over the Network
If you need to ensure security while transferring or receiving files over a network, and specially if you need to perform that operation over the Internet, you will want to resort to 2 secure methods for file transfers (don’t even think about doing it over plain FTP!).
Example 8: Transferring files with scp (secure copy)
Use the -P flag if SSH on the remote hosts is listening on a port other than the default 22. The -p switch will preserve the permissions of local_file after the transfer, which will be made with the credentials of remote_useron remote_hosts. You will need to make sure that /absolute/path/to/remote/directory is writeable by this user.
# scp -P XXXX -p local_file remote_user@remote_host:/absolute/path/to/remote/directory
Example 9: Receiving files with scp (secure copy)
You can also download files with scp from a remote host:
# scp remote_user@remote_host:myFile.txt /absolute/path/to/local/directory
Or even between two remote hosts (in this case, copy the file myFile.txt from remote_host1 to remote_host2):
# scp remote_user1@remote_host1:/absolute/path/to/remote/directory1/myFile.txt remote_user1@remote_host2:/absolute/path/to/remote/directory2/
Don’t forget to use the -P switch if SSH is listening on a port other than the default 22.
You can read more about SCP commands.
Example 10: Sending and receiving files with SFTP
Unlike SCP, SFTP does not require previously knowing the location of the file that we want to download or send.
This is the basic syntax to connect to a remote host using SFTP:
# sftp -oPort=XXXX username@host
Where XXXX represents the port where SSH is listening on host, which can be either a hostname or its corresponding IP address. You can disregard the -oPort flag if SSH is listening on its default port (22).
Once the connection is successful, you can issue the following commands to send or receive files:
get -Pr [remote file or directory] # Receive files
put -r [local file or directory] # Send files
In both cases, the -r switch is used to recursively receive or send files, respectively. In the first case, the -Poption will also preserve the original file permissions.
To close the connection, simply type “exit” or “bye”. You can read more about sftp command.
Summing Up
You may want to complement what we have covered in this article with what we’ve already learned in other tutorials of this series, for example Part 8: How To Setup an Iptables Firewall.
If you know your systems well, you will be able to easily detect malicious or suspicious activity when the numbers show unusual activity without an apparent reason. You will also be able to plan ahead for network resources if you’re expecting a sudden increase in their use.
As a final note, remember to shut down the ports that are not strictly needed, or change the default to a higher number (~20000) to avoid common port scans to detect them.
As always, don’t hesitate to let us know if you have any questions or concerns about this article.