
LFCS: How to use GNU ‘sed’ Command to Create, Edit, and Manipulate files in Linux – Part 1
The Linux Foundation announced the LFCS (Linux Foundation Certified Sysadmin) certification, a new program that aims at helping individuals all over the world to get certified in basic to intermediate system administration tasks for Linux systems. This includes supporting running systems and services, along with first-hand troubleshooting and analysis, and smart decision-making to escalate issues to engineering teams.
Linux Foundation Certified Sysadmin – Part 1
Please watch the following video that demonstrates about The Linux Foundation Certification Program.
The series will be titled Preparation for the LFCS (Linux Foundation Certified Sysadmin) Parts 1 through 10 and cover the following topics for Ubuntu, CentOS, and openSUSE:
Important: Due to changes in the LFCS certification requirements effective Feb. 2, 2016, we are including the following necessary topics to the LFCS series published here. To prepare for this exam, your are highly encouraged to use the LFCE series as well.
This post is Part 1 of a 20-tutorial series, which will cover the necessary domains and competencies that are required for the LFCS certification exam. That being said, fire up your terminal, and let’s start.
Processing Text Streams in Linux
Linux treats the input to and the output from programs as streams (or sequences) of characters. To begin understanding redirection and pipes, we must first understand the three most important types of I/O (Input and Output) streams, which are in fact special files (by convention in UNIX and Linux, data streams and peripherals, or device files, are also treated as ordinary files).
The difference between > (redirection operator) and | (pipeline operator) is that while the first connects a command with a file, the latter connects the output of a command with another command.
# command > file
# command1 | command2
Since the redirection operator creates or overwrites files silently, we must use it with extreme caution, and never mistake it with a pipeline. One advantage of pipes on Linux and UNIX systems is that there is no intermediate file involved with a pipe – the stdout of the first command is not written to a file and then read by the second command.
For the following practice exercises we will use the poem “A happy child” (anonymous author).

cat command example
Using sed
The name sed is short for stream editor. For those unfamiliar with the term, a stream editor is used to perform basic text transformations on an input stream (a file or input from a pipeline).
The most basic (and popular) usage of sed is the substitution of characters. We will begin by changing every occurrence of the lowercase y to UPPERCASE Y and redirecting the output to ahappychild2.txt. The g flag indicates that sed should perform the substitution for all instances of term on every line of file. If this flag is omitted, sed will replace only the first occurrence of term on each line.
Basic syntax:
# sed ‘s/term/replacement/flag’ file
Our example:
# sed ‘s/y/Y/g’ ahappychild.txt > ahappychild2.txt

sed command example
Should you want to search for or replace a special character (such as /, \, &) you need to escape it, in the term or replacement strings, with a backward slash.
For example, we will substitute the word and for an ampersand. At the same time, we will replace the word Iwith You when the first one is found at the beginning of a line.
# sed 's/and/\&/g;s/^I/You/g' ahappychild.txt

sed replace string
In the above command, a ^ (caret sign) is a well-known regular expression that is used to represent the beginning of a line.
As you can see, we can combine two or more substitution commands (and use regular expressions inside them) by separating them with a semicolon and enclosing the set inside single quotes.
Another use of sed is showing (or deleting) a chosen portion of a file. In the following example, we will display the first 5 lines of /var/log/messages from Jun 8.
# sed -n '/^Jun 8/ p' /var/log/messages | sed -n 1,5p
Note that by default, sed prints every line. We can override this behaviour with the -n option and then tell sed to print (indicated by p) only the part of the file (or the pipe) that matches the pattern (Jun 8 at the beginning of line in the first case and lines 1 through 5 inclusive in the second case).
Finally, it can be useful while inspecting scripts or configuration files to inspect the code itself and leave out comments. The following sed one-liner deletes (d) blank lines or those starting with # (the | character indicates a boolean OR between the two regular expressions).
# sed '/^#\|^$/d' apache2.conf

sed match string
uniq Command
The uniq command allows us to report or remove duplicate lines in a file, writing to stdout by default. We must note that uniq does not detect repeated lines unless they are adjacent. Thus, uniq is commonly used along with a preceding sort (which is used to sort lines of text files). By default, sort takes the first field (separated by spaces) as key field. To specify a different key field, we need to use the -k option.
Examples
The du –sch /path/to/directory/* command returns the disk space usage per subdirectories and files within the specified directory in human-readable format (also shows a total per directory), and does not order the output by size, but by subdirectory and file name. We can use the following command to sort by size.
# du -sch /var/* | sort –h
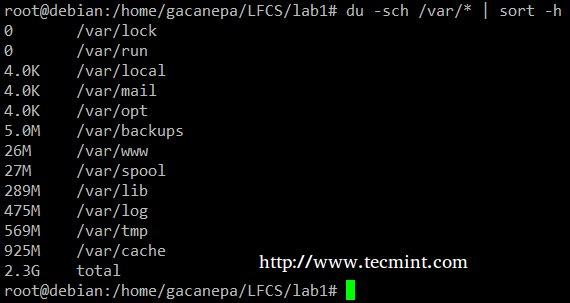
sort command example
You can count the number of events in a log by date by telling uniq to perform the comparison using the first 6 characters (-w 6) of each line (where the date is specified), and prefixing each output line by the number of occurrences (-c) with the following command.
# cat /var/log/mail.log | uniq -c -w 6

Count Numbers in File
Finally, you can combine sort and uniq (as they usually are). Consider the following file with a list of donors, donation date, and amount. Suppose we want to know how many unique donors there are. We will use the following command to cut the first field (fields are delimited by a colon), sort by name, and remove duplicate lines.
# cat sortuniq.txt | cut -d: -f1 | sort | uniq

Find Unique Records in File
Read Also: 13 “cat” Command Examples
grep Command
grep searches text files or (command output) for the occurrence of a specified regular expression and outputs any line containing a match to standard output.
Examples
Display the information from /etc/passwd for user gacanepa, ignoring case.
# grep -i gacanepa /etc/passwd

grep command example
Show all the contents of /etc whose name begins with rc followed by any single number.
# ls -l /etc | grep rc[0-9]

List Content Using grep
Read Also: 12 “grep” Command Examples
tr Command Usage
The tr command can be used to translate (change) or delete characters from stdin, and write the result to stdout.
Examples
Change all lowercase to uppercase in sortuniq.txt file.
# cat sortuniq.txt | tr [:lower:] [:upper:]

Sort Strings in File
Squeeze the delimiter in the output of ls –l to only one space.
# ls -l | tr -s ' '

Squeeze Delimiter
cut Command Usage
The cut command extracts portions of input lines (from stdin or files) and displays the result on standard output, based on number of bytes (-b option), characters (-c), or fields (-f). In this last case (based on fields), the default field separator is a tab, but a different delimiter can be specified by using the -d option.
Examples
Extract the user accounts and the default shells assigned to them from /etc/passwd (the –d option allows us to specify the field delimiter, and the –f switch indicates which field(s) will be extracted.
# cat /etc/passwd | cut -d: -f1,7

Extract User Accounts
Summing up, we will create a text stream consisting of the first and third non-blank files of the output of the lastcommand. We will use grep as a first filter to check for sessions of user gacanepa, then squeeze delimiters to only one space (tr -s ‘ ‘). Next, we’ll extract the first and third fields with cut, and finally sort by the second field (IP addresses in this case) showing unique.
# last | grep gacanepa | tr -s ' ' | cut -d' ' -f1,3 | sort -k2 | uniq

last command example
The above command shows how multiple commands and pipes can be combined so as to obtain filtered data according to our desires. Feel free to also run it by parts, to help you see the output that is pipelined from one command to the next (this can be a great learning experience, by the way!).
Summary
Although this example (along with the rest of the examples in the current tutorial) may not seem very useful at first sight, they are a nice starting point to begin experimenting with commands that are used to create, edit, and manipulate files from the Linux command line. Feel free to leave your questions and comments below – they will be much appreciated!
Reference Links
LFCS: How to Install and Use vi/vim as a Full Text Editor – Part 2
A couple of months ago, the Linux Foundation launched the LFCS (Linux Foundation Certified Sysadmin) certification in order to help individuals from all over the world to verify they are capable of doing basic to intermediate system administration tasks on Linux systems: system support, first-hand troubleshooting and maintenance, plus intelligent decision-making to know when it’s time to raise issues to upper support teams.

Learning VI Editor in Linux
Please take a look at the below video that explains The Linux Foundation Certification Program.
This post is Part 2 of a 10-tutorial series, here in this part, we will cover the basic file editing operations and understanding modes in vi/m editor, that are required for the LFCS certification exam.
Perform Basic File Editing Operations Using vi/m
Vi was the first full-screen text editor written for Unix. Although it was intended to be small and simple, it can be a bit challenging for people used exclusively to GUI text editors, such as NotePad++, or gedit, to name a few examples.
To use Vi, we must first understand the 3 modes in which this powerful program operates, in order to begin learning later about the its powerful text-editing procedures.
Please note that most modern Linux distributions ship with a variant of vi known as vim (“Vi improved”), which supports more features than the original vi does. For that reason, throughout this tutorial we will use vi and vim interchangeably.
If your distribution does not have vim installed, you can install it as follows.
- Ubuntu and derivatives: aptitude update && aptitude install vim
- Red Hat-based distributions: yum update && yum install vim
- openSUSE: zypper update && zypper install vim
Why should I want to learn vi?
There are at least 2 good reasons to learn vi.
1. vi is always available (no matter what distribution you’re using) since it is required by POSIX.
2. vi does not consume a considerable amount of system resources and allows us to perform any imaginable tasks without lifting our fingers from the keyboard.
In addition, vi has a very extensive built-in manual, which can be launched using the :help command right after the program is started. This built-in manual contains more information than vi/m’s man page.

vi Man Pages
Launching vi
To launch vi, type vi in your command prompt.

Start vi Editor
Then press i to enter Insert mode, and you can start typing. Another way to launch vi/m is.
# vi filename
Which will open a new buffer (more on buffers later) named filename, which you can later save to disk.
Understanding Vi modes
1. In command mode, vi allows the user to navigate around the file and enter vi commands, which are brief, case-sensitive combinations of one or more letters. Almost all of them can be prefixed with a number to repeat the command that number of times.
For example, yy (or Y) copies the entire current line, whereas 3yy (or 3Y) copies the entire current line along with the two next lines (3 lines in total). We can always enter command mode (regardless of the mode we’re working on) by pressing the Esc key. The fact that in command mode the keyboard keys are interpreted as commands instead of text tends to be confusing to beginners.
2. In ex mode, we can manipulate files (including saving a current file and running outside programs). To enter this mode, we must type a colon (:) from command mode, directly followed by the name of the ex-mode command that needs to be used. After that, vi returns automatically to command mode.
3. In insert mode (the letter i is commonly used to enter this mode), we simply enter text. Most keystrokes result in text appearing on the screen (one important exception is the Esc key, which exits insert mode and returns to command mode).
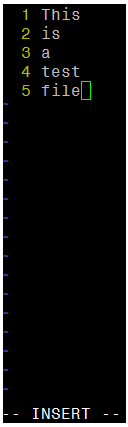
vi Insert Mode
Vi Commands
The following table shows a list of commonly used vi commands. File edition commands can be enforced by appending the exclamation sign to the command (for example, <b.:q! enforces quitting without saving).
| Key command | Description |
| h or left arrow | Go one character to the left |
| j or down arrow | Go down one line |
| k or up arrow | Go up one line |
| l (lowercase L) or right arrow | Go one character to the right |
| H | Go to the top of the screen |
| L | Go to the bottom of the screen |
| G | Go to the end of the file |
| w | Move one word to the right |
| b | Move one word to the left |
| 0 (zero) | Go to the beginning of the current line |
| ^ | Go to the first nonblank character on the current line |
| $ | Go to the end of the current line |
| Ctrl-B | Go back one screen |
| Ctrl-F | Go forward one screen |
| i | Insert at the current cursor position |
| I (uppercase i) | Insert at the beginning of the current line |
| J (uppercase j) | Join current line with the next one (move next line up) |
| a | Append after the current cursor position |
| o (lowercase O) | Creates a blank line after the current line |
| O (uppercase o) | Creates a blank line before the current line |
| r | Replace the character at the current cursor position |
| R | Overwrite at the current cursor position |
| x | Delete the character at the current cursor position |
| X | Delete the character immediately before (to the left) of the current cursor position |
| dd | Cut (for later pasting) the entire current line |
| D | Cut from the current cursor position to the end of the line (this command is equivalent to d$) |
| yX | Give a movement command X, copy (yank) the appropriate number of characters, words, or lines from the current cursor position |
| yy or Y | Yank (copy) the entire current line |
| p | Paste after (next line) the current cursor position |
| P | Paste before (previous line) the current cursor position |
| . (period) | Repeat the last command |
| u | Undo the last command |
| U | Undo the last command in the last line. This will work as long as the cursor is still on the line. |
| n | Find the next match in a search |
| N | Find the previous match in a search |
| :n | Next file; when multiple files are specified for editing, this commands loads the next file. |
| :e file | Load file in place of the current file. |
| :r file | Insert the contents of file after (next line) the current cursor position |
| :q | Quit without saving changes. |
| :w file | Write the current buffer to file. To append to an existing file, use :w >> file. |
| :wq | Write the contents of the current file and quit. Equivalent to x! and ZZ |
| :r! command | Execute command and insert output after (next line) the current cursor position. |
Vi Options
The following options can come in handy while running vim (we need to add them in our ~/.vimrc file).
# echo set number >> ~/.vimrc
# echo syntax on >> ~/.vimrc
# echo set tabstop=4 >> ~/.vimrc
# echo set autoindent >> ~/.vimrc
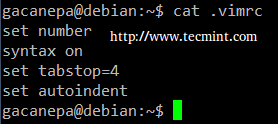
vi Editor Options
- set number shows line numbers when vi opens an existing or a new file.
- syntax on turns on syntax highlighting (for multiple file extensions) in order to make code and config files more readable.
- set tabstop=4 sets the tab size to 4 spaces (default value is 8).
- set autoindent carries over previous indent to the next line.
Search and replace
vi has the ability to move the cursor to a certain location (on a single line or over an entire file) based on searches. It can also perform text replacements with or without confirmation from the user.
a). Searching within a line: the f command searches a line and moves the cursor to the next occurrence of a specified character in the current line.
For example, the command fh would move the cursor to the next instance of the letter h within the current line. Note that neither the letter f nor the character you’re searching for will appear anywhere on your screen, but the character will be highlighted after you press Enter.
For example, this is what I get after pressing f4 in command mode.

Search String in Vi
b). Searching an entire file: use the / command, followed by the word or phrase to be searched for. A search may be repeated using the previous search string with the n command, or the next one (using the N command). This is the result of typing /Jane in command mode.
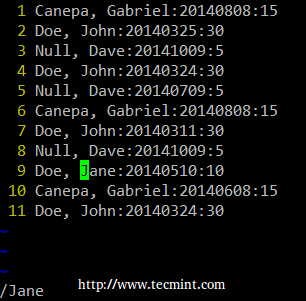
Vi Search String in File
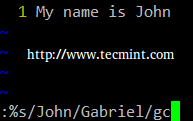
c). vi uses a command (similar to sed’s) to perform substitution operations over a range of lines or an entire file. To change the word “old” to “young” for the entire file, we must enter the following command.
:%s/old/young/g
Notice: The colon at the beginning of the command.
Vi Search and Replace
The colon (:) starts the ex command, s in this case (for substitution), % is a shortcut meaning from the first line to the last line (the range can also be specified as n,m which means “from line n to line m”), old is the search pattern, while young is the replacement text, and g indicates that the substitution should be performed on every occurrence of the search string in the file.
Alternatively, a c can be added to the end of the command to ask for confirmation before performing any substitution.
:%s/old/young/gc
Before replacing the original text with the new one, vi/m will present us with the following message.
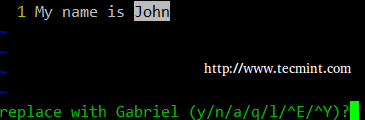
Replace String in Vi
- y: perform the substitution (yes)
- n: skip this occurrence and go to the next one (no)
- a: perform the substitution in this and all subsequent instances of the pattern.
- q or Esc: quit substituting.
- l (lowercase L): perform this substitution and quit (last).
- Ctrl-e, Ctrl-y: Scroll down and up, respectively, to view the context of the proposed substitution.
Editing Multiple Files at a Time
Let’s type vim file1 file2 file3 in our command prompt.
# vim file1 file2 file3
First, vim will open file1. To switch to the next file (file2), we need to use the :n command. When we want to return to the previous file, :N will do the job.
In order to switch from file1 to file3.
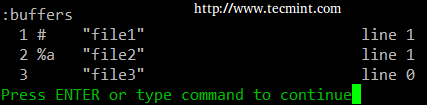
a). The :buffers command will show a list of the file currently being edited.
:buffers
Edit Multiple Files
b). The command :buffer 3 (without the s at the end) will open file3 for editing.
In the image above, a pound sign (#) indicates that the file is currently open but in the background, while %amarks the file that is currently being edited. On the other hand, a blank space after the file number (3 in the above example) indicates that the file has not yet been opened.
Temporary vi buffers
To copy a couple of consecutive lines (let’s say 4, for example) into a temporary buffer named a (not associated with a file) and place those lines in another part of the file later in the current vi section, we need to…
1. Press the ESC key to be sure we are in vi Command mode.
2. Place the cursor on the first line of the text we wish to copy.
3. Type “a4yy” to copy the current line, along with the 3 subsequent lines, into a buffer named a. We can continue editing our file – we do not need to insert the copied lines immediately.
4. When we reach the location for the copied lines, use “a before the p or P commands to insert the lines copied into the buffer named a:
- Type “ap to insert the lines copied into buffer a after the current line on which the cursor is resting.
- Type “aP to insert the lines copied into buffer a before the current line.
If we wish, we can repeat the above steps to insert the contents of buffer a in multiple places in our file. A temporary buffer, as the one in this section, is disposed when the current window is closed.
Summary
As we have seen, vi/m is a powerful and versatile text editor for the CLI. Feel free to share your own tricks and comments below.
Reference Links
Update: If you want to extend your VI editor skills, then I would suggest you read following two guides that will guide you to some useful VI editor tricks and tips.
Part 1: Learn Useful ‘Vi/Vim’ Editor Tips and Tricks to Enhance Your Skills
Part 2: 8 Interesting ‘Vi/Vim’ Editor Tips and Tricks
LFCS: How to Archive/Compress Files & Directories, Setting File Attributes and Finding Files in Linux – Part 3
Recently, the Linux Foundation started the LFCS (Linux Foundation Certified Sysadmin) certification, a brand new program whose purpose is allowing individuals from all corners of the globe to have access to an exam, which if approved, certifies that the person is knowledgeable in performing basic to intermediate system administration tasks on Linux systems. This includes supporting already running systems and services, along with first-level troubleshooting and analysis, plus the ability to decide when to escalate issues to engineering teams.
Linux Foundation Certified Sysadmin – Part 3
Please watch the below video that gives the idea about The Linux Foundation Certification Program.
This post is Part 3 of a 10-tutorial series, here in this part, we will cover how to archive/compress files and directories, set file attributes, and find files on the filesystem, that are required for the LFCS certification exam.
Archiving and Compression Tools
A file archiving tool groups a set of files into a single standalone file that we can backup to several types of media, transfer across a network, or send via email. The most frequently used archiving utility in Linux is tar. When an archiving utility is used along with a compression tool, it allows to reduce the disk size that is needed to store the same files and information.
The tar utility
tar bundles a group of files together into a single archive (commonly called a tar file or tarball). The name originally stood for tape archiver, but we must note that we can use this tool to archive data to any kind of writeable media (not only to tapes). Tar is normally used with a compression tool such as gzip, bzip2, or xz to produce a compressed tarball.
Basic syntax:
# tar [options] [pathname ...]
Where … represents the expression used to specify which files should be acted upon.
Most commonly used tar commands
| Long option | Abbreviation | Description |
| –create | c | Creates a tar archive |
| –concatenate | A | Appends tar files to an archive |
| –append | r | Appends files to the end of an archive |
| –update | u | Appends files newer than copy in archive |
| –diff or –compare | d | Find differences between archive and file system |
| –file archive | f | Use archive file or device ARCHIVE |
| –list | t | Lists the contents of a tarball |
| –extract or –get | x | Extracts files from an archive |
Normally used operation modifiers
| Long option | Abbreviation | Description |
| –directory dir | C | Changes to directory dir before performing operations |
| –same-permissions | p | Preserves original permissions |
| –verbose | v | Lists all files read or extracted. When this flag is used along with –list, the file sizes, ownership, and time stamps are displayed. |
| –verify | W | Verifies the archive after writing it |
| –exclude file | — | Excludes file from the archive |
| –exclude=pattern | X | Exclude files, given as a PATTERN |
| –gzip or –gunzip | z | Processes an archive through gzip |
| –bzip2 | j | Processes an archive through bzip2 |
| –xz | J | Processes an archive through xz |
Gzip is the oldest compression tool and provides the least compression, while bzip2 provides improved compression. In addition, xz is the newest but (usually) provides the best compression. This advantages of best compression come at a price: the time it takes to complete the operation, and system resources used during the process.
Normally, tar files compressed with these utilities have .gz, .bz2, or .xz extensions, respectively. In the following examples we will be using these files: file1, file2, file3, file4, and file5.
Grouping and compressing with gzip, bzip2 and xz
Group all the files in the current working directory and compress the resulting bundle with gzip, bzip2, and xz(please note the use of a regular expression to specify which files should be included in the bundle – this is to prevent the archiving tool to group the tarballs created in previous steps).
# tar czf myfiles.tar.gz file[0-9]
# tar cjf myfiles.tar.bz2 file[0-9]
# tar cJf myfile.tar.xz file[0-9]

Compress Multiple Files
Listing the contents of a tarball and updating / appending files to the bundle
List the contents of a tarball and display the same information as a long directory listing. Note that update or append operations cannot be applied to compressed files directly (if you need to update or append a file to a compressed tarball, you need to uncompress the tar file and update / append to it, then compress again).
# tar tvf [tarball]
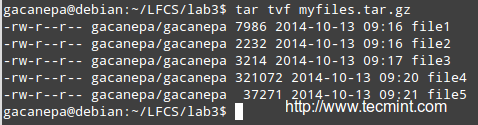
List Archive Content
Run any of the following commands:
# gzip -d myfiles.tar.gz	[#1]
# bzip2 -d myfiles.tar.bz2	[#2]
# xz -d myfiles.tar.xz 		[#3]
Then
# tar --delete --file myfiles.tar file4 (deletes the file inside the tarball)
# tar --update --file myfiles.tar file4 (adds the updated file)
and
# gzip myfiles.tar		[ if you choose #1 above ]
# bzip2 myfiles.tar		[ if you choose #2 above ]
# xz myfiles.tar 		[ if you choose #3 above ]
Finally,
# tar tvf [tarball] #again
and compare the modification date and time of file4 with the same information as shown earlier.
Excluding file types
Suppose you want to perform a backup of user’s home directories. A good sysadmin practice would be (may also be specified by company policies) to exclude all video and audio files from backups.
Maybe your first approach would be to exclude from the backup all files with an .mp3 or .mp4 extension (or other extensions). What if you have a clever user who can change the extension to .txt or .bkp, your approach won’t do you much good. In order to detect an audio or video file, you need to check its file type with file. The following shell script will do the job.
#!/bin/bash
# Pass the directory to backup as first argument.
DIR=$1
# Create the tarball and compress it. Exclude files with the MPEG string in its file type.
# -If the file type contains the string mpeg, $? (the exit status of the most recently executed command) expands to 0, and the filename is redirected to the exclude option. Otherwise, it expands to 1.
# -If $? equals 0, add the file to the list of files to be backed up.
tar X <(for i in $DIR/*; do file $i | grep -i mpeg; if [ $? -eq 0 ]; then echo $i; fi;done) -cjf backupfile.tar.bz2 $DIR/*

Exclude Files in tar
Restoring backups with tar preserving permissions
You can then restore the backup to the original user’s home directory (user_restore in this example), preserving permissions, with the following command.
# tar xjf backupfile.tar.bz2 --directory user_restore --same-permissions

Restore Files from Archive
Read Also:
Using find Command to Search for Files
The find command is used to search recursively through directory trees for files or directories that match certain characteristics, and can then either print the matching files or directories or perform other operations on the matches.
Normally, we will search by name, owner, group, type, permissions, date, and size.
Basic syntax:
# find [directory_to_search] [expression]
Finding files recursively according to Size
Find all files (-f) in the current directory (.) and 2 subdirectories below (-maxdepth 3 includes the current working directory and 2 levels down) whose size (-size) is greater than 2 MB.
# find . -maxdepth 3 -type f -size +2M
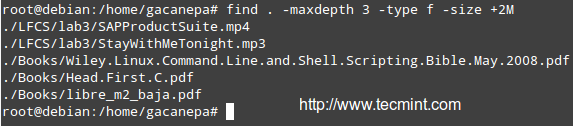
Find Files Based on Size
Finding and deleting files that match a certain criteria
Files with 777 permissions are sometimes considered an open door to external attackers. Either way, it is not safe to let anyone do anything with files. We will take a rather aggressive approach and delete them! (‘{}‘ + is used to “collect” the results of the search).
# find /home/user -perm 777 -exec rm '{}' +

Find Files with 777Permission
Finding files per atime or mtime
Search for configuration files in /etc that have been accessed (-atime) or modified (-mtime) more (+180) or less (-180) than 6 months ago or exactly 6 months ago (180).
Modify the following command as per the example below:
# find /etc -iname "*.conf" -mtime -180 -print

Find Modified Files
Read Also: 35 Practical Examples of Linux ‘find’ Command
File Permissions and Basic Attributes
The first 10 characters in the output of ls -l are the file attributes. The first of these characters is used to indicate the file type:
- – : a regular file
- -d : a directory
- -l : a symbolic link
- -c : a character device (which treats data as a stream of bytes, i.e. a terminal)
- -b : a block device (which handles data in blocks, i.e. storage devices)
The next nine characters of the file attributes are called the file mode and represent the read (r), write (w), and execute (x) permissions of the file’s owner, the file’s group owner, and the rest of the users (commonly referred to as “the world”).
Whereas the read permission on a file allows the same to be opened and read, the same permission on a directory allows its contents to be listed if the execute permission is also set. In addition, the execute permission in a file allows it to be handled as a program and run, while in a directory it allows the same to be cd’ed into it.
File permissions are changed with the chmod command, whose basic syntax is as follows:
# chmod [new_mode] file
Where new_mode is either an octal number or an expression that specifies the new permissions.
The octal number can be converted from its binary equivalent, which is calculated from the desired file permissions for the owner, the group, and the world, as follows:
The presence of a certain permission equals a power of 2 (r=22, w=21, x=20), while its absence equates to 0. For example:

File Permissions
To set the file’s permissions as above in octal form, type:
# chmod 744 myfile
You can also set a file’s mode using an expression that indicates the owner’s rights with the letter u, the group owner’s rights with the letter g, and the rest with o. All of these “individuals” can be represented at the same time with the letter a. Permissions are granted (or revoked) with the + or – signs, respectively.
Revoking execute permission for a shell script to all users
As we explained earlier, we can revoke a certain permission prepending it with the minus sign and indicating whether it needs to be revoked for the owner, the group owner, or all users. The one-liner below can be interpreted as follows: Change mode for all (a) users, revoke (–) execute permission (x).
# chmod a-x backup.sh
Granting read, write, and execute permissions for a file to the owner and group owner, and read permissions for the world.
When we use a 3-digit octal number to set permissions for a file, the first digit indicates the permissions for the owner, the second digit for the group owner and the third digit for everyone else:
- Owner: (r=22 + w=21 + x=20 = 7)
- Group owner: (r=22 + w=21 + x=20 = 7)
- World: (r=22 + w=0 + x=0 = 4),
# chmod 774 myfile
In time, and with practice, you will be able to decide which method to change a file mode works best for you in each case. A long directory listing also shows the file’s owner and its group owner (which serve as a rudimentary yet effective access control to files in a system):

Linux File Listing
File ownership is changed with the chown command. The owner and the group owner can be changed at the same time or separately. Its basic syntax is as follows:
# chown user:group file
Where at least user or group need to be present.
Few Examples
Changing the owner of a file to a certain user.
# chown gacanepa sent
Changing the owner and group of a file to an specific user:group pair.
# chown gacanepa:gacanepa TestFile
Changing only the group owner of a file to a certain group. Note the colon before the group’s name.
# chown :gacanepa email_body.txt
Conclusion
As a sysadmin, you need to know how to create and restore backups, how to find files in your system and change their attributes, along with a few tricks that can make your life easier and will prevent you from running into future issues.
I hope that the tips provided in the present article will help you to achieve that goal. Feel free to add your own tips and ideas in the comments section for the benefit of the community. Thanks in advance!
Reference Links
LFCS: Partitioning Storage Devices, Formatting Filesystems and Configuring Swap Partition – Part 4
Last August, the Linux Foundation launched the LFCS certification (Linux Foundation Certified Sysadmin), a shiny chance for system administrators to show, through a performance-based exam, that they can perform overall operational support of Linux systems: system support, first-level diagnosing and monitoring, plus issue escalation – if needed – to other support teams.
Linux Foundation Certified Sysadmin – Part 4
Please aware that Linux Foundation certifications are precise, totally based on performance and available through an online portal anytime, anywhere. Thus, you no longer have to travel to a examination center to get the certifications you need to establish your skills and expertise.
Please watch the below video that explains The Linux Foundation Certification Program.
This post is Part 4 of a 10-tutorial series, here in this part, we will cover the Partitioning storage devices, Formatting filesystems and Configuring swap partition, that are required for the LFCS certification exam.
Partitioning Storage Devices
Partitioning is a means to divide a single hard drive into one or more parts or “slices” called partitions. A partition is a section on a drive that is treated as an independent disk and which contains a single type of file system, whereas a partition table is an index that relates those physical sections of the hard drive to partition identifications.
In Linux, the traditional tool for managing MBR partitions (up to ~2009) in IBM PC compatible systems is fdisk. For GPT partitions (~2010 and later) we will use gdisk. Each of these tools can be invoked by typing its name followed by a device name (such as /dev/sdb).
Managing MBR Partitions with fdisk
We will cover fdisk first.
# fdisk /dev/sdb
A prompt appears asking for the next operation. If you are unsure, you can press the ‘m‘ key to display the help contents.

fdisk Help Menu
In the above image, the most frequently used options are highlighted. At any moment, you can press ‘p‘ to display the current partition table.

Show Partition Table
The Id column shows the partition type (or partition id) that has been assigned by fdisk to the partition. A partition type serves as an indicator of the file system, the partition contains or, in simple words, the way data will be accessed in that partition.
Please note that a comprehensive study of each partition type is out of the scope of this tutorial – as this series is focused on the LFCS exam, which is performance-based.
Some of the options used by fdisk as follows:
You can list all the partition types that can be managed by fdisk by pressing the ‘l‘ option (lowercase l).
Press ‘d‘ to delete an existing partition. If more than one partition is found in the drive, you will be asked which one should be deleted.
Enter the corresponding number, and then press ‘w‘ (write modifications to partition table) to apply changes.
In the following example, we will delete /dev/sdb2, and then print (p) the partition table to verify the modifications.

fdisk Command Options
Press ‘n‘ to create a new partition, then ‘p‘ to indicate it will be a primary partition. Finally, you can accept all the default values (in which case the partition will occupy all the available space), or specify a size as follows.

Create New Partition
If the partition Id that fdisk chose is not the right one for our setup, we can press ‘t‘ to change it.

Change Partition Name
When you’re done setting up the partitions, press ‘w‘ to commit the changes to disk.

Save Partition Changes
Managing GPT Partitions with gdisk
In the following example, we will use /dev/sdb.
# gdisk /dev/sdb
We must note that gdisk can be used either to create MBR or GPT partitions.

Create GPT Partitions
The advantage of using GPT partitioning is that we can create up to 128 partitions in the same disk whose size can be up to the order of petabytes, whereas the maximum size for MBR partitions is 2 TB.
Note that most of the options in fdisk are the same in gdisk. For that reason, we will not go into detail about them, but here’s a screenshot of the process.

gdisk Command Options
Formatting Filesystems
Once we have created all the necessary partitions, we must create filesystems. To find out the list of filesystems supported in your system, run.
# ls /sbin/mk*

Check Filesystems Type
The type of filesystem that you should choose depends on your requirements. You should consider the pros and cons of each filesystem and its own set of features. Two important attributes to look for in a filesystem are.
- Journaling support, which allows for faster data recovery in the event of a system crash.
- Security Enhanced Linux (SELinux) support, as per the project wiki, “a security enhancement to Linux which allows users and administrators more control over access control”.
In our next example, we will create an ext4 filesystem (supports both journaling and SELinux) labeled Tecminton /dev/sdb1, using mkfs, whose basic syntax is.
# mkfs -t [filesystem] -L [label] device
or
# mkfs.[filesystem] -L [label] device
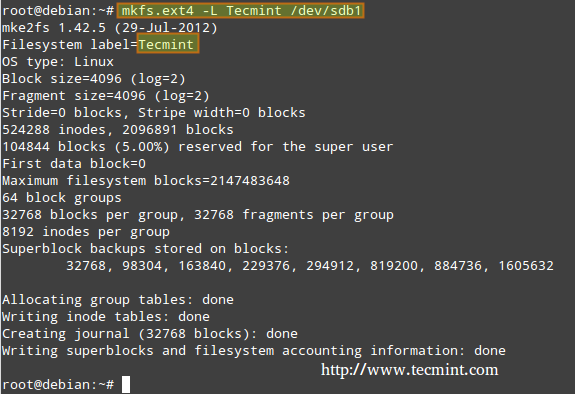
Create ext4 Filesystems
Creating and Using Swap Partitions
Swap partitions are necessary if we need our Linux system to have access to virtual memory, which is a section of the hard disk designated for use as memory, when the main system memory (RAM) is all in use. For that reason, a swap partition may not be needed on systems with enough RAM to meet all its requirements; however, even in that case it’s up to the system administrator to decide whether to use a swap partition or not.
A simple rule of thumb to decide the size of a swap partition is as follows.
Swap should usually equal 2x physical RAM for up to 2 GB of physical RAM, and then an additional 1x physical RAM for any amount above 2 GB, but never less than 32 MB.
So, if:
M = Amount of RAM in GB, and S = Amount of swap in GB, then
If M < 2
	S = M *2
Else
	S = M + 2
Remember this is just a formula and that only you, as a sysadmin, have the final word as to the use and size of a swap partition.
To configure a swap partition, create a regular partition as demonstrated earlier with the desired size. Next, we need to add the following entry to the /etc/fstab file (X can be either b or c).
/dev/sdX1 swap swap sw 0 0
Finally, let’s format and enable the swap partition.
# mkswap /dev/sdX1
# swapon -v /dev/sdX1
To display a snapshot of the swap partition(s).
# cat /proc/swaps
To disable the swap partition.
# swapoff /dev/sdX1
For the next example, we’ll use /dev/sdc1 (=512 MB, for a system with 256 MB of RAM) to set up a partition with fdisk that we will use as swap, following the steps detailed above. Note that we will specify a fixed size in this case.

Create Swap Partition

Enable Swap Partition
Conclusion
Creating partitions (including swap) and formatting filesystems are crucial in your road to Sysadminship. I hope that the tips given in this article will guide you to achieve your goals. Feel free to add your own tips & ideas in the comments section below, for the benefit of the community.
Reference Links
LFCS: How to Mount/Unmount Local and Network (Samba & NFS) Filesystems in Linux – Part 5
The Linux Foundation launched the LFCS certification (Linux Foundation Certified Sysadmin), a brand new program whose purpose is allowing individuals from all corners of the globe to get certified in basic to intermediate system administration tasks for Linux systems, which includes supporting running systems and services, along with overall monitoring and analysis, plus smart decision-making when it comes to raising issues to upper support teams.

Linux Foundation Certified Sysadmin – Part 5
The following video shows an introduction to The Linux Foundation Certification Program.
This post is Part 5 of a 10-tutorial series, here in this part, we will explain How to mount/unmount local and network filesystems in linux, that are required for the LFCS certification exam.
Mounting Filesystems
Once a disk has been partitioned, Linux needs some way to access the data on the partitions. Unlike DOS or Windows (where this is done by assigning a drive letter to each partition), Linux uses a unified directory tree where each partition is mounted at a mount point in that tree.
A mount point is a directory that is used as a way to access the filesystem on the partition, and mounting the filesystem is the process of associating a certain filesystem (a partition, for example) with a specific directory in the directory tree.
In other words, the first step in managing a storage device is attaching the device to the file system tree. This task can be accomplished on a one-time basis by using tools such as mount (and then unmounted with umount) or persistently across reboots by editing the /etc/fstab file.
The mount command (without any options or arguments) shows the currently mounted filesystems.
# mount

Check Mounted Filesystem
In addition, mount is used to mount filesystems into the filesystem tree. Its standard syntax is as follows.
# mount -t type device dir -o options
This command instructs the kernel to mount the filesystem found on device (a partition, for example, that has been formatted with a filesystem type) at the directory dir, using all options. In this form, mount does not look in /etc/fstab for instructions.
If only a directory or device is specified, for example.
# mount /dir -o options
or
# mount device -o options
mount tries to find a mount point and if it can’t find any, then searches for a device (both cases in the /etc/fstabfile), and finally attempts to complete the mount operation (which usually succeeds, except for the case when either the directory or the device is already being used, or when the user invoking mount is not root).
You will notice that every line in the output of mount has the following format.
device on directory type (options)
For example,
/dev/mapper/debian-home on /home type ext4 (rw,relatime,user_xattr,barrier=1,data=ordered)
Reads:
dev/mapper/debian-home is mounted on /home, which has been formatted as ext4, with the following options: rw,relatime,user_xattr,barrier=1,data=ordered
Mount Options
Most frequently used mount options include.
- async: allows asynchronous I/O operations on the file system being mounted.
- auto: marks the file system as enabled to be mounted automatically using mount -a. It is the opposite of noauto.
- defaults: this option is an alias for async,auto,dev,exec,nouser,rw,suid. Note that multiple options must be separated by a comma without any spaces. If by accident you type a space between options, mount will interpret the subsequent text string as another argument.
- loop: Mounts an image (an .iso file, for example) as a loop device. This option can be used to simulate the presence of the disk’s contents in an optical media reader.
- noexec: prevents the execution of executable files on the particular filesystem. It is the opposite of exec.
- nouser: prevents any users (other than root) to mount and unmount the filesystem. It is the opposite of user.
- remount: mounts the filesystem again in case it is already mounted.
- ro: mounts the filesystem as read only.
- rw: mounts the file system with read and write capabilities.
- relatime: makes access time to files be updated only if atime is earlier than mtime.
- user_xattr: allow users to set and remote extended filesystem attributes.
Mounting a device with ro and noexec options
# mount -t ext4 /dev/sdg1 /mnt -o ro,noexec
In this case we can see that attempts to write a file to or to run a binary file located inside our mounting point fail with corresponding error messages.
# touch /mnt/myfile
# /mnt/bin/echo “Hi there”

Mount Device Read Write
Mounting a device with default options
In the following scenario, we will try to write a file to our newly mounted device and run an executable file located within its filesystem tree using the same commands as in the previous example.
# mount -t ext4 /dev/sdg1 /mnt -o defaults

Mount Device
In this last case, it works perfectly.
Unmounting Devices
Unmounting a device (with the umount command) means finish writing all the remaining “on transit” data so that it can be safely removed. Note that if you try to remove a mounted device without properly unmounting it first, you run the risk of damaging the device itself or cause data loss.
That being said, in order to unmount a device, you must be “standing outside” its block device descriptor or mount point. In other words, your current working directory must be something else other than the mounting point. Otherwise, you will get a message saying that the device is busy.
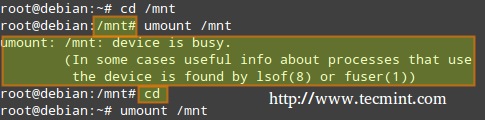
Unmount Device
An easy way to “leave” the mounting point is typing the cd command which, in lack of arguments, will take us to our current user’s home directory, as shown above.
Mounting Common Networked Filesystems
The two most frequently used network file systems are SMB (which stands for “Server Message Block”) and NFS (“Network File System”). Chances are you will use NFS if you need to set up a share for Unix-like clients only, and will opt for Samba if you need to share files with Windows-based clients and perhaps other Unix-like clients as well.
Read Also
- Setup Samba Server in RHEL/CentOS and Fedora
- Setting up NFS (Network File System) on RHEL/CentOS/Fedora and Debian/Ubuntu
The following steps assume that Samba and NFS shares have already been set up in the server with IP 192.168.0.10 (please note that setting up a NFS share is one of the competencies required for the LFCE exam, which we will cover after the present series).
Mounting a Samba share on Linux
Step 1: Install the samba-client samba-common and cifs-utils packages on Red Hat and Debian based distributions.
# yum update && yum install samba-client samba-common cifs-utils
# aptitude update && aptitude install samba-client samba-common cifs-utils
Then run the following command to look for available samba shares in the server.
# smbclient -L 192.168.0.10
And enter the password for the root account in the remote machine.

Mount Samba Share
In the above image we have highlighted the share that is ready for mounting on our local system. You will need a valid samba username and password on the remote server in order to access it.
Step 2: When mounting a password-protected network share, it is not a good idea to write your credentials in the /etc/fstab file. Instead, you can store them in a hidden file somewhere with permissions set to 600, like so.
# mkdir /media/samba
# echo “username=samba_username” > /media/samba/.smbcredentials
# echo “password=samba_password” >> /media/samba/.smbcredentials
# chmod 600 /media/samba/.smbcredentials
Step 3: Then add the following line to /etc/fstab file.
# //192.168.0.10/gacanepa /media/samba cifs credentials=/media/samba/.smbcredentials,defaults 0 0
Step 4: You can now mount your samba share, either manually (mount //192.168.0.10/gacanepa) or by rebooting your machine so as to apply the changes made in /etc/fstab permanently.
# mount -a

Mount Password Protect Samba Share
Mounting a NFS share on Linux
Step 1: Install the nfs-common and portmap packages on Red Hat and Debian based distributions.
# yum update && yum install nfs-utils nfs-utils-lib
# aptitude update && aptitude install nfs-common
Step 2: Create a mounting point for the NFS share.
# mkdir /media/nfs
Step 3: Add the following line to /etc/fstab file.
192.168.0.10:/NFS-SHARE /media/nfs nfs defaults 0 0
Step 4: You can now mount your nfs share, either manually (mount 192.168.0.10:/NFS-SHARE) or by rebooting your machine so as to apply the changes made in /etc/fstab permanently.
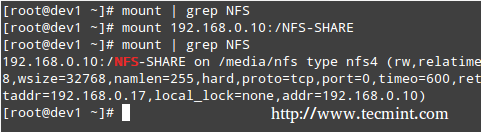
Mount NFS Share
Mounting Filesystems Permanently
As shown in the previous two examples, the /etc/fstab file controls how Linux provides access to disk partitions and removable media devices and consists of a series of lines that contain six fields each; the fields are separated by one or more spaces or tabs. A line that begins with a hash mark (#) is a comment and is ignored.
Each line has the following format.
<file system> <mount point> <type> <options> <dump> <pass>
Where:
- <file system>: The first column specifies the mount device. Most distributions now specify partitions by their labels or UUIDs. This practice can help reduce problems if partition numbers change.
- <mount point>: The second column specifies the mount point.
- <type>: The file system type code is the same as the type code used to mount a filesystem with the mount command. A file system type code of auto lets the kernel auto-detect the filesystem type, which can be a convenient option for removable media devices. Note that this option may not be available for all filesystems out there.
- <options>: One (or more) mount option(s).
- <dump>: You will most likely leave this to 0 (otherwise set it to 1) to disable the dump utility to backup the filesystem upon boot (The dump program was once a common backup tool, but it is much less popular today.)
- <pass>: This column specifies whether the integrity of the filesystem should be checked at boot time with fsck. A 0 means that fsck should not check a filesystem. The higher the number, the lowest the priority. Thus, the root partition will most likely have a value of 1, while all others that should be checked should have a value of 2.
Mount Examples
1. To mount a partition with label TECMINT at boot time with rw and noexec attributes, you should add the following line in /etc/fstab file.
LABEL=TECMINT /mnt ext4 rw,noexec 0 0
2. If you want the contents of a disk in your DVD drive be available at boot time.
/dev/sr0 /media/cdrom0 iso9660 ro,user,noauto 0 0
Where /dev/sr0 is your DVD drive.
Summary
You can rest assured that mounting and unmounting local and network filesystems from the command line will be part of your day-to-day responsibilities as sysadmin. You will also need to master /etc/fstab. I hope that you have found this article useful to help you with those tasks. Feel free to add your comments (or ask questions) below and to share this article through your network social profiles.
Reference Links
LFCS: Assembling Partitions as RAID Devices – Creating & Managing System Backups – Part 6
Recently, the Linux Foundation launched the LFCS (Linux Foundation Certified Sysadmin) certification, a shiny chance for system administrators everywhere to demonstrate, through a performance-based exam, that they are capable of performing overall operational support on Linux systems: system support, first-level diagnosing and monitoring, plus issue escalation, when required, to other support teams.

Linux Foundation Certified Sysadmin – Part 6
The following video provides an introduction to The Linux Foundation Certification Program.
This post is Part 6 of a 10-tutorial series, here in this part, we will explain How to Assemble Partitions as RAID Devices – Creating & Managing System Backups, that are required for the LFCS certification exam.
Understanding RAID
The technology known as Redundant Array of Independent Disks (RAID) is a storage solution that combines multiple hard disks into a single logical unit to provide redundancy of data and/or improve performance in read / write operations to disk.
However, the actual fault-tolerance and disk I/O performance lean on how the hard disks are set up to form the disk array. Depending on the available devices and the fault tolerance / performance needs, different RAID levels are defined. You can refer to the RAID series here in Tecmint.com for a more detailed explanation on each RAID level.
RAID Guide: What is RAID, Concepts of RAID and RAID Levels Explained
Our tool of choice for creating, assembling, managing, and monitoring our software RAIDs is called mdadm(short for multiple disks admin).
---------------- Debian and Derivatives ----------------
# aptitude update && aptitude install mdadm
---------------- Red Hat and CentOS based Systems ----------------
# yum update && yum install mdadm
---------------- On openSUSE ----------------
# zypper refresh && zypper install mdadm #
Assembling Partitions as RAID Devices
The process of assembling existing partitions as RAID devices consists of the following steps.
1. Create the array using mdadm
If one of the partitions has been formatted previously, or has been a part of another RAID array previously, you will be prompted to confirm the creation of the new array. Assuming you have taken the necessary precautions to avoid losing important data that may have resided in them, you can safely type y and press Enter.
# mdadm --create --verbose /dev/md0 --level=stripe --raid-devices=2 /dev/sdb1 /dev/sdc1

Creating RAID Array
2. Check the array creation status
In order to check the array creation status, you will use the following commands – regardless of the RAID type. These are just as valid as when we are creating a RAID0 (as shown above), or when you are in the process of setting up a RAID5, as shown in the image below.
# cat /proc/mdstat
or
# mdadm --detail /dev/md0	[More detailed summary]

Check RAID Array Status
3. Format the RAID Device
Format the device with a filesystem as per your needs / requirements, as explained in Part 4 of this series.
4. Monitor RAID Array Service
Instruct the monitoring service to “keep an eye” on the array. Add the output of mdadm –detail –scan to /etc/mdadm/mdadm.conf (Debian and derivatives) or /etc/mdadm.conf (CentOS / openSUSE), like so.
# mdadm --detail --scan

Monitor RAID Array
# mdadm --assemble --scan [Assemble the array]
To ensure the service starts on system boot, run the following commands as root.
Debian and Derivatives
Debian and derivatives, though it should start running on boot by default.
# update-rc.d mdadm defaults
Edit the /etc/default/mdadm file and add the following line.
AUTOSTART=true
On CentOS and openSUSE (systemd-based)
# systemctl start mdmonitor
# systemctl enable mdmonitor
On CentOS and openSUSE (SysVinit-based)
# service mdmonitor start
# chkconfig mdmonitor on
5. Check RAID Disk Failure
In RAID levels that support redundancy, replace failed drives when needed. When a device in the disk array becomes faulty, a rebuild automatically starts only if there was a spare device added when we first created the array.

Check RAID Faulty Disk
Otherwise, we need to manually attach an extra physical drive to our system and run.
# mdadm /dev/md0 --add /dev/sdX1
Where /dev/md0 is the array that experienced the issue and /dev/sdX1 is the new device.
6. Disassemble a working array
You may have to do this if you need to create a new array using the devices – (Optional Step).
# mdadm --stop /dev/md0 				#  Stop the array
# mdadm --remove /dev/md0 			# Remove the RAID device
# mdadm --zero-superblock /dev/sdX1 	# Overwrite the existing md superblock with zeroes
7. Set up mail alerts
You can configure a valid email address or system account to send alerts to (make sure you have this line in mdadm.conf). – (Optional Step)
MAILADDR root
In this case, all alerts that the RAID monitoring daemon collects will be sent to the local root account’s mail box. One of such alerts looks like the following.
Note: This event is related to the example in STEP 5, where a device was marked as faulty and the spare device was automatically built into the array by mdadm. Thus, we “ran out” of healthy spare devices and we got the alert.
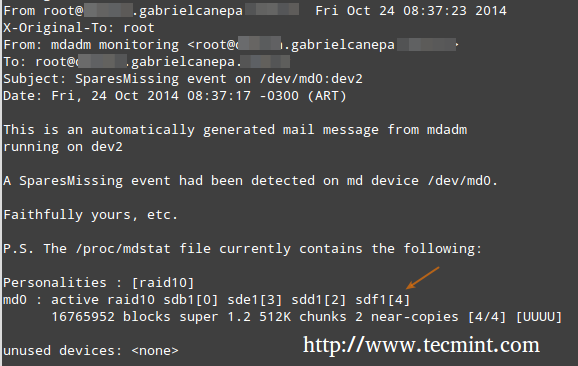
RAID Monitoring Alerts
Understanding RAID Levels
RAID 0
The total array size is n times the size of the smallest partition, where n is the number of independent disks in the array (you will need at least two drives). Run the following command to assemble a RAID 0 array using partitions /dev/sdb1 and /dev/sdc1.
# mdadm --create --verbose /dev/md0 --level=stripe --raid-devices=2 /dev/sdb1 /dev/sdc1
Common uses: Setups that support real-time applications where performance is more important than fault-tolerance.
RAID 1 (aka Mirroring)
The total array size equals the size of the smallest partition (you will need at least two drives). Run the following command to assemble a RAID 1 array using partitions /dev/sdb1 and /dev/sdc1.
# mdadm --create --verbose /dev/md0 --level=1 --raid-devices=2 /dev/sdb1 /dev/sdc1
Common uses: Installation of the operating system or important subdirectories, such as /home.
RAID 5 (aka drives with Parity)
The total array size will be (n – 1) times the size of the smallest partition. The “lost” space in (n-1) is used for parity (redundancy) calculation (you will need at least three drives).
Note that you can specify a spare device (/dev/sde1 in this case) to replace a faulty part when an issue occurs. Run the following command to assemble a RAID 5 array using partitions /dev/sdb1, /dev/sdc1, /dev/sdd1, and /dev/sde1 as spare.
# mdadm --create --verbose /dev/md0 --level=5 --raid-devices=3 /dev/sdb1 /dev/sdc1 /dev/sdd1 --spare-devices=1 /dev/sde1
Common uses: Web and file servers.
RAID 6 (aka drives with double Parity
The total array size will be (n*s)-2*s, where n is the number of independent disks in the array and s is the size of the smallest disk. Note that you can specify a spare device (/dev/sdf1 in this case) to replace a faulty part when an issue occurs.
Run the following command to assemble a RAID 6 array using partitions /dev/sdb1, /dev/sdc1, /dev/sdd1, /dev/sde1, and /dev/sdf1 as spare.
# mdadm --create --verbose /dev/md0 --level=6 --raid-devices=4 /dev/sdb1 /dev/sdc1 /dev/sdd1 /dev/sde --spare-devices=1 /dev/sdf1
Common uses: File and backup servers with large capacity and high availability requirements.
RAID 1+0 (aka stripe of mirrors)
The total array size is computed based on the formulas for RAID 0 and RAID 1, since RAID 1+0 is a combination of both. First, calculate the size of each mirror and then the size of the stripe.
Note that you can specify a spare device (/dev/sdf1 in this case) to replace a faulty part when an issue occurs. Run the following command to assemble a RAID 1+0 array using partitions /dev/sdb1, /dev/sdc1, /dev/sdd1, /dev/sde1, and /dev/sdf1 as spare.
# mdadm --create --verbose /dev/md0 --level=10 --raid-devices=4 /dev/sd[b-e]1 --spare-devices=1 /dev/sdf1
Common uses: Database and application servers that require fast I/O operations.
Creating and Managing System Backups
It never hurts to remember that RAID with all its bounties IS NOT A REPLACEMENT FOR BACKUPS! Write it 1000 times on the chalkboard if you need to, but make sure you keep that idea in mind at all times. Before we begin, we must note that there is no one-size-fits-all solution for system backups, but here are some things that you do need to take into account while planning a backup strategy.
- What do you use your system for? (Desktop or server? If the latter case applies, what are the most critical services – whose configuration would be a real pain to lose?)
- How often do you need to take backups of your system?
- What is the data (e.g. files / directories / database dumps) that you want to backup? You may also want to consider if you really need to backup huge files (such as audio or video files).
- Where (meaning physical place and media) will those backups be stored?
Backing Up Your Data
Method 1: Backup entire drives with dd command. You can either back up an entire hard disk or a partition by creating an exact image at any point in time. Note that this works best when the device is offline, meaning it’s not mounted and there are no processes accessing it for I/O operations.
The downside of this backup approach is that the image will have the same size as the disk or partition, even when the actual data occupies a small percentage of it. For example, if you want to image a partition of 20 GB that is only 10% full, the image file will still be 20 GB in size. In other words, it’s not only the actual data that gets backed up, but the entire partition itself. You may consider using this method if you need exact backups of your devices.
Creating an image file out of an existing device
# dd if=/dev/sda of=/system_images/sda.img
OR
--------------------- Alternatively, you can compress the image file ---------------------
# dd if=/dev/sda | gzip -c > /system_images/sda.img.gz
Restoring the backup from the image file
# dd if=/system_images/sda.img of=/dev/sda
OR

--------------------- Depending on your choice while creating the image  ---------------------
gzip -dc /system_images/sda.img.gz | dd of=/dev/sda
Method 2: Backup certain files / directories with tar command – already covered in Part 3 of this series. You may consider using this method if you need to keep copies of specific files and directories (configuration files, users’ home directories, and so on).
Method 3: Synchronize files with rsync command. Rsync is a versatile remote (and local) file-copying tool. If you need to backup and synchronize your files to/from network drives, rsync is a go.
Whether you’re synchronizing two local directories or local < — > remote directories mounted on the local filesystem, the basic syntax is the same.
Synchronizing two local directories or local < — > remote directories mounted on the local filesystem
# rsync -av source_directory destination directory
Where, -a recurse into subdirectories (if they exist), preserve symbolic links, timestamps, permissions, and original owner / group and -v verbose.
rsync Synchronizing Files
In addition, if you want to increase the security of the data transfer over the wire, you can use ssh over rsync.
Synchronizing local → remote directories over ssh
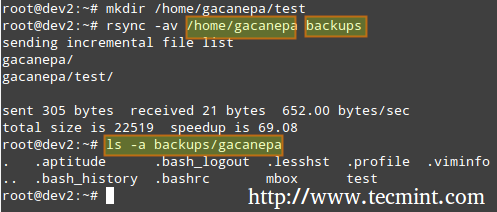
# rsync -avzhe ssh backups root@remote_host:/remote_directory/
This example will synchronize the backups directory on the local host with the contents of /root/remote_directory on the remote host.
Where the -h option shows file sizes in human-readable format, and the -e flag is used to indicate a ssh connection.

rsync Synchronize Remote Files
Synchronizing remote → local directories over ssh.
In this case, switch the source and destination directories from the previous example.
# rsync -avzhe ssh root@remote_host:/remote_directory/ backups
Please note that these are only 3 examples (most frequent cases you’re likely to run into) of the use of rsync. For more examples and usages of rsync commands can be found at the following article.
Read Also: 10 rsync Commands to Sync Files in Linux
Summary
As a sysadmin, you need to ensure that your systems perform as good as possible. If you’re well prepared, and if the integrity of your data is well supported by a storage technology such as RAID and regular system backups, you’ll be safe.
If you have questions, comments, or further ideas on how this article can be improved, feel free to speak out below. In addition, please consider sharing this series through your social network profiles.
LFCS: Managing System Startup Process and Services (SysVinit, Systemd and Upstart) – Part 7
A couple of months ago, the Linux Foundation announced the LFCS (Linux Foundation Certified Sysadmin) certification, an exciting new program whose aim is allowing individuals from all ends of the world to get certified in performing basic to intermediate system administration tasks on Linux systems. This includes supporting already running systems and services, along with first-hand problem-finding and analysis, plus the ability to decide when to raise issues to engineering teams.

Linux Foundation Certified Sysadmin – Part 7
The following video describes an brief introduction to The Linux Foundation Certification Program.
This post is Part 7 of a 10-tutorial series, here in this part, we will explain how to Manage Linux System Startup Process and Services, that are required for the LFCS certification exam.
Managing the Linux Startup Process
The boot process of a Linux system consists of several phases, each represented by a different component. The following diagram briefly summarizes the boot process and shows all the main components involved.

Linux Boot Process
When you press the Power button on your machine, the firmware that is stored in a EEPROM chip in the motherboard initializes the POST (Power-On Self Test) to check on the state of the system’s hardware resources. When the POST is finished, the firmware then searches and loads the 1st stage boot loader, located in the MBR or in the EFI partition of the first available disk, and gives control to it.
MBR Method
The MBR is located in the first sector of the disk marked as bootable in the BIOS settings and is 512 bytes in size.
- First 446 bytes: The bootloader contains both executable code and error message text.
- Next 64 bytes: The Partition table contains a record for each of four partitions (primary or extended). Among other things, each record indicates the status (active / not active), size, and start / end sectors of each partition.
- Last 2 bytes: The magic number serves as a validation check of the MBR.
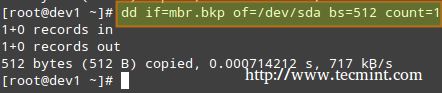
The following command performs a backup of the MBR (in this example, /dev/sda is the first hard disk). The resulting file, mbr.bkp can come in handy should the partition table become corrupt, for example, rendering the system unbootable.
Of course, in order to use it later if the need arises, we will need to save it and store it somewhere else (like a USB drive, for example). That file will help us restore the MBR and will get us going once again if and only if we do not change the hard drive layout in the meanwhile.
Backup MBR
# dd if=/dev/sda of=mbr.bkp bs=512 count=1

Backup MBR in Linux
Restoring MBR
# dd if=mbr.bkp of=/dev/sda bs=512 count=1
Restore MBR in Linux
EFI/UEFI Method
For systems using the EFI/UEFI method, the UEFI firmware reads its settings to determine which UEFI application is to be launched and from where (i.e., in which disk and partition the EFI partition is located).
Next, the 2nd stage boot loader (aka boot manager) is loaded and run. GRUB [GRand Unified Boot] is the most frequently used boot manager in Linux. One of two distinct versions can be found on most systems used today.
- GRUB legacy configuration file: /boot/grub/menu.lst (older distributions, not supported by EFI/UEFI firmwares).
- GRUB2 configuration file: most likely, /etc/default/grub.
Although the objectives of the LFCS exam do not explicitly request knowledge about GRUB internals, if you’re brave and can afford to mess up your system (you may want to try it first on a virtual machine, just in case), you need to run.
# update-grub
As root after modifying GRUB’s configuration in order to apply the changes.
Basically, GRUB loads the default kernel and the initrd or initramfs image. In few words, initrd or initramfs help to perform the hardware detection, the kernel module loading and the device discovery necessary to get the real root filesystem mounted.
Once the real root filesystem is up, the kernel executes the system and service manager (init or systemd, whose process identification or PID is always 1) to begin the normal user-space boot process in order to present a user interface.
Both init and systemd are daemons (background processes) that manage other daemons, as the first service to start (during boot) and the last service to terminate (during shutdown).

Systemd and Init
Starting Services (SysVinit)
The concept of runlevels in Linux specifies different ways to use a system by controlling which services are running. In other words, a runlevel controls what tasks can be accomplished in the current execution state = runlevel (and which ones cannot).
Traditionally, this startup process was performed based on conventions that originated with System V UNIX, with the system passing executing collections of scripts that start and stop services as the machine entered a specific runlevel (which, in other words, is a different mode of running the system).
Within each runlevel, individual services can be set to run, or to be shut down if running. Latest versions of some major distributions are moving away from the System V standard in favour of a rather new service and system manager called systemd (which stands for system daemon), but usually support sysv commands for compatibility purposes. This means that you can run most of the well-known sysv init tools in a systemd-based distribution.
Read Also: Why ‘systemd’ replaces ‘init’ in Linux
Besides starting the system process, init looks to the /etc/inittab file to decide what runlevel must be entered.
| Runlevel | Description |
| 0 | Halt the system. Runlevel 0 is a special transitional state used to shutdown the system quickly. |
| 1 | Also aliased to s, or S, this runlevel is sometimes called maintenance mode. What services, if any, are started at this runlevel varies by distribution. It’s typically used for low-level system maintenance that may be impaired by normal system operation. |
| 2 | Multiuser. On Debian systems and derivatives, this is the default runlevel, and includes -if available- a graphical login. On Red-Hat based systems, this is multiuser mode without networking. |
| 3 | On Red-Hat based systems, this is the default multiuser mode, which runs everything except the graphical environment. This runlevel and levels 4 and 5 usually are not used on Debian-based systems. |
| 4 | Typically unused by default and therefore available for customization. |
| 5 | On Red-Hat based systems, full multiuser mode with GUI login. This runlevel is like level 3, but with a GUI login available. |
| 6 | Reboot the system. |
To switch between runlevels, we can simply issue a runlevel change using the init command: init N (where N is one of the runlevels listed above). Please note that this is not the recommended way of taking a running system to a different runlevel because it gives no warning to existing logged-in users (thus causing them to lose work and processes to terminate abnormally).
Instead, the shutdown command should be used to restart the system (which first sends a warning message to all logged-in users and blocks any further logins; it then signals init to switch runlevels); however, the default runlevel (the one the system will boot to) must be edited in the /etc/inittab file first.
For that reason, follow these steps to properly switch between runlevels, As root, look for the following line in /etc/inittab.
id:2:initdefault:
and change the number 2 for the desired runlevel with your preferred text editor, such as vim (described in How to use vi/vim editor in Linux – Part 2 of this series).
Next, run as root.
# shutdown -r now
That last command will restart the system, causing it to start in the specified runlevel during next boot, and will run the scripts located in the /etc/rc[runlevel].d directory in order to decide which services should be started and which ones should not. For example, for runlevel 2 in the following system.

Change Runlevels in Linux
Manage Services using chkconfig
To enable or disable system services on boot, we will use chkconfig command in CentOS / openSUSE and sysv-rc-conf in Debian and derivatives. This tool can also show us what is the preconfigured state of a service for a particular runlevel.
Read Also: How to Stop and Disable Unwanted Services in Linux
Listing the runlevel configuration for a service.
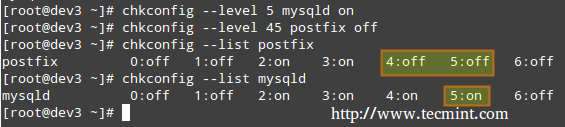
# chkconfig --list [service name]
# chkconfig --list postfix
# chkconfig --list mysqld

Listing Runlevel Configuration
In the above image we can see that postfix is set to start when the system enters runlevels 2 through 5, whereas mysqld will be running by default for runlevels 2 through 4. Now suppose that this is not the expected behaviour.
For example, we need to turn on mysqld for runlevel 5 as well, and turn off postfix for runlevels 4 and 5. Here’s what we would do in each case (run the following commands as root).
Enabling a service for a particular runlevel
# chkconfig --level [level(s)] service on
# chkconfig --level 5 mysqld on
Disabling a service for particular runlevels
# chkconfig --level [level(s)] service off
# chkconfig --level 45 postfix off
Enable Disable Services
We will now perform similar tasks in a Debian-based system using sysv-rc-conf.
Manage Services using sysv-rc-conf
Configuring a service to start automatically on a specific runlevel and prevent it from starting on all others.
1. Let’s use the following command to see what are the runlevels where mdadm is configured to start.
# ls -l /etc/rc[0-6].d | grep -E 'rc[0-6]|mdadm'

Check Runlevel of Service Running
2. We will use sysv-rc-conf to prevent mdadm from starting on all runlevels except 2. Just check or uncheck (with the space bar) as desired (you can move up, down, left, and right with the arrow keys).
# sysv-rc-conf

SysV Runlevel Config
Then press q to quit.
3. We will restart the system and run again the command from STEP 1.
# ls -l /etc/rc[0-6].d | grep -E 'rc[0-6]|mdadm'

Verify Service Runlevel
In the above image we can see that mdadm is configured to start only on runlevel 2.
What About systemd?
systemd is another service and system manager that is being adopted by several major Linux distributions. It aims to allow more processing to be done in parallel during system startup (unlike sysvinit, which always tends to be slower because it starts processes one at a time, checks whether one depends on another, and waits for daemons to launch so more services can start), and to serve as a dynamic resource management to a running system.
Thus, services are started when needed (to avoid consuming system resources) instead of being launched without a solid reason during boot.
Viewing the status of all the processes running on your system, both systemd native and SysV services, run the following command.
# systemctl

Check All Running Processes
The LOAD column shows whether the unit definition (refer to the UNIT column, which shows the service or anything maintained by systemd) was properly loaded, while the ACTIVE and SUB columns show the current status of such unit.
Displaying information about the current status of a service
When the ACTIVE column indicates that an unit’s status is other than active, we can check what happened using.
# systemctl status [unit]
For example, in the image above, media-samba.mount is in failed state. Let’s run.
# systemctl status media-samba.mount

Check Service Status
We can see that media-samba.mount failed because the mount process on host dev1 was unable to find the network share at //192.168.0.10/gacanepa.
Starting or Stopping Services
Once the network share //192.168.0.10/gacanepa becomes available, let’s try to start, then stop, and finally restart the unit media-samba.mount. After performing each action, let’s run systemctl status media-samba.mount to check on its status.
# systemctl start media-samba.mount
# systemctl status media-samba.mount
# systemctl stop media-samba.mount
# systemctl restart media-samba.mount
# systemctl status media-samba.mount

Starting Stoping Services
Enabling or disabling a service to start during boot
Under systemd you can enable or disable a service when it boots.
# systemctl enable [service] 		# enable a service
# systemctl disable [service] 		# prevent a service from starting at boot
The process of enabling or disabling a service to start automatically on boot consists in adding or removing symbolic links in the /etc/systemd/system/multi-user.target.wants directory.

Enabling Disabling Services
Alternatively, you can find out a service’s current status (enabled or disabled) with the command.
# systemctl is-enabled [service]
For example,
# systemctl is-enabled postfix.service
In addition, you can reboot or shutdown the system with.
# systemctl reboot
# systemctl shutdown
Upstart
Upstart is an event-based replacement for the /sbin/init daemon and was born out of the need for starting services only, when they are needed (also supervising them while they are running), and handling events as they occur, thus surpassing the classic, dependency-based sysvinit system.
It was originally developed for the Ubuntu distribution, but is used in Red Hat Enterprise Linux 6.0. Though it was intended to be suitable for deployment in all Linux distributions as a replacement for sysvinit, in time it was overshadowed by systemd. On February 14, 2014, Mark Shuttleworth (founder of Canonical Ltd.) announced that future releases of Ubuntu would use systemd as the default init daemon.
Because the SysV startup script for system has been so common for so long, a large number of software packages include SysV startup scripts. To accommodate such packages, Upstart provides a compatibility mode: It runs SysV startup scripts in the usual locations (/etc/rc.d/rc?.d, /etc/init.d/rc?.d, /etc/rc?.d, or a similar location). Thus, if we install a package that doesn’t yet include an Upstart configuration script, it should still launch in the usual way.
Furthermore, if we have installed utilities such as chkconfig, you should be able to use them to manage your SysV-based services just as we would on sysvinit based systems.
Upstart scripts also support starting or stopping services based on a wider variety of actions than do SysV startup scripts; for example, Upstart can launch a service whenever a particular hardware device is attached.
A system that uses Upstart and its native scripts exclusively replaces the /etc/inittab file and the runlevel-specific SysV startup script directories with .conf scripts in the /etc/init directory.
These *.conf scripts (also known as job definitions) generally consists of the following:
-
- Description of the process.
- Runlevels where the process should run or events that should trigger it.
- Runlevels where process should be stopped or events that should stop it.
- Options.
- Command to launch the process.
For example,
# My test service - Upstart script demo description "Here goes the description of 'My test service'" author "Dave Null <dave.null@example.com>"
# Stanzas

#
# Stanzas define when and how a process is started and stopped
# See a list of stanzas here: http://upstart.ubuntu.com/wiki/Stanzas#respawn
# When to start the service
start on runlevel [2345]
# When to stop the service
stop on runlevel [016]
# Automatically restart process in case of crash
respawn
# Specify working directory
chdir /home/dave/myfiles
# Specify the process/command (add arguments if needed) to run
exec bash backup.sh arg1 arg2
To apply changes, you will need to tell upstart to reload its configuration.
# initctl reload-configuration
Then start your job by typing the following command.
$ sudo start yourjobname
Where yourjobname is the name of the job that was added earlier with the yourjobname.conf script.
A more complete and detailed reference guide for Upstart is available in the project’s web site under the menu “Cookbook”.
Summary
A knowledge of the Linux boot process is necessary to help you with troubleshooting tasks as well as with adapting the computer’s performance and running services to your needs.
In this article we have analyzed what happens from the moment when you press the Power switch to turn on the machine until you get a fully operational user interface. I hope you have learned reading it as much as I did while putting it together. Feel free to leave your comments or questions below. We always look forward to hearing from our readers!
Managing Users & Groups, File Permissions & Attributes and Enabling sudo Access on Accounts – Part 8
Last August, the Linux Foundation started the LFCS certification (Linux Foundation Certified Sysadmin), a brand new program whose purpose is to allow individuals everywhere and anywhere take an exam in order to get certified in basic to intermediate operational support for Linux systems, which includes supporting running systems and services, along with overall monitoring and analysis, plus intelligent decision-making to be able to decide when it’s necessary to escalate issues to higher level support teams.
Linux Foundation Certified Sysadmin – Part 8
Please have a quick look at the following video that describes an introduction to the Linux Foundation Certification Program.
This article is Part 8 of a 10-tutorial long series, here in this section, we will guide you on how to manage users and groups permissions in Linux system, that are required for the LFCS certification exam.
Since Linux is a multi-user operating system (in that it allows multiple users on different computers or terminals to access a single system), you will need to know how to perform effective user management: how to add, edit, suspend, or delete user accounts, along with granting them the necessary permissions to do their assigned tasks.
Adding User Accounts
To add a new user account, you can run either of the following two commands as root.
# adduser [new_account]
# useradd [new_account]
When a new user account is added to the system, the following operations are performed.
1. His/her home directory is created (/home/username by default).
2. The following hidden files are copied into the user’s home directory, and will be used to provide environment variables for his/her user session.
.bash_logout
.bash_profile
.bashrc
3. A mail spool is created for the user at /var/spool/mail/username.
4. A group is created and given the same name as the new user account.
Understanding /etc/passwd
The full account information is stored in the /etc/passwd file. This file contains a record per system user account and has the following format (fields are delimited by a colon).
[username]:[x]:[UID]:[GID]:[Comment]:[Home directory]:[Default shell]
- Fields [username] and [Comment] are self explanatory.
- The x in the second field indicates that the account is protected by a shadowed password (in /etc/shadow), which is needed to logon as [username].
- The [UID] and [GID] fields are integers that represent the User IDentification and the primary Group IDentification to which [username] belongs, respectively.
- The [Home directory] indicates the absolute path to [username]’s home directory, and
- The [Default shell] is the shell that will be made available to this user when he or she logins the system.
Understanding /etc/group
Group information is stored in the /etc/group file. Each record has the following format.
[Group name]:[Group password]:[GID]:[Group members]
- [Group name] is the name of group.
- An x in [Group password] indicates group passwords are not being used.
- [GID]: same as in /etc/passwd.
- [Group members]: a comma separated list of users who are members of [Group name].

Add User Accounts
After adding an account, you can edit the following information (to name a few fields) using the usermodcommand, whose basic syntax of usermod is as follows.
# usermod [options] [username]
Setting the expiry date for an account
Use the –expiredate flag followed by a date in YYYY-MM-DD format.
# usermod --expiredate 2014-10-30 tecmint
Adding the user to supplementary groups
Use the combined -aG, or –append –groups options, followed by a comma separated list of groups.
# usermod --append --groups root,users tecmint
Changing the default location of the user’s home directory
Use the -d, or –home options, followed by the absolute path to the new home directory.
# usermod --home /tmp tecmint
Changing the shell the user will use by default
Use –shell, followed by the path to the new shell.
# usermod --shell /bin/sh tecmint
Displaying the groups an user is a member of
# groups tecmint
# id tecmint
Now let’s execute all the above commands in one go.
# usermod --expiredate 2014-10-30 --append --groups root,users --home /tmp --shell /bin/sh tecmint

usermod Command Examples
In the example above, we will set the expiry date of the tecmint user account to October 30th, 2014. We will also add the account to the root and users group. Finally, we will set sh as its default shell and change the location of the home directory to /tmp:
Read Also:
For existing accounts, we can also do the following.
Disabling account by locking password
Use the -L (uppercase L) or the –lock option to lock a user’s password.
# usermod --lock tecmint
Unlocking user password
Use the –u or the –unlock option to unlock a user’s password that was previously blocked.
# usermod --unlock tecmint
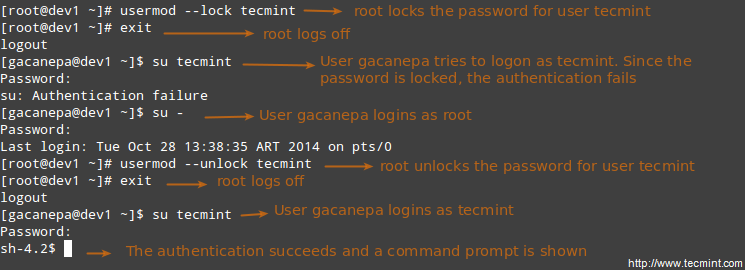
Lock User Accounts
Creating a new group for read and write access to files that need to be accessed by several users
Run the following series of commands to achieve the goal.
# groupadd common_group # Add a new group
# chown :common_group common.txt # Change the group owner of common.txt to common_group
# usermod -aG common_group user1 # Add user1 to common_group
# usermod -aG common_group user2 # Add user2 to common_group
# usermod -aG common_group user3 # Add user3 to common_group
Deleting a group
You can delete a group with the following command.
# groupdel [group_name]
If there are files owned by group_name, they will not be deleted, but the group owner will be set to the GID of the group that was deleted.
Linux File Permissions
Besides the basic read, write, and execute permissions that we discussed in Archiving Tools and Setting File Attributes – Part 3 of this series, there are other less used (but not less important) permission settings, sometimes referred to as “special permissions”.
Like the basic permissions discussed earlier, they are set using an octal file or through a letter (symbolic notation) that indicates the type of permission.
Deleting user accounts
You can delete an account (along with its home directory, if it’s owned by the user, and all the files residing therein, and also the mail spool) using the userdel command with the –remove option.
# userdel --remove [username]
Group Management
Every time a new user account is added to the system, a group with the same name is created with the username as its only member. Other users can be added to the group later. One of the purposes of groups is to implement a simple access control to files and other system resources by setting the right permissions on those resources.
For example, suppose you have the following users.
- user1 (primary group: user1)
- user2 (primary group: user2)
- user3 (primary group: user3)
All of them need read and write access to a file called common.txt located somewhere on your local system, or maybe on a network share that user1 has created. You may be tempted to do something like,
# chmod 660 common.txt
OR
# chmod u=rw,g=rw,o= common.txt [notice the space between the last equal sign and the file name]
However, this will only provide read and write access to the owner of the file and to those users who are members of the group owner of the file (user1 in this case). Again, you may be tempted to add user2 and user3to group user1, but that will also give them access to the rest of the files owned by user user1 and group user1.
This is where groups come in handy, and here’s what you should do in a case like this.
Understanding Setuid
When the setuid permission is applied to an executable file, an user running the program inherits the effective privileges of the program’s owner. Since this approach can reasonably raise security concerns, the number of files with setuid permission must be kept to a minimum. You will likely find programs with this permission set when a system user needs to access a file owned by root.
Summing up, it isn’t just that the user can execute the binary file, but also that he can do so with root’s privileges. For example, let’s check the permissions of /bin/passwd. This binary is used to change the password of an account, and modifies the /etc/shadow file. The superuser can change anyone’s password, but all other users should only be able to change their own.

passwd Command Examples
Thus, any user should have permission to run /bin/passwd, but only root will be able to specify an account. Other users can only change their corresponding passwords.
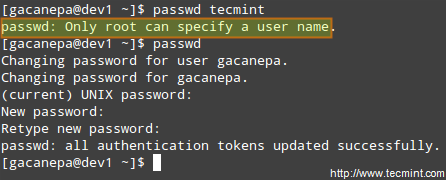
Change User Password
Understanding Setgid
When the setgid bit is set, the effective GID of the real user becomes that of the group owner. Thus, any user can access a file under the privileges granted to the group owner of such file. In addition, when the setgid bit is set on a directory, newly created files inherit the same group as the directory, and newly created subdirectories will also inherit the setgid bit of the parent directory. You will most likely use this approach whenever members of a certain group need access to all the files in a directory, regardless of the file owner’s primary group.
# chmod g+s [filename]
To set the setgid in octal form, prepend the number 2 to the current (or desired) basic permissions.
# chmod 2755 [directory]
Setting the SETGID in a directory

Add Setgid to Directory
Understanding Sticky Bit
When the “sticky bit” is set on files, Linux just ignores it, whereas for directories it has the effect of preventing users from deleting or even renaming the files it contains unless the user owns the directory, the file, or is root.
# chmod o+t [directory]
To set the sticky bit in octal form, prepend the number 1 to the current (or desired) basic permissions.
# chmod 1755 [directory]
Without the sticky bit, anyone able to write to the directory can delete or rename files. For that reason, the sticky bit is commonly found on directories, such as /tmp, that are world-writable.
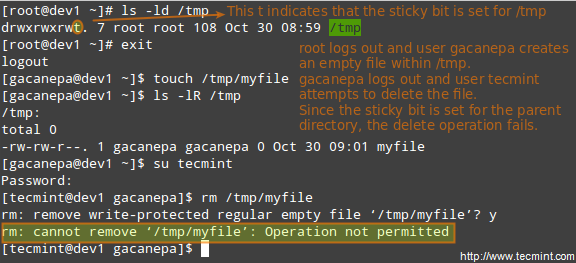
Add Stickybit to Directory
Special Linux File Attributes
There are other attributes that enable further limits on the operations that are allowed on files. For example, prevent the file from being renamed, moved, deleted, or even modified. They are set with the chattr commandand can be viewed using the lsattr tool, as follows.
# chattr +i file1
# chattr +a file2
After executing those two commands, file1 will be immutable (which means it cannot be moved, renamed, modified or deleted) whereas file2 will enter append-only mode (can only be open in append mode for writing).
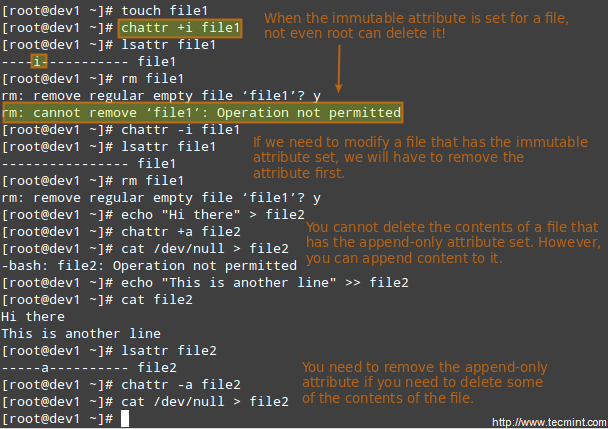
Chattr Command to Protect Files
Accessing the root Account and Using sudo
One of the ways users can gain access to the root account is by typing.
$ su
and then entering root’s password.
If authentication succeeds, you will be logged on as root with the current working directory as the same as you were before. If you want to be placed in root’s home directory instead, run.
$ su -
and then enter root’s password.
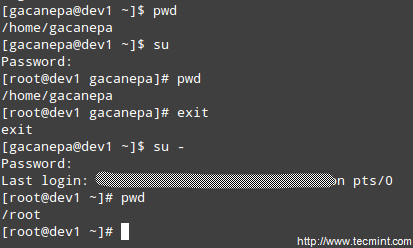
Enable Sudo Access on Users
The above procedure requires that a normal user knows root’s password, which poses a serious security risk. For that reason, the sysadmin can configure the sudo command to allow an ordinary user to execute commands as a different user (usually the superuser) in a very controlled and limited way. Thus, restrictions can be set on a user so as to enable him to run one or more specific privileged commands and no others.
Read Also: Difference Between su and sudo User
To authenticate using sudo, the user uses his/her own password. After entering the command, we will be prompted for our password (not the superuser’s) and if the authentication succeeds (and if the user has been granted privileges to run the command), the specified command is carried out.
To grant access to sudo, the system administrator must edit the /etc/sudoers file. It is recommended that this file is edited using the visudo command instead of opening it directly with a text editor.
# visudo
This opens the /etc/sudoers file using vim (you can follow the instructions given in Install and Use vim as Editor – Part 2 of this series to edit the file).
These are the most relevant lines.
Defaults    secure_path="/usr/sbin:/usr/bin:/sbin"
root        ALL=(ALL) ALL
tecmint     ALL=/bin/yum update
gacanepa    ALL=NOPASSWD:/bin/updatedb
%admin      ALL=(ALL) ALL
Let’s take a closer look at them.
Defaults secure_path="/usr/sbin:/usr/bin:/sbin:/usr/local/bin"
This line lets you specify the directories that will be used for sudo, and is used to prevent using user-specific directories, which can harm the system.
The next lines are used to specify permissions.
root ALL=(ALL) ALL
- The first ALL keyword indicates that this rule applies to all hosts.
- The second ALL indicates that the user in the first column can run commands with the privileges of any user.
- The third ALL means any command can be run.
tecmint ALL=/bin/yum update
If no user is specified after the = sign, sudo assumes the root user. In this case, user tecmint will be able to run yum update as root.
gacanepa ALL=NOPASSWD:/bin/updatedb
The NOPASSWD directive allows user gacanepa to run /bin/updatedb without needing to enter his password.
%admin ALL=(ALL) ALL
The % sign indicates that this line applies to a group called “admin”. The meaning of the rest of the line is identical to that of an regular user. This means that members of the group “admin” can run all commands as any user on all hosts.
To see what privileges are granted to you by sudo, use the “-l” option to list them.

Sudo Access Rules
PAM (Pluggable Authentication Modules)
Pluggable Authentication Modules (PAM) offer the flexibility of setting a specific authentication scheme on a per-application and / or per-service basis using modules. This tool present on all modern Linux distributions overcame the problem often faced by developers in the early days of Linux, when each program that required authentication had to be compiled specially to know how to get the necessary information.
For example, with PAM, it doesn’t matter whether your password is stored in /etc/shadow or on a separate server inside your network.
For example, when the login program needs to authenticate a user, PAM provides dynamically the library that contains the functions for the right authentication scheme. Thus, changing the authentication scheme for the login application (or any other program using PAM) is easy since it only involves editing a configuration file (most likely, a file named after the application, located inside /etc/pam.d, and less likely in /etc/pam.conf).
Files inside /etc/pam.d indicate which applications are using PAM natively. In addition, we can tell whether a certain application uses PAM by checking if it the PAM library (libpam) has been linked to it:
# ldd $(which login) | grep libpam # login uses PAM
# ldd $(which top) | grep libpam # top does not use PAM

Check Linux PAM Library
In the above image we can see that the libpam has been linked with the login application. This makes sense since this application is involved in the operation of system user authentication, whereas top does not.
Let’s examine the PAM configuration file for passwd – yes, the well-known utility to change user’s passwords. It is located at /etc/pam.d/passwd:
# cat /etc/passwd
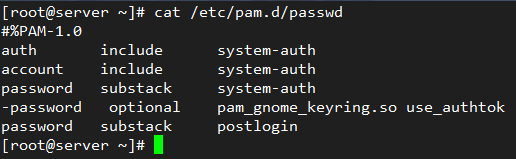
PAM Configuration File for Linux Password
The first column indicates the type of authentication to be used with the module-path (third column). When a hyphen appears before the type, PAM will not record to the system log if the module cannot be loaded because it could not be found in the system.
The following authentication types are available:
account: this module type checks if the user or service has supplied valid credentials to authenticate.auth: this module type verifies that the user is who he / she claims to be and grants any needed privileges.password: this module type allows the user or service to update their password.session: this module type indicates what should be done before and/or after the authentication succeeds.
The second column (called control) indicates what should happen if the authentication with this module fails:
requisite: if the authentication via this module fails, overall authentication will be denied immediately.requiredis similar to requisite, although all other listed modules for this service will be called before denying authentication.sufficient: if the authentication via this module fails, PAM will still grant authentication even if a previous marked as required failed.optional: if the authentication via this module fails or succeeds, nothing happens unless this is the only module of its type defined for this service.includemeans that the lines of the given type should be read from another file.substackis similar to includes but authentication failures or successes do not cause the exit of the complete module, but only of the substack.
The fourth column, if it exists, shows the arguments to be passed to the module.
The first three lines in /etc/pam.d/passwd (shown above), load the system-auth module to check that the user has supplied valid credentials (account). If so, it allows him / her to change the authentication token (password) by giving permission to use passwd (auth).
For example, if you append
remember=2
to the following line
password sufficient pam_unix.so sha512 shadow nullok try_first_pass use_authtok
in /etc/pam.d/system-auth:
password sufficient pam_unix.so sha512 shadow nullok try_first_pass use_authtok remember=2
the last two hashed passwords of each user are saved in /etc/security/opasswd so that they cannot be reused:

Linux Password Fields
Summary
Effective user and file management skills are essential tools for any system administrator. In this article we have covered the basics and hope you can use it as a good starting to point to build upon. Feel free to leave your comments or questions below, and we’ll respond quickly.
Linux Package Management with Yum, RPM, Apt, Dpkg, Aptitude and Zypper – Part 9
Last August, the Linux Foundation announced the LFCS certification (Linux Foundation Certified Sysadmin), a shiny chance for system administrators everywhere to demonstrate, through a performance-based exam, that they are capable of succeeding at overall operational support for Linux systems. A Linux Foundation Certified Sysadmin has the expertise to ensure effective system support, first-level troubleshooting and monitoring, including finally issue escalation, when needed, to engineering support teams.
Linux Foundation Certified Sysadmin – Part 9
Watch the following video that explains about the Linux Foundation Certification Program.
This article is a Part 9 of 10-tutorial long series, today in this article we will guide you about Linux Package Management, that are required for the LFCS certification exam.
Package Management
In few words, package management is a method of installing and maintaining (which includes updating and probably removing as well) software on the system.
In the early days of Linux, programs were only distributed as source code, along with the required man pages, the necessary configuration files, and more. Nowadays, most Linux distributors use by default pre-built programs or sets of programs called packages, which are presented to users ready for installation on that distribution. However, one of the wonders of Linux is still the possibility to obtain source code of a program to be studied, improved, and compiled.
How package management systems work
If a certain package requires a certain resource such as a shared library, or another package, it is said to have a dependency. All modern package management systems provide some method of dependency resolution to ensure that when a package is installed, all of its dependencies are installed as well.
Packaging Systems
Almost all the software that is installed on a modern Linux system will be found on the Internet. It can either be provided by the distribution vendor through central repositories (which can contain several thousands of packages, each of which has been specifically built, tested, and maintained for the distribution) or be available in source code that can be downloaded and installed manually.
Because different distribution families use different packaging systems (Debian: *.deb / CentOS: *.rpm / openSUSE: *.rpm built specially for openSUSE), a package intended for one distribution will not be compatible with another distribution. However, most distributions are likely to fall into one of the three distribution families covered by the LFCS certification.
High and low-level package tools
In order to perform the task of package management effectively, you need to be aware that you will have two types of available utilities: low-level tools (which handle in the backend the actual installation, upgrade, and removal of package files), and high-level tools (which are in charge of ensuring that the tasks of dependency resolution and metadata searching -”data about the data”- are performed).
| DISTRIBUTION | LOW-LEVEL TOOL | HIGH-LEVEL TOOL |
| Debian and derivatives | dpkg | apt-get / aptitude |
| CentOS | rpm | yum |
| openSUSE | rpm | zypper |
Let us see the descrption of the low-level and high-level tools.
dpkg is a low-level package manager for Debian-based systems. It can install, remove, provide information about and build *.deb packages but it can’t automatically download and install their corresponding dependencies.
Read More: 15 dpkg Command Examples
apt-get is a high-level package manager for Debian and derivatives, and provides a simple way to retrieve and install packages, including dependency resolution, from multiple sources using the command line. Unlike dpkg, apt-get does not work directly with *.deb files, but with the package proper name.
Read More: 25 apt-get Command Examples
aptitude is another high-level package manager for Debian-based systems, and can be used to perform management tasks (installing, upgrading, and removing packages, also handling dependency resolution automatically) in a fast and easy way. It provides the same functionality as apt-get and additional ones, such as offering access to several versions of a package.
rpm is the package management system used by Linux Standard Base (LSB)-compliant distributions for low-level handling of packages. Just like dpkg, it can query, install, verify, upgrade, and remove packages, and is more frequently used by Fedora-based distributions, such as RHEL and CentOS.
Read More: 20 rpm Command Examples
yum adds the functionality of automatic updates and package management with dependency management to RPM-based systems. As a high-level tool, like apt-get or aptitude, yum works with repositories.
Read More: 20 yum Command Examples
Common Usage of Low-Level Tools
The most frequent tasks that you will do with low level tools are as follows:
1. Installing a package from a compiled (*.deb or *.rpm) file
The downside of this installation method is that no dependency resolution is provided. You will most likely choose to install a package from a compiled file when such package is not available in the distribution’s repositories and therefore cannot be downloaded and installed through a high-level tool. Since low-level tools do not perform dependency resolution, they will exit with an error if we try to install a package with unmet dependencies.
# dpkg -i file.deb 		[Debian and derivative]
# rpm -i file.rpm 		[CentOS / openSUSE]
Note: Do not attempt to install on CentOS a *.rpm file that was built for openSUSE, or vice-versa!
2. Upgrading a package from a compiled file
Again, you will only upgrade an installed package manually when it is not available in the central repositories.
# dpkg -i file.deb 		[Debian and derivative]
# rpm -U file.rpm 		[CentOS / openSUSE]
3. Listing installed packages
When you first get your hands on an already working system, chances are you’ll want to know what packages are installed.
# dpkg -l 		[Debian and derivative]
# rpm -qa 		[CentOS / openSUSE]
If you want to know whether a specific package is installed, you can pipe the output of the above commands to grep, as explained in manipulate files in Linux – Part 1 of this series. Suppose we need to verify if package mysql-common is installed on an Ubuntu system.
# dpkg -l | grep mysql-common

Check Installed Packages
Another way to determine if a package is installed.
# dpkg --status package_name 		[Debian and derivative]
# rpm -q package_name 			[CentOS / openSUSE]
For example, let’s find out whether package sysdig is installed on our system.
# rpm -qa | grep sysdig
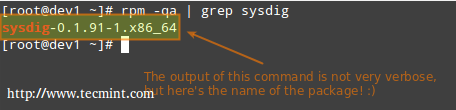
Check sysdig Package
4. Finding out which package installed a file
# dpkg --search file_name
# rpm -qf file_name
For example, which package installed pw_dict.hwm?
# rpm -qf /usr/share/cracklib/pw_dict.hwm

Query File in Linux
Common Usage of High-Level Tools
The most frequent tasks that you will do with high level tools are as follows.
1. Searching for a package
aptitude update will update the list of available packages, and aptitude search will perform the actual search for package_name.
# aptitude update && aptitude search package_name
In the search all option, yum will search for package_name not only in package names, but also in package descriptions.
# yum search package_name
# yum search all package_name
# yum whatprovides “*/package_name”
Let’s supposed we need a file whose name is sysdig. To know that package we will have to install, let’s run.
# yum whatprovides “*/sysdig”

Check Package Description
whatprovides tells yum to search the package the will provide a file that matches the above regular expression.
# zypper refresh && zypper search package_name [On openSUSE]
2. Installing a package from a repository
While installing a package, you may be prompted to confirm the installation after the package manager has resolved all dependencies. Note that running update or refresh (according to the package manager being used) is not strictly necessary, but keeping installed packages up to date is a good sysadmin practice for security and dependency reasons.
# aptitude update && aptitude install package_name 		[Debian and derivatives]
# yum update && yum install package_name 			[CentOS]
# zypper refresh && zypper install package_name 		[openSUSE]
3. Removing a package
The option remove will uninstall the package but leaving configuration files intact, whereas purge will erase every trace of the program from your system.
# aptitude remove / purge package_name
# yum erase package_name
---Notice the minus sign in front of the package that will be uninstalled, openSUSE ---

# zypper remove -package_name
Most (if not all) package managers will prompt you, by default, if you’re sure about proceeding with the uninstallation before actually performing it. So read the onscreen messages carefully to avoid running into unnecessary trouble!
4. Displaying information about a package
The following command will display information about the birthday package.
# aptitude show birthday
# yum info birthday
# zypper info birthday

Check Package Information
Summary
Package management is something you just can’t sweep under the rug as a system administrator. You should be prepared to use the tools described in this article at a moment’s notice. Hope you find it useful in your preparation for the LFCS exam and for your daily tasks. Feel free to leave your comments or questions below. We will be more than glad to get back to you as soon as possible.
Understanding & Learning Basic Shell Scripting and Linux Filesystem Troubleshooting – Part 10
The Linux Foundation launched the LFCS certification (Linux Foundation Certified Sysadmin), a brand new initiative whose purpose is to allow individuals everywhere (and anywhere) to get certified in basic to intermediate operational support for Linux systems, which includes supporting running systems and services, along with overall monitoring and analysis, plus smart decision-making when it comes to raising issues to upper support teams.

Linux Foundation Certified Sysadmin – Part 10
Check out the following video that guides you an introduction to the Linux Foundation Certification Program.
This is the last article (Part 10) of the present 10-tutorial long series. In this article we will focus on basic shell scripting and troubleshooting Linux file systems. Both topics are required for the LFCS certification exam.
Understanding Terminals and Shells
Let’s clarify a few concepts first.
- A shell is a program that takes commands and gives them to the operating system to be executed.
- A terminal is a program that allows us as end users to interact with the shell. One example of a terminal is GNOME terminal, as shown in the below image.

Gnome Terminal
When we first start a shell, it presents a command prompt (also known as the command line), which tells us that the shell is ready to start accepting commands from its standard input device, which is usually the keyboard.
You may want to refer to another article in this series (Use Command to Create, Edit, and Manipulate files – Part 1) to review some useful commands.
Linux provides a range of options for shells, the following being the most common:
bash Shell
Bash stands for Bourne Again SHell and is the GNU Project’s default shell. It incorporates useful features from the Korn shell (ksh) and C shell (csh), offering several improvements at the same time. This is the default shell used by the distributions covered in the LFCS certification, and it is the shell that we will use in this tutorial.
sh Shell
The Bourne SHell is the oldest shell and therefore has been the default shell of many UNIX-like operating systems for many years.
ksh Shell
The Korn SHell is a Unix shell which was developed by David Korn at Bell Labs in the early 1980s. It is backward-compatible with the Bourne shell and includes many features of the C shell.
A shell script is nothing more and nothing less than a text file turned into an executable program that combines commands that are executed by the shell one after another.
Basic Shell Scripting
As mentioned earlier, a shell script is born as a plain text file. Thus, can be created and edited using our preferred text editor. You may want to consider using vi/m (refer to Usage of vi Editor – Part 2 of this series), which features syntax highlighting for your convenience.
Type the following command to create a file named myscript.sh and press Enter.
# vim myscript.sh
The very first line of a shell script must be as follows (also known as a shebang).
#!/bin/bash
It “tells” the operating system the name of the interpreter that should be used to run the text that follows.
Now it’s time to add our commands. We can clarify the purpose of each command, or the entire script, by adding comments as well. Note that the shell ignores those lines beginning with a pound sign # (explanatory comments).
#!/bin/bash
echo This is Part 10 of the 10-article series about the LFCS certification
echo Today is $(date +%Y-%m-%d)
Once the script has been written and saved, we need to make it executable.
# chmod 755 myscript.sh
Before running our script, we need to say a few words about the $PATH environment variable. If we run,
echo $PATH
from the command line, we will see the contents of $PATH: a colon-separated list of directories that are searched when we enter the name of a executable program. It is called an environment variable because it is part of the shell environment – a set of information that becomes available for the shell and its child processes when the shell is first started.
When we type a command and press Enter, the shell searches in all the directories listed in the $PATH variable and executes the first instance that is found. Let’s see an example,

Environment Variables
If there are two executable files with the same name, one in /usr/local/bin and another in /usr/bin, the one in the first directory will be executed first, whereas the other will be disregarded.
If we haven’t saved our script inside one of the directories listed in the $PATH variable, we need to append ./ to the file name in order to execute it. Otherwise, we can run it just as we would do with a regular command.
# pwd
# ./myscript.sh
# cp myscript.sh ../bin
# cd ../bin
# pwd
# myscript.sh

Execute Script
Conditionals
Whenever you need to specify different courses of action to be taken in a shell script, as result of the success or failure of a command, you will use the if construct to define such conditions. Its basic syntax is:
if CONDITION; then
	COMMANDS;
else
	OTHER-COMMANDS
fi
Where CONDITION can be one of the following (only the most frequent conditions are cited here) and evaluates to true when:
- [ -a file ] → file exists.
- [ -d file ] → file exists and is a directory.
- [ -f file ] →file exists and is a regular file.
- [ -u file ] →file exists and its SUID (set user ID) bit is set.
- [ -g file ] →file exists and its SGID bit is set.
- [ -k file ] →file exists and its sticky bit is set.
- [ -r file ] →file exists and is readable.
- [ -s file ]→ file exists and is not empty.
- [ -w file ]→file exists and is writable.
- [ -x file ] is true if file exists and is executable.
- [ string1 = string2 ] → the strings are equal.
- [ string1 != string2 ] →the strings are not equal.
[ int1 op int2 ] should be part of the preceding list, while the items that follow (for example, -eq –> is true if int1is equal to int2.) should be a “children” list of [ int1 op int2 ] where op is one of the following comparison operators.
- -eq –> is true if int1 is equal to int2.
- -ne –> true if int1 is not equal to int2.
- -lt –> true if int1 is less than int2.
- -le –> true if int1 is less than or equal to int2.
- -gt –> true if int1 is greater than int2.
- -ge –> true if int1 is greater than or equal to int2.
For Loops
This loop allows to execute one or more commands for each value in a list of values. Its basic syntax is:
for item in SEQUENCE; do
		COMMANDS;
done
Where item is a generic variable that represents each value in SEQUENCE during each iteration.
While Loops
This loop allows to execute a series of repetitive commands as long as the control command executes with an exit status equal to zero (successfully). Its basic syntax is:
while EVALUATION_COMMAND; do
		EXECUTE_COMMANDS;
done
Where EVALUATION_COMMAND can be any command(s) that can exit with a success (0) or failure (other than 0) status, and EXECUTE_COMMANDS can be any program, script or shell construct, including other nested loops.
Putting It All Together
We will demonstrate the use of the if construct and the for loop with the following example.
Determining if a service is running in a systemd-based distro
Let’s create a file with a list of services that we want to monitor at a glance.
# cat myservices.txt

sshd
mariadb
httpd
crond
firewalld
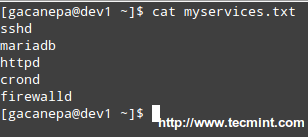
Script to Monitor Linux Services
Our shell script should look like.
#!/bin/bash

# This script iterates over a list of services and
# is used to determine whether they are running or not.

for service in $(cat myservices.txt); do
    	systemctl status $service | grep --quiet "running"
    	if [ $? -eq 0 ]; then
            	echo $service "is [ACTIVE]"
    	else
            	echo $service "is [INACTIVE or NOT INSTALLED]"
    	fi
done
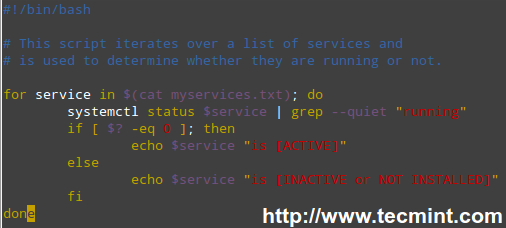
Linux Service Monitoring Script
Let’s explain how the script works.
1). The for loop reads the myservices.txt file one element of LIST at a time. That single element is denoted by the generic variable named service. The LIST is populated with the output of,
# cat myservices.txt
2). The above command is enclosed in parentheses and preceded by a dollar sign to indicate that it should be evaluated to populate the LIST that we will iterate over.
3). For each element of LIST (meaning every instance of the service variable), the following command will be executed.
# systemctl status $service | grep --quiet "running"
This time we need to precede our generic variable (which represents each element in LIST) with a dollar sign to indicate it’s a variable and thus its value in each iteration should be used. The output is then piped to grep.
The –quiet flag is used to prevent grep from displaying to the screen the lines where the word running appears. When that happens, the above command returns an exit status of 0 (represented by $? in the if construct), thus verifying that the service is running.
An exit status different than 0 (meaning the word running was not found in the output of systemctl status $service) indicates that the service is not running.

Services Monitoring Script
We could go one step further and check for the existence of myservices.txt before even attempting to enter the for loop.
#!/bin/bash

# This script iterates over a list of services and
# is used to determine whether they are running or not.

if [ -f myservices.txt ]; then
    	for service in $(cat myservices.txt); do
            	systemctl status $service | grep --quiet "running"
            	if [ $? -eq 0 ]; then
                    	echo $service "is [ACTIVE]"
            	else
                    	echo $service "is [INACTIVE or NOT INSTALLED]"
            	fi
    	done
else
    	echo "myservices.txt is missing"
fi
Pinging a series of network or internet hosts for reply statistics
You may want to maintain a list of hosts in a text file and use a script to determine every now and then whether they’re pingable or not (feel free to replace the contents of myhosts and try for yourself).
The read shell built-in command tells the while loop to read myhosts line by line and assigns the content of each line to variable host, which is then passed to the ping command.
#!/bin/bash

# This script is used to demonstrate the use of a while loop

while read host; do
    	ping -c 2 $host
done < myhosts
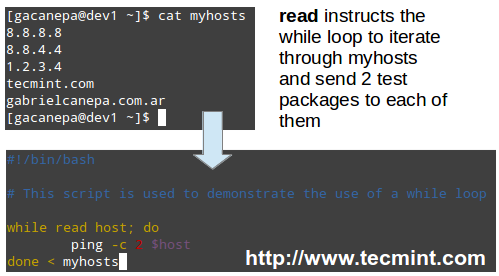
Script to Ping Servers
Read Also:
- Learn Shell Scripting: A Guide from Newbies to System Administrator
- 5 Shell Scripts to Learn Shell Programming
Filesystem Troubleshooting
Although Linux is a very stable operating system, if it crashes for some reason (for example, due to a power outage), one (or more) of your file systems will not be unmounted properly and thus will be automatically checked for errors when Linux is restarted.
In addition, each time the system boots during a normal boot, it always checks the integrity of the filesystems before mounting them. In both cases this is performed using a tool named fsck (“file system check”).
fsck will not only check the integrity of file systems, but also attempt to repair corrupt file systems if instructed to do so. Depending on the severity of damage, fsck may succeed or not; when it does, recovered portions of files are placed in the lost+found directory, located in the root of each file system.
Last but not least, we must note that inconsistencies may also happen if we try to remove an USB drive when the operating system is still writing to it, and may even result in hardware damage.
The basic syntax of fsck is as follows:
# fsck [options] filesystem
Checking a filesystem for errors and attempting to repair automatically
In order to check a filesystem with fsck, we must first unmount it.
# mount | grep sdg1
# umount /mnt
# fsck -y /dev/sdg1

Check Filesystem Errors
Besides the -y flag, we can use the -a option to automatically repair the file systems without asking any questions, and force the check even when the filesystem looks clean.
# fsck -af /dev/sdg1
If we’re only interested in finding out what’s wrong (without trying to fix anything for the time being) we can run fsck with the -n option, which will output the filesystem issues to standard output.
# fsck -n /dev/sdg1
Depending on the error messages in the output of fsck, we will know whether we can try to solve the issue ourselves or escalate it to engineering teams to perform further checks on the hardware.
Summary
We have arrived at the end of this 10-article series where have tried to cover the basic domain competencies required to pass the LFCS exam.
For obvious reasons, it is not possible to cover every single aspect of these topics in any single tutorial, and that’s why we hope that these articles have put you on the right track to try new stuff yourself and continue learning.
If you have any questions or comments, they are always welcome – so don’t hesitate to drop us a line via the form below!
LFCS: How to Manage and Create LVM Using vgcreate, lvcreate and lvextend Commands – Part 11
Because of the changes in the LFCS exam requirements effective Feb. 2, 2016, we are adding the necessary topics to the LFCS series published here. To prepare for this exam, your are highly encouraged to use the LFCE series as well.

LFCS: Manage LVM and Create LVM Partition – Part 11
One of the most important decisions while installing a Linux system is the amount of storage space to be allocated for system files, home directories, and others. If you make a mistake at that point, growing a partition that has run out of space can be burdensome and somewhat risky.
Logical Volumes Management (also known as LVM), which have become a default for the installation of most (if not all) Linux distributions, have numerous advantages over traditional partitioning management. Perhaps the most distinguishing feature of LVM is that it allows logical divisions to be resized (reduced or increased) at will without much hassle.
The structure of the LVM consists of:
- One or more entire hard disks or partitions are configured as physical volumes (PVs).
- A volume group (VG) is created using one or more physical volumes. You can think of a volume group as a single storage unit.
- Multiple logical volumes can then be created in a volume group. Each logical volume is somewhat equivalent to a traditional partition – with the advantage that it can be resized at will as we mentioned earlier.
In this article we will use three disks of 8 GB each (/dev/sdb, /dev/sdc, and /dev/sdd) to create three physical volumes. You can either create the PVs directly on top of the device, or partition it first.
Although we have chosen to go with the first method, if you decide to go with the second (as explained in Part 4 – Create Partitions and File Systems in Linux of this series) make sure to configure each partition as type 8e.
Creating Physical Volumes, Volume Groups, and Logical Volumes
To create physical volumes on top of /dev/sdb, /dev/sdc, and /dev/sdd, do:
# pvcreate /dev/sdb /dev/sdc /dev/sdd
You can list the newly created PVs with:
# pvs
and get detailed information about each PV with:
# pvdisplay /dev/sdX
(where X is b, c, or d)
If you omit /dev/sdX as parameter, you will get information about all the PVs.
To create a volume group named vg00 using /dev/sdb and /dev/sdc (we will save /dev/sdd for later to illustrate the possibility of adding other devices to expand storage capacity when needed):
# vgcreate vg00 /dev/sdb /dev/sdc
As it was the case with physical volumes, you can also view information about this volume group by issuing:
# vgdisplay vg00
Since vg00 is formed with two 8 GB disks, it will appear as a single 16 GB drive:
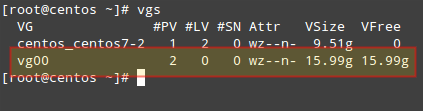
List LVM Volume Groups
When it comes to creating logical volumes, the distribution of space must take into consideration both current and future needs. It is considered good practice to name each logical volume according to its intended use.
For example, let’s create two LVs named vol_projects (10 GB) and vol_backups (remaining space), which we can use later to store project documentation and system backups, respectively.
The -n option is used to indicate a name for the LV, whereas -L sets a fixed size and -l (lowercase L) is used to indicate a percentage of the remaining space in the container VG.
# lvcreate -n vol_projects -L 10G vg00
# lvcreate -n vol_backups -l 100%FREE vg00
As before, you can view the list of LVs and basic information with:
# lvs
and detailed information with
# lvdisplay
To view information about a single LV, use lvdisplay with the VG and LV as parameters, as follows:
# lvdisplay vg00/vol_projects

List Logical Volume
In the image above we can see that the LVs were created as storage devices (refer to the LV Path line). Before each logical volume can be used, we need to create a filesystem on top of it.
We’ll use ext4 as an example here since it allows us both to increase and reduce the size of each LV (as opposed to xfs that only allows to increase the size):
# mkfs.ext4 /dev/vg00/vol_projects
# mkfs.ext4 /dev/vg00/vol_backups
In the next section we will explain how to resize logical volumes and add extra physical storage space when the need arises to do so.
Resizing Logical Volumes and Extending Volume Groups
Now picture the following scenario. You are starting to run out of space in vol_backups, while you have plenty of space available in vol_projects. Due to the nature of LVM, we can easily reduce the size of the latter (say 2.5 GB) and allocate it for the former, while resizing each filesystem at the same time.
Fortunately, this is as easy as doing:
# lvreduce -L -2.5G -r /dev/vg00/vol_projects
# lvextend -l +100%FREE -r /dev/vg00/vol_backups

Resize Reduce Logical Volume and Volume Group
It is important to include the minus (-) or plus (+) signs while resizing a logical volume. Otherwise, you’re setting a fixed size for the LV instead of resizing it.
It can happen that you arrive at a point when resizing logical volumes cannot solve your storage needs anymore and you need to buy an extra storage device. Keeping it simple, you will need another disk. We are going to simulate this situation by adding the remaining PV from our initial setup (/dev/sdd).
To add /dev/sdd to vg00, do
# vgextend vg00 /dev/sdd
If you run vgdisplay vg00 before and after the previous command, you will see the increase in the size of the VG:
# vgdisplay vg00
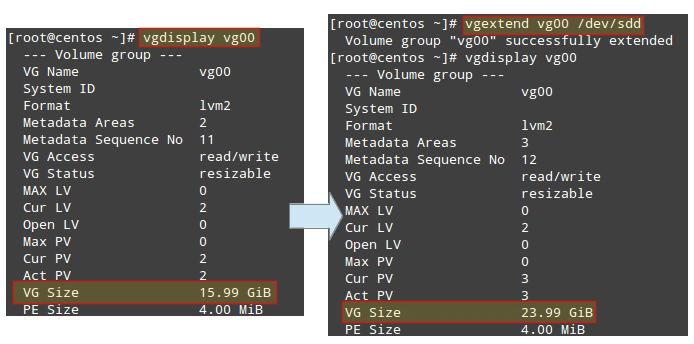
Check Volume Group Disk Size
Now you can use the newly added space to resize the existing LVs according to your needs, or to create additional ones as needed.
Mounting Logical Volumes on Boot and on Demand
Of course there would be no point in creating logical volumes if we are not going to actually use them! To better identify a logical volume we will need to find out what its UUID (a non-changing attribute that uniquely identifies a formatted storage device) is.
To do that, use blkid followed by the path to each device:
# blkid /dev/vg00/vol_projects
# blkid /dev/vg00/vol_backups

Find Logical Volume UUID
Create mount points for each LV:
# mkdir /home/projects
# mkdir /home/backups
and insert the corresponding entries in /etc/fstab (make sure to use the UUIDs obtained before):
UUID=b85df913-580f-461c-844f-546d8cde4646 /home/projects	ext4 defaults 0 0
UUID=e1929239-5087-44b1-9396-53e09db6eb9e /home/backups ext4	defaults 0 0
Then save the changes and mount the LVs:
# mount -a
# mount | grep home

Mount Logical Volumes on Linux
When it comes to actually using the LVs, you will need to assign proper ugo+rwx permissions as explained in Part 8 – Manage Users and Groups in Linux of this series.
Summary
In this article we have introduced Logical Volume Management, a versatile tool to manage storage devices that provides scalability. When combined with RAID (which we explained in Part 6 – Create and Manage RAID in Linux of this series), you can enjoy not only scalability (provided by LVM) but also redundancy (offered by RAID).
In this type of setup, you will typically find LVM on top of RAID, that is, configure RAID first and then configure LVM on top of it.
If you have questions about this article, or suggestions to improve it, feel free to reach us using the comment form below.
LFCS: How to Explore Linux with Installed Help Documentations and Tools – Part 12
Because of the changes in the LFCS exam objectives effective February 2nd, 2016, we are adding the needed topics to the LFCS series published here. To prepare for this exam, your are highly encouraged to use the LFCE series as well.
LFCS: Explore Linux with Installed Documentations and Tools – Part 12
Once you get used to working with the command line and feel comfortable doing so, you realize that a regular Linux installation includes all the documentation you need to use and configure the system.
Another good reason to become familiar with command line help tools is that in the LFCS and LFCE exams, those are the only sources of information you can use – no internet browsing and no googling. It’s just you and the command line.
For that reason, in this article we will give you some tips to effectively use the installed docs and tools in order to prepare to pass the Linux Foundation Certification exams.
Linux Man Pages
A man page, short for manual page, is nothing less and nothing more than what the word suggests: a manual for a given tool. It contains the list of options (with explanation) that the command supports, and some man pages even include usage examples as well.
To open a man page, use the man command followed by the name of the tool you want to learn more about. For example:
# man diff
will open the manual page for diff, a tool used to compare text files line by line (to exit, simply hit the q key.).
Let’s say we want to compare two text files named file1 and file2 in Linux. These files contain the list of packages that are installed in two Linux boxes with the same distribution and version.
Doing a diff between file1 and file2 will tell us if there is a difference between those lists:
# diff file1 file2
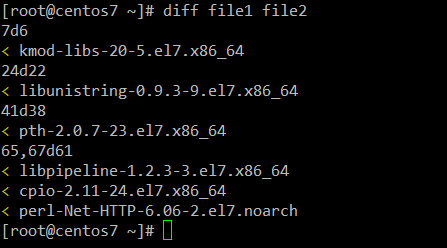
Compare Two Text Files in Linux
where the < sign indicates lines missing in file2. If there were lines missing in file1, they would be indicated by the > sign instead.
On the other hand, 7d6 means line #7 in file should be deleted in order to match file2 (same with 24d22 and 41d38), and 65,67d61 tells us we need to remove lines 65 through 67 in file one. If we make these corrections, both files will then be identical.
Alternatively, you can display both files side by side using the -y option, according to the man page. You may find this helpful to more easily identify missing lines in files:
# diff -y file1 file2
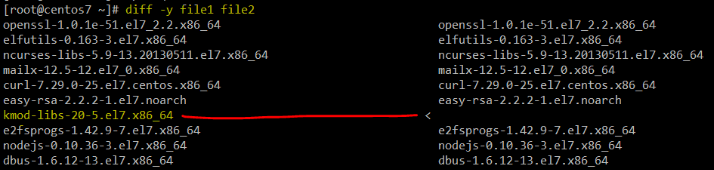
Compare and List Difference of Two Files
Also, you can use diff to compare two binary files. If they are identical, diff will exit silently without output. Otherwise, it will return the following message: “Binary files X and Y differ”.
The –help Option
The --help option, available in many (if not all) commands, can be considered a short manual page for that specific command. Although it does not provide a comprehensive description of the tool, it is an easy way to obtain information on the usage of a program and a list of its available options at a quick glance.
For example,
# sed --help
shows the usage of each option available in sed (the stream editor).
One of the classic examples of using sed consists of replacing characters in files. Using the -i option (described as “edit files in place”), you can edit a file without opening it. If you want to make a backup of the original contents as well, use the -i option followed by a SUFFIX to create a separate file with the original contents.
For example, to replace each occurrence of the word Lorem with Tecmint (case insensitive) in lorem.txtand create a new file with the original contents of the file, do:
# less lorem.txt | grep -i lorem
# sed -i.orig 's/Lorem/Tecmint/gI' lorem.txt
# less lorem.txt | grep -i lorem
# less lorem.txt.orig | grep -i lorem
Please note that every occurrence of Lorem has been replaced with Tecmint in lorem.txt, and the original contents of lorem.txt has been saved to lorem.txt.orig.

Replace A String in Files
Installed Documentation in /usr/share/doc
This is probably my favorite pick. If you go to /usr/share/doc and do a directory listing, you will see lots of directories with the names of the installed tools in your Linux system.
According to the Filesystem Hierarchy Standard, these directories contain useful information that might not be in the man pages, along with templates and configuration files to make configuration easier.
For example, let’s consider squid-3.3.8 (version may vary from distribution to distribution) for the popular HTTP proxy and squid cache server.
Let’s cd into that directory:
# cd /usr/share/doc/squid-3.3.8
and do a directory listing:
# ls

Linux Directory Listing with ls Command
You may want to pay special attention to QUICKSTART and squid.conf.documented. These files contain an extensive documentation about Squid and a heavily commented configuration file, respectively. For other packages, the exact names may differ (as QuickRef or 00QUICKSTART, for example), but the principle is the same.
Other packages, such as the Apache web server, provide configuration file templates inside /usr/share/doc, that will be helpful when you have to configure a standalone server or a virtual host, to name a few cases.
GNU info Documentation
You can think of info documents as man pages on steroids. As such, they not only provide help for a specific tool, but also they do so with hyperlinks (yes, hyperlinks in the command line!) that allow you to navigate from a section to another using the arrow keys and Enter to confirm.
Perhaps the most illustrative example is:
# info coreutils
Since coreutils contains the basic file, shell and text manipulation utilities which are expected to exist on every operating system, you can reasonably expect a detailed description for each one of those categories in info coreutils.
Info Coreutils
As it is the case with man pages, you can exit an info document by pressing the q key.
Additionally, GNU info can be used to display regular man pages as well when followed by the tool name. For example:
# info tune2fs
will return the man page of tune2fs, the ext2/3/4 filesystems management tool.
And now that we’re at it, let’s review some of the uses of tune2fs:
Display information about the filesystem on top of /dev/mapper/vg00-vol_backups:
# tune2fs -l /dev/mapper/vg00-vol_backups
Set a filesystem volume name (Backups in this case):
# tune2fs -L Backups /dev/mapper/vg00-vol_backups
Change the check intervals and / or mount counts (use the -c option to set a number of mount counts and /or the -i option to set a check interval, where d=days, w=weeks, and m=months).
# tune2fs -c 150 /dev/mapper/vg00-vol_backups # Check every 150 mounts
# tune2fs -i 6w /dev/mapper/vg00-vol_backups # Check every 6 weeks
All of the above options can be listed with the --help option, or viewed in the man page.
Summary
Regardless of the method that you choose to invoke help for a given tool, knowing that they exist and how to use them will certainly come in handy in the exam. Do you know of any other tools that can be used to look up documentation? Questions and other comments are more than welcome as well.
LFCS: How to Configure and Troubleshoot Grand Unified Bootloader (GRUB) – Part 13
Because of the recent changes in the LFCS certification exam objectives effective from February 2nd, 2016, we are adding the needed topics to the LFCS series published here. To prepare for this exam, you are highly encouraged to follow the LFCE series as well.

LFCS: Configure and Troubleshoot Grub Boot Loader – Part 13
In this article we will introduce you to GRUB and explain why a boot loader is necessary, and how it adds versatility to the system.
The Linux boot process from the time you press the power button of your computer until you get a fully-functional system follows this high-level sequence:
- 1. A process known as POST (Power-On Self Test) performs an overall check on the hardware components of your computer.
- 2. When POST completes, it passes the control over to the boot loader, which in turn loads the Linux kernel in memory (along with initramfs) and executes it. The most used boot loader in Linux is the GRand Unified Boot loader, or GRUB for short.
- 3. The kernel checks and accesses the hardware, and then runs the initial process (mostly known by its generic name “init”) which in turn completes the system boot by starting services.
In Part 7 of this series (“SysVinit, Upstart, and Systemd”) we introduced the service management systems and tools used by modern Linux distributions. You may want to review that article before proceeding further.
Introducing GRUB Boot Loader
Two major GRUB versions (v1 sometimes called GRUB Legacy and v2) can be found in modern systems, although most distributions use v2 by default in their latest versions. Only Red Hat Enterprise Linux 6 and its derivatives still use v1 today.
Thus, we will focus primarily on the features of v2 in this guide.
Regardless of the GRUB version, a boot loader allows the user to:
- 1). modify the way the system behaves by specifying different kernels to use,
- 2). choose between alternate operating systems to boot, and
- 3). add or edit configuration stanzas to change boot options, among other things.
Today, GRUB is maintained by the GNU project and is well documented in their website. You are encouraged to use the GNU official documentation while going through this guide.
When the system boots you are presented with the following GRUB screen in the main console. Initially, you are prompted to choose between alternate kernels (by default, the system will boot using the latest kernel) and are allowed to enter a GRUB command line (with c) or edit the boot options (by pressing the e key).

GRUB Boot Screen
One of the reasons why you would consider booting with an older kernel is a hardware device that used to work properly and has started “acting up” after an upgrade (refer to this link in the AskUbuntu forums for an example).
The GRUB v2 configuration is read on boot from /boot/grub/grub.cfg or /boot/grub2/grub.cfg, whereas /boot/grub/grub.conf or /boot/grub/menu.lst are used in v1. These files are NOT to be edited by hand, but are modified based on the contents of /etc/default/grub and the files found inside /etc/grub.d.
In a CentOS 7, here’s the configuration file that is created when the system is first installed:
GRUB_TIMEOUT=5
GRUB_DISTRIBUTOR="$(sed 's, release .*$,,g' /etc/system-release)"
GRUB_DEFAULT=saved
GRUB_DISABLE_SUBMENU=true
GRUB_TERMINAL_OUTPUT="console"
GRUB_CMDLINE_LINUX="vconsole.keymap=la-latin1 rd.lvm.lv=centos_centos7-2/swap crashkernel=auto  vconsole.font=latarcyrheb-sun16 rd.lvm.lv=centos_centos7-2/root rhgb quiet"
GRUB_DISABLE_RECOVERY="true"
In addition to the online documentation, you can also find the GNU GRUB manual using info as follows:
# info grub
If you’re interested specifically in the options available for /etc/default/grub, you can invoke the configuration section directly:
# info -f grub -n 'Simple configuration'
Using the command above you will find out that GRUB_TIMEOUT sets the time between the moment when the initial screen appears and the system automatic booting begins unless interrupted by the user. When this variable is set to -1, boot will not be started until the user makes a selection.
When multiple operating systems or kernels are installed in the same machine, GRUB_DEFAULT requires an integer value that indicates which OS or kernel entry in the GRUB initial screen should be selected to boot by default. The list of entries can be viewed not only in the splash screen shown above, but also using the following command:
In CentOS and openSUSE:
# awk -F\' '$1=="menuentry " {print $2}' /boot/grub2/grub.cfg
In Ubuntu:
# awk -F\' '$1=="menuentry " {print $2}' /boot/grub/grub.cfg
In the example shown in the below image, if we wish to boot with the kernel version 3.10.0-123.el7.x86_64 (4th entry), we need to set GRUB_DEFAULT to 3 (entries are internally numbered beginning with zero) as follows:
GRUB_DEFAULT=3

Boot System with Old Kernel Version
One final GRUB configuration variable that is of special interest is GRUB_CMDLINE_LINUX, which is used to pass options to the kernel. The options that can be passed through GRUB to the kernel are well documented in the Kernel Parameters file and in man 7 bootparam.
Current options in my CentOS 7 server are:
GRUB_CMDLINE_LINUX="vconsole.keymap=la-latin1 rd.lvm.lv=centos_centos7-2/swap crashkernel=auto vconsole.font=latarcyrheb-sun16 rd.lvm.lv=centos_centos7-2/root rhgb quiet"
Why would you want to modify the default kernel parameters or pass extra options? In simple terms, there may be times when you need to tell the kernel certain hardware parameters that it may not be able to determine on its own, or to override the values that it would detect.
This happened to me not too long ago when I tried Vector Linux, a derivative of Slackware, on my 10-year old laptop. After installation it did not detect the right settings for my video card so I had to modify the kernel options passed through GRUB in order to make it work.
Another example is when you need to bring the system to single-user mode to perform maintenance tasks. You can do this by appending the word single to GRUB_CMDLINE_LINUX and rebooting:
GRUB_CMDLINE_LINUX="vconsole.keymap=la-latin1 rd.lvm.lv=centos_centos7-2/swap crashkernel=auto vconsole.font=latarcyrheb-sun16 rd.lvm.lv=centos_centos7-2/root rhgb quiet single"
After editing /etc/defalt/grub, you will need to run update-grub (Ubuntu) or grub2-mkconfig -o /boot/grub2/grub.cfg (CentOS and openSUSE) afterwards to update grub.cfg(otherwise, changes will be lost upon boot).
This command will process the boot configuration files mentioned earlier to update grub.cfg. This method ensures changes are permanent, while options passed through GRUB at boot time will only last during the current session.
Fixing Linux GRUB Issues
If you install a second operating system or if your GRUB configuration file gets corrupted due to human error, there are ways you can get your system back on its feet and be able to boot again.
In the initial screen, press c to get a GRUB command line (remember that you can also press e to edit the default boot options), and use help to bring the available commands in the GRUB prompt:

Fix Grub Configuration Issues in Linux
We will focus on ls, which will list the installed devices and filesystems, and we will examine what it finds. In the image below we can see that there are 4 hard drives (hd0 through hd3).
Only hd0 seems to have been partitioned (as evidenced by msdos1 and msdos2, where 1 and 2 are the partition numbers and msdos is the partitioning scheme).
Let’s now examine the first partition on hd0 (msdos1) to see if we can find GRUB there. This approach will allow us to boot Linux and there use other high level tools to repair the configuration file or reinstall GRUB altogether if it is needed:
# ls (hd0,msdos1)/
As we can see in the highlighted area, we found the grub2 directory in this partition:

Find Grub Configuration
Once we are sure that GRUB resides in (hd0,msdos1), let’s tell GRUB where to find its configuration file and then instruct it to attempt to launch its menu:
set prefix=(hd0,msdos1)/grub2
set root=(hd0,msdos1)
insmod normal
normal

Find and Launch Grub Menu
Then in the GRUB menu, choose an entry and press Enter to boot using it. Once the system has booted you can issue the grub2-install /dev/sdX command (change sdX with the device you want to install GRUB on). The boot information will then be updated and all related files be restored.
# grub2-install /dev/sdX
Other more complex scenarios are documented, along with their suggested fixes, in the Ubuntu GRUB2 Troubleshooting guide. The concepts explained there are valid for other distributions as well.
Summary
In this article we have introduced you to GRUB, indicated where you can find documentation both online and offline, and explained how to approach an scenario where a system has stopped booting properly due to a bootloader-related issue.
Fortunately, GRUB is one of the tools that is best documented and you can easily find help either in the installed docs or online using the resources we have shared in this article.
Do you have questions or comments? Don’t hesitate to let us know using the comment form below. We look forward to hearing from you!
LFCS: Monitor Linux Processes Resource Usage and Set Process Limits on a Per-User Basis – Part 14
Due to recent modifications in the LFCS certification exam objectives effective from February 2nd, 2016, we are adding the needed articles to the LFCS series published here. To prepare for this exam, you are strongly encouraged to go through the LFCE series as well.
Monitor Linux Processes and Set Process Limits Per User – Part 14
Every Linux system administrator needs to know how to verify the integrity and availability of hardware, resources, and key processes. In addition, setting resource limits on a per-user basis must also be a part of his / her skill set.
In this article we will explore a few ways to ensure that the system both hardware and the software is behaving correctly to avoid potential issues that may cause unexpected production downtime and money loss.
Linux Reporting Processors Statistics
With mpstat you can view the activities for each processor individually or the system as a whole, both as a one-time snapshot or dynamically.
In order to use this tool, you will need to install sysstat:
# yum update && yum install sysstat              [On CentOS based systems]
# aptitutde update && aptitude install sysstat   [On Ubuntu based systems]
# zypper update && zypper install sysstat        [On openSUSE systems]
Read more about sysstat and it’s utilities at Learn Sysstat and Its Utilities mpstat, pidstat, iostat and sar in Linux
Once you have installed mpstat, use it to generate reports of processors statistics.
To display 3 global reports of CPU utilization (-u) for all CPUs (as indicated by -P ALL) at a 2-second interval, do:
# mpstat -P ALL -u 2 3
Sample Output
Linux 3.19.0-32-generic (tecmint.com) 	Wednesday 30 March 2016 	_x86_64_	(4 CPU)

11:41:07  IST  CPU    %usr   %nice    %sys %iowait    %irq   %soft  %steal  %guest  %gnice   %idle
11:41:09  IST  all    5.85    0.00    1.12    0.12    0.00    0.00    0.00    0.00    0.00   92.91
11:41:09  IST    0    4.48    0.00    1.00    0.00    0.00    0.00    0.00    0.00    0.00   94.53
11:41:09  IST    1    2.50    0.00    0.50    0.00    0.00    0.00    0.00    0.00    0.00   97.00
11:41:09  IST    2    6.44    0.00    0.99    0.00    0.00    0.00    0.00    0.00    0.00   92.57
11:41:09  IST    3   10.45    0.00    1.99    0.00    0.00    0.00    0.00    0.00    0.00   87.56

11:41:09  IST  CPU    %usr   %nice    %sys %iowait    %irq   %soft  %steal  %guest  %gnice   %idle
11:41:11  IST  all   11.60    0.12    1.12    0.50    0.00    0.00    0.00    0.00    0.00   86.66
11:41:11  IST    0   10.50    0.00    1.00    0.00    0.00    0.00    0.00    0.00    0.00   88.50
11:41:11  IST    1   14.36    0.00    1.49    2.48    0.00    0.00    0.00    0.00    0.00   81.68
11:41:11  IST    2    2.00    0.50    1.00    0.00    0.00    0.00    0.00    0.00    0.00   96.50
11:41:11  IST    3   19.40    0.00    1.00    0.00    0.00    0.00    0.00    0.00    0.00   79.60

11:41:11  IST  CPU    %usr   %nice    %sys %iowait    %irq   %soft  %steal  %guest  %gnice   %idle
11:41:13  IST  all    5.69    0.00    1.24    0.00    0.00    0.00    0.00    0.00    0.00   93.07
11:41:13  IST    0    2.97    0.00    1.49    0.00    0.00    0.00    0.00    0.00    0.00   95.54
11:41:13  IST    1   10.78    0.00    1.47    0.00    0.00    0.00    0.00    0.00    0.00   87.75
11:41:13  IST    2    2.00    0.00    1.00    0.00    0.00    0.00    0.00    0.00    0.00   97.00
11:41:13  IST    3    6.93    0.00    0.50    0.00    0.00    0.00    0.00    0.00    0.00   92.57

Average:     CPU    %usr   %nice    %sys %iowait    %irq   %soft  %steal  %guest  %gnice   %idle
Average:     all    7.71    0.04    1.16    0.21    0.00    0.00    0.00    0.00    0.00   90.89
Average:       0    5.97    0.00    1.16    0.00    0.00    0.00    0.00    0.00    0.00   92.87
Average:       1    9.24    0.00    1.16    0.83    0.00    0.00    0.00    0.00    0.00   88.78
Average:       2    3.49    0.17    1.00    0.00    0.00    0.00    0.00    0.00    0.00   95.35
Average:       3   12.25    0.00    1.16    0.00    0.00    0.00    0.00    0.00    0.00   86.59
To view the same statistics for a specific CPU (CPU 0 in the following example), use:
# mpstat -P 0 -u 2 3
Sample Output
Linux 3.19.0-32-generic (tecmint.com) 	Wednesday 30 March 2016 	_x86_64_	(4 CPU)

11:42:08  IST  CPU    %usr   %nice    %sys %iowait    %irq   %soft  %steal  %guest  %gnice   %idle
11:42:10  IST    0    3.00    0.00    0.50    0.00    0.00    0.00    0.00    0.00    0.00   96.50
11:42:12  IST    0    4.08    0.00    0.00    2.55    0.00    0.00    0.00    0.00    0.00   93.37
11:42:14  IST    0    9.74    0.00    0.51    0.00    0.00    0.00    0.00    0.00    0.00   89.74
Average:       0    5.58    0.00    0.34    0.85    0.00    0.00    0.00    0.00    0.00   93.23
The output of the above commands shows these columns:
CPU: Processor number as an integer, or the word all as an average for all processors.%usr: Percentage of CPU utilization while running user level applications.%nice: Same as%usr, but with nice priority.%sys: Percentage of CPU utilization that occurred while executing kernel applications. This does not include time spent dealing with interrupts or handling hardware.%iowait: Percentage of time when the given CPU (or all) was idle, during which there was a resource-intensive I/O operation scheduled on that CPU. A more detailed explanation (with examples) can be found here.%irq: Percentage of time spent servicing hardware interrupts.%soft: Same as%irq, but with software interrupts.%steal: Percentage of time spent in involuntary wait (steal or stolen time) when a virtual machine, as guest, is “winning” the hypervisor’s attention while competing for the CPU(s). This value should be kept as small as possible. A high value in this field means the virtual machine is stalling – or soon will be.%guest: Percentage of time spent running a virtual processor.%idle: percentage of time when CPU(s) were not executing any tasks. If you observe a low value in this column, that is an indication of the system being placed under a heavy load. In that case, you will need to take a closer look at the process list, as we will discuss in a minute, to determine what is causing it.
To put the place the processor under a somewhat high load, run the following commands and then execute mpstat (as indicated) in a separate terminal:
# dd if=/dev/zero of=test.iso bs=1G count=1
# mpstat -u -P 0 2 3
# ping -f localhost # Interrupt with Ctrl + C after mpstat below completes
# mpstat -u -P 0 2 3
Finally, compare to the output of mpstat under “normal” circumstances:

Report Linux Processors Related Statistics
As you can see in the image above, CPU 0 was under a heavy load during the first two examples, as indicated by the %idle column.
In the next section we will discuss how to identify these resource-hungry processes, how to obtain more information about them, and how to take appropriate action.
Reporting Linux Processes
To list processes sorting them by CPU usage, we will use the well known ps command with the -eo (to select all processes with user-defined format) and --sort (to specify a custom sorting order) options, like so:
# ps -eo pid,ppid,cmd,%cpu,%mem --sort=-%cpu
The above command will only show the PID, PPID, the command associated with the process, and the percentage of CPU and RAM usage sorted by the percentage of CPU usage in descending order. When executed during the creation of the .iso file, here’s the first few lines of the output:

Find Linux Processes By CPU Usage
Once we have identified a process of interest (such as the one with PID=2822), we can navigate to /proc/PID (/proc/2822 in this case) and do a directory listing.
This directory is where several files and subdirectories with detailed information about this particular process are kept while it is running.
For example:
/proc/2822/iocontains IO statistics for the process (number of characters and bytes read and written, among others, during IO operations)./proc/2822/attr/currentshows the current SELinux security attributes of the process./proc/2822/cgroupdescribes the control groups (cgroups for short) to which the process belongs if the CONFIG_CGROUPS kernel configuration option is enabled, which you can verify with:
# cat /boot/config-$(uname -r) | grep -i cgroups
If the option is enabled, you should see:
CONFIG_CGROUPS=y
Using cgroups you can manage the amount of allowed resource usage on a per-process basis as explained in Chapters 1 through 4 of the Red Hat Enterprise Linux 7 Resource Management guide, in Chapter 9 of the openSUSE System Analysis and Tuning guide, and in the Control Groups section of the Ubuntu 14.04 Server documentation.
The /proc/2822/fd is a directory that contains one symbolic link for each file descriptor the process has opened. The following image shows this information for the process that was started in tty1 (the first terminal) to create the .iso image:

Find Linux Process Information
The above image shows that stdin (file descriptor 0), stdout (file descriptor 1), and stderr (file descriptor 2) are mapped to /dev/zero, /root/test.iso, and /dev/tty1, respectively.
More information about /proc can be found in “The /proc filesystem” document kept and maintained by Kernel.org, and in the Linux Programmer’s Manual.
Setting Resource Limits on a Per-User Basis in Linux
If you are not careful and allow any user to run an unlimited number of processes, you may eventually experience an unexpected system shutdown or get locked out as the system enters an unusable state. To prevent this from happening, you should place a limit on the number of processes users can start.
To do this, edit /etc/security/limits.conf and add the following line at the bottom of the file to set the limit:
* hard nproc 10
The first field can be used to indicate either a user, a group, or all of them (*), whereas the second field enforces a hard limit on the number of process (nproc) to 10. To apply changes, logging out and back in is enough.
Thus, let’s see what happens if a certain user other than root (either a legitimate one or not) attempts to start a shell fork bomb. If we had not implemented limits, this would initially launch two instances of a function, and then duplicate each of them in a neverending loop. Thus, it would eventually bringing your system to a crawl.
However, with the above restriction in place, the fork bomb does not succeed but the user will still get locked out until the system administrator kills the process associated with it:
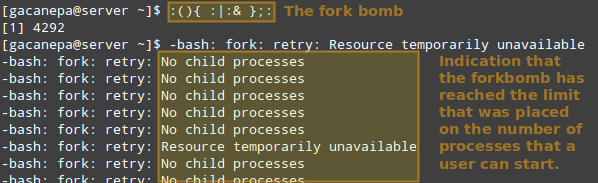
Run Shell Fork Bomb
TIP: Other possible restrictions made possible by ulimit are documented in the limits.conf file.
Linux Other Process Management Tools
In addition to the tools discussed previously, a system administrator may also need to:
a) Modify the execution priority (use of system resources) of a process using renice. This means that the kernel will allocate more or less system resources to the process based on the assigned priority (a number commonly known as “niceness” in a range from -20 to 19).
The lower the value, the greater the execution priority. Regular users (other than root) can only modify the niceness of processes they own to a higher value (meaning a lower execution priority), whereas root can modify this value for any process, and may increase or decrease it.
The basic syntax of renice is as follows:
# renice [-n] <new priority> <UID, GID, PGID, or empty> identifier
If the argument after the new priority value is not present (empty), it is set to PID by default. In that case, the niceness of process with PID=identifier is set to <new priority>.
b) Interrupt the normal execution of a process when needed. This is commonly known as “killing” the process. Under the hood, this means sending the process a signal to finish its execution properly and release any used resources in an orderly manner.
To kill a process, use the kill command as follows:
# kill PID
Alternatively, you can use pkill to terminate all processes of a given owner (-u), or a group owner (-G), or even those processes which have a PPID in common (-P). These options may be followed by the numeric representation or the actual name as identifier:
# pkill [options] identifier
For example,
# pkill -G 1000
will kill all processes owned by group with GID=1000.
And,
# pkill -P 4993
will kill all processes whose PPID is 4993.
Before running a pkill, it is a good idea to test the results with pgrep first, perhaps using the -l option as well to list the processes’ names. It takes the same options but only returns the PIDs of processes (without taking any further action) that would be killed if pkill is used.
# pgrep -l -u gacanepa
This is illustrated in the next image:

Find User Running Processes in Linux
Summary
In this article we have explored a few ways to monitor resource usage in order to verify the integrity and availability of critical hardware and software components in a Linux system.
We have also learned how to take appropriate action (either by adjusting the execution priority of a given process or by terminating it) under unusual circumstances.
We hope the concepts explained in this tutorial have been helpful. If you have any questions or comments, feel free to reach us using the contact form below.
How to Change Kernel Runtime Parameters in a Persistent and Non-Persistent Way
In Part 13 of this LFCS (Linux Foundation Certified Sysadmin) series we explained how to use GRUB to modify the behavior of the system by passing options to the kernel for the ongoing boot process.
Similarly, you can use the command line in a running Linux system to alter certain runtime kernel parameters as a one-time modification, or permanently by editing a configuration file.
Thus, you are allowed to enable or disable kernel parameters on-the-fly without much difficulty when it is needed due to a required change in the way the system is expected to operate.
Introducing the /proc Filesystem
The latest specification of the Filesystem Hierarchy Standard indicates that /proc represents the default method for handling process and system information as well as other kernel and memory information. Particularly, /proc/sys is where you can find all the information about devices, drivers, and some kernel features.
The actual internal structure of /proc/sys depends heavily on the kernel being used, but you are likely to find the following directories inside. In turn, each of them will contain other subdirectories where the values for each parameter category are maintained:
dev: parameters for specific devices connected to the machine.fs: filesystem configuration (quotas and inodes, for example).- kernel: kernel-specific configuration.
net: network configuration.vm: use of the kernel’s virtual memory.
To modify the kernel runtime parameters we will use the sysctl command. The exact number of parameters that can be modified can be viewed with:
# sysctl -a | wc -l
If you want to view the complete list of Kernel parameters, just do:
# sysctl -a
As the the output of the above command will consist of A LOT of lines, we can use a pipeline followed by less to inspect it more carefully:
# sysctl -a | less
Let’s take a look at the first few lines. Please note that the first characters in each line match the names of the directories inside /proc/sys:
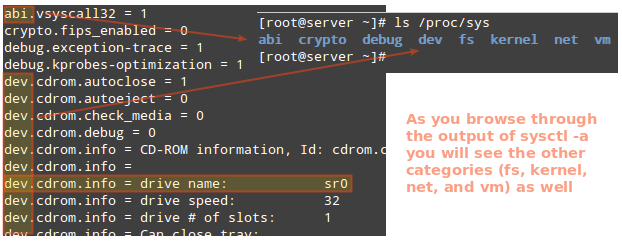
Understand Linux /proc Filesystem
For example, the highlighted line:
dev.cdrom.info = drive name: sr0
indicates that sr0 is an alias for the optical drive. In other words, that is how the kernel “sees” that drive and uses that name to refer to it.
In the following section we will explain how to change other “more important” kernel runtime parameters in Linux.
How to Change or Modify Linux Kernel Runtime Parameteres
Based on what we have explained so far, it is easy to see that the name of a parameter matches the directory structure inside /proc/sys where it can be found.
For example:
dev.cdrom.autoclose → /proc/sys/dev/cdrom/autoclose
net.ipv4.ip_forward → /proc/sys/net/ipv4/ip_forward
Check Linux Kernel Parameters
That said, we can view the value of a particular Linux kernel parameter using either sysctl followed by the name of the parameter or reading the associated file:
# sysctl dev.cdrom.autoclose
# cat /proc/sys/dev/cdrom/autoclose
# sysctl net.ipv4.ip_forward
# cat /proc/sys/net/ipv4/ip_forward
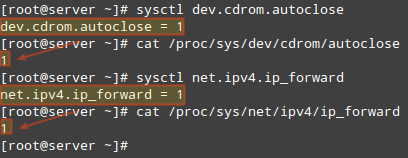
Check Linux Kernel Parameters
Set or Modify Linux Kernel Parameters
To set the value for a kernel parameter we can also use sysctl, but using the -w option and followed by the parameter’s name, the equal sign, and the desired value.
Another method consists of using echo to overwrite the file associated with the parameter. In other words, the following methods are equivalent to disable the packet forwarding functionality in our system (which, by the way, should be the default value when a box is not supposed to pass traffic between networks):
# echo 0 > /proc/sys/net/ipv4/ip_forward
# sysctl -w net.ipv4.ip_forward=0
It is important to note that kernel parameters that are set using sysctl will only be enforced during the current session and will disappear when the system is rebooted.
To set these values permanently, edit /etc/sysctl.conf with the desired values. For example, to disable packet forwarding in /etc/sysctl.conf make sure this line appears in the file:
net.ipv4.ip_forward=0
Then run following command to apply the changes to the running configuration.
# sysctl -p
Other examples of important kernel runtime parameters are:
fs.file-max specifies the maximum number of file handles the kernel can allocate for the system. Depending on the intended use of your system (web / database / file server, to name a few examples), you may want to change this value to meet the system’s needs.
Otherwise, you will receive a “Too many open files” error message at best, and may prevent the operating system to boot at the worst.
If due to an innocent mistake you find yourself in this last situation, boot in single user mode (as explained in Part 13 – Configure and Troubleshoot Linux Grub Boot Loader) and edit /etc/sysctl.conf as instructed earlier. To set the same restriction on a per-user basis, refer to Part 14 – Monitor and Set Linux Process Limit Usage of this series.
kernel.sysrq is used to enable the SysRq key in your keyboard (also known as the print screen key) so as to allow certain key combinations to invoke emergency actions when the system has become unresponsive.
The default value (16) indicates that the system will honor the Alt+SysRq+key combination and perform the actions listed in the sysrq.c documentation found in kernel.org (where key is one letter in the b-z range). For example, Alt+SysRq+b will reboot the system forcefully (use this as a last resort if your server is unresponsive).
Warning! Do not attempt to press this key combination on a virtual machine because it may force your host system to reboot!
When set to 1, net.ipv4.icmp_echo_ignore_all will ignore ping requests and drop them at the kernel level. This is shown in the below image – note how ping requests are lost after setting this kernel parameter:
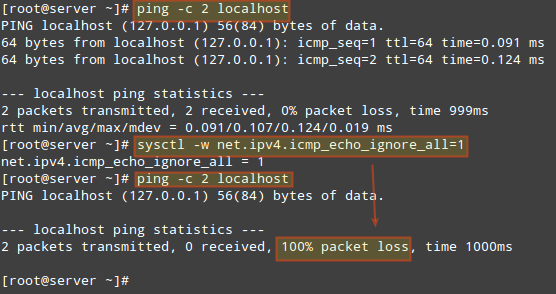
Block Ping Requests in Linux
A better and easier way to set individual runtime parameters is using .conf files inside /etc/sysctl.d, grouping them by categories.
For example, instead of setting net.ipv4.ip_forward=0 and net.ipv4.icmp_echo_ignore_all=1 in /etc/sysctl.conf, we can create a new file named net.conf inside /etc/sysctl.d:
# echo "net.ipv4.ip_forward=0" > /etc/sysctl.d/net.conf
# echo "net.ipv4.icmp_echo_ignore_all=1" >> /etc/sysctl.d/net.conf
If you choose to use this approach, do not forget to remove those same lines from /etc/sysctl.conf.
Summary
In this article we have explained how to modify kernel runtime parameters, both persistent and non persistently, using sysctl, /etc/sysctl.conf, and files inside /etc/sysctl.d.
In the sysctl docs you can find more information on the meaning of more variables. Those files represent the most complete source of documentation about the parameters that can be set via sysctl.
Did you find this article useful? We surely hope you did. Don’t hesitate to let us know if you have any questions or suggestions to improve.
How to Set Access Control Lists (ACL’s) and Disk Quotas for Users and Groups
Access Control Lists (also known as ACLs) are a feature of the Linux kernel that allows to define more fine-grained access rights for files and directories than those specified by regular ugo/rwx permissions.
For example, the standard ugo/rwx permissions does not allow to set different permissions for different individual users or groups. With ACLs this is relatively easy to do, as we will see in this article.
Checking File System Compatibility with ACLs
To ensure that your file systems are currently supporting ACLs, you should check that they have been mounted using the acl option. To do that, we will use tune2fs for ext2/3/4 file systems as indicated below. Replace /dev/sda1 with the device or file system you want to check:
# tune2fs -l /dev/sda1 | grep "Default mount options:"
Note: With XFS, Access Control Lists are supported out of the box.
In the following ext4 file system, we can see that ACLs have been enabled for /dev/xvda2:
# tune2fs -l /dev/xvda2 | grep "Default mount options:"

Check ACL Enabled on Linux Filesystem
If the above command does not indicate that the file system has been mounted with support for ACLs, it is most likely due to the noacl option being present in /etc/fstab.
In that case, remove it, unmount the file system, and then mount it again, or simply reboot your system after saving the changes to /etc/fstab.
Introducing ACLs in Linux
To illustrate how ACLs work, we will use a group named developers and add users walterwhite and saulgoodman (yes, I am a Breaking Bad fan!) to it.:
# groupadd developers
# useradd walterwhite
# useradd saulgoodman
# usermod -a -G developers walterwhite
# usermod -a -G developers saulgoodman
Before we proceed, let’s verify that both users have been added to the developers group:
# id walterwhite
# id saulgoodman

Find User ID in Linux
Let’s now create a directory called test in /mnt, and a file named acl.txt inside (/mnt/test/acl.txt).
Then we will set the group owner to developers and change its default ugo/rwx permissions recursively to 770(thus granting read, write, and execute permissions granted to both the owner and the group owner of the file):
# mkdir /mnt/test
# touch /mnt/test/acl.txt
# chgrp -R developers /mnt/test
# chmod -R 770 /mnt/test
As expected, you can write to /mnt/test/acl.txt as walterwhite or saulgoodman:
# su - walterwhite
# echo "My name is Walter White" > /mnt/test/acl.txt
# exit
# su - saulgoodman
# echo "My name is Saul Goodman" >> /mnt/test/acl.txt
# exit
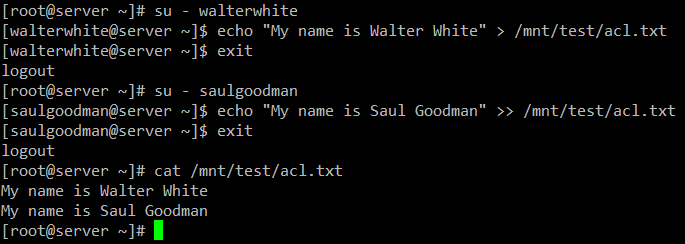
Verify ACL Rules on Users
So far so good. However, we will soon see a problem when we need to grant write access to /mnt/test/acl.txtfor another user that is not in the developers group.
Standard ugo/rwx permissions would require that the new user be added to the developers group, but that would give him/her the same permissions over all the objects owned by the group. That is precisely where ACLs come in handy.
Setting ACL’s in Linux
There are two types of ACLs: access ACLs are (which are applied to a file or directory), and default (optional) ACLs, which can only be applied to a directory.
If files inside a directory where a default ACL has been set do not have a ACL of their own, they inherit the default ACL of their parent directory.
Let’s give user gacanepa read and write access to /mnt/test/acl.txt. Before doing that, let’s take a look at the current ACL settings in that directory with:
# getfacl /mnt/test/acl.txt
Then change the ACLs on the file, use u: followed by the username and :rw to indicate read / write permissions:
# setfacl -m u:gacanepa:rw /mnt/test/acl.txt
And run getfacl on the file again to compare. The following image shows the “Before” and “After”:
# getfacl /mnt/test/acl.txt
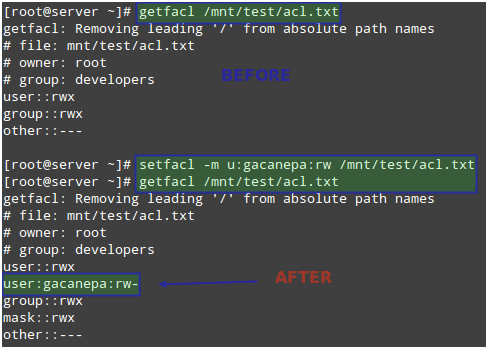
Set ACL on Linux Users
Next, we will need to give others execute permissions on the /mnt/test directory:
# chmod +x /mnt/test
Keep in mind that in order to access the contents of a directory, a regular user needs execute permissions on that directory.
User gacanepa should now be able to write to the file. Switch to that user account and execute the following command to confirm:
# echo "My name is Gabriel Cánepa" >> /mnt/test/acl.txt
To set a default ACL to a directory (which its contents will inherit unless overwritten otherwise), add d: before the rule and specify a directory instead of a file name:
# setfacl -m d:o:r /mnt/test
# getfacl /mnt/test/
The ACL above will allow users not in the owner group to have read access to the future contents of the /mnt/test directory. Note the difference in the output of getfacl /mnt/test before and after the change:

Set Default ACL to Linux Directory
To remove a specific ACL, replace -m in the commands above with -x. For example,
# setfacl -x d:o /mnt/test
Alternatively, you can also use the -b option to remove ALL ACLs in one step:
# setfacl -b /mnt/test
For more information and examples on the use of ACLs, please refer to chapter 10, section 2, of the openSUSE Security Guide (also available for download at no cost in PDF format).
Set Linux Disk Quotas on Users and Filesystems
Storage space is another resource that must be carefully used and monitored. To do that, quotas can be set on a file system basis, either for individual users or for groups.
Thus, a limit is placed on the disk usage allowed for a given user or a specific group, and you can rest assured that your disks will not be filled to capacity by a careless (or malintentioned) user.
The first thing you must do in order to enable quotas on a file system is to mount it with the usrquota or grpquota (for user and group quotas, respectively) options in /etc/fstab.
For example, let’s enable user-based quotas on /dev/vg00/vol_backups and group-based quotas on /dev/vg00/vol_projects.
Note that the UUID is used to identify each file system.
UUID=f6d1eba2-9aed-40ea-99ac-75f4be05c05a /home/projects ext4 defaults,grpquota 0 0
UUID=e1929239-5087-44b1-9396-53e09db6eb9e /home/backups ext4 defaults,usrquota 0 0
Unmount and remount both file systems:
# umount /home/projects
# umount /home/backups
# mount -o remount /home/projects
# mount -o remount /home/backups
Then check that the usrquota and grpquota options are present in the output of mount (see highlighted below):
# mount | grep vg00

Check Linux User Quota and Group Quota
Finally, run the following commands to initialize and enable quotas:
# quotacheck -avugc
# quotaon -vu /home/backups
# quotaon -vg /home/projects
That said, let’s now assign quotas to the username and group we mentioned earlier. You can later disable quotas with quotaoff.
Setting Linux Disk Quotas
Let’s begin by setting an ACL on /home/backups for user gacanepa, which will give him read, write, and execute permissions on that directory:
# setfacl -m u:gacanepa:rwx /home/backups/
Then with,
# edquota -u gacanepa
We will make the soft limit=900 and the hard limit=1000 blocks (1024 bytes/block * 1000 blocks = 1024000 bytes = 1 MB) of disk space usage.
We can also place a limit of 20 and 25 as soft and hard limites on the number of files this user can create.
The above command will launch the text editor ($EDITOR) with a temporary file where we can set the limits mentioned previously:

Linux Disk Quota For User
These settings will cause a warning to be shown to user gacanepa when he has either reached the 900-block or 20-inode limits for a default grace period of 7 days.
If the over-quota situation has not been eliminated by then (for example, by removing files), the soft limit will become the hard limit and this user will be prevented from using more storage space or creating more files.
To test, let’s have user gacanepa try to create an empty 2 MB file named test1 inside /home/backups:
# dd if=/dev/zero of=/home/backups/test1 bs=2M count=1
# ls -lh /home/backups/test1
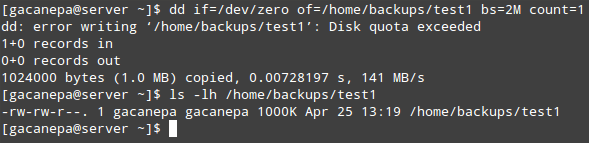
Verify Linux User Quota on Disk
As you can see, the write operation file fails due to the disk quota having been exceeded. Since only the first 1000 KB are written to disk, the result in this case will most likely be a corrupt file.
Similarly, you can create an ACL for the developers groups in order to give members of that group rwx access to /home/projects:
# setfacl -m g:developers:rwx /home/projects/
And set the quota limits with:
# edquota -g developers
Just like we did with user gacanepa earlier.
The grace period can be specified for any number of seconds, minutes, hours, days, weeks, or months by executing.
# edquota -t
and updating the values under Block grace period and Inode grace period.
As opposed to block or inode usage (which are set on an user or group-basis), the grace period is set system-wide.
To report quotas, you can use quota -u [user] or quota -g [group] for a quick list or repquota -v [/path/to/filesystem] for a more detailed (verbose) and nicely formatted report.
Of course, you will want to replace [user], [group], and [/path/to/filesystem] with specific user / group names and file system you want to check.
Summary
In this article we have explained how to set Access Control Lists and disk quotas for users and groups. Using both, you will be able to manage permissions and disk usage more effectively.
If you want to learn more about quotas, you can refer to the Quota Mini-HowTo in The Linux Documentation Project.
Needless to say, you can also count on us to answer questions. Just submit them using the comment form below and we will be more than glad to take a look.
How to Install Cygwin, a Linux-like Commandline Environment for Windows
During the last Microsoft Build Developer Conference held from March 30th to April 1st, Microsoft released an announcement and gave a presentation that surprised the industry: beginning with Windows 10 update #14136, it would be possible to run bash on Ubuntu on top of Windows.
Although this update has already been released by now, it is still in beta and is only available for insiders / developers and not for the public in general.
Without a doubt, when this feature reaches stable status and is available for everyone to use, it will be welcome with open arms – especially by FOSS professionals who work with technologies (Python, Ruby, etc) that are native to the Linux command line environment. Unfortunately, it will only be available in Windows 10 and not on previous versions.
However, Cygwin a well-known and widely-used Linux environment for Windows has been around for quite some time and has been extensively utilized by Linux pros whenever they’ve had the need to work on a Windows computer.
While foundationally different from “Bash on Ubuntu on Windows”, Cygwin is free software and provides a large set of GNU and Open Source tools that you can use as if you were on Linux, and a DLL that which contributes with substantial POSIX API functionality. On top of that, you can use Cygwin on all 32 and 64-bit Windows versions starting with XP SP3.
Downloading and Installing Cygwin
In this article we will guide you how to set up Cygwin with the most frequently used tools in the Linux command line. Depending on the available storage space and on your specific needs, you can later choose to install others very easily.
To install Cygwin (note that the same instructions apply to updating the software), we will need to download the Cygwin setup, depending on your version of Microsoft Windows. Once downloaded, double click on the .exe file to begin with the installation and follow the steps outlined below to complete it.
Step 1 – Launch the installation process and choose “Install from Internet”:
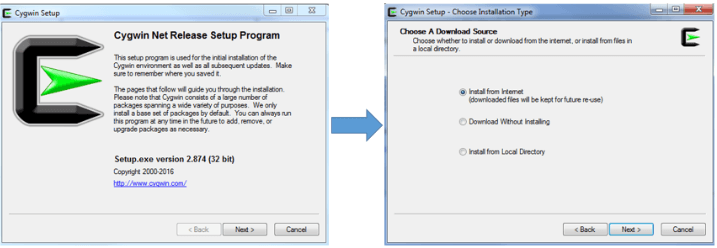
Installing Cygwin
Step 2 – Select an existing directory where you want to install Cygwin and its installation file (Warning: don’t choose folders with spaces on their names):
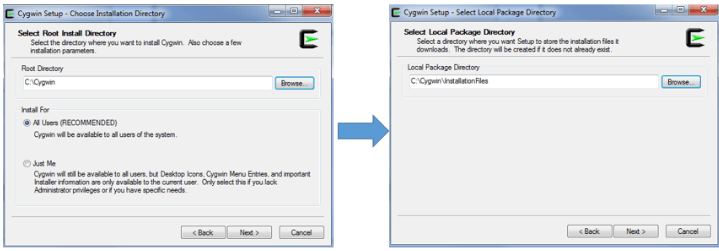
Select Cygwin Installation Directory
Step 3 – Choose your Internet connection type and a select a FTP or HTTP mirror (go to https://cygwin.com/mirrors.html to select a mirror near your geographical location and then click Add to insert the desired mirror in the site list) to proceed with the download:
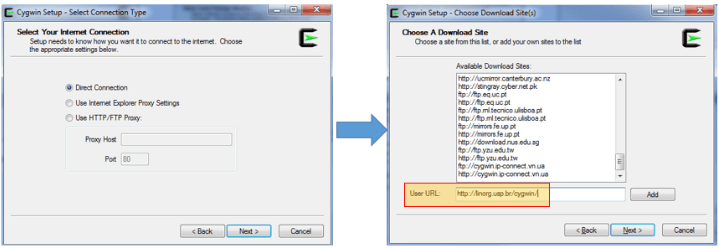
Select Cygwin Connection Type
After you click next in the last screen, some preliminary packages -which will guide the actual installation process- will be retrieved first. If the chosen mirror is not operational or does not contain all the necessary files, you will be prompted to use another one. You can also choose a FTP server if the HTTP counterpart does not work.
If everything goes as expected, within a matter of minutes you will be presented with the package selection screen. In my case, I ended up choosing ftp://mirrors.kernel.org after others failed.
Step 4 – Select the packages you want to install by clicking on each desired category. Note you can also choose to install the source code as well. You can also search for packages using the input textbox. When you’re done selecting the packages you need, click Next.
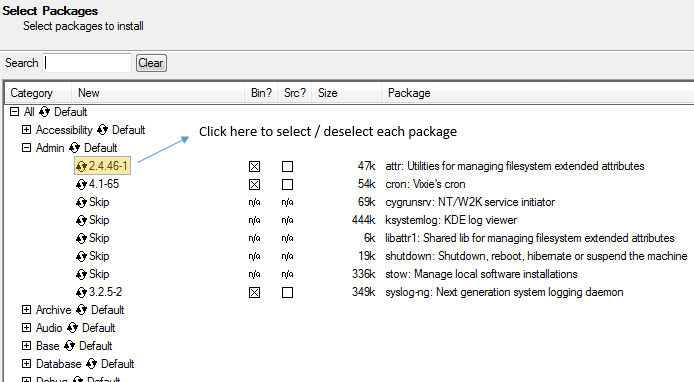
Select Packages to Install under Cygwin
If you selected a package that has dependencies, you will be prompted to confirm the installation of dependencies as well.
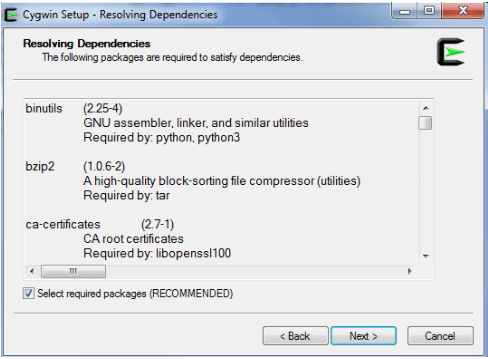
Cygwin Setup
As it is to be expected, the download time will depend on the number of packages you selected previously and their required dependencies. In any event, you should see the following screen after 15-20 minutes.
Select the desired options (Create icon on Desktop / Add icon to Start Menu) and click Finish to complete the installation:
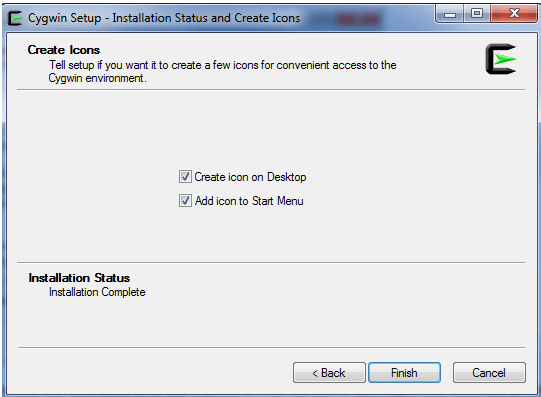
Cygwin Installation Setup
After you have successfully completed steps 1 through 4, we can open Cygwin by double clicking its icon on the Windows desktop, as we will see in the next section.
Launching and using Cygwin
Once you have launched Cygwin you can start typing commands as if you would do in a Linux terminal. However, you should note that just like it is the case in Linux, the initial directory is a virtual folder called /home/username.
The image below shows the result of running the following commands in my recently finished Cygwin installation.
Print current date:
$ echo "Today is $(date +%F)"
The initial directory is found inside a folder named home that is located in the directory where Cygwin was installed (/cygdrive/c = C:\Cygwin\home in my case):
$ pwd
Change directory to the root of the C: drive:
$ cd C:
Create a directory:
$ mkdir 'C:\Users\Gabriel\test'
Redirect the output of the command to a file:
$ ls -l > 'C:\Users\Gabriel\test\files.txt'
View contents of the root directory of the C: drive.
$ cat 'C:\Users\Gabriel\test\files.txt'
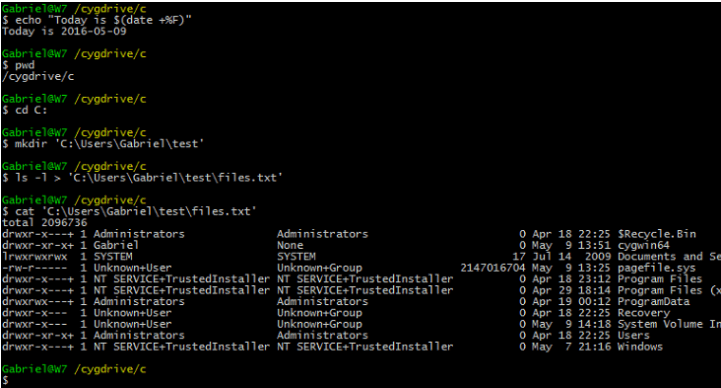
Running Linux Commands on Cygwin
If you installed vim or another text editor, you can also invoke it as usual to create a bash shell script. The following example will search for files with permissions set to 777 beginning at the directory given as parameter and will 1) print the file names to the screen, and 2) change the permissions to 644, and delete them if they are empty.
# vim fixperms.sh
Add the following content to file:
#!/bin/bash
DIR=$1
echo "The permissions of the following files are being changed to 644: "
find $DIR -type f -perm 777 -print -exec chmod 644 {} +
echo "The following empty files are being removed: "
find $DIR -type f -empty -print -empty -delete
Feel free to add to the above script other commands if you wish, then give it execute permissions and run it:
$ chmod +x fixperms.sh
$ ./fixperms.sh .
Let’s see the script in action:
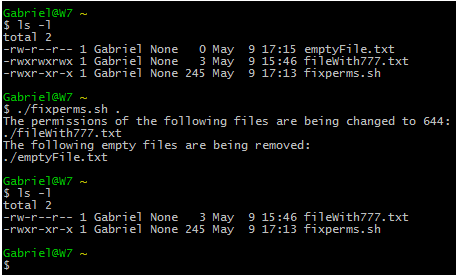
Run Shell Scripts in Cygwin
As you can see, we were able to run a bash shell script in Windows (using the GNU version of find command) with the help of Cygwin – and that was just an example.
Think for a minute. What other examples of classic Linux commands would you like to see? Feel free to give it a try, let us know how it goes, and don’t hesitate to ask us for help.
Summary
In this article we have explained how to install Cygwin, a Linux-like command line environment for Windows. As such, keep in mind that it is NOT a method to run native Linux applications in Windows, but you can compile applications using the source code if you want to do so.
If you find out that some of the commands you use more frequently are not available, restart the installation and search for the specific packages when you reach Step 4 (feel free to repeat this process as many times as needed). The number of packages available is amazing and the chances of not being able to find what you need are next to zero.
If you have had the chance to use Cygwin already, we would appreciate it if you can leave a comment using the form below to tell us about your experience. If not, we certainly hope we ignited a spark of interest with this article, and your feedback is highly appreciated as well.
An Ultimate Guide to Setting Up FTP Server to Allow Anonymous Logins
In a day where massive remote storage is rather common, it may be strange to talk about sharing files using FTP (File Transfer Protocol).
However, it is still used for file exchange where security does not represent an important consideration and for public downloads of documents, for example.
It’s for that reason that learning how to configure a FTP server and enable anonymous downloads (not requiring authentication) is still a relevant topic.
In this article we will explain how to set up a FTP server to allow connections on passive mode where the client initiates both channels of communication to the server (one for commands and the other for the actual transmission of files, also known as the control and data channels, respectively).
You can read more about passive and active modes (which we will not cover here) in Active FTP vs. Passive FTP, a Definitive Explanation.
That said, let’s begin!
Setting up a FTP Server in Linux
To set up FTP in our server we will install the following packages:
# yum install vsftpd ftp         [CentOS]
# aptitude install vsftpd ftp    [Ubuntu]
# zypper install vsftpd ftp      [openSUSE]
The vsftpd package is an implementation of a FTP server. The name of the package stands for Very Secure FTP Daemon. On the other hand, ftp is the client program that will be used to access the server.
Keep in mind that during the exam, you will be given only one VPS where you will need to install both client and server, so that is precisely the same approach that we will follow in this article.
In CentOS and openSUSE, you will be required to start and enable the vsftpd service:
# systemctl start vsftpd && systemctl enable vsftpd
In Ubuntu, vsftpd should be started and set to start on subsequent boots automatically after the installation. If not, you can start it manually with:
$ sudo service vsftpd start
Once vsftpd is installed and running, we can proceed to configure our FTP server.
Configuring the FTP Server in Linux
At any point, you can refer to man vsftpd.conf for further configuration options. We will set the most common options and mention their purpose in this guide.
As with any other configuration file, it is important to make a backup copy of the original before making changes:
# cp /etc/vsftpd/vsftpd.conf /etc/vsftpd/vsftpd.conf.orig
Then open /etc/vsftpd/vsftpd.conf (the main configuration file) and edit the following options as indicated:
1. Make sure you allow anonymous access to the server (we will use the /storage/ftp directory for this example – that’s where we will store documents for anonymous users to access) without password:
anonymous_enable=YES
no_anon_password=YES
anon_root=/storage/ftp/
If you omit the last setting, the ftp directory will default to /var/ftp (the home directory of the dedicated ftp user that was created during installation).
2. To enable read-only access (thus disabling file uploads to the server), set the following variable to NO:
write_enable=NO
Important: Only use steps #3 and #4 if you choose to disable the anonymous logins.
3. Likewise, you may want to also allow local users to login with their system credentials to the FTP server. Later on this article we will show you how to restrict them to their respective home directories to store and retrieve files using FTP:
local_enable=YES
If SELinux is in enforcing mode, you will also need to set the ftp_home_dir flag to on so that FTP is allowed to write and read files to and from their home directories:
# getsebool ftp_home_dir
If not, you can enable it permanently with:
# setsebool -P ftp_home_dir 1
The expected output is shown below:
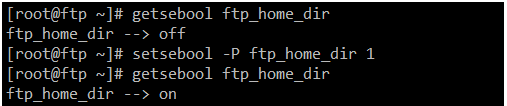
SELinux – Enable FTP on Home Directories
4. In order to restrict authenticated system users to their home directories, we will use:
chroot_local_user=YES
chroot_list_enable=YES
chroot_list_file=/etc/vsftpd/chroot_list
With the above chroot settings and an empty /etc/vsftpd/chroot_list file (which YOU need to create), you will restrict ALL system users to their home directories.
Important: Please note this still requires that you ensure that none of them has write permissions to the top directory.
If you want to allow a specific user (or more) outside their home directories, insert the usernames in /etc/vsftpd/chroot_list, one per line.
5. In addition, the following settings will allow you to limit the available bandwidth for anonymous logins (10 KB) and authenticated users (20 KB) in bytes per second, and restrict the number of simultaneous connections per IP address to 5:
anon_max_rate=10240
local_max_rate=20480
max_per_ip=5
6. We will restrict the data channel to TCP ports 15000 through 15500 in the server. Note this is an arbitrary choice and you can use a different range if you wish.
Add the following lines to /etc/vsftpd/vsftpd.conf if they are not already present:
pasv_enable=YES
pasv_max_port=15500
pasv_min_port=15000
7. Finally, you can set a welcome message to be shown each time a user access the server. A little information without further details will do:
ftpd_banner=This is a test FTP server brought to you by Tecmint.com
.
8. Now don’t forget to restart the service in order to apply the new configuration:
# systemctl restart vsftpd      [CentOS]
$ sudo service vsftpd restart   [Ubuntu]
9. Allow FTP traffic through the firewall (for firewalld):
On FirewallD
# firewall-cmd --add-service=ftp
# firewall-cmd --add-service=ftp --permanent
# firewall-cmd --add-port=15000-15500/tcp
# firewall-cmd --add-port=15000-15500/tcp --permanent
On IPTables
# iptables --append INPUT --protocol tcp --destination-port 21 -m state --state NEW,ESTABLISHED --jump ACCEPT
# iptables --append INPUT --protocol tcp --destination-port 15000:15500  -m state --state ESTABLISHED,RELATED --jump ACCEPT
Regardless of the distribution, we will need to load the ip_conntrack_ftp module:
# modprobe ip_conntrack_ftp
And make it persistent across boots. On CentOS and openSUSE this means adding the module name to the IPTABLES_MODULES in /etc/sysconfig/iptables-config like so:
IPTABLES_MODULES="ip_conntrack_ftp"
whereas in Ubuntu you’ll want to add the module name (without the modprobe command) at the bottom of /etc/modules:
$ sudo echo "ip_conntrack_ftp" >> /etc/modules
10. Last but not least, make sure the server is listening on IPv4 or IPv6 sockets (but not both!). We will use IPv4here:
listen=YES
We will now test the newly installed and configured FTP server.
Testing the FTP Server in Linux
We will create a regular PDF file (in this case, the PDF version of the vsftpd.conf manpage) in /storage/ftp.
Note that you may need to install the ghostcript package (which provides ps2pdf) separately, or use another file of your choice:
# man -t vsftpd.conf | ps2pdf - /storage/ftp/vstpd.conf.pdf
To test, we will use both a web browser (by going to ftp://Your_IP_here) and using the command line client (ftp). Let’s see what happens when we enter that FTP address in our browser:
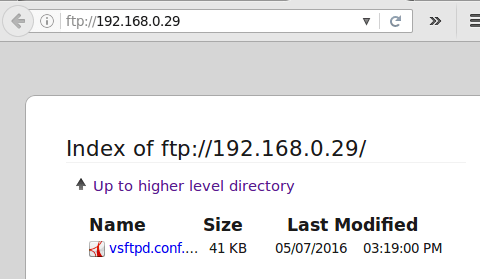
FTP Web Directory Browsing
As you can see, the PDF file we saved earlier in /storage/ftp is available for you to download.
On the command line, type:
# ftp localhost
And enter anonymous as the user name. You should not be prompted for your password:
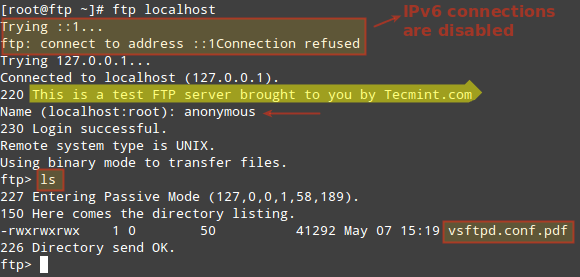
Verify FTP Connection
To retrieve files using the command line, use the get command followed by the filename, like so:
# get vsftpd.conf.pdf
and you’re good to go.
Summary
In this guide we have explained how to properly set up a FTP and use it to allow anonymous logins. You can also follow the instructions given to disable such logins and only allow local users to authenticate using their system credentials (not illustrated in this article since it is not required on the exam).
If you run into any issues, please share with us the output of the following command, which will stripe the configuration file from commented and empty lines, and we will be more than glad to take a look:
# grep -Eiv '(^$|^#)' /etc/vsftpd/vsftpd.conf
Mine is as below (note that there are other configuration directives that we did not cover in this article as they are set by default, so no change was required at our side):
local_enable=NO
write_enable=NO
local_umask=022
dirmessage_enable=YES
xferlog_enable=YES
connect_from_port_20=YES
xferlog_std_format=YES
ftpd_banner=This is a test FTP server brought to you by Tecmint.com
listen=YES
listen_ipv6=NO
pam_service_name=vsftpd
userlist_enable=YES
tcp_wrappers=YES
anon_max_rate=10240
local_max_rate=20480
max_per_ip=5
anon_root=/storage/ftp
no_anon_password=YES
allow_writeable_chroot=YES
pasv_enable=YES
pasv_min_port=15000
pasv_max_port=15500
Particularly, this directive
xferlog_enable=YES
will enable the transfer log in /var/log/xferlog. Make sure you look in that file while troubleshooting.
Additionally, feel free to drop us a note using the comment form below if you have questions or any comments about this article.
Setup a Basic Recursive Caching DNS Server and Configure Zones for Domain
Imagine what it would be like if we had to remember the IP addresses of all the websites that we use on a daily basis. Even if we had a prodigious memory, the process to browse to a website would be ridiculously slow and time-consuming.
And what about if we needed to visit multiple websites or use several applications that reside in the same machine or virtual host? That would be one of the worst headaches I can think of – not to mention the possibility that the IP address associated with a website or application can be changed without prior notice.
Just the very thought of it would be enough reason to desist using the Internet or internal networks after a while.
That’s precisely what a world without Domain Name System (also known as DNS) would be. Fortunately, this service solves all of the issues mentioned above – even if the relationship between an IP address and a name changes.
For that reason, in this article we will learn how to configure and use a simple DNS server, a service that will allow to translate domain names into IP addresses and vice versa.
Introducing DNS Name Resolution
For small networks that are not subject to frequent changes, the /etc/hosts file can be used as a rudimentary method of domain name to IP address resolution.
With a very simple syntax, this file allows us to associate a name (and / or an alias) with an IP address as follows:
[IP address] [name] [alias(es)]
For example,
192.168.0.1 gateway gateway.mydomain.com
192.168.0.2 web web.mydomain.com
Thus, you can reach the web machine either by its name, the web.mydomain.com alias, or its IP address.
For larger networks, or those that are subject to frequent changes, using the /etc/hosts file to resolve domain names into IP addresses would not be an acceptable solution. That’s where the need for a dedicated service comes in.
Under the hood, a DNS server queries a large database in the form of a tree, which starts at the root (“.”)zone.
The following image will help us to illustrate:

DNS Name Resolution Diagram
In the image above, the root (.) zone contains com, edu, and net domains. Each of these domains are (or can be) managed by different organizations to avoid depending on a big, central one. This allows to properly distribute requests in a hierarchical way.
Let’s see what happens under the hood:
1. When a client makes a query to a DNS server for web1.sales.me.com, the server sends the query to the top (root) DNS server, which points the query to the name server in the .com zone.
This, in turn, sends the query to the next level name server (in the me.com zone), and then to sales.me.com. This process is repeated as many times as needed until the FQDN (Fully Qualified Domain Name, web1.sales.me.com in this example) is returned by the name server of the zone where it belongs.
2. In this example, the name server in sales.me.com. responds for the address web1.sales.me.com and returns the desired domain name-IP association and other information as well (if configured to do so).
All this information is sent to the original DNS server, which then passes it back to the client that requested it in the first place. To avoid repeating the same steps for future identical queries, the results of the query are stored in the DNS server.
These are the reasons why this kind of setup is commonly known as a recursive, caching DNS server.
Installing and Configuring a DNS Server
In Linux, the most used DNS server is bind (short for Berkeley Internet Name Daemon), which can be installed as follows:
# yum install bind bind-utils        [CentOS]
# zypper install bind bind-utils     [openSUSE]
# aptitude install bind9 bind9utils  [Ubuntu]
Once we have installed bind and related utilities, let’s make a copy of the configuration file before making any changes:
# cp /etc/named.conf /etc/named.conf.orig            [CentOS and openSUSE]
# cp /etc/bind/named.conf /etc/bind/named.conf.orig  [Ubuntu]
Then let’s open named.conf and head over to the options block, where we need to set make sure the following settings are present to configure a recursive, caching server with IP 192.168.0.18/24 that can be accessed only by hosts in the same network (as a security measure).
The forwarders settings are used to indicate which name servers should be queried first (in the following example we use Google’s name servers) for hosts outside our domain:
options {
...
listen-on port 53 { 127.0.0.1; 192.168.0.18};
allow-query 	{ localhost; 192.168.0.0/24; };
recursion yes;
forwarders {
    	8.8.8.8;
    	8.8.4.4;
};
…
}
Outside the options block we will define our sales.me.com zone (in Ubuntu this is usually done in a separate file called named.conf.local) that maps a domain with a given IP address and a reverse zone to map the IP address to the corresponding domain.
However, the actual configuration of each zone will go in separate files as indicated by the file directive (“master” indicates we will only use one DNS server).
Add the following blocks to named.conf file:
zone "sales.me.com." IN {
    type master;
    file "/var/named/sales.me.com.zone";
};
zone "0.168.192.in-addr.arpa" IN {
    type master;
    file "/var/named/0.162.198.in-addr.arpa.zone";
};
Note that in-addr.arpa (for IPv4 addresses) and ip6.arpa (for IPv6) are conventions for reverse zone configurations.
After saving the above changes to named.conf, we can check for errors as follows:
# named-checkconf /etc/named.conf
If any errors are found, the above command will output an informative message with the cause and the line where they are located. Otherwise, it will not return anything.
Configuring DNS Zones
In the files /var/named/sales.me.com.zone and /var/named/0.168.192.in-addr.arpa.zone we will configure the forward (domain → IP address) and reverse (IP address → domain) zones.
Let’s tackle the forward configuration first:
1. At the top of the file you will find a line beginning with TTL (short for Time To Live), which specifies how long the cached response should “live” before being replaced by the results of a new query.
In the line immediately below, we will reference our domain and set the email address where notifications should be sent (note that the root.sales.me.com means root@sales.me.com).
2. A SOA (Start Of Authority) record indicates that this system is the authoritative nameserver for machines inside the sales.me.com domain.
The following settings are required when there are two nameservers (one master and one slave) per domain (although such is not our case since it is not required in the exam, they are presented here for your reference):
The Serial is used to distinguish one version of the zone definition file from a previous one (where settings could have changed). If the cached response points to a definition with a different serial, the query is performed again instead of feeding it back to the client.
In a setup with a slave (secondary) nameserver, Refresh indicates the amount of time until the secondary should check for a new serial from the master server.
In addition, Retry tells the server how often the secondary should attempt to contact the primary if no response from the primary has been received, whereas Expire indicates when the zone definition in the secondary is no longer valid after the master server could not be reached, and Negative TTL is the time that a Non-existent domain (NXdomain) should be cached.
3. A NS record indicates what is the authoritative DNS server for our domain (referenced by the @ sign at the beginning of the line).
4. An A record (for IPv4 addresses) or an AAAA (for IPv6 addresses) translates names into IP addresses.
In the example below:
dns: 192.168.0.18 (the DNS server itself)
web1: 192.168.0.29 (a web server inside the sales.me.com zone)
mail1: 192.168.0.28 (a mail server inside the sales.me.com zone)
mail2: 192.168.0.30 (another mail server)
5. A MX record indicates the names of the authorized mail transfer agents (MTAs) for this domain. The hostname should be prefaced by a number indicating the priority that the current mail server should have when there are two or more MTAs for the domain (the lower the value, the higher the priority – in the following example, mail1 is the primary whereas mail2 is the secondary MTA).
6. A CNAME record sets an alias (www.web1) for a host (web1).
IMPORTANT: The dot (.) at the end of the names is required.
$TTL	604800
@   	IN  	SOA 	sales.me.com. root.sales.me.com. (
                    	2016051101 ; Serial
                    	10800 ; Refresh
                    	3600  ; Retry
                    	604800 ; Expire
                    	604800) ; Negative TTL
;
@   	IN  	NS  	dns.sales.me.com.
dns 	IN  	A   	192.168.0.18
web1	IN  	A   	192.168.0.29
mail1   IN  	A   	192.168.0.28
mail2   IN  	A   	192.168.0.30
@   	IN  	MX  	10 mail1.sales.me.com.
@   	IN  	MX  	20 mail2.sales.me.com.
www.web1    	IN  	CNAME   web1
Let’s now take a look at the reverse zone configuration (/var/named/0.168.192.in-addr.arpa.zone). The SOArecord is the same as in the previous file, whereas the last three lines with a PTR (pointer) record indicate the last octet in the IPv4 address of the mail1, web1, and mail2 hosts (192.168.0.28, 192.168.0.29, and 192.168.0.30, respectively).
$TTL	604800
@   	IN  	SOA 	sales.me.com. root.sales.me.com. (
                    	2016051101 ; Serial
                    	10800 ; Refresh
                    	3600  ; Retry
                    	604800 ; Expire
                    	604800) ; Minimum TTL
@   	IN  	NS  	dns.sales.me.com.
28  	IN  	PTR 	mail1.sales.me.com.
29  	IN  	PTR 	web1.sales.me.com.
30  	IN  	PTR 	mail2.sales.me.com.
You can check the zone files for errors with:
# named-checkzone sales.me.com /var/named/sales.me.com.zone
# named-checkzone 0.168.192.in-addr.arpa /var/named/0.168.192.in-addr.arpa.zone
The following image illustrates what is the expected output on success:

Check DNS Zone File Configuration Errors
Otherwise, you will get an error message stating the cause and how to fix it:
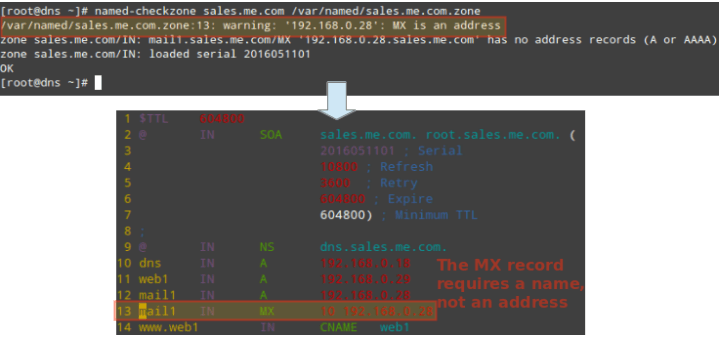
Fix DNS Zone Configuration Error
Once you have verified the main configuration file and the zone files, restart the named service to apply changes.
In CentOS and openSUSE, do:
# systemctl restart named
And don’t forget to enable it as well:
# systemctl enable named
In Ubuntu:
$ sudo service bind9 restart
Finally, you will have to edit the configuration of your main network interfaces:
---- In /etc/sysconfig/network-scripts/ifcfg-enp0s3 for CentOS and openSUSE ----
DNS1=192.168.0.18

---- In /etc/network/interfaces for Ubuntu ----
dns-nameservers 192.168.0.18
and restart the network service to apply changes.
Testing the DNS Server
At this point we are ready to query our DNS server for local and outside names and addresses. The following commands will return the IP address associated with the host web1:
# host web1.sales.me.com
# host web1
# host www.web1
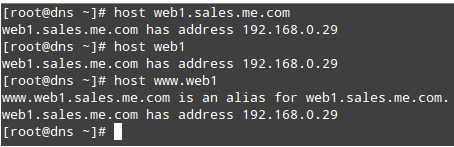
Query DNS on Domain Host
How can we find out who is handling emails for sales.me.com? It’s easy to find out – just query the MX records for the domain:
# host -t mx sales.me.com

Query MX Record Of Domain
Likewise, let’s perform a reverse query. This will help us find out the name behind an IP address:
# host 192.168.0.28
# host 192.168.0.29

DNS Reverse Query on IP Address
You can try the same operations for outside hosts:
# host -t mx linux.com
# host 8.8.8.8
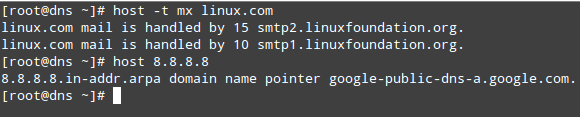
Check Domain DNS Information
To verify that queries are indeed going through our DNS server, let’s enable logging:
# rndc querylog
And check the /var/log/messages file (in CentOS and openSUSE):
# host -t mx linux.com
# host 8.8.8.8
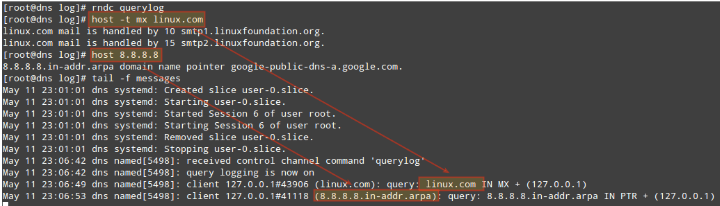
Verify DNS Queries in Log
To disable DNS logging, type again:
# rndc querylog
In Ubuntu, enabling logging will require adding the following independent block (same level as the options block) to /etc/bind/named.conf:
logging {
	channel query_log {
    	file "/var/log/bind9/query.log";
    	severity dynamic;
    	print-category yes;
    	print-severity yes;
    	print-time yes;
	};
	category queries { query_log; };
};
Note that the log file must exist and be writable by named.
Summary
In this article we have explained how to set up a basic recursive, caching DNS server and how to configure zones for a domain.
The mystery of name to IP resolution (and vice versa) is not such anymore! To ensure the proper operation of your DNS server, don’t forget to allow the service in your firewall (port TCP 53) as explained in Part 8 of the LFCE series (“Setup an Iptables Firewall to Enable Remote Access to Services“) and other articles in this same site such as Firewall Essentials and Network Traffic Control Using FirewallD and Iptables.
We hope you have found this article helpful – don’t hesitate to let us know if you have questions or comments. We always enjoy hearing from our readers!
Implementing Mandatory Access Control with SELinux or AppArmor in Linux
To overcome the limitations of and to increase the security mechanisms provided by standard ugo/rwxpermissions and access control lists, the United States National Security Agency (NSA) devised a flexible Mandatory Access Control (MAC) method known as SELinux (short for Security Enhanced Linux) in order to restrict among other things, the ability of processes to access or perform other operations on system objects (such as files, directories, network ports, etc) to the least permission possible, while still allowing for later modifications to this model.

SELinux
and AppArmor Security Hardening Linux
Another popular and widely-used MAC is AppArmor, which in addition to the features provided by SELinux, includes a learning mode that allows the system to “learn” how a specific application behaves, and to set limits by configuring profiles for safe application usage.
In CentOS 7, SELinux is incorporated into the kernel itself and is enabled in Enforcing mode by default (more on this in the next section), as opposed to openSUSE and Ubuntu which use AppArmor.
In this article we will explain the essentials of SELinux and AppArmor and how to use one of these tools for your benefit depending on your chosen distribution.
Introduction to SELinux and How to Use it on CentOS 7
Security Enhanced Linux can operate in two different ways:
- Enforcing: SELinux denies access based on SELinux policy rules, a set of guidelines that control the security engine.
- Permissive: SELinux does not deny access, but denials are logged for actions that would have been denied if running in enforcing mode.
SELinux can also be disabled. Although it is not an operation mode itself, it is still an option. However, learning how to use this tool is better than just ignoring it. Keep it in mind!
To display the current mode of SELinux, use getenforce. If you want to toggle the operation mode, use setenforce 0 (to set it to Permissive) or setenforce 1 (Enforcing).
Since this change will not survive a reboot, you will need to edit the /etc/selinux/config file and set the SELINUXvariable to either enforcing, permissive, or disabled in order to achieve persistence across reboots:
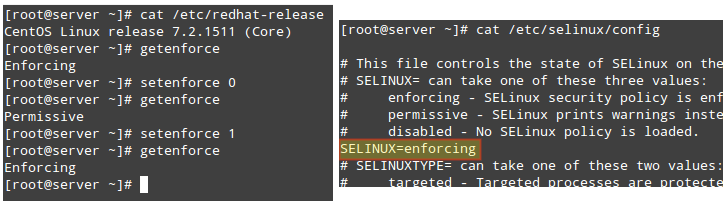
How to Enable and Disable SELinux Mode
On a side note, if getenforce returns Disabled, you will have to edit /etc/selinux/config with the desired operation mode and reboot. Otherwise, you will not be able to set (or toggle) the operation mode with setenforce.
One of the typical uses of setenforce consists of toggling between SELinux modes (from enforcing to permissive or the other way around) to troubleshoot an application that is misbehaving or not working as expected. If it works after you set SELinux to Permissive mode, you can be confident you’re looking at a SELinux permissions issue.
Two classic cases where we will most likely have to deal with SELinux are:
- Changing the default port where a daemon listens on.
- Setting the DocumentRoot directive for a virtual host outside of /var/www/html.
Let’s take a look at these two cases using the following examples.
EXAMPLE 1: Changing the default port for the sshd daemon
One of the first thing most system administrators do in order to secure their servers is change the port where the SSH daemon listens on, mostly to discourage port scanners and external attackers. To do this, we use the Port directive in /etc/ssh/sshd_config followed by the new port number as follows (we will use port 9999 in this case):
Port 9999
After attempting to restart the service and checking its status we will see that it failed to start:
# systemctl restart sshd
# systemctl status sshd

Check SSH Service Status
If we take a look at /var/log/audit/audit.log, we will see that sshd was prevented from starting on port 9999 by SELinux because that is a reserved port for the JBoss Management service (SELinux log messages include the word “AVC” so that they might be easily identified from other messages):
# cat /var/log/audit/audit.log | grep AVC | tail -1

Check Linux Audit Logs
At this point most people would probably disable SELinux but we won’t. We will see that there’s a way for SELinux, and sshd listening on a different port, to live in harmony together. Make sure you have the policycoreutils-python package installed and run:
# yum install policycoreutils-python
To view a list of the ports where SELinux allows sshd to listen on. In the following image we can also see that port 9999 was reserved for another service and thus we can’t use it to run another service for the time being:
# semanage port -l | grep ssh
Of course we could choose another port for SSH, but if we are certain that we will not need to use this specific machine for any JBoss-related services, we can then modify the existing SELinux rule and assign that port to SSH instead:
# semanage port -m -t ssh_port_t -p tcp 9999
After that, we can use the first semanage command to check if the port was correctly assigned, or the -lCoptions (short for list custom):
# semanage port -lC
# semanage port -l | grep ssh
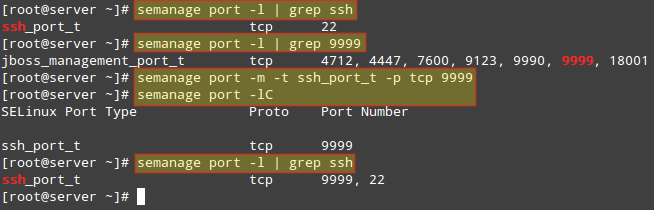
Assign Port to SSH
We can now restart SSH and connect to the service using port 9999. Note that this change WILL survive a reboot.
EXAMPLE 2: Choosing a DocumentRoot outside /var/www/html for a virtual host
If you need to set up a Apache virtual host using a directory other than /var/www/html as DocumentRoot (say, for example, /websrv/sites/gabriel/public_html):
DocumentRoot “/websrv/sites/gabriel/public_html”
Apache will refuse to serve the content because the index.html has been labeled with the default_t SELinuxtype, which Apache can’t access:
# wget http://localhost/index.html
# ls -lZ /websrv/sites/gabriel/public_html/index.html

Labeled as default_t SELinux Type
As with the previous example, you can use the following command to verify that this is indeed a SELinux-related issue:
# cat /var/log/audit/audit.log | grep AVC | tail -1

Check Logs for SELinux Issues
To change the label of /websrv/sites/gabriel/public_html recursively to httpd_sys_content_t, do:
# semanage fcontext -a -t httpd_sys_content_t "/websrv/sites/gabriel/public_html(/.*)?"
The above command will grant Apache read-only access to that directory and its contents.
Finally, to apply the policy (and make the label change effective immediately), do:
# restorecon -R -v /websrv/sites/gabriel/public_html
Now you should be able to access the directory:
# wget http://localhost/index.html
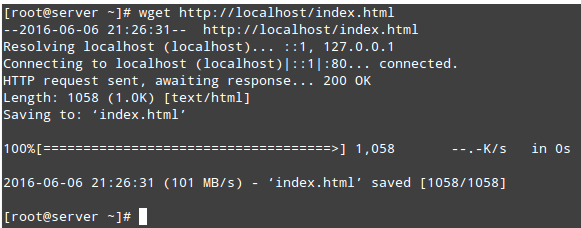
Access Apache Directory
For more information on SELinux, refer to the Fedora 22 SELinux and Administrator guide.
Introduction to AppArmor and How to Use it on OpenSUSE and Ubuntu
The operation of AppArmor is based on profiles defined in plain text files where the allowed permissions and access control rules are set. Profiles are then used to place limits on how applications interact with processes and files in the system.
A set of profiles is provided out-of-the-box with the operating system, whereas others can be put in place either automatically by applications when they are installed or manually by the system administrator.
Like SELinux, AppArmor runs profiles in two modes. In enforce mode, applications are given the minimum permissions that are necessary for them to run, whereas in complain mode AppArmor allows an application to take restricted actions and saves the “complaints” resulting from that operation to a log (/var/log/kern.log, /var/log/audit/audit.log, and other logs inside /var/log/apparmor).
These logs will show through lines with the word audit in them errors that would occur should the profile be run in enforce mode. Thus, you can try out an application in complain mode and adjust its behavior before running it under AppArmor in enforce mode.
The current status of AppArmor can be shown using:
$ sudo apparmor_status
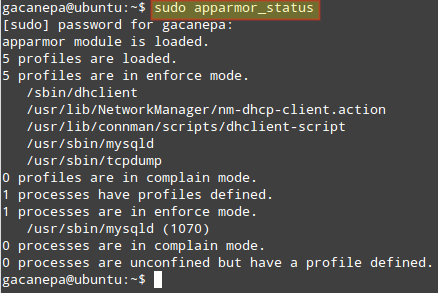
Check AppArmor Status
The image above indicates that the profiles /sbin/dhclient, /usr/sbin/, and /usr/sbin/tcpdump are in enforce mode (that is true by default in Ubuntu).
Since not all applications include the associated AppArmor profiles, the apparmor-profiles package, which provides other profiles that have not been shipped by the packages they provide confinement for. By default, they are configured to run in complain mode so that system administrators can test them and choose which ones are desired.
We will make use of apparmor-profiles since writing our own profiles is out of the scope of the LFCS certification. However, since profiles are plain text files, you can view them and study them in preparation to create your own profiles in the future.
AppArmor profiles are stored inside /etc/apparmor.d. Let’s take a look at the contents of that directory before and after installing apparmor-profiles:
$ ls /etc/apparmor.d

View AppArmor Directory Content
If you execute sudo apparmor_status again, you will see a longer list of profiles in complain mode. You can now perform the following operations:
To switch a profile currently in enforce mode to complain mode:
$ sudo aa-complain /path/to/file
and the other way around (complain –> enforce):
$ sudo aa-enforce /path/to/file
Wildcards are allowed in the above cases. For example,
$ sudo aa-complain /etc/apparmor.d/*
will place all profiles inside /etc/apparmor.d into complain mode, whereas
$ sudo aa-enforce /etc/apparmor.d/*
will switch all profiles to enforce mode.
To entirely disable a profile, create a symbolic link in the /etc/apparmor.d/disabled directory:
$ sudo ln -s /etc/apparmor.d/profile.name /etc/apparmor.d/disable/
For more information on AppArmor, please refer to the official AppArmor wiki and to the documentation provided by Ubuntu.
Summary
In this article we have gone through the basics of SELinux and AppArmor, two well-known MACs. When to use one or the other? To avoid difficulties, you may want to consider sticking with the one that comes with your chosen distribution. In any event, they will help you place restrictions on processes and access to system resources to increase the security in your servers.
Do you have any questions, comments, or suggestions about this article? Feel free to let us know using the form below. Don’t hesitate to let us know if you have any questions or comments.