How to Backup/Restore MySQL/MariaDB and PostgreSQL Using ‘Automysqlbackup’ and ‘Autopostgresqlbackup’ Tools

If you are a database administrator (DBA) or are responsible for maintaining, backing up, and restoring databases, you know you can’t afford to lose data. The reason is simple: losing data not only means the loss of important information, but also may damage your business financially.

MySQL/MariaDB & PostgreSQL Backup

MySQL/MariaDB & PostgreSQL Backup/Restore

For that reason, you must always make sure that:

1. your databases are backed up on a periodic basis,
2. those backups are stored in a safe place, and
3. you perform restoration drills regularly.

This last activity should not be overlooked, as you don’t want to run into a major issue without having practiced what needs to be done in such situation.

In this tutorial we will introduce you to two nice utilities to back up MySQL / MariaDB and PostgreSQLdatabases, respectively: automysqlbackup and autopostgresqlbackup.

Since the latter is based on the former, we will focus our explanation on automysqlbackup and highlight differences with autopgsqlbackup, if any at all.

It is strongly recommended to store the backups in a network share mounted in the backup directory so that in the event of a system-wide crash, you will still be covered.

Read following useful guides on MySQL:

Installing MySQL / MariaDB / PostgreSQL Databases

1. This guide assumes the you must have MySQL / MariaDB / PostgreSQL instance running, If not, please install the following packages:

Fedora-based distributions:

# yum update && yum install mariadb mariadb-server mariadb-libs postgresql postgresql-server postgresql-libs

Debian and derivatives:

# aptitude update && aptitude install mariadb-client mariadb-server mariadb-common postgresql-client postgresql postgresql-common

2. You have a testing MySQL / MariaDB / PostgreSQL database that you can use (you are advised to NOT use either automysqlbackup or autopostgresqlbackup in a production environment until you have become acquainted with these tools).

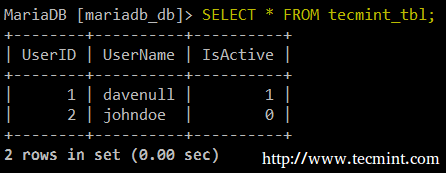
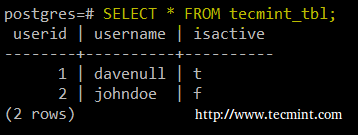
Otherwise, create two sample databases and populate them with data before proceeding. In this article I will use the following databases and tables:

MySQL/MariaDB
CREATE DATABASE mariadb_db;
CREATE TABLE tecmint_tbl (UserID INT AUTO_INCREMENT PRIMARY KEY, 
UserName VARCHAR(50), 
IsActive BOOL);

Create MySQL Database

Create MySQL Database

PostgreSQL
CREATE DATABASE postgresql_db;
CREATE TABLE tecmint_tbl (
UserID SERIAL PRIMARY KEY,
UserName VARCHAR(50),
IsActive BOOLEAN);

Create PostgreSQL Database

Create PostgreSQL Database

Installing automysqlbackup and autopgsqlbackup in CentOS 7 and Debian 8

3. In Debian 8, both tools are available in the repositories, so installing them is as simple as running:

# aptitude install automysqlbackup autopostgresqlbackup

Whereas in CentOS 7 you will need to download the installation scripts and run them. In the sections below we will focus exclusively on installing, configuring, and testing these tools on CentOS 7 since for Debian 8 – where they almost work out of the box, we will make the necessary clarifications later in this article.

Installing and configuring automysqlbackup in CentOS 7

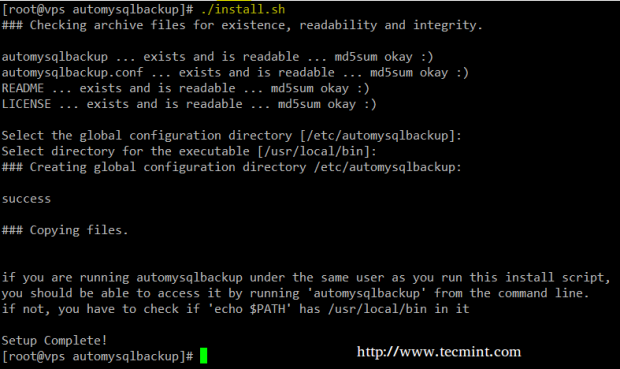
4. Let us begin by creating a working directory inside /opt to download the installation script and run it:

# mkdir /opt/automysqlbackup
# cd /opt/automysqlbackup
# wget http://ufpr.dl.sourceforge.net/project/automysqlbackup/AutoMySQLBackup/AutoMySQLBackup%20VER%203.0/automysqlbackup-v3.0_rc6.tar.gz
# tar zxf automysqlbackup-v3.0_rc6.tar.gz
# ./install.sh

.

Installing AutoMysqlBackup in CentOS-7

Installing AutoMysqlBackup in CentOS-7

5. The configuration file for automysqlbackup is located inside /etc/automysqlbackup under the name myserver.conf. Let’s take a look at most relevant configuration directives:

myserver.conf – Configure Automysqlbackup
# Username to access the MySQL server
CONFIG_mysql_dump_username='root'
# Password
CONFIG_mysql_dump_password='YourPasswordHere'
# Host name (or IP address) of MySQL server
CONFIG_mysql_dump_host='localhost'
# Backup directory
CONFIG_backup_dir='/var/backup/db/automysqlbackup'
# List of databases for Daily/Weekly Backup e.g. ( 'DB1' 'DB2' 'DB3' ... )
# set to (), i.e. empty, if you want to backup all databases
CONFIG_db_names=(AddYourDatabase Names Here)
# List of databases for Monthly Backups.
# set to (), i.e. empty, if you want to backup all databases
CONFIG_db_month_names=(AddYourDatabase Names Here)
# Which day do you want monthly backups? (01 to 31)
# If the chosen day is greater than the last day of the month, it will be done
# on the last day of the month.
# Set to 0 to disable monthly backups.
CONFIG_do_monthly="01"
# Which day do you want weekly backups? (1 to 7 where 1 is Monday)
# Set to 0 to disable weekly backups.
CONFIG_do_weekly="5"
# Set rotation of daily backups. VALUE*24hours
# If you want to keep only today's backups, you could choose 1, i.e. everything older than 24hours will be removed.
CONFIG_rotation_daily=6
# Set rotation for weekly backups. VALUE*24hours. A value of 35 means 5 weeks.
CONFIG_rotation_weekly=35
# Set rotation for monthly backups. VALUE*24hours. A value of 150 means 5 months.
CONFIG_rotation_monthly=150
# Include CREATE DATABASE statement in backup?
CONFIG_mysql_dump_create_database='no'
# Separate backup directory and file for each DB? (yes or no)
CONFIG_mysql_dump_use_separate_dirs='yes'
# Choose Compression type. (gzip or bzip2)
CONFIG_mysql_dump_compression='gzip'
# What would you like to be mailed to you?
# - log   : send only log file
# - files : send log file and sql files as attachments (see docs)
# - stdout : will simply output the log to the screen if run manually.
# - quiet : Only send logs if an error occurs to the MAILADDR.
CONFIG_mailcontent='quiet'
# Email Address to send mail to? (user@domain.com)
CONFIG_mail_address='root'
# Do you wish to encrypt your backups using openssl?
#CONFIG_encrypt='no'
# Choose a password to encrypt the backups.
#CONFIG_encrypt_password='password0123'
# Command to run before backups (uncomment to use)
#CONFIG_prebackup="/etc/mysql-backup-pre"
# Command run after backups (uncomment to use)
#CONFIG_postbackup="/etc/mysql-backup-post"

Once you have configured automysqlbackup as per your needs, you are strongly advise to check out the README file found in /etc/automysqlbackup/README.

MySQL Database Backup

6. When you’re ready, go ahead and run the program, passing the configuration file as argument:

# automysqlbackup /etc/automysqlbackup/myserver.conf

Configure Automysqlbackup on CentOS 7

Configure Automysqlbackup on CentOS 7

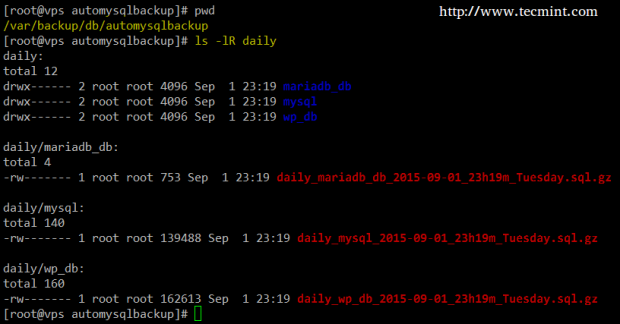
A quick inspection of the daily directory will show that automysqlbackup has run successfully:

# pwd
# ls -lR daily

MySQL Daily Database Backup

MySQL Daily Database Backup

Of course you can add a crontab entry to run automysqlbackup at a time of day that best suits your needs (1:30am every day in the below example):

30 01 * * * /usr/local/bin/automysqlbackup /etc/automysqlbackup/myserver.conf

Restoring a MySQL Backup

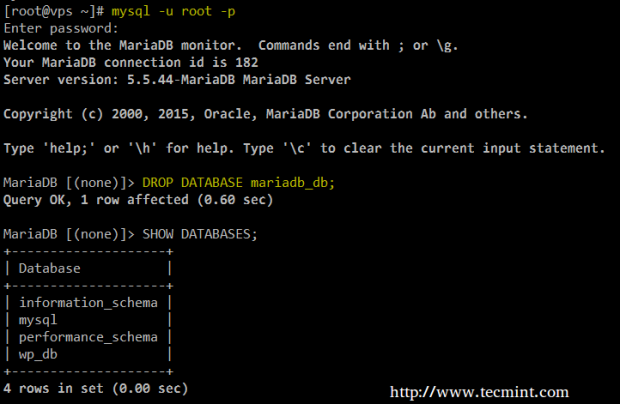
7. Now let’s drop the mariadb_db database on purpose:

Drop MariaDB Database

Drop MariaDB Database

Let’s create it again and restore the backup. In the MariaDB prompt, type:

CREATE DATABASE mariadb_db;
exit

Then locate:

# cd /var/backup/db/automysqlbackup/daily/mariadb_db
# ls

Locate MariaDB Database backup

Locate MariaDB Database backup

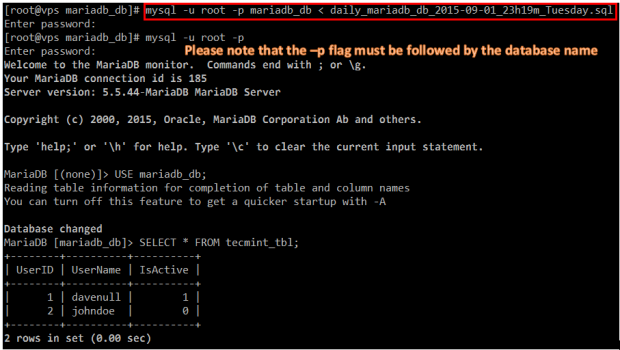
And restore the backup:

# mysql -u root -p mariadb_db < daily_mariadb_db_2015-09-01_23h19m_Tuesday.sql
# mysql -u root -p
MariaDB [(none)]> USE mariadb_db; 
MariaDB [(none)]> SELECT * FROM tecmint_tb1;

Restore MariaDB Backup

Restore MariaDB Backup

Installing and configuring autopostgresqlbackup in CentOS 7

8. In order for autopostgresql to work flawlessly in CentOS 7, we will need to install some dependencies first:

# yum install mutt sendmail

Then let’s repeat the process as before:

# mkdir /opt/autopostgresqlbackup
# cd /opt/autopostgresqlbackup
# wget http://ufpr.dl.sourceforge.net/project/autopgsqlbackup/AutoPostgreSQLBackup/AutoPostgreSQLBackup-1.0/autopostgresqlbackup.sh.1.0
# mv autopostgresqlbackup.sh.1.0 /opt/autopostgresqlbackup/autopostgresqlbackup.sh

Let’s make the script executable and start / enable the service:

# chmod 755 autopostgresqlbackup.sh
# systemctl start postgresql
# systemctl enable postgresql

Finally, we will edit the value of the backup directory setting to:

autopostgresqlbackup.sh – Configure Autopostgresqlbackup
BACKUPDIR="/var/backup/db/autopostgresqlbackup"

After having through the configuration file of automysqlbackup, configuring this tool is very easy (that part of the task is left up to you).

9. In CentOS 7, as opposed to Debian 8autopostgresqlbackup is best run as the postgres system user, so in order to do that you should either switch to that account or add a cron job to its crontab file:

# crontab -u postgres -e
30 01 * * * /opt/autopostgresqlbackup/autopostgresqlbackup.sh

The backup directory, by the way, needs to be created and its permissions and group ownership must be set recursively to 0770 and postgres (again, this will NOT be necessary in Debian):

# mkdir /var/backup/db/autopostgresqlbackup
# chmod -R 0770 /var/backup/db/autopostgresqlbackup
# chgrp -R postgres /var/backup/db/autopostgresqlbackup

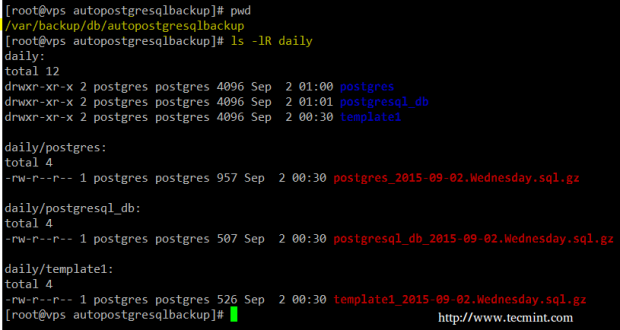
The result:

# cd /var/backup/db/autopostgresqlbackup
# pwd
# ls -lR daily

PostgreSQL Daily Database Backup

PostgreSQL Daily Database Backup

10. Now you can restore the files when needed (remember to do this as user postgres after recreating the empty database):

# gunzip -c postgresql_db_2015-09-02.Wednesday.sql.gz | psql postgresql_db

Considerations in Debian 8

As we mentioned earlier, not only the installation of these tools in Debian is more straightforward, but also their respective configurations. You will find the configuration files in:

  1. Automysqlbackup: /etc/default/automysqlbackup
  2. Autopostgresqlbackup: /etc/default/autopostgresqlbackup

Summary

In this article we have explained how to install and use automysqlbackup and autopostgresqlbackup (learning how to use the first will help you master the second as well), two great database back up tools that can make your tasks as a DBA or system administrator / engineer much easier.

Please note that you can expand on this topic by setting up email notifications or sending backup files as attachments via email – not strictly required, but may come in handy sometimes.

As a final note, remember that the permissions of configuration files should be set to the minimum (0600 in most cases). We look forward to hearing what you think about this article. Feel free to drop us a note using the form below.

Source

Installing and Configuring X2Go Server and Client on Debian 8

Much of the power behind Linux comes from the command line and the ability for a system to be managed easily remotely. However, for most users from the Windows world or novice Linux administrators, there may be a preference to have access to the graphical user interface for remote management functionality.

Other users may simply have a desktop at home that may need to have graphical applications managed remotely as well. Which ever situation may be the case, there are some inherent security risks such as the remote traffic not being encrypted thus allowing malicious users to sniff the remote desktop session.

Install X2Go Server and Client in Linux

Install X2Go Server and Client in Debian

To solve this common issue with remote desktop systems, X2Go tunnels the remote desktop session through secure shell (SSH). While only one of many of the benefits of X2Go, it is a very important one!

Features of X2Go

  1. Graphical remote desktop control.
  2. Tunneled through SSH.
  3. Sound support.
  4. File and printer sharing from client to server.
  5. Ability to access a single application rather than a whole desktop session.

Environment Setup

  1. This guide assumes a working Debian 8 (Jessie) setup with LXDE (other desktop environments are support however; please see this link).
  2. Another Linux client to install the X2Go client software (This guide uses Linux Mint 17.1 with the Cinnamon desktop environment).
  3. Working network connection with openssh-server already installed and working.
  4. Root access

Installation of X2Go Server and Client on Debian 8

This part of the process will require setting up the X2Go server as well as an X2Go client in order to have a remote desktop connection. The guide will start first with the server setup and then proceed to the client setup.

X2Go Server Installation

The server in this tutorial will be the Debian 8 system running LXDE. The start of the installation process, is to install the X2Go Debian repository and obtain the GPG keys. The first step is to obtain the keys which can be easily accomplished the apt.

# apt-key adv --recv-keys --keyserver keys.gnupg.net E1F958385BFE2B6E

Once the keys have been obtained, a repository file needs to be created for apt to look for the X2Go packages at a specific repository location. This can all be accomplished with one simple command that creates the needed apt list file and puts the appropriate entry into that file.

# echo "deb http://packages.x2go.org/debian jessie main" >> /etc/apt/sources.list.d/x2go.list
# apt-get update

The above commands will instruct apt to search this newly provided repository for packages and more specifically the X2Go packages. At this point, the system is ready to have the X2Go server installed using the apt meta-packager.

# apt-get install x2goserver

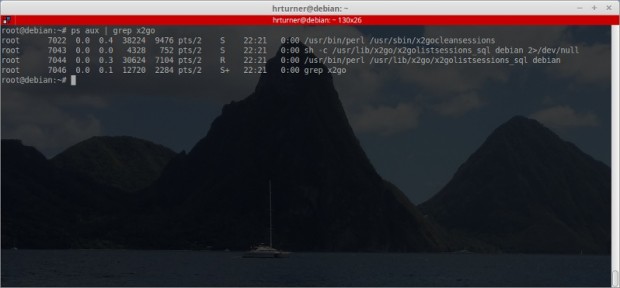
At this point the X2Go server should be installed and started. It is always a good idea to confirm that installed servers are running though.

# ps aux | grep x2go

Confirm X2Go Server Installed and Running

Confirm X2Go Server Installed and Running

In the event that the system doesn’t automatically start X2Go, run the following command to attempt to start the service.

# service x2goserver start

At this point the basic server configuration should be done and the system should be waiting for connections from the X2Go client system.

X2Go Client Installation

The client installation is easier than the server installation. Most distributions already have the client in their provided repositories and this package can easily be installed with the apt meta-packager.

NOTE: Remember that this is done on a computer that is going to connect to the server setup in the previous paragraphs.

# apt-get install x2goclient

Assuming that apt doesn’t return any issues, the X2Go client should be ready to go. Navigate to the X2Goexecutable via the client’s distribution’s file explorer or launch the utility from the command line with the following command.

# x2goclient

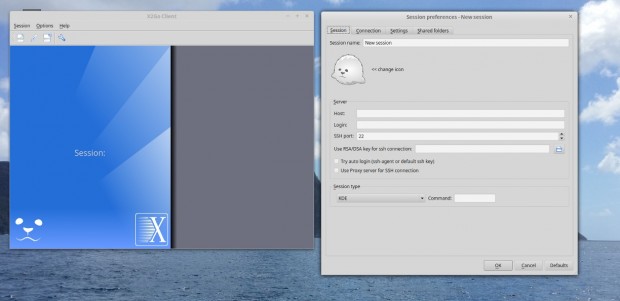
X2Go Client Session

X2Go Client Session

The above windows are the initial windows once the X2Go client is launched. Let’s connect to the Debian Servernow!

In the server field in the window on the right, enter the Debian system’s ip address. The next box needs to have the user name of someone who can SSH into the Debian system.

The next thing to change is the Session Type at the bottom. Since the Debian server is using LXDE, it is a good idea to select LXDE from the drop down.

Again, not all desktop environments are supported at the moment, please reference the link at the top of this guide to see what desktop environments are supported or if any work-arounds are needed.

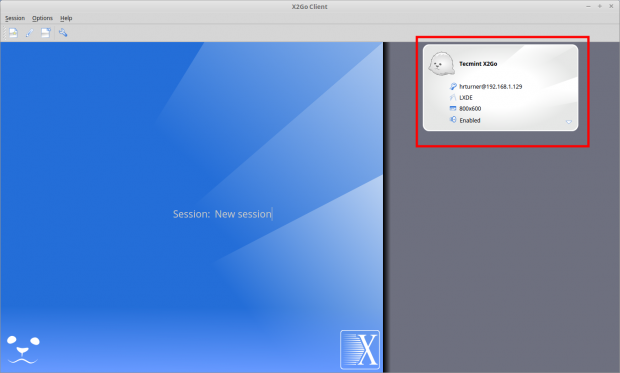
Once the above information have been input, click the “Ok” button at the bottom of the window to finish setting up the session profile. The next step is to click and activate the newly created session. To do this simply click on the session just created on the right in the X2Go Client window.

Connect Remote Debian Desktop

Connect Remote Debian Desktop

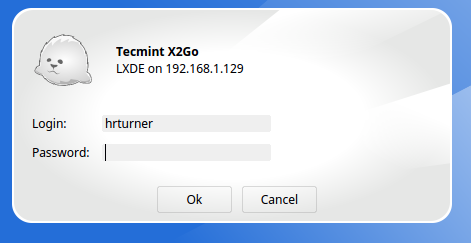
Once this session is selected, it will prompt for the user on the remote machine’s credentials. Again these credentials will be the user on the Debian server’s credentials!

Remote Linux Desktop Login

Remote Debian Desktop Login

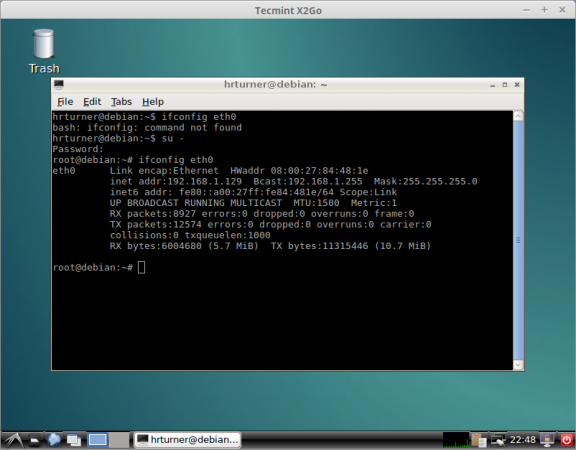
Once the correct password is provided the system will then display the remote system’s graphical display in a scalable window on the client system!

Linux Remote Desktop Access

Debian Remote Desktop Access

Hopefully at this point, your X2Go system is working like the above systems and you are enjoying a secure remote desktop connection to a Debian server!

Best of luck with this new (and more secure) remote desktop solution for a Debian Linux system! Please feel free to share any comments or questions below and we’d be happy to assist.

Source

FreeFileSync – Compare and Synchronize Files in Ubuntu

FreeFileSync is a free, open source and cross platform folder comparison and synchronization software, which helps you synchronize files and folders on Linux, Windows and Mac OS.

It is portable and can also be installed locally on a system, it’s feature-rich and is intended to save time in setting up and executing backup operations while having attractive graphical interface as well.

FreeFileSync Features

Below are it’s key features:

  1. It can synchronize network shares and local disks.
  2. It can synchronize MTP devices (Android, iPhone, tablet, digital camera).
  3. It can also synchronize via SFTP (SSH File Transfer Protocol).
  4. It can identify moved and renamed files and folders.
  5. Displays disk space usage with directory trees.
  6. Supports copying locked files (Volume Shadow Copy Service).
  7. Identifies conflicts and propagate deletions.
  8. Supports comparison of files by content.
  9. It can be configured to handle Symbolic Links.
  10. Supports automation of sync as a batch job.
  11. Enables processing of multiple folder pairs.
  12. Supports in-depth and detailed error reporting.
  13. Supports copying of NTFS extended attributes such as (compressed, encrypted, sparse).
  14. Also supports copying of NTFS security permissions and NTFS Alternate Data Streams.
  15. Support long file paths with more than 260 characters.
  16. Supports Fail-safe file copy prevents data corruption.
  17. Allows expanding of environment variables such as %UserProfile%.
  18. Supports accessing of variable drive letters by volume name (USB sticks).
  19. Supports managing of versions of deleted/updated files.
  20. Prevent disc space issues via optimal sync sequence.
  21. Supports full Unicode.
  22. Offers a highly optimized run time performance.
  23. Supports filters to include and exclude files plus lots more.

How To Install FreeFileSync in Ubuntu Linux

We will add official FreeFileSync PPA, which is available for Ubuntu 14.04 and Ubuntu 15.10 only, then update the system repository list and install it like so:

-------------- On Ubuntu 14.04 and 15.10 -------------- 
$ sudo apt-add-repository ppa:freefilesync/ffs
$ sudo apt-get update
$ sudo apt-get install freefilesync

On Ubuntu 16.04 and newer version, go to the FreeFileSync download page and get the appropriate package file for Ubuntu and Debian Linux.

Next, move into the Download folder, extract the FreeFileSync_*.tar.gz into the /opt directory as follows:

$ cd Downloads/
$ sudo tar xvf FreeFileSync_*.tar.gz -C /opt/
$ cd /opt/
$ ls
$ sudo unzip FreeFileSync/Resources.zip -d /opt/FreeFileSync/Resources/

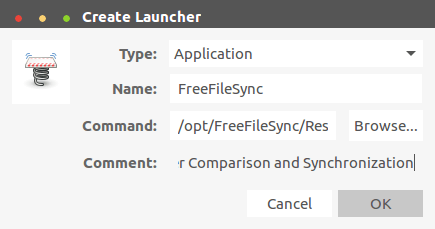
Now we will create an application launcher (.desktop file) using Gnome Panel. To view examples of .desktopfiles on your system, list the contents of the directory /usr/share/applications:

$ ls /usr/share/applications

In case you do not have Gnome Panel installed, type the command below to install it:

$ sudo apt-get install --no-install-recommends gnome-panel

Next, run the command below to create the application launcher:

$ sudo gnome-desktop-item-edit /usr/share/applications/ --create-new

And define the values below:

Type: 	   Application 
Name: 	   FreeFileSync
Command:   /opt/FreeFileSync/FreeFileSync		
Comment:   Folder Comparison and Synchronization

To add an icon for the launcher, simply clicking on the spring icon to select it: /opt/FreeFileSync/Resources/FreeFileSync.png.

When you have set all the above, click OK create it.

Create Desktop Launcher

Create Desktop Launcher

If you don’t want to create desktop launcher, you can start FreeFileSync from the directory itself.

$ ./FreeFileSync

How to Use FreeFileSync in Ubuntu

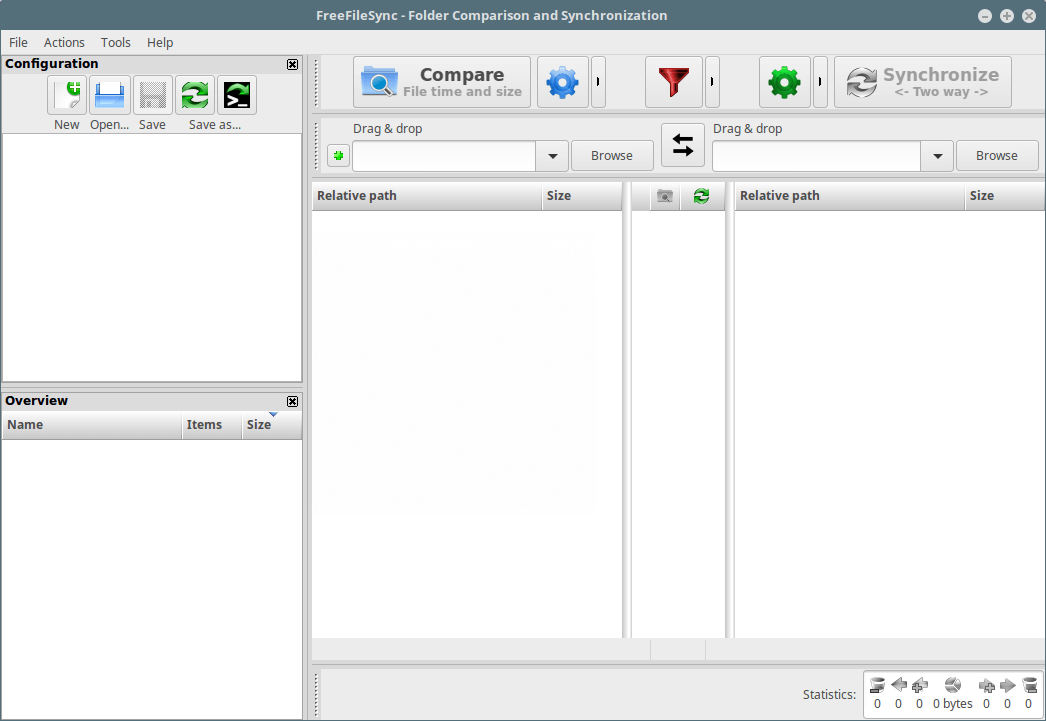
In Ubuntu, search for FreeFileSync in the Unity Dash, whereas in Linux Mint, search for it in the System Menu, and click on the FreeFileSync icon to open it.

FreeFileSync

FreeFileSync

Compare Two Folders Using FreeFileSync

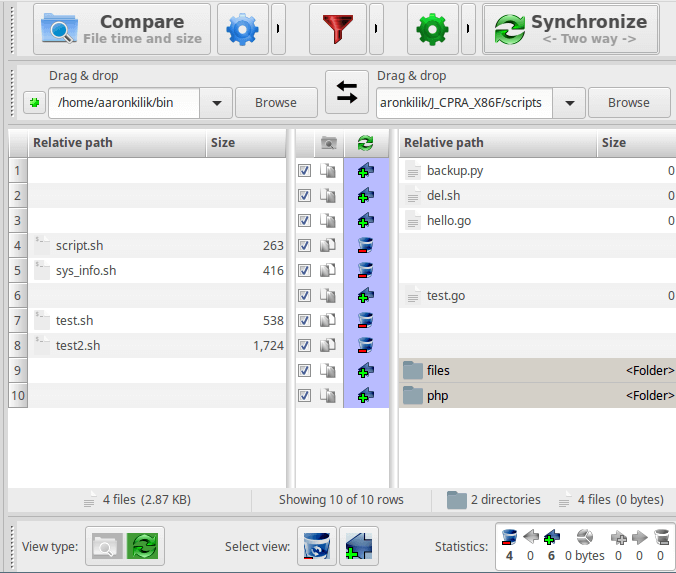
In the example below, we’ll use:

Source Folder:	/home/aaronkilik/bin
Destination Folder:	/media/aaronkilik/J_CPRA_X86F/scripts

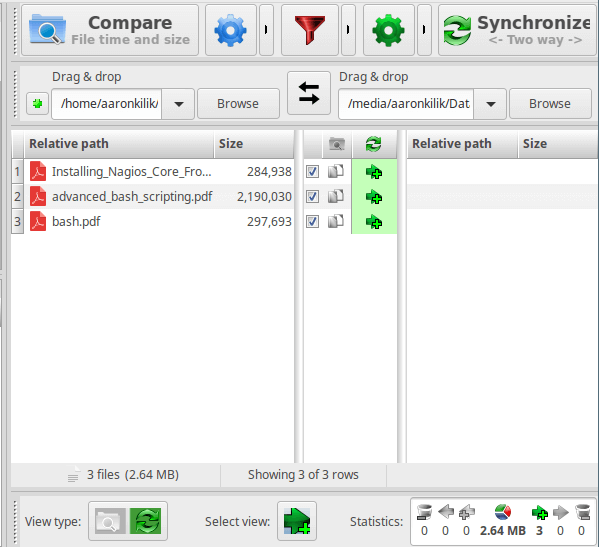
To compare the file time and size of the two folders (default setting), simply click on the Compare button.

Compare Two Folders in Linux

Compare Two Folders in Linux

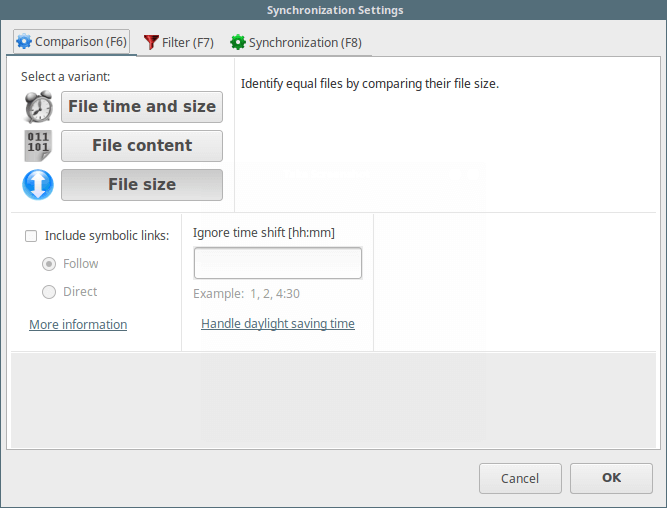
Press F6 to change what to compare by default, in the two folders: file time and size, content or file size from the interface below. Note that the meaning of the each option you select is included as well.

File Comparison Settings

File Comparison Settings

Synchronization Two Folders Using FreeFileSync

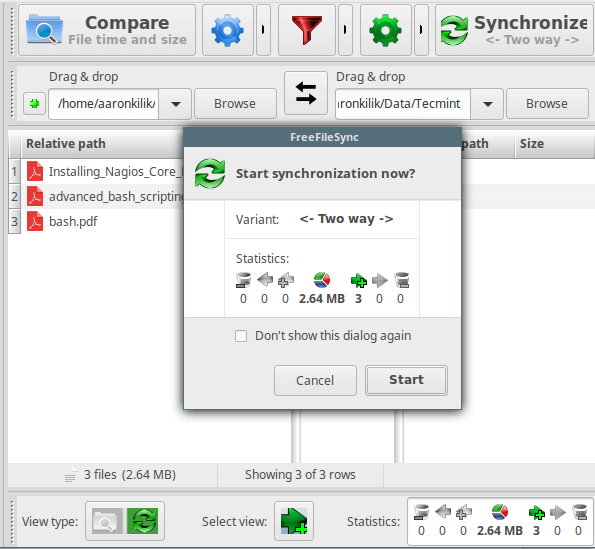
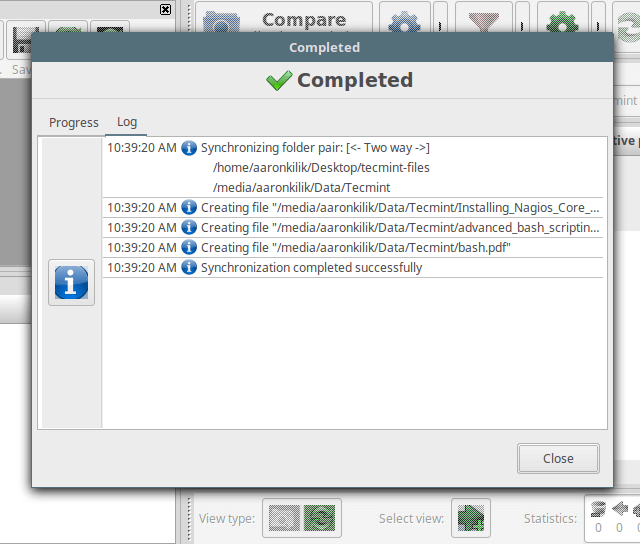
You can start by comparing the two folders, and then click on Synchronize button, to start the synchronization process; click Start from the dialog box the appears thereafter:

Source Folder: /home/aaronkilik/Desktop/tecmint-files
Destination Folder: /media/aaronkilik/Data/Tecmint

Compare and Synchronize Two Folders

Compare and Synchronize Two Folders

Start File Synchronization

Start File Synchronization

File Synchronization Completed

File Synchronization Completed

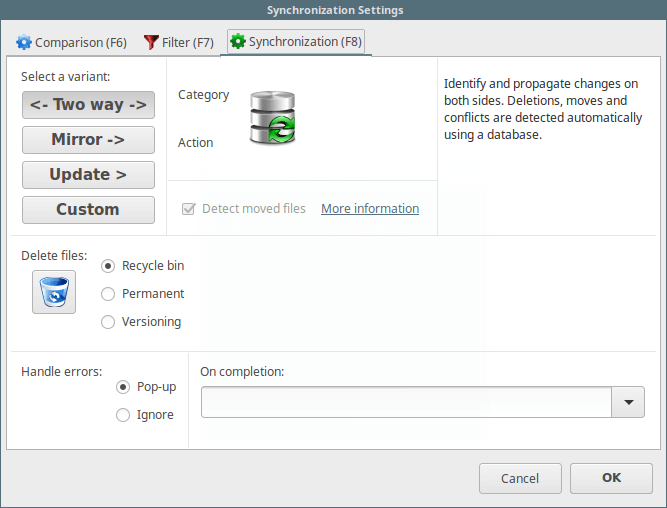
To set the default synchronization option: two way, mirror, update or custom, from the following interface; press F8. The meaning of the each option is included there.

File Synchronization Settings

File Synchronization Settings

For more information, visit FreeFileSync homepage at http://www.freefilesync.org/

That’s all! In this article, we showed you how to install FreeFileSync in Ubuntu and it’s derivatives such as Linux Mint, Kubuntu and many more. Drop your comments via the feedback section below.
Source

How to Setup Two-Factor Authentication (Google Authenticator) for SSH Logins

By default, SSH already uses a secure data communication between remote machines, but if you want to add some extra security layer to your SSH connections, you can add a Google Authenticator (two-factor authentication) module that allow you to enter a random one-time password (TOTP) verification code while connecting to SSH servers. You’ll have to enter the verification code from your smartphone or PC when you connect.

The Google Authenticator is an open-source module that includes implementations of one-time passcodes (TOTP) verification token developed by Google. It supports several mobile platforms, as well as PAM (Pluggable Authentication Module). These one-time passcodes are generated using open standards created by the OATH(Initiative for Open Authentication).

SSH Two Factor Authentication

SSH Two Factor Authentication

In this article I will show you how to setup and configure SSH for two-factor authentication under Red HatCentOSFedora and UbuntuLinux Mint and Debian.

Installing Google Authenticator Module

Open the machine that you want to setup two factor authentication and install following PAM libraries along with development libraries that are needed for the PAM module to work correctly with Google authenticatormodule.

On Red HatCentOS and Fedora systems install the ‘pam-devel‘ package.

# yum install pam-devel make gcc-c++ wget

On UbuntuLinux Mint and Debian systems install ‘libpam0g-dev‘ package.

# apt-get install libpam0g-dev make gcc-c++ wget

Download and extract Google authenticator module under Home directory (assume you are already logged in home directory of root).

# cd /root
# wget https://google-authenticator.googlecode.com/files/libpam-google-authenticator-1.0-source.tar.bz2
# tar -xvf libpam-google-authenticator-1.0-source.tar.bz2

Type the following commands to compile and install Google authenticator module on the system.

# cd libpam-google-authenticator-1.0
# make
# make install
# google-authenticator

Once you run ‘google-authenticator‘ command, it will prompt you with a serious of question. Simply type “y” (yes) as the answer in most situation. If something goes wrong, you can type again ‘google-authenticator‘ command to reset the settings.

  1. Do you want authentication tokens to be time-based (y/n) y

After this question, you will get your ‘secret key‘ and ‘emergency codes‘. Write down these details somewhere, we will need the ‘secret key‘ later on to setup Google Authenticator app.

[root@tecmint libpam-google-authenticator-1.0]# google-authenticator

Do you want authentication tokens to be time-based (y/n) y
https://www.google.com/chart?chs=200x200&chld=M|0&cht=qr&chl=otpauth://totp/root@tecmint.com%3Fsecret%3DXEKITDTYCBA2TLPL
Your new secret key is: XEKITDTYCBA2TLPL
Your verification code is 461618
Your emergency scratch codes are:
  65083399
  10733609
  47588351
  71111643
  92017550

Next, follow the setup wizard and in most cases type answer as “y” (yes) as shown below.

Do you want me to update your "/root/.google_authenticator" file (y/n) y

Do you want to disallow multiple uses of the same authentication
token? This restricts you to one login about every 30s, but it increases
your chances to notice or even prevent man-in-the-middle attacks (y/n) y

By default, tokens are good for 30 seconds and in order to compensate for
possible time-skew between the client and the server, we allow an extra
token before and after the current time. If you experience problems with poor
time synchronization, you can increase the window from its default
size of 1:30min to about 4min. Do you want to do so (y/n) y

If the computer that you are logging into isn't hardened against brute-force
login attempts, you can enable rate-limiting for the authentication module.
By default, this limits attackers to no more than 3 login attempts every 30s.
Do you want to enable rate-limiting (y/n) y

Configuring SSH to use Google Authenticator Module

Open the PAM configuration file ‘/etc/pam.d/sshd‘ and add the following line to the top of the file.

auth       required     pam_google_authenticator.so

Next, open the SSH configuration file ‘/etc/ssh/sshd_config‘ and scroll for fine the line that says.

ChallengeResponseAuthentication no

Change it to “yes“. So, it becomes like this.

ChallengeResponseAuthentication yes

Finally, restart SSH service to take new changes.

# /etc/init.d/sshd restart

Configuring Google Authenticator App

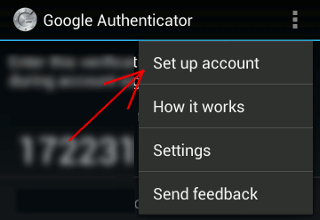
Launch Google Authenticator app in your smartphone. Press Menu and choose “Setup an account“. If you don’t have this app, you can download and install Google Authenticator app on your Android/iPhone/Blackberrydevices.

Google Authenticator Setup Account

Google Authenticator Setup Account

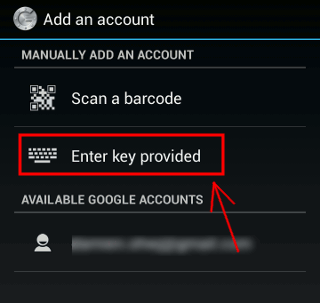
Press “Enter key provided”.

Google Authenticator Secret Key

Enter Google Authenticator Secret Key

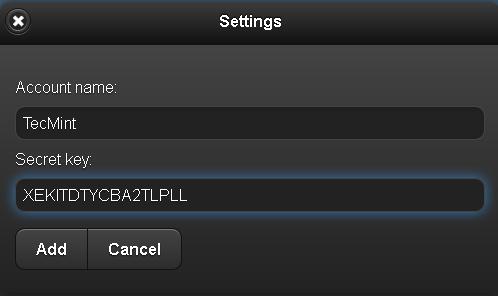
Add your account ‘Name‘ and enter the ‘secret key‘ generated earlier.

Google Authenticator Account Name

Google Authenticator Account Name and Secret Key

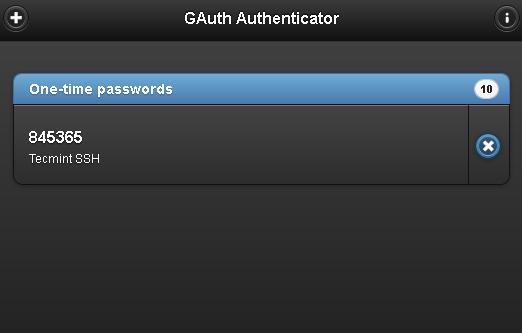
It will generate one time password (verification code) that will constantly changing every 30sec on your phone.

Google Authenticator One Time Password

Google Authenticator One Time Password

Now try to login via SSH, you will be prompted with Google Authenticator code (Verification code) and Password whenever you attempt to log in via SSH. You have only 30 seconds to enter this verification code, if you miss it will regenerate new verification code.

login as: tecmint
Access denied
Using keyboard-interactive authentication.
Verification code:
Using keyboard-interactive authentication.
Password:
Last login: Tue Apr 23 13:58:29 2013 from 172.16.25.125
[root@tecmint ~]#

If you don’t have smartphone, you can also use a Firefox add-on called GAuth Authenticator to do two-factor authentication.

Important: The two-factor authentication works with password based SSH login. If you are using any private/public key SSH session, it will ignore two-factor authentication and log you in directly.

Source

Useful ‘host’ Command Examples for Querying DNS Lookups

Host command is a minimal and easy-to-use CLI utility for performing DNS lookups which translate domain names to IP addresses and vice versa. It can also be used to list and verify various types of DNS records such as NS and MX, test and validate ISP DNS server and Internet connectivity, spam and blacklisting records, detecting and troubleshooting DNS server issues among others.

In this article, we will learn how to use host command with a few useful examples in Linux to perform DNS lookups. In previous articles, we showed the most used 8 Nslookup commands for testing and troubleshooting DNS servers and to query specific DNS resource records (RR) as well.

We also explained 10 Linux Dig (Domain Information Groper) commands to query DNS info, it works more like the Nslookup tool. The host utility also works in a similar way and comes preinstalled on most if not all mainstream Linux distros.

With that said, let’s look at these 14 host commands below.

Find the Domain IP Address

This is the simplest host command you can run, just provide a domain name such as google.com to get the associated IP addresses.

$ host google.com

google.com has address 216.58.201.46
google.com has IPv6 address 2a00:1450:4009:80b::200e
google.com mail is handled by 20 alt1.aspmx.l.google.com.
google.com mail is handled by 30 alt2.aspmx.l.google.com.
google.com mail is handled by 10 aspmx.l.google.com.
google.com mail is handled by 40 alt3.aspmx.l.google.com.
google.com mail is handled by 50 alt4.aspmx.l.google.com.

Find Domain Name Servers

To find out the domain name servers use the -t option.

$ host -t ns google.com

google.com name server ns1.google.com.
google.com name server ns2.google.com.
google.com name server ns3.google.com.
google.com name server ns4.google.com.

Find Domain CNAME Record

To find out the domain CNAME, run.

$ host -t cname mail.google.com

mail.google.com is an alias for googlemail.l.google.com.

Find Domain MX Record

To find out the MX records for a domain.

$ host -n -t mx google.com

ogle.com mail is handled by 50 alt4.aspmx.l.google.com.
google.com mail is handled by 10 aspmx.l.google.com.
google.com mail is handled by 40 alt3.aspmx.l.google.com.
google.com mail is handled by 30 alt2.aspmx.l.google.com.
google.com mail is handled by 20 alt1.aspmx.l.google.com.

Find Domain TXT Record

To find out the TXT records for a domain.

$ host -t txt google.com

google.com descriptive text "v=spf1 include:_spf.google.com ~all"

Find Domain SOA Record

You can make host attempt to display the SOA records for specified zone, from all the listed authoritative name servers for that zone with the -C flag.

$ host -C google.com

Nameserver 216.239.38.10:
	google.com has SOA record ns1.google.com. dns-admin.google.com. 156142728 900 900 1800 60
Nameserver 216.239.32.10:
	google.com has SOA record ns3.google.com. dns-admin.google.com. 156142728 900 900 1800 60
Nameserver 216.239.34.10:
	google.com has SOA record ns4.google.com. dns-admin.google.com. 156142728 900 900 1800 60
Nameserver 216.239.36.10:
	google.com has SOA record ns2.google.com. dns-admin.google.com. 156142728 900 900 1800 60

Query Particular Name Server

To query particual domain name server.

$ host google.com ns4.google.com

Using domain server:
Name: ns4.google.com
Address: 216.239.38.10#53
Aliases: 

google.com has address 172.217.19.46
google.com has IPv6 address 2a00:1450:4005:808::200e
google.com mail is handled by 30 alt2.aspmx.l.google.com.
google.com mail is handled by 20 alt1.aspmx.l.google.com.
google.com mail is handled by 50 alt4.aspmx.l.google.com.
google.com mail is handled by 10 aspmx.l.google.com.
google.com mail is handled by 40 alt3.aspmx.l.google.com.

Find All Information of Domain Records and Zones

To make a query of type ANY, use the -a (all) option which is equivalent to setting the -v option.

$ host -a google.com

Trying "google.com"
;; ->>HEADER<

Get Domain TTL Information

To find out domain TTL information.

$ host -v -t a google.com

Trying "google.com"
;; ->>HEADER<

Use Either IPv4 or IPv6

The -4 or -6 option forces host to use only IPv4 or only IPV6 query transport respectively.

$ host -4 google.com
OR
$ host -6 google.com

Perform Non-Recursive Queries

The -r option performs non-recursive queries, note that setting this option clears the RD (recursion desired), the bit in the query which host makes.

$ host -rR 5 google.com

google.com has address 216.58.201.46
google.com has IPv6 address 2a00:1450:4009:80b::200e
google.com mail is handled by 30 alt2.aspmx.l.google.com.
google.com mail is handled by 40 alt3.aspmx.l.google.com.
google.com mail is handled by 50 alt4.aspmx.l.google.com.
google.com mail is handled by 20 alt1.aspmx.l.google.com.
google.com mail is handled by 10 aspmx.l.google.com.

Set UDP Retries for a Lookup

By default the number of UDP tries is 1, to change it, use the -R flag.

$ host -R 5 google.com

google.com has address 216.58.201.46
google.com has IPv6 address 2a00:1450:4009:80b::200e
google.com mail is handled by 30 alt2.aspmx.l.google.com.
google.com mail is handled by 40 alt3.aspmx.l.google.com.
google.com mail is handled by 50 alt4.aspmx.l.google.com.
google.com mail is handled by 20 alt1.aspmx.l.google.com.
google.com mail is handled by 10 aspmx.l.google.com.

Set Query Time Wait for Reply

Using the -W switch, you can instruct host to wait for a reply for the specified time in seconds and if the -wflag is used, it makes host to wait forever for a reply:

$ host -T -W 10 google.com

google.com has address 216.58.201.46
google.com has IPv6 address 2a00:1450:4009:80b::200e
google.com mail is handled by 10 aspmx.l.google.com.
google.com mail is handled by 40 alt3.aspmx.l.google.com.
google.com mail is handled by 30 alt2.aspmx.l.google.com.
google.com mail is handled by 20 alt1.aspmx.l.google.com.
google.com mail is handled by 50 alt4.aspmx.l.google.com.

That’s it! In this article, we learned how to use host command with a few useful examples in Linux. Use the feedback form below to share any thoughts with us concerning this guide.

Source

How to Change SSH Port in Linux

SSH or Secure Shell daemon is a network protocol that is used to perform remotely secured log ins to Linux systems via a secured channel through unsecured networks using strong cryptography.

One of the most basic utility of SSH protocol is the ability to access Unix shells on remote Linux machines and execute commands. However, SSH protocol can offer other implementations, such as the ability to create secured TCP tunnels over the protocol, to remotely and securely transfer files between machines or to act as a FTP like service.

The standard port used by SSH service is 22/TCP. However, you might want to change SSH default port in your Linux server, in order to achieve some kind of security through obscurity because the standard 22/TCP port is continuously targeted for vulnerabilities by hackers and bots in internet.

To change SSH service default port in Linux, first you need to open the main SSH daemon configuration file for editing with your favorite text editor by issuing the below command and make the following changes.

# vi /etc/ssh/sshd_config

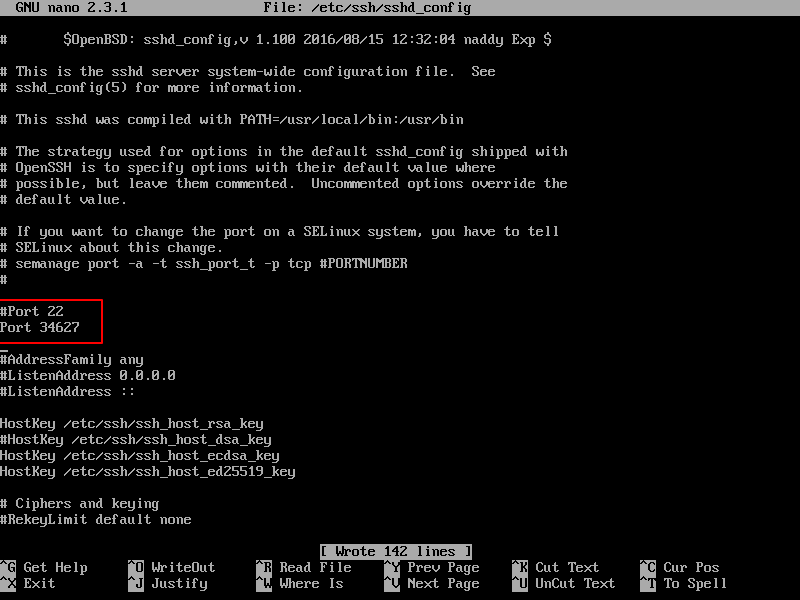
In sshd_config file, search and comment the line that begins with Port 22, by adding a hashtag (#) in front of the line. Below this line, add a new port line and specify your desired port to bind SSH.

In this example, we’ll configure SSH service to bind and listen on port 34627/TCP. Make sure you choose a random port, preferably higher than 1024 (the superior limit of standard well-known ports). The maximum port that can be setup for for SSH is 65535/TCP.

#Port 22
Port 34627

Change SSH Port in Linux

Change SSH Port in Linux

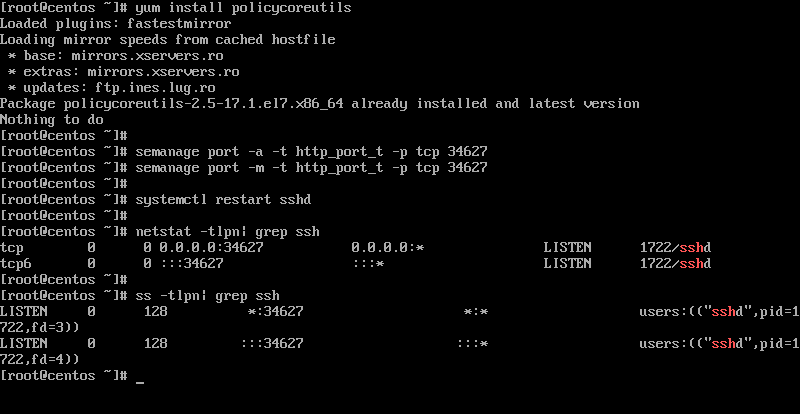
After you’ve made the above changes, restart the SSH daemon to reflect changes and issue netstat or ss command to confirm that SSH service listens on the new TCP port.

# systemctl restart ssh
# netstat -tlpn| grep ssh
# ss -tlpn| grep ssh

In CentOS or RHEL Linux based distributions, install policycoreutils package and add the below rules to relax SELinux policy in order for the SSH daemon to bind on the new port.

# yum install policycoreutils
# semanage port -a -t ssh_port_t -p tcp 34627
# semanage port -m -t ssh_port_t -p tcp 34627
# systemctl restart sshd
# netstat -tlpn| grep ssh
# ss -tlpn| grep ssh

Verify SSH New Port

Verify SSH New Port

Also, don’t forget to update the firewall rules specific for your own installed Linux distribution in order to allow incoming connections to be established on the new added SSH port.

Source

Restrict SSH User Access to Certain Directory Using Chrooted Jail

There are several reasons to restrict a SSH user session to a particular directory, especially on web servers, but the obvious one is a system security. In order to lock SSH users in a certain directory, we can use chrootmechanism.

change root (chroot) in Unix-like systems such as Linux, is a means of separating specific user operations from the rest of the Linux system; changes the apparent root directory for the current running user process and its child process with new root directory called a chrooted jail.

In this tutorial, we’ll show you how to restrict a SSH user access to a given directory in Linux. Note that we’ll run the all the commands as root, use the sudo command if you are logged into server as a normal user.

Step 1: Create SSH Chroot Jail

1. Start by creating the chroot jail using the mkdir command below:

# mkdir -p /home/test

2. Next, identify required files, according to the sshd_config man page, the ChrootDirectory option specifies the pathname of the directory to chroot to after authentication. The directory must contain the necessary files and directories to support a user’s session.

For an interactive session, this requires at least a shell, commonly sh, and basic /dev nodes such as null, zero, stdin, stdout, stderr, and tty devices:

# ls -l /dev/{null,zero,stdin,stdout,stderr,random,tty}

Listing Required Files

Listing Required Files

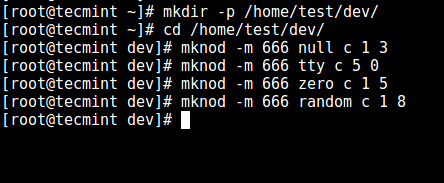
3. Now, create the /dev files as follows using the mknod command. In the command below, the -m flag is used to specify the file permissions bits, c means character file and the two numbers are major and minor numbers that the files point to.

# mkdir -p /home/test/dev/		
# cd /home/test/dev/
# mknod -m 666 null c 1 3
# mknod -m 666 tty c 5 0
# mknod -m 666 zero c 1 5
# mknod -m 666 random c 1 8

Create /dev and Required Files

Create /dev and Required Files

4. Afterwards, set the appropriate permission on the chroot jail. Note that the chroot jail and its subdirectories and subfiles must be owned by root user, and not writable by any normal user or group:

# chown root:root /home/test
# chmod 0755 /home/test
# ls -ld /home/test

Set Permissions on Directory

Set Permissions on Directory

Step 2: Setup Interactive Shell for SSH Chroot Jail

5. First, create the bin directory and then copy the /bin/bash files into the bin directory as follows:

# mkdir -p /home/test/bin
# cp -v /bin/bash /home/test/bin/

Copy Files to bin Directory

Copy Files to bin Directory

6. Now, identify bash required shared libs, as below and copy them into the lib directory:

# ldd /bin/bash
# mkdir -p /home/test/lib64
# cp -v /lib64/{libtinfo.so.5,libdl.so.2,libc.so.6,ld-linux-x86-64.so.2} /home/test/lib64/

Copy Shared Library Files

Copy Shared Library Files

Step 3: Create and Configure SSH User

7. Now, create the SSH user with the useradd command and set a secure password for the user:

# useradd tecmint
# passwd tecmint

8. Create the chroot jail general configurations directory, /home/test/etc and copy the updated account files (/etc/passwd and /etc/group) into this directory as follows:

# mkdir /home/test/etc
# cp -vf /etc/{passwd,group} /home/test/etc/

Copy Password Files

Copy Password Files

Note: Each time you add more SSH users to the system, you will need to copy the updated account files into the /home/test/etc directory.

Step 4: Configure SSH to Use Chroot Jail

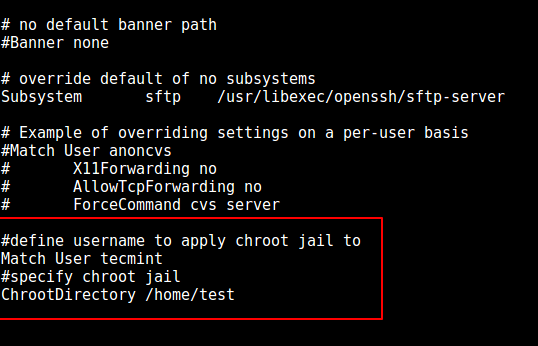
9. Now, open the sshd_config file.

# vi /etc/ssh/sshd_config

and add/modify the lines below in the file.

#define username to apply chroot jail to
Match User tecmint
#specify chroot jail
ChrootDirectory /home/test

Configure SSH Chroot Jail

Configure SSH Chroot Jail

Save the file and exit, and restart the SSHD services:

# systemctl restart sshd
OR
# service sshd restart

Step 5: Testing SSH with Chroot Jail

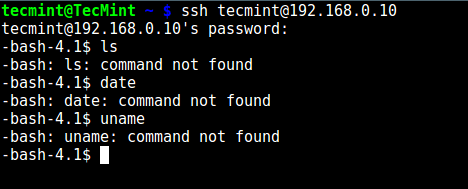
10. At this point, test if the chroot jail setup is working as expected:

# ssh tecmint@192.168.0.10
-bash-4.1$ ls
-bash-4.1$ date
-bash-4.1$ uname

Testing SSH User Chroot Jail

Testing SSH User Chroot Jail

From the screenshot above, we can see that the SSH user is locked in the chrooted jail, and can’t run any external commands (ls, date, uname etc).

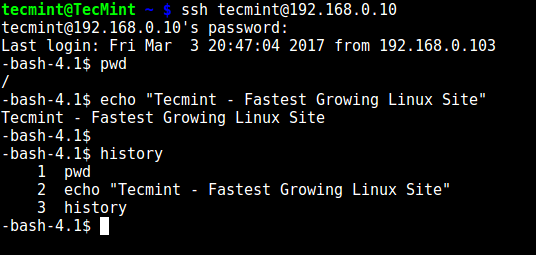
The user can only execute bash and its builtin commands such as(pwd, history, echo etc) as seen below:

# ssh tecmint@192.168.0.10
-bash-4.1$ pwd
-bash-4.1$ echo "Tecmint - Fastest Growing Linux Site"
-bash-4.1$ history

SSH Built-in Commands

SSH Built-in Commands

Step 6. Create SSH User’s Home Directory and Add Linux Commands

11. From the previous step, we can notice that the user is locked in the root directory, we can create a home directory for the the SSH user like so (do this for all future users):

# mkdir -p /home/test/home/tecmint
# chown -R tecmint:tecmint /home/test/home/tecmint
# chmod -R 0700 /home/test/home/tecmint

Create SSH User Home Directory

Create SSH User Home Directory

12. Next, install a few user commands such as ls, date, mkdir in the bin directory:

# cp -v /bin/ls /home/test/bin/
# cp -v /bin/date /home/test/bin/
# cp -v /bin/mkdir /home/test/bin/

Add Commands to SSH User

Add Commands to SSH User

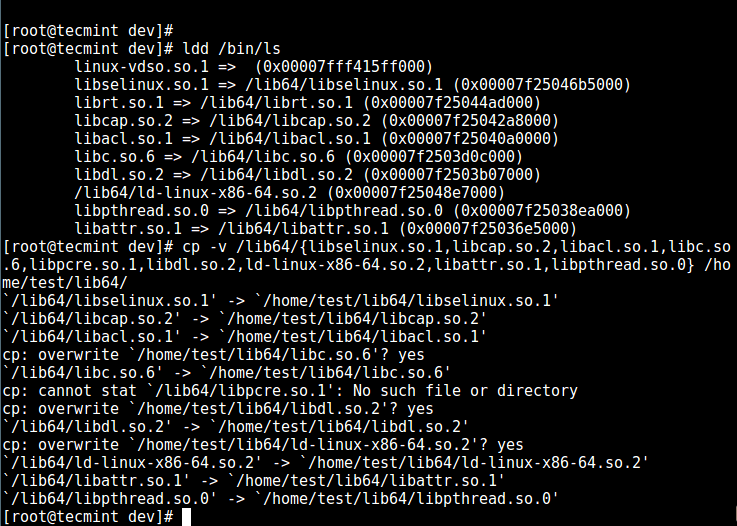
13. Next, check the shared libraries for the commands above and move them into the chrooted jail libraries directory:

# ldd /bin/ls
# cp -v /lib64/{libselinux.so.1,libcap.so.2,libacl.so.1,libc.so.6,libpcre.so.1,libdl.so.2,ld-linux-x86-64.so.2,libattr.so.1,libpthread.so.0} /home/test/lib64/

Copy Shared Libraries

Copy Shared Libraries

Step 7. Testing SFTP with Chroot Jail

14. Do a final test using sftp; check if the commands you have just installed are working.

Add the line below in the /etc/ssh/sshd_config file:

#Enable sftp to chrooted jail 
ForceCommand internal-sftp

Save the file and exit. Then restart the SSHD services:

# systemctl restart sshd
OR
# service sshd restart

15. Now, test using SSH, you’ll get the following error:

# ssh tecmint@192.168.0.10

Test SSH Chroot Jail

Test SSH Chroot Jail

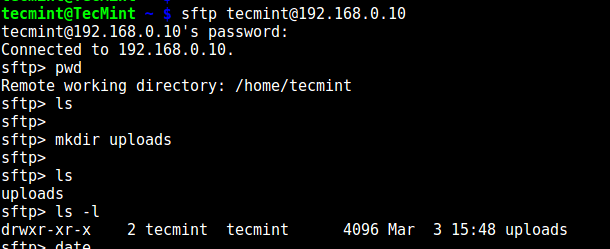
Try using SFTP as follows:

# sftp tecmint@192.168.0.10

Testing sFTP SSH User

Testing sFTP SSH User

Suggested Read: Restrict SFTP Users to Home Directories Using chroot Jail

That’s it for now!. In this article, we showed you how to restrict a SSH user in a given directory (chrooted jail) in Linux. Use the comment section below to offer us your thoughts about this guide.

Source

How to Restrict SFTP Users to Home Directories Using chroot Jail

In this tutorial, we will be discussing how to restrict SFTP users to their home directories or specific directories. It means the user can only access his/her respective home directory, not the entire file system.

Restricting users home directories is vital, especially in a shared server environment, so that an unauthorized user won’t sneak peek into the other user’s files and folders.

Important: Please also note that the purpose of this article is to provide SFTP access only, not SSH logins, by following this article will have the permissions to do file transfer, but not allowed to do a remote SSH session.

Suggested Read: Restrict SSH User Access to Certain Directory Using Chrooted Jail

The simplest way to do this, is to create a chrooted jail environment for SFTP access. This method is same for all Unix/Linux operating systems. Using chrooted environment, we can restrict users either to their home directory or to a specific directory.

Restrict Users to Home Directories

In this section, we will create new group called sftpgroup and assign correct ownership and permissions to user accounts. There are two choices to restrict users to home or specific directories, we will see both way in this article.

Create or Modify Users and Groups

Let us restrict the existing user, for example tecmint, to his/her home directory named /home/tecmint. For this, you need to create a new sftpgroup group using groupadd command as shown:

# groupadd sftpgroup

Next, assign the user ‘tecmint’ to sftpgroup group.

# usermod -G sftpgroup tecmint

You can also create a new user using useradd command, for example senthil and assign the user to sftpusers group.

# adduser senthil -g sftpgroup -s /sbin/nologin
# passwd tecmint

Modify SSH Configuration File

Open and add the following lines to /etc/ssh/sshd_config configuration file.

Subsystem sftp internal-sftp
 
   Match Group sftpgroup
   ChrootDirectory /home
   ForceCommand internal-sftp
   X11Forwarding no
   AllowTcpForwarding no

Save and exit the file, restart sshd service to take new changes into effect.

# systemctl restart sshd
OR
# service sshd restart

If you chroot multiple users to the same directory, you should change the permissions of each user’s home directory in order to prevent all users to browse the home directories of the each other users.

# chmod 700 /home/tecmint

Verify SSH and SFTP Users Login

Now, it’s time to check the login from a local system. Try to ssh your remote system from your local system.

# ssh tecmint@192.168.1.150

Here,

  1. tecmint – remote system’s username.
  2. 192.168.1.150 – Remote system’s IP address.
Sample output:
tecmint@192.168.1.150's password: 
Could not chdir to home directory /home/tecmint: No such file or directory
This service allows sftp connections only.
Connection to 192.168.1.150 closed.

Then, access remote system using SFTP.

# sftp tecmint@192.168.1.150
Sample output:
tecmint@192.168.1.150's password: 
Connected to 192.168.1.150.
sftp>

Let us check the current working directory:

sftp&gt pwd
Remote working directory: /

sftp&gt ls
tecmint  

Here, tecmint is the home directory. Cd to the tecmint directory and create the files or folders of your choice.

sftp&gt cd tecmint
Remote working directory: /

sftp&gt mkdir test
tecmint  

Restrict Users to a Specific Directory

In our previous example, we restrict the existing users to the home directory. Now, we will see how to restrict a new user to a custom directory.

Create Group and New Users

Create a new group sftpgroup.

# groupadd sftpgroup

Next, create a directory for SFTP group and assign permissions for the root user.

# mkdir -p /sftpusers/chroot
# chown root:root /sftpusers/chroot/

Next, create new directories for each user, to which they will have full access. For example, we will create tecmint user and it’s new home directory with correct group permission using following series of commands.

# adduser tecmint -g sftpgroup -s /sbin/nologin
# passwd tecmint
# mkdir /sftpusers/chroot/tecmint
# chown tecmint:sftpgroup /sftpusers/chroot/tecmint/
# chmod 700 /sftpusers/chroot/tecmint/

Configure SSH for SFTP Access

Modify or add the following lines at the end of the file:

#Subsystem  	sftp	/usr/libexec/openssh/sftp-server
Subsystem sftp  internal-sftp
 
Match Group sftpgroup
   ChrootDirectory /sftpusers/chroot/
   ForceCommand internal-sftp
   X11Forwarding no
   AllowTcpForwarding no

Save and exit the file. Restart sshd service to take effect the saved changes.

# systemctl restart sshd
OR
# service sshd restart

That’s it, you can check by logging into the your remote SSH and SFTP server by using the step provided above at Verify SSH and SFTP login.

Be mindful that this method will disable the shell access, i.e you can’t access the remote system’s shell session using SSH. You can only access the remote systems via SFTP and do file transfer to and from the local and remote systems.

Conclusion

Now you know how to restrict users home directories using a Chroot environment in Linux. If you find this useful, share this article on your social networks and let us know in the comment section below if there is any other methods to restrict users home directories.

Source

How to Find Recent or Today’s Modified Files in Linux

In this article, we will explain two, simple command line tips that enable you to only list all today’s files.

One of the common problems Linux users encounter on the command line is locating files with a particular name, it can be much easier when you actually know the filename.

However, assuming that you have forgotten the name of a file that you created (in your home folder which contains hundreds of files) at an earlier time during the day and yet you need to use urgently.

Below are different ways of only listing all files that you created or modified (directly or indirectly) today.

1. Using the ls command, you can only list today’s files in your home folder as follows, where:

  1. -a – list all files including hidden files
  2. -l – enables long listing format
  3. --time-style=FORMAT – shows time in the specified FORMAT
  4. +%D – show/use date in %m/%d/%y format
# ls  -al --time-style=+%D | grep 'date +%D'

Find Recent Files in Linux

Find Recent Files in Linux

In addition, you can sort the resultant list alphabetically by including the -X flag:

# ls -alX --time-style=+%D | grep 'date +%D'

You can also list based on size (largest first) using the -S flag:

# ls -alS --time-style=+%D | grep 'date +%D'

2. Again, it is possible to use the find command which is practically more flexible and offers plenty of options than ls, for the same purpose as below.

  1. -maxdepth level is used to specify the level (in terms of sub-directories) below the starting point (current directory in this case) to which the search operation will be carried out.
  2. -newerXY, this works if timestamp X of the file in question is newer than timestamp Y of the file reference. X and Y represent any of the letters below:
    1. a – access time of the file reference
    2. B – birth time of the file reference
    3. c – inode status change time of reference
    4. m – modification time of the file reference
    5. t – reference is interpreted directly as a time

This means that, only files modified on 2016-12-06 will be considered:

# find . -maxdepth 1 -newermt "2016-12-06"

Find Today's Files in Linux

Find Today’s Files in Linux

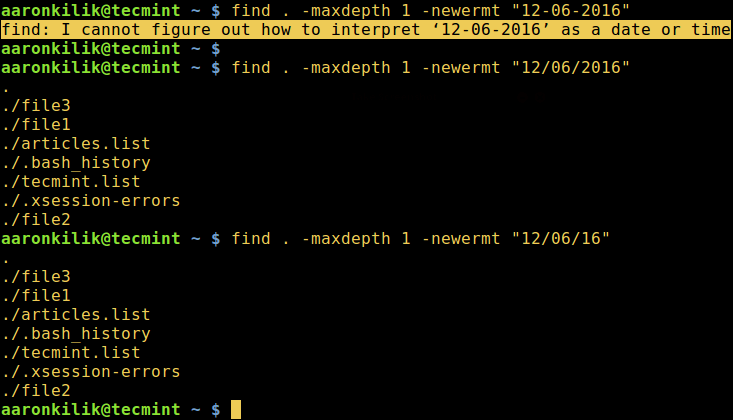
Important: Use the correct date format as reference in the find command above, once you use a wrong format, you will get an error as the one below:

# find . -maxdepth 1 -newermt "12-06-2016"

find: I cannot figure out how to interpret '12-06-2016' as a date or time

Alternatively, use the correct formats below:

# find . -maxdepth 1 -newermt "12/06/2016"
OR
# find . -maxdepth 1 -newermt "12/06/16"

Find Todays Modified Files in Linux

Find Todays Modified Files in Linux

You can get more usage information for ls and find commands in our following series of articles on same.

  1. Master Linux ‘ls’ Command with This 15 Examples
  2. Useful 7 Quirky ‘ls’ Tricks for Linux Users
  3. Master Linux ‘find’ Command with This 35 Examples
  4. Ways to Find Multiple Filenames with Extensions in Linux

In this article, we explained two important tips of how to list only today’s files with the help of ls and find commands. Make use of the feedback form below to send us any question(s) or comments about the topic. You can as well inform us of any commands used for the same goal.

Source

How to Run ‘sudo’ Command Without Entering a Password in Linux

In case you are running Linux on a machine that you normally use alone, say on a laptop, entering a password each time you invoke sudo can become so boring in the long run. Therefore, in this guide, we will describe how to configure sudo command to run without entering a password.

This setting is done in the /etc/sudoers file, which drives sudoers to use default security policy plugin for the sudo command; under the user privilege specification section.

Important: In the sudeors file, the authenticate parameter which is turned on by default is used for authentication purposes. If it is set, users must authenticate themselves via a password (or other means of authentication) before they run commands with sudo.

However, this default value may be overridden using the NOPASSWD (require no password when user invokes sudo command) tag.

The syntax to configure user privileges is as follows:

user_list host_list=effective_user_list tag_list command_list

Where:

  1. user_list – list of users or a user alias that has already been set.
  2. host_list – list of hosts or a host alias on which users can run sudo.
  3. effective_user_list – list of users they must be running as or a run as alias.
  4. tag_list – list of tags such as NOPASSWD.
  5. command_list – list of commands or a command alias to be run by user(s) using sudo.

To allow a user (aaronkilik in the example below) to run all commands using sudo without a password, open the sudoers file:

$ sudo visudo

And add the following line:

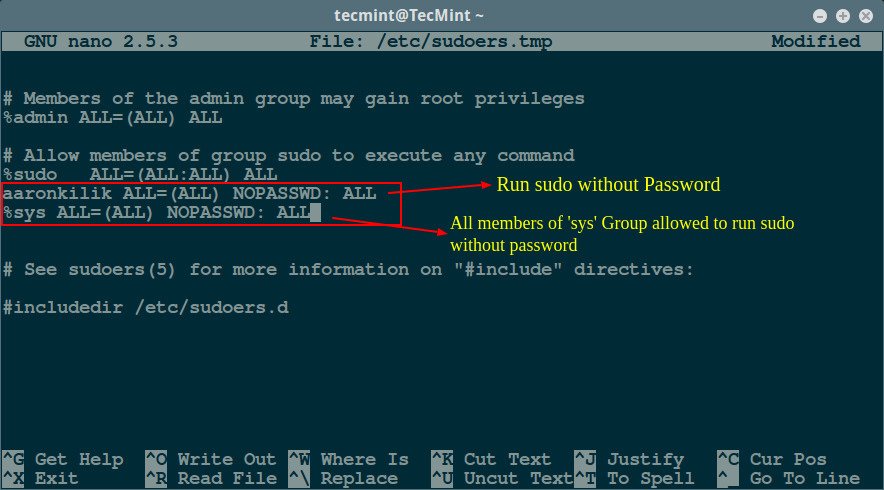
aaronkilik ALL=(ALL) NOPASSWD: ALL

For the case of a group, use the % character before the group name as follows; this means that all member of the sys group will run all commands using sudo without a password.

%sys ALL=(ALL) NOPASSWD: ALL

To permit a user to run a given command (/bin/kill) using sudo without a password, add the following line:

aaronkilik ALL=(ALL) NOPASSWD: /bin/kill

The line below will enable member of the sys group to run the commands: /bin/kill/bin/rm using sudowithout a password:

%sys ALL=(ALL) NOPASSWD: /bin/kill, /bin/rm

Run sudo Without Password

Run sudo Without Password

For more sudo configuration and additional usage options, read our articles that describes more examples:

  1. 10 Useful Sudoers Configurations for Setting ‘sudo’ in Linux
  2. Let Sudo Insult You When You Enter Incorrect Password
  3. How to Keep ‘sudo’ Password Timeout Session Longer in Linux

In this article, we described how to configure sudo command to run without entering a password. Do not forget to offer us your thoughts about this guide or other useful sudeors configurations for Linux system administrators all in the comments.

Source

WP2Social Auto Publish Powered By : XYZScripts.com