How to Install Telegram Messenger Application on Linux

Telegram is an Instant Messaging (IM) application similar to whatsapp. It has a very large user base. It has a lot of features that differentiate it from other messaging application.

This article aims at making you aware of telegram application followed by detailed installation instructions on Linux Box.

Features of Telegram

  1. Implementation for mobile devices
  2. Available for Desktop.
  3. Application Program Interface (API) of Telegram can be Accessed by third party developers.
  4. Available for Android, iphone/ipad, Windows Phone, Web-Version, PC, Mac and Linux
  5. The above application provides Heavily Encrypted and self destruct messages.
  6. Lets you access your message from multiple devices and platform.
  7. The overall processing and message delivery is lightening fast.
  8. Distributed server across the globe for security and speed.
  9. Open API and Free Protocol
  10. NoAds, No Subscription charge. – Free forever.
  11. Powerful – No limit to media and chats
  12. Several security measures that make it safe from Hackers.
  13. Reply to Specific message in group. Mention @username to notify multiple users in group.

Why Telegram?

When Applications like whatsapp and other IM are providing almost same things in bag, why should someone opt for Telegram?

Well Availability of API to third party developer is enough to say. Moreover availability for PC which means you won’t have to struggle typing message using your mobile, but you can use your PC and that is pretty more than sufficient.

Also The option to connect on remote locations, Co-ordinate – Group of upto 200 Members, Sync all your devices, Send – Documents of all kind, Encrypt message, Self destruction of message, Storage of Media in Cloud, Build own tool on freely available API and what not.

Testing Environment

We have used Debian GNU/Linux, x86_64 architecture to test it and the overall process went very smooth for us. Here what we did stepwise.

Installation of Telegram Messenger in Linux

First go to the official Telegram site, and download Telegram source package (tsetup.1.1.23.tar.xz) for Linux system or you may use following wget command to download directly.

# wget https://updates.tdesktop.com/tlinux/tsetup.1.1.23.tar.xz

Once package has been downloaded, unpack the tarball and switch from current working directory to the extracted directory.

# tar -xf tsetup.1.1.23.tar.xz 
# cd Telegram/

Next, execute the binary file ‘Telegram’ from the command line as shown below.

# ./Telegram

1. The first Impression. Click “START MESSAGING”.

Start Messaging

Start Messaging

2. Enter Your phone Number. Click “NEXT”. If you have not registered for telegram before this, using the same number as entered above you will get a warning that you don’t have a telegram account yet. Click “Register Here”.

Signup for Telegram

Signup for Telegram

3. After submitting your phone number, telegram will send you a verification code, shortly. You need to Enter it.

Telegram Verification Code

Telegram Verification Code

4. Enter your First_Name, Last_name and pics and click “SIGNUP”.

Enter Account Details

Enter Account Details

5. After account creation, I got this interface. Everything seems at its place, even when I am new to telegram Application. The interface is really simple.

Telegram Interface

Telegram Interface

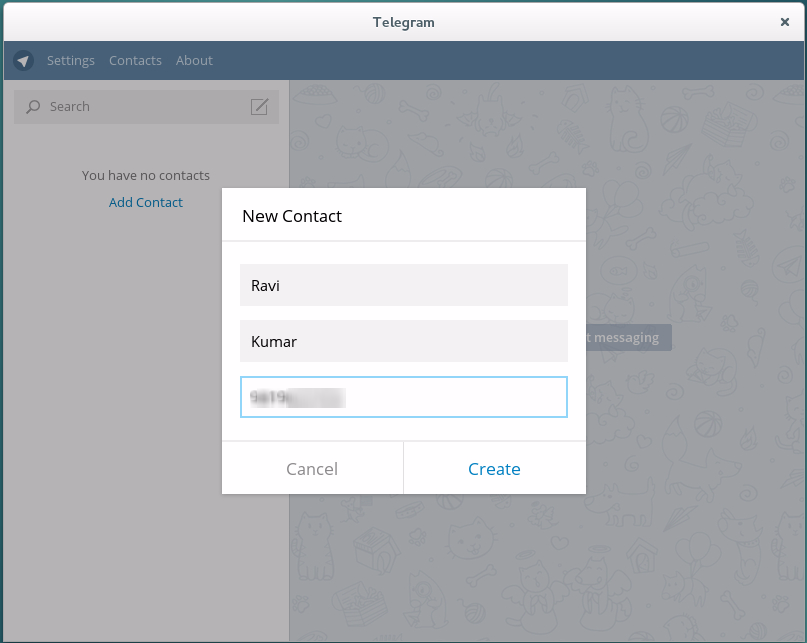
6. Click Add a contact and Enter Their first_name, last_name and Phone number. Click create when done!.

Add New Telegram Contact

Add New Telegram Contact

7. If the contact you added is not on telegram already, You get a warning message and telegram will acknowledge you when your contact joins telegram.

Telegram Contact Notification

Telegram Contact Notification

8. As soon as the contact joins telegram you get a message (pop-out like) that reads [YOUR_CONTACT] joined telegram.

9. A formal chat window on Linux Machine. Nice experience…

Telegram Contact Join Message

Telegram Contact Join Message

10. At the same time, I’ve tried messaging from my android mobile device, the interface looks similar on both.

Telegram Mobile Interface

Telegram Mobile Interface

11. Telegram settings page. You have a lot of options to configure.

Telegram Settings

Telegram Settings

12. About Telegram.

About Telegram

About Telegram

Less Interesting Points

  1. Telegram usage protocol MTProto Mobile protocol.
  2. Released Initially for iPhone in the year 2013 (August 14)..
  3. People Behind this Amazing Project: Pavel and Nikolai Durov..

That’s all for now. I’ll be here again with another interesting article you will love to read. I take the pleasure on behalf of Tecmint to thank all our valuable readers and critics who made us stand where we are now through continuous self evolving process. Keep Connected! Keep Commenting. Share if you care for us.

https://telegram.org/

Source

Remmina – A Feature Rich Remote Desktop Sharing Tool for Linux

Remmina is a is free and open-source, feature-rich and powerful remote desktop client for Linux and other Unix-like systems, written in GTK+3. It’s intended for system administrators and travelers, who need to remotely access and work with many computers.

It supports several network protocols in a simple, unified, homogeneous and easy-to-use user interface.

Remmina Features

  • Supports RDP, VNC, NX, XDMCP and SSH.
  • Enables users to maintain a list of connection profiles, organized by groups.
  • Supports quick connections by users directly putting in the server address.
  • Remote desktops with higher resolutions are scrollable/scalable in both window and fullscreen mode.
  • Supports viewport fullscreen mode; here the remote desktop automatically scrolls when the mouse moves over the screen edge.
  • Also supports floating toolbar in fullscreen mode; enables you to switch between modes, toggle keyboard grabbing, minimize and beyond.
  • Offers tabbed interface, optionally managed by groups.
  • Also offers tray icon, allows you to quickly access configured connection profiles.

In this article, we will show you how to install and use Remmina with a few supported protocols in Linux for desktop sharing.

Prerequisites

  • Allow desktop sharing in remote machines (enable remote machines to permit remote connections).
  • Setup SSH services on the remote machines.

How to Install Remmina Desktop Sharing Tool in Linux

Remmina and its plugin packages are already provided in the official repositories of the all if not most of the mainstream Linux distributions. Run the commands below to install it with all supported plugins:

------------ On Debian/Ubuntu ------------ 
$ sudo apt-get install remmina remmina-plugin-*
------------ On CentOS/RHEL ------------ 
# yum install remmina remmina-plugins-*
------------ On Fedora 22+ ------------ 
$ sudo dnf copr enable hubbitus/remmina-next
$ sudo dnf upgrade --refresh 'remmina*' 'freerdp*'

Once you have installed it, search for remmina in the Ubuntu Dash or Linux Mint Menu, then launch it:

Remmina Desktop Sharing Client

Remmina Desktop Sharing Client

You can perform any configurations via the graphical interface or by editing the files under $HOME/.remmina or $HOME/.config/remmina.

To setup a new connection to a remote server press [Ctrl+N] or go to Connection -> New, configure the remote connection profile as shown in the screenshot below. This is the basic settings interface.

Remmina Basic Desktop Preferences

Remmina Basic Desktop Preferences

Click on Advanced from the interface above to configure advanced connection settings.

Remmina Advance Desktop Settings

Remmina Advance Desktop Settings

To configure SSH settings, click on the SSH from the profile interface above.

Remmina SSH Settings

Remmina SSH Settings

Once you have configured all the necessary settings, save the settings by clicking on Save button and from the main interface, you’ll be able to view all your configured remote connection profiles as shown below.

Remmina Configured Servers

Remmina Configured Servers

Connecting to Remote Machine Using sFTP

Choose the connection profile and edit the settings, choose SFTP – Secure File Transfer from the Protocolsdown menu. Then set a startup path (optional) and specify the SSH authentication details. Lastly, click Connect.

Remmina sftp Connection

Remmina sftp Connection

Enter your SSH user password here.

Enter SSH Password

Enter SSH Password

If you see the interface below, then the SFTP connection is successful, you can now transfer files between your machines.

Remmina Remote sFTP Filesystem

Remmina Remote sFTP Filesystem

Connect to Remote Machine Using SSH

Select the connection profile and edit the settings, then choose SSH – Secure Shell from the Protocols down menu and optionally set a startup program and SSH authentication details. Lastly, click Connect, and enter the user SSH password.

Remmina SSH Connection

Remmina SSH Connection

When you see the interface below, it means your connection is successful, you can now control the remote machine using SSH.

Remmina Remote SSH Connection

Remmina Remote SSH Connection

Connect to Remote Machine Using VNC

Choose the connection profile from the list and edit the settings, then select VNC – Virtual Network Computingfrom the Protocols down menu. Configure basic, advanced and ssh settings for the connection and click Connect, then enter the user SSH password.

Remmina VNC Connection

Remmina VNC Connection

Once you see the following interface, it implies that you have successfully connected to the remote machine using VNC protocol.

Enter the user login password from the desktop login interface as shown in the screenshot below.

Remmina Remote Desktop Login

Remmina Remote Desktop Login

Remmina Remote Desktop Sharing

Remmina Remote Desktop Sharing

Simply follow the steps above to use the other remaining protocols to access remote machines, it’s that simple.

Remmina Homepage: https://www.remmina.org/wp/

That’s all! In this article, we showed you how to install and use Remmina remote connection client with a few supported protocols in Linux. You can share any thoughts in the comments via the feedback form below.

Source

How to Install Let’s Chat on CentOS and Debian Based Systems

Let’s Chat is a free and open source, self-hosted chat application designed for relatively small teams. It is feature-rich; built using Node.js and employs MongoDB to store the application data.

Let’s Chat Features:

  • Supports persistent messages
  • Supports multiple rooms
  • Supports local/Kerberos/LDAP authentication
  • Comes with a REST-like API
  • Supports private and password-protected rooms
  • Offers support for new message alerts / notifications
  • Also supports mentions (hey @tecmint/@all)
  • Provides support for image embeds / Giphy search
  • Allows for code pasting
  • Supports for file uploads (locally or from Amazon S3 or Azure)
  • Also supports XMPP Multi-user chat (MUC) and 1-to-1 chat between XMPP users and many more.

Importantly, it is intended to be easily deployable on any system that meets all following requirements.

Requirements

  • Node.js (0.11+)
  • MongoDB (2.6+)
  • Python (2.7.x)

In this article, we will explain how to install and use a Let’s Chat messaging application for small teams on CentOS and Debian based systems.

Step 1: Update the System

1. First make sure to perform a system-wide update by installing necessary packages as follows.

-------------- On CentOS/RHEL/Fedora -------------- 
$ sudo yum update && sudo yum upgrade

-------------- On Debian/Ubuntu -------------- 
$ sudo apt-get update && sudo apt-get -y upgrade
$ sudo apt-get install software-properties-common git build-essential

2. After finishing system update, reboot the server (Optional).

$ sudo reboot

Step 2: Installing Node.js

3. Install most recent version of NodeJS (i.e version 7.x at the time of writing) using the nodesource repository as shown.

-------------- On CentOS/RHEL/Fedora --------------
$ curl -sL https://rpm.nodesource.com/setup_7.x | sudo -E bash - 
$ sudo yum install nodejs

-------------- On Debian/Ubuntu -------------- 
$ curl -sL https://deb.nodesource.com/setup_7.x | sudo -E bash -
$ sudo apt install nodejs 

Step 3: Installing MongoDB Server

4. Next you need to install MongoDB community version, however, it is not available in the YUM repository. Therefore you have to enable the MongoDB repository as explained below.

On CentOS/RHEL/Fedora

$ cat <<EOF | sudo tee -a /etc/yum.repos.d/mongodb-org-3.4.repo
[mongodb-org-3.4]
name=MongoDB Repository
baseurl=https://repo.mongodb.org/yum/redhat/7/mongodb-org/3.4/x86_64/
gpgcheck=1
enabled=1
gpgkey=https://www.mongodb.org/static/pgp/server-3.4.asc
EOF

Now install and start the latest version of MongoDB Server (i.e 3.4).

$ sudo yum install mongodb-org
$ sudo systemctl start mongod.service
$ sudo systemctl enable mongod.service

On Debian/Ubuntu

$ sudo apt-key adv --keyserver hkp://keyserver.ubuntu.com:80 --recv EA312927
$ echo 'deb http://repo.mongodb.org/apt/ubuntu xenial/mongodb-org/3.2 multiverse' | sudo tee /etc/apt/sources.list.d/mongodb-org-3.2.list
$ sudo apt-get update
$ sudo apt-get install -y mongodb-org
$ sudo systemctl start mongod.service
$ sudo systemctl enable mongod.service

Step 4: Install Let’s Chat Server

5. First install git to clone the Let’s Chat repository and install dependencies as shown.

$ sudo yum install git		##RHEL/CentOS
$ sudo apt install git		##Debian/Ubuntu

$ cd /srv
$ sudo git clone https://github.com/sdelements/lets-chat.git 
$ cd lets-chat
$ sudo npm install

Install Let Chat using NPM

Install Let Chat using NPM

Note: The npm WARN signals from the output above are normal during the installation. Just ignore them.

6. After finishing installation, create the application configuration file (/srv/lets-chat/settings.yml) from the sample file and define your custom settings in it:

$ sudo cp settings.yml.sample settings.yml

We will use default settings provided from the sample settings file.

7. Finally start the Let’s Chat server.

$ npm start 

To keep the Let’s Chat daemon running, let’s press Ctrl-C to exit and then create a Systemd unit file to enable it at system boot.

Step 5: Create Let’s Chat Startup File

8. Create a systemd unit file for Let’s Chat.

$ sudo vi /etc/systemd/system/letschat.service

Copy and paste the unit configuration below in the file.

[Unit]
Description=Let's Chat Server
Wants=mongodb.service
After=network.target mongodb.service

[Service]
Type=simple
WorkingDirectory=/srv/lets-chat
ExecStart=/usr/bin/npm start
User=root
Group=root
Restart=always
RestartSec=9

[Install]
WantedBy=multi-user.target

9. Now start the service for the mean time and enable it to automatically start on system boot.

$ sudo systemctl start letschat
$ sudo systemctl enable letschat
$ sudo systemctl status letschat

Start LetsChat Server

Start LetsChat Server

Step 6: Access Let’s Chat Web Interface

10. Once everything in place, you can access the Let’s Chat web interface at the following URL.

https://SERVER_IP:5000
OR
https://localhost:5000

Lets Chat Login

Lets Chat Login

11. Click on “I need an account” to create one and fill in the required information and click “Register”.

Create Lets Chat Account

Create Lets Chat Account

You may also like following related articles:

  1. Useful Commands to Create Commandline Chat Server in Linux
  2. Create Your Own Instant Messaging/Chat Server Using “Openfire” in Linux

Let’s Chat Github repository: https://github.com/sdelements/lets-chat

Enjoy! You now have Let’s Chat application installed on your system. To share any thoughts with us, use the feedback form below.

Source

Install OpenLiteSpeed, PHP 7 & MariaDB on Debian and Ubuntu

OpenLiteSpeed is an open source, high-performance HTTP server with an event-driven architecture; built for Unix-like operating systems including Linux and Windows OS.

It is a powerful, modular HTTP server that comes with several modules for common HTTP server functionalities, it can handle hundreds of thousands of concurrent connections without critical server load issues, and it supports third-party modules via API (LSIAPI) as well.

Importantly, it supports Apache-compatible rewrite rules, ships in with a an easy-to-use, user friendly Web administration console which shows real-time server stats. OpenLiteSpeed utilizes minimal CPU and memory resources, supports creation of virtual hosts, high-performance page caching as well as installation of a different PHP versions.

Step 1: Enable OpenLitespeed Repository

1. OpenLiteSpeed is not present in the Debian/Ubuntu software repositories, so you have to add OpenLiteSpeed repository with this command. This will create the file /etc/apt/sources.list.d/lst_debian_repo.list:

$ wget -c http://rpms.litespeedtech.com/debian/enable_lst_debain_repo.sh 
$ sudo bash enable_lst_debain_repo.sh

Step 2: Install OpenLiteSpeed on Debian/Ubuntu

2. Then install OpenLiteSpeed 1.4 (the latest version at the time of this writing) with the apt command below, which will install it under the /usr/local/lsws directory. The service will also be started after installation is complete.

$ sudo apt install openlitespeed

3. After installing it, you can start and confirm the OpenLiteSpeed version by running like this

$ /usr/local/lsws/bin/lshttpd -v

Check OpenLiteSpeed Version

Check OpenLiteSpeed Version

4. OpenLiteSpeed runs on port “8088” by default. If you have UFW firewall enabled on the system, update firewall rules to permit port 8088 to access your default site on the server.

$ sudo ufw allow 8088/tcp
$ sudo ufw reload

5. Now open a web browser and type the following URL to verify the default page of OpenLiteSpeed.

http://SERVER_IP:8088/ 
or 
http://localhost:8088

Verify OpenLiteSpeed Page

Verify OpenLiteSpeed Page

Step 3: Install PHP 7 for OpenLiteSpeed

6. Next, install PHP 7 with most needed modules for OpenLiteSpeed with the command below, it will install PHP as /usr/local/lsws/lsphp70/bin/lsphp.

$ sudo apt install lsphp70 lsphp70-common lsphp70-mysql lsphp70-dev lsphp70-curl lsphp70-dbg

7. If you want to install extra PHP modules, run the command below to list all the available modules.

$ sudo apt install lsphp70-

List PHP 7 Modules

List PHP 7 Modules

Step 4: Configure OpenLiteSpeed and PHP 7

8. In this section, we will configure OpenLiteSpeed and PHP 7 with the standard HTTP port 80 as explained below.

As we mentioned earlier on, OpenLiteSpeed comes with a WebAdmin console which listens on port 7080. So, first start by setting the admin username and password for the OpenLiteSpeed WebAdmin console using the command below.

$ sudo /usr/local/lsws/admin/misc/admpass.sh
Set OpenLiteSpeed Admin Account
Please specify the user name of administrator.
This is the user name required to login the administration Web interface.

User name [admin]: tecmint

Please specify the administrator's password.
This is the password required to login the administration Web interface.

Password: 
Retype password: 
Administrator's username/password is updated successfully!

9. Now add firewall rules to permit port 7080 via the firewall to access the WebAdmin console.

$ sudo ufw allow 7080/tcp
$ sudo ufw reload

10. Now open a web browser and type the following URL to access OpenLiteSpeed WebAdmin console.

http://SERVER_IP:7080
OR
http://localhost:7080

Enter the username and password you set above, and click on “Login“.

OpenLiteSpeed WebAdmin Login

OpenLiteSpeed WebAdmin Login

OpenLiteSpeed WebAdmin Dashboard

OpenLiteSpeed WebAdmin Dashboard

11. By default, OpenLiteSpeed 1.4 uses LSPHP 5, you need to make a few changes to setup LSPHP 70 as explained below.

Go to Server Configuration → External App → Add button on the right side to add new “lsphp70” as shown in the screen shot below.

Add PHP 7 Support to OpenLiteSpeed

Add PHP 7 Support to OpenLiteSpeed

12. Then define the new External App, set type to “LiteSpeed SAPI App” and click next to add the new external application’s name, address, maximum number of connections, initial response timeout, and retry timeout.

Name: 					lsphp70
Address:    				uds://tmp/lshttpd/lsphp.sock
Notes: 					LSPHP70 Configuration 
Max Connections: 			35
Initial Request Timeout (secs): 	60
Retry Timeout : 			0

Set External App

Set External App

Configure External App

Configure External App

Note that the most critical configuration here is the Command setting, it tells the external app where to find PHP executable it will use – provide the absolute path of LSPHP70:

Command: 	/usr/local/lsws/lsphp70/bin/lsphp	

And click on the Save button to save the above configurations.

13. Next, click on Server Configuration → Script Handler and edit the default lsphp5 script handler, enter the following values.

Suffixes: 		php
Handler Type: 		LiteSpeed SAPI
Handler Name:		lsphp70
Notes:			lsphp70 script handler definition 

Configure Script Handler

Configure Script Handler

14. By default, most HTTP servers are associated with or listen on port 80, but OpenLiteSpeed listens on 8080by default: change it to 80.

Click on Listeners to see a list of all listeners configurations. Then click View to see all settings of the default listener and to edit, click Edit.

Set the port to 80 and save the configuration and save the settings.

Set OpenLiteSpeed Port

Set OpenLiteSpeed Port

15. To reflect the above changes, gracefully restart OpenLiteSpeed by clicking on the restart button and click yes to confirm.

Restart OpenLiteSpeed Server

Restart OpenLiteSpeed Server

16. Add firewall rules to permit port 80 via the firewall.

$ sudo ufw allow 80/tcp
$ sudo ufw reload

Step 5: Test PHP 7 and OpenLiteSpeed Installation

17. Finally verify that OpenLiteSpeed is running on port 80 and PHP 7 using following URL’s.

http://SERVER_IP
http://SERVER_IP/phpinfo.php 

18. To manage and control OpenLiteSpeed service, use these commands.

# /usr/local/lsws/bin/lswsctrl start            #start OpenLiteSpeed
# /usr/local/lsws/bin/lswsctrl stop             #Stop OpenLiteSpeed 
# /usr/local/lsws/bin/lswsctrl restart          #gracefully restart OpenLiteSpeed (zero downtime)
# /usr/local/lsws/bin/lswsctrl help             #show OpenLiteSpeed commands

Step 6: Install MariaDB for OpenLiteSpeed

20. Install MariaDB database management system using following command.

$ sudo apt install mariadb-server

21. Next, start the MariaDB database system and secure its installation.

$ sudo systemctl start mysql
$ sudo mysql_secure_installation

After running the security script above, you will be prompted to enter the root password, simply press [Enter]without providing it:

Enter current password for root (enter for none):

You will also be asked to answer the questions below, simply type y to all the questions to set a root password, remove anonymous users, turn off remote root login, remove the test database and reload privilege tables:

Set root password? [Y/n] y Remove anonymous users? [Y/n] y Disallow root login remotely? [Y/n] y Remove test database and access to it? [Y/n] y Reload privilege tables now? [Y/n] y

You can find additional information from OpenLitespeed Homepage: http://open.litespeedtech.com/mediawiki/

You may also like to read following related articles.

  1. Installing LAMP (Linux, Apache, MariaDB, PHP/PhpMyAdmin) in RHEL/CentOS 7.0
  2. Install Latest Nginx 1.10.1, MariaDB 10 and PHP 5.5/5.6 on RHEL/CentOS 7/6
  3. How To Install Nginx, MariaDB 10, PHP 7 (LEMP Stack) in 16.10/16.04
  4. How to Install LAMP with PHP 7 and MariaDB 10 on Ubuntu 16.10

That’s all! In this tutorial, we have explained how to setup OpenLiteSpeed, PHP 7 and MariaDB on Debian/Ubuntu systems. If you have any queries or additional thoughts do share using the comment section.

Source

Install OpenLiteSpeed (HTTP), PHP 7 & MariaDB on CentOS 7

OpenLiteSpeed is a free and open source, super lightweight HTTP server for Unix-like operating systems including Linux and Windows OS as well – designed by LiteSpeed Technologies.

It is feature-rich; high performance HTTP server that can be used to manage hundreds of thousands of simultaneous connections without critical server load issues, and it also supports third-party modules via API (LSIAPI).

OpenLiteSpeed Features:

  • High performance, event-driven architecture.
  • Super light-weight, minimal CPU and memory resources.
  • Ships with Apache-compatible rewrite rules.
  • User friendly WebAdmin GUI.
  • Supports numerous modules to enhance its functionality.
  • Allows creation of virtual hosts.
  • Supports high-performance page caching.
  • Several different versions of PHP installation support.

In this article, we will explain how to install and configure OpenLiteSpeed – High Performance HTTP Web Server with PHP 7 and MariaDB support on CentOS 7 and RHEL 7.

Step 1: Enable OpenLitespeed Repository

1. First install and enable own OpenLitespeed Repository to install latest version of OpenLiteSpeed and PHP 7using following command.

# rpm -ivh http://rpms.litespeedtech.com/centos/litespeed-repo-1.1-1.el7.noarch.rpm

Install OpenLiteSpeed Repository

Install OpenLiteSpeed Repository

Step 2: Install OpenLiteSpeed on CentOS 7

2. Now install OpenLiteSpeed 1.4 (the latest version at the time of this writing) with the YUM package managercommand below; this will install it under the /usr/local/lsws directory.

# yum install openlitespeed

Install OpenLiteSpeed on CentOS-7

Install OpenLiteSpeed on CentOS-7

3. Once installed, you can start and confirm the OpenLiteSpeed version by running.

# /usr/local/lsws/bin/lswsctrl start
# /usr/local/lsws/bin/lshttpd -v

Check OpenLiteSpeed Version

Check OpenLiteSpeed Version

4. By default, OpenLiteSpeed runs on port “8088, so you need update the firewall rules to permit port 8088 via the firewall to access OpenLiteSpeed default site on the server.

# firewall-cmd --zone=public --permanent --add-port=8088/tcp
# firewall-cmd --reload

5. Now open a web browser and type the following URL to verify the default page of OpenLiteSpeed.

http://SERVER_IP:8088/ 
or 
http://localhost:8088

Verify OpenLiteSpeed Page

Verify OpenLiteSpeed Page

Step 3: Install PHP 7 for OpenLiteSpeed

6. Here, you need to enable the EPEL repository from which you will install PHP 7 with the following command.

# yum install epel-release

7. Then install PHP 7 and a few necessary modules for OpenLiteSpeed with the command below, it will install PHP as /usr/local/lsws/lsphp70/bin/lsphp.

# yum install lsphp70 lsphp70-common lsphp70-mysqlnd lsphp70-process lsphp70-gd lsphp70-mbstring lsphp70-mcrypt lsphp70-opcache lsphp70-bcmath lsphp70-pdo lsphp70-xml

Attention: You might have noticed that here PHP is not installed in the usual way, you must prefix it with lsbecause there is a distinct PHP for LiteSpeed.

8. To install additional PHP modules, use the command below to list all the available PHP modules.

# yum search lsphp70
Sample Output
Loaded plugins: fastestmirror, langpacks, product-id, search-disabled-repos, subscription-manager, versionlock
This system is not registered with Subscription Management. You can use subscription-manager to register.
Loading mirror speeds from cached hostfile
 * base: centos.mirror.snu.edu.in
 * epel: mirror.premi.st
 * extras: mirrors.nhanhoa.com
 * rpmforge: mirror.veriteknik.net.tr
 * updates: centos.mirror.snu.edu.in
=============================================================================================== N/S matched: lsphp70 ================================================================================================
lsphp70-debuginfo.x86_64 : Debug information for package lsphp70
lsphp70-pecl-igbinary-debuginfo.x86_64 : Debug information for package lsphp70-pecl-igbinary
lsphp70.x86_64 : PHP scripting language for creating dynamic web sites
lsphp70-bcmath.x86_64 : A module for PHP applications for using the bcmath library
lsphp70-common.x86_64 : Common files for PHP
lsphp70-dba.x86_64 : A database abstraction layer module for PHP applications
lsphp70-dbg.x86_64 : The interactive PHP debugger
lsphp70-devel.x86_64 : Files needed for building PHP extensions
lsphp70-enchant.x86_64 : Enchant spelling extension for PHP applications
lsphp70-gd.x86_64 : A module for PHP applications for using the gd graphics library
lsphp70-gmp.x86_64 : A module for PHP applications for using the GNU MP library
lsphp70-imap.x86_64 : A module for PHP applications that use IMAP
lsphp70-intl.x86_64 : Internationalization extension for PHP applications
lsphp70-json.x86_64 : JavaScript Object Notation extension for PHP
lsphp70-ldap.x86_64 : A module for PHP applications that use LDAP
lsphp70-mbstring.x86_64 : A module for PHP applications which need multi-byte s
...

Step 4: Configure OpenLiteSpeed and PHP 7

9. Now configure OpenLiteSpeed and PHP 7, and then set the standard HTTP port 80 as explained below.

As we mentioned earlier on, OpenLiteSpeed comes with a WebAdmin console which is associated to port 7080.

Begin by configuring the admin username and password for the OpenLiteSpeed WebAdmin console; run the following command to do so:

# /usr/local/lsws/admin/misc/admpass.sh
Set OpenLiteSpeed Admin Account
Please specify the user name of administrator.
This is the user name required to login the administration Web interface.

User name [admin]: tecmint

Please specify the administrator's password.
This is the password required to login the administration Web interface.

Password: 
Retype password: 
Administrator's username/password is updated successfully!

10. Next update firewall rules to permit port 7080 via the firewall to access the WebAdmin console.

# firewall-cmd --zone=public --permanent --add-port=7080/tcp
# firewall-cmd --reload

11. Now open a web browser and type the following URL to access OpenLiteSpeed WebAdmin console.

http://SERVER_IP:7080
OR
http://localhost:7080

Enter the username and password you set above, and click on “Login“.

OpenLiteSpeed WebAdmin Login

OpenLiteSpeed WebAdmin Login

OpenLiteSpeed WebAdmin Dashboard

OpenLiteSpeed WebAdmin Dashboard

12. OpenLiteSpeed uses LSPHP 5 by default, you need to make a few changes to setup LSPHP 70 as explained below.

To do that, go to Server Configuration → External App → Add button on the right side to add new “lsphp70” as shown in the screen shot below.

Add PHP 7 Support to OpenLiteSpeed

Add PHP 7 Support to OpenLiteSpeed

13. Then define External App, set type to “LiteSpeed SAPI App” and click next to add the new external application’s name, address, maximum number of connections, initial response timeout, and retry timeout.

Name: 					lsphp70
Address:    				uds://tmp/lshttpd/lsphp.sock
Notes: 					LSPHP70 Configuration 
Max Connections: 			35
Initial Request Timeout (secs): 	60
Retry Timeout : 			0

Set External App

Set External App

Configure External App

Configure External App

The most important config here is the Command setting which instructs the external app where to find PHP executable it will use; point it to the LSPHP70 installation:

 Command: 	/usr/local/lsws/lsphp70/bin/lsphp	

Then click on the Save button to save the above configurations.

14. Next, click on Server Configuration → Script Handler and edit the default lsphp5 script handler, use the values below. Once you are done, save the settings.

Suffixes: 		php
Handler Type: 		LiteSpeed SAPI
Handler Name:		lsphp70
Notes:			lsphp70 script handler definition 

Configure Script Handler

Configure Script Handler

15. The default port HTTP servers normally listen on port 80, but for OpenLiteSpeed it is 8080: change it to 80.

Click on Listeners to see a list of all listeners configurations. Then click View to see all settings of the default listener and to edit, click Edit. Set the port to 80 and save the configuration and save the settings.

Set OpenLiteSpeed Port

Set OpenLiteSpeed Port

16. To reflect the above changes, gracefully restart OpenLiteSpeed by clicking on the restart button and click yes to confirm.

Restart OpenLiteSpeed Server

Restart OpenLiteSpeed Server

Step 5: Verify PHP 7 and OpenLiteSpeed Installation

17. Now test if the OpenLiteSpeed server is listening on port 80. Modify firewall rules to permit port 80 via the firewall.

# firewall-cmd --zone=public --permanent --add-port=80/tcp
# firewall-cmd --reload 

18. Finally verify that OpenLiteSpeed is running on port 80 and PHP 7 using following URL’s.

http://SERVER_IP
http://SERVER_IP/phpinfo.php 

19. To manage and control OpenLiteSpeed service, use these commands.

# /usr/local/lsws/bin/lswsctrl start 		#start OpenLiteSpeed
# /usr/local/lsws/bin/lswsctrl stop   		#Stop OpenLiteSpeed 
# /usr/local/lsws/bin/lswsctrl restart 		#gracefully restart OpenLiteSpeed (zero downtime)
# /usr/local/lsws/bin/lswsctrl help 		#show OpenLiteSpeed commands

Step 6: Install MariaDB for OpenLiteSpeed

20. Install MariaDB database management system using following command.

# yum install openlitespeed mariadb-server

21. Next, start the MariaDB database system and secure its installation.

# systemctl start mariadb
# mysql_secure_installation

First, it will ask you to provide MariaDB root password, just press ENTER to set a new root password and confirm. For other questions, simply hit ENTER to accept the default settings.

You can find additional information from OpenLitespeed Homepage: http://open.litespeedtech.com/mediawiki/

You may also following related articles.

  1. Installing LAMP (Linux, Apache, MariaDB, PHP/PhpMyAdmin) in RHEL/CentOS 7.0
  2. Install Latest Nginx 1.10.1, MariaDB 10 and PHP 5.5/5.6 on RHEL/CentOS 7/6
  3. How To Install Nginx, MariaDB 10, PHP 7 (LEMP Stack) in 16.10/16.04
  4. How to Install LAMP with PHP 7 and MariaDB 10 on Ubuntu 16.10

In this article, we have explained you through the steps for installing and configuring OpenLiteSpeed with PHP 7 and MariaDB on a CentOS 7 system.

We hope that everything went on well, otherwise send us your queries or any thoughts via the comment section below.

Source

How to Mount Windows Partitions in Ubuntu

If you are running a dual-boot of Ubuntu and Windows, sometimes you might fail to access a Windows partition (formatted with NTFS or FAT32 filesystem type), while using Ubuntu, after hibernating Windows (or when it’s not fully shutdown).

This is because, Linux cannot mount and open hibernated Windows partitions (the full discussion of this is beyond the ambit of this article).

In this article, we will simply show how to mount Windows partition in Ubuntu. We will explain a few useful methods of solving the above issue.

Mount Windows Using the File Manager

The first and safest way is to boot into Windows and fully shutdown the system. Once you have done that, power on the machine and select Ubuntu kernel from the grub menu to boot into Ubuntu.

After a successful logon, open your file manager, and from the left pane, find the partition you wish to mount (under Devices) and click on it. It should be automatically mounted and its contents will show up in the main pane.

Mounted Windows Partition

Mounted Windows Partition

Mount Windows Partition in Read Only Mode From Terminal

The second method is to manually mount the filesystem in read only mode. Usually, all mounted filesystems are located under the directory /media/$USERNAME/.

Ensure that you have a mount point in that directory for the Windows partition (in this example, $USERNAME=aaronkilik and the Windows partition is mounted to a directory called WIN_PART, a name which corresponds to the device label):

$ cd /media/aaronkilik/
$ ls -l

List Mounted Partitions

List Mounted Partitions

In case the mount point is missing, create it using the mkdir command as shown (if you get “permission denied” errors, use sudo command to gain root privileges):

$ sudo mkdir /media/aaronkilik/WIN_PART

To find the device name, list all block devices attached to the system using the lsblk utility.

$ lsblk

List Block Devices

List Block Devices

Then mount the partition (/dev/sdb1 in this case) in read-only mode to the above directory as shown.

$ sudo mount -t vfat -o ro /dev/sdb1 /media/aaronkilik/WIN_PART		#fat32
OR
$ sudo mount -t ntfs-3g -o ro /dev/sdb1 /media/aaronkilik/WIN_PART	#ntfs

Now to get mount details (mount point, options etc..) of the device, run the mount command without any options and pipe its output to grep command.

$ mount | grep "sdb1" 

List Windows Partition

List Windows Partition

After successfully mounting the device, you can access files on your Windows partition using any applications in Ubuntu. But, remember that, because the device is mounted as read-only, you will not be able to write to the partition or modify any files.

Also note that if Windows is in a hibernated state, if you write to or modify files in the Windows partition from Ubuntu, all your changes will be lost after a reboot.

For more information, refer to the Ubuntu community help wiki: Mounting Windows Partitions.

That’s all! In this article, we have shown how to mount Windows partition in Ubuntu. Use the feedback form below to reach us for any questions if you face any unique challenges or for any comments.

Source

How to Install Ubuntu 18.04 Alongside With Windows

This tutorial describes the installation process of the latest release of Ubuntu Desktop 18.04, codename Bionic Beaver, on a dedicated machine or a virtual machine alongside a pre-installed Windows 10 Operating System. The installation process can be done via the Ubuntu Desktop DVD ISO image or via a bootable Ubuntu USBdrive.

The Ubuntu Bionic OS will be installed on a UEFI motherboard with Legacy Mode or CSM (Compatibility Support Module) option disabled.

Requirements

  1. Download Ubuntu Desktop 18.04 ISO image for x86_64bit architecture.
  2. A direct or a proxy internet connection.
  3. Rufus utility in order to create an Ubuntu Desktop bootable USB drive compatible with UEFI motherboards.

Create Free Space on Windows for Ubuntu Install

On a pre-installed machine with a single Windows 10 partition, you need to create some free space in Windowspartition in order to install Ubuntu 18.04.

First login to the system using an account with administrator privileges, open a Command Prompt window with admin rights and execute diskmgmt.msc command to open Disk Management utility.

diskmgmt.msc

Select the Windows partition, usually C: volume, right click on this partition and select Shrink Volume option in order to reduce the partition size.

Windows Disk Management Utility

Windows Disk Management Utility

Wait for the system to collect partition size data, add the desired amount of space you want to shrink and hit in Shrink button. After the shrink process completes, a new unallocated space will be present in your drive. We’ll use this free space to install Ubuntu alongside Windows 10.

New Windows Partition for Ubuntu Install

New Windows Partition for Ubuntu Install

Install Ubuntu 18.4 Alongside with Windows

On the next step, place Ubuntu Desktop DVD ISO image or the bootable USB stick into the appropriate motherboard drive and, reboot the machine and hit the appropriate bootable key ((usually F12F10 or F2) in order to boot the Ubuntu installer DVD or USB bootable image.

On the first installation screen select Install Ubuntu and hit Enter key to start the installation process.

Select Install Ubuntu

Select Install Ubuntu

In the ”Welcome” screen, select your installation language and hit on Continue button.

Select Ubuntu Installation Language

Select Ubuntu Installation Language

On the next screen, select the keyboard layout for your system and hit on Continue button.

Select Ubuntu Keyboard Layout

Select Ubuntu Keyboard Layout

In the next installation screen, choose Normal installation and hit on Continue button. In this screen you also have the option to perform a Minimal installation of Ubuntu Desktop, which includes only some basic system utilities and a web browser.

You can also turn off Secure Boot option, if this option is enabled in motherboard UEFI settings in order to install third-party software for graphic card, Wi-Fi or additional media formats. Be aware that turning off Secure Boot option requires a password.

Select Ubuntu Install Type

Select Ubuntu Install Type

Next, In Installation type menu, choose Something else option in order to manually partition the hard disk and hit on Continue button.

Ubuntu Manual Partition

Ubuntu Manual Partition

In hard disk partition table menu, select the hard drive free space and hit on + button in order to create the Ubuntu partition.

Select Ubuntu Install Drive

Select Ubuntu Install Drive

In the partition pop-up window, add the size of the partition in MB, choose the partition type as Primary and the partition location at the Beginning of this space.

Next, format this partition with ext4 filesystem and use / as partition mount point. The /(root) partition summary is described below:

  • Size = minimum 30000 MB recommended
  • Type for the new partition = Primary
  • Location for the new partition = Beginning of this space
  • Use as = EXT4 journaling file system
  • Mount point = /

Create Ubuntu Root Partition

Create Ubuntu Root Partition

After completing this step, hit on OK button to return to disk utility. Other partitions, such as /home or Swap are optional in Ubuntu Desktop and should be created only for special purposes.

However, if you still want to add a home partition, select free space, hit on + button and use the below scheme to create the partition.

  • Size = size allocated as per your requirements, depending on the size of remaining disk free space
  • Type for the new partition = Primary
  • Location for the new partition = Beginning
  • Use as = EXT4 journaling file system
  • Mount point = /home

In this guide we’ll install Ubuntu alongside Windows 10 with only the /(root) partition set. After you’ve created the required root partition on the disk, select Windows boot Manager as device for the boot loader installation and hit on Install Now button.

Select Ubuntu Boot Manager

Select Ubuntu Boot Manager

In the pop-up window, hit on Continue button in order to commit the changes that will be written to disk and start the installation.

Confirm Ubuntu Partition ChangesConfirm Ubuntu Partition Changes

Confirm Ubuntu Partition Changes

On the next screen, select your location from the provided map and hit on Continue button.

Select Your Country Location

Select Your Country Location

Next, insert your name, the name of your desktop, a username with a strong password and choose the option with ‘Require my password to log in’. When you finish, hit on Continue button and wait for the installation process to complete.

Create Ubuntu User Account

Create Ubuntu User Account

During the installation process, a series of screens which describe Ubuntu Desktop and the installation progress bar will be displayed on your screen. You cannot interfere with the installation process in this final stage.

Ubuntu Installation Progress

Ubuntu Installation Progress

After the installation completes, eject the installation medium and hit on Restart now button in order to reboot the machine.

Ubuntu Installation Finishes

Ubuntu Installation Finishes

After reboot, the system should boot into GNU GRUB menu. In case the GRUB menu is not displayed, restart the machine, go to motherboard UEFI settings and change boot order or Boot Options -> BBS priority.

The settings to enable GRUB menu highly depends on your machine motherboard UEFI settings. You should consult motherboard documentation in order to identify the settings that need to be changed in order to display GRUB menu.

Ubuntu Boot Grub Menu

Ubuntu Boot Grub Menu

Finally, login to Ubuntu 18.04 Desktop with the credentials configured while installing the system and follow the initial Ubuntu welcome screen in order to start using Ubuntu Desktop.

Ubuntu Login Screen

Ubuntu Login Screen

Ubuntu New Features

Ubuntu New Features

Congratulations! You have successfully installed Ubuntu 18.04 Bionic Desktop alongside Windows 10 on your machine.

Source

Install WordPress with Nginx, MariaDB 10 and PHP 7 on Ubuntu 18.04

WordPress 5 recently released with some core changes, such as the Gutenberg editor. Many of our readers might want to test it on their own server. For those of you, in this tutorial we are going to setup WordPress 5with LEMP on Ubuntu 18.04.

Read AlsoInstall WordPress with Nginx, MariaDB 10 and PHP 7 on Debian 9

For people who are not aware, LEMP is a popular combination of LinuxNginxMySQL/MariaDB and PHP.

Requirements

  1. A dedicated server or a VPS (Virtual Private Server) with Ubuntu 18.04 minimal installation.

This tutorial will guide you through the installation of all the required packages, creating your own database, preparing vhost and completing the WordPress installation via browser.

Installing Nginx Web Server on Ubuntu 18.04

First we will prepare our web server Nginx. To install the package, run the following command:

$ sudo apt update && sudo apt upgrade
$ sudo apt install nginx

To start the nginx service and automatically start it upon system boot, run the following commands:

$ sudo systemctl start nginx.service
$ sudo systemctl enable nginx.service

Creating Vhost for WordPress Website on Nginx

Now we will create vhost for our WordPress website. Create the following file using your favorite text editor:

$ sudo vim /etc/nginx/sites-available/wordpress.conf

In the example below, change example.com with the domain you wish to use:

server {
    listen 80;
    listen [::]:80;
    root /var/www/html/wordpress;
    index  index.php index.html index.htm;
    server_name example.com www.example.com;

     client_max_body_size 100M;

    location / {
        try_files $uri $uri/ /index.php?$args;        
    }

    location ~ \.php$ {
    include snippets/fastcgi-php.conf;
    fastcgi_pass             unix:/var/run/php/php7.2-fpm.sock;
    fastcgi_param   SCRIPT_FILENAME $document_root$fastcgi_script_name;
    }
}

Save the file and exit. Then enable the site with:

$ sudo ln -s /etc/nginx/sites-available/wordpress.conf  /etc/nginx/sites-enabled/

Then reload nginx with:

$ sudo systemctl reload nginx 

Installing MariaDB 10 on Ubuntu 18.04

We will use MariaDB for our WordPress database. To install MariaDB run the following command:

$ sudo apt install mariadb-server mariadb-client

Once the installation is complete, we will start it and configure it to start automatically on system boot:

$ sudo systemctl start mariadb.service
$ sudo systemctl enable mariadb.service

Next secure your MariaDB installation by running the following command:

$ sudo mysql_secure_installation

Simply answer the questions in the prompt to complete the task.

Creating WordPress Database for Website

After that we will prepare the database, database user and password for that user. They will be used by our WordPress application so it can connect to the MySQL server.

$ sudo mysql -u root -p

With the commands below, we will first create database, then a database user and its password. Then we will grant the user privileges to that database.

CREATE DATABASE wordpress;
CREATE USER 'wp_user'@'localhost' IDENTIFIED BY ‘secure_password’;
GRANT ALL ON wordpress.* TO 'wp_user'@'localhost' ;
FLUSH PRIVILEGES;
EXIT;

Installing PHP 7 on Ubuntu 18.04

Since WordPress is application written in PHP, we will install PHP and the required PHP packages to run WordPress, use the command below:

$ sudo apt install php-fpm php-common php-mbstring php-xmlrpc php-soap php-gd php-xml php-intl php-mysql php-cli php-ldap php-zip php-curl

Once the install is complete, we will start the php-fpm service and enable it:

$ sudo systemctl start php7.2-fpm
$ systemctl enable php7.2-fpm

Installing WordPress 5 on Ubuntu 18.04

From this point on, starts the easy part. Download the latest WordPress package with the following wget command:

$ cd /tmp && wget http://wordpress.org/latest.tar.gz

Then extract the archive with:

$ sudo tar -xvzf latest.tar.gz -C /var/www/html

The above will create our document root that we have set in the vhost which is /var/www/html/wordpress. We will then need to change the ownership of the files and folders within that directory with:

$ sudo chown www-data: /var/www/html/wordpress/ -R

Now we are ready to run the installation of our WordPress. If you have used unregistered/non-existing domain, you can configure your hosts /etc/hosts file with the following record:

192.168.1.100 example.com

Presuming that your server’s IP address is 192.168.1.100 and that the domain you are using is example.comThat way your computer will resolve example.com on the given IP address.

Now load your domain into a browser, you should see the WordPress installation page:

Select WordPress Install Language

Select WordPress Install Language

On the next page input the database credentials that we have setup earlier:

WordPress Database Settings

WordPress Database Settings

Submit the form and on the next screen configure your website title, admin user and email:

WordPress Website Setup

WordPress Website Setup

Your installation is now complete and you can start managing your WordPress website. You can start by installing some fresh new theme or extending the site functionality via plugins.

Conclusion

That was it. The process of setting up your own WordPress installation on Ubuntu 18.04. I hope the process was easy and straightforward.

Source

How to Install WordPress 5 On Ubuntu 16.10/16.04 Using LAMP Stack

For those who cannot afford the hustles of developing websites from scratch, there are now several content management systems (CMSs) such as WordPress that you can take advantage of to setup blogs as well as complete websites with a few clicks.

WordPress is a powerful, free and open-source, highly pluggable and customizable CMS that is being used by millions around the world to run blogs and fully functional websites.

It is easy to install and learn, especially for persons who do not have prior website design and development knowledge. With millions of plugins and themes available, developed by an active and dedicated community of fellow users and developers, that you can utilize to tailor your blog or website to work and look just the way you want.

Suggested Read: How to Setup WordPress with LAMP + Postfix as Send-Only Mail Notifications

Requirements:

  1. A dedicated VPS with a registered domain name, I suggest you to go for Bluehost hosting, which offers 50%off, one Free Domain name and Free SSL.

In this post, we shall run through the various steps you can follow, to install the latest version of WordPress 5.3on Ubuntu 18.10-18.04Ubuntu 16.10-16.04 and Linux Mint 18-19 with LAMP (LinuxApacheMySQL and PHP) stack.

Install LAMP on Ubuntu and Linux Mint

First, we shall uncover the various steps for installation of LAMP stack before progressing to install WordPress.

Step 1: Install Apache Web Server

To install Apache web server, issue the command below:

$ sudo apt-get install apache2 apache2-utils 

We need to enable Apache2 web server to start at system boot time, as well start the service as follows:

$ sudo systemctl enable apache2
$ sudo systemctl start apache2

To test whether the server is running, open your web browser and enter http://server_address. The Apache2 default index page will be displayed in case the web server is up and running.

Apache Default Page Under Ubuntu 16.04

Apache Default Page Under Ubuntu 16.04

Note: The Apache default root directory is /var/www/html, all your web files will be stored in this directory.

Step 2: Install MySQL Database Server

Next, we need to install MySQL database server by running the command below:

$ sudo apt-get install mysql-client mysql-server

If you want to install MariaDB, you can install it using following command.

$ sudo apt-get install mariadb-server mariadb-client

During the package installation, you will be prompted to set the root user password for mysql as seen in the image below. Choose a good and secure password, then hit the OK button twice to proceed further.

Set MySQL root Password

Set MySQL root Password

The database server deployment is not yet secure, for this reason, issue the following command to harden it’s security:

$ sudo mysql_secure_installation 

Firstly, you will be asked to install the ‘validate_password’ plugin, so type in Y/Yes and press Enter, and also choose the default password strength level. On my system, I already installed it.

Importantly, if you do not want to change the root password, then type N/No when prompted to do so. Answer Y/Yes for the rest of the subsequent questions.

Step 3: Install PHP and Modules

Last but not least, we shall install PHP and a few modules for it to work with the web and database servers using the command below:

$ sudo apt-get install php7.0 php7.0-mysql libapache2-mod-php7.0 php7.0-cli php7.0-cgi php7.0-gd  

Furthermore, to test if php is working in collaboration with the web server, we need to create a info.php file inside /var/www/html.

$ sudo vi /var/www/html/info.php

And paste the code below into the file, save it and exit.

<?php 
phpinfo();
?>

When that is done, open your web browser and type in the this address http://server_address/info.php. You should be able to view the php info page below as a confirmation.

PHP 7.0 Information

PHP 7.0 Information

Step 4: Install WordPress CMS

Download the latest WordPress package and extract it by issuing the commands below on the terminal:

$ wget -c http://wordpress.org/latest.tar.gz
$ tar -xzvf latest.tar.gz

Then move the WordPress files from the extracted folder to the Apache default root directory, /var/www/html/:

$ sudo rsync -av wordpress/* /var/www/html/

Next, set the correct permissions on the website directory, that is give ownership of the WordPress files to the web server as follows:

$ sudo chown -R www-data:www-data /var/www/html/
$ sudo chmod -R 755 /var/www/html/

Step 5: Create WordPress Database

Execute the command below and provide the root user password, then hit Enter to move to the mysql shell:

$ mysql -u root -p 

At the mysql shell, type the following commands, pressing Enter after each line of a mysql command. Remember to use your own, valid values for database_namedatabaseuser, and also use a strong and secure password as databaseuser_password:

mysql> CREATE DATABASE wp_myblog;
mysql> GRANT ALL PRIVILEGES ON wp_myblog.* TO 'your_username_here'@'localhost' IDENTIFIED BY 'your_chosen_password_here';
mysql> FLUSH PRIVILEGES;
mysql> EXIT;

Go the /var/www/html/ directory and rename existing wp-config-sample.php to wp-config.php:

$ sudo mv wp-config-sample.php wp-config.php

then update it with your database information under the MySQL settings section (refer to the highlighted boxes in the image below):

// ** MySQL settings - You can get this info from your web host ** //
/** The name of the database for WordPress */
define('DB_NAME', 'database_name_here'); /** MySQL database username */ define('DB_USER', 'username_here'); /** MySQL database password */ define('DB_PASSWORD', 'password_here'); /** MySQL hostname */ define('DB_HOST', 'localhost'); /** Database Charset to use in creating database tables. */ define('DB_CHARSET', 'utf8'); /** The Database Collate type. Don't change this if in doubt. */ define('DB_COLLATE', '');

Afterwards, restart the web server and mysql service using the commands below:

$ sudo systemctl restart apache2.service 
$ sudo systemctl restart mysql.service 

Open your web browser, then enter your server address: http://server-address to get the welcome page below. Read through the page and click on “Let’s go!” to proceed further and fill all requested on screen information .

WordPress Installation Wizard

WordPress Installation Wizard

Hoping that everything went on just fine, you can now enjoy WordPress on your system. However, to express any concerns or ask questions concerning the steps above or even provide additional information that you think has not been included in this tutorial, you can use the feedback section below to get back to us.

Source

How to Install WordPress with LSCache, OpenLiteSpeed and CyberPanel

OpenLiteSpeed is a high-performance event-driven open source web server developed and maintained by LiteSpeed Technologies. In this article, we will see how we can use CyberPanel to get up and running with LSCache and WordPress on OpenLiteSpeed in few clicks.

What is LSCache?

LSCache is a full-page cache built directly into OpenLiteSpeed web server, it is similar to Varnish but more efficient because we remove the reverse proxy layer from the picture when LSCache is used.

LSCache WordPress Plugin!

LiteSpeed has also developed a WordPress plugin that communicates with OpenLiteSpeed web server to cache the dynamic content which greatly reduces the load time, increases performance and puts less load on your server.

LiteSpeed’s plugin provides powerful cache-management tools that, due to LSCache’s tight integration into the server, are impossible for other plugins to replicate. These include tag-based smart purging of the cache, and the ability to cache multiple versions of generated content based on criteria such as mobile vs. desktop, geography, and currency.

LSCache has the ability to cache personalized copies of a page, which means that caching can be extended to include logged-in users. Pages that are publicly uncacheable may be cached privately.

In addition to LSCache’s advanced cache-management capabilities, the WordPress plugin also provides additional optimization functionality such as CSS/JS minification and combination, HTTP/2 Push, lazy load for images and iframes, and database optimization.

What is CyberPanel?

CyberPanel is a control panel on top of OpenLiteSpeed, you can use it to create websites and install WordPress with one click.

It also features:

  • FTP
  • DNS
  • Email
  • Multiple PHPs

In this article, we will see how we can efficiently make use of all of these technologies to get up and running in no time.

Step 1: Install CyberPanel – ControlPanel

1. The first step is to install CyberPanel, you can use the following commands to install CyberPanel on your Centos 7 VPS or dedicated server.

# wget http://cyberpanel.net/install.tar.gz
# tar zxf install.tar.gz
# cd install
# chmod +x install.py
# python install.py [IP Address]

After successful CyberPanel installation, you will get login credentials as shown below.

###################################################################
                CyberPanel Successfully Installed                  


                Visit: https://192.168.0.104:8090                
                Username: admin                                    
                Password: 1234567                                  
###################################################################

2. Now login into CyberPanel using above credentials.

CyberPanel Login

CyberPanel Login

Cyber Panel Dashboard

Cyber Panel Dashboard

Step 2: Install WordPress in CyberPanel

3. To setup WordPress with LSCache, first we need to create a website by going to Main > Websites > Create Website section and fill out all details as shown.

Create Website in CyberPanel

Create Website in CyberPanel

4. Now go to Main > Websites > List Websites section, click on Launch icon to launch the website panel, so that WordPress can be installed.

List Websites

List Websites

Once the website panel is launched you will have the following options on your screen:

Website Information

Website Information

5. On this window, open File Manager and delete everything from the public_html folder. Now scroll down to the bottom and you will see a tab which says WordPress with LS Cache.

Install WordPress with LSCache

Install WordPress with LSCache

6. In the path box do not enter anything if you want WordPress to be installed in the website document root. If you enter any path it will be relative to the website home directory.

For example, if you enter wordpress, your WordPress installation directory will be tecmint.com/wordpress.

7. Once you click on “Install WordPress“, CyberPanel will download WordPress and LSCache, create the database, and setup a WordPress site. Once CyberPanel is finished installing WordPress you will need to visit your website domain to configure your website.

WordPress Installation Completed

WordPress Installation Completed

In this example we’ve used tecmint.com, so we will visit this domain to configure our site. These are very basic settings and you can follow the onscreen instructions to complete your configurations.

Step 3: Activate LiteSpeed Cache Plugin

8. Once WordPress is installed, you can login to the dashboard at https://tecmint.com/wp-admin. It will ask for the username/password combination that you set up during wordpress configuration.

Activate LSCache on WordPress

Activate LSCache on WordPress

The LSCache plugin is already installed, so you just need to go into Installed Plugins in your WordPress dashboard and activate it.

9. Now verify LSCache by going to example.com and see your responce headers will look something like.

Check LSCache Headers

Check LSCache Headers

You can see that this page is now served from cache and the request didn’t hit the backend at all.

Step 4: Advance LiteSpeed Cache Options

  • Purge Cache – If for some reason you want to purge the cache you can do so via the LSCache. On this page you have numerous ways to purge the cache.

LSCache Purge

LSCache Purge

Minify, Combine, and HTTP/2 Push

  • Minification – When code is minified, all unnecessary whitespace characters, newline characters, and comments are removed. This shrinks the size of the source code.
  • Combination – When a website includes several JavaScript (or CSS) files, those files may be combined into one. This reduces the number of requests made by the browser and, if there was duplicate code, it is removed.
  • HTTP/2 Push – This functionality allows the server to anticipate the browser’s needs and act upon them. One example: when serving index.html, HTTP/2 can reasonably assume that the browser also wants the included CSS and JS files, and will push them, too, without being asked.

All of the above measures give OpenLiteSpeed the ability to serve content faster. These settings can be found in the LiteSpeed Cache settings page under the Optimize tab, and they are all disabled by default. Press the ONbutton next to each setting that you’d like to enable.

It is possible to exclude some CSS, JS, and HTML from being minified or combined. Enter the URLs to these resources in the appropriate boxes, one per line, to exclude them.

Step 5: Change Default PHP and Install Extensions

10. If, for some reason, you need to change the PHP version for your WordPress website you can do so via CyberPanel:

Change PHP Version

Change PHP Version

11. Some additional WordPress plugins may require you to install additional PHP extensions, or you may want to add Redis to WordPress. You can install missing extensions via CyberPanel from the Server > PHP > Install Extensions tab.

First select the PHP version from the drop down for which you want to install the extension. In the search box, enter the extension name, and finally click Install to install the missing extension.

Install PHP Extensions

Install PHP Extensions

For more information read CyberPanel and OpenLiteSpeed Documentation.

Source

WP2Social Auto Publish Powered By : XYZScripts.com