Tomb is a free open source, small, powerful and simple tool for encrypting files on GNU/Linux. At the time of this writing, it comprises of a shell script (zsh) using generic filesystem GNU tools and the Linux kernel crypto API (cryptsetup and LUKS).
It also employs various GNU/Linux tools such as steghide, lsof, mlocate, resizefs, dcfld and many more, to extend its functionality.
Tomb is used to create secure backups of secret or personal files in encrypted, password-protected directories called tombs. These directories can only be opened using their associated keyfiles and passwords.
After creating a tomb, you can store its key files separately, for example your tomb file can exist on a remote server while the key file is on your laptop or desktop at home or in office. If the tomb file is on your laptop or desktop, you can hide it within the filesystem or as a more secure option, store the key in a USB drive.
In addition, you can hide a tomb in the filesystem or move it safely over a network or in external storage media; share it with other friends or colleagues. You can also hide a key in an image as we will see later on.
Requirements
Tomb needs a few programs such as zsh, gnupg, cryptsetup and pinentry-curses to be installed on a system in order to work.
How to Installing Tomb in Linux Systems
First start by installing the following required tools using your distribution default package manager and also we will install steghide to add functionality for hiding of keys in images.
$ sudo apt install gnupg zsh cryptsetup pinentry-curses steghide	#Debian/Ubuntu
$ sudo yum install gnupg zsh cryptsetup pinentry-curses steghide	#CentOS/RHEL
$ sudo dnf install gnupg zsh cryptsetup pinentry-curses steghide	#Fedora 22+
After installing required packages, download the stable tomb source code for your distribution or use the following wget command to download directly in terminal as shown.
$ cd Downloads/
$ wget -c https://files.dyne.org/tomb/Tomb-2.5.tar.gz
Next, extract the tar archive file you just downloaded and move into the decompressed folder.
$ tar -xzvf Tomb-2.5.tar.gz
$ cd Tomb-2.5
Finally, run the following command, as root or use sudo command to gain root privileges, to install the binary under /usr/local/bin/.
$ sudo make install
How to Create Tombs in Linux Systems
After installing tomb, you can generate a tomb by creating a new key for it and set its password as explained below.
To create a tomb, use the dig sub-command and the -s flag to set its size in MB (this size can be increased when a tomb gets full to capacity after adding files).
$ sudo tomb dig -s 30 tecmint.tomb
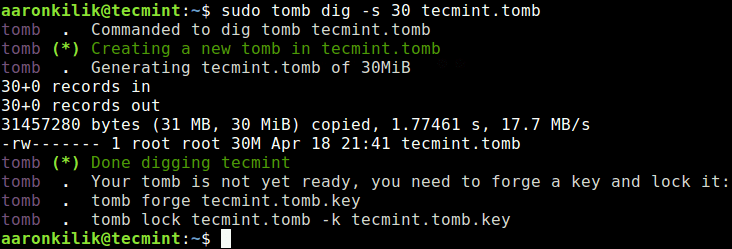
Create a New Tomb
Then create a new key for tecmint.tomb with the forge sub-command and set its password when asked. This operation will take some time to complete, just sit back and relax or go prepare yourself a cup of coffee.
$ sudo tomb forge tecmint.tomb.key
While creating the key, tomb will complain if swap space exists on disk, and it will terminate if that swap memory is turned on as shown in the following screenshot. This is due to a security risk associated with swap memory on disk (refer to documentation or man page for more information).
You can either use the -f flag to force the operation or turn of swap memory with the following command.
$ sudo swapoff -a
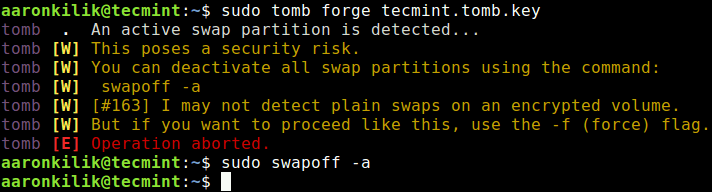
Turn Off Swap
Then try to create the tomb key once more.
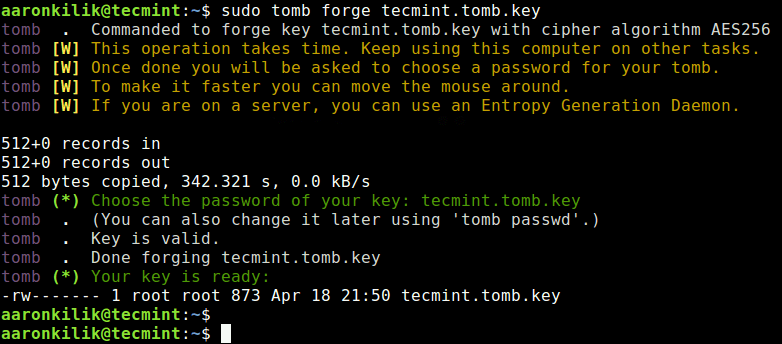
Create a New Tomb Key File
Next, format tecmint.tomb to lock it with the above key. The -k flag specifies the location of the key file to use.
$ sudo tomb lock tecmint.tomb -k tecmint.tomb.key
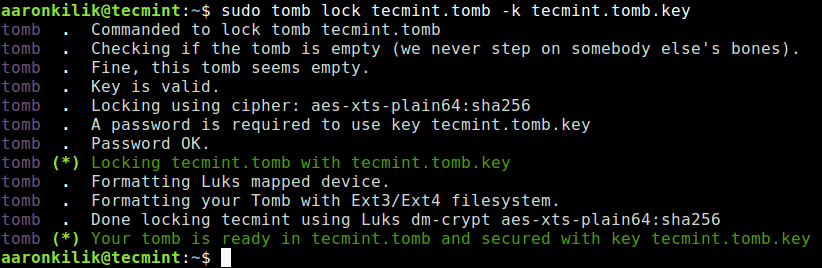
Lock Tomb File with Key
How to Open a New Tomb
To open a tomb, use the open sub-command, you will be prompted to enter the password you set while creating the tomb.
$ sudo tomb open -k tecmint.tomb.key tecmint.tomb
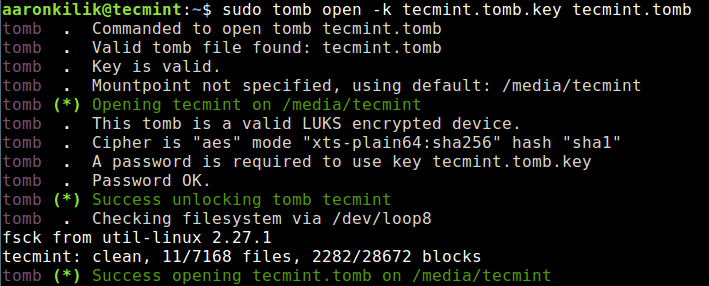
Open a New Tomb
From the output of the previous command, the tomb has been opened and mounted on /media/tecmint/ – this is where you can add your secret files.
If you have numerous tombs, you can list all open tombs plus get some information about them as shown.
$ sudo tomb list

List All Tombs
How to Copy Files to Open Tomb
Now you can add your secret or important files to the tomb as follows. Every time you need to add more files, open the tomb first, as shown above.
$ sudo cp -v passwds.txt accounts.txt keys.txt -t /media/tecmint/

Copy Files to Open Tomb
After opening a tomb, once you are done using it or adding files to it, use the close sub-command to close the tomb file. But if a process is working with an open tomb, if may fail to close.
$ sudo tomb close
You can close all tombs by running.
$ sudo tomb close all
To force an open tomb to close, even when a process is interacting with it, use the slam sub-command.
$ sudo tomb slam
OR
$ sudo tomb slam all
How to Hiding Tomb Key in an Image
It is also possible to hide/encode the tomb key in an image using the bury sub-command, as follows
$ sudo tomb bury -k tecmint.tomb.key zizu.jpg
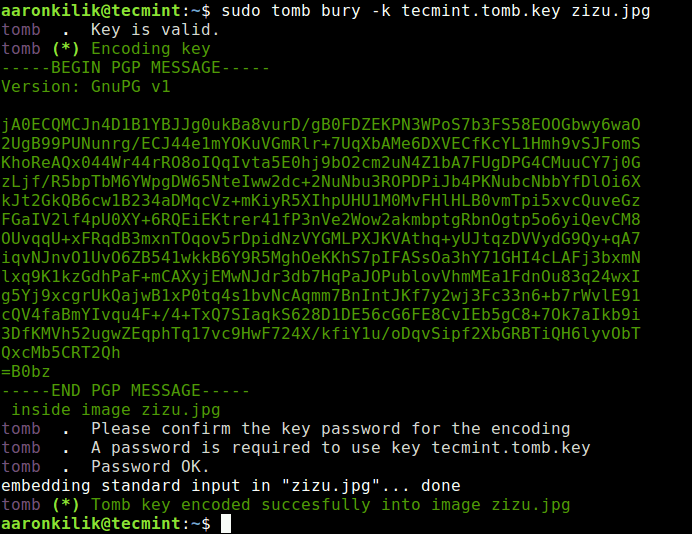
Hide Tomb Key in Image
Then use the newly created jpeg image to open the tomb, as shown.
$ sudo tomb open -k zizu.jpg tecmint.tomb
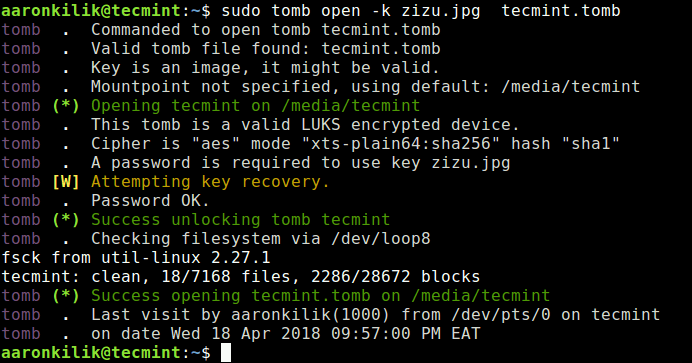
Open Tomb Using Encoded Image
You can also recover a key encoded in a jpeg image with the exhume sub-command.
$ sudo tomb  exhume zizu.jpg -k tecmint.tomb.key
OR
$ sudo tomb -f exhume zizu.jpg -k tecmint.tomb.key   #force operation if key exists in current directory
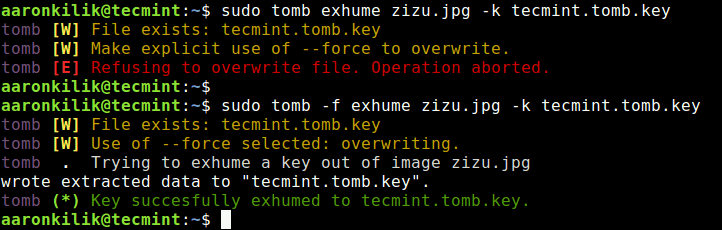
Reoover a Key from Image
Attention: Remember to hide the tomb key, do not keep it in the same directory with the tomb. For example, we will move the key for tecmint.tomb into a secret location (you can use your own location) or keep it on an external media or move it to remote server over SSH.
$ sudo mv tecmint.tomb.key /var/opt/keys/
Unfortunately, we can not exploit all the tomb usage commands and options in this guide, you can consult its man page for more information. There, you will find instruction on how to change a tomb’s key and password, resize it and much more.
$ man tomb
Tomb Github repository: https://github.com/dyne/Tomb
Summary
Tomb is a simple yet powerful and easy-to-use encryption tool for handling files as delicate as secrets, on GNU/Linux systems. Share your thoughts about it via the comment form below.