How to Increase Number of Open Files Limit in Linux

In Linux, you can change the maximum amount of open files. You may modify this number by using the ulimitcommand. It grants you the ability to control the resources available for the shell or process started by it.

Read Also: Set Linux Running Processes Limits on Per-Userl Level

In this short tutorial we will show you how to check your current limit of open files and files descriptions, but to do so, you will need to have root access to your system.

First, Lets see how we can find out the maximum number of opened file descriptors on your Linux system.

Find Linux Open File Limit

The value is stored in:

# cat /proc/sys/fs/file-max

818354

The number you will see, shows the number of files that a user can have opened per login session. The result might be different depending on your system.

For example on a CentOS server of mine, the limit was set to 818354, while on Ubuntu server that I run at home the default limit was set to 176772.

If you want to see the hard and soft limits, you can use the following commands:

Check Hard Limit in Linux

# ulimit -Hn

4096

Check Soft Limits in Linux

# ulimit -Sn

1024

To see the hard and soft values for different users, you can simply switch user with “su” to the user which limits you want to check.

For example:

# su marin
$ ulimit -Sn

1024
$ ulimit -Hn

4096

How to Check System wide File Descriptors Limits in Linux

If you are running a server, some of your applications may require higher limits for opened file descriptors. A good example for such are MySQL/MariaDB services or Apache web server.

You can increase the limit of opened files in Linux by editing the kernel directive fs.file-max. For that purpose, you can use the sysctl utility.

Sysctl is used to configure kernel parameters at runtime.

For example, to increase open file limit to 500000, you can use the following command as root:

# sysctl -w fs.file-max=500000

You can check the current value for opened files with the following command:

$ cat /proc/sys/fs/file-max

With the above command the changes you have made will only remain active until the next reboot. If you wish to apply them permanently, you will have to edit the following file:

# vi /etc/sysctl.conf

Add the following line:

fs.file-max=500000

Of course, you can change the number per your needs. To verify the changes again use:

# cat /proc/sys/fs/file-max

Users will need to logout and login again for the changes to take effect. If you want to apply the limit immediately, you can use the following command:

# sysctl -p

Set User Level Open File limits in Linux

The above examples, showed how to set global limits, but you may want to apply limits per user basis. For that purpose, as user root, you will need to edit the following file:

# vi /etc/security/limits.conf

If you are a Linux administrator, I suggest you that you become very familiar with that file and what you can do to it. Read all of the comments in it as it provides great flexibility in terms of managing system resources by limiting users/groups on different levels.

The lines that you should add take the following parameters:

<domain>        <type>  <item>  <value>

Here is an example of setting a soft and hard limits for user marin:

## Example hard limit for max opened files
marin        hard nofile 4096
## Example soft limit for max opened files
marin        soft nofile 1024

Final thoughts

This brief article showed you a basic example of how you can check and configure global and user level limits for maximum number of opened files.

While we just scratched the surface, I highly encourage you to have a more detailed look and read regarding /etc/sysctl.conf and /etc/security/limits.conf and learn how to use them. They will be of great help for you one day.

Source

A Command Line Web Browsing with Lynx and Links Tools

For some people around the globe, a web browser that render text along with graphics is important since it gives an easy to use and attractive interface, glossy look, nice visibility, easy navigation, and after all click-initiated control. On the other hand there exist some people who want a web browser that render text only.

For System Administrators who generally don’t have X-windows as a safety measure on their server, the text based web browser comes to rescue. Some OS comes bundled with the text based browser, viz., the ‘links‘ web comes bundled with Gentoo GNU/Linux where installation proceeds with tar ball.

If a command-line browser is more (speedybetterinterface, etc) then it makes a sense to use such text based browsers. In reality, for some features the text based browser gives more better access to encoded information in the page, than the graphical interface.

Examples of a few web Browser that render text+graphics with a little brief.

Google Chrome

It is a free-ware web browser developed by Google having a usages share of 39%, making it most widely used web browser on the planet. The open source project on which chrome is based is called chromium and is available in the Debian repository (and other distros, however it is not much in my acknowledgement).

Read Also : Install Google Chrome 50 on RHEL/CentOS 7/6 and Fedora 23-18

Mozilla Firefox

It is a FOSS (Free and Open Source Software) web Browser having a usages share of 24-25% from different sources, making it the world’s third most used web browser. This web browser is a bit heavy but customisable to any extent.

Read Also : Install Firefox 46 in RHEL/CentOS and Fedora

There are a lot other web browsers but most of them are not FOSS and hence not listed here viz., OperaSafariIExplorer.

Lynx is another web browser that is available for Linux (and Windows too). We will be giving a brief description of these two browsers.

Links Browser Properties

  1. Free and Open source (Foss)
  2. Text and graphical web browser with a pull down menu.
  3. Built in support for color and monochrome terminal with the facility of horizontal scrolling.
  4. Inherits a lot of features from graphical user interface e.g., pop-ups, Menus, etc in textual-fashion.
  5. Capable of font Rendering in different sizes and JavaScript support.

Lynx Browser Properties

  1. Text-based Web Browser.
  2. Highly Configurable.
  3. Oldest web browser in use and development.
  4. support for SSL and many features of HTML
  5. Highlight the chosen link.
  6. Number all the links on a web page and open links using number assigned.
  7. No support for JavaScript.
  8. Compatible with older hardware.
  9. Web bugs unsupported, hence 0% privacy concern.
  10. No support for HTTP Cookies.
  11. Configuration through commands in terminal or configuration files.

Download Lynx and Links

  1. Lynx – http://lynx.browser.org/
  2. Links – http://links.twibright.com/

Installation of Lynx and Links

Install Lynx on Debian based Linux systems.

# apt-get install lynx
# apt-get install links

Install Lynx on Red Hat based Linux systems.

# yum -y install lynx
# yum -y install links

How to Use Lynx and Links

Open a link: lynx/links https://www.tecmint.com.

# lynx https://www.tecmint.com
OR
# links https://www.tecmint.com

Linux Command Line Browsers

Linux Command Line Browsers

Shortcut Keys
  1. g: open an address
  2. Left Navigation Arrow: back page
  3. Right Navigation Arrow: Activate Link/ Next Page
  4. Up/Down Navigation Arrow Key: Navigate Through Page

For Detailed Information of their working you can refer to their man pages.

That’s all for now. Don’t forget to mention your valuable thoughts and Comments about the article in the comment Section. Like us and Help us Spread. I will be coming with an Interesting article very soon, till then stay tuned. Good Day Flocks!

Source

5 ‘stat’ Command Examples for Linux Newbies

stat command is a useful utility for viewing file or file system status. It retrieves information such as file type; access rights in octal and human-readable; SELinux security context string; time of file birth, last access, last data modification, last status change in both human-readable and in seconds since Epoch, and much more.

It has an option to specify a custom format instead of the default, for displaying information. In this guide, we will look at five stat command examples for Linux newbies.

Check Linux File Status

1. The easiest way to use stat is to provide it a file as an argument. The following command will display the size, blocks, IO blocks, file type, inode value, number of links and much more information about the file /var/log/syslog, as shown in the screenshot:

$ stat /var/log/syslog

File: '/var/log/syslog'
  Size: 26572     	Blocks: 56         IO Block: 4096   regular file
Device: 80ah/2058d	Inode: 8129076     Links: 1
Access: (0640/-rw-r-----)  Uid: (  104/  syslog)   Gid: (    4/     adm)
Access: 2018-04-06 09:42:10.987615337 +0530
Modify: 2018-04-06 11:09:29.756650149 +0530
Change: 2018-04-06 11:09:29.756650149 +0530
 Birth: -

Check File System Status

2. In the previous example, stat command treated the input file as a normal file, however, to display file system status instead of file status, use the -f option.

$ stat -f /var/log/syslog

File: "/var/log/syslog"
    ID: ce97e63d2201c974 Namelen: 255     Type: ext2/ext3
Block size: 4096       Fundamental block size: 4096
Blocks: Total: 84769790   Free: 16012830   Available: 11700997
Inodes: Total: 21544960   Free: 20995459

You can also provide a directory/filesystem as an argument as shown.

$ stat -f /

File: "/"
    ID: ce97e63d2201c974 Namelen: 255     Type: ext2/ext3
Block size: 4096       Fundamental block size: 4096
Blocks: Total: 84769790   Free: 16056471   Available: 11744638
Inodes: Total: 21544960   Free: 21005263

Enable Following of Symbolic Links

3. Since Linux supports links (symbolic and hard links), certain files may have one or more links, or they could even exist in a filesystem.

To enable stat to follow links, use the -L flag as shown.

$ stat -L /

 File: '/'
  Size: 4096      	Blocks: 8          IO Block: 4096   directory
Device: 80ah/2058d	Inode: 2           Links: 25
Access: (0755/drwxr-xr-x)  Uid: (    0/    root)   Gid: (    0/    root)
Access: 2018-04-09 10:55:55.119150525 +0530
Modify: 2018-02-20 11:15:54.462893167 +0530
Change: 2018-02-20 11:15:54.462893167 +0530
 Birth: -

Use a Custom Format To Display Information

4. stat also allows you to use a particular or custom format instead of the default. The -c flag is used to specify the format used, it prints a newline after each use of format sequence.

Alternatively, you can use the --printf option which enables interpreting of backslash escapes sequences and turns off printing of a trailing newline. You need to use \n in the format to print a new line, for example.

# stat --printf='%U\n%G\n%C\n%z\n' /var/log/secure

Meaning of the format sequences for files used in above example:

  • %U – user name of owner
  • %G – group name of owner
  • %C – SELinux security context string
  • %z – time of last status change, human-readable

5. Here is an example which shows using of accepted format sequences for file systems.

$ stat --printf='%n\n%a\n%b\n' /

Meaning of the format sequences used in the above command.

  • %n – shows the file name
  • %a – print free blocks available to non-superuser
  • %b – outputs total data blocks in file system

Print Information in Terse Form

6. The -t option can be used to print the information in terse form.

$ stat -t /var/log/syslog

/var/log/syslog 12760 32 81a0 104 4 80a 8129076 1 0 0 1523251873 1523256421 1523256421 0 4096

As a last note, your shell may have its own version of stat, please refer to your shell’s documentation for details about the options it supports. To see all accepted output format sequences, refer to the stat man page.

$ man stat 

In this article, we have explained five stat command examples for Linux newbies. Use the feedback form below to ask any questions.

Source

10 lsof Command Examples in Linux

This is our on-going series of Linux commands and in this article we are going to review lsof command with practical examples. lsof meaning ‘LiSt Open Files’ is used to find out which files are open by which process. As we all know Linux/Unix considers everything as a files (pipessocketsdirectoriesdevices etc). One of the reason to use lsof command is when a disk cannot be unmounted as it says the files are being used. With the help of this command we can easily identify the files which are in use.

lsof command examples

10 Linux lsof Command Examples

1. List all Open Files with lsof Command

In the below example, it will show long listing of open files some of them are extracted for better understanding which displays the columns like CommandPIDUSERFDTYPE etc.

# lsof

COMMAND    PID      USER   FD      TYPE     DEVICE  SIZE/OFF       NODE NAME
init         1      root  cwd      DIR      253,0      4096          2 /
init         1      root  rtd      DIR      253,0      4096          2 /
init         1      root  txt      REG      253,0    145180     147164 /sbin/init
init         1      root  mem      REG      253,0   1889704     190149 /lib/libc-2.12.so
init         1      root   0u      CHR        1,3       0t0       3764 /dev/null
init         1      root   1u      CHR        1,3       0t0       3764 /dev/null
init         1      root   2u      CHR        1,3       0t0       3764 /dev/null
init         1      root   3r     FIFO        0,8       0t0       8449 pipe
init         1      root   4w     FIFO       0,8       0t0       8449 pipe
init         1      root   5r      DIR       0,10         0          1 inotify
init         1      root   6r      DIR       0,10         0          1 inotify
init         1      root   7u     unix 0xc1513880       0t0       8450 socket

Sections and it’s values are self-explanatory. However, we’ll review FD & TYPE columns more precisely.

FD – stands for File descriptor and may seen some of the values as:

  1. cwd current working directory
  2. rtd root directory
  3. txt program text (code and data)
  4. mem memory-mapped file

Also in FD column numbers like 1u is actual file descriptor and followed by u,r,w of it’s mode as:

  1. r for read access.
  2. w for write access.
  3. u for read and write access.

TYPE – of files and it’s identification.

  1. DIR – Directory
  2. REG – Regular file
  3. CHR – Character special file.
  4. FIFO – First In First Out

2. List User Specific Opened Files

The below command will display the list of all opened files of user tecmint.

# lsof -u tecmint

COMMAND  PID    USER   FD   TYPE     DEVICE SIZE/OFF   NODE NAME
sshd    1838 tecmint  cwd    DIR      253,0     4096      2 /
sshd    1838 tecmint  rtd    DIR      253,0     4096      2 /
sshd    1838 tecmint  txt    REG      253,0   532336 188129 /usr/sbin/sshd
sshd    1838 tecmint  mem    REG      253,0    19784 190237 /lib/libdl-2.12.so
sshd    1838 tecmint  mem    REG      253,0   122436 190247 /lib/libselinux.so.1
sshd    1838 tecmint  mem    REG      253,0   255968 190256 /lib/libgssapi_krb5.so.2.2
sshd    1838 tecmint  mem    REG      253,0   874580 190255 /lib/libkrb5.so.3.3

3. Find Processes running on Specific Port

To find out all the running process of specific port, just use the following command with option -i. The below example will list all running process of port 22.

# lsof -i TCP:22

COMMAND  PID    USER   FD   TYPE DEVICE SIZE/OFF NODE NAME
sshd    1471    root    3u  IPv4  12683      0t0  TCP *:ssh (LISTEN)
sshd    1471    root    4u  IPv6  12685      0t0  TCP *:ssh (LISTEN)

4. List Only IPv4 & IPv6 Open Files

In below example shows only IPv4 and IPv6 network files open with separate commands.

# lsof -i 4

COMMAND    PID    USER   FD   TYPE DEVICE SIZE/OFF NODE NAME
rpcbind   1203     rpc    6u  IPv4  11326      0t0  UDP *:sunrpc
rpcbind   1203     rpc    7u  IPv4  11330      0t0  UDP *:954
rpcbind   1203     rpc    8u  IPv4  11331      0t0  TCP *:sunrpc (LISTEN)
avahi-dae 1241   avahi   13u  IPv4  11579      0t0  UDP *:mdns
avahi-dae 1241   avahi   14u  IPv4  11580      0t0  UDP *:58600

# lsof -i 6

COMMAND    PID    USER   FD   TYPE DEVICE SIZE/OFF NODE NAME
rpcbind   1203     rpc    9u  IPv6  11333      0t0  UDP *:sunrpc
rpcbind   1203     rpc   10u  IPv6  11335      0t0  UDP *:954
rpcbind   1203     rpc   11u  IPv6  11336      0t0  TCP *:sunrpc (LISTEN)
rpc.statd 1277 rpcuser   10u  IPv6  11858      0t0  UDP *:55800
rpc.statd 1277 rpcuser   11u  IPv6  11862      0t0  TCP *:56428 (LISTEN)
cupsd     1346    root    6u  IPv6  12112      0t0  TCP localhost:ipp (LISTEN)

5. List Open Files of TCP Port ranges 1-1024

To list all the running process of open files of TCP Port ranges from 1-1024.

# lsof -i TCP:1-1024

COMMAND  PID    USER   FD   TYPE DEVICE SIZE/OFF NODE NAME
rpcbind 1203     rpc   11u  IPv6  11336      0t0  TCP *:sunrpc (LISTEN)
cupsd   1346    root    7u  IPv4  12113      0t0  TCP localhost:ipp (LISTEN)
sshd    1471    root    4u  IPv6  12685      0t0  TCP *:ssh (LISTEN)
master  1551    root   13u  IPv6  12898      0t0  TCP localhost:smtp (LISTEN)
sshd    1834    root    3r  IPv4  15101      0t0  TCP 192.168.0.2:ssh->192.168.0.1:conclave-cpp (ESTABLISHED)
sshd    1838 tecmint    3u  IPv4  15101      0t0  TCP 192.168.0.2:ssh->192.168.0.1:conclave-cpp (ESTABLISHED)
sshd    1871    root    3r  IPv4  15842      0t0  TCP 192.168.0.2:ssh->192.168.0.1:groove (ESTABLISHED)
httpd   1918    root    5u  IPv6  15991      0t0  TCP *:http (LISTEN)
httpd   1918    root    7u  IPv6  15995      0t0  TCP *:https (LISTEN)

6. Exclude User with ‘^’ Character

Here, we have excluded root user. You can exclude a particular user using ‘^’ with command as shown above.

# lsof -i -u^root

COMMAND    PID    USER   FD   TYPE DEVICE SIZE/OFF NODE NAME
rpcbind   1203     rpc    6u  IPv4  11326      0t0  UDP *:sunrpc
rpcbind   1203     rpc    7u  IPv4  11330      0t0  UDP *:954
rpcbind   1203     rpc    8u  IPv4  11331      0t0  TCP *:sunrpc (LISTEN)
rpcbind   1203     rpc    9u  IPv6  11333      0t0  UDP *:sunrpc
rpcbind   1203     rpc   10u  IPv6  11335      0t0  UDP *:954
rpcbind   1203     rpc   11u  IPv6  11336      0t0  TCP *:sunrpc (LISTEN)
avahi-dae 1241   avahi   13u  IPv4  11579      0t0  UDP *:mdns
avahi-dae 1241   avahi   14u  IPv4  11580      0t0  UDP *:58600
rpc.statd 1277 rpcuser    5r  IPv4  11836      0t0  UDP *:soap-beep
rpc.statd 1277 rpcuser    8u  IPv4  11850      0t0  UDP *:55146
rpc.statd 1277 rpcuser    9u  IPv4  11854      0t0  TCP *:32981 (LISTEN)
rpc.statd 1277 rpcuser   10u  IPv6  11858      0t0  UDP *:55800
rpc.statd 1277 rpcuser   11u  IPv6  11862      0t0  TCP *:56428 (LISTEN)

7. Find Out who’s Looking What Files and Commands?

Below example shows user tecmint is using command like ping and /etc directory .

# lsof -i -u tecmint

COMMAND  PID    USER   FD   TYPE DEVICE SIZE/OFF NODE NAME
bash    1839 tecmint  cwd    DIR  253,0    12288   15 /etc
ping    2525 tecmint  cwd    DIR  253,0    12288   15 /etc

8. List all Network Connections

The following command with option ‘-i’ shows the list of all network connections ‘LISTENING & ESTABLISHED’.

# lsof -i

COMMAND    PID    USER   FD   TYPE DEVICE SIZE/OFF NODE NAME
rpcbind   1203     rpc    6u  IPv4  11326      0t0  UDP *:sunrpc
rpcbind   1203     rpc    7u  IPv4  11330      0t0  UDP *:954
rpcbind   1203     rpc   11u  IPv6  11336      0t0  TCP *:sunrpc (LISTEN)
avahi-dae 1241   avahi   13u  IPv4  11579      0t0  UDP *:mdns
avahi-dae 1241   avahi   14u  IPv4  11580      0t0  UDP *:58600
rpc.statd 1277 rpcuser   11u  IPv6  11862      0t0  TCP *:56428 (LISTEN)
cupsd     1346    root    6u  IPv6  12112      0t0  TCP localhost:ipp (LISTEN)
cupsd     1346    root    7u  IPv4  12113      0t0  TCP localhost:ipp (LISTEN)
sshd      1471    root    3u  IPv4  12683      0t0  TCP *:ssh (LISTEN)
master    1551    root   12u  IPv4  12896      0t0  TCP localhost:smtp (LISTEN)
master    1551    root   13u  IPv6  12898      0t0  TCP localhost:smtp (LISTEN)
sshd      1834    root    3r  IPv4  15101      0t0  TCP 192.168.0.2:ssh->192.168.0.1:conclave-cpp (ESTABLISHED)
httpd     1918    root    5u  IPv6  15991      0t0  TCP *:http (LISTEN)
httpd     1918    root    7u  IPv6  15995      0t0  TCP *:https (LISTEN)
clock-app 2362   narad   21u  IPv4  22591      0t0  TCP 192.168.0.2:45284->www.gov.com:http (CLOSE_WAIT)
chrome    2377   narad   61u  IPv4  25862      0t0  TCP 192.168.0.2:33358->maa03s04-in-f3.1e100.net:http (ESTABLISHED)
chrome    2377   narad   80u  IPv4  25866      0t0  TCP 192.168.0.2:36405->bom03s01-in-f15.1e100.net:http (ESTABLISHED)

9. Search by PID

The below example only shows whose PID is 1 [One].

# lsof -p 1

COMMAND PID USER   FD   TYPE     DEVICE SIZE/OFF   NODE NAME
init      1 root  cwd    DIR      253,0     4096      2 /
init      1 root  rtd    DIR      253,0     4096      2 /
init      1 root  txt    REG      253,0   145180 147164 /sbin/init
init      1 root  mem    REG      253,0  1889704 190149 /lib/libc-2.12.so
init      1 root  mem    REG      253,0   142472 189970 /lib/ld-2.12.so

10. Kill all Activity of Particular User

Sometimes you may have to kill all the processes for a specific user. Below command will kills all the processes of tecmint user.

# kill -9 `lsof -t -u tecmint`

Note: Here, it’s not possible to give example of all available options, this guide is only to show how lsofcommand can be use. You may refer man page of lsof command to know more about it. Please share it if you find this article is useful through our comment box below.

Source

Translate rwx Permissions into Octal Format in Linux

Sometimes you may find it useful to display the access rights of files or directories in octal form instead of rwxor perhaps you want to display both.

Instead of using good old ls -l command, in most modern Linux distributions (if not all) you will find stat, an utility that displays file or filesystem status.

When run without arguments but followed by a given filename, stat will display a good deal of information about the file or directory. If used with the -c option, stat allows you to specify an output format. It is precisely this option that’s of particular interest to us.

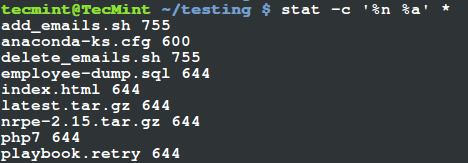
To display all files in the current working directory followed by the access rights in octal form, type:

# stat -c '%n %a' *
Sample Output
add_emails.sh 755
anaconda-ks.cfg 600
delete_emails.sh 755
employee-dump.sql 644
index.html 644
latest.tar.gz 644
nrpe-2.15.tar.gz 644
php7 644
playbook.retry 644

Find Linux File Permissions in Octal Format

Find Linux File Permissions in Octal Format


In the command above, the format sequence:

  1. %n – means file name
  2. %a – means access rights in octal form

Alternatively, you can append %a to %A, the argument passed to stat if you want to display the permissions in rwx format as well.

In that case, you can type:

# stat -c '%n %A' *
Sample Output
add_emails.sh -rwxr-xr-x
anaconda-ks.cfg -rw-------
delete_emails.sh -rwxr-xr-x
employee-dump.sql -rw-r--r--
index.html -rw-r--r--
latest.tar.gz -rw-r--r--
nrpe-2.15.tar.gz -rw-r--r--
php7 -rw-r--r--
playbook.retry -rw-r--r--

Find Linux File Permissions in Directory

Find Linux File Permissions in Directory

To view the file type in the output, you can add %F format sequence.

# stat -c '%c %F %a'

There are several other format sequences you can specify, refer to the stat man page to find out more.

# man stat

In this tip, we have covered an important Linux utility called stat, that helps you to display a file or file system status. Our main focus here was to translate the rwx access rights from the traditional ls -l output to octal form.

As I had mentioned earlier on, many modern Linux distributions now come with stat utility. But you must also remember that your shell may come with its own version of stat, therefore refer to your shell’s documentation for more information concerning options and how to use them.

Source

How to Create a Shared Directory for All Users in Linux

As a system administrator, you may have a certain directory that you want to give read/write access to every user on a Linux server. In this guide, we will review how to enable write access to all users on a particular directory (shared directory) in Linux.

This calls for setting the appropriate access permissions, and the most effective as well as reliable method to allocating a common group for all the users who will share or have write access to the specific directory.

So, start by creating the directory and common group in case it doesn’t already exist on the system as follows:

$ sudo mkdir -p /var/www/reports/
$ sudo groupadd project 

Then add an existing user who will have write access to the directory: /var/www/reports/ to the group project as below.

$ sudo usermod -a -G project tecmint 

Create Common Directory Group

Create Common Directory Group

The flags and arguments used in the above command are:

  1. -a – which adds the user to the supplementary group.
  2. -G – specifies the group name.
  3. project – group name.
  4. tecmint – existing username.

Afterwards, proceed to configure the appropriate permissions on the directory, where the option -R enables recursive operations into subdirectories:

$ sudo chgrp -R project /var/www/reports/
$ sudo chmod -R 2775 /var/www/reports/

Explaining the permissions 2775 in the chmod command above:

  1. 2 – turns on the setGID bit, implying–newly created subfiles inherit the same group as the directory, and newly created subdirectories inherit the set GID bit of the parent directory.
  2. 7 – gives rwx permissions for owner.
  3. 7 – gives rwx permissions for group.
  4. 5 – gives rx permissions for others.

You can create more system users and add them to the directory group as follows:

$ sudo useradd -m -c "Aaron Kili" -s/bin/bash -G project aaronkilik
$ sudo useradd -m -c "John Doo" -s/bin/bash -G project john
$ sudo useradd -m -c "Ravi Saive" -s/bin/bash -G project ravi

Then create subdirectories where the new users above will store their project reports:

$ sudo mkdir -p /var/www/reports/aaronkilik_reports
$ sudo mkdir -p /var/www/reports/johndoo_reports
$ sudo mkdir -p /var/www/reports/ravi_reports

Now you can create files/folders and share with other users on the same group.

That’s it! In this tutorial, we reviewed how to enable write access to all users on a particular directory. To understand more about users/groups in Linux, read How to Manage Users/Groups File Permissions and Attributes.

Remember to offer us your thoughts about this article via the feedback form below.

Source

How Do I Access or Mount Windows/USB NTFS Partition in RHEL/CentOS/Fedora

Sometimes it may happens in some stage, you may have to access data on a Windows partition, USB device or any similar device. Today most of the modern Linux systems automatically recognize and mount any disks.

However, in some occasions where you may required to configure your system manually to mount ntfs partitions on your Linux system. Specially when you are using dual boot operating environment. Fortunately, this process is not so complicated task its just very fairly straight forward.

How to mount ntfs partition in linux

How to mount Windows NTFS Partition in Linux

This article explains you on how to access or mount Windows XPVista NTFS or USB filesystem using the ‘mount‘ command in RHEL/CentOS/Fedora systems.

How to Mount Windows NTFS Partition in Linux

First you need to enable EPEL (Extra Packages for Enterprise Linux) Repository. You may refer the article on how to enable EPEL Repository under RHELCentOS and Fedora systems.

To mount any NTFS based filesystem, you need to install a tool called NTFS3G. Before heading up for installation let’s understand NTGS3G.

What is NTFS3G

NTFS3G is an open source cross-platform, stable, GPL licensed, POSIXNTFS R/W driver used in Linux. It provides safe handling of Windows NTFS file systems viz create, remove, rename, move files, directories, hard links, etc.

Once EPEL is installed and enabled, let’s install ntfs-3g package using the below command with root user.

# yum -y install ntfs-3g
Fuse Install

Next, install and load FUSE driver to mount detected devices with below command. FUSE module is included in the kernel itself in version 2.6.18-164 or newer.

# yum install fuse
# modprobe fuse
Identify NTFS Partition

Once fuse module is loaded, type below command to find out NTFS Partitions in Linux.

# fdisk -l
 Device Boot      Start    End      Blocks   Id  System
/dev/sdb1         1	   21270    7816688   b  W95 FAT32
Mount NTFS partition

First create a mount point to mount the NTFS partition.

# mkdir /mnt/nts

Simply run the following command to mount the partition. Replace sda1 with your actual partition found.

# mount -t ntfs-3g /dev/sda1 /mnt/nts

Once it’s mounted on /mnt/ntfs, you may use regular Linux ls -l command to list the content of mounted filesystem.

[root@tecmint ntfs]# ls -l
total 27328
drwx------.  2 root root    16384 Sep  2 19:37 Cert
drwx------. 20 root root    16384 Aug 24  2011 club_application
drwx------.  6 root root    16384 Aug 11 15:37 docs
drwx------.  7 root root    16384 Jul 31  2012 Downloads
drwx------.  2 root root    16384 Dec 10 20:28 images
-rwxr-xr-x.  1 root root    31744 Jan 18 00:29 Material List.doc

If you want to make mount point permanent at the boot time, then simple add the following line at the end of /etc/fstab file. This will remain as permanent.

/dev/sda1    /mnt/usb    ntfs-3g        defaults    0    0
Umount NTFS Partition

Simply, use the following command to unmount the mounted partition.

# umount /mnt/usb

Read Also : How to Mount ISO Images in Linux

Source

4 Ways to Disable Root Account in Linux

The root account is the ultimate account on a Linux and other Unix-like operating systems. This account has access to all commands and files on a system with full read, write and execute permissions. It is used to perform any kind of task on a system; to create/update/access/delete other users’ accountsinstall/remove/upgrade software packages, and so much more.

Because the root user has absolute powers, any actions he/she performs are critical on a system. In this regard, any errors by the root user may have huge implications on the normal operation of a system. In addition, this account may also be abused by using it improperly or inappropriately either accidentally, maliciously, or through contrived ignorance of policies.

Therefore, it is advisable to disable the root access in your Linux server, instead, create an administrative account which should be configured to gain root user privileges using the sudo command, to perform critical tasks on the server.

In this article, we will explain four ways to disable root user account login in Linux.

Attention: Before you block access to the root account, make sure you have created an administrative account, capable of using sudo command to gain root user privileges, with the useradd command and give this user account a strong password. The flag -m means create user’s home directory and -c allows to specify a comment:

# useradd -m -c "Admin User" admin
# passwd admin

Next, add this user to the appropriate group of system administrators using the usermod command, where the switch -a means append user account and -G specifies a group to add the user in (wheel or sudo depending on your Linux distribution):

# usermod -aG wheel admin    #CentOS/RHEL
# usermod -aG sudo admin     #Debian/Ubuntu 

Once you have created a user with administrative privileges, switch to that account in order to block root access.

# su admin

1. Change root User’s Shell

The simplest method to disable root user login is to change its shell from /bin/bash or /bin/bash (or any other shell that permits user login) to /sbin/nologin, in the /etc/passwd file, which you can open for editing using any of your favorite command line editors as shown.

  
$ sudo vim /etc/passwd

Change the line:

root:x:0:0:root:/root:/bin/bash
to
root:x:0:0:root:/root:/sbin/nologin

Change root User Shell

Change root User Shell

Save the file and close it.

From now on, when root user logs in, he/she will get the message “This account is currently not available.” This is the default message, but, you can change it and set a custom message in the the file /etc/nologin.txt.

This method is only effective with programs that require a shell for user login, otherwise, sudoftp and emailclients can access the root account.

2. Disable root Login via Console Device (TTY)

The second method uses a PAM module called pam_securetty, which permits root access only if the user is logging in on a “secure” TTY, as defined by the listing in /etc/securetty.

The above file allows you to specify which TTY devices the root user is allowed to login on, emptying this file prevents root login on any devices attached to the computer system.

To create an empty file, run.

$ sudo mv /etc/securetty /etc/securetty.orig
$ sudo touch /etc/securetty
$ sudo chmod 600 /etc/securetty

This method has some limitations, it only affects programs such as login, display managers (i.e gdmkdm and xdm) and other network services that launch a TTY. Programs such as su, sudo, ssh, and other related openssh tools will have access to the root account.

3. Disabl SSH Root Login

The commonest way of accessing remote servers or VPSs is via SSH and to block root user login under it, you need to edit the /etc/ssh/sshd_config file.

$ sudo vim /etc/ssh/sshd_config

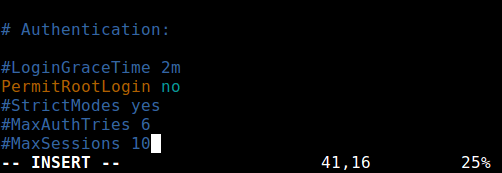
Then uncomment (if it is commented) the directive PermitRootLogin and set its value to no as shown in the screenshot.

Disable Root Login in SSh

Disable Root Login in SSh

Once you are done, save and close the file. Then restart the sshd service to apply the recent change in configurations.

$ sudo systemctl restart sshd 
OR
$ sudo service sshd restart 

As you may already know, this method only affects openssh tools set, programs such as ssh, scp, sftp will be blocked from accessing the root account.

4. Restrict root Acess to Services Via PAM

Pluggable Authentication Modules (PAM in short) is a centralized, pluggable, modular, and flexible method of authentication on Linux systems. PAM, through the /lib/security/pam_listfile.so module, allows great flexibility in limiting the privileges of specific accounts.

The above module can be used to reference a list of users who are not allowed to log in via some target services such as login, ssh and any PAM aware programs.

In this case, we want to disable root user access to a system, by restricting access to login and sshd services. First open and edit the file for the target service in the /etc/pam.d/ directory as shown.

$ sudo vim /etc/pam.d/login
OR
sudo vim /etc/pam.d/sshd

Next, add the configuration below in both files.

auth    required       pam_listfile.so \
        onerr=succeed  item=user  sense=deny  file=/etc/ssh/deniedusers

When you are done, save and close each file. Then create the plain file /etc/ssh/deniedusers which should contain one item per line and not world readable.

Add the name root in it, then save and close it.

$ sudo vim /etc/ssh/deniedusers

Also set the required permissions on this.

$ sudo chmod 600 /etc/ssh/deniedusers

This method only affect programs and services that are PAM aware. You can block root access to the system via ftp and email clients and more.

For more information, consult the relevant man pages.

$ man pam_securetty
$ man sshd_config
$ man pam

That’s all! In this article, we have explained four ways of disabling the root user login (or account) in Linux. Do you have any comments, suggestions or questions, feel free to reach us via the feedback form below.

Source

How to Find Out List of All Open Ports in Linux

In this article, we will briefly talk about ports in computer networking and move to how you can list all open ports in Linux.

In computer networking, and more definitely in software terms, a port is a logical entity which acts as a endpoint of communication to identify a given application or process on an Linux operating system. It is a 16-bit number (0 to 65535) which differentiates one application from another on end systems.

The two most popular Internet transport protocols, Transmission Control Protocol (TCP) and the User Datagram Protocol (UDP) and other less known protocols use port numbers for communication sessions (source and destination port numbers in conjunction with the source and destination IP addresses).

In addition, a combination of an IP address, port and protocol such as TCP/UDP is known as a socket, and every service must have a unique socket.

Below are the different categories of ports:

  1. 0-1023 – the Well Known Ports, also referred to as System Ports.
  2. 1024-49151 – the Registered Ports, also known as User Ports.
  3. 49152-65535 – the Dynamic Ports, also referred to as the Private Ports.

You can view a list of different applications and port/protocol combination in /etc/services file in Linux using cat command:

$ cat /etc/services 
OR
$ cat /etc/services | less
Network Services and Ports
# /etc/services:
# $Id: services,v 1.48 2009/11/11 14:32:31 ovasik Exp $
#
# Network services, Internet style
# IANA services version: last updated 2009-11-10
#
# Note that it is presently the policy of IANA to assign a single well-known
# port number for both TCP and UDP; hence, most entries here have two entries
# even if the protocol doesn't support UDP operations.
# Updated from RFC 1700, ``Assigned Numbers'' (October 1994).  Not all ports
# are included, only the more common ones.
#
# The latest IANA port assignments can be gotten from
#       http://www.iana.org/assignments/port-numbers
# The Well Known Ports are those from 0 through 1023.
# The Registered Ports are those from 1024 through 49151
# The Dynamic and/or Private Ports are those from 49152 through 65535
#
# Each line describes one service, and is of the form:
#
# service-name  port/protocol  [aliases ...]   [# comment]

tcpmux          1/tcp                           # TCP port service multiplexer
tcpmux          1/udp                           # TCP port service multiplexer
rje             5/tcp                           # Remote Job Entry
rje             5/udp                           # Remote Job Entry
echo            7/tcp
echo            7/udp
discard         9/tcp           sink null
discard         9/udp           sink null
systat          11/tcp          users
systat          11/udp          users
daytime         13/tcp
daytime         13/udp
qotd            17/tcp          quote
qotd            17/udp          quote
msp             18/tcp                          # message send protocol
msp             18/udp                          # message send protocol
chargen         19/tcp          ttytst source
chargen         19/udp          ttytst source
ftp-data        20/tcp
ftp-data        20/udp
# 21 is registered to ftp, but also used by fsp
ftp             21/tcp
ftp             21/udp          fsp fspd
ssh             22/tcp                          # The Secure Shell (SSH) Protocol
ssh             22/udp                          # The Secure Shell (SSH) Protocol
telnet          23/tcp
telnet          23/udp

To list all open ports or currently running ports including TCP and UDP in Linux, we will use netstat, is a powerful tool for monitoring network connections and statistics.

List All Network Ports Using Netstat Command
$ netstat -lntu

Proto Recv-Q Send-Q Local Address               Foreign Address             State      
tcp        0      0 0.0.0.0:22                  0.0.0.0:*                   LISTEN      
tcp        0      0 0.0.0.0:3306                0.0.0.0:*                   LISTEN      
tcp        0      0 0.0.0.0:25                  0.0.0.0:*                   LISTEN      
tcp        0      0 :::22                       :::*                        LISTEN      
tcp        0      0 :::80                       :::*                        LISTEN      
tcp        0      0 :::25                       :::*                        LISTEN      
udp        0      0 0.0.0.0:68                  0.0.0.0:*                               

Where,

  1. -l – prints only listening sockets
  2. -n – shows port number
  3. -t – enables listing of tcp ports
  4. -u – enables listing of udp ports

You can also use ss command, a well known useful utility for examining sockets in a Linux system. Run the command below to list all your open TCP and UCP ports:

List All Network Ports Using ss Command
$ ss -lntu

Netid State      Recv-Q Send-Q               Local Address:Port       Peer Address:Port 
udp   UNCONN     0      0                    *:68                     *:*     
tcp   LISTEN     0      128                  :::22                    :::*     
tcp   LISTEN     0      128                  *:22                     *:*     
tcp   LISTEN     0      50                   *:3306                   *:*     
tcp   LISTEN     0      128                  :::80                    ::*     
tcp   LISTEN     0      100                  :::25                    :::*     
tcp   LISTEN     0      100                  *:25  

Make it a point to read through the man pages of the commands above for more usage information.

In summary, understanding the concept of ports in computer networking is very vital for system and network administrators. You can as well go through this netstat guide with simple, precise and well explained examples.

Last but not least, get in touch with us by sharing other methods for listing open ports in Linux or asking a question via the response form below.

Source

What’s Difference Between Grep, Egrep and Fgrep in Linux?

One of the renowned search tool on Unix-like systems which can be used to search for anything whether it be a file, or a line or multiple lines in file is grep utility. It is very vast in functionality which can be attributed to the large number of options it supports like: searching using string pattern, or reg-ex pattern or perl based reg-ex etc.

Difference Between grep, egrep and fgrep

Difference Between grep, egrep and fgrep in Linux

Due its varying functionalities, it has many variants including grepegrep (Extended GREP), fgrep (Fixed GREP), pgrep (Process GREP), rgrep (Recursive GREP) etc. But these variants have minor differences to original grepwhich has made them popular and to be used by various Linux programmers for specific tasks.

Main thing that remains to be investigated is what are the differences between the three main variants i.e. ‘grep’‘egrep’ and ‘fgrep’ of grep that makes Linux users choose one or the other version as per requirement.

Some Special Meta-Characters of grep

  1. + – Equivalent to one or more occurrences of previous character.
  2. ? – This denotes almost 1 repetition of previous character. Like: a? Would match ‘a’ or ‘aa’.
  3. ( – Start of alternation expression.
  4. ) – End of alternation expression.
  5. | – Matching either of the expression separated by '|'. Like: “(a|b)cde” would match either ‘abcde’ or ‘bbcde’.
  6. { – This meta-character indicates start of range specifier. Like: “a{2}” matches “aa” in file i.e. a 2 times.
  7. } – This meta-character indicates end of range specifier.

Differences Between grep, egrep and fgrep

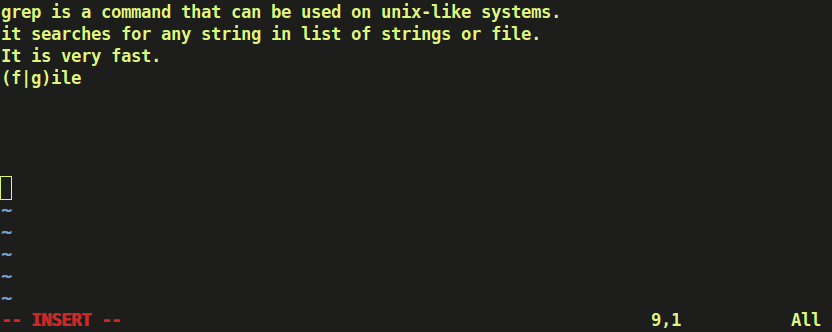
Some main differences between grepegrep and fgrep can be highlighted as follows. For this set of examples we are assuming the file on which operation is being performed to be:

Linux grep Command

Linux grep Command

Grep Command

grep or Global Regular Expression Print is the main search program on Unix-like systems which can search for any type of string on any file or list of files or even output of any command.

Suggested Read: 12 Practical Examples of Linux grep Command

It uses Basic Regular Expressions apart from normal strings as a search pattern. In Basic Regular Expressions (BRE), meta-characters like: '{','}','(',')','|','+','?' loose their meaning and are treated as normal characters of string and need to be escaped if they are to be treated as special characters.

Suggested Read: 11 Advance ‘Grep’ Commands on Character Classes and Bracket Expressions

Also, grep uses Boyer-Moore algorithm for fast searching any string or regular expression.

$ grep -C 0 '(f|g)ile' check_file
$ grep -C 0 '\(f\|g\)ile' check_file

Linux grep Command Example

Linux grep Command Example

Like here, when the command is run without escaping '(' ')' and '|' then it searched for the complete string i.e. “(f|g)ile” in the file. But when the special characters were escaped, then instead of treating them as part of string, grep treated them as meta-characters and searched for words “file” or “gile” in the file.

Egrep Command

Egrep or grep -E is another version of grep or the Extended grep. This version of grep is efficient and fast when it comes to searching for a regular expression pattern as it treats meta-characters as is and doesn’t substitute them as strings like in grep, and hence you are freed from the burden of escaping them as in grep. It uses ERE or the Extended Regular Expression set.

In case of egrep, even if you do not escape the meta-characters, it would treat them as special characters and substitute them for their special meaning instead of treating them as part of string.

$ egrep -C 0 '(f|g)ile' check_file
$ egrep -C 0 '\(f\|g\)ile' check_file

Linux egrep Command Examples

Linux egrep Command Examples

Like here, egrep searched for “file” string when the meta-characters were not escaped as it would mean by the meaning of these characters. But, when these characters were escaped, then egrep treated them as part of string and searched for complete string “(f|g)ile” in the file.

fgrep Command

Fgrep or the Fixed grep or grep -F is yet another version of grep which is fast in searching when it comes to search for the entire string instead of regular expression as it doesn’t recognize the regular expressions, neither any meta-characters. For searching any direct string, this is the version of grep which should be selected.

Fgrep searches for complete string and doesn’t even recognize special characters as part of regular expression even if escaped or not escaped.

$ fgrep -C 0 '(f|g)ile' check_file
$ fgrep -C 0 '\(f\|g\)ile' check_file

Linux fgrep Command Examples

Linux fgrep Command Examples

Like, when meta-characters were not escaped, fgrep searched for the complete string “(f|g)ile” in the file, and when the meta-characters were escaped, then the fgrep command searched for “\(f\|g\)ile” all characters as is in the file.

We’ve already covered some practical examples of grep command you can read them here, if you want to get more out of grep command in Linux.

Learn 12 Practical Examples of Linux grep Command

Conclusion

Above highlighted are the differences between ‘grep’‘egrep’ and ‘fgrep’. Apart from difference in the set of regular expressions used, and speed of execution, rest command line parameters remain same for all the three versions of grep and even instead of “egrep” or “fgrep”, “grep -E” or “grep -F” are recommended to be used.

If you find any other differences between these three versions of grep, do mention them in your comments.

Source

WP2Social Auto Publish Powered By : XYZScripts.com