Logging Into Websites With Python – Linux Hint

The login feature is an important functionality in today’s web applications. This feature helps keep special content from non-users of the site and is also used to identify premium users too. Therefore if you intend web scraping a website, you could come across the login feature if the content is only available to registered users.

Web scraping tutorials have been covered in the past, therefore this tutorial only covers the aspect of gaining access into websites by logging in with code instead of doing it manually by using the browser.

To understand this tutorial and be able to write scripts for logging into websites, you would need some understanding of HTML. Maybe not enough to build awesome websites, but enough to understand the structure of a basic web page.

This would be done with the Requests and BeautifulSoup Python libraries. Asides those Python libraries, you would need a good browser such as Google Chrome or Mozilla Firefox as they would be important for initial analysis before writing code.

The Requests and BeautifulSoup libraries can be installed with the pip command from the terminal as seen below:

pip install requests
pip install BeautifulSoup4

To confirm the success of the installation, activate Python’s interactive shell which is done by typing python into the terminal.

Then import both libraries:

import requests
from bs4 import BeautifulSoup

The import is successful if there are no errors.

The process

Logging into a website with scripts requires knowledge of HTML and an idea of how the web works. Let’s briefly look into how the web works.

Websites are made of two main parts, the client-side and the server-side. The client-side is the part of a website that the user interacts with, while the server-side is the part of the website where business logic and other server operations such as accessing the database are executed.

When you try opening a website through its link, you are making a request to the server-side to fetch you the HTML files and other static files such as CSS and JavaScript. This request is known as the GET request. However when you are filling a form, uploading a media file or a document, creating a post and clicking let’s say a submit button, you are sending information to the server side. This request is known as the POST request.

An understanding those two concepts would be important when writing our script.

Inspecting the website

To practice the concepts of this article, we would be using the Quotes To Scrape website.

Logging into websites requires information such as the username and a password.

However since this website is just used as a proof of concept, anything goes. Therefore we would be using admin as the username and 12345 as the password.

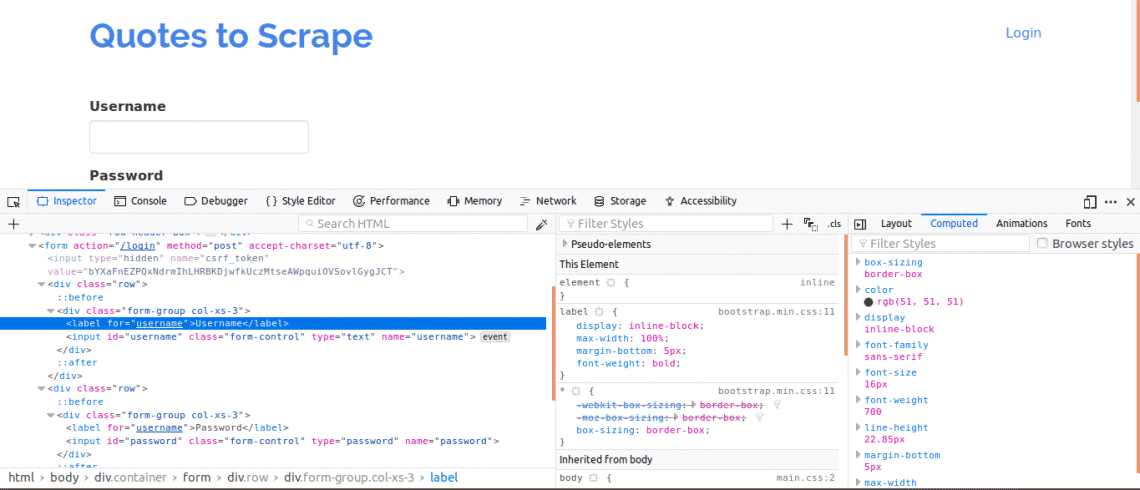
Firstly, it is important to view the page source as this would give an overview of the structure of the web page. This can be done by right clicking on the web page and clicking on “View page source”. Next, you inspect the login form. You do this by right clicking on one of the login boxes and clicking inspect element. On inspecting element, you should see input tags and then a parent form tag somewhere above it. This shows that logins are basically forms being POSTed to the server-side of the website.

Now, note the name attribute of the input tags for the username and password boxes, they would be needed when writing the code. For this website, the name attribute for the username and the password are username and password respectively.

Next, we have to know if there are other parameters which would be important for login. Let’s quickly explain this. To increase the security of websites, tokens are usually generated to prevent Cross Site Forgery attacks.

Therefore, if those tokens are not added to the POST request then the login would fail. So how do we know about such parameters?

We would need to use the Network tab. To get this tab on Google Chrome or Mozilla Firefox, open up the Developer Tools and click on the Network tab.

Once you are in the network tab, try refreshing the current page and you would notice requests coming in. You should try to watch out for POST requests being sent in when we try logging in.

Here’s what we would do next, while having the Network tab open. Put in the login details and try logging in, the first request you would see should be the POST request.

Click on the POST request and view the form parameters. You would notice the website has a csrf_token parameter with a value. That value is a dynamic value, therefore we would need to capture such values using the GET request first before using the POST request.

For other websites you would be working on, you probably may not see the csrf_token but there may be other tokens that are dynamically generated. Over time, you would get better at knowing the parameters that truly matter in making a login attempt.

The Code

Firstly, we need to use Requests and BeautifulSoup to get access to the page content of the login page.

from requests import Session
from bs4 import BeautifulSoup as bs

with Session() as s:
site = s.get(“http://quotes.toscrape.com/login”)
print(site.content)

This would print out the content of the login page before we log in and if you search for the “Login” keyword. The keyword would be found in the page content showing that we are yet to log in.

Next, we would search for the csrf_token keyword which was found as one of the parameters when using the network tab earlier. If the keyword shows a match with an input tag, then the value can be extracted every time you run the script using BeautifulSoup.

from requests import Session
from bs4 import BeautifulSoup as bs

with Session() as s:
site = s.get(“http://quotes.toscrape.com/login”)
bs_content = bs(site.content, “html.parser”)
token = bs_content.find(“input”, {“name”:”csrf_token”})[“value”]
login_data = {“username”:”admin”,”password”:”12345″, “csrf_token”:token}
s.post(“http://quotes.toscrape.com/login”,login_data)
home_page = s.get(“http://quotes.toscrape.com”)
print(home_page.content)

This would print the page’s content after logging in, and if you search for the “Logout” keyword. The keyword would be found in the page content showing that we were able to successfully log in.

Let’s take a look at each line of code.

from requests import Session
from bs4 import BeautifulSoup as bs

The lines of code above are used to import the Session object from the requests library and the BeautifulSoup object from the bs4 library using an alias of bs.

Requests session is used when you intend keeping the context of a request, so the cookies and all information of that request session can be stored.

bs_content = bs(site.content, “html.parser”)
token = bs_content.find(“input”, {“name”:”csrf_token”})[“value”]

This code here utilizes the BeautifulSoup library so the csrf_token can be extracted from the web page and then assigned to the token variable. You can learn about extracting data from nodes using BeautifulSoup.

login_data = {“username”:”admin”,”password”:”12345″, “csrf_token”:token}
s.post(“http://quotes.toscrape.com/login”, login_data)

The code here creates a dictionary of the parameters to be used for log in. The keys of the dictionaries are the name attributes of the input tags and the values are the value attributes of the input tags.

The post method is used to send a post request with the parameters and log us in.

home_page = s.get(“http://quotes.toscrape.com”)
print(home_page.content)

After a login, these lines of code above simply extract the information from the page to show that the login was successful.

Conclusion

The process of logging into websites using Python is quite easy, however the setup of websites are not the same therefore some sites would prove more difficult to log into than others. There is more that can be done to overcome whatever login challenges you have.

The most important thing in all of this is the knowledge of HTML, Requests, BeautifulSoup and the ability to understand the information gotten from the Network tab of your web browser’s Developer tools.

Source

Getting started with Jenkins X

Jenkins X is an open source system that offers software developers continuous integration, automated testing, and continuous delivery, known as CI/CD, in Kubernetes. Jenkins X-managed projects get a complete CI/CD process with a Jenkins pipeline that builds and packages project code for deployment to Kubernetes and access to pipelines for promoting projects to staging and production environments.

Developers are already benefiting from running “classic” open source Jenkins and CloudBees Jenkins on Kubernetes, thanks in part to the Jenkins Kubernetes plugin, which allows you to dynamically spin-up Kubernetes pods to run Jenkins build agents. Jenkins X adds what’s missing from Jenkins: comprehensive support for continuous delivery and managing the promotion of projects to preview, staging, and production environments running in Kubernetes.

This article is a high-level explanation of how Jenkins X works; it assumes you have some knowledge of Kubernetes and classic Jenkins.

What you get with Jenkins X

If you’re running on one of the major cloud providers (Amazon Elastic Container Service for Kubernetes, Google Kubernetes Engine, or Microsoft Azure Kubernetes Service), installing and deploying Jenkins X is easy. Download the Jenkins X command-line interface and run the jx create cluster command. You’ll be prompted for the necessary information and, if you take the defaults, Jenkins X will create a starter-size Kubernetes cluster and install Jenkins X.

When you deploy Jenkins X, a number of services are put in motion to watch your Git repositories and respond by building, testing, and promoting your applications to staging, production, and other environments you define. Jenkins X also deploys a set of supporting services, including Jenkins, Docker Registry, Chart Museum, and Monocular to manage Helm charts, and Nexus, which serves as a Maven and npm repository.

The Jenkins X deployment also creates two Git repositories, one for your staging environment and one for production. These are in addition to the Git repositories you use to manage your project source code. Jenkins X uses these repositories to manage what is deployed to each environment, and promotions are done via Git pull requests (PRs)—this approach is known as GitOps. Each repository contains a Helm chart that specifies the applications to be deployed to the corresponding environment. Each repository also has a Jenkins pipeline to handle promotions.

Creating a new project with Jenkins X

To create a new project with Jenkins X, use the jx create quickstart command. If you don’t specify any options, jx will prompt you to select a project name and a platform—which can be just about anything. SpringBoot, Go, Python, Node, ASP.NET, Rust, Angular, and React are all supported, and the list keeps growing. Once you have chosen your project name and platform, Jenkins X will:

  • Create a new project that includes a “hello-world”-style web project
  • Add the appropriate type of makefile or build script for the chosen platform
  • Add a Jenkinsfile to manage promotions to staging and production environments
  • Add a Dockerfile and Helm charts, created via Draft
  • Add a Skaffold configuration for deploying the application to Kubernetes
  • Create a Git repository and push the new project code there

Next, a webhook from Git will notify Jenkins X that a project changed, and it will run your project’s Jenkins pipeline to build and push your Docker image and Helm charts.

Finally, the pipeline will submit a PR to the staging environment’s Git repository with the changes needed to promote the application.

Once the PR is merged, the staging pipeline will run to apply those changes and do the promotion. A couple of minutes after creating your project, you’ll have end-to-end CI/CD, and your project will be running in staging and available for use.

The figure above illustrates the repositories, registries, and pipelines and how they interact in a Jenkins X promotion to staging. Here are the steps:

  1. The developer commits and pushes the change to the project’s Git repository
  2. Jenkins X is notified and runs the project’s Jenkins pipeline in a Docker image that includes the project’s language and supporting frameworks
  3. The project pipeline builds, tests, and pushes the project’s Helm chart to Chart Museum and its Docker image to the registry
  4. The project pipeline creates a PR with changes needed to add the project to the staging environment
  5. Jenkins X automatically merges the PR to Master
  6. Jenkins X is notified and runs the staging pipeline
  7. The staging pipeline runs Helm, which deploys the environment, pulling Helm charts from Chart Museum and Docker images from the Docker registry. Kubernetes creates the project’s resources, typically a pod, service, and ingress.

Importing your existing projects into Jenkins X

When you import a project via

jx import

, Jenkins X adds the things needed for your project to be deployed to Kubernetes and participate in CI/CD. It will add a Jenkins pipeline, Helm charts, and a Skaffold configuration for deploying the application to Kubernetes. Jenkins X will create a Git repository and push the changes there. Next, a webhook from Git will notify Jenkins X that a project changed, and promotion to staging will happen as described above for new projects.

Promoting your project to production

To promote a version of your project to the production environment, use the jx promote command. This command will prepare a Git PR that contains the Helm chart changes needed to deploy into the production environment and submit this request to the production environment’s Git repository. Once the request is manually approved, Jenkins X will run the production pipeline to deploy your project via Helm.

This figure illustrates the repositories, registries, and pipelines and how they interact in a Jenkins X promotion to production. Here are the steps:

  1. The developer runs the jx promote command to promote a project to production
  2. Jenkins X creates a PR with changes needed to add the project to the production environment
  3. The developer manually approves the PR, and it is merged to Master
  4. Jenkins X is notified and runs the production pipeline
  5. The production pipeline runs Helm, which deploys the environment, pulling Helm charts from Chart Museum and Docker images from the Docker registry. Kubernetes creates the project’s resources, typically a pod, service, and ingress.

Other features of Jenkins X

Other interesting and appealing features of Jenkins X include:

Preview environments

When you create a PR to add a new feature to your project, you can ask Jenkins X to create a preview environment so you can make your new feature available for preview and testing before the PR is merged.

Extensions

It is possible to create extensions to Jenkins X. An extension is code that runs at specific times in the CI/CD process. An extension can provide code that runs when the extension is installed, uninstalled, as well as before and after each pipeline.

Serverless Jenkins

Instead of running the Jenkins web application, which continually consumes CPU and memory resources, you can run Jenkins only when you need it. During the past year, the Jenkins community created a version of Jenkins that can run classic Jenkins pipelines via the command line with the configuration defined by code instead of HTML forms.

This capability is now available in Jenkins X. When you create a Jenkins X cluster, you can choose to use Serverless Jenkins. If you do, Jenkins X will deploy Prow to handle webhooks from GitHub and Knative to run Jenkins pipelines.

Jenkins X limitations

Jenkins X also has some limitations that should be considered:

  • Jenkins X is currently limited to projects that use Git: Jenkins X is opinionated about CI/CD and assumes everybody wants to run and deploy software to Kubernetes and everybody is happy to use Git for source code and defining environments. Also, the Serverless Jenkins feature currently works only with GitHub.
  • Jenkins X is limited to Kubernetes: It is true that Jenkins X can run automated builds, testing, and continuous integration for any type of software, but the continuous delivery part targets a Kubernetes namespace managed by Jenkins X.
  • Jenkins X requires cluster-admin level Kubernetes access: Jenkins X needs cluster-admin access so it can define and manage a Kubernetes custom resource definition. Hopefully, this is a temporary limitation, because it could be a show-stopper for some.

Conclusions

Jenkins X looks to be a good way to implement CI/CD for Kubernetes, and I’m looking forward to putting it to the test in production. Using Jenkins X is also a good way to learn about some useful open source tools for deploying to Kubernetes, including Helm, Draft, Skaffold, Prow, and more. These are things you might want to use even if you decide Jenkins X is not for you. If you’re deploying to Kubernetes, take Jenkins X for a spin.

Source

Install Redis on CentOS 7.5 – Linux Hint

Redis is a quick database like server that can be used as a in memory cache or data store. Its very popular in the context of scalable websites because it can store data in memory and be sharded to store large volumes of data and provide lightening fast results to users on the world wide web. Today we will look at how to install Redis on CentOS 7.5 and get started with its usage.

Update Yum

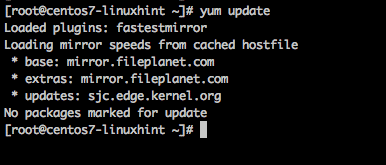
First start by updating your system to keep other packages up to date with yum update.

Extra Packages for Enterprise Linux(EPEL)

Redis server is not in the default repository on a standard CentOS7 install, so we need to install the EPEL package to get access to more packages.

[root@centos7-linuxhint ~]# yum install epel-release

After installing epel, you need to run yum update again.

[root@centos7-linuxhint ~]# yum update

Install Redis Server Package

Now that the EPEL has been added a simple yum install command will install the redis server software.

[root@centos7-linuxhint ~]# yum -y install redis

After installation you will have redis-server and redis-cli commands in your system. And also you can see a redis service has been installed

Start the Redis Server

Even though technically you can start a redis server using the inbuilt commands, lets use the service that is provided with CentOS to do the start, stop and status of redis server on the system.

[root@centos7-linuxhint ~]# service redis start

It should be running now, check it with status command:

Storing and Retrieving Data

Ok, now that Redis is running, lets start with a trivial example and store a key and value pair and then see how to query it. We will use redis-cli with default options which will connect to a server on localhost and the default redis port. Also note in the real world, you should consider setting up proper security to your Redis instances.

We will use the set and get commands in order to store a key value pair in the server. Here is a screen shot of an example:

You can also use the inline help to get a list of all the possible commands and the help text with them. Enter interactive mode from the redis-cli and then type help as shown below:

Redis: More information

For more information check out the following links below:

Source

Three SSH GUI Tools for Linux | Linux.com

At some point in your career as a Linux administrator, you’re going to use Secure Shell (SSH) to remote into a Linux server or desktop. Chances are, you already have. In some instances, you’ll be SSH’ing into multiple Linux servers at once. In fact, Secure Shell might well be one of the most-used tools in your Linux toolbox. Because of this, you’ll want to make the experience as efficient as possible. For many admins, nothing is as efficient as the command line. However, there are users out there who do prefer a GUI tool, especially when working from a desktop machine to remote into and work on a server.

If you happen to prefer a good GUI tool, you’ll be happy to know there are a couple of outstanding graphical tools for SSH on Linux. Couple that with a unique terminal window that allows you to remote into multiple machines from the same window, and you have everything you need to work efficiently. Let’s take a look at these three tools and find out if one (or more) of them is perfectly apt to meet your needs.

I’ll be demonstrating these tools on Elementary OS, but they are all available for most major distributions.

PuTTY

Anyone that’s been around long enough knows about PuTTY. In fact, PuTTY is the de facto standard tool for connecting, via SSH, to Linux servers from the Windows environment. But PuTTY isn’t just for Windows. In fact, from withing the standard repositories, PuTTY can also be installed on Linux. PuTTY’s feature list includes:

  • Saved sessions.
  • Connect via IP address or hostname.
  • Define alternative SSH port.
  • Connection type definition.
  • Logging.
  • Options for keyboard, bell, appearance, connection, and more.
  • Local and remote tunnel configuration
  • Proxy support
  • X11 tunneling support

The PuTTY GUI is mostly a way to save SSH sessions, so it’s easier to manage all of those various Linux servers and desktops you need to constantly remote into and out of. Once you’ve connected, from PuTTY to the Linux server, you will have a terminal window in which to work. At this point, you may be asking yourself, why not just work from the terminal window? For some, the convenience of saving sessions does make PuTTY worth using.

Installing PuTTY on Linux is simple. For example, you could issue the command on a Debian-based distribution:

sudo apt-get install -y putty

Once installed, you can either run the PuTTY GUI from your desktop menu or issue the command putty. In the PuTTY Configuration window (Figure 1), type the hostname or IP address in the HostName (or IP address) section, configure the port (if not the default 22), select SSH from the connection type, and click Open.

Once the connection is made, you’ll then be prompted for the user credentials on the remote server (Figure 2).

To save a session (so you don’t have to always type the remote server information), fill out the IP address (or hostname), configure the port and connection type, and then (before you click Open), type a name for the connection in the top text area of the Saved Sessions section, and click Save. This will then save the configuration for the session. To then connect to a saved session, select it from the saved sessions window, click Load, and then click Open. You should then be prompted for the remote credentials on the remote server.

EasySSH

Although EasySSH doesn’t offer the amount of configuration options found in PuTTY, it’s (as the name implies) incredibly easy to use. One of the best features of EasySSH is that it offers a tabbed interface, so you can have multiple SSH connections open and quickly switch between them. Other EasySSH features include:

  • Groups (so you can group tabs for an even more efficient experience).
  • Username/password save.
  • Appearance options.
  • Local and remote tunnel support.

Install EasySSH on a Linux desktop is simple, as the app can be installed via flatpak (which does mean you must have Flatpak installed on your system). Once flatpak is installed, add EasySSH with the commands:

sudo flatpak remote-add –if-not-exists flathub https://flathub.org/repo/flathub.flatpakrepo

sudo flatpak install flathub com.github.muriloventuroso.easyssh

Run EasySSH with the command:

flatpak run com.github.muriloventuroso.easyssh

The EasySSH app will open, where you can click the + button in the upper left corner. In the resulting window (Figure 3), configure your SSH connection as required.

Once you’ve added the connection, it will appear in the left navigation of the main window (Figure 4).

To connect to a remote server in EasySSH, select it from the left navigation and then click the Connect button (Figure 5).

The one caveat with EasySSH is that you must save the username and password in the connection configuration (otherwise the connection will fail). This means anyone with access to the desktop running EasySSH can remote into your servers without knowing the passwords. Because of this, you must always remember to lock your desktop screen any time you are away (and make sure to use a strong password). The last thing you want is to have a server vulnerable to unwanted logins.

Terminator

Terminator is not actually an SSH GUI. Instead, Terminator functions as a single window that allows you to run multiple terminals (and even groups of terminals) at once. Effectively you can open Terminator, split the window vertical and horizontally (until you have all the terminals you want), and then connect to all of your remote Linux servers by way of the standard SSH command (Figure 6).

To install Terminator, issue a command like:

sudo apt-get install -y terminator

Once installed, open the tool either from your desktop menu or from the command terminator. With the window opened, you can right-click inside Terminator and select either Split Horizontally or Split Vertically. Continue splitting the terminal until you have exactly the number of terminals you need, and then start remoting into those servers.
The caveat to using Terminator is that it is not a standard SSH GUI tool, in that it won’t save your sessions or give you quick access to those servers. In other words, you will always have to manually log into your remote Linux servers. However, being able to see your remote Secure Shell sessions side by side does make administering multiple remote machines quite a bit easier.

Few (But Worthwhile) Options

There aren’t a lot of SSH GUI tools available for Linux. Why? Because most administrators prefer to simply open a terminal window and use the standard command-line tools to remotely access their servers. However, if you have a need for a GUI tool, you have two solid options and one terminal that makes logging into multiple machines slightly easier. Although there are only a few options for those looking for an SSH GUI tool, those that are available are certainly worth your time. Give one of these a try and see for yourself.

Source

How to automatically join Ubuntu clients to a Univention Corporate Server domain – NoobsLab

Univention Corporate Server (UCS) provides a shared trust and security context called a domain. This means, the members of the domain know and trust each other. To get access to resources and services provided within the domain, users and computers have to join the domain.

Linux clients, such as Ubuntu and its derivates, could be joined to a UCS domain for a long time, but it always involved a rather long process of copying commands from the Univention documentation to the command line of the involved systems.

In April of 2018 Univention released the new “Ubuntu Domain Join Assistant” which provides both a graphical interface, making the whole join process a lot easier and time-saving, but also a CLI tool to automate the domain join of many Ubuntu clients.

Let‘s get started – the graphical way:

Let‘s assume we just installed a Univention Corporate Server in the current version of 4.3 and a plain Ubuntu 18.04 client – both with an out-of-the-box feature set and without any modifications. Using the optional software component “DHCP server” in UCS is not strictly necessary, but recommended.

Now log in to your Ubuntu client with a user. To install in Ubuntu 18.04/16.04/14.04/Linux Mint 19/18/17 open Terminal (Press Ctrl+Alt+T) and copy the following commands in the Terminal:

Those commands will add the “Personal Package Archive” (PPA) for the Ubuntu Domain Join Assistant, update the package index and then install the package “univention-domain-join”.

A successful installation will add the Ubuntu Domain Join Assistant to the start menu:

Now start the “Ubuntu Domain Join Assistant”. Since we are going to change some system settings, we need to authenticate as a privileged user:

The “Ubuntu Domain Join Assistant” will open. We need to enter the Domain Name (in my example that‘s “intranet.cabbage.org”) OR the IP address of the UCS Master. Additionally we need a privileged Domain User that is allowed to join computers, e.g. “Administrator” and the corresponding password:

The join process might take some seconds. Afterwards we need to reboot the Ubuntu client:

Now we can log in with a Domain User:


You will also notice that a corresponding computer object has been created in UCS:

Automate it!
As mentioned above, Univention also provides a CLI tool that can be utilized to automate the whole process. And can be integrated in any automation or configuration management tool or you can wrap it in your own shell script – we just need to:

– optionally copy a file with the domain join password to the client (or provide it directly with the “–password” option)

– run “univention-domain-join-cli” with the needed options, e.g.:

This way we could join dozens of Ubuntu clients at once or even install and configure them with the help of a software management software like opsi (https://www.univention.com/blog-en/2018/05/automated-maintenance-of-linux-desktop-clients-in-the-ucs-domain-with-opsi/).

The CLI tool shows more information during the join process than the graphical interface, but both tools provide a logfile underneath “/var/log/univention/”.

We hope this gives you an impression on what is possible with Univention Corporate Server and how easy the administration of a UCS domain can be. If you like further information on UCS, check this article Univention Corporate Server An Enterprise Linux (Overview And Tutorial)

https://www.noobslab.com/2018/10/univention-corporate-server-tutorial.html

Source

Ubuntu Killall Command – Linux Hint

Every single Linux distros is a collection of standard and something other tools at the core. Ubuntu, being one of the most popular ones, offers the most popular and powerful Linux tools in the wild. “killall” is such a powerful tool at your disposal. Let’s find out what you can do with “killall”. It’s just like “kill” but with a lot more power in the pocket. It’s a CLI tool. Caution is a must as a wrong command can completely render your system useless.

“killall” follows the following structure –

According to the man page of “killall”, the tool sends a signal to the target processes. Without specifying the signal type, the default is SIGTERM. If “killall” is able to kill at least 1 process matching the requirements, it returns a zero return code. You can’t kill a “killall” process.

Killing a process

This is the most basic usage of “killall” command. All you have to do is just pass the name of the process.

For example, I’ve got GNOME Disks open, process name “gnome-disks”. For killing the process, run the following command –

Asking for permission

When you’re running “killall” commands, there’s a pretty good chance that you’re about to kill something unintended. You have to use the “-i” flag.

Case sensitivity

Generally, “killall” is a case-sensitive tool, so make sure that you type the name correctly.

# Wrong command
killall

GNOME-disks

# Correct commandkillall gnome-disks

If you want to force killall as case-insensitive, use “-I” flag.

Choosing the ENDING signal

There are different types of termination signal available. If you want to use a specific end signal, use the following structure –

killall -s

# ORkillall –signal

# ORkillall -SIGNAL

For finding out the available signal list, use the “-l” flag.

Killing process by the time

You can also tell “killall” to terminate the processes depending on their time of running!

killall -o [

TIME

]

# ORkillall –older-than [TIME]

For example,

This command will kill all the processes that have been running for more than 2 hours.

killall -y [

TIME

]

# ORkillall –younger-than [TIME]

For example,

This command will kill all the processes that are younger than 2 hours.

Killing all the processes owned by a user

This is a very risky thing to do and may even render your system useless unless you restart it. Make sure that you have all your important tasks finished.

The structure goes like this –

For example,

This command will kill everything under the user “viktor”.

Other “killall” commands

There are a number of other available commands of “killall”. For the short list, use the following command –

For an in-depth explanation of every single parameter and options, the man page is the best option.

You can export the man page to a separate text file for reading later.

man killall > ~/Desktop/killall.txt

Enjoy!

Source

Valve’s card game Artifact is running very well on Linux, releasing next week

Artifact, Valve’s newest game, is due out on November 28th and it will be coming with same-day Linux support. Valve provided me with an early copy and it’s pleasing to see it running well.

We won’t have any formal review until after release, however, I do have some rather basic initial thoughts found from a few hours with the beta today. Mainly, I just wanted to assure people it’s running nicely on Linux. I also don’t want to break any rules by saying too much before release…

Some shots of the beta on Ubuntu 18.10 to start with. First up is a look at the three lanes during the hero placement section, which gives you a choice where to put them. It’s interesting, because you can only play coloured cards if you have a hero of that colour in the same lane.

Heroes are your essential cards of course, for a number of reasons. They can really turn the tide when things get ugly. They can buff up other card, have their own special abilities, you can equip items on them to buff them further and so on. Honestly, I’m a little blown away at the level of detail here.

For those collectors amongst our readers, here’s a little shot while opening a Booster Pack with the last one always being a rare card:

Lanes can extend across the screen, as shown here where I have an additional four cards not shown. You can amass a pretty big army of heroes and creeps. In this particular screenshot, I had already taken down the tower (there’s one in each lane) which was replaced with an Ancient in this lane and so with my current combined attack power this was a fatal finishing blow to my opponent (destroying an Ancient is an instant win).

I haven’t so far come across any Linux-specific issues, it certainly looks like Valve has given the Linux version plenty of attention. I would have been surprised if it wasn’t running well, given Valve’s focus on Linux lately. For those of you who might have had some worries—fear not!

It’s worth mentioning they have been through a bit of controversy on it lately, with it having a bit of a backlash against the monetization model. This was amplified somewhat, because Valve didn’t put enough focus into certain areas of the game. Valve responded here, to say they’ve added additional modes to practice and play with friends, along with allowing you to convert unwanted cards into event tickets. It sounds like they’re going in the right direction with it and it is good to seem them act on feedback.

It’s going to be interesting to see what more of you think of it once it has released. For me personally, I think I’m going to quite enjoy it. What I honestly thought would confuse the hell out of me, so far, hasn’t in any way. There’s quite a bit to learn of course and certain elements to it are quite complex, but it’s nothing like what I expected.

You can follow along and wishlist it on Steam. As always, do ensure your platform preference is set on Steam in your account preferences at the bottom. More thorough thoughts will be up at release on the 28th.

Source

Gartner IT Infrastructure, Operations and Cloud Strategies Conference 2018

Share with friends and colleagues on social media

Next week, the SUSE team will be at the Intercontinental London Hotel at the O2 for the Gartner IT Infrastructure, Operations and Cloud Strategies Conference. This will be a great opportunity to hear from many well-respected names within the IT community – analysts, experts and even the quite legendary Frank Abagnale, of “Catch Me If You Can” fame. While one of the most memorable scenes in the film version of Frank Abagnale’s adventures depicts him pretending to be a Pan Am pilot, strolling through an airport arm-in-arm with a bevy of beautiful female cabin crew, the SUSE team will be leaving their flight crew uniforms, which were last seen in action at the OpenStack Summit in Berlin, at home. However, my Movember moustache will still be very much in evidence for all to admire as it continues its European tour to celebrate my 13th year of supporting the Movember Foundation in their aim to stop men dying too young (having been to Berlin last week, and then heading to Madrid for the HPE Discover conference next week once the Gartner conference is finished).

The death of the data centre?

We’re looking forward to helping lots of people understand how data centres have evolved, and how software-defined infrastructure is the future and should be part of every business’s cloud strategy. Whether you already have a fully-fledged cloud strategy, are using public cloud for test and development, or are just starting to think about how to best leverage cloud resources, the conference will give you plenty to think about. Giuseppe Paterno and I will be talking on Tuesday 27th November at 12:45pm about the death of the data centre, so please do come along to hear if the data centre is indeed dead, or if it’s just having a little lie down to catch its breath. In addition to discussing the merits of public cloud, private cloud, OpenStack and containers, we’ll also be talking about how our customer ApiOmat used SUSE CaaS Platform and SUSE Cloud Application Platform to enable them to better serve their enterprise customers.

Chameleons, chameleons everywhere – catch them if you can

Of course, the SUSE team will be giving away some of our ever-popular Geeko stuffed chameleons in the exhibitors hall, so come along to talk to us, hear about how software-defined infrastructure should be a part of your cloud strategy, and pick up a cuddly chameleon to keep you company on your journey home!


Share with friends and colleagues on social media

Source

Smart speaker voice platforms compared

At the Embedded Linux Conference Europe, Leon Anavi compared the Alexa and Google Assistant voice platforms and looked into open source newcomer Mycroft Mark II.

U.S. consumers are expected to drop a bundle this Black Friday on smart speakers and home hubs. A Nov. 15 Canalys report estimates that shipments of voice-assisted speakers grew 137 percent in Q3 2018 year-to-year and are on the way to 75 million-unit sales in 2018. At the recent Embedded Linux Conference Europe in Edinburgh, embedded Linux developer and Raspberry Pi HAT creator Leon Anavi of the Konsulko Group reported on the latest smart speaker trends.

At ELCE, Leon Anavi explains inner workings of Google Assistant SDK
(click image to enlarge)


As Anavi noted in his “Comparison of Voice Assistant SDKs for Embedded Linux Devices” talk, conversing with computers became a staple of science fiction over half a century ago. Voice technology is interesting “because it combines AI, big data, IoT, and application development,” said Anavi.

In Q3 2017, Amazon and Google owned the industry with 74.7 percent and 24.6 percent, respectively, said Canalys. A year later, the percentages were down to 31.9 and 29.8. China-based Alibaba and Xiaomi almost equally split another 21.8 percent share, followed by 17.4 percent for “others,” which mostly use Amazon Alexis, and increasingly, Google Assistant.

Despite the success of the mostly Linux-driven smart speaker market, Linux application developers have not jumped into voice app development in the numbers one might expect. In part, this is due to reservations about Google and Amazon privacy safeguards, as well as the proprietary nature of the hardware and cloud software.

“Privacy is a concern with smart speakers,” said Anavi. “You can’t fully trust a corporation if the product is not open source.”

Anavi summarized the Google and Amazon SDKs but spent more time on the fully open source Mycroft Mark. Although Anavi clearly prefers Mycroft, he encouraged developers to investigate all the platforms. “There is a huge demand in the market for these devices and a lot of opportunity for IoT integration, from writing new skills to integrating voice assistants in consumer electronics devices,” said Anavi.

Alexa/Echo

Amazon’s Alexa debuted in the Echo smart speaker four years ago. Amazon has since expanded to the Echo branded Dot, Spot, Tap, and Plus speakers, as well as the Echo Show and new Echo Show 2 display hubs.

Amazon Echo Show 2
(click image to enlarge)


The market leading Echo devices run on Amazon’s Linux- and Android-based Fire OS. The original Echo and Dot ran on the Cortex-A8-based TI DM3725 SoC while more recent devices have moved to an Armv8 MediaTek MT8163V SoC with 256MB RAM and 4GB flash.

Thanks to Amazon’s wise decision to release an Apache 2.0 licensed Alexa Voice Services (AVS) SDK, Alexa also runs on most third-party hubs. The SDK includes an Alexa Skills Kit for creating custom Skills. The cloud platform required to make Alexa devices work is not open source, however, and commercial vendors must sign an agreement and undergo a certification process.

Alexa runs on a variety of hardware including the Raspberry Pi, as well as smart devices ranging from the Ecobee4 Smart Thermostat to the LG Hub Robot. Microsoft recently began selling Echo devices, and earlier this year partnered with Amazon to integrate Alexa with its own Cortana voice agent in devices. This week, Microsoft announced that users can voice-activate Skype calls via Alexa on Echo devices.

On Nov. 20, Amazon announced it had publicly released its Alexa Mobile Accessory Kit to help developers bring Alexa to Bluetooth headphones, headsets, and wearables. The developers kit lets Bluetooth devices communicate with a phone’s Alexa app without requiring the device makers to build a custom app or Alexa skill.

Google Assistant/Home

The Google Assistant voice agent debuted on the Google Home smart speaker in 2016. It has since expanded to the Echo Dot-like Home Mini, which like the Home runs on a 1.2GHz dual-core Cortrex-A7 Marvell Armada 1500 Mini Plus with 512MB RAM and 4GB flash. This year’s Home Max offered improved speakers and advanced to a 1.5GHz, quad-core Cortex-A53 processor. More recently, Google launched the touchscreen enabled Google Home Hub.

The Google Home devices run on a version of the Linux-based Google Cast OS. Like Alexa, the Python driven Google Assistant SDK lets you add the voice agent to third-party devices. However, it’s still in preview stage and lacks an open source license. Developers can create applications with Google Actions.

Last year, Google launched a version of its Google Assistant SDK for the Raspberry Pi 3 and began selling an AIY Voice Kit that runs on the Pi. There’s also a kit that runs on the Orange Pi, said Anavi.

This year, Google has aggressively courted hardware partners to produce home hub devices that combine Assistant with Google’s proprietary Android Things. The devices run on a variety of Arm-based SoCs led by the Qualcomm SD212 Home Hub Platform.

Google Home Hub (left) and LG XBOOM AI ThinQ WK9
(click images to enlarge)


The SDK expansion has resulted in a variety of third-party devices running Assistant, including the Lenovo Smart Display and the just released

LG XBOOM AI ThinQ WK9

touchscreen hubs. Sales of Google Home devices outpaced Echo earlier this year, although Amazon regained the lead in Q3, says Canalys.

Like Alexa, but unlike Mycroft, Google Assistant offers multilingual support. The latest version supports follow-up questions without having to repeat the activation word, and there’s a voice match feature that can recognize up to six users. A new Google Duplex feature accomplishes real-world tasks through natural phone conversations.

Mycroft/Mark

Anavi’s favorite smart speaker is the Linux-driven, open source (Apache 2.0 and CERN) Mycroft. The Raspberry Pi based Mycroft Mark 1 speaker was certified by the Open Source Hardware Association (OSHA).

The Mycroft Mark II launched on Kickstarter in January and has received $450,000 in funding. This Xilinx Zynq UltraScale+ MPSoC driven home hub integrates Aaware’s far-field Sound Capture technology. A Nov. 15 update post revealed that the Mark II will miss its December ship date.

Mycroft Mark II weather and timer skills

Kansas City-based Mycroft has raised $2.5 million from institutional investors and is now seeking funding on

StartEngine

. Mycroft sees itself as a software company and is encouraging other companies to build the Mycroft Core platform and Mycroft AI voice agent into products. The company offers an enterprise server license to corporate customers for $1,500 a month, and there’s a free, Raspbian based

Picroft

application for the Raspberry Pi. A Picroft hardware kit is under consideration.

Mycroft promises that user data will never be saved without an opt-in (to improve machine learning algorithms), and that it will never be used for marketing purposes. Like Alexa and Assistant, however, it’s not available offline without a cloud service, a feature that would better ensure privacy. Anavi says the company is working on an offline option.

The Mycroft AI agent is enabled via a Python based Mycroft Pulse SDK, and a Mycroft Skills Manager is available for Skills development. Like Alexa and Assistant, Mycroft supports custom wake words. The new version uses its homegrown Precise wake-word listener technology in place of the earlier PocketSphinx. There’s also an optional device and account management stack called Mycroft Home.

For text-to-speech (TTS), Mycroft defaults to the open source Mimic, which is co-developed with VocaliD. It also supports eSpeak, MaryTTS, Google TTS, and FATTS.

Mycroft lacks its own speech to-text (STT) engine, which Anavi calls “the biggest challenge for an open source voice assistant.” Instead, it defaults to Google STT and supports IBM Watson STT and wit.ai.

Mycroft is collaborating with Mozilla on its open source
DeepSpeech STT, an open source TensorFlow implementation of Baidu’s DeepSpeech platform. Baidu trails Alibaba and Xiaomi in the Chinese voice assistant market but is one of the fastest growing voice AI companies. Just as Alibaba uses its homegrown, Alexa-like AliGenie agent on its Tmall Genie speaker, Baidu loads its speakers such as its ceiling-mounted PopIn Alladin with its DeepSpeech-driven DuerOS voice platform. Xiaomi has used Alexa and Cortana.

Mycroft is the most mature of several alternative voice AI projects that promise improved privacy safeguards. A recent VentureBeat article reported on emerging privacy-oriented technologies including Snips and SoundHound.

Anavi concluded with some demo videos showing off his soothing, Bulgarian AI whisperer vocal style. “I try to be polite with these things,” said Anavi. “Someday they may rule the world and I want to survive.”

Anavi’s ELCE video presentation can be below.

Leon Anavi’s “Comparison of Voice Assistant SDKs for Embedded Linux Devices”

This article is copyright © 2018 Linux.com and was originally published here. It has been reproduced by this site with the permission of its owner. Please visit Linux.com for up-to-date news and articles about Linux and open source.

Source

Free Personal Finance Apps You Can Take to the Bank | Reviews

Today’s Linux platform accommodates a number of really good financial applications that are more than capable of handling both personal and small-business accounting operations. That was not always the case, however.

Not quite 10 years ago, I scoured Linux repositories in a quest for replacement applications for popular Microsoft Windows tools. Back then, the pickings were mighty slim. Often, the only recourse was to use Microsoft Windows-based applications that ran under WINE.

Classics and Fresh Faces

The best of the Linux lot were
GnuCash,
HomeBank,
KMyMoney and
Skrooge. In fact, depending on the Linux distro you fancied, those four packages often comprised the entire financial software lot.

In terms of features and performance, they were as good as or better than the well-known Microsoft Windows equivalents — MSMoney and Quicken. Those Linux staples are still top of the class today. Their feature sets have expanded. Their performance has matured. However, Linux users now have a few more very noteworthy choices to chart their personal and small business financial activities.

In a change of pace from the usual Linux distro reviews, Linux Picks and Pans presents a roundup of the best financial apps that make the Linux OS a treasure trove for your financial needs. These Linux apps are tools to handle your budget, track your investments, and better organize your record-keeping. At a bare minimum, they will help you become more aware of where your money goes.

One development with the growing catalog of money management software for Linux users is the cost factor. Just because an application runs on Linux does not mean it is free to use. The lines have been blurring between open source products and Linux packages with free trial periods or reduced features unless you pay to upgrade. This software roundup includes only free, open source products.

If you are looking for an app only to track your checking and savings accounts, you will probably find the applications in this roundup a bit too advanced. For maintaining your bank account registers, you can find a variety of spreadsheet template files for LibreOffice Calc and Microsoft Excel on the Internet. Yes, you can get Microsoft Office apps for Linux now! They are cloud-based, and you need a Microsoft log-in such as a free Outlook.com mail account.

Cash In with GNUCash

GnuCash is an advanced financial program and one of the few money apps that an accountant using Linux would relish. It is a powerhouse personal and small business finance manager. It comes with a steep learning curve, though.

It is a double-entry accounting system. GnuCash tracks budgets and maintains various accounts in numerous category types. It has a full suite of standard and customizable reports.

GnuCash has the look and feel of a checkbook register. Its GUI (graphical user interface) is designed for easy entry and tracking of bank accounts, stocks, income and expenses. The easiness ends there, however, if double-entry accounting is not your comfort zone.

GNUCash

If you do not have an appreciation for formal accounting principles, be sure you spend considerable time studying the ample documentation. Learning to use GnuCash is not overly difficult. It is designed to be simple and easy to use. Its core functions, though, are based on formal accounting principles.

For business finances, GnuCash offers key features. For instance, it handles reports and graphs as well as scheduled transactions and financial calculations. If you run a small business, this app will track your customers, vendors, jobs, invoices and more. From that perspective, GnuCash is a full-service package.

There is not much that GNUCash cannot do. It handles Check Printing, Mortgage and Loan Repayment, Online Stock and Mutual Fund Quotes and Stock/Mutual Fund Portfolios. Create recurring transactions with adjustable amounts and timelines. Set an automatic reminder when a transaction is due. Or postpone a scheduled payment without canceling or entering it before the due date.

The latest stable release of GnuCash is version 3.3. Most Linux distributions come bundled with a version of GnuCash. Often, it is not the most current version.

Feel at Home with HomeBank

Compared to GnuCash, HomeBank is a much easier personal accounting system to use. It is designed for analyzing your personal finance and budget in detail using powerful filtering tools and charts, and for those purposes it is an ideal tool.

It includes the ability to import data easily from Intuit Quicken, Microsoft Money or other software. It also makes importing bank account statements in OFX/QFX, QIF, CSV formats a snap.

Also, it flags duplicate transactions during the import process and handles multiple currencies. It offers online updates for various account types such as Bank, Cash, Asset, Credit card and Liability. It also makes it simple to schedule recurring transactions.

Homebank

HomeBank is more than a simple ledger program. It uses categories and tags to organize transactions.

For example, this app handles multiple checking and savings accounts. Plus, it automates check numbering and category/payee assignment.

HomeBank can schedule transactions with a post-in-advance option and makes creating entries easy with transaction templates, split-category entries and internal transfer functions. It also offers simple month or annual budget tracking options, and has dynamic reports with charts.

The current version is 2.2, released Oct. 10, 2018.

Welcome Uncle Skrooge

Skrooge resembles Quicken with its dashboard-style graphical user interface, or GUI. It looks less like a banking ledger. The design is much more user-friendly. Skrooge goes where the other financial apps don’t.

The tab structure gives Skrooge a more appealing look and feel. Each task — such as filtered reports, ledger entry and dashboard — remains open as a tab line along the top of the viewing windows under the menu and toolbar rows. This keeps viewing open tabs one click away to see the Dashboard, Income vs. Expenditure report, various pie categories, etc.

Skrooge is no slouch when it comes to features. One of its strong points is the ability to grab data from other money applications so you do not have to set it up from scratch.

Skrooge

It imports QIF, QFX/OFX and CSV formats. It can handle exports from KMyMoney, Microsoft Money, GNUCash, Grisbi, HomeBank and Money Manager EX.

Other features include advanced graphical reports, tabs to help organize your work, infinite undo/redo even after a file is closed, and infinite categories levels. You also get instant filtering on operations and reports, mass update of operations, scheduled operations, and the ability to track refund of your expenses.

Skrooge also automatically processes operations based on search conditions and handles a variety of currencies. It lets you work with budget formats and a dashboard.

The latest stable version is version 2.16.2 released on Nov. 4, 2018.

Easy KMyMoney Doubles Down

KMyMoney makes using double-entry accounting principles. It could very well be the Linux version of Quicken that actually is easier to use.

The user interface has a look and feel that is familiar and intuitive. This money manager is one of the original made for Linux.

The KDE community developed and maintains this money manager app. Although it is a part of the KDE desktop, KMyMoney runs fine in most other Linux desktop environments.

KMyMoney

It supports different account types, categorization of expenses and incomes, reconciliation of bank accounts, and import/export to the “QIF” file format. You can use the OFX and HBCI formats for imports and exports through plugins.

What gives KMyMoney an edge, at least where usability is concerned, is its friendly user interface. It is a comprehensive finance-tracking application that does not require an accounting degree to use effectively.

Even if you have no prior experience with money management software, KMyMoney is a win-win solution. The interfaces used in most other Linux finance and banking tools are much more cumbersome. KMyMoney has a much lower learning curve.

KMyMoney is a capable and useful tool for tracking bank accounts and investment results. Not much effort is needed to set it up and learn to use it efficiently.

Oddly, it is as if the Linux version is a separate product. You cannot get it from the main website. The Linux version is available on Sourceforge.net.

The latest release is version 4.6.4.
Get KMyMoney here.

Grisbi Masters Simple Entry Accounting

Grisbi Finance Manager is functional and uncomplicated. It is an ideal personal financial management program.

Much of the credit for that assessment is due to the accounting entry method that relies on debiting one account and crediting one account. It is populated with an impressive set of home finance features, including support for multiple currencies.

The feature set focuses on best practices for handling Accounting, Budgeting and Reporting. You can create multiple unlimited accounts, categories and reports.

Grisbi

One of the essential features that work is Grisbi’s clear and consistent user interface. Another design feature that makes Grisbi work so well is its customization. You can tailor transactions lists, trees, tabs, and a lot more to your use.

Grisbi uses a tab-based interface for its menu system. This makes the controls easy to operate. It is built around using multiple accounts, categories and transactions. You can back up and archive your records effortlessly, and use the built-in scheduler and file encryption tools.

Importing and exporting data has an Achilles’ heel: You cannot export to non-QIF and non-CSV formats. Real-time updating is a drawback as well. You can’t. There is no local help file, and an account is unrecoverable if the user forgets the password.

My only real complaint about using Grisbi is the unnecessary challenge to learning how to get the most out of it. Do not bother downloading the 259-page Grisbi manual unless you are fluent in French. For speakers of other languages, that makes for a steep learning curve. You are totally on your own.

The current stable edition of Grisbi is version 1.1.93, released in December 2017.

Buddi Does It Simply

If you crave simplicity but demand budgeting awareness from your money management software,
Buddi could be the hands-down banking tool for you. It is a personal finance and budgeting program.

Buddi ignores the complications of other features that make more in-depth money applications harder to use. It is aimed at users with little or no financial background.

Buddi

Buddi’s user interface is based on a three-tab concept built around your accounts, your budget and your reports.

Buddi runs on any Linux computer with a Java virtual machine installed. The only drawback with this software is its legacy nature. The latest version, Buddi 3.4.1.14, was released on Jan. 14, 2016.

Use Money Manager EX for Lightweight Reliability

Money Manager Ex is easy-to-use personal finance software. Use it to organize your non-business finances and keep track of where, when and how your money goes.

Money Manager includes all the basic features you need to get an overview of your personal net worth. It helps you to keep tabs on your checking, credit card, savings, stock investment and assets accounts.

You can set reminders for recurring bills and deposits. Use it for budgeting and cash flow forecasting. Create graphs and pie charts of your spending and savings with one click.

MoneyManagerEx

Two factors make this application an unbeatable personal finance tool. You do not have to install Money Manager EX. Instead, run it from a USB drive. It uses the nonproprietary SQLite Database with AES Encryption.

Several features make Money Manager EX intuitive and simple. It has a wizard to simply create accounts and start to use the program. You can use multiple currencies for each account to have more flexibility.

Categories tell you the reason for an expenditure or income received. Clear displays show all expenses and income. You can divide and highlight them with different status indicators. You can search, filter and sort by every field to have a clear understanding of bank accounts at any time.

Special transactions can be set up in order to have the transaction entered into the database at some future date. They generally occur at regular intervals based on a schedule.

Budgeting and Asset tracking are easy to do with Money Manager Ex. You can undervalue or increase every asset value by a specific rate per year, or leave them unchanged. It is a snap to set up a budget for any time interval.

One of the best features in this lightweight money management application is the ability to store all related documents to every element type (transaction, account, asset) so you always have quick access to invoices, receipts and contracts.

The latest stable release of Money Manager EX Desktop is 1.3.3.

Bottom Line

These seven money manager applications for Linux offer a wide range of features and user interfaces. Some are good starting products for users with little or no experience with this category of software. Other titles give you all of the tools to manage your household and your small business.

I deliberately avoided ranking these Linux products. I also suspended the usual star rating for each one in this roundup. All of them share two things in common. They are all free open source applications. They are all stable and very workable, depending on your money-tracking and management needs.

Some of them are easy to set up and use. Others are more involved and can be frustrating if you are not familiar with accounting procedures.

Source

WP2Social Auto Publish Powered By : XYZScripts.com