Today’s Linux platform accommodates a number of really good financial applications that are more than capable of handling both personal and small-business accounting operations. That was not always the case, however.
Not quite 10 years ago, I scoured Linux repositories in a quest for replacement applications for popular Microsoft Windows tools. Back then, the pickings were mighty slim. Often, the only recourse was to use Microsoft Windows-based applications that ran under WINE.
Classics and Fresh Faces
The best of the Linux lot were
GnuCash,
HomeBank,
KMyMoney and
Skrooge. In fact, depending on the Linux distro you fancied, those four packages often comprised the entire financial software lot.
In terms of features and performance, they were as good as or better than the well-known Microsoft Windows equivalents — MSMoney and Quicken. Those Linux staples are still top of the class today. Their feature sets have expanded. Their performance has matured. However, Linux users now have a few more very noteworthy choices to chart their personal and small business financial activities.
In a change of pace from the usual Linux distro reviews, Linux Picks and Pans presents a roundup of the best financial apps that make the Linux OS a treasure trove for your financial needs. These Linux apps are tools to handle your budget, track your investments, and better organize your record-keeping. At a bare minimum, they will help you become more aware of where your money goes.
One development with the growing catalog of money management software for Linux users is the cost factor. Just because an application runs on Linux does not mean it is free to use. The lines have been blurring between open source products and Linux packages with free trial periods or reduced features unless you pay to upgrade. This software roundup includes only free, open source products.
If you are looking for an app only to track your checking and savings accounts, you will probably find the applications in this roundup a bit too advanced. For maintaining your bank account registers, you can find a variety of spreadsheet template files for LibreOffice Calc and Microsoft Excel on the Internet. Yes, you can get Microsoft Office apps for Linux now! They are cloud-based, and you need a Microsoft log-in such as a free Outlook.com mail account.
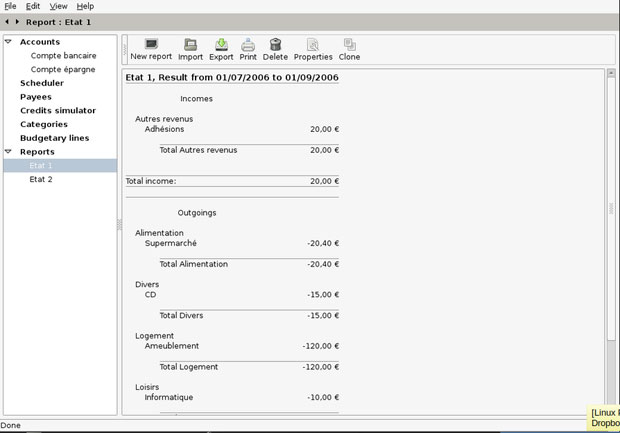
Cash In with GNUCash
GnuCash is an advanced financial program and one of the few money apps that an accountant using Linux would relish. It is a powerhouse personal and small business finance manager. It comes with a steep learning curve, though.
It is a double-entry accounting system. GnuCash tracks budgets and maintains various accounts in numerous category types. It has a full suite of standard and customizable reports.
GnuCash has the look and feel of a checkbook register. Its GUI (graphical user interface) is designed for easy entry and tracking of bank accounts, stocks, income and expenses. The easiness ends there, however, if double-entry accounting is not your comfort zone.

If you do not have an appreciation for formal accounting principles, be sure you spend considerable time studying the ample documentation. Learning to use GnuCash is not overly difficult. It is designed to be simple and easy to use. Its core functions, though, are based on formal accounting principles.
For business finances, GnuCash offers key features. For instance, it handles reports and graphs as well as scheduled transactions and financial calculations. If you run a small business, this app will track your customers, vendors, jobs, invoices and more. From that perspective, GnuCash is a full-service package.
There is not much that GNUCash cannot do. It handles Check Printing, Mortgage and Loan Repayment, Online Stock and Mutual Fund Quotes and Stock/Mutual Fund Portfolios. Create recurring transactions with adjustable amounts and timelines. Set an automatic reminder when a transaction is due. Or postpone a scheduled payment without canceling or entering it before the due date.
The latest stable release of GnuCash is version 3.3. Most Linux distributions come bundled with a version of GnuCash. Often, it is not the most current version.
Feel at Home with HomeBank
Compared to GnuCash, HomeBank is a much easier personal accounting system to use. It is designed for analyzing your personal finance and budget in detail using powerful filtering tools and charts, and for those purposes it is an ideal tool.
It includes the ability to import data easily from Intuit Quicken, Microsoft Money or other software. It also makes importing bank account statements in OFX/QFX, QIF, CSV formats a snap.
Also, it flags duplicate transactions during the import process and handles multiple currencies. It offers online updates for various account types such as Bank, Cash, Asset, Credit card and Liability. It also makes it simple to schedule recurring transactions.
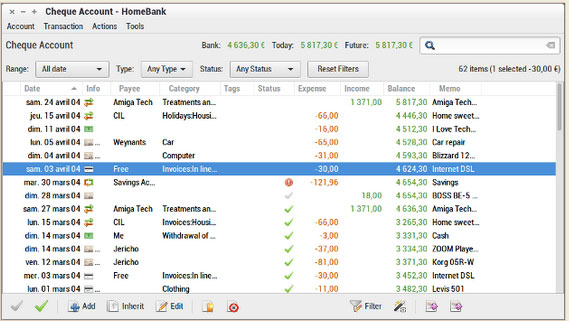
HomeBank is more than a simple ledger program. It uses categories and tags to organize transactions.
For example, this app handles multiple checking and savings accounts. Plus, it automates check numbering and category/payee assignment.
HomeBank can schedule transactions with a post-in-advance option and makes creating entries easy with transaction templates, split-category entries and internal transfer functions. It also offers simple month or annual budget tracking options, and has dynamic reports with charts.
The current version is 2.2, released Oct. 10, 2018.
Welcome Uncle Skrooge
Skrooge resembles Quicken with its dashboard-style graphical user interface, or GUI. It looks less like a banking ledger. The design is much more user-friendly. Skrooge goes where the other financial apps don’t.
The tab structure gives Skrooge a more appealing look and feel. Each task — such as filtered reports, ledger entry and dashboard — remains open as a tab line along the top of the viewing windows under the menu and toolbar rows. This keeps viewing open tabs one click away to see the Dashboard, Income vs. Expenditure report, various pie categories, etc.
Skrooge is no slouch when it comes to features. One of its strong points is the ability to grab data from other money applications so you do not have to set it up from scratch.
It imports QIF, QFX/OFX and CSV formats. It can handle exports from KMyMoney, Microsoft Money, GNUCash, Grisbi, HomeBank and Money Manager EX.
Other features include advanced graphical reports, tabs to help organize your work, infinite undo/redo even after a file is closed, and infinite categories levels. You also get instant filtering on operations and reports, mass update of operations, scheduled operations, and the ability to track refund of your expenses.
Skrooge also automatically processes operations based on search conditions and handles a variety of currencies. It lets you work with budget formats and a dashboard.
The latest stable version is version 2.16.2 released on Nov. 4, 2018.
Easy KMyMoney Doubles Down
KMyMoney makes using double-entry accounting principles. It could very well be the Linux version of Quicken that actually is easier to use.
The user interface has a look and feel that is familiar and intuitive. This money manager is one of the original made for Linux.
The KDE community developed and maintains this money manager app. Although it is a part of the KDE desktop, KMyMoney runs fine in most other Linux desktop environments.
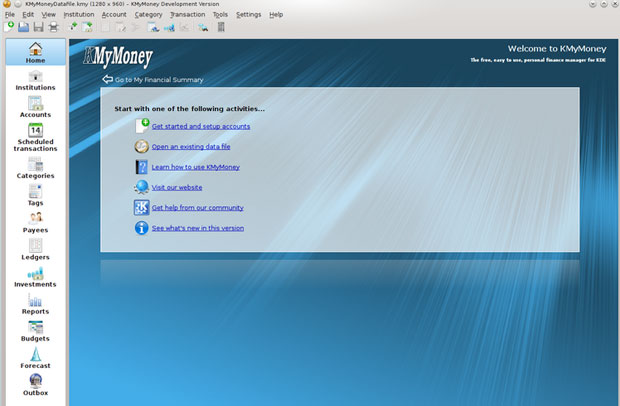
It supports different account types, categorization of expenses and incomes, reconciliation of bank accounts, and import/export to the “QIF” file format. You can use the OFX and HBCI formats for imports and exports through plugins.
What gives KMyMoney an edge, at least where usability is concerned, is its friendly user interface. It is a comprehensive finance-tracking application that does not require an accounting degree to use effectively.
Even if you have no prior experience with money management software, KMyMoney is a win-win solution. The interfaces used in most other Linux finance and banking tools are much more cumbersome. KMyMoney has a much lower learning curve.
KMyMoney is a capable and useful tool for tracking bank accounts and investment results. Not much effort is needed to set it up and learn to use it efficiently.
Oddly, it is as if the Linux version is a separate product. You cannot get it from the main website. The Linux version is available on Sourceforge.net.
The latest release is version 4.6.4.
Get KMyMoney here.
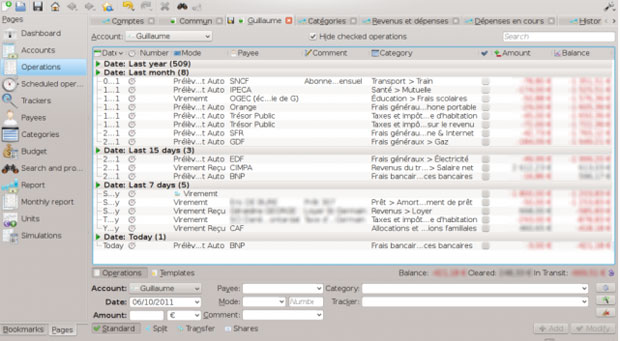
Grisbi Masters Simple Entry Accounting
Grisbi Finance Manager is functional and uncomplicated. It is an ideal personal financial management program.
Much of the credit for that assessment is due to the accounting entry method that relies on debiting one account and crediting one account. It is populated with an impressive set of home finance features, including support for multiple currencies.
The feature set focuses on best practices for handling Accounting, Budgeting and Reporting. You can create multiple unlimited accounts, categories and reports.
One of the essential features that work is Grisbi’s clear and consistent user interface. Another design feature that makes Grisbi work so well is its customization. You can tailor transactions lists, trees, tabs, and a lot more to your use.
Grisbi uses a tab-based interface for its menu system. This makes the controls easy to operate. It is built around using multiple accounts, categories and transactions. You can back up and archive your records effortlessly, and use the built-in scheduler and file encryption tools.
Importing and exporting data has an Achilles’ heel: You cannot export to non-QIF and non-CSV formats. Real-time updating is a drawback as well. You can’t. There is no local help file, and an account is unrecoverable if the user forgets the password.
My only real complaint about using Grisbi is the unnecessary challenge to learning how to get the most out of it. Do not bother downloading the 259-page Grisbi manual unless you are fluent in French. For speakers of other languages, that makes for a steep learning curve. You are totally on your own.
The current stable edition of Grisbi is version 1.1.93, released in December 2017.
Buddi Does It Simply
If you crave simplicity but demand budgeting awareness from your money management software,
Buddi could be the hands-down banking tool for you. It is a personal finance and budgeting program.
Buddi ignores the complications of other features that make more in-depth money applications harder to use. It is aimed at users with little or no financial background.

Buddi’s user interface is based on a three-tab concept built around your accounts, your budget and your reports.
Buddi runs on any Linux computer with a Java virtual machine installed. The only drawback with this software is its legacy nature. The latest version, Buddi 3.4.1.14, was released on Jan. 14, 2016.
Use Money Manager EX for Lightweight Reliability
Money Manager Ex is easy-to-use personal finance software. Use it to organize your non-business finances and keep track of where, when and how your money goes.
Money Manager includes all the basic features you need to get an overview of your personal net worth. It helps you to keep tabs on your checking, credit card, savings, stock investment and assets accounts.
You can set reminders for recurring bills and deposits. Use it for budgeting and cash flow forecasting. Create graphs and pie charts of your spending and savings with one click.
Two factors make this application an unbeatable personal finance tool. You do not have to install Money Manager EX. Instead, run it from a USB drive. It uses the nonproprietary SQLite Database with AES Encryption.
Several features make Money Manager EX intuitive and simple. It has a wizard to simply create accounts and start to use the program. You can use multiple currencies for each account to have more flexibility.
Categories tell you the reason for an expenditure or income received. Clear displays show all expenses and income. You can divide and highlight them with different status indicators. You can search, filter and sort by every field to have a clear understanding of bank accounts at any time.
Special transactions can be set up in order to have the transaction entered into the database at some future date. They generally occur at regular intervals based on a schedule.
Budgeting and Asset tracking are easy to do with Money Manager Ex. You can undervalue or increase every asset value by a specific rate per year, or leave them unchanged. It is a snap to set up a budget for any time interval.
One of the best features in this lightweight money management application is the ability to store all related documents to every element type (transaction, account, asset) so you always have quick access to invoices, receipts and contracts.
The latest stable release of Money Manager EX Desktop is 1.3.3.
Bottom Line
These seven money manager applications for Linux offer a wide range of features and user interfaces. Some are good starting products for users with little or no experience with this category of software. Other titles give you all of the tools to manage your household and your small business.
I deliberately avoided ranking these Linux products. I also suspended the usual star rating for each one in this roundup. All of them share two things in common. They are all free open source applications. They are all stable and very workable, depending on your money-tracking and management needs.
Some of them are easy to set up and use. Others are more involved and can be frustrating if you are not familiar with accounting procedures.