strace is a powerful command line tool for debugging and trouble shooting programs in Unix-like operating systems such as Linux. It captures and records all system calls made by a process and the signals received by the process.
Read Also: How to Audit Linux Process Using ‘autrace’ on CentOS/RHEL
It displays the name of each system call together with its arguments enclosed in a parenthesis and its return value to standard error; you can optionally redirect it to a file as well.
In this article, we will explain 10 strace command examples for troubleshooting and debugging programs and processes in a Linux system.
How to Install Strace Process Monitoring Tool in Linux
If strace is not pre-installed on your Linux system, run the appropriate command below for your distribution, to install it.
$ sudo apt install strace	#Debian/Ubuntu
# yum install strace		#RHEL/CentOS
# dnf install strace		#Fedora 22+
In case a program crashes or behaves in a way not expected, you can go through its systems calls to get a clue of what exactly happened during its execution. As we will see later on, system calls can be categorized under different events: those relating to process management, those that take a file as an argument, those that involve networking, memory mapping, signals, IPC and also file descriptor related system calls.
You can either run a program/command with strace or pass a PID to it using the -p option as in the following examples.
1. Trace Linux Command System Calls
You can simply run a command with strace like this, here we are tracing of all system calls made by the df command.
$ strace df -h

execve("/bin/df", ["df", "-h"], [/* 50 vars */]) = 0
brk(NULL)                               = 0x136e000
access("/etc/ld.so.nohwcap", F_OK)      = -1 ENOENT (No such file or directory)
mmap(NULL, 8192, PROT_READ|PROT_WRITE, MAP_PRIVATE|MAP_ANONYMOUS, -1, 0) = 0x7f82f78fd000
access("/etc/ld.so.preload", R_OK)      = -1 ENOENT (No such file or directory)
open("/etc/ld.so.cache", O_RDONLY|O_CLOEXEC) = 3
fstat(3, {st_mode=S_IFREG|0644, st_size=147662, ...}) = 0
mmap(NULL, 147662, PROT_READ, MAP_PRIVATE, 3, 0) = 0x7f82f78d8000
close(3)                                = 0
access("/etc/ld.so.nohwcap", F_OK)      = -1 ENOENT (No such file or directory)
open("/lib/x86_64-linux-gnu/libc.so.6", O_RDONLY|O_CLOEXEC) = 3
read(3, "7ELF
$ strace df -h
execve("/bin/df", ["df", "-h"], [/* 50 vars */]) = 0
brk(NULL)                               = 0x136e000
access("/etc/ld.so.nohwcap", F_OK)      = -1 ENOENT (No such file or directory)
mmap(NULL, 8192, PROT_READ|PROT_WRITE, MAP_PRIVATE|MAP_ANONYMOUS, -1, 0) = 0x7f82f78fd000
access("/etc/ld.so.preload", R_OK)      = -1 ENOENT (No such file or directory)
open("/etc/ld.so.cache", O_RDONLY|O_CLOEXEC) = 3
fstat(3, {st_mode=S_IFREG|0644, st_size=147662, ...}) = 0
mmap(NULL, 147662, PROT_READ, MAP_PRIVATE, 3, 0) = 0x7f82f78d8000
close(3)                                = 0
access("/etc/ld.so.nohwcap", F_OK)      = -1 ENOENT (No such file or directory)
open("/lib/x86_64-linux-gnu/libc.so.6", O_RDONLY|O_CLOEXEC) = 3
read(3, "\177ELF\2\1\1\3\0\0\0\0\0\0\0\0\3\0>\0\1\0\0\0P\t\2\0\0\0\0\0"..., 832) = 832
fstat(3, {st_mode=S_IFREG|0755, st_size=1868984, ...}) = 0
mmap(NULL, 3971488, PROT_READ|PROT_EXEC, MAP_PRIVATE|MAP_DENYWRITE, 3, 0) = 0x7f82f7310000
...
>
$ strace df -h
execve("/bin/df", ["df", "-h"], [/* 50 vars */]) = 0
brk(NULL)                               = 0x136e000
access("/etc/ld.so.nohwcap", F_OK)      = -1 ENOENT (No such file or directory)
mmap(NULL, 8192, PROT_READ|PROT_WRITE, MAP_PRIVATE|MAP_ANONYMOUS, -1, 0) = 0x7f82f78fd000
access("/etc/ld.so.preload", R_OK)      = -1 ENOENT (No such file or directory)
open("/etc/ld.so.cache", O_RDONLY|O_CLOEXEC) = 3
fstat(3, {st_mode=S_IFREG|0644, st_size=147662, ...}) = 0
mmap(NULL, 147662, PROT_READ, MAP_PRIVATE, 3, 0) = 0x7f82f78d8000
close(3)                                = 0
access("/etc/ld.so.nohwcap", F_OK)      = -1 ENOENT (No such file or directory)
open("/lib/x86_64-linux-gnu/libc.so.6", O_RDONLY|O_CLOEXEC) = 3
read(3, "\177ELF\2\1\1\3\0\0\0\0\0\0\0\0\3\0>\0\1\0\0\0P\t\2\0\0\0\0\0"..., 832) = 832
fstat(3, {st_mode=S_IFREG|0755, st_size=1868984, ...}) = 0
mmap(NULL, 3971488, PROT_READ|PROT_EXEC, MAP_PRIVATE|MAP_DENYWRITE, 3, 0) = 0x7f82f7310000
...
P\t
$ strace df -h
execve("/bin/df", ["df", "-h"], [/* 50 vars */]) = 0
brk(NULL)                               = 0x136e000
access("/etc/ld.so.nohwcap", F_OK)      = -1 ENOENT (No such file or directory)
mmap(NULL, 8192, PROT_READ|PROT_WRITE, MAP_PRIVATE|MAP_ANONYMOUS, -1, 0) = 0x7f82f78fd000
access("/etc/ld.so.preload", R_OK)      = -1 ENOENT (No such file or directory)
open("/etc/ld.so.cache", O_RDONLY|O_CLOEXEC) = 3
fstat(3, {st_mode=S_IFREG|0644, st_size=147662, ...}) = 0
mmap(NULL, 147662, PROT_READ, MAP_PRIVATE, 3, 0) = 0x7f82f78d8000
close(3)                                = 0
access("/etc/ld.so.nohwcap", F_OK)      = -1 ENOENT (No such file or directory)
open("/lib/x86_64-linux-gnu/libc.so.6", O_RDONLY|O_CLOEXEC) = 3
read(3, "\177ELF\2\1\1\3\0\0\0\0\0\0\0\0\3\0>\0\1\0\0\0P\t\2\0\0\0\0\0"..., 832) = 832
fstat(3, {st_mode=S_IFREG|0755, st_size=1868984, ...}) = 0
mmap(NULL, 3971488, PROT_READ|PROT_EXEC, MAP_PRIVATE|MAP_DENYWRITE, 3, 0) = 0x7f82f7310000
...
"..., 832) = 832 fstat(3, {st_mode=S_IFREG|0755, st_size=1868984, ...}) = 0 mmap(NULL, 3971488, PROT_READ|PROT_EXEC, MAP_PRIVATE|MAP_DENYWRITE, 3, 0) = 0x7f82f7310000 ...
From the output above, you can see various types of system calls made by df command, for example.
open("/etc/ld.so.cache", O_RDONLY|O_CLOEXEC) = 3
Where:
- open – is the type of system call
- (“/etc/ld.so.cache”, O_RDONLY|O_CLOEXEC) – system call argument
- 3 – system call return value
Below is an sample output showing the write system calls, that displays df command output on the screen.
mmap(NULL, 26258, PROT_READ, MAP_SHARED, 3, 0) = 0x7f82f78f5000
close(3)                                = 0
fstat(1, {st_mode=S_IFCHR|0620, st_rdev=makedev(136, 1), ...}) = 0
write(1, "Filesystem      Size  Used Avail"..., 49Filesystem      Size  Used Avail Use% Mounted on
) = 49
write(1, "udev            3.9G     0  3.9G"..., 43udev            3.9G     0  3.9G   0% /dev
) = 43
write(1, "tmpfs           788M  9.6M  779M"..., 43tmpfs           788M  9.6M  779M   2% /run
) = 43
write(1, "/dev/sda10      324G  252G   56G"..., 40/dev/sda10      324G  252G   56G  82% /
) = 40
write(1, "tmpfs           3.9G  104M  3.8G"..., 47tmpfs           3.9G  104M  3.8G   3% /dev/shm
) = 47
write(1, "tmpfs           5.0M  4.0K  5.0M"..., 48tmpfs           5.0M  4.0K  5.0M   1% /run/lock
) = 48
write(1, "tmpfs           3.9G     0  3.9G"..., 53tmpfs           3.9G     0  3.9G   0% /sys/fs/cgroup
) = 53
write(1, "cgmfs           100K     0  100K"..., 56cgmfs           100K     0  100K   0% /run/cgmanager/fs
) = 56
write(1, "tmpfs           788M   36K  788M"..., 53tmpfs           788M   36K  788M   1% /run/user/1000
) = 53
close(1)                                = 0
close(2)                                = 0
exit_group(0)                           = ?
+++ exited with 0 +++
2. Trace Linux Process PID
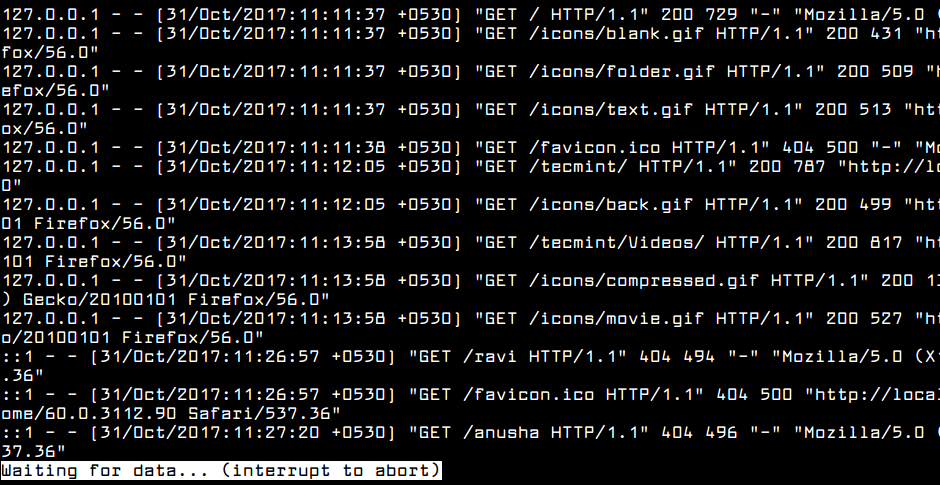
If a process is already running, you can trace it by simply passing its PID as follows; this will fill your screen with continues output that shows system calls being made by the process, to end it, press [Ctrl + C].
$ sudo strace -p 3569

strace: Process 3569 attached
restart_syscall(<... resuming interrupted poll ...>) = 1
recvmsg(4, {msg_name(0)=NULL, msg_iov(1)=[{"U0!70
$ sudo strace -p 3569
strace: Process 3569 attached
restart_syscall(<... resuming interrupted poll ...>) = 1
recvmsg(4, {msg_name(0)=NULL, msg_iov(1)=[{"U\2\24\300!\247\330\0\3\24\4\0\20\0\0\0\0\0\0\24\24\24\24\24\0\0\3\37%\2\0\0", 4096}], msg_controllen=0, msg_flags=0}, 0) = 32
recvmsg(4, 0x7ffee4dbf870, 0)           = -1 EAGAIN (Resource temporarily unavailable)
recvmsg(4, 0x7ffee4dbf850, 0)           = -1 EAGAIN (Resource temporarily unavailable)
poll([{fd=3, events=POLLIN}, {fd=4, events=POLLIN}, {fd=5, events=POLLIN}, {fd=10, events=POLLIN}, {fd=30, events=POLLIN}, {fd=31, events=POLLIN}], 6, -1) = 1 ([{fd=31, revents=POLLIN}])
read(31, "\372", 1)                     = 1
recvmsg(4, 0x7ffee4dbf850, 0)           = -1 EAGAIN (Resource temporarily unavailable)
poll([{fd=3, events=POLLIN}, {fd=4, events=POLLIN}, {fd=5, events=POLLIN}, {fd=10, events=POLLIN}, {fd=30, events=POLLIN}, {fd=31, events=POLLIN}], 6, 0) = 1 ([{fd=31, revents=POLLIN}])
read(31, "\372", 1)                     = 1
recvmsg(4, 0x7ffee4dbf850, 0)           = -1 EAGAIN (Resource temporarily unavailable)
poll([{fd=3, events=POLLIN}, {fd=4, events=POLLIN}, {fd=5, events=POLLIN}, {fd=10, events=POLLIN}, {fd=30, events=POLLIN}, {fd=31, events=POLLIN}], 6, 0) = 0 (Timeout)
mprotect(0x207faa20000, 8192, PROT_READ|PROT_WRITE) = 0
mprotect(0x207faa20000, 8192, PROT_READ|PROT_EXEC) = 0
mprotect(0x207faa21000, 4096, PROT_READ|PROT_WRITE) = 0
mprotect(0x207faa21000, 4096, PROT_READ|PROT_EXEC) = 0
...
%
$ sudo strace -p 3569
strace: Process 3569 attached
restart_syscall(<... resuming interrupted poll ...>) = 1
recvmsg(4, {msg_name(0)=NULL, msg_iov(1)=[{"U\2\24\300!\247\330\0\3\24\4\0\20\0\0\0\0\0\0\24\24\24\24\24\0\0\3\37%\2\0\0", 4096}], msg_controllen=0, msg_flags=0}, 0) = 32
recvmsg(4, 0x7ffee4dbf870, 0)           = -1 EAGAIN (Resource temporarily unavailable)
recvmsg(4, 0x7ffee4dbf850, 0)           = -1 EAGAIN (Resource temporarily unavailable)
poll([{fd=3, events=POLLIN}, {fd=4, events=POLLIN}, {fd=5, events=POLLIN}, {fd=10, events=POLLIN}, {fd=30, events=POLLIN}, {fd=31, events=POLLIN}], 6, -1) = 1 ([{fd=31, revents=POLLIN}])
read(31, "\372", 1)                     = 1
recvmsg(4, 0x7ffee4dbf850, 0)           = -1 EAGAIN (Resource temporarily unavailable)
poll([{fd=3, events=POLLIN}, {fd=4, events=POLLIN}, {fd=5, events=POLLIN}, {fd=10, events=POLLIN}, {fd=30, events=POLLIN}, {fd=31, events=POLLIN}], 6, 0) = 1 ([{fd=31, revents=POLLIN}])
read(31, "\372", 1)                     = 1
recvmsg(4, 0x7ffee4dbf850, 0)           = -1 EAGAIN (Resource temporarily unavailable)
poll([{fd=3, events=POLLIN}, {fd=4, events=POLLIN}, {fd=5, events=POLLIN}, {fd=10, events=POLLIN}, {fd=30, events=POLLIN}, {fd=31, events=POLLIN}], 6, 0) = 0 (Timeout)
mprotect(0x207faa20000, 8192, PROT_READ|PROT_WRITE) = 0
mprotect(0x207faa20000, 8192, PROT_READ|PROT_EXEC) = 0
mprotect(0x207faa21000, 4096, PROT_READ|PROT_WRITE) = 0
mprotect(0x207faa21000, 4096, PROT_READ|PROT_EXEC) = 0
...
", 4096}], msg_controllen=0, msg_flags=0}, 0) = 32 recvmsg(4, 0x7ffee4dbf870, 0) = -1 EAGAIN (Resource temporarily unavailable) recvmsg(4, 0x7ffee4dbf850, 0) = -1 EAGAIN (Resource temporarily unavailable) poll([{fd=3, events=POLLIN}, {fd=4, events=POLLIN}, {fd=5, events=POLLIN}, {fd=10, events=POLLIN}, {fd=30, events=POLLIN}, {fd=31, events=POLLIN}], 6, -1) = 1 ([{fd=31, revents=POLLIN}]) read(31, "2", 1) = 1 recvmsg(4, 0x7ffee4dbf850, 0) = -1 EAGAIN (Resource temporarily unavailable) poll([{fd=3, events=POLLIN}, {fd=4, events=POLLIN}, {fd=5, events=POLLIN}, {fd=10, events=POLLIN}, {fd=30, events=POLLIN}, {fd=31, events=POLLIN}], 6, 0) = 1 ([{fd=31, revents=POLLIN}]) read(31, "2", 1) = 1 recvmsg(4, 0x7ffee4dbf850, 0) = -1 EAGAIN (Resource temporarily unavailable) poll([{fd=3, events=POLLIN}, {fd=4, events=POLLIN}, {fd=5, events=POLLIN}, {fd=10, events=POLLIN}, {fd=30, events=POLLIN}, {fd=31, events=POLLIN}], 6, 0) = 0 (Timeout) mprotect(0x207faa20000, 8192, PROT_READ|PROT_WRITE) = 0 mprotect(0x207faa20000, 8192, PROT_READ|PROT_EXEC) = 0 mprotect(0x207faa21000, 4096, PROT_READ|PROT_WRITE) = 0 mprotect(0x207faa21000, 4096, PROT_READ|PROT_EXEC) = 0 ...
3. Get Summary of Linux Process
Using the -c flag, you can generate a report of total time, calls, and errors for each system call, as follows.
$ sudo strace -c -p 3569

strace: Process 3569 attached

^Cstrace: Process 3569 detached
% time     seconds  usecs/call     calls    errors syscall
------ ----------- ----------- --------- --------- ----------------
 99.73    0.016000           8      1971           poll
  0.16    0.000025           0       509        75 futex
  0.06    0.000010           0      1985      1966 recvmsg
  0.06    0.000009           0      2336           mprotect
  0.00    0.000000           0       478           read
  0.00    0.000000           0        13           write
  0.00    0.000000           0        29           mmap
  0.00    0.000000           0         9           munmap
  0.00    0.000000           0        18           writev
  0.00    0.000000           0       351           madvise
  0.00    0.000000           0         1           restart_syscall
------ ----------- ----------- --------- --------- ----------------
100.00    0.016044                  7700      2041 total
4. Print Instruction Pointer During System Call
The -i option displays the instruction pointer at the time of each system call made by the program.
$ sudo strace -i df -h

[00007f0d7534c777] execve("/bin/df", ["df", "-h"], [/* 17 vars */]) = 0
[00007faf9cafa4b9] brk(NULL)            = 0x12f0000
[00007faf9cafb387] access("/etc/ld.so.nohwcap", F_OK) = -1 ENOENT (No such file or directory)
[00007faf9cafb47a] mmap(NULL, 8192, PROT_READ|PROT_WRITE, MAP_PRIVATE|MAP_ANONYMOUS, -1, 0) = 0x7faf9cd03000
[00007faf9cafb387] access("/etc/ld.so.preload", R_OK) = -1 ENOENT (No such file or directory)
[00007faf9cafb327] open("/etc/ld.so.cache", O_RDONLY|O_CLOEXEC) = 3
[00007faf9cafb2b4] fstat(3, {st_mode=S_IFREG|0644, st_size=147662, ...}) = 0
[00007faf9cafb47a] mmap(NULL, 147662, PROT_READ, MAP_PRIVATE, 3, 0) = 0x7faf9ccde000
[00007faf9cafb427] close(3)             = 0
[00007faf9cafb387] access("/etc/ld.so.nohwcap", F_OK) = -1 ENOENT (No such file or directory)
[00007faf9cafb327] open("/lib/x86_64-linux-gnu/libc.so.6", O_RDONLY|O_CLOEXEC) = 3
[00007faf9cafb347] read(3, "7ELF
$ sudo strace -i df -h
[00007f0d7534c777] execve("/bin/df", ["df", "-h"], [/* 17 vars */]) = 0
[00007faf9cafa4b9] brk(NULL)            = 0x12f0000
[00007faf9cafb387] access("/etc/ld.so.nohwcap", F_OK) = -1 ENOENT (No such file or directory)
[00007faf9cafb47a] mmap(NULL, 8192, PROT_READ|PROT_WRITE, MAP_PRIVATE|MAP_ANONYMOUS, -1, 0) = 0x7faf9cd03000
[00007faf9cafb387] access("/etc/ld.so.preload", R_OK) = -1 ENOENT (No such file or directory)
[00007faf9cafb327] open("/etc/ld.so.cache", O_RDONLY|O_CLOEXEC) = 3
[00007faf9cafb2b4] fstat(3, {st_mode=S_IFREG|0644, st_size=147662, ...}) = 0
[00007faf9cafb47a] mmap(NULL, 147662, PROT_READ, MAP_PRIVATE, 3, 0) = 0x7faf9ccde000
[00007faf9cafb427] close(3)             = 0
[00007faf9cafb387] access("/etc/ld.so.nohwcap", F_OK) = -1 ENOENT (No such file or directory)
[00007faf9cafb327] open("/lib/x86_64-linux-gnu/libc.so.6", O_RDONLY|O_CLOEXEC) = 3
[00007faf9cafb347] read(3, "\177ELF\2\1\1\3\0\0\0\0\0\0\0\0\3\0>\0\1\0\0\0P\t\2\0\0\0\0\0"..., 832) = 832
[00007faf9cafb2b4] fstat(3, {st_mode=S_IFREG|0755, st_size=1868984, ...}) = 0
[00007faf9cafb47a] mmap(NULL, 3971488, PROT_READ|PROT_EXEC, MAP_PRIVATE|MAP_DENYWRITE, 3, 0) = 0x7faf9c716000
[00007faf9cafb517] mprotect(0x7faf9c8d6000, 2097152, PROT_NONE) = 0
...
>
$ sudo strace -i df -h
[00007f0d7534c777] execve("/bin/df", ["df", "-h"], [/* 17 vars */]) = 0
[00007faf9cafa4b9] brk(NULL)            = 0x12f0000
[00007faf9cafb387] access("/etc/ld.so.nohwcap", F_OK) = -1 ENOENT (No such file or directory)
[00007faf9cafb47a] mmap(NULL, 8192, PROT_READ|PROT_WRITE, MAP_PRIVATE|MAP_ANONYMOUS, -1, 0) = 0x7faf9cd03000
[00007faf9cafb387] access("/etc/ld.so.preload", R_OK) = -1 ENOENT (No such file or directory)
[00007faf9cafb327] open("/etc/ld.so.cache", O_RDONLY|O_CLOEXEC) = 3
[00007faf9cafb2b4] fstat(3, {st_mode=S_IFREG|0644, st_size=147662, ...}) = 0
[00007faf9cafb47a] mmap(NULL, 147662, PROT_READ, MAP_PRIVATE, 3, 0) = 0x7faf9ccde000
[00007faf9cafb427] close(3)             = 0
[00007faf9cafb387] access("/etc/ld.so.nohwcap", F_OK) = -1 ENOENT (No such file or directory)
[00007faf9cafb327] open("/lib/x86_64-linux-gnu/libc.so.6", O_RDONLY|O_CLOEXEC) = 3
[00007faf9cafb347] read(3, "\177ELF\2\1\1\3\0\0\0\0\0\0\0\0\3\0>\0\1\0\0\0P\t\2\0\0\0\0\0"..., 832) = 832
[00007faf9cafb2b4] fstat(3, {st_mode=S_IFREG|0755, st_size=1868984, ...}) = 0
[00007faf9cafb47a] mmap(NULL, 3971488, PROT_READ|PROT_EXEC, MAP_PRIVATE|MAP_DENYWRITE, 3, 0) = 0x7faf9c716000
[00007faf9cafb517] mprotect(0x7faf9c8d6000, 2097152, PROT_NONE) = 0
...
P\t
$ sudo strace -i df -h
[00007f0d7534c777] execve("/bin/df", ["df", "-h"], [/* 17 vars */]) = 0
[00007faf9cafa4b9] brk(NULL)            = 0x12f0000
[00007faf9cafb387] access("/etc/ld.so.nohwcap", F_OK) = -1 ENOENT (No such file or directory)
[00007faf9cafb47a] mmap(NULL, 8192, PROT_READ|PROT_WRITE, MAP_PRIVATE|MAP_ANONYMOUS, -1, 0) = 0x7faf9cd03000
[00007faf9cafb387] access("/etc/ld.so.preload", R_OK) = -1 ENOENT (No such file or directory)
[00007faf9cafb327] open("/etc/ld.so.cache", O_RDONLY|O_CLOEXEC) = 3
[00007faf9cafb2b4] fstat(3, {st_mode=S_IFREG|0644, st_size=147662, ...}) = 0
[00007faf9cafb47a] mmap(NULL, 147662, PROT_READ, MAP_PRIVATE, 3, 0) = 0x7faf9ccde000
[00007faf9cafb427] close(3)             = 0
[00007faf9cafb387] access("/etc/ld.so.nohwcap", F_OK) = -1 ENOENT (No such file or directory)
[00007faf9cafb327] open("/lib/x86_64-linux-gnu/libc.so.6", O_RDONLY|O_CLOEXEC) = 3
[00007faf9cafb347] read(3, "\177ELF\2\1\1\3\0\0\0\0\0\0\0\0\3\0>\0\1\0\0\0P\t\2\0\0\0\0\0"..., 832) = 832
[00007faf9cafb2b4] fstat(3, {st_mode=S_IFREG|0755, st_size=1868984, ...}) = 0
[00007faf9cafb47a] mmap(NULL, 3971488, PROT_READ|PROT_EXEC, MAP_PRIVATE|MAP_DENYWRITE, 3, 0) = 0x7faf9c716000
[00007faf9cafb517] mprotect(0x7faf9c8d6000, 2097152, PROT_NONE) = 0
...
"..., 832) = 832 [00007faf9cafb2b4] fstat(3, {st_mode=S_IFREG|0755, st_size=1868984, ...}) = 0 [00007faf9cafb47a] mmap(NULL, 3971488, PROT_READ|PROT_EXEC, MAP_PRIVATE|MAP_DENYWRITE, 3, 0) = 0x7faf9c716000 [00007faf9cafb517] mprotect(0x7faf9c8d6000, 2097152, PROT_NONE) = 0 ...
5. Show Time of Day For Each Trace Output Line
You can also print the time of day for each line in the trace output, by passing the -t flag.
$ sudo strace -t df -h

15:19:25 execve("/bin/df", ["df", "-h"], [/* 17 vars */]) = 0
15:19:25 brk(NULL)                      = 0x234c000
15:19:25 access("/etc/ld.so.nohwcap", F_OK) = -1 ENOENT (No such file or directory)
15:19:25 mmap(NULL, 8192, PROT_READ|PROT_WRITE, MAP_PRIVATE|MAP_ANONYMOUS, -1, 0) = 0x7f8c7f1d9000
15:19:25 access("/etc/ld.so.preload", R_OK) = -1 ENOENT (No such file or directory)
15:19:25 open("/etc/ld.so.cache", O_RDONLY|O_CLOEXEC) = 3
15:19:25 fstat(3, {st_mode=S_IFREG|0644, st_size=147662, ...}) = 0
15:19:25 mmap(NULL, 147662, PROT_READ, MAP_PRIVATE, 3, 0) = 0x7f8c7f1b4000
15:19:25 close(3)                       = 0
15:19:25 access("/etc/ld.so.nohwcap", F_OK) = -1 ENOENT (No such file or directory)
15:19:25 open("/lib/x86_64-linux-gnu/libc.so.6", O_RDONLY|O_CLOEXEC) = 3
15:19:25 read(3, "7ELF
$ sudo strace -t df -h
15:19:25 execve("/bin/df", ["df", "-h"], [/* 17 vars */]) = 0
15:19:25 brk(NULL)                      = 0x234c000
15:19:25 access("/etc/ld.so.nohwcap", F_OK) = -1 ENOENT (No such file or directory)
15:19:25 mmap(NULL, 8192, PROT_READ|PROT_WRITE, MAP_PRIVATE|MAP_ANONYMOUS, -1, 0) = 0x7f8c7f1d9000
15:19:25 access("/etc/ld.so.preload", R_OK) = -1 ENOENT (No such file or directory)
15:19:25 open("/etc/ld.so.cache", O_RDONLY|O_CLOEXEC) = 3
15:19:25 fstat(3, {st_mode=S_IFREG|0644, st_size=147662, ...}) = 0
15:19:25 mmap(NULL, 147662, PROT_READ, MAP_PRIVATE, 3, 0) = 0x7f8c7f1b4000
15:19:25 close(3)                       = 0
15:19:25 access("/etc/ld.so.nohwcap", F_OK) = -1 ENOENT (No such file or directory)
15:19:25 open("/lib/x86_64-linux-gnu/libc.so.6", O_RDONLY|O_CLOEXEC) = 3
15:19:25 read(3, "\177ELF\2\1\1\3\0\0\0\0\0\0\0\0\3\0>\0\1\0\0\0P\t\2\0\0\0\0\0"..., 832) = 832
15:19:25 fstat(3, {st_mode=S_IFREG|0755, st_size=1868984, ...}) = 0
15:19:25 mmap(NULL, 3971488, PROT_READ|PROT_EXEC, MAP_PRIVATE|MAP_DENYWRITE, 3, 0) = 0x7f8c7ebec000
15:19:25 mprotect(0x7f8c7edac000, 2097152, PROT_NONE) = 0
...
>
$ sudo strace -t df -h
15:19:25 execve("/bin/df", ["df", "-h"], [/* 17 vars */]) = 0
15:19:25 brk(NULL)                      = 0x234c000
15:19:25 access("/etc/ld.so.nohwcap", F_OK) = -1 ENOENT (No such file or directory)
15:19:25 mmap(NULL, 8192, PROT_READ|PROT_WRITE, MAP_PRIVATE|MAP_ANONYMOUS, -1, 0) = 0x7f8c7f1d9000
15:19:25 access("/etc/ld.so.preload", R_OK) = -1 ENOENT (No such file or directory)
15:19:25 open("/etc/ld.so.cache", O_RDONLY|O_CLOEXEC) = 3
15:19:25 fstat(3, {st_mode=S_IFREG|0644, st_size=147662, ...}) = 0
15:19:25 mmap(NULL, 147662, PROT_READ, MAP_PRIVATE, 3, 0) = 0x7f8c7f1b4000
15:19:25 close(3)                       = 0
15:19:25 access("/etc/ld.so.nohwcap", F_OK) = -1 ENOENT (No such file or directory)
15:19:25 open("/lib/x86_64-linux-gnu/libc.so.6", O_RDONLY|O_CLOEXEC) = 3
15:19:25 read(3, "\177ELF\2\1\1\3\0\0\0\0\0\0\0\0\3\0>\0\1\0\0\0P\t\2\0\0\0\0\0"..., 832) = 832
15:19:25 fstat(3, {st_mode=S_IFREG|0755, st_size=1868984, ...}) = 0
15:19:25 mmap(NULL, 3971488, PROT_READ|PROT_EXEC, MAP_PRIVATE|MAP_DENYWRITE, 3, 0) = 0x7f8c7ebec000
15:19:25 mprotect(0x7f8c7edac000, 2097152, PROT_NONE) = 0
...
P\t
$ sudo strace -t df -h
15:19:25 execve("/bin/df", ["df", "-h"], [/* 17 vars */]) = 0
15:19:25 brk(NULL)                      = 0x234c000
15:19:25 access("/etc/ld.so.nohwcap", F_OK) = -1 ENOENT (No such file or directory)
15:19:25 mmap(NULL, 8192, PROT_READ|PROT_WRITE, MAP_PRIVATE|MAP_ANONYMOUS, -1, 0) = 0x7f8c7f1d9000
15:19:25 access("/etc/ld.so.preload", R_OK) = -1 ENOENT (No such file or directory)
15:19:25 open("/etc/ld.so.cache", O_RDONLY|O_CLOEXEC) = 3
15:19:25 fstat(3, {st_mode=S_IFREG|0644, st_size=147662, ...}) = 0
15:19:25 mmap(NULL, 147662, PROT_READ, MAP_PRIVATE, 3, 0) = 0x7f8c7f1b4000
15:19:25 close(3)                       = 0
15:19:25 access("/etc/ld.so.nohwcap", F_OK) = -1 ENOENT (No such file or directory)
15:19:25 open("/lib/x86_64-linux-gnu/libc.so.6", O_RDONLY|O_CLOEXEC) = 3
15:19:25 read(3, "\177ELF\2\1\1\3\0\0\0\0\0\0\0\0\3\0>\0\1\0\0\0P\t\2\0\0\0\0\0"..., 832) = 832
15:19:25 fstat(3, {st_mode=S_IFREG|0755, st_size=1868984, ...}) = 0
15:19:25 mmap(NULL, 3971488, PROT_READ|PROT_EXEC, MAP_PRIVATE|MAP_DENYWRITE, 3, 0) = 0x7f8c7ebec000
15:19:25 mprotect(0x7f8c7edac000, 2097152, PROT_NONE) = 0
...
"..., 832) = 832 15:19:25 fstat(3, {st_mode=S_IFREG|0755, st_size=1868984, ...}) = 0 15:19:25 mmap(NULL, 3971488, PROT_READ|PROT_EXEC, MAP_PRIVATE|MAP_DENYWRITE, 3, 0) = 0x7f8c7ebec000 15:19:25 mprotect(0x7f8c7edac000, 2097152, PROT_NONE) = 0 ...
6. Print Command Time Spent in System Calls
To shows the time difference between the starting and the end of each system call made by a program, use the -T option.
$ sudo strace -T df -h

execve("/bin/df", ["df", "-h"], [/* 17 vars */]) = 0 <0.000287>
brk(NULL)                               = 0xeca000 <0.000035>
access("/etc/ld.so.nohwcap", F_OK)      = -1 ENOENT (No such file or directory) <0.000028>
mmap(NULL, 8192, PROT_READ|PROT_WRITE, MAP_PRIVATE|MAP_ANONYMOUS, -1, 0) = 0x7f9aff2b1000 <0.000020>
access("/etc/ld.so.preload", R_OK)      = -1 ENOENT (No such file or directory) <0.000019>
open("/etc/ld.so.cache", O_RDONLY|O_CLOEXEC) = 3 <0.000022>
fstat(3, {st_mode=S_IFREG|0644, st_size=147662, ...}) = 0 <0.000015>
mmap(NULL, 147662, PROT_READ, MAP_PRIVATE, 3, 0) = 0x7f9aff28c000 <0.000019>
close(3)                                = 0 <0.000014>
...
7. Trace Only Specific System Calls
In the command below, trace=write is known as a qualifying expression, where trace is a qualifier (others include signal, abbrev, verbose, raw, read, or write). Here, write is the value of the qualifier.
The following command actually shows the system calls to print df output on standard output.
$ sudo strace -e trace=write df -h

write(1, "Filesystem      Size  Used Avail"..., 49Filesystem      Size  Used Avail Use% Mounted on
) = 49
write(1, "udev            3.9G     0  3.9G"..., 43udev            3.9G     0  3.9G   0% /dev
) = 43
write(1, "tmpfs           788M  9.6M  779M"..., 43tmpfs           788M  9.6M  779M   2% /run
) = 43
write(1, "/dev/sda10      324G  252G   56G"..., 40/dev/sda10      324G  252G   56G  82% /
) = 40
write(1, "tmpfs           3.9G  104M  3.8G"..., 47tmpfs           3.9G  104M  3.8G   3% /dev/shm
) = 47
write(1, "tmpfs           5.0M  4.0K  5.0M"..., 48tmpfs           5.0M  4.0K  5.0M   1% /run/lock
) = 48
write(1, "tmpfs           3.9G     0  3.9G"..., 53tmpfs           3.9G     0  3.9G   0% /sys/fs/cgroup
) = 53
write(1, "cgmfs           100K     0  100K"..., 56cgmfs           100K     0  100K   0% /run/cgmanager/fs
) = 56
write(1, "tmpfs           788M   28K  788M"..., 53tmpfs           788M   28K  788M   1% /run/user/1000
) = 53
+++ exited with 0 +++
Here are some additional commands about trace qualifier.
$ sudo strace -e trace=open,close df -h
$ sudo strace -e trace=open,close,read,write df -h
$ sudo strace -e trace=all df -h
8. Trace System Calls Based on a Certain Condition
Let’s look at how to trace system calls relating to a given class of events. This command can be used to trace all system calls involving process management.
$ sudo strace -q -e trace=process df -h

execve("/bin/df", ["df", "-h"], [/* 17 vars */]) = 0
arch_prctl(ARCH_SET_FS, 0x7fe2222ff700) = 0
Filesystem      Size  Used Avail Use% Mounted on
udev            3.9G     0  3.9G   0% /dev
tmpfs           788M  9.6M  779M   2% /run
/dev/sda10      324G  252G   56G  82% /
tmpfs           3.9G  104M  3.8G   3% /dev/shm
tmpfs           5.0M  4.0K  5.0M   1% /run/lock
tmpfs           3.9G     0  3.9G   0% /sys/fs/cgroup
cgmfs           100K     0  100K   0% /run/cgmanager/fs
tmpfs           788M   28K  788M   1% /run/user/1000
exit_group(0)                           = ?
+++ exited with 0 +++
Next, to trace all system calls that take a filename as an argument, run this command.
$ sudo strace -q  -e trace=file df -h

execve("/bin/df", ["df", "-h"], [/* 17 vars */]) = 0
access("/etc/ld.so.nohwcap", F_OK)      = -1 ENOENT (No such file or directory)
access("/etc/ld.so.preload", R_OK)      = -1 ENOENT (No such file or directory)
open("/etc/ld.so.cache", O_RDONLY|O_CLOEXEC) = 3
access("/etc/ld.so.nohwcap", F_OK)      = -1 ENOENT (No such file or directory)
open("/lib/x86_64-linux-gnu/libc.so.6", O_RDONLY|O_CLOEXEC) = 3
open("/usr/lib/locale/locale-archive", O_RDONLY|O_CLOEXEC) = 3
open("/usr/share/locale/locale.alias", O_RDONLY|O_CLOEXEC) = 3
...
To trace all system calls involving memory mapping, type.
$ sudo strace -q -e trace=memory df -h

brk(NULL)                               = 0x77a000
mmap(NULL, 8192, PROT_READ|PROT_WRITE, MAP_PRIVATE|MAP_ANONYMOUS, -1, 0) = 0x7fe8f4658000
mmap(NULL, 147662, PROT_READ, MAP_PRIVATE, 3, 0) = 0x7fe8f4633000
mmap(NULL, 3971488, PROT_READ|PROT_EXEC, MAP_PRIVATE|MAP_DENYWRITE, 3, 0) = 0x7fe8f406b000
mprotect(0x7fe8f422b000, 2097152, PROT_NONE) = 0
mmap(0x7fe8f442b000, 24576, PROT_READ|PROT_WRITE, MAP_PRIVATE|MAP_FIXED|MAP_DENYWRITE, 3, 0x1c0000) = 0x7fe8f442b000
mmap(0x7fe8f4431000, 14752, PROT_READ|PROT_WRITE, MAP_PRIVATE|MAP_FIXED|MAP_ANONYMOUS, -1, 0) = 0x7fe8f4431000
mmap(NULL, 4096, PROT_READ|PROT_WRITE, MAP_PRIVATE|MAP_ANONYMOUS, -1, 0) = 0x7fe8f4632000
mmap(NULL, 4096, PROT_READ|PROT_WRITE, MAP_PRIVATE|MAP_ANONYMOUS, -1, 0) = 0x7fe8f4631000
mmap(NULL, 4096, PROT_READ|PROT_WRITE, MAP_PRIVATE|MAP_ANONYMOUS, -1, 0) = 0x7fe8f4630000
mprotect(0x7fe8f442b000, 16384, PROT_READ) = 0
mprotect(0x616000, 4096, PROT_READ)     = 0
mprotect(0x7fe8f465a000, 4096, PROT_READ) = 0
munmap(0x7fe8f4633000, 147662)          = 0
mmap(NULL, 2981280, PROT_READ, MAP_PRIVATE, 3, 0) = 0x7fe8f3d93000
brk(NULL)                               = 0x77a000
brk(0x79b000)                           = 0x79b000
mmap(NULL, 619, PROT_READ, MAP_PRIVATE, 3, 0) = 0x7fe8f4657000
mmap(NULL, 26258, PROT_READ, MAP_SHARED, 3, 0) = 0x7fe8f4650000
Filesystem      Size  Used Avail Use% Mounted on
udev            3.9G     0  3.9G   0% /dev
tmpfs           788M  9.6M  779M   2% /run
/dev/sda10      324G  252G   56G  82% /
tmpfs           3.9G  104M  3.8G   3% /dev/shm
tmpfs           5.0M  4.0K  5.0M   1% /run/lock
tmpfs           3.9G     0  3.9G   0% /sys/fs/cgroup
cgmfs           100K     0  100K   0% /run/cgmanager/fs
tmpfs           788M   28K  788M   1% /run/user/1000
+++ exited with 0 +++
You can trace all network and signals related system calls.
$ sudo strace -e trace=network df -h
$ sudo strace -e trace=signal df -h
9. Redirect Trace Output to File
To write the trace messages sent to standard error to a file, use the -o option. This means that only the command output is printed on the screen as shown below.
$ sudo strace -o df_debug.txt df -h

Filesystem      Size  Used Avail Use% Mounted on
udev            3.9G     0  3.9G   0% /dev
tmpfs           788M  9.6M  779M   2% /run
/dev/sda10      324G  252G   56G  82% /
tmpfs           3.9G  104M  3.8G   3% /dev/shm
tmpfs           5.0M  4.0K  5.0M   1% /run/lock
tmpfs           3.9G     0  3.9G   0% /sys/fs/cgroup
cgmfs           100K     0  100K   0% /run/cgmanager/fs
tmpfs           788M   28K  788M   1% /run/user/1000
To look through the file, use cat command.
$ cat df_debug.txt
10. Show Some Debugging Output of Strace
To show debugging information for strace tool, use the -d flag.
$ strace -d df -h
For additional information, see the strace man page.
$ man strace
Also read these useful related articles:
- 20 Command Line Tools to Monitor Linux Performance
- Sysdig – A Powerful System Monitoring and Troubleshooting Tool for Linux
- How to Trace Execution of Commands in Shell Script with Shell Tracing
- BCC – Dynamic Tracing Tools for Linux Performance Monitoring, Networking and More
In conclusion, strace is a remarkable tool for diagnosing cause(s) of program failure: it is a powerful debugging and trouble shooting. It is practically useful to experienced system administrators, programmers and hackers. To share any thoughts concerning this article, use the feedback form below.
Source