How To Check And Repair MyISAM Tables In MySQL

How To Repair MyISAM tables in mysql

MySQL tables can become corrupt for a variety for reasons such as incomplete writes, running out of space, the MySQL daemon being killed or crashing, power failures. If MySQL detects a crashed or corrupt table it will need to be repaired before it can be used again. This guide will walk you through detecting crashed tables and how to repair MyISAM tables.

Find Crashed MyISAM Tables In MySQL

Usually a table will show as corrupt in the mysql log, to locate the location of the log, you will be able to find it in my.cnf or you can view it directly in mysql by the following:

MariaDB [(none)]> show variables like ‘%log_error%’;
+—————+——————————–+
| Variable_name | Value |
+—————+——————————–+
| log_error | /var/lib/mysql/centos7-vm2.err |
+—————+——————————–+
1 row in set (0.01 sec)

You can then cat that log

cat /var/lib/mysql/centos7-vm2.err|grep -i crashed

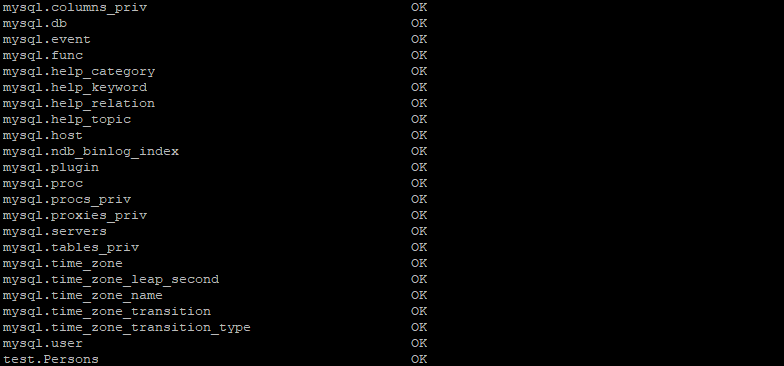
This will return any crashed tables that have been logged. Another way to check all of the tables is to used the mysqlcheck binary

mysqlcheck -A

will check for all crashed tables

# mysqlcheck -A
mysql.columns_priv OK
mysql.db OK
mysql.event OK
mysql.func OK
mysql.help_category OK
mysql.help_keyword OK
mysql.help_relation OK
mysql.help_topic OK
mysql.host OK
mysql.ndb_binlog_index OK
mysql.plugin OK
mysql.proc OK
mysql.procs_priv OK
mysql.proxies_priv OK
mysql.servers OK
mysql.tables_priv OK
mysql.time_zone OK
mysql.time_zone_leap_second OK
mysql.time_zone_name OK
mysql.time_zone_transition OK
mysql.time_zone_transition_type OK
mysql.user OK
test.Persons OK
test.tablename OK
test.testtable OK

Lastly you can check a table directly through MySQL as well:

MariaDB [test]> check table testtable;
+—————-+——-+———-+———-+
| Table | Op | Msg_type | Msg_text |
+—————-+——-+———-+———-+
| test.testtable | check | status | OK |
+—————-+——-+———-+———-+
1 row in set (0.00 sec)

Repair a single MyISAM table

Once you have located the table in need of repair you can repair it directly through MySQL. Once connected type ‘use databasename’ substituting the real database name that contains the crashed table:

MariaDB [(none)]> use test
Database changed

After that all you need to do is type ‘repair table tablename’ substituting ‘tablename’ with the name of the crashed table:

MariaDB [test]> repair table tablename
-> ;
+—————-+——–+———-+———-+
| Table | Op | Msg_type | Msg_text |
+—————-+——–+———-+———-+
| test.tablename | repair | status | OK |
+—————-+——–+———-+———-+
1 row in set (0.00 sec)

Check And Repair All MyISAM Tables

You can do this quickly by using mysqlcheck with the following command

mysqlcheck -A –auto-repair

You will see each table followed by a status

# mysqlcheck -A –auto-repair
mysql.columns_priv OK
mysql.db OK
mysql.event OK
mysql.func OK
mysql.help_category OK
mysql.help_keyword OK
mysql.help_relation OK
mysql.help_topic OK
mysql.host OK
mysql.ndb_binlog_index OK
mysql.plugin OK
mysql.proc OK
mysql.procs_priv OK
mysql.proxies_priv OK
mysql.servers OK
mysql.tables_priv OK
mysql.time_zone OK
mysql.time_zone_leap_second OK
mysql.time_zone_name OK
mysql.time_zone_transition OK
mysql.time_zone_transition_type OK
mysql.user OK
test.Persons OK
test.tablename OK
test.testtable OK

This command will attempt to check and repair all MySQL tables in every database on the server. That is it for repairing MyISAM tables in MySQL.

Nov 9, 2017LinuxAdmin.io

Source

Configure MySQL Replication with Puppet | Lisenet.com :: Linux | Security

We’re going to use Puppet to install MySQL and configure Master/Master replication.

This article is part of the Homelab Project with KVM, Katello and Puppet series.

Homelab

We have two CentOS 7 servers installed which we want to configure as follows:

db1.hl.local (10.11.1.17) – will be configured as a MySQL master
db2.hl.local (10.11.1.18) – will be configured as a MySQL master

SELinux set to enforcing mode.

See the image below to identify the homelab part this article applies to.
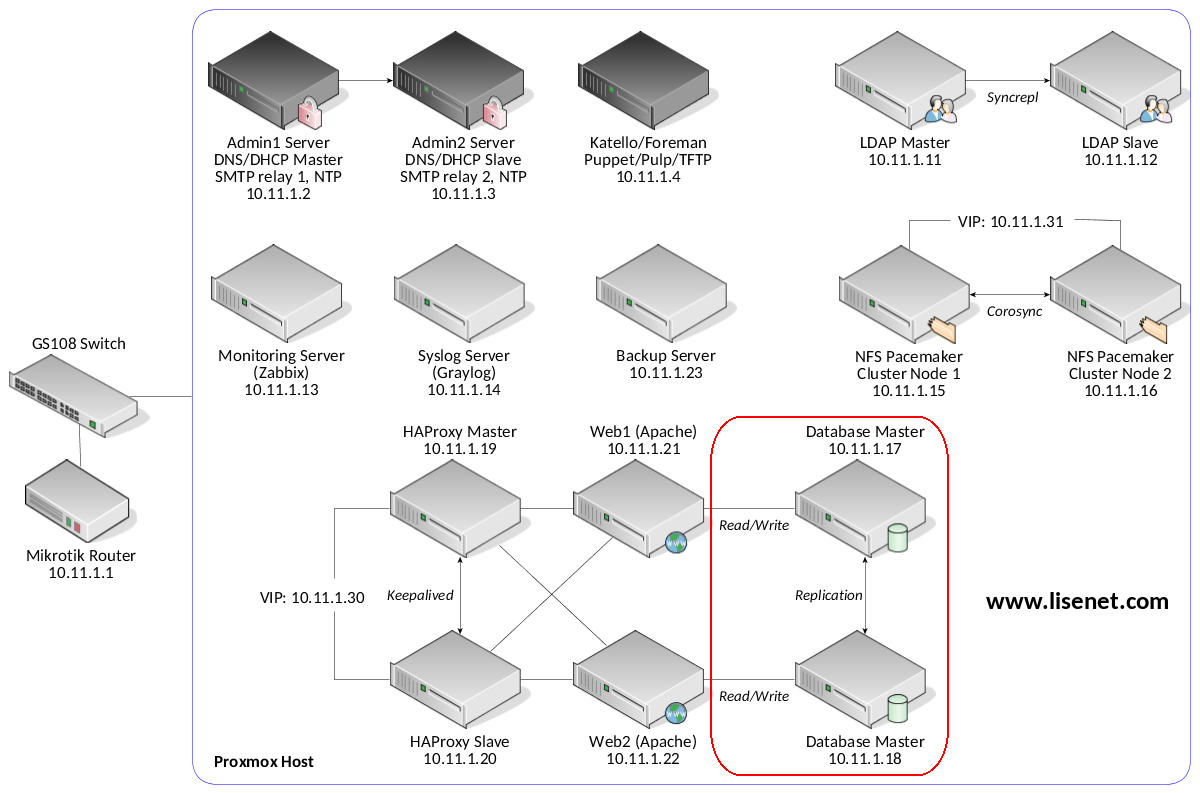
Configuration with Puppet

Puppet master runs on the Katello server.

Puppet Modules

We use puppetlabs-mysql Puppet module to configure the server.

Please see the module documentation for features supported and configuration options available.

Katello Repositories

MySQL repository is provided by Katello (we configured them here).

Configure Firewall

It is essential to ensure that MySQL servers can talk to each other. The following needs applying to both MySQL masters:

firewall { ‘007 allow MySQL’:
dport => [3306],
source => ‘10.11.1.0/24’,
proto => tcp,
action => accept,
}

This will also allow Apache connections to the database.

Configure MySQL Master on db1.hl.local

Nothing groundbreaking here really, but note the auto-increment-offset. This is to help prevent the situation where two queries insert data at the same time in the same database and the same table on both servers db1 and db2, and different entries end up with the same id.

class { ‘mysql::server’:
package_name => ‘mysql-community-server’,
service_name => ‘mysqld’,
root_password => ‘PleaseChangeMe’,
create_root_my_cnf => true,
manage_config_file => true,
config_file => ‘/etc/my.cnf’,
purge_conf_dir => true,
restart => true,
override_options => {
mysqld => {
bind-address => ‘0.0.0.0’,
datadir => ‘/var/lib/mysql’,
log-error => ‘/var/log/mysqld.log’,
pid-file => ‘/var/run/mysqld/mysqld.pid’,
wait_timeout => ‘600’,
interactive_timeout => ‘600’,
server-id => ‘1’,
log-bin => ‘mysql-bin’,
relay-log => ‘mysql-relay-log’,
auto-increment-offset => ‘1’,
auto-increment-increment => ‘2’,
},
mysqld_safe => {
log-error => ‘/var/log/mysqld.log’,
},
},
remove_default_accounts => true,
}->
## MySQL admin user who can connect remotely
mysql_user { ‘[email protected]%’:
ensure => ‘present’,
password_hash => mysql_password(‘PleaseChangeMe’),
}->
mysql_grant { ‘[email protected]%/*.*’:
ensure => ‘present’,
options => [‘GRANT’],
privileges => [‘ALL’],
table => ‘*.*’,
user => ‘[email protected]%’,
}->
## MySQL user for replication
mysql_user { ‘[email protected]%’:
ensure => ‘present’,
password_hash => mysql_password(‘PleaseChangeMe’),
}->
mysql_grant { ‘[email protected]%/*.*’:
ensure => ‘present’,
privileges => [‘REPLICATION SLAVE’],
table => ‘*.*’,
user => ‘[email protected]%’,
}

Configure MySQL Master on db2.hl.local

Configuration of the second server is almost identical to the first one with two exceptions: server-id and auto-increment-offset.

class { ‘mysql::server’:
package_name => ‘mysql-community-server’,
service_name => ‘mysqld’,
root_password => ‘PleaseChangeMe’,
create_root_my_cnf => true,
manage_config_file => true,
config_file => ‘/etc/my.cnf’,
purge_conf_dir => true,
restart => true,
override_options => {
mysqld => {
bind-address => ‘0.0.0.0’,
datadir => ‘/var/lib/mysql’,
log-error => ‘/var/log/mysqld.log’,
pid-file => ‘/var/run/mysqld/mysqld.pid’,
wait_timeout => ‘600’,
interactive_timeout => ‘600’,
server-id => ‘2’,
log-bin => ‘mysql-bin’,
relay-log => ‘mysql-relay-log’,
auto-increment-offset => ‘2’,
auto-increment-increment => ‘2’,
},
mysqld_safe => {
log-error => ‘/var/log/mysqld.log’,
},
},
remove_default_accounts => true,
}->
## MySQL admin user who can connect remotely
mysql_user { ‘[email protected]%’:
ensure => ‘present’,
password_hash => mysql_password(‘PleaseChangeMe’),
}->
mysql_grant { ‘[email protected]%/*.*’:
ensure => ‘present’,
options => [‘GRANT’],
privileges => [‘ALL’],
table => ‘*.*’,
user => ‘[email protected]%’,
}->
## MySQL user for replication
mysql_user { ‘[email protected]%’:
ensure => ‘present’,
password_hash => mysql_password(‘PleaseChangeMe’),
}->
mysql_grant { ‘[email protected]%/*.*’:
ensure => ‘present’,
privileges => [‘REPLICATION SLAVE’],
table => ‘*.*’,
user => ‘[email protected]%’,
}

Configure Master/Master Replication

The easy part is complete, and we should have our MySQL nodes provisioned at this stage.

We don’t have any databases created yet, therefore at this point there isn’t much we want to sync between the two servers.

Let us go ahead and put the steps required to configure MySQL replication manually into a Bash script start_mysql_repl.sh. Note that the script is a quick and dirty way of getting MySQL replication working, but it’s not the right approach.

Ideally we should use a Puppet template with parameters, so that we can provide values for them by passing a parameter hash to a function and wouldn’t have to hardcode hostnames, usernames etc.

#!/bin/bash
#
# Author: Tomas at www.lisenet.com
# Configure MySQL Replication with Puppet
#
# Variables below must match with the ones
# defined in the Puppet manifest
#
master1_host=”db1.hl.local”;
master2_host=”db2.hl.local”;
repl_user=”dbrepl”;
repl_pass=”PleaseChangeMe”;
db_user=”dbadmin”;
db_pass=”PleaseChangeMe”;
master1_status=”/tmp/master1.status”;
master2_status=”/tmp/master2.status”;

if ! [ -f “/root/.replication1.done” ];then
mysql -h”$master1_host” -u”$db_user” -p”$db_pass” -ANe “SHOW MASTER STATUS;”|awk ” >”$master1_status” &&
log_file=$(cut -d” ” -f1 “$master1_status”) &&
log_pos=$(cut -d” ” -f2 “$master1_status”) &&
mysql -h”$master2_host” -u”$db_user” -p”$db_pass” “$master2_status” &&
log_file=$(cut -d” ” -f1 “$master2_status”) &&
log_pos=$(cut -d” ” -f2 “$master2_status”) &&
mysql -h”$master1_host” -u”$db_user” -p”$db_pass”

Note: there are no spaces between in front of EOSQL. WordPress does funny things with formatting sometimes.

The script configures master host db1.hl.local as a slave for master host db2.hl.local.

The script also configures master host db2.hl.local as a slave for master host db1.hl.local.

Apply the following Puppet configuration to the server db1.hl.local (it must not be applied to the second server).

Note how we deploy the script, configure replication and then create a database. The name of the database is “blog”, mostly because of the fact that we’ll be using it for WordPress.

file { ‘/root/start_mysql_repl.sh’:
ensure => ‘file’,
source => ‘puppet:///homelab_files/start_mysql_repl.sh’,
owner => ‘0’,
group => ‘0’,
mode => ‘0700’,
notify => Exec[‘configure_replication’],
}
exec { ‘configure_replication’:
command => ‘/root/start_mysql_repl.sh’,
path => ‘/usr/bin:/usr/sbin:/bin:/sbin’,
provider => shell,
unless => [‘test -f /root/.replication1.done’, ‘test -f /root/.replication2.done’],
notify => Exec[‘create_database’],
}
## We want to create the database after
## the replication has been established

exec { ‘create_database’:
command => ‘mysql –defaults-file=/root/.my.cnf -e “DROP DATABASE IF EXISTS blog; CREATE DATABASE blog; GRANT ALL PRIVILEGES ON blog.* TO ‘dbuser1’@’10.11.1.%’ IDENTIFIED BY ‘PleaseChangeMe’; FLUSH PRIVILEGES;”‘,
path => ‘/usr/bin:/usr/sbin:/bin:/sbin’,
provider => shell,
refreshonly => true,
notify => Exec[‘import_database’],
}
## We want to import the database from a dump file
exec { ‘import_database’:
command => ‘mysql –defaults-file=/root/.my.cnf blog ‘/usr/bin:/usr/sbin:/bin:/sbin’,
provider => shell,
onlyif => [‘test -f /root/blog.sql’],
refreshonly => true,
}
file { ‘/root/blog.sql’:
ensure => file,
source => ‘puppet:///homelab_files/blog.sql’,
owner => ‘0’,
group => ‘0’,
mode => ‘0600’,
}

The database import part restores the content of our WordPress database. Because the import is performed after the replication has been established, the database is available on both MySQL masters.

Source
How to install Firefox Quantum and speed up your web browsing — The Ultimate Linux Newbie Guide

Firefox Quantum Logo

This week, the web’s been ablaze, on fire even (pardon the pun) with the release of Firefox Quantum. Apparently it’s 2x faster and uses 30% less memory than Chrome. In today’s just the examples, here’s how to install it on your Linux box to get the latest fast goodness from Mozilla. It might even make die hard Chrome browser fans make a move!

Install Quantum in Ubuntu 17.10

The latest Ubuntu distribution (17.10) has been updated to include the latest version of Firefox in their main repositories. Once you update as below, Quantum is Firefox version 57 or greater:
sudo apt update
apt upgrade
firefox –version

How to install Firefox on other Linux distributions that don’t have v57 in their repositories

cd
wget -L -O firefox.tar.bz2 ‘https://download.mozilla.org/?product=firefox-latest-ssl&os=linux64&lang=en-US’
tar xf firefox.tar.bz2
cd firefox
./firefox &

Source

Amazon Athena adds support for resource-based policies defined in the AWS Glue Data Catalog

Amazon Athena is an interactive query service that makes it easy to analyze data in Amazon S3 using standard SQL. Athena is serverless, so there is no infrastructure to manage, and you pay only for the queries that you run. Athena uses the Glue Data Catalog, a managed repository, integrated with Amazon EMR, Amazon Athena, Amazon Redshift Spectrum, and AWS Glue ETL, to store metadata information, and automate schema discovery and schema version history. With the recent release of resource-based policies and resource-level permissions for the AWS Glue Data Catalog, you can restrict or allow Athena access to Data Catalog Objects such as databases and tables. Please note that you still need S3 policies to govern access to data stored in Amazon S3. Click here to learn more

Source

Debian GNU/Linux Server 8.8 Installation (No GUI) on Oracle VirtualBox

Debian GNU/Linux 8.8 Server Installation
Debian GNU/Linux 8.8 Server Installation on Oracle VirtualBox

This video tutorial shows

Debian GNU/Linux Server 8.8 installation

on Oracle

VirtualBox

step by step. This tutorial is also helpful to install Debian 8.8 as a server on physical computer or laptop hardware. We also install Guest Additions on Debian Linux 8.8 for better performance and usability features.

Debian GNU/Linux Server 8.8 Installation Steps:

  1. Create Virtual Machine on Oracle VirtualBox
  2. Start Debian 8.8 Server Mode Installation
  3. Install VirtualBox Guest Additions

Installing Debian GNU/Linux Server 8.8 on VirtualBox


Debian 8.8 New Features and Improvements

Debian GNU/Linux 8.8

mainly adds corrections for security problems to the stable release, along with a few adjustments for serious problems. Security advisories were already published separately and are referenced where available. Those who frequently install updates from security.debian.org won’t have to update many packages and most updates from security.debian.org are included in this update. Debian 8.8 is not a new version of Debian. It’s just a Debian 8 image with the latest updates of some of the packages. So, if you’re running a Debian 8 installation with all the latest updates installed, you don’t need to do anything.

Debian Website:

https://www.debian.org/

Hope you found this Debian GNU/Linux Server 8.8 installation on Oracle VirtualBox tutorial helpful and informative. Please consider sharing it. Your feedback and questions are welcome!

Source

Redis Labs Modules Forked » Linux Magazine

New Commons Clause license rider causes Debian and Fedora developers to fork Redis Labs modules.

As expected, developers from the desktop projects Fedora and Debian have forked the modules that database vendor Redis Labs put under the Commons Clause.

The Commons Clause is an extra license rider that prohibits the user from “selling” the software, and “selling” is defined to include selling services such as hosting and consulting. According to Redis Labs and the creators of the Commons Clause, the rider was created to prevent huge hosting companies like Amazon from using the code without contributing to the project. Unfortunately, the license also has the effect of making the Redis Labs modules incompatible with the open source licenses used with Linux and other FOSS projects.

To fix the problem, Debian and Fedora came together to fork these modules. Nathan Scott, Principal Software Engineer at Red Hat, wrote on a Google Group, “…we have begun collaborating on a set of module repositories forked from prior to the license change. We will maintain changes to these modules under their original open source licenses, applying only free and open fixes and updates.”

It was an expected move. When license changes are made to any open source project, often some open source community jumps in and forks the project to keep a version fully compatible with the earlier open source license. The fork means commercial vendors like Amazon will still be able to use these modules without contributing anything to Redis Labs or the newly forked project. However, not all forks are successful. It’s not the license that matters. What matters is the expertise of the developers who write and maintain the codebase. Google once forked Linux for Android, but eventually ended up merging with the mainline kernel.

In a previous interview, Redis Labs told me that they were not sure whether adding the Commons Clause to these licenses would work or not; they already tried the Affero GPL (AGPL) license, which is also designed to address the so-called application service provider loophole that allows cloud vendors to avoid contributing back their changes, but the move to the AGPL didn’t help them get vendors like Amazon to contribute.

Redis Labs added the Commons Clause to only those modules that their staff wrote; there is no change to the modules written by external parties.

Source

Beginner’s Guide to Installing Linux Mint 19

HOW TO INSTALL LINUX MINT 19

PREPARATION

1. Create bootable DVD or USB media.

* Download ISO image from https://linuxmint.com/
* You can burn a bootable DVD in Windows 7 and up simply by inserting a blank DVD and then double-clicking the ISO file.
* Creating a bootable USB drive will require you to install software. Find out more here: https://mintguide.org/tools/317-make-a-bootable-flash-drive-from-an-iso-image-on-linux-mint.html

2. Boot Linux Mint 18.

* You will have to turn off Secure Boot in your computer’s BIOS setting to be able to boot from a DVD or USB drive.
* Once you get Linux Mint 19 booted, take time to play around and ensure that all of you hardware is working properly.
* Check to see if you will need any proprietary drives for your system.
* Take some time to read through the Linux Mint User’s Guide to familiarize your self with the system.

3. Backup ALL Data You Wish To Keep!

* Do NOT use commercial backup software or the built-in Windows backup utility. Linux Mint MUST be able to read the files you create.
* Backups MUST be stored on a USB drive or other removable media.
* It is OK to store backup data in a Zip file. Linux Mint can open them with Archive Manager.

INSTALLATION

WARNING! Proceed at your own risk. Installing Linux Mint will wipe out your current Windows installation and all data you have stored on the computer. There is no way to “uninstall” Linux Mint!
* It is a good idea to have another computer, smartphone or tablet available so you can have access to the Internet in case you need to look something up.
* Turn off Secure Boot in your computer’s BIOS settings.
* Hook computer to the Internet with an Ethernet cable if drivers will be needed to use Wi-Fi.
* Boot Linux Mint
* Launch Linux Mint’s installer and follow the directions.
* Restart the computer. You are now Running Linux Mint!

POST-INSTALLATION SETUP

Follow the “First Steps” outlined in the Welcome Screen:
* Setup Timeshift
* Change to local mirrors
* Install ALL updates!
* Check for and install drivers.
* Restart the computer.

Tweaks:
* Open GNOME Disks and enable Write Cache for all internal drives.
* Enable recommended packages in Synaptic Package Manager
* Configure the Desktop and choose startup applications.
* Optional: Install Google Chrome browser: https://www.google.com/chrome/index.html
* Restart and have fun!

Linux Mint is now fully installed and ready to use.

Please be sure to give EzeeLinux a ‘Like’ on Facebook! Thanks! https://www.facebook.com/EzeeLinux
Check out http://www.ezeelinux.com for more about Linux.

Joe Collins

Joe Collins worked in radio and TV stations for over 20 years where he installed, maintained and programmed computer automation systems. Joe also worked for Gateway Computer for a short time as a Senior Technical Support Professional in the early 2000’s and has offered freelance home computer technical support and repair for over a decade.

Joe is a fan of Ubuntu Linux and Open Source software and recently started offering Ubuntu installation and support for those just starting out with Linux through EzeeLinux.com. The goal of EzeeLinux is to make Linux easy and start them on the right foot so they can have the best experience possible.

Joe lives in historic Portsmouth, VA in a hundred year old house with three cats, three kids and a network of computers built from scrounged parts, all happily running Linux.

Source

Linux Today – Complete guide to Dual Boot Ubuntu 18.XX with Windows 10

Oct 17, 2018, 07:00 (0 Talkback[s])

(Other stories by Shusain)

Learn how to Dual boot Ubuntu 18.xx along with Windows 10. Ubuntu 18.04 aka Bionic Beaver was released on April 26th, 2018 with a lot of changes on front end as well as on backend. Major change that anybody who has ever used Ubuntu, will notice is the Desktop Environment.

Complete Story

Related Stories:

Source

Imunify360 3.6.6 is here – Imunify360 Blog

Imunify360 3.6.6 is here

We are pleased to announce that a new updated Imunify360 version 3.6.6 is now available. This latest version embodies further improvements of the product as well as bugfixes.

Tasks

  • DEF-6162: AI-BOLIT vulnerabilities are now marked as suspicious.

Fixes

  • DEF-6170: blacklisted IP is no longer put into Gray List by sensor alert.;
  • DEF-6205: do not fail if /etc/virtual/domainowners has wrong UTF-8 data;
  • DEF-6220: fixed CLNError() is not JSON serializable;
  • DEF-6221: fixed SEND_ADDITIONAL_DATA.enable label in settings in UI.

To install the new Imunify360 version 3.6.6 please follow the instructions in the documentation.

The upgrading is available since Imunify360 version 2.0-19.

To upgrade Imunify360 on CentOS/CloudLinux systems, run the command:

yum update imunify360-firewall

To upgrade Imunify360 on Ubuntu systems, rut the command:

apt-get update
apt-get install –only-upgrade imunify360-firewall

More information on Imunify360 can be found here.
Source

WP2Social Auto Publish Powered By : XYZScripts.com