
mod_wsgi is an Apache module that can be used for serving Python scripts over HTTP via Apache web server like Django, Web.py, Werkzug, Chery.py, TurboGears, and Flask. In this tutorial, we will learn how to install and set up of mod_wsgi with the Apache server on Ubuntu 18.04 LTS (Bionic Beaver) server.
FF-Multi-Converter: A Great Application for Linux/Ubuntu/Linux Mint – NoobsLab

You may have heard and used multimedia converter application as audio/video files converter only. FF-Multi-Converter is an application that lets you convert audio/video files to various formats, documents to several formats and images to most used formats. isn’t it great? This application is around for a while and you may or may not used it. The most recent version ported to Python3 and now supports most of the Linux distributions.
FF-Multi-Converter uses FFmpeg for audio/video files conversion, unoconv for documents coversion and ImageMagick utility for image conversion. The main goal of this application is to offer most popular multimedia types in one application and provide different conversion options for them easily through a fairly easy to use graphical interface, you will find this application very handy and useful. It is written using Python3 and PyQt5, released under GNU General Public License (GPL V3).


Features:
- Conversions for several file formats.
- Very easy to use interface.
- Access to common conversion options.
- Audio/video ffmpeg-presets management.
- Options for saving and naming files.
- Multilingual – over 20 languages.
Supported formats:
-
- Audio/Video formats:
- aac, ac3, afc, aiff, amr, asf, au, avi, dvd, flac, flv, mka, mkv, mmf, mov, mp3, mp4, mpg, ogg, ogv, psp, rm, spx, vob, wav, webm, wma, wmv
- Audio/Video formats:
And any other format supported by ffmpeg.
- Image formats:
- bmp, cgm, dpx, emf, eps, fpx, gif, jbig, jng, jpeg, mrsid, p7, pdf, picon, png, ppm, psd, rad, tga, tif, webp, xpm
- Document file formats:
- doc -> odt, pdf
- html -> odt
- odp -> pdf, ppt
- ods -> pdf
- odt -> doc, html, pdf, rtf, sxw, txt, xml
- ppt -> odp
- rtf -> odt
- sdw -> odt
- sxw -> odt
- txt -> odt
- xls -> ods
- xml -> doc, odt, pdf
Available for Ubuntu 18.04 Bionic/18.10/16.04 Xenial/14.04 Trusty/Linux Mint 19/18/17/other Ubuntu derivativesTo install FFMultiConverter in Ubuntu/Linux Mint open Terminal (Press Ctrl+Alt+T) and copy the following commands in the Terminal:
To install in any Linux distribution, download latest FF-Multi-Converter and extract it. You need to install these dependencies (python3, pyqt5, ffmpeg, imagemagick, unoconv). Then use following command to install it from extracted folder.
That’s it
![]()
Use Cozy to Play Audiobooks in Linux
Last updated October 5, 2018 By John Paul
We review Cozy, an audiobook player for Linux. Read to find out if it’s worth to install Cozy on your Linux system or not.

Audiobooks are a great way to consume literature. Many people who don’t have time to read, choose to listen. Most people, myself included, just use a regular media player like VLC or MPV for listening to audiobooks on Linux.
Today, we will look at a Linux application built solely for listening to audiobooks.
 Cozy Audiobook Player
Cozy Audiobook Player for Linux
The Cozy Audiobook Player is created by Julian Geywitz from Germany. It is built using both Python and GTK+ 3. According to the site, Julian wrote Cozy on Fedora and optimized it for elementary OS.
The player borrows its layout from iTunes. The player controls are placed along the top of the application The library takes up the rest. You can sort all of your audiobooks based on the title, author and reader, and search very quickly.
 Initial setup
When you first launch Cozy, you are given the option to choose where you will store your audiobook files. Cozy will keep an eye on that folder and update your library as you add new audiobooks. You can also set it up to use an external or network drive.
Features of Cozy
Here is a full list of the features that Cozy has to offer.
- Import all your audiobooks into Cozy to browse them comfortably
- Sort your audiobooks by author, reader & title
- Remembers your playback position
- Sleep timer
- Playback speed control
- Search your audiobook library
- Add multiple storage locations
- Drag & Drop to import new audio books
- Support for DRM free mp3, m4a (aac, ALAC, …), flac, ogg, wav files
- Mpris integration (Media keys & playback info for the desktop environment)
- Developed on Fedora and tested under elementaryOS
Experiencing Cozy
 Audiobook library
At first, I was excited to try our Cozy because I like to listen to audiobooks. However, I ran into a couple of issues. There is no way to edit the information of an audiobook. For example, I downloaded a couple audiobooks from LibriVox to test it. All three audiobooks were listed under “Unknown” for the reader. There was nothing to edit or change the audiobook info. I guess you could edit all of the files, but that would take quite a bit of time.
When I listen to an audiobook, I like to know what track is currently playing. Cozy only has a single progress bar for the whole audiobook. I know that Cozy is designed to remember where you left off in an audiobook, but if I was going to continue to listen to the audiobook on my phone, I would like to know what track I am on.
 Settings
Installing Cozy on Linux
If you would like to install Cozy, you have several options for different distros.
Ubuntu, Debian, openSUSE, Fedora
Julian used the openSUSE Build Service to create custom repos for Ubuntu, Debian, openSUSE and Fedora. Each one only takes a couple terminal commands to install.
Install Cozy using Flatpak on any Linux distribution (including Ubuntu)
If your distro supports Flatpak, you can install Cozy using the following commands:
flatpak remote-add –user –if-not-exists flathub https://flathub.org/repo/flathub.flatpakrepo
flatpak install –user flathub com.github.geigi.cozy
Install Cozy on elementary OS
If you have elementary OS installed, you can install Cozy from the built-in App Store.
Install Cozy on Arch Linux
Cozy is available in the Arch User Repository. All you have to do is search for cozy-audiobooks.
Where to find free Audiobooks?
In order to try out this application, you will need to find some audiobooks to listen to. My favorite site for audiobooks is LibriVox. Since LibriVox depends on volunteers to record audiobooks, the quality can vary. However, there are a number of very talented readers.
Here is a list of free audiobook sources:
Final Thoughts on Cozy
For now, I think I’ll stick with my preferred audiobook software (VLC) for now. Cozy just doesn’t add anything. I won’t call it a must-have application for Linux just yet. There is no compelling reason for me to switch. Maybe, I’ll revisit it again in the future, maybe when it hits 1.0.
Take Cozy for a spin. You might come to a different conclusion.
Have you ever used Cozy? If not, what is your favorite audiobook player? What is your favorite source for free audiobooks? Let us know in the comments below.
If you found this article interesting, please take a minute to share it on social media, Hacker News or Reddit.

About John Paul
My name is John Paul Wohlscheid. I’m an aspiring mystery writer who loves to play with technology, especially Linux. You can catch up with me at my personal website
Download Node.js Linux 10.12.0
Node.js is an open source and completely free software that empowers web developers to build scalable and fast network programs. Being based on Chrome’s JavaScript runtime, the Node.js software is extremely efficient and lightweight, especially because it uses a non-blocking, event-driven I/O model.
The top platform for running server-side JavaScript code
Node.js is currently considered the top platform for running server-side JavaScript code, being used in production in big companies like Google, eBay, Yahoo, LinkedIn, Microsoft, Cloud9 and many more.
Mandatory example
The following code will create a simple web server that responds with “Hello World” for every request.
var http = require(‘http’);
http.createServer(function (req, res) {
res.writeHead(200, {‘Content-Type’: ‘text/plain’});
res.end(‘Hello Worldn’);
}).listen(1337, ‘127.0.0.1’);
console.log(‘Server running at http://127.0.0.1:1337/’);
In order to run the HTTP server, you will have to the code above into a file called “example.js” (without quotes) and execute it with the node command from a terminal emulator:
% node example.js
Server running at http://127.0.0.1:1337/
Supported operating systems
Node.js is a multi-platform application that has been successfully tested under numerous GNU/Linux distributions, including Debian, Ubuntu, Arch Linux, Fedora, Red Hat Enterprise Linux, openSUSE, Mageia, Slackware, and others, as well as on the commercial Mac OS X and Microsoft Windows operating systems. Both 64-bit and 32-bit instruction set architectures are supported at this time.
Under the hood, requirements and availability
As mentioned, this is a multi-platform software. It can be downloaded as pre-built installers for the Mac OS X, GNU/Linux and Microsoft Windows operating systems, as well as a universal source archive that can be compiled and installed on virtually any operating system where Python is supported.
Build network app Non-blocking I/O model Real-time application Develop Non-blocking Build Network
The New Yorker on Linus Torvalds

Posted by msmash
on Thursday September 20, 2018 @10:31AM
from the closer-look dept.
Linus Torvalds announced on Sunday that he was sorry for
how he treated the community over the years
. Torvalds, 48, said he planned to make some changes to how he conducted himself, and on that part, he said he would be taking some time off from Linux kernel development work.
The New Yorker has published a story on Torvalds today
in which it notes that it reached out to Torvalds days before he made the big announcement. From the story, which may be paywalled for some readers:
Torvalds’s decision to step aside came after The New Yorker asked him a series of questions about his conduct for a story on complaints about his abusive behavior discouraging women from working as Linux-kernel programmers. In a response to The New Yorker, Torvalds said, “I am very proud of the Linux code that I invented and the impact it has had on the world. I am not, however, always proud of my inability to communicate well with others — this is a lifelong struggle for me. To anyone whose feelings I have hurt, I am deeply sorry.”
Torvalds’s response was conveyed by the Linux Foundation, which supports Linux and other open-source programming projects and paid Torvalds $1.6 million in annual compensation as of 2016. The foundation said that it supported his decision and has encouraged women to participate but that it has little control over how Torvalds runs the coding process. “We are able to have varying degrees of impact on these outcomes in newer projects,” the statement said. “Older more established efforts like the Linux kernel are much more challenging to influence.”
Linux’s elite developers, who are overwhelmingly male, tend to share their leader’s aggressive self-confidence. There are very few women among the most prolific contributors, though the foundation and researchers estimate that roughly ten per cent of all Linux coders are women. “Everyone in tech knows about it, but Linus gets a pass,” Megan Squire, a computer-science professor at Elon University, told me, referring to Torvalds’s abusive behavior. “He’s built up this cult of personality, this cult of importance.”
Never call a man a fool. Borrow from him.
Working…
Doghouse – Continuity » Linux Magazine
Developing an exit strategy can ensure continuity when it comes to FOSS projects.
In a conversation with a chief technical officer (CTO) of a web-hosting company the other day, he mentioned that a large piece of FOSS that his company depended on was being removed from the Linux kernel, because there was no one to develop and support it. While he did not really come out and make the accusation, I inferred from his remark that he felt parts of the Linux kernel were not receiving proper attention, given their importance to the FOSS world.
This does happen, and it has been noted in the past. Typically at the last minute, the FOSS community will belly up to the bar, and a few more developers will be found. Or some company will fund the primary developers, so they can spend full time supporting the software that they had been supporting and developing in their spare time.
Yes, the FOSS community has a coverage problem from time to time. Yes, sometimes software that we depend on goes stagnant, with the developers either leaving the project or sometimes (unfortunately) dying. This is why software projects need to spend as much time “building community” around their projects as they do writing code. The project leaders have to attract new talent, both building enthusiasm for the project, as well as building expertise in those who will become the new architects and leaders of tomorrow.
[…]
Use Express-Checkout link below to read the full article (PDF).
Linux Today – Have a Plan for Netplan
Oct 16, 2018, 19:00 (0 Talkback[s])
(Other stories by Shawn Powers)
The old way of configuring Debian-based network interfaces was based on the ifupdown package. The new default is called Netplan, and although it’s not terribly difficult to use, it’s drastically different. Netplan is sort of the interface used to configure the back-end dæmons that actually configure the interfaces. Right now, the back ends supported are NetworkManager and networkd.
If you tell Netplan to use NetworkManager, all interface configuration control is handed off to the GUI interface on the desktop.
Upgrade Ubuntu 18.04 LTS to 18.10
The Ubuntu 18.10 Cosmic Cuttlefish will be released on October 18, 2018. If you can’t wait to see what Ubuntu 18.10 has to offer, then good news for you. Ubuntu 18.10 Beta version is now available to download. You can also upgrade your existing Ubuntu 18.04 LTS Bionic Beaver installation to Ubuntu 18.10 Cosmic Cuttlefish.
In this article, I will show you how to upgrade your existing Ubuntu 18.04 LTS to Ubuntu 18.10. Let’s get started.
In this section of the article, I will show you how to upgrade your Ubuntu 18.04 LTS desktop to Ubuntu 18.10 (currently in Beta) Desktop operating system.
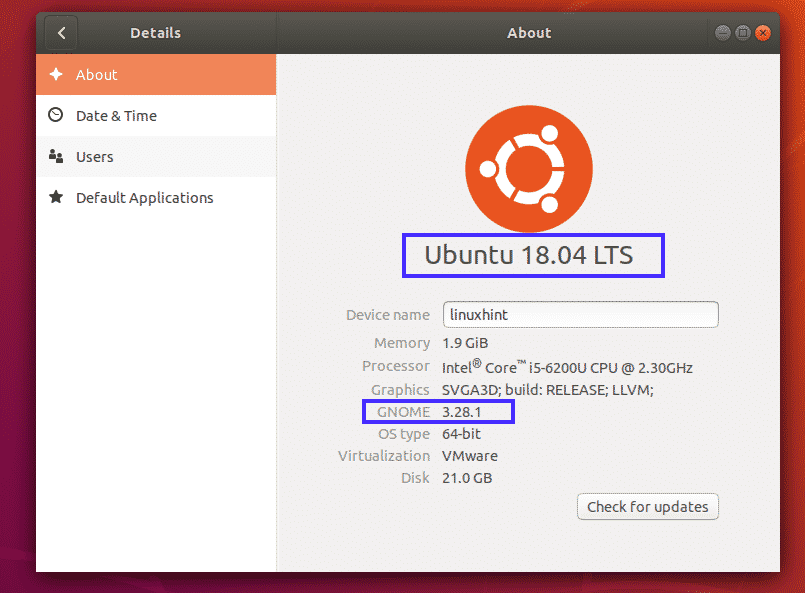
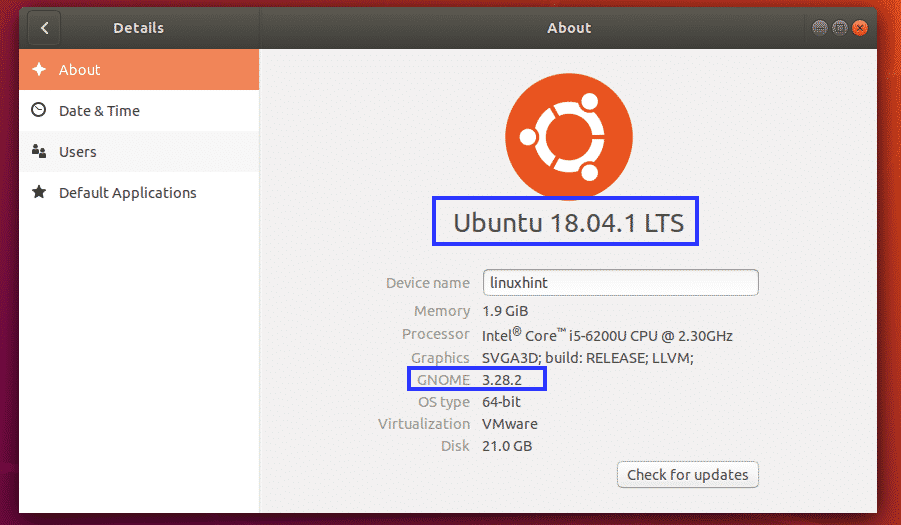
First, check the version of Ubuntu you’re using before you go through the upgrade process. That way, you will be able to verify whether the upgrade worked or not.
As you can see, from the About (Settings > Details > About) tab, I am using Ubuntu 18.04 LTS GNOME 3.28.1 desktop environment.
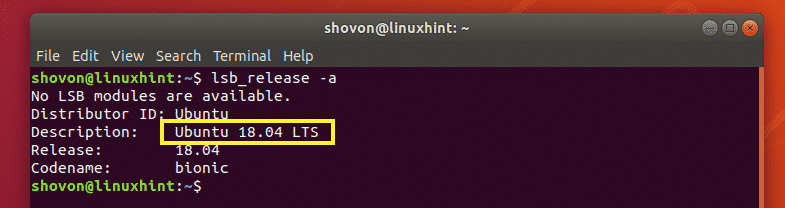
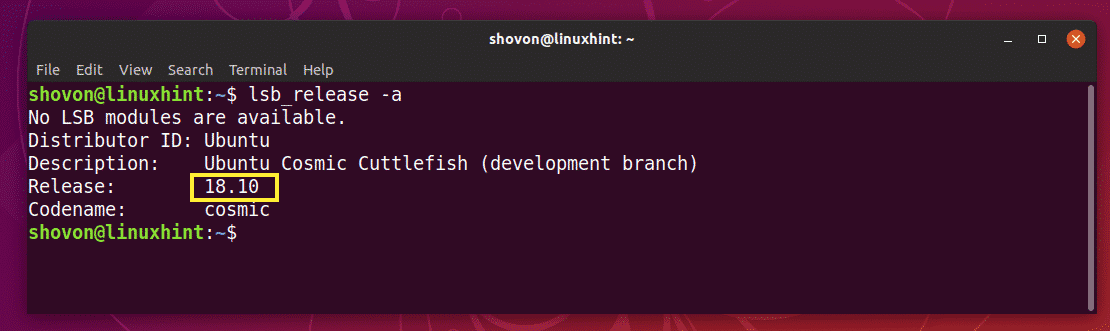
To get the same information from the command line interface, open up a Terminal and run the following command:
As you can see, I get the same information here.
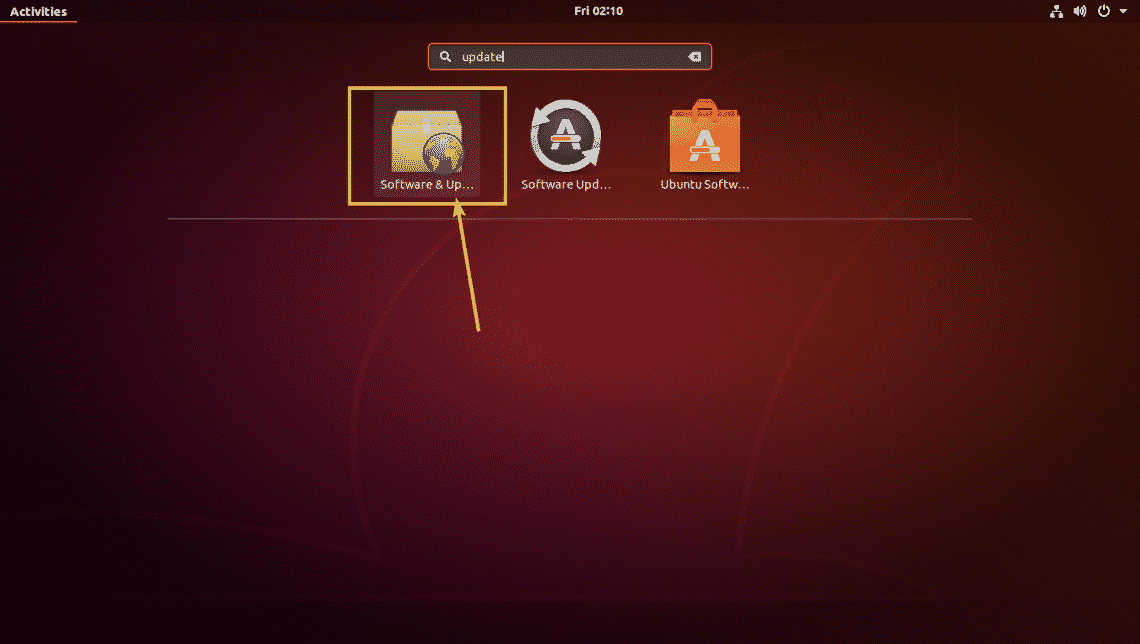
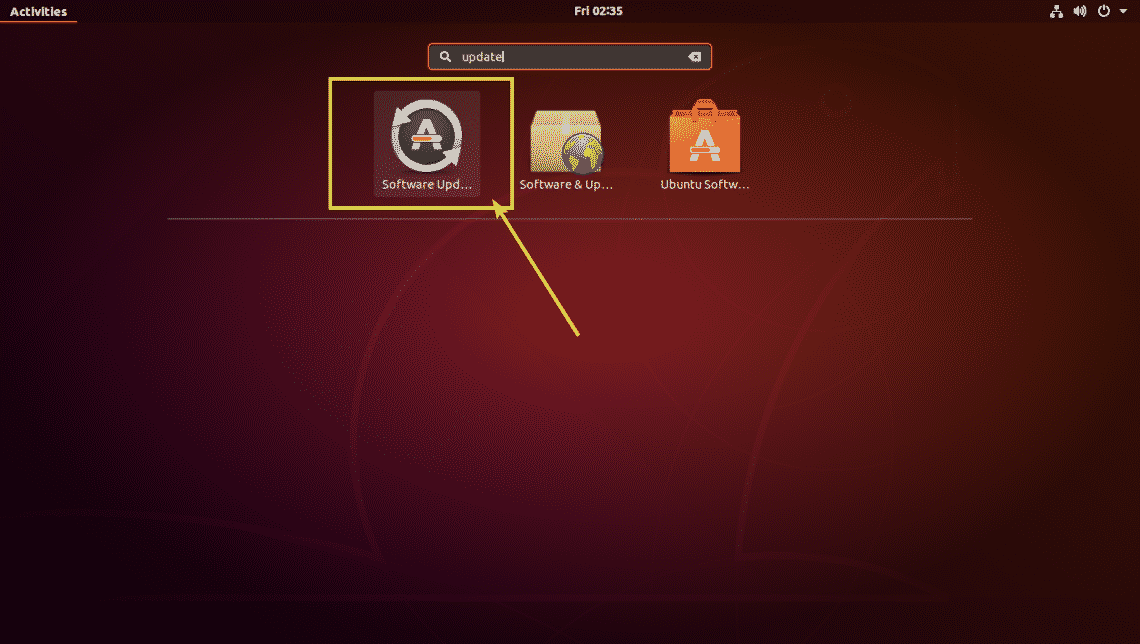
Now, search for Software & Updates app from the Application Menu and click on the Software & Updates app as marked in the screenshot below.
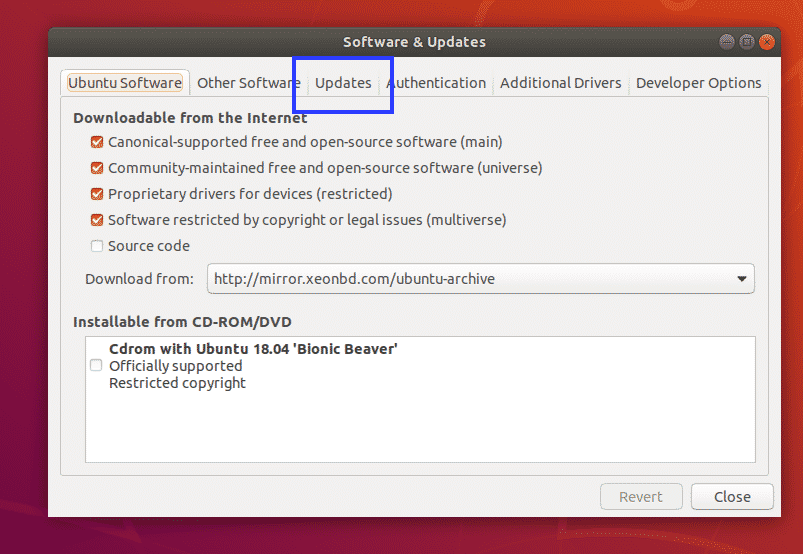
Software & Updates app should open up. Now click on the Updates tab as marked in the screenshot below.
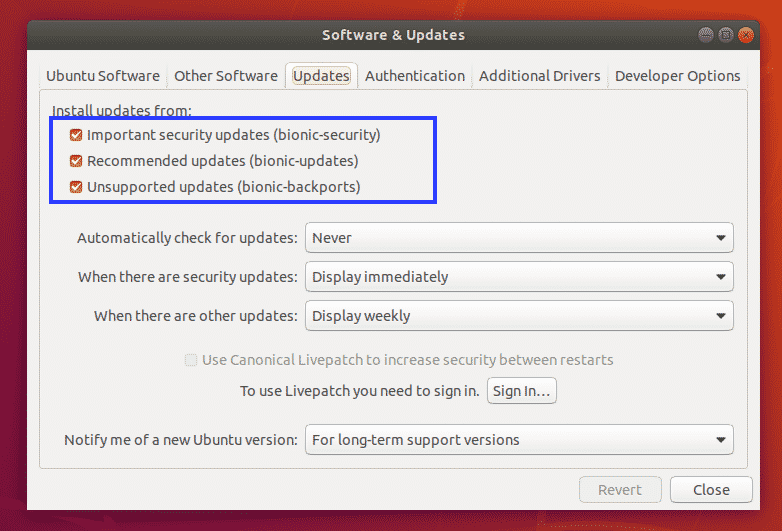
From the Updates tab, make sure the check boxes are marked as shown in the screenshot below.
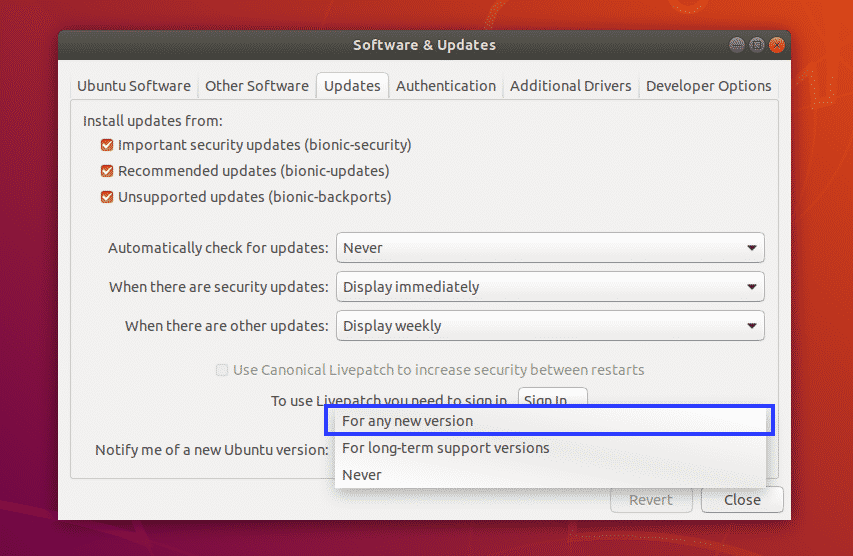
Also, change Notify me of a new Ubuntu version to For any new version as marked in the screenshot below.
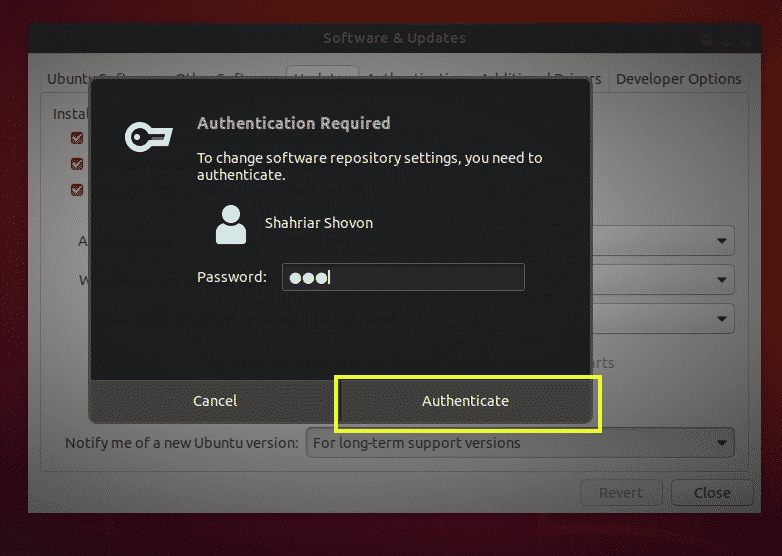
Now type in your password and click on Authenticate.
Now click on Close to exit out of Software & Updates app.

Now you have to make sure all the software packages are up to date on your Ubuntu 18.04 LTS before you upgrade your Ubuntu 18.04 LTS to 18.10. This is very important because if all the softwares are not up to date, then you may face problems in the upgrade process.
On Ubuntu 18.04 LTS, you can use the Software Updater app to update all the software packages very easily. Look for Software Updater from the Application Menu and then click on the Software Updater icon as marked in the screenshot below.
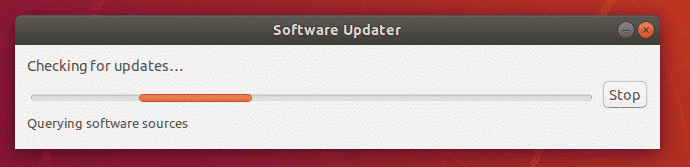
Software Updater should check for softwares updates for your Ubuntu 18.04 LTS operating system.
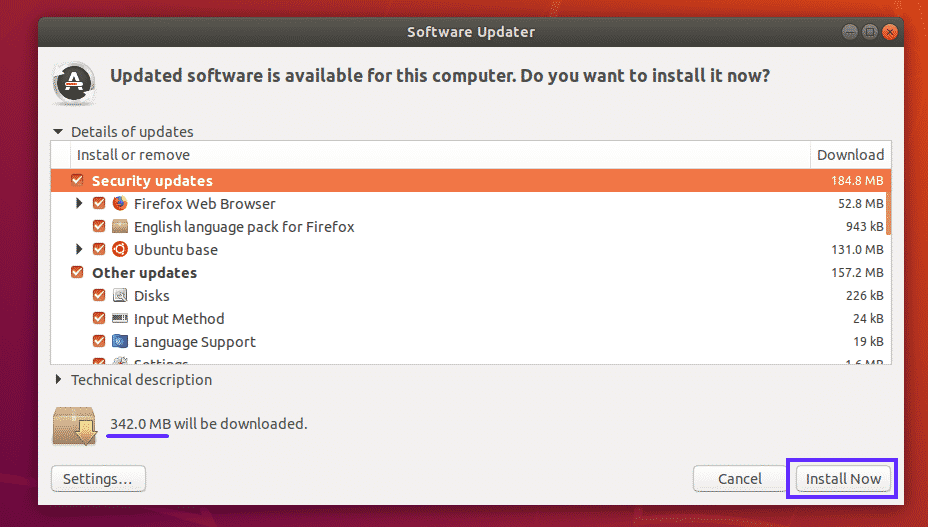
If any software update is available, it should show up in the Software Updater app as you can see in the screenshot below. About 342 MB of internet data will be used to download the required packages for the software update. If your using limited internet plan (such as Mobile broadband), make sure you have enough internet data available. Once you’re done reviewing everything, click on Install Now to start the software update process.
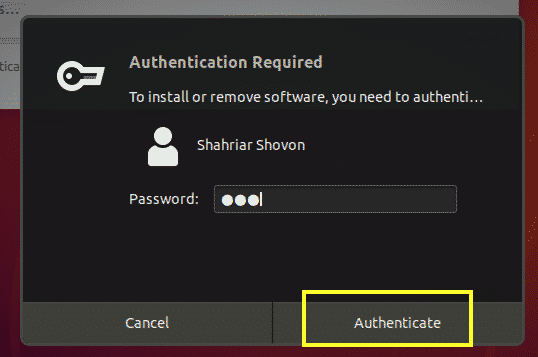
Now type in your password and click on Authenticate.
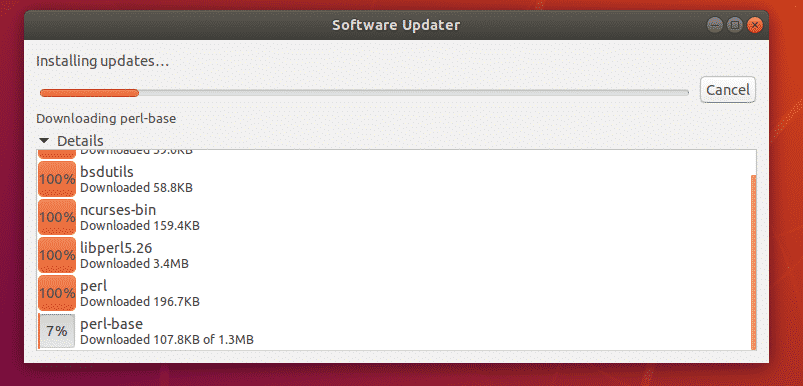
Software Updater app should download and install all the required packages.
Once the software update is complete, you should see the following window. Now click on Restart Now.

Once your computer starts, your Ubuntu 18.04 LTS should be updated to the latest stable version (18.04.1 LTS at the time of this writing) as you can see in the screenshot below. The GNOME version is also upgraded from 3.28.1 to 3.28.2 (at the time of this writing).
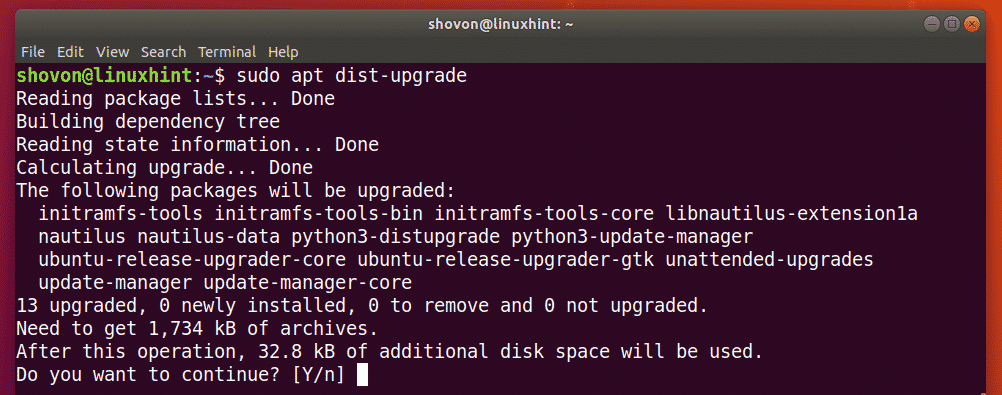
The Software Updater app may not update some of the packages on your Ubuntu 18.04 LTS desktop. To make sure these are updated as well, open up a Terminal (press <Ctrl> + t) and run the following command:

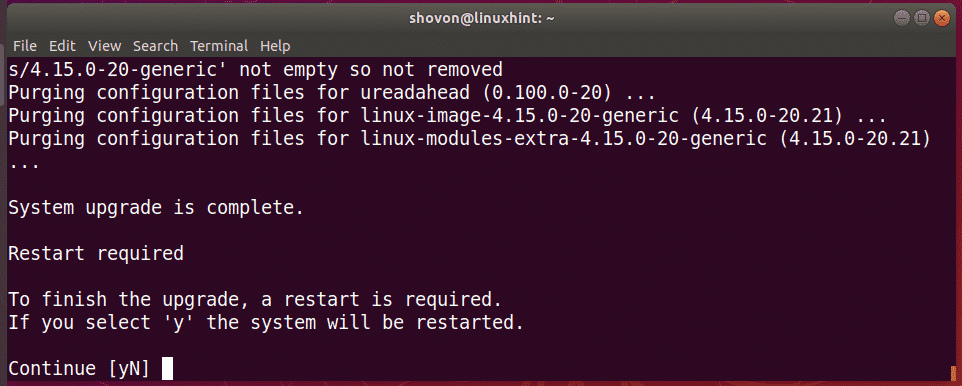
Now press y and then press <Enter>.
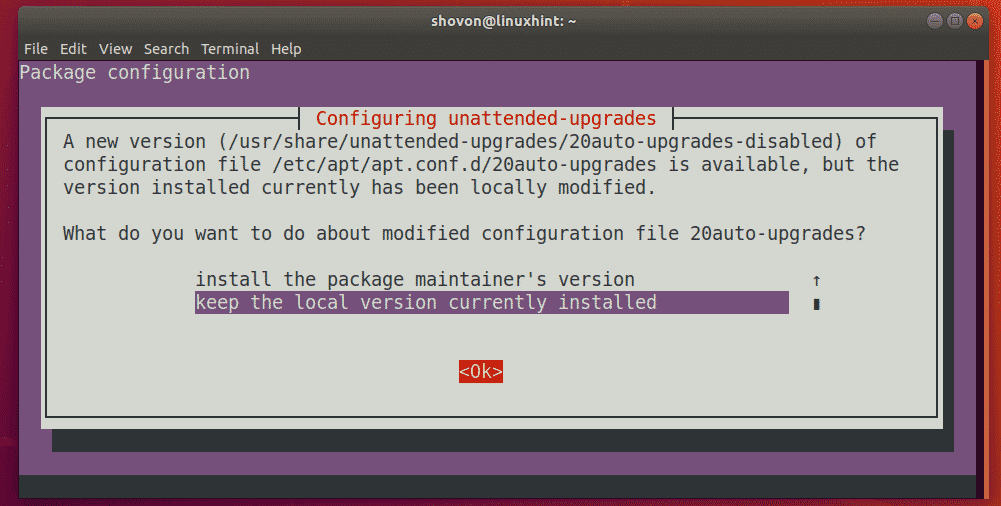
If you see the following message, just keep the default and press <Enter>.
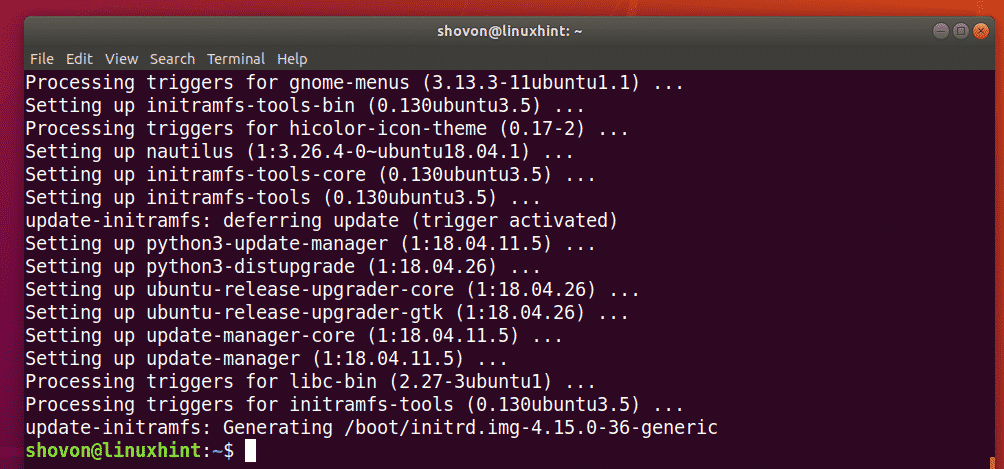
The packages are updated.
Now reboot your computer with the following command:
Your Ubuntu 18.04 LTS desktop is now ready to be upgraded to Ubuntu 18.10.
Just open a Terminal from the Application Menu or by pressing <Ctrl> + t and run the following command:
$ sudo do-release-upgrade -d
NOTE: As Ubuntu 18.10 is in Beta now, you have to run sudo do-release-upgrade -d in order to upgrade to Ubuntu 18.10 from Ubuntu 18.04. But once Ubuntu 18.10 is released, please run sudo do-release-upgrade without the -d flag.

Ubuntu 18.10 package repository is being added and APT package repository cache is being updated.

When you see the following prompt, press y and then press <Enter>.
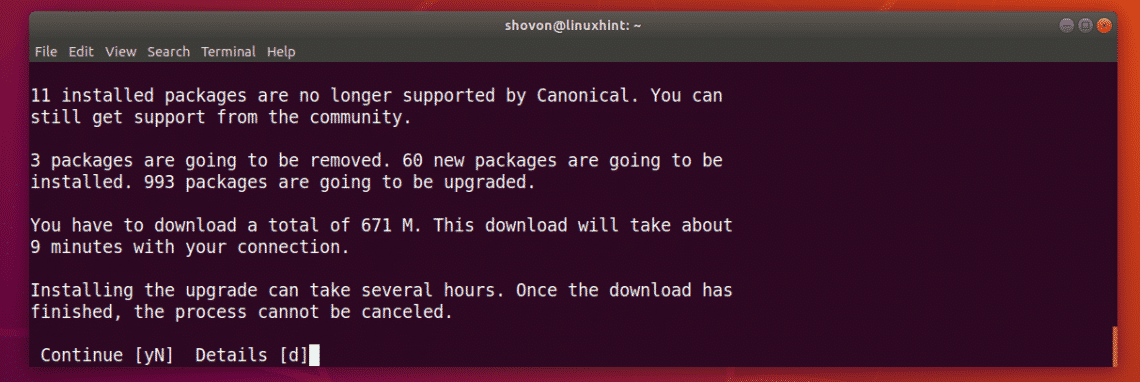
Now press <Enter> to continue.
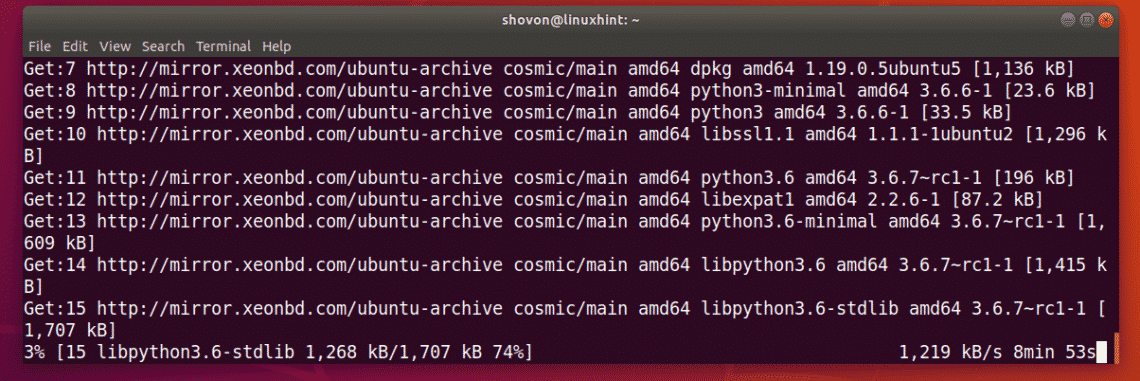
The release upgrade has started. It should take a while to complete.
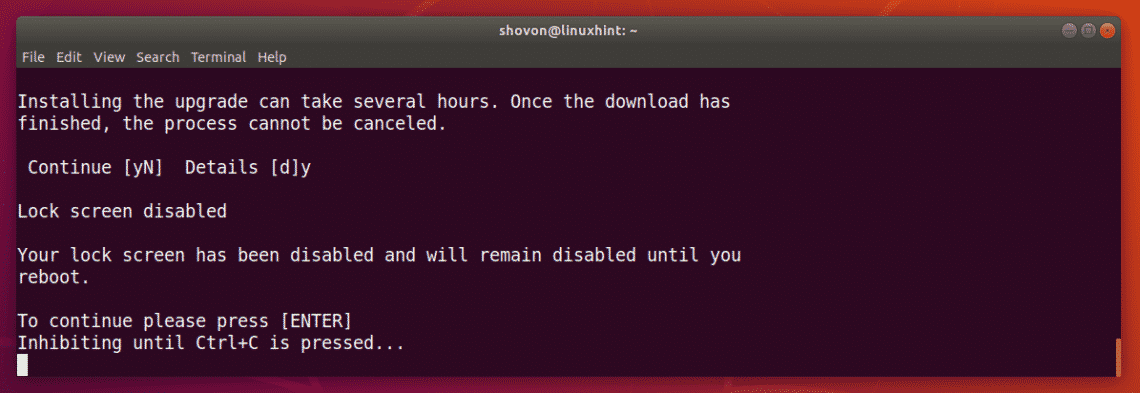
Press y and then press <Enter> to continue.
Now press y and then press <Enter>. Your computer should be restarted.
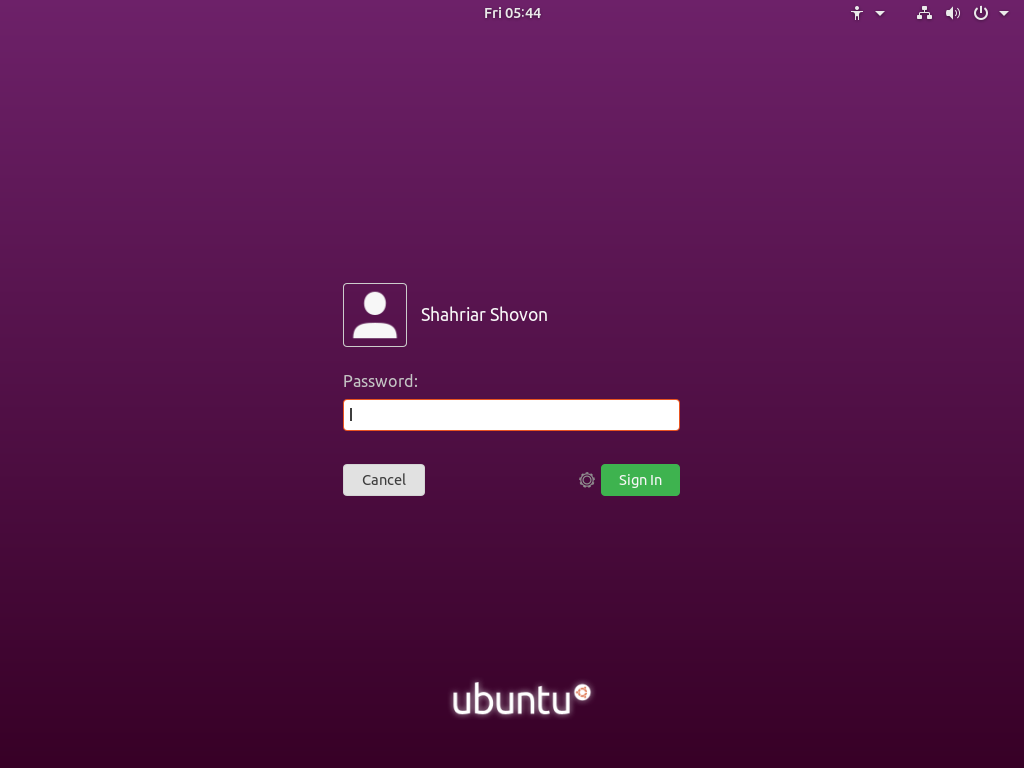
Now you should be booted into the Ubuntu 18.10 login screen as you can see in the screenshot below.
Once you login, you should see the following window. This is the default look and feel of Ubuntu 18.10. Ubuntu 18.10 got a new theme and icon set. I love it.

As you can see, I am using Ubuntu 18.10 Cosmic Cuttlefish development branch or Beta version with GNOME 3.30.1
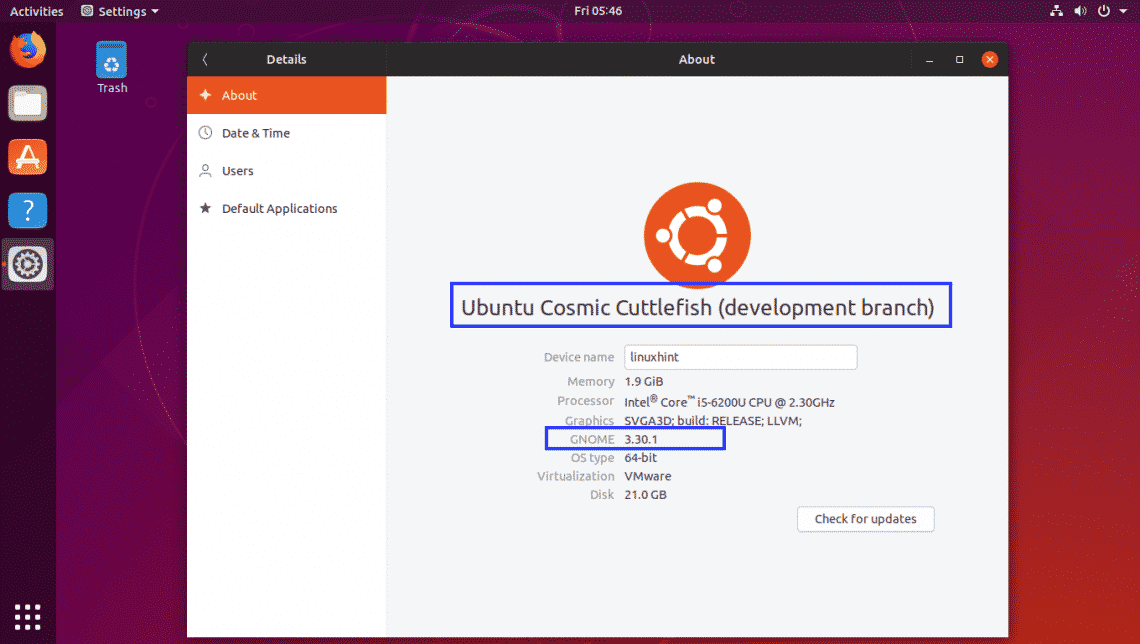
Congrats! You’ve successfully upgraded to Ubuntu 18.10 from Ubuntu 18.04 LTS.
Upgrading to Ubuntu 18.10 from 18.04 from the Terminal:
You can also upgrade to Ubuntu 18.10 from 18.04 LTS from the command line.
First, open up a Terminal by pressing <Ctrl> + t.
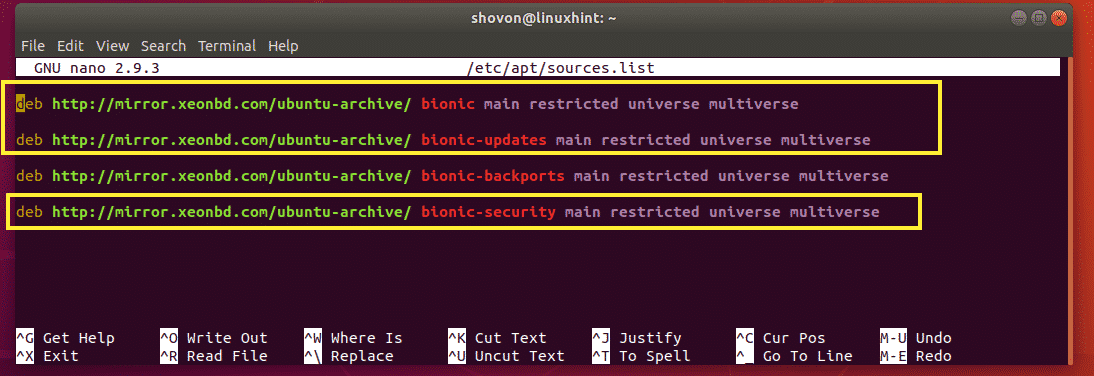
Now open the /etc/apt/sources.list file with the following command:
$ sudo nano /etc/apt/sources.list

Make sure at least the marked package repositories are enabled.
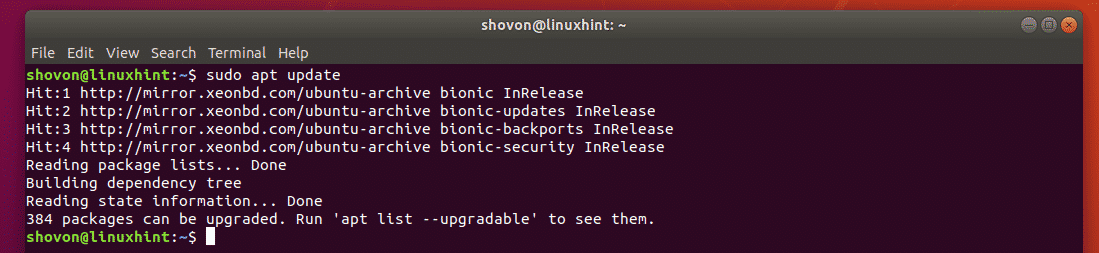
Now update the APT package repository cache with the following command:
Now update all the packages with the following command:
Now update the kernel and some of the system packages with the following command:
Once these upgrades are complete, reboot your computer with the following command:
Now upgrade your Ubuntu 18.04 LTS to Ubuntu 18.10 Cosmic Cuttlefish with the following command:
$ sudo do-release-upgrade -d
NOTE: Once Ubuntu 18.10 is released, remove the -d flag from the command. The reason is explained in the earlier section of this article above.
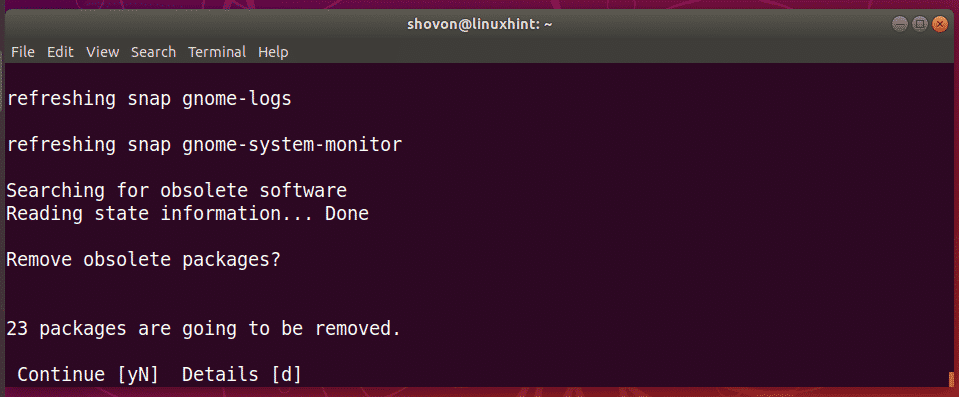
Once the release upgrade is complete, reboot your computer with the following command:
You should be booted into Ubuntu 18.10.
So that’s how you upgrade Ubuntu 18.04 LTS to Ubuntu 18.10. Thanks for reading this article.
An introduction to Ansible Operators in Kubernetes
For years, Ansible has been a go-to choice for infrastructure automation. As Kubernetes adoption has skyrocketed, Ansible has continued to shine in the emerging container orchestration ecosystem.
Ansible fits naturally into a Kubernetes workflow, using YAML to describe the desired state of the world. Multiple projects, including the Automation Broker, are adapting Ansible for use behind specific APIs. This article will focus on a new technique, created through a joint effort by the Ansible core team and the developers of Automation Broker, that uses Ansible to create Operators with minimal effort.
What is an Operator?
An Operator
is a Kubernetes controller that deploys and manages a service or application in a cluster. It automates human operation knowledge and best practices to keep services running and healthy. Input is received in the form of a custom resource. Let’s walk through that using a Memcached Operator as an example.
The Memcached Operator can be deployed as a service running in a cluster, and it includes a custom resource definition (CRD) for a resource called Memcached. The end user creates an instance of that custom resource to describe how the Memcached Deployment should look. The following example requests a Deployment with three Pods.
apiVersion: “cache.example.com/v1alpha1”
kind: “Memcached”
metadata:
name: “example-memcached”
spec:
size: 3
The Operator’s job is called reconciliation—continuously ensuring that what is specified in the “spec” matches the real state of the world. This sample Operator delegates Pod management to a Deployment controller. So while it does not directly create or delete Pods, if you change the size, the Operator’s reconciliation loop ensures that the new value is applied to the Deployment resource it created.
A mature Operator can deploy, upgrade, back up, repair, scale, and reconfigure an application that it manages. As you can see, not only does an Operator provide a simple way to deploy arbitrary services using only native Kubernetes APIs; it enables full day-two (post-deployment, such as updates, backups, etc.) management, limited only by what you can code.
Creating an Operator
The Operator SDK makes it easy to get started. It lays down the skeleton of a new Operator with many of the complex pieces already handled. You can focus on defining your custom resources and coding the reconciliation logic in Go. The SDK saves you a lot of time and ongoing maintenance burden, but you will still end up owning a substantial software project.
Ansible was recently introduced to the Operator SDK as an even simpler way to make an Operator, with no coding required. To create an Operator, you merely:
- Create a CRD in the form of YAML
- Define what reconciliation should do by creating an Ansible role or playbook
It’s YAML all the way down—a familiar experience for Kubernetes users.
How does it work?
There is a preexisting Ansible Operator base container image that includes Ansible, ansible-runner, and the Operator’s executable service. The SDK helps to build a layer on top that adds one or more CRDs and associates each with an Ansible role or playbook.
When it’s running, the Operator uses a Kubernetes feature to “watch” for changes to any resource of the type defined. Upon receiving such a notification, it reconciles the resource that changed. The Operator runs the corresponding role or playbook, and information about the resource is passed to Ansible as extra-vars.
Using Ansible with Kubernetes
Following several iterations, the Ansible community has produced a remarkably easy-to-use module for working with Kubernetes. Especially if you have any experience with a Kubernetes module prior to Ansible 2.6, you owe it to yourself to have a look at the k8s module. Creating, retrieving, and updating resources is a natural experience that will feel familiar to any Kubernetes user. It makes creating an Operator that much easier.
Give it a try
If you need to build a Kubernetes Operator, doing so with Ansible could save time and complexity. To learn more, head over to the Operator SDK documentation and work through the Getting Started Guide for Ansible-based Operators. Then join us on the Operator Framework mailing list and let us know what you think.
Michael Hrivnak will present Automating Multi-Service Deployments on Kubernetes at LISA18, October 29-31 in Nashville, Tennessee, USA.
Arm’s Mbed Linux OS feeds into Pelion IoT strategy
 Arm unveiled an “Mbed Linux OS” distro that mixes Yocto and Mbed code and works with its Pelion IoT Platform. Arm also extended Pelion to support x86 devices that use Intel’s SDO provisioning scheme.
Politics and international relations may be fraught with acrimony these days, but the tech world seems a bit friendlier of late. Last week Microsoft joined the Open Invention Network and agreed to grant a royalty-free, unrestricted license of its 60,000-patent portfolio to other OIN members, thereby enabling Android and Linux device manufacturers to avoid exorbitant patent payments. This week, Arm and Intel kept up the happy talk by agreeing to a partnership involving IoT device provisioning.
Arm’s recently announced Pelion IoT Platform will align with Intel’s Secure Device Onboard (SDO) provisioning technology to make it easier for IoT vendors and customers to onboard both x86 and Arm-based devices using a common Peleon platform. Arm also announced Pelion related partnerships with myDevices and Arduino (see farther below).
In another nod to Intel, Arm unveiled a new, IoT focused Mbed Linux OS distribution that combines the Linux kernel with tools and recipes from the Intel-backed Yocto Project. The distro also integrates security and IoT connectivity code from its open source Mbed RTOS.

Pelion IoT Platform architecture
(click image to enlarge)
When Pelion was announced, Arm mentioned cross-platform support, but there were few details. Now with the Intel SDO deal and the launch of Mbed Linux OS, Arm has formally expanded Pelion from an MCU-only IoT data aggregation platform to one that supports more advanced x86 and Cortex-A based systems.
Mbed Linux OS
The early stage Mbed Linux OS will be released by the end of the year as an invitation-only developer preview. Both the OS source code and related test suites will eventually be open sourced.
In the Mbed Linux OS blog announcement, Arm’s Mark Wright pitches the distro as a secure, IoT focused “sibling” to the Cortex-M focused Mbed that is designed for Cortex-A processors. Arm will support Mbed Linux with its MCU-oriented Mbed community of 350,000 developers and will offer support for popular Linux development boards and modules. The Softbank-owned company will also supply optional commercial support.
Like Mbed, Mbed Linux will be “deeply integrated” with the Pelion IoT System in order “to simplify lifecycle management.” The Pelion support provides device provisioning, connectivity, and updates, thereby enabling development teams to update the OS and the applications independently, says Wright. Working with the Pelion Device Management Application, Mbed Linux OS can “simplify in-field provisioning and eradicate the need for legacy serial connections for initial device configuration,” says Arm.
Mbed Linux will support Arm’s Platform Security Architecture and hardware based TrustZone security to enable secure, signed boot and signed updates. It will also enable deployment of applications in secure, OCI-compliant containers.
Arm did not specify which components of the Yocto Project code it would integrate with Mbed. In late August, Arm and Facebook joined Intel and TI as Platinum members of the Yocto Project. The Linux Foundation hosted project was launched by Intel but is now widely used on Arm as well as x86 based IoT devices.
Despite common references to “Yocto Linux,” Yocto Project is not a distribution, but rather a collection of open source templates, tools, and methods for creating custom embedded Linux-based systems. A Yocto foundation underlies most major commercial Linux distributions such as Wind River Linux and Mentor Embedded Linux and is often spun into custom builds by DIY developers, especially for resource constrained IoT devices.
We saw no mention of a contribution for the Arm-backed Linaro initiative for either Mbed Linux or Pelion. Linaro, which oversees the 96Boards project, develops open source embedded Linux and Android software components. The Yocto and Linaro projects were initially seen as rivals, but they have grown increasingly complementary. Linaro’s Arm toolchain can be used within Yocto Project, as well as with the related OpenEmbedded build environment and Bitbake build engine.
Developers can sign up for the limited number of invites to participate in the upcoming developer preview of Mbed Linux OS here.
Arm’s Pelion partnerships
Arm’s Pelion IoT Platform will soon run on devices with Intel’s recently launched Secure Device Onboard (SDO) service, enabling customers to deploy both Arm and x86 based systems controlled by the common Pelion platform. “We believe this collaboration is a big step forward for greater customer choice, fewer device SKUs, higher volume and velocity through IoT supply chains and lower deployment cost,” says Arm.

Intel’s Secure Device Onboard provisioning used within Pelion IoT Platform
(click image to enlarge)
The SDO “zero-touch onboarding service” depends on Intel Enhanced Privacy ID (EPID) data embedded in chips to validate and provision IoT devices automatically. SDO automatically discovers and provisions compliant devices during installation. This “late binding” approach reduces provisioning times from 20 minutes to an hour to a few minutes, says Intel.
Unlike PKI based authentication methods, “SDO does not insert Intel into the authentication path.” Instead, it brokers a rendezvous URL to the Intel SDO service where Intel EPID opens a private authentication channel between the device and the customer’s IoT platform.

Pelion device management conceptual diagram (from Arm’s Aug. announcement)
(click image to enlarge)
The Pelion IoT Platform offers its own scheme for provisioning and configuration of devices using cryptographic identities built into Cortex-M MCUs running Mbed. With the new Mbed Linux, Pelion will also be able to accept devices that run on Cortex-A chips with TrustZone security.
Pelion combines Arm’s Mbed Cloud connected Mbed IoT Device Management Platform with technologies it acquired via two 2018 acquisitions. The new Treasure Data unit supplies data management services to Pelion. Meanwhile, Stream Technologies provides Pelion managed gateway services for wireless technologies including cellular, LoRa, and satellite communications.
The partnership with myDevices extends Pelion support to devices that run myDevices’ new IoT in a Box turnkey IoT software for LoRa gateways and nodes. myDevices, which is known for its Linux- and Arduino-friendly Cayenne drag-and-drop IoT development and management platform, launched IoT in a Box to enable easy set up a LoRa gateway and LoRa sensor nodes. Different IoT in a Box versions target specific applications ranging from home and building management to storage lockers to refrigeration systems. Developers can try out Pelion services together with IoT in a Box for a new, $199 IoT Starter Kit.
The Arduino partnership is a bit less clear. It appears to extend Arm’s Pelion Connectivity Management stack, based on the Stream Technologies acquisition, to Arduino devices. The partnership gives users the option of selecting “competitive global data plans” for cellular service, says Arm.
More details on this and the other Pelion announcements should emerge at Arm TechCon in San Jose, Calif. and IoT Solution World Congress in Barcelona, both of which run Oct 16-18. Intel also offers a video overview of the Pelion/SDO mashup.
This article is copyright © 2018 Linux.com and was originally published here. It has been reproduced by this site with the permission of its owner. Please visit Linux.com for up-to-date news and articles about Linux and open source.