By Jack M. Germain
Aug 17, 2018 5:00 AM PT
Oracle on Wednesday announced that it has open-sourced
GraphPipe to enhance machine learning applications.
The project’s goal is to improve deployment results for machine learning models, noted Project Leader Vish Abrams. That process includes creating an open standard.
The company has a questionable relationship with open source developers, so its decision to open-source GraphPipe might not receive a flood of interest.
Oracle hopes developers will rally behind the project to simplify and standardize the deployment of machine learning models. GraphPipe consists of a set of libraries and tools for following a deployment standard.
GraphPipe is an attempt to standardize on the client end and transport layers of machine learning.
Most ML deployments have to build a custom solution that may not deal with multiple ML backends very well, according to Jack E. Gold, principal analyst at J.Gold Associates.
“So Oracle is trying to rationalize all of the client side and transport layer capabilities,” he told LinuxInsider. “It will depend on whether others see this as a real open source and build tools based on it, or see it as an Oracle-directed project.”
If the open source community sees Oracle’s actions as an attempt to gain an advantage for the company, then they will not be very interested in working with it, he warned.
Making Progress
Oracle no doubt will gain some benefits from open-sourcing GraphPipe. It already has some capability in this space. Other vendors, like Google and Microsoft, have been trying to build out similar capabilities, noted Gold, but those attempts so far have not been via open source.
Developers have made progress over the last few years in building machine learning into applications, Abrams pointed out, but successfully deploying a model requires overcoming several problems.
There is no standard for model serving APIs, which means users are limited to whatever framework is at hand, he explained. Also, building a model server can be very complicated. Further, many of the existing solutions lack a focus on performance in some use cases.
Abrams and his team developed GraphPipe to address those challenges.
Open Source Impact
Oracle’s decision to open-source this project could benefit development communities. Standardized libraries are a commonly open-sourced thing (ML or not), and they are a good thing, remarked Gary McGraw, vice president of security technology at
Synopsys.
“In this case, Oracle is providing some libraries which help with some aspects of the ML production pipeline,” he told LinuxInsider. “This makes sense since Oracle is in the business of storing big piles of data in databases. Big data is another ML component that is useful.”
Who gains more from the cooperation is the tricky part, McGraw said. If the library is useful, it will be picked up by developers, who by now use open source things in almost everything they build.
“So that is a positive thing. GraphPipe appears to be addressing a legitimate need,” he said. “On the other hand, Oracle will gain a foothold in lots of ML code and attempt to become indispensable, so it obviously benefits them directly.”
What It Does
GraphPipe is a network protocol that simplifies and standardizes transmission of machine learning data between remote processes. No dominant standard exists for how tensor-like data should be transmitted between components in a deep learning architecture.
Developers commonly use protocols like JSON. But that solution is inefficient. TensorFlow uses multiple protocol buffers, which makes it a large and complex software.
GraphPipe’s design solves both of those limitations by bringing efficiency through a binary, memory-mapped format while remaining simple and light on dependencies. It includes simple implementations of clients and servers that make deploying and querying machine learning models from any framework less complicated.

GraphPipe’s servers can deliver models built in TensorFlow, PyTorch, mxnet, CNTK, or caffe2, according to Abrams.
Github Ready
GraphPipe is available on Oracle’s GitHub, along with documentation, examples and other relevant content.
GraphPipe comes with guidelines for serving models consistently according to the flatbuffer definitions.
The package contents also include examples for serving models from TensorFlow, ONNX, and caffe2 along with client libraries for querying models served via GraphPipe.
Comparing Outcomes
GraphPipe behaves much like a TensorFlow-serving predict request. It uses flatbuffers as the message format, according to Oracle.
Flatbuffers are similar to Google protocol buffers. But it provides the added benefit of avoiding a memory copy during the deserialization step. The flatbuffer definitions provide a request message that includes input tensors, input names and output names.
GraphPipe relies on a remote model to accept the request message. It returns one tensor per requested output name. The remote model also must provide metadata about the types and shapes of the inputs and outputs that it supports.
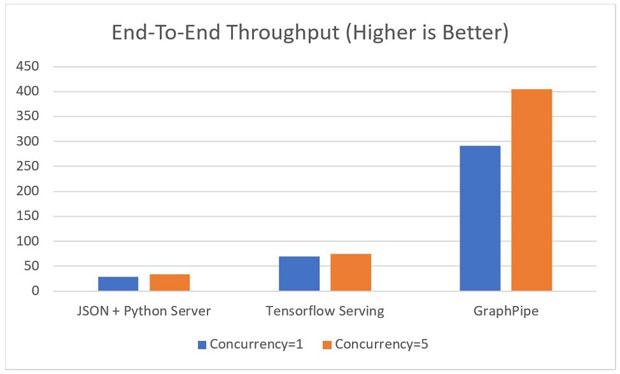
Protocol performance is better in GraphPipe, based on a comparison of serialization and deserialization speed and end-to-end throughput.
Trust in the Making
This choice of open standards helps Oracle regain community trust, not just by opening up its project to the world, but also by embracing what the community creates and uses, according to Stephen Goldberg, CEO of
HarperDB.
This creates an interconnected web that props up all projects involved, not just GraphPipe.
“Choosing established standards eases implementations, as there is nothing new to learn, understand or vet out,” Goldberg told LinuxInsider.
“This is a huge win for developers and implementers in the machine learning space,” he continued. “Rather than spending copious amounts of time in the weeds figuring out deployments across frameworks, developers can focus on the work that moves their project forward.”
Shifting their stance on support for open source has been hugely important for companies like Microsoft and Oracle, observed Goldberg, and there will be many benefits from the success and continuing maturity of projects such as GraphPipe.
With their established brands and resources behind such projects, large enterprises will be more inclined to adopt these tools and products.
“Oracle is taking strong steps towards embracing the collaborative technology landscape that we now inhabit,” Goldberg said. “We have seen Oracle adopt a more open, transparent and collaborative approach to their ecosystem.”
Oracle has been on a path to becoming a huge champion of collaboration and transparency, he suggested. The company has focused on finding the best holistic solutions for customers, and that is an indication that its embrace of open source is authentic.

 Jack M. Germain has been an ECT News Network reporter since 2003. His main areas of focus are enterprise IT, Linux and open source technologies. He has written numerous reviews of Linux distros and other open source software.
Email Jack.
Source


 CubieTech has posted specs for a “CubieBoard9” SBC with a quad -A53 Actions S900 SoC with 3GB LPDDR3, 16GB eMMC, WiFi/BT, and dual independent displays with HDMI, MIPI-DSI, LVDS, and eDP.