We are pleased to announce our dedicated series of posts on Java Programming Language on the demand of our readers. In this series we are going to cover everything you need to know about Java.

Learn Java Programming
Why Java?
Java is a General purpose, Object Oriented Programming Language written by James Gosling. It is known for many features which makes it different from other Programming languages. It is one of those Programming Language that has always remained in demand since the time of its initial release. It is one of the most powerful Programming Language which can do amazing things when combined with the power of Linux. Linux+Java is Future. Most talked about Features of Java are:
- General Purpose Programming Language
- Object Oriented approach
- Friendly Syntax
- Portability
- Memory Management Feature
- Architecture Neutral
- Interpreted
This tutorial is for those, who have knowledge of any other programming and/or Scripting Language and want to learn Java from core level.
What you need to get started with Java
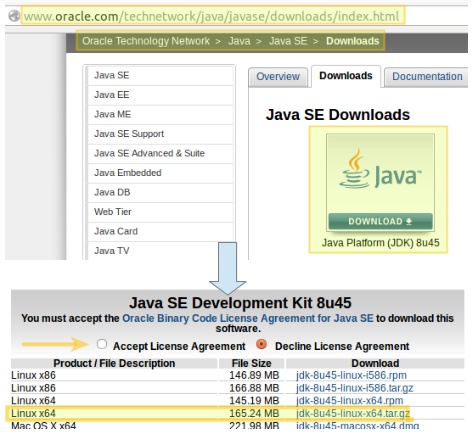
First thing is you need is to install Java Compiler and set path. The detailed instructions to install latest version of Java and set path is here [Install Java JDK/JRE in Linux]. Once the Java Compiler is Installed and Path is set, run
$ java -version
Sample Output
java version "1.8.0_45"
Java(TM) SE Runtime Environment (build 1.8.0_45-b14)
Java HotSpot(TM) 64-Bit Server VM (build 25.45-b02, mixed mode)
Second thing is you need a text editor. You may use any text editor of your choice which may be command line based or a GUI Text editor. My favorite editors are nano (command_line) and gedit (GUI).
You may use any but make sure you don’t use an Integrated Development Environment (IDE). If you start using IDE at this level, you will never understand a few things, so say no to IDE.
The last things you need is a good step-by step guide (which I will be providing) and a never ending quest to learn Java.
Topics we are going to cover
This is an Ever expanding list of topics and there is nothing hard and fast associated with it. I will keep adding up topics to this section as we dive deep into Java. From here you may go anywhere but I suggest you to go through all the topics stepwise.
Part 6: Understanding Class and Objects in Java to Create Object in Java
Part 7: Understanding Java Variables and its Types and Introduction to Keywords
Part 8: Behavior of objects in JVM and variable Initialization in Java
Part 9: Local Variables and Instances in Java
Part 10: How to Code and Develop Your First Class in Java
We always got the support of our readers and once again we seek the support of our beloved Readers to make popular Java Series Post on Tecmint. Fasten your seat belts and lets start. Keep following.
What is Java? A Brief History about Java
Java is a General Purpose, class based, object oriented, Platform independent, portable, Architecturally neutral, multithreaded, dynamic, distributed, Portable and robust interpreted Programming Language.
What is Java and Brief History about Java
Why Java is a called:
General Purpose
Java capabilities are not limited to any specific application domain rather it can be used in various application domain and hence it is called General Purpose Programming Language.
Class based
Java is a class based/oriented programming language which means Java supports inheritance feature of object-oriented Programming Language.
Object oriented
Java is object-oriented means software developed in Java are combination of different types of object.
Platform Independent
A Java code will run on any JVM (Java Virtual Machine). Literally you can run same Java code on Windows JVM, Linux JVM, Mac JVM or any other JVM practically and get same result every time.
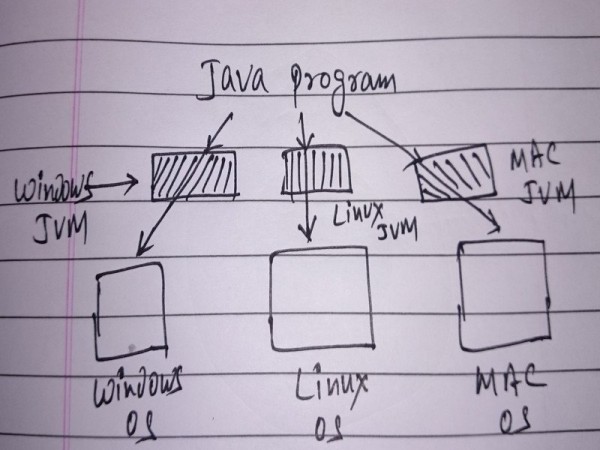
Java Platform Independent
Architecturally Neutral
A Java code is not dependent upon Processor Architecture. A Java Application compiled on 64 bit architecture of any platform will run on 32 bit (or any other architecture) system without any issue.
Multithreaded
A thread in Java refers to an independent program. Java supports multithread which means Java is capable of running many tasks simultaneously, sharing the same memory.
Dynamic
Java is a Dynamic programming language which means it executes many programming behavior at Runtime and don’t need to be passed at compile time as in the case of static programming.
Distributed
Java Supports distributed System which means we can access files over Internet just by calling the methods.
Portable
A Java program when compiled produce bytecodes. Bytecodes are magic. These bytecodes can be transferred via network and can be executed by any JVM, hence came the concept of ‘Write once, Run Anywhere(WORA)’.

Java Concept
Robust
Java is a robust programming Language which means it can cope with error while the program is executing as well as keep operating with abnormalities to certain extent. Automatic Garbage collection, strong memory management, exception handling and type checking further adds to the list.
Interpreted
Java is a compiled programming Language which compiles the Java program into Java byte codes. This JVM is then interpreted to run the program.
Other than the above discussed feature, there are a few other remarkable features, like:
Security
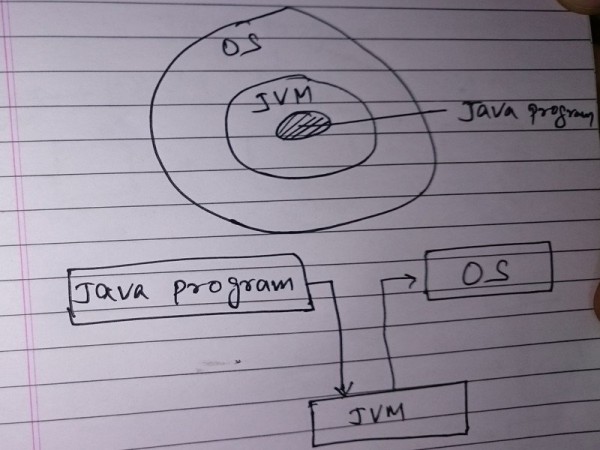
Unlike other programming Language where Program interacts with OS using User runtime environment of OS, Java provides an extra layer of security by putting JVM between Program and OS.
Java Security
Simple Syntax
Java is an improved c++ which ensures friendly syntax but with removed unwanted features and inclusion of Automatic Garbage collection.
High Level Programming Language
Java is a High Level Programming Language the syntax of which is human readable. Java lets programmer to concentrate on what to achieve and not how to achieve. The JVM converts a Java Program to Machine understandable language.
High Performance
Java make use of Just-In-Time compiler for high performance. Just-In-Time compiler is a computer program that turns Java byte codes into instructions that can directly be sent to compilers.
History of Java
Java Programming Language was written by James Gosling along with two other person ‘Mike Sheridan‘ and ‘Patrick Naughton‘, while they were working at Sun Microsystems. Initially it was named oak Programming Language.
Java Releases
- Initial Java Versions 1.0 and 1.1 was released in the year 1996 for Linux, Solaris, Mac and Windows.
- Java version 1.2 (Commonly called as java 2) was released in the year 1998.
- Java Version 1.3 codename Kestrel was released in the year 2000.
- Java Version 1.4 codename Merlin was released in the year 2002.
- Java Version 1.5/Java SE 5 codename ‘Tiger’ was released in the year 2004.
- Java Version 1.6/Java SE 6 Codename ‘Mustang’ was released in the year 2006.
- Java Version 1.7/Java SE 7 Codename ‘Dolphin’ was released in the year 2011.
- Java Version 1.8 is the current stable release which was released this year (2015).
Five Goals which were taken into consideration while developing Java:
- Keep it simple, familiar and object oriented.
- Keep it Robust and Secure.
- Keep it architecture-neural and portable.
- Executable with High Performance.
- Interpreted, threaded and dynamic.
Why we call it Java 2, Java 5, Java 6, Java 7 and Java 8, not their actual version number which 1.2, 1.5, 1.6, 1.7 and 1.8?
Java 1.0 and 1.1 were Java. When Java 1.2 was released it had a lots of changes and marketers/developers wanted a new name so they called it Java 2 (J2SE), remove the numeric before decimal.
This was not the condition when Java 1.3 and Java 1.4 were released hence they were never called Java 3 and Java 4, but they were still Java 2.
When Java 5 was released, once again it was having a lots of changes for the developer/marketers and need a new name. The next number in sequence was 3, but calling Java 1.5 as Java 3 was confusing hence a decision was made to keep the naming as per version number and till now the legacy continues.
Places where Java is used
Java is implemented over a number of places in modern world. It is implemented as Standalone Application, Web Application, Enterprise Application and Mobile Application. Games, Smart Card, Embedded System, Robotics, Desktop, etc.
Keep connected we are coming up with “Working and code Structure of Java”.
How Java Works and Understanding Code Structure of Java – Part 2
In our last post ‘What is Java and History of Java‘ we had covered What is Java, features of Java in details, release history and its naming as well as places where Java is utilized.

Working of Java Understanding Java Code – Part 2
Here in this post we will be going through working and code structure of Java Programming Language. Before we proceed let me remind you that Java was developed keeping in mind “Write Once Run Anywhere/Anytime (WORA)” means to ensure that the application developed should be architecturally neutral, Platform Independent and portable.
Working of Java
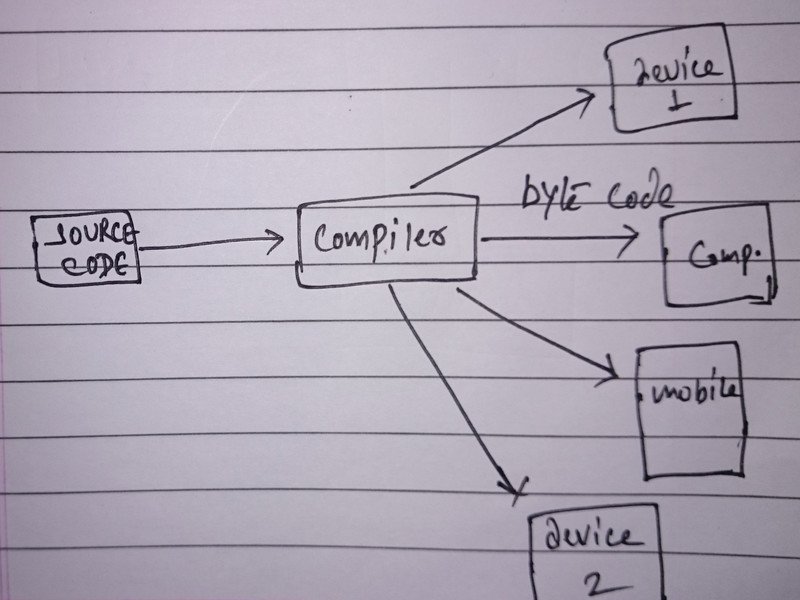
Having these goals in mind Java was developed with the below working model which can be classified into four stages.
Stage 1
Write the source file. This file contains all the procedure, method, class and objects within established protocol for Java Programming Language. The name of source file should be the name of the class or vice-versa. The source file name must have extension .java. Also the filename and class name are case sensitive.
Stage 2
Run the Java Source Code file through Java Compiler. Java Source code Compiler checks for error and syntax in the source file. It won’t let you compile your source code without satisfying Java compiler by fixing all errors and warning.
Stage 3
Compiler creates classfile. These classfile inherit the same name as the Source code file name, but the extension varies. The Source file name has extension 'filename.java', where as the extension of classfile created by compiler is 'filename.class'. This classfile is coded into bytecode – bytecodes are like magic.
Stage 4
This classfile created by Java Compiler is portable and architecturally neutral. You can port this classfile to run on any processor architecture and Platform/device. All you need is a Java Virtual Machine (JVM) to run this code no matter where.
Now understand the above four stages using an example. Here is a small sample Java Program code. Don’t worry if you don’t understand the code below. As of now just understand how it works.
public class MyFirstProgram
{
    public static void main(String[] args)
    {
        System.out.println("Hello Tecmint, This is my first Java Program");
    }
}
1. I wrote this program and defined class name MyFirstProgram. It is important to notice that this program must be saved as 'MyFirstProgram.java'.
Remember stage 1 above – The class name and file name must be same and filename must have extension .java. Also java is case sensitive hence if your classname is ‘MyFirstProgram‘, your source file name must be ‘MyFirstProgram.java‘.
You can not name it as ‘Myfirstprogram.java‘ or ‘myfirstprogram.java‘ or anything else. By convention it is a good idea to name your class based upon what the program is doing actually.
2. To compile this Java Source file, you need to pass it through Java compiler. Java compiler will essentially check the source code for any error and warning. It wont compile the source code until all the issues are solved. To compile java source code, you need to run:
$ javac MyFirstProgram.java
Where MyFirstProgram.java is the name of the source file.
3. On successful compilation you will notice that the Java compiler created a new file in the same directory the name of which is MyFirstProgram.class.
This class file is coded in bytecodes and can be run on any platform, any processor architecture any number of time. You may run the class file inside of JVM (Java Virtual Machine) on Linux or any other platform simply as:
$ java MyFirstProgram
So all you learnt above can be summarized as:
Java Source Code >> Compiler >> classfile/bytecode >> Various devices running JVM
Understanding Code Structure in Java
1. Java source code file must contains a class definition. One Java Source file can contain only one public class/top-level class however it can contain lots of private class/inner-class.
The outer class/top class/public class can access all private class/inner class. The class must be within curly braces. Everything in Java is an object and class is a blueprint for object.
A demo of public/private class in Java:
public class class0
{
...
	private class1
	{
	…
	}

	private class 2
	{
	…
	}
...
}
2. Class contain one or more methods. Method must go within the curly braces of the class. A dummy example is:
public class class0
{
	public static void main(String[] args)
	{
	…..
	…..
	}
}
3. A method contain one or more statement/instruction. The instruction(s) must go within the curly braces of method. A dummy example is:
public class class0
{
	public static void main(String[] args)
	{
	System.out.println("Hello Tecmint, This is my first Java Program");
	System.out.println("I am Loving Java");
	…
	...
	}
}
Also important to mention at this point – Every Statement must end with semicolon. A dummy example is:
System.out.println("Hello Tecmint, This is my first Java Program");
...
...
System.out.println("I am Loving Java");
Writing your first Java Program with detailed description. The description is being put as comments here (//means commented out) in this example. You should write comments within a program.
Not only because this is a good habit but also because it makes the code readable ab you or anyone else at anytime later.
// Declare a Public class and name it anything but remember the class name and file name must be same, say class name is MyProg and hence file name must be MyProg.java
public class MyProg

// Remember everything goes into curly braces of class?
{


// This is a method which is inside the curly braces of class.
   public static void main(String[] args)

    // Everything inside a method goes into curly braces
    {

    // Statement or Instruction inside method. Note it ends with a semicolon
    System.out.println("I didn't knew JAVA was so much fun filled");

    // closing braces of method
    }

// closing braces of class
}
A detailed technical description of the above simple Java Program.
public class MyProg
Here in the above name of class is MyProg and MyProg is a Public class which means everyone can access it.
public static void main(String[] args)
Here the method name is main which is a public method, means it can be accessed by anyone. The return type is void which means no return value. 'Strings[] args' means the arguments for the method main should be array which is to be called args. Don’t worry about the meaning of ‘static‘ as of now. We will be describing in details about it when required.
System.out.println("I didn't knew JAVA was so much fun filled");
System.out.ln ask JVM to print the output to standard output which is Linux command Line in our case. Anything that is in between braces of println statement gets print as it is, unless it is a variable. We will be going into details of variable later. The statement is ending with semicolon.
Even if something is not clear now you need not worry about this. Also you don’t need to memories anything. Just go through the post and understand terminologies and working even when the picture is not very clear.
That’s all for now. Provide us with your valuable feedback in the comments below. We are working on the next part “class and Main method in Java”and will be publishing soon.
Understanding Java Class, Main Method and Loops Control in Java – Part 3
In our last post ‘Working and code structure of Java‘ we emphasized in details of working of Java, Java Source File, Java Class File, Class (Public/Private), Method, Statement, Your first Java Program, Compilation and running of Java Program.
Here in this java learning series guide, we will understand how java class, main method and loops control works and also we will see basic codes using Java class with main method and loops control.
Understanding Java Class Method and Loops Control – Part 3
Everything in Java goes in a class
Everything in Java is an object and class is a blueprint of object. Every piece of code in Java is placed under the curly braces of class. When you compile a Java Program it produces a class file. When you run Java Program you are not running the Program file in actual but the class.
When you run a Program in Java Virtual Machine (JVM), it loads the required class and then goes directly to the main () method. The program continues to run till the closing braces of main () method. The program start executing just after the main() method. A class must have a main () method. Not all the class (Private class) requires a main () method.
What goes inside main () Method?
A main () method is the place where magic starts. You can ask JVM to do anything within main() method via statement/instructions and loops.
What is loop?
Loop is an instruction or a number of instructions in sequence that keeps on repeating till the condition is reached. Loops are the logical structure of a programming language. Loop logical structure are typically used to do a process, check the condition, do a process, check the condition,….. till condition requirements are met.
Loops in Java
There are three different loop mechanism in Java.
1. while Loop
while Loop in Java is a control structure which is used to perform a task repeatedly for a certain number of times, as defined in boolean expression, till the expression test result is true. If the boolean expression text result is false the while loop will be ignored completely without being executed even a single time.
Syntax of while loop:
while (boolean expression)
{
	statement/instructions
}
An example of while Loop in Java:
public class While_loop
{
    public static void main(String[] args)
    {
        int A = 100;
        while(A>0)
        {
            System.out.println("The Value of A = " +A);
            A=A-10;
        }
    }
}
Sample Output
$ java While_loop

The Value of A = 100
The Value of A = 90
The Value of A = 80
The Value of A = 70
The Value of A = 60
The Value of A = 50
The Value of A = 40
The Value of A = 30
The Value of A = 20
The Value of A = 10
Anatomy of While_loop Program
// Public Class While_loop
public class While_loop
{
    // main () Method
    public static void main(String[] args)
    {
        // declare an integer variable named 'A' and give it the value of 100
        int A = 100;
        // Keep looping as long as the value of A is greater than 0. 'A>0' here is the boolean
           expression
        while(A>0)
        {
	 // Statement
            System.out.println("The Value of A = " +A);
            // Post Decrement (by 10)
	 A=A-10;
        }
    }
}
2. do..while Loop
do…while loop is very much similar to the while loop except the fact that it contains a do… before while to ensure that loop execute at least once.
Syntax of while loop:
do
{
statement/instructions
}
while (boolean expression);
You may see the above syntax which clearly shows that the 'do..' part of the loop executed before checking the boolean expression, if it is true or false. Hence no matter what the result (true/false) of boolean expression, the loop executes. If true it will execute till the condition is satisfied. If false it will be executed once.
An Example of do…while Loop in Java:
public class do_while
{
    public static void main(String[] args)
    {
        int A=100;
        do
        {
            System.out.println("Value of A = " +A);
            A=A-10;
        }
        while (A>=50);
    }
}
Sample Output
$ java do_while

Value of A = 100
Value of A = 90
Value of A = 80
Value of A = 70
Value of A = 60
Value of A = 50
Anatomy of do_while Program:
// public class do_while
public class do_while
{
    // main () Method
    public static void main(String[] args)
    {
        // Declare a Integer Variable 'A' and assign it a value = 100
        int A=100;
        // do...while loop starts
        do
        {
            // execute the below statement without checking boolean expression condition if true
               or false
            System.out.println("Value of A = " +A);
            // Post Decrement (by 10)
            A=A-10;
        }
        // Check condition. Loop the execute only till the value of Variable A is greater than or
           equal to 50.
        while (A>=50);
    }
}
3. for Loop
for_loop in Java is widely used for repetition control. It is used to iterate a task for specific number of times. For loop is used to control how many times the loop needs to execute to perform a task. for loop is only useful if you know how many times you need to execute the loop.
Syntax of for loop:
for (initialization; boolean-expression; update)
{
statement
}

An example of the for loop in Java

public class for_loop
{
    public static void main(String[] arge)
    {
        int A;
        for (A=100; A>=0; A=A-7)
        {
            System.out.println("Value of A = " +A);
        }
    }
}
Sample Output
$ java for_loop

Value of A = 100
Value of A = 93
Value of A = 86
Value of A = 79
Value of A = 72
Value of A = 65
Value of A = 58
Value of A = 51
Value of A = 44
Value of A = 37
Value of A = 30
Value of A = 23
Value of A = 16
Value of A = 9
Value of A = 2
Anatomy of for_loop Program:
// public class for_loop
public class for_loop
{
    // main () Method
    public static void main(String[] arge)
    {
        // Declare a Integer Variable A
        int A;
        // for loop starts. Here Initialization is A=100, boolean_expression is A>=0 and update is
           A=A-7
        for (A=100; A>=0; A=A-7)
        {
            // Statement
            System.out.println("Value of A = " +A);
        }
    }
}
The Break and Continue keywords for loops in Java
1. The Break Keyword
As the name suggest the break keyword is used to stop the entire loop immediately. The break keyword must always be used inside the loop or switch statement. Once the loop breaks by using break; JVM starts executing the very next line of code outside of the loop. An example of break loop in Java is:
public class break
{
    public static void main(String[] args)
    {
        int A = 100;
        while(A>0)
        {
            System.out.println("The Value of A = " +A);
            A=A-10;
            if (A == 40)
            {
                break;
            }
        }
    }
}
Sample Output
$ java break

The Value of A = 100
The Value of A = 90
The Value of A = 80
The Value of A = 70
The Value of A = 60
The Value of A = 50
The Continue Keyword
The continue keyword can be used with any loop in Java. Continue keyword ask the loop to jump to the next iteration immediately. However it is interpreted differently by for loop and while/do…while loop.
Continue Keyword in for loop jumps to the next update statement.
An example of continue in for loop:
public class continue_for_loop
{
    public static void main(String[] arge)
    {
        int A;
        for (A=10; A>=0; A=A-1)
        {
	    if (A == 2)
		{
	        continue;
		}
            System.out.println("Value of A = " +A);
        }
    }
}
Sample Output
$ java continue_for_loop

Value of A = 10
Value of A = 9
Value of A = 8
Value of A = 7
Value of A = 6
Value of A = 5
Value of A = 4
Value of A = 3
Value of A = 1
Value of A = 0
Did you noticed, it skipped Value of A = 2. It does so by dumping to the next update statement.
2. Continue Keyword in while loop or do…while loop jumps to the boolean expression.
Well you can do it yourself. Its too easy. Just follow the above steps.
That’s all for now from my side.
Understanding Java Compiler and Java Virtual Machine – Part 4
Till now we have gone through working and code structure of Java and Class, Main method & Loop Control in Java. Here in this post we will see What is Java Compiler and Java Virtual Machine. What are they meant for and their roles.
Understanding Java Compiler and Java Virtual Machine – Part 4
What is Java Compiler
Java is a strongly typed language which means variable must hold right kind of data. In a strongly typed language a variable can not hold wrong data type. This is a safety feature very well implemented in Java Programming Language.
Java compiler is responsible for through checking the variables for any violation in data-type holding. A few exception may arise at run-time which is compulsory for dynamic binding feature of Java. As Java program runs it may include new objects that were not existing before hence to have some degree of flexibility a few exceptions are allowed in data-type that a variable can hold.
Java Compiler set filter for those piece of code that won’t compile ever except for the comments. Compiler do not parse the comments and leave it as it is. Java code supports three kinds of comments within Program.
1. /* COMMENT HERE */
2. /** DOCUMENTATION COMMENT HERE */
3. // COMMENT HERE
Anything that is placed between /* and */ or /** and */ or after // is ignored by Java Compiler.
Java Compiler is responsible for strict checking any syntax violation. Java Compiler is designed to be a bytecode compiler ie., it create a class file out of actual program file written purely in bytecode.
Java Compiler is the first stage of security. It is the first line of defense where checking for incorrect data-type in variable is checked. A wrong data-type can cause damage to the program and outside it. Also compiler check if any piece of code trying to invoke restricted piece of code like private class. It restrict unauthorized access of code/class/critical data.
Java Compiler produce bytecodes/class file that are platform and architecturally neutral that requires JVM to run and it will literally run on any device/platform/architecture.
What is Java Virtual Machine (JVM)
Java Virtual Machine is the next line of security which put an extra layer between Java Application and OS. Also it check the class file that has been security checked and compiled by Java Compiler, if someone tampered the class file/bytecode to restrict access to unauthorized critical data.
Java Virtual Machine interprets the bytecode by loading the class file to machine Language.
JVM is responsible for functions like Load and Store, Arithmetic calculation, Type conversion, Object Creation, Object Manupulation, Control Transfer, Throwing exception, etc.
The working model of Java in which Java Compiler compiles the code into calssfile/bytecodes and then Java Virtual Machine run the classfile/bytecode. This model ensures that code run at fast speed and the additional layer ensures security.
So what do you think – Java Compiler or Java Virtual Machine perform more important task? A Java program has to run through both the surface (Compiler and JVM) essentially.
This post sums the role of Java Compiler and JVM. All your suggestions are welcome in the comments below. We are working on the next post “object oriented approach of Java”. Till then stay tuned and connected to TecMint. Like and share us and help us get spread.
Object Oriented Approach of Java Programming and Encapsulation – Part 5
Since the beginning of this series (and even before that) you knew Java is an Object Oriented Programming Language. The object oriented Programming Language is based upon the concept of “objects”, which contains data as attributes in methods.
Object Oriented Approach of Java – Part 5
Every object in Java has state and behavior which are represented by instance variables and methods. Each instance of a class can have unique value for it’s instance variable.
For example,
Machine A may be powered up with Debian and have 8GB of RAM while Machine B can have installed Gentoo with 4GB of RAM. Also it is obvious that managing Machine that have installed Gentoo requires more knowledge – A behavior acting on its state. Here method is using instance variable values.
The JVM when parse a class, it make object of that kind. When you are writing a class, in actual you acting like a compiler telling your class what the object should know and how it should act. Every object of a particular type can have different value for same instance variable.
Every Instance of a class has the same method but it possible that all of them behave differently.
The OS class has 3 Instance variables namely OS Name, OS Type, OS Category.
-
|
OS
|
|
OS_Name
OS_Type
OS_Category
|
|
Boot()
Reboot()
scan()
|
The Boot() method boots one OS which is represented by OS Name for that instance. So if you boot() on one instance you will boot into Debian while on another instance you will boot into Gentoo. The method code, remains the same in either case.
Void Boot()
	{
	bootloader.bootos(OS_Name);
	}
You are already aware that the program starts to execute just after the main() method. You can pass values into you method.
For example you would like to tell you OS what services to start at boot as:
You are already aware that the program starts to execute just after the main() method. You can pass values into you method. For example you would like to tell you OS what services to start at boot as:
OS.services(apache2);
What you pass into methods are called arguments. You can use a variable with a type and a name inside a method. It is important to pass values with parameter if a method takes a parameter.
OS deb = debian();
deb.reboot(600);
Here the reboot method on the OS passes the value of 600 (reboot machine after 600 sec) as an argument to the method. Till now we have seen method always returning void, which means it don’t return you anything, simply as:
void main()
	{
	…
	…
	}
However you can ask your compiler to get exactly what you are desiring and your compiler won’t return you wrong types. You may simply do like:
int Integer()
	{
	…
	…
	return 70;
	}
You can send more than one value value to a method. You can do this by calling two parameter methods and sending it to arguments. Note variable type and parameter type must always match.
void numbers(int a, int b)
	{
	int c = a + b;
	System.out.print(“sum is” +c);
	}
Declare and Initialize Instance Variables
1. When you don’t know the value to initialize.
int a;
float b;
string c;
2. When the know the value to Initialize.
int a = 12;
float b = 11.23;
string c = tecmint;
Note: A instance variables are often confused with local variables, however there is a very thin line between them to differentiate.
3. Instance Variables are declared inside a class unlike local variables that are declared within a method.
4. Unlike Instance Variables, local variables must initialize before it can be used. The compiler will report error if you use local variable before it is initialized.
Encapsulation
You might have heard about encapsulation. It is a feature of most of the object oriented programming language which makes it possible to bind data and functions into a single component. Encapsulation is supported by class and protects codes from accidental damage by creating a wall around objects and hides their properties and methods, selectively.
We will expand encapsulation in details in the right tutorial when it is required. As of now it is sufficient for you to know What encapsulation is? What it does? And how it does?
That’s all for now.
Day to Day: Learning Java Programming Language – Part I
In 1995 when c++ programming language were widely used. An employee of Sun Microsystem working on a platform called ‘Green‘ Developed a programming language and named it as ‘oak‘.
The name was inspired by an oak tree which he use to see outside of his office windows. Later the name oakwas replaced by Java.
Java Programming language was developed by James Gosling and hence James Gosling has been honoured as the Father of Java Programming Language.

James Gosling – Father of Java Programming
Now the question is, if there already was such a functional programming language (c++) available, why Mr. Gosling and his team needed a different programming language.
Java was intended with the Features:
- Write once, run anywhere
- Cross Platform Program Development i.e., Architecturally Neutral
- Security
- Class based
- Object oriented
- Support for web technologies
- Robust
- Interpreted
- Inheritance
- Threaded
- Dynamic
- High Performance
Before Java was developed, The program written on a computer or for an architecture won’t run on another computer and architecture, hence while developing Java the team focus mainly on cross platform functionality and from there the concept of write once, run anywhere came, which remains the quote of sun microsystem for a long time.
Java program runs inside JVM (Java Virtual Machine) which adds an extra layer between System and program, which further means extra security. Other programming language prior to Java was not having such feature which means a code being run could be malicious can infect a system or other systems attached to it, however Java maintained to overcome this issue using JVM.
Java is a OOP (Object Oriented Programming) Language. By object oriented feature, it means all the entity is a object which further suggest Real World Object.
When Java was being developed at Sun, coincidentally web technologies has started to take take shape and the Java development was highly influenced with this, and even today web world uses Java more than any other language. Java is strictly an interpreted language, which means Java executes the source code directly by translating the source code in an intermediate form.
Java is robust in nature i.e., it can cope up with errors be in input or calculation. When we say Java is dynamic programming language, we mean to say that it is capable of breaking complex problems into simple problems and then execute them independently.
Java supports threading. Threads are small processes that can be managed independently by operating system scheduler.
Java Support Inheritance, which means relation can be established between classes.
No doubt! Java was developed as a successor to ‘c‘ and ‘c++‘ programming Language hence it inherit a number of features from its predecessor viz., c and c++ with a number of new features.
Learning Java from the point of view of carrier is highly appreciated and one of the most sought after technology. The best way to learn any programming language is to start programming.
Before we go to programming, one more thing we need to know is: the class name and program name should be same, however it can be different in certain condition but by convention it is always a good idea to rename the program as it’s class name.
Javac is the compiler of Java Programming Language. Obviously you should have Java installed and environment variable set. Installing Java on RPM based system is just a click away as on Windows and more or less on Debian based system.
However Debian Wheezy don’t have Java in its repo. And it is a little messy to install Java in Wheezy. Hence a quick step to install on debian is as below:
Installing Java in Debian Wheezy
Download correct Java version for your System and architecture from here:
- http://www.oracle.com/technetwork/java/javase/downloads/index.html
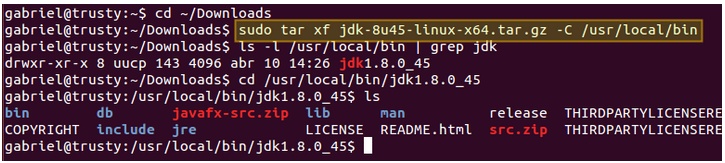
Once you’ve downloaded , use the following commands to install in Debian Wheezy.
# mv /home/user_name/Downloads /opt/
# cd /opt/
# tar -zxvf jdk-7u3-linux-x64.tar.gz
# rm -rf jdk-7u3-linux-x64.tar.gz
# cd jdk1.7.0_03
# update-alternatives --install /usr/bin/java java /opt/jdk1.7.0_03/bin/java 1
# update-alternatives --install /usr/bin/javac javac /opt/jdk1.7.0_03/bin/javac 1
# update-alternatives --install /usr/lib/mozilla/plugins/libjavaplugin.so mozilla-javaplugin.so /opt/jdk1.7.0_03/jre/lib/amd64/libnpjp2.so 1
# update-alternatives --set java /opt/jdk1.7.0_03/bin/java
# update-alternatives --set javac /opt/jdk1.7.0_03/bin/javac
# update-alternatives --set mozilla-javaplugin.so /opt/jdk1.7.0_03/jre/lib/amd64/libnpjp2.so
For RHEL, CentOS and Fedora users can also install latest version of Java by going to below url.
- Install Java in RHEL, CentOS and Fedora
Let’s move to programming section to learn few basic Java programs.
Program 1: hello.java
class hello{
public static void main (String args[]){
System.out.println("Sucess!");
}
}
Save it as: hello.java. And Compile it and run as shown.
# javac hello.java
# java hello
Sample Output
Sucess!
Program 2: calculation.java
class calculation {
public static void main(String args[]) {
int num;
num = 123;
System.out.println("This is num: " + num);
num = num * 2;
System.out.print("The value of num * 2 is ");
System.out.println(num);
}
}
Save it as: calculation.java. And Compile it and run as shown.
# javac calculation.java
# java calculation
Sample Output
This is num: 123
The value of num * 2 is 246
Do it Yourself:
- Write a program that ask for your first name and last name and then address you with your last name.
- Write a program with three Integer values and perform addition, Substraction, Multiplication and Divisionand gets the custom output.
Note: This way of learning will make you know and learn something. However if you face problem in writing programs of ‘Do it Yourself‘ you can come up with your codes and problems in comments.
Day to Day: Learning Java Programming Language – Part 2
Moving a step ahead of the previous article on Day-to-Day: Java Programming Part – I. Here in this very post we will be learning control statements and loops in Java, which is very useful in developing an application.
Learning java Programming Part – 2
if statement
The if statement in Java works similar to if statement in any other programming language of the world including shell scripting.
Program 3: compare.java
class compare{
public static void main(String args[]){
int a,b;
a=10;
b=20;
if(a < b)
System.out.println("a(" +a+ ")is less than b(" +b+")");
a=a*2;
if(a==b)
System.out.println("a(" +a+ ")is equal to b(" +b+")");
a=a*2;
if(a>b)
System.out.println("a(" +a+ ")is greater than b(" +b+")");
}
}
Save it as: compare.java. And Compile it and run as shown.
# javac compare.java
# java compare
Sample Output
a(10)is less than b(20)
a(20)is equal to b(20)
a(40)is greater than b(20)
Note: In the above program
- A class namely compare is defined.
- Two Integers are declared with the initial value of 10 and 20 respectively.
- The if statement checks the condition and act according to the statement. Syntax of if statement is if (condition) statement;
- System.out.println prints anything and everything that is placed between double quotes. Anything within the quotes are printed as it is, and outside of quotes are treated as variable.
- + is a concatenation, which is used to concatenate two parts of a statement.
for loop
If you have any programming experience, sure you would be aware of the importance of loop statements. Here again the for loop statement works similar to the for statement in any language.
Program4: forloop.java
class forloop{
public static void main(String args[]){
int q1;
for (q1=0; q1<=10; q1++)
System.out.println("The value of interger: "+q1);
}
}
Save it as: forloop.java. And Compile it and run as shown.
# javac forloop.java
# java forloop
Sample Output
Output:
The value of interger: 0
The value of interger: 1
The value of interger: 2
The value of interger: 3
The value of interger: 4
The value of interger: 5
The value of interger: 6
The value of interger: 7
The value of interger: 8
The value of interger: 9
The value of interger: 10
Note: In the above program all the statements and codes are more or less identical to the above program, except the for statement.
- The above for statement is a loop, which continues to execute again and again till the conditions are satisfied.
- The for loop, generally is divided in three chunks of codes separated by semicolon, each of which is very meaningful.
- The first part (q1=0, in the above program) is called initialiser. i.e., the above integer, q1 is forced to start with ‘0‘.
- The second part (q1<=10, in the above program) is called condition. i.e., the above integer is permitted to go up-to the value of 10 or less than 10, which ever is correct for the given situation.
- The Third and the last part (q1++, in the above code, which may be written as q+1) is called iteration.i.e., the above integer value is asked to increase with a value of ‘+1‘ every time the loop is executed, till the condition is satisfied.
Well the above program has only one linked statement to the ‘for loop‘. But in larger and more sophisticated program the loop statement could be linked to more than one statement or say a block of codes.
Program 5: loopblock.java
class loopblock{
	public static void main(String args[]){
		int x, y=20;
		for(x=0;x<20;x=x+2)
		{
		System.out.println("x is: "+x);
		System.out.println("y is: "+y);
		y=y-2;
}
}
}
Save it as: loopblock.java. And Compile it and run as shown.
# javac loopblock.java
# java loopblock
Sample Output
x is: 0
y is: 20
x is: 2
y is: 18
x is: 4
y is: 16
x is: 6
y is: 14
x is: 8
y is: 12
x is: 10
y is: 10
x is: 12
y is: 8
x is: 14
y is: 6
x is: 16
y is: 4
x is: 18
y is: 2
Note: The above program is almost the same as the previous program, except it uses a block of codes linked with for loop. To execute more than one statement/block, we need to put all the statement as “{….codes/block..}” else the code won’t compile correctly.
Yeah we can use ‘x- –‘ or ‘x-1‘ for decrease statement in for loop where required.
After getting a glimpse of whole lot of codes, we need to know a little theory which will be helpful in the later stage of coding’s.
What we have seen till now is: Java programs are a collection of Whitespaces, identifiers, comments, literals, operators, separators and keywords.
Whitespace
Java is a free form language, you need not follow any indentation rule. You could write all the codes on a single line with one whitespace between each token and it will execute correctly. However it will be difficult to understand.
Identifiers
In Java identifiers are class name, method name or variable name. It could be uppercase, lowercase, their sequence or a combination of all of these with special characters like ‘$‘. However identifiers should never start with a numerical values.
Examples of valid identifiers in Java:
s4, New#class, TECmint_class, etc.
Literals
A constant value in Java is created using literals. e.g., ‘115′ is an integer literal. ‘3.14‘ is a float literal, ‘X‘ is a character constant and “tecmint is the best online site dedicated to foss technology” is a string literal.
Comment
comment has nothing to do with the execution of codes in Java or any other language, however comment in between the codes make them readable and human understandable. It is a good practice to write comments in between the lines of code, where required.
In Java anything between /** and **/ is meant for documentation and is a comment.
Certain separators are defined in Java.
- Parenthesis ()
- Braces {}
- Brackets []
- Semicolon ;
- comma ,
- Period .
Note: Each separator has a meaning and needs to be used where required, You can’t use one in place of other. We will discuss them in details, in the later phase of codes itself.
Keywords
There are 50 reserved keywords defined in Java. These keywords can not be used as names for a variable, class or method as these keywords has predefined meaning.
abstract	continue	for	          new	        switch
assert	        default	        goto	          package	synchronized
boolean	        do	        if	          private	this
break   	double	        implements	  protected	throw
byte	        else	        import	          public	throws
case	        enum	        instanceof	  return	transient
catch	        extends	        int	          short	        try
char	        final	        interface	  static	void
class	        finally	        long	          strictfp	volatile
const	        float	        native	          super	        while
The keyword cons and keywords are reserved but not used. Feeling nervous with all these stuffs. You actually don’t need to be nervous, neither you need to memorise all these stuffs. You will be used to all these when you start living Java.
That’s all for now from me.
Source