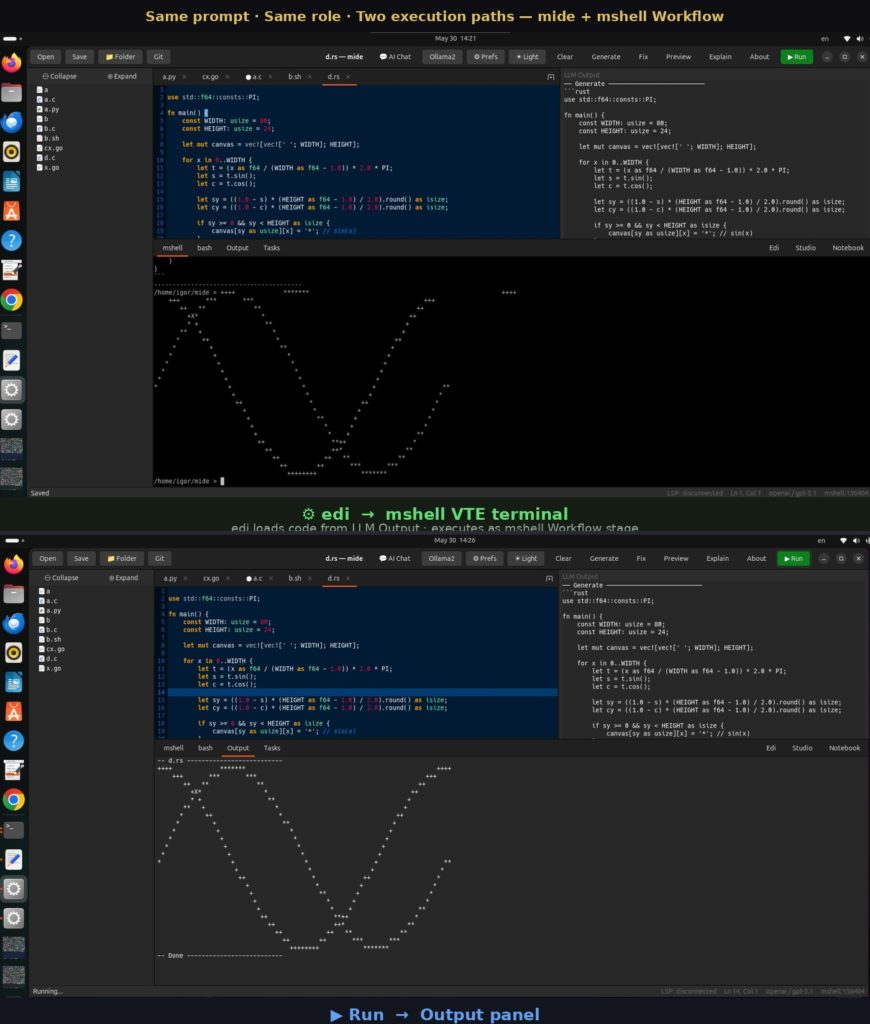
mide + mshell Workflow Role = Accidental Superpower Here’s a fun side effect of how mide and mshell Workflow roles work together. When you load mshell_expert.role as a system prompt in AI Chat, the LLM is instructed to wrap every piece of code in fenced code blocks — exactly the mshell Workflow pipeline format. So when you ask it to “write Rust code that draws sine and cosine in ASCII”, it does two things at once without being asked: Puts the Rust source into the editor via Generate Puts the same code as a workflow block into LLM Output — ready to run in edi Now you have two independent execution paths from a single prompt: ▶ Run button → mide compiles and runs the Rust file → result appears in the Output panel ⚙ edi button → loads the code from LLM Output → executes it as a mshell Workflow stage → result appears in the mshell VTE terminal Same code. Same sine wave. Two completely different runtimes — both work perfectly. This isn’t a bug. The role does exactly what it’s told. The LLM just happens to speak fluent mshell Workflow by default when the role is loaded — and mide is ready to run whatever comes out, in whatever way you prefer. Moral of the story: write your roles right, and the pipeline takes care of itself. 🎯
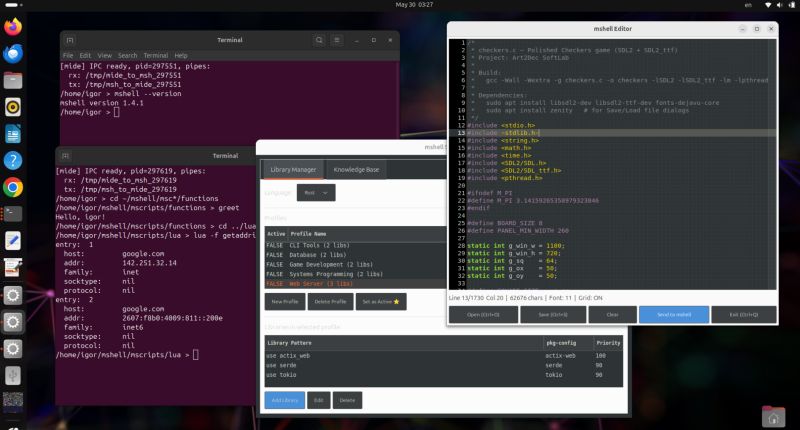
🛠️ Meet MIDE — the primary development workstation for the mshell Ecosystem that brings together a polyglot editor, AI assistance, simultaneous LLM models, and the full mshell toolchain.
✏️ Editor & Built-in Tools: ✅ Multi-tab GtkSourceView editor — C, C++, Go, Rust, Python, Lua, Bash, mshell ✅ Syntax highlighting, line numbers — dark and light themes switchable on the fly ✅ LSP integration — code completion, go-to-definition, live diagnostics ✅ Language profiles (.prf) — compiler flags, libraries, pkg-config packages per project ✅ Run modes: Auto / Makefile / Custom command per language ✅ MD/TXT Preview panel ✅ File tree — project navigation with Collapse/Expand All ✅ Search in files — full project text search ✅ Two embedded terminals: mshell and bash — always available side by side ✅ Output and Tasks panels — script results and running jobs, alongside mshell and bash terminals ✅ mshell connected via IPC — inline LLM commands, urlcache, eval math, pythonexec, and direct launch of mshell built-in GUI applications (Studio, Notebook, edi) without leaving mide
🤖 AI: ✅ Explain / Fix / Generate — inline LLM actions on editor code, result inserted directly ✅ 💬 AI Chat — separate chat window: free-form conversation, role loading (.role), prompt templates (.prm), context management ✅ Chat → editor: insert code block, run as script, send to edi as .md workflow — one click ✅ 🎨 Image generation via prompt, profile-based (size, quality, count) ✅ Image analysis ✅ LLM provider cycling: OllamaN — hundreds of Ollama models (local & cloud), Claude, OpenAI, Gemini
📄 mshell Workflow: ✅ Workflows are plain Markdown (.md) files — human-readable and executable simultaneously, no separate build system ✅ Each fenced code block is a pipeline stage — any of 8 languages compiled and run automatically, data flows via named variables between stages ✅ LLM directives inline — up to 3 models as pipeline stages, async parallel execution with await barriers ✅ Full control flow: WHILE, FOREACH, LOOP, TRY/CATCH, SPLIT/MERGE, IF/routing ✅ AI Chat generates workflows directly ✅ Specialized LLM roles: mshell expert (scripts + workflows), mshell workflow expert (polyglot pipelines), matplotlib expert (data visualization workflows) — loaded on demand from .role files ✅ Generative → Materialized: LLM-driven workflows convert to deterministic, LLM-free production artifacts ✅ Ideal for AI agents — the Intelligent Email Agent for IMAP/POP3 servers is built on mide and mshell Workflow
🔧 mshell Ecosystem Integration: ✅ ⚙ edi — mshell Workflow editor ✅ mshell Studio — Library Manager and Knowledge Base/Validator ✅ mshell Notebook
📁 Git Integration: ✅ ⚡ Force Sync → GitHub in one click ✅ AI-generated README.md
🐚 Meet MSHELL — a next-generation Unix shell for AI-assisted development and mathematics by Art2Dec SoftLab. A single C binary that replaces bash as your login shell — adding native LLM integration, polyglot code execution, and a complete Workflow engine without sacrificing standard shell compatibility.
⚡ Shell & Scripting: ✅ Bash compatibility — pipes, redirections, standard Unix commands work as-is ✅ Native .ms scripts (#!/bin/mshell) — variables, IF/FOR/WHILE/FUNC, full control flow with AST-based parser ✅ Embedded Lua engine — inline math: arithmetic, trigonometry, statistics, calculus, matrix and vector operations, all via eval ✅ pythonexec — execute Python code inline, one-liners or multi-statement ✅ Native execution of C, C++, Go, Rust, Python, Lua, Bash — compiled and run on demand
🤖 AI Integration — Different AI Models Simultaneously: ✅ ollamaN — chat mode: conversational LLM with 200 message pairs persistent context per model ✅ ollamaNexec — exec mode: generate and automatically execute code, bash scripts, Python — no manual steps ✅ -url= / url= option — fetch any web page and pass to LLM in one command ✅ PDF, DOCX, XLSX, DjVu — auto-extracted and included in LLM context when referenced by filename ✅ urlcache — 50-slot web page cache: load, view, refresh, merge slots for multi-source analysis ✅ Pipe mode (-p) — chain LLM output into standard Unix pipes ✅ Image analysis — image=path.png sends image directly to multimodal LLM ✅ Vendors: Ollama (hundreds of local & cloud models), Claude, OpenAI, Gemini
📊 Visualization — Live GUI from CLI: ✅ ollamaNexec commands generate and runs matplotlib, plotly, seaborn and other frameworks code on the fly — chart opens as real GUI window instantly
📄 mshell Workflow: ✅ Plain Markdown (.md) files as executable polyglot pipelines — documentation and code in one file ✅ 8 languages per pipeline — bash, python, c, cpp, rust, go, lua, mshell — each block auto compiled and run ✅ Inter-language variable system (Interlang) — named variables flow between any language blocks via MSH_VAR_* files ✅ LLM directives inline (<!–@1–>) — up to 3 models as pipeline stages, async parallel execution ✅ Full control flow: WHILE, FOREACH, LOOP, TRY/CATCH, SPLIT/MERGE, IF/routing ✅ Generative → Materialized: LLM-driven workflows captured into deterministic, LLM-free production artifacts 🔧 Built-in GUI Apps: ✅ edi — visual Workflow and languages editor ✅ mshell Studio — Library Manager (per-language compilation profiles) + Knowledge Base/Validator (error pattern learning, auto-fix)
🖥️ Platform: Linux x86_64 · ARM64 — Ubuntu 22.04/24.04 LTS, Debian 12/13, Raspberry Pi 4/5 ⚙️ Tech stack: C · embedded Lua · GCC/G++/rustc/go/python3
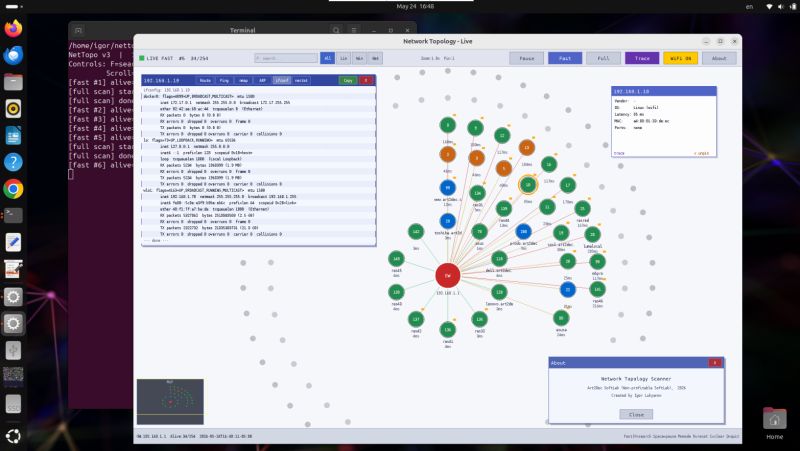
🔍 Ever wanted to see your entire network — live — in one glance?
Meet **nettopo3** — a real-time Network Topology Scanner built from scratch at Art2Dec SoftLab using Go, C/SDL2, and Bash. No web server. No database. No agents on target hosts. Just run it and watch your network come alive.
🖧 **What it does:** ✅ Scans one or more subnets continuously — full /24 in under 15 seconds ✅ Visualizes all hosts as an interactive live graph — color-coded by OS and latency ✅ Detects Linux, Windows, macOS, Network Devices automatically via TTL + vendor ✅ Wi-Fi vs wired detection — via ping jitter analysis (no extra infrastructure needed) ✅ Latency rings — hosts arranged by response time around the gateway ✅ Pinned host panels — vendor, MAC, open ports, SSH banner, HTTP title, NetBIOS, SNMP ✅ Live diagnostic windows — Route, Ping, nmap, ARP, ifconf, netstat — up to 8 simultaneously ✅ Multi-subnet support — multiple CIDRs in one topology view ✅ Copy-to-clipboard output for tickets and documentation
⚙️ **Tech stack:** 🔹 **Go** — concurrent scanner (50 goroutines, fast + full-detail loops) 🔹 **C / SDL2** — hardware-accelerated live graph at 60 fps 🔹 **Bash** — launcher script
Built using the **mshell Workflow** platform — an innovative multi-language pipeline environment from Art2Dec SoftLab that orchestrates Go, C, Python, Bash and more in a single visual workflow.
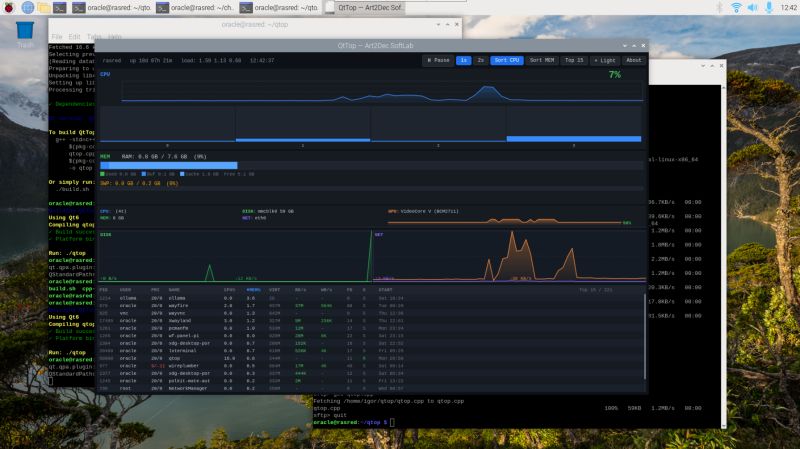
🖥️ Open-source system performance monitor in C++/Qt6 — real-time, cross-platform, dark & light themes! Built from scratch as part of the Art2Dec SoftLab open-source initiative. Runs natively on Linux x86_64 and ARM64 (Raspberry Pi 4/5). ✅ CPU monitoring — per-core histogram bars + 60-second history oscilloscope with gradient fill ✅ Memory — color-coded RAM bar (Used / Buffers / Cache / Free) + Swap, live GB stats ✅ GPU auto-detection:
NVIDIA — via nvidia-smi AMD — via sysfs gpu_busy_percent Intel — via gt_cur_freq_mhz Raspberry Pi VideoCore — via vcgencmd
✅ Raspberry Pi specific: SD card / eMMC flash storage monitoring — used & free space, read/write speeds, VideoCore GPU load graph via vcgencmd — works out of the box on Pi 4/5 ✅ Disk & Network — dual oscilloscopes with gradient fill, read/write and rx/tx speeds ✅ Hardware info bar — CPU model, RAM size, Disk, Network interface, GPU model — detected once at startup ✅ Full process table with scroll and click-to-sort on any column: PID · USER · PRI/NI · NAME · CPU% · MEM% · VIRT · RD/s · WR/s · FD · S · START ✅ Top 15 / All processes toggle ✅ Dark / Light theme — switch on the fly ✅ Pause, 1s/2s refresh rate ✅ Single C++ source file, no external dependencies beyond Qt6 Pre-built binaries for Linux x86_64 and ARM64 (Raspberry Pi) included. MIT License — free to use, modify, and distribute. 🔗 GitHub: https://github.com/igor101964/qttop
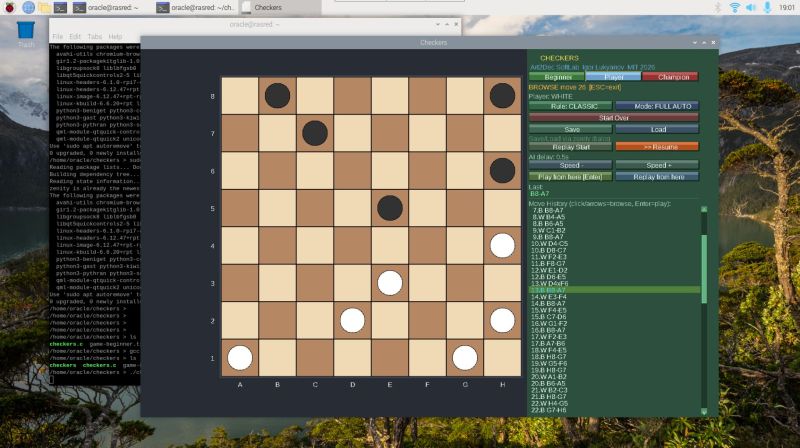
🎮 Open-source Checkers game in C/SDL2 — now with International rules and macOS support!
Built from scratch as part of the Art2Dec SoftLab open-source initiative. Runs natively on Linux x86_64, ARM64 (Raspberry Pi) and macOS Sequoia (Intel x86_64).
✅ Two complete rule sets: • Russian Checkers — traditional rules, men capture forward only • International Checkers — men capture in all directions, flying kings move any distance diagonally, kings land anywhere beyond the captured piece. Rich multi-jump combinations!
✅ 3 play modes: • Manual — full control, both sides • Semi-Auto — you play White, computer plays Black • Full-Auto — computer vs computer (demo / analysis)
✅ 3 AI difficulty levels: • Beginner — random moves • Player — Minimax algorithm (depth 2) • Champion — Minimax + Alpha-Beta pruning (depth 4)
✅ Mandatory capture highlighted with blinking red border ✅ Full game replay & position analysis ✅ Browse any position in move history ✅ Save/Load games with full board snapshots ✅ Resizable SDL2 window, single C source file per version
Pre-built binaries for Linux x86_64, ARM64 and macOS Intel included. Apple Silicon (M1/M2/M3/M4) — you are welcome to build it, same source compiles natively! MIT License — free to use, modify, and distribute.
We are pleased to announce version 1.2 of the Intelligent Email Agent — the most complete autonomous email management system for IMAP/POP3 mail servers available today. Built on the mshell Ecosystem, it combines a native GTK3 GUI with a Go IMAP/POP3 client and a dual-LLM pipeline for classification, draft generation, and autonomous sending. The system is model-agnostic and works with Claude, GPT, and open-source models.
New in Version 1.2: a) Bulk Contact Management Checkbox selection in both the main contact list and Archive Browser, Shift+Click range selection for fast multi-contact operations, Bulk Archive, Restore and Restore Bulk operations, permanent deletion with single confirmation. b) Remove Completely c) Permanent deletion of archived contacts with full audit trail d) Full Text Search Deep search across all threads and attachments: PDF, DOCX, XLSX, PPTX, TXT, MD, HTML, TEX Scoped separately for active contacts and archive Extension search: by names or type .pdf, .doc/.docx, .md, .txt, .jpg, .jpeg, .mp4, .mpg, .mpeg and others to find all files of that type and searching content at non-binary files. Double-click result opens thread or file at the exact match location. Intelligent Email Agent v1.2 · May 2026 · Art2Dec SoftLab (non-profit softlab)
What is Materialization at mshell Workflow? Materialization is the process of converting a generative workflow into a deterministic, LLM-free version. When you run a generative .md file with MSHELL_MATERIALIZE=1, mshell creates a _materialized.md file alongside it. The materialized file contains the actual code generated by the LLMs during that run — with all LLM directives replaced by the concrete code they produced. Running the materialized file executes the same logic every time, without any LLM calls.