Go (also referred to as GoLang) is an open source and lower level programming language designed to enable users to easily write simple, reliable, and highly efficient computer programs.
Developed in 2007 at Google by a team of programmers – Robert Griesemer, Rob Pike, and Ken Thompson, it is a compiled, statically typed language same as other system languages such as C, C++, Java and many more.
GoLang is highly productive, and readable with support for networking and multiprocessing and it is scalable in extensive systems as well. Below is a list of a few well known open source projects developed using GoLang:
- Docker
- Kubernetes
- Lime
- InfluxDB
- Gogs (Go Git Service) among others.
Install GoLang in Linux Systems
1. Go to https://golang.org/dl/ and download the latest version (i.e 1.7.3) of GoLang in an archive file as follows:
$ cd ~/Downloads
$ wget -c https://storage.googleapis.com/golang/go1.7.3.linux-amd64.tar.gz
2. Next, check the integrity of the tarball by verifying the SHA256 checksum of the archive file using the shasum command as below, where the flag -a is used to specify the algorithm to be used:
$ shasum -a 256 go1.7.3.linux-amd64.tar.gz

ead40e884ad4d6512bcf7b3c7420dd7fa4a96140  go1.7.3.linux-amd64.tar.gz
Important: To show that the contents of the downloaded archive file are the exact copy provided on the GoLang website, the 256-bit hash value generated from the command above as seen in the output should be the same as that provided along with the download link.
If that is the case, proceed to the next step, otherwise download a new tarball and run the check again.
3. Then extract the tar archive files into /usr/local directory using the command below.
$ sudo tar -C /usr/local -xvzf go1.7.3.linux-amd64.tar.gz
Where, -C specifies the destination directory..
Configuring GoLang Environment in Linux
4. First, setup your Go workspace by creating a directory ~/go_projects which is the root of your workspace. The workspace is made of three directories namely:
binwhich will contain Go executable binaries.srcwhich will store your source files andpkgwhich will store package objects.
Therefore create the above directory tree as follows:
$ mkdir -p ~/go_projects/{bin,src,pkg}
$ cd ~/go_projects
$ ls
5. Now it’s time to execute Go like the rest of Linux programs without specifying its absolute path, its installation directory must be stored as one of the values of $PATH environment variable.
Now, add /usr/local/go/bin to the PATH environment variable by inserting the line below in your /etc/profile file for a system-wide installation or $HOME/.profile or $HOME./bash_profile for user specific installation:
Using your preferred editor, open the appropriate user profile file as per your distribution and add the line below, save the file and exit:
export PATH=$PATH:/usr/local/go/bin
6. Then, set the values of GOPATH and GOBIN Go environment variables in your user profile file (~/.profile or ~/bash_profile) to point to your workspace directory.
export GOPATH="$HOME/go_projects"
export GOBIN="$GOPATH/bin"
Note: If you installed GoLang in a custom directory other than the default (/usr/local/), you must specify that directory as the value of GOROOT variable.
For instance, if you have installed GoLang in home directory, add the lines below to your $HOME/.profile or $HOME/.bash_profile file.
export GOROOT=$HOME/go
export PATH=$PATH:$GOROOT/bin
7. The final step under this section is to effect the changes made to the user profile in the current bash session like so:
$ source ~/.bash_profile
OR
$ source ~/.profile
Verify GoLang Installation
8. Run the commands below to view your Go version and environment:
$ go version
$ go env
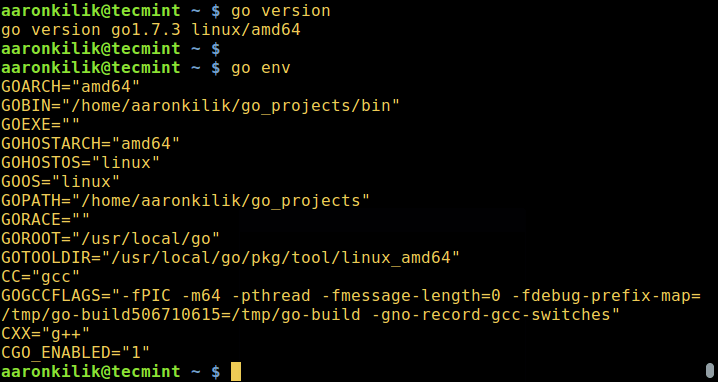
Check GoLang Version and Environment
Type the following command to display usage information for Go tool, which manages Go source code:
$ go help
9. To test your if your Go installation is working correctly, write a small Go hello world program, save the file in ~/go_projects/src/hello/ directory. All your GoLang source files must end with the .go extension.
Begin by creating the hello project directory under ~/go_projects/src/:
$ mkdir -p ~/go_projects/src/hello
Then use your favorite editor to create the hello.go file:
$ vi ~/go_projects/src/hello/hello.go
Add the lines below in the file, save it and exit:
package main

import "fmt"

func main() {
    fmt.Printf("Hello, you have successfully installed GoLang in Linux\n")
}
10. Now, compile the program above as using go install and run it:
$ go install $GOPATH/src/hello/hello.go
$ $GOBIN/hello

First GoLang Program
If you see the output showing you the message in the program file, then your installation is working correctly.
11. To run your Go binary executables like other Linux commands, add $GOBIN to your $PATH environment variable.
Reference Links: https://golang.org/
That’s it! You can now go on and learn GoLang for writing simple, reliable, and highly efficient computer programs. Are you already make use of GoLang?
Share your experience with us and many other Linux users out there via the comment section below or imaginably, you can ask a question in relation to this guide or GoLang.