fswatch is a cross-platform, file change monitor that gets notification alerts when the contents of the specified files or directories are altered or modified.
It executes four types of monitors on different operating systems such as:
- A monitor build on the File System Events API of Apple OS X.
- A monitor based on kqueue, a notification interface present in FreeBSD 4.1 also supported on many *BSD systems, OS X inclusive.
- A monitor based on File Events Notification API of the Solaris kernel plus its spin-offs.
- A monitor based on inotify, a kernel subsystem that shows file system modifications to apps.
- A monitor based on ReadDirectoryChangesW, a Windows API that records alters to a directory.
- A monitor that regularly check that status of file system, keeps file modification times in memory, and manually determine file system changes (which works anywhere, where stat can be used).
Features of fswatch
- Supports several OS-specific APIs
- Allows recursive directory monitoring
- Performs path filtering using including and excluding regular expressions
- Supports customizable record format
- Additionally, it supports periodic idle events
How To Install fswatch in Linux Systems
Unfortunately, fswatch package is not available to install from the default system repositories in any Linux distributions. The only way to install the latest version of fswatch is to build from source tarball as show in the following installation instructions.
First grab the latest fswatch tarball using following wget command and install it as shown:
$ wget https://github.com/emcrisostomo/fswatch/releases/download/1.9.3/fswatch-1.9.3.tar.gz
$ tar -xvzf fswatch-1.9.3.tar.gz
$ cd fswatch-1.9.3
$ ./configure
$ make
$ sudo make install
Important: Make sure you’ve GNU GCC (C and C++ Compiler) and Development Tools (build-essential on Debian/Ubuntu) installed on the system, before you compile fswatch from source. If not, install it using following command on your respective Linux distributions..
# yum group install 'Development Tools'		[On CentOS/RHEL]
# dnf group install 'Development Tools'		[On Fedora 22+ Versions]
$ sudo apt-get install build-essential          [On Debian/Ubuntu Versions]
On Debian/Ubuntu distributions, you might get following error while executing fswatch command..
fswatch: error while loading shared libraries: libfswatch.so.6: cannot open shared object file: No such file or directory
To fix it, you need to execute the command below, this will help refresh the links and cache to the dynamic libraries before you can start using fswatch.
$ sudo ldconfig
How do I use fswatch on Linux?
The general syntax for running fswatch is:
$ fswatch [option] [path]
On Linux, it is recommended that you use the default inotify monitor, you can list available monitors by employing the -M or - list-monitors option:
$ fswatch -M
$ fswatch --list-monitors
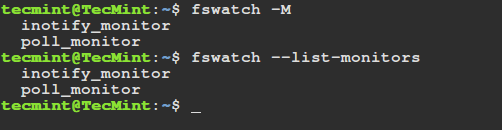
fswatch – List Monitors
The command below enables you to watch the changes in the current directory (/home/tecmint), with events being delivered to standard output every 4 seconds.
The -l or –-latency option allows you to set the latency in seconds, the default being 1 second.
$ fswatch -l 4 .

The next command monitors changes to the /var/log/auth.log file every 5 seconds:
$ fswatch -l 5 /var/log/auth.log
Using -t or --timestamp option prints the time stamp for every event, to print the time in UTC format, employ -u or --utf-time option. You can as well format time using -f or --format-time format option:
$ fswatch --timestamp /var/log/auth.log
Next, -x or --event-flags tells fswatch to print the event flags along side the event path. You can use –event-field-seperator option to print events using the particular separator.
$ fswatch --events-flags ~ /var/log/auth.log
To print the numeric value of an event indicating changes in your home directory and /var/log/auth.log file, use -n or --numeric option as below:
$ fswatch --numeric ~ /var/log/auth.log
Perhaps you can look through the fswatch man page for detailed usage options and information:
$ man fswatch
For more information and usage, visit fswatch Github repository: https://github.com/emcrisostomo/fswatch
In this post, we covered a simple command line utility to help Linux users get notified when the contents of specified files or directory hierarchies are modified.
I hope all went well with the installation, if that is not the case for you, make an effort to reach us via the feedback form below. In addition, in case you have used it before, you may want to offer us some thoughts about your experience with fswatch.