In this article we will show how to create a database (also known as a schema), tables (with data types), and explain how to perform Data Manipulation Language (DML) operations with data on a MySQL / MariaDB server.
It is assumed that you have previously 1) installed the necessary packages on your Linux system, and 2)executed mysql_secure_installation to improve the database server’s security. If not, follow below guides to install MySQL/MariaDB server.
- Install Latest MySQL Database in Linux Systems
- Install Latest MariaDB Database in Linux Systems
For brevity, we will refer to MariaDB exclusively throughout this article, but the concepts and commands outlined here apply to MySQL as well.
Part 1: Learn MySQL / MariaDB for Beginners
Creating Databases, Tables, and Authorized Users
As you know, a database can be defined in simple terms as an organized collection of information. Particularly, MariaDB is a relational database management system (RDBMS) and uses the Structure Query Language to perform operations on databases. Additionally, keep in mind that MariaDB uses the terms database and schema interchangeably.
To store persistent information in a database, we will use tables that store rows of data. Often, two or more tables will be related to each other in some way. That is part of the organization that characterizes the use of relational databases.
Creating a New Database
To create a new database named BooksDB, enter the MariaDB prompt with the following command (you’ll be prompted to enter the password for the root MariaDB user):
[root@TecMint ~]# mysql -u root -p
Enter password:
Welcome to the MariaDB monitor.  Commands end with ; or \g.
Your MariaDB connection id is 2
Server version: 10.1.14-MariaDB MariaDB Server

Copyright (c) 2000, 2016, Oracle, MariaDB Corporation Ab and others.

Type 'help;' or '\h' for help. Type '\c' to clear the current input statement.

MariaDB [(none)]> CREATE DATABASE BookstoreDB;
Query OK, 1 row affected (0.00 sec)

MariaDB [(none)]>
Once the database has been created, we need to create at least two tables on it. But first let’s explore the concept of data types.
Introducing MariaDB data Types
As we explained earlier, tables are database objects where we will keep persistent information. Each table consists of two or more fields (also known as columns) of a given data type (the type of information) that such field can store.
The most common data types in MariaDB are the following (you can consult the complete list in the official MariaDB online documentation):
Numeric:
- BOOLEAN considers 0 as false and any other values as true.
- TINYINT, if used with SIGNED, covers the range from -128 to 127, whereas the UNSIGNED range is 0 to 255.
- SMALLINT, if used with SIGNED, covers the range from -32768 to 32767. The UNSIGNED range is 0 to 65535.
- INT, if used with UNSIGNED, covers the range from 0 to 4294967295, and -2147483648 to 2147483647 otherwise.
Note: In TINYINT, SMALLINT, and INT, the default SIGNED is assumed.
DOUBLE(M, D), where M is the total number of digits and D is the number of digits after the decimal point, represents a double-precision floating-point number. If UNSIGNED is specified, negative values are not be allowed.
String:
- VARCHAR(M) represents a string of variable length where M is the maximum allowed column length in bytes (65,535 in theory). In most cases, the number of bytes is identical to the number of characters, except for some characters that can take up as much as 3 bytes. For example, the Spanish letter ñ represents one character but takes up 2 bytes.
- TEXT(M) represents a column with a maximum length of 65,535 characters. However, as it happens with VARCHAR(M), the actual maximum length is reduced if multi-byte characters are stored. If M is specified, the column is created as the smallest type that can store such number of characters.
- MEDIUMTEXT(M) and LONGTEXT(M) are similar to TEXT(M), only that the maximum allowed lengths are 16,777,215 and 4,294,967,295 characters, respectively.
Date and Time:
- DATE represents the date in YYYY-MM-DD format.
- TIME represents the time in HH:MM:SS.sss format (hour, minutes, seconds, and milliseconds).
- DATETIME is the combination of DATE and TIME in YYYY-MM-DD HH:MM:SS format.
- TIMESTAMP is used to define the moment a row was added or updated.
After having reviewed these data types, you will be in a better position to determine which data type you need to assign to a given column in a table.
For example, a person’s name can easily fit into a VARCHAR(50), whereas a blog post will need a TEXT type (choose M as per your specific needs).
Creating Tables with Primary and Foreign Keys
Before we dive into creating tables, there are two fundamental concepts about relational databases that we need to review: primary and foreign keys.
A primary key contains a value that uniquely identifies each row, or record, in the table. On the other hand, a foreign key is used to create a link between the data in two tables, and to control the data that can be stored in the table where the foreign key is located. Both primary and foreign keys are generally INTs.
To illustrate, let’s use the BookstoreDB and create two tables named AuthorsTBL and BooksTBL as follows. The NOT NULL constraint indicates that the associated field requires a value other than NULL.
Also, AUTO_INCREMENT is used to increase by one the value of INT primary key columns when a new record is inserted into the table.
MariaDB [(none)]> USE BookstoreDB;

MariaDB [(none)]> CREATE TABLE AuthorsTBL (
AuthorID INT NOT NULL AUTO_INCREMENT,
AuthorName VARCHAR(100),
PRIMARY KEY(AuthorID)
);

MariaDB [(none)]> CREATE TABLE BooksTBL (
BookID INT NOT NULL AUTO_INCREMENT,
BookName VARCHAR(100) NOT NULL,
AuthorID INT NOT NULL,
BookPrice DECIMAL(6,2) NOT NULL,
BookLastUpdated TIMESTAMP,
BookIsAvailable BOOLEAN,
PRIMARY KEY(BookID),
FOREIGN KEY (AuthorID) REFERENCES AuthorsTBL(AuthorID)
);
Create MySQL Tables with Primary and Foreign Key
MariaDB [(none)]> USE BookstoreDB;
Database changed
MariaDB [BookstoreDB]> CREATE TABLE AuthorsTBL (
    -> AuthorID INT NOT NULL AUTO_INCREMENT,
    -> AuthorName VARCHAR(100),
    -> PRIMARY KEY(AuthorID)
    -> );
Query OK, 0 rows affected (0.05 sec)

MariaDB [BookstoreDB]> CREATE TABLE BooksTBL (
    -> BookID INT NOT NULL AUTO_INCREMENT,
    -> BookName VARCHAR(100) NOT NULL,
    -> AuthorID INT NOT NULL,
    -> BookPrice DECIMAL(6,2) NOT NULL,
    -> BookLastUpdated TIMESTAMP,
    -> BookIsAvailable BOOLEAN,
    -> PRIMARY KEY(BookID),
    -> FOREIGN KEY (AuthorID) REFERENCES AuthorsTBL(AuthorID)
    -> );
Query OK, 0 rows affected (0.05 sec)

MariaDB [BookstoreDB]>
Now we can go ahead and start inserting records into AuthorsTBL and BooksTBL.
Selecting, Inserting, Updating, and Deleting Rows
We will first populate the AuthorsTBL table. Why? Because we need to have values for AuthorID before inserting records into the BooksTBL.
Execute the following query from your MariaDB prompt:
MariaDB [BookstoreDB]> INSERT INTO AuthorsTBL (AuthorName) VALUES ('Agatha Christie'), ('Stephen King'), ('Paulo Coelho');
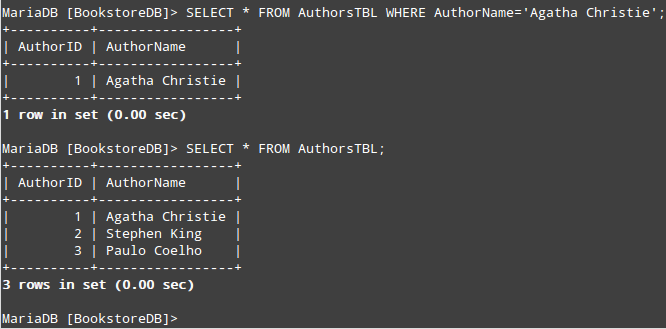
After that, we will select all records from AuthorsTBL. Remember we will need the AuthorID for each record to create the INSERT query for BooksTBL.
If you want to retrieve one record at a time, you can use a WHERE clause to indicate a condition that a row must meet to be returned. For example,
MariaDB [BookstoreDB]> SELECT * FROM AuthorsTBL WHERE AuthorName='Agatha Christie';
Alternatively, you can select all the records simultaneously:
MariaDB [BookstoreDB]> SELECT * FROM AuthorsTBL;
Select and Query Record in MySQL
MariaDB [BookstoreDB]> SELECT * FROM AuthorsTBL WHERE AuthorName='Agatha Christie';
+----------+-----------------+
| AuthorID | AuthorName      |
+----------+-----------------+
|        1 | Agatha Christie |
+----------+-----------------+
1 row in set (0.00 sec)

MariaDB [BookstoreDB]> SELECT * FROM AuthorsTBL;
+----------+-----------------+
| AuthorID | AuthorName      |
+----------+-----------------+
|        1 | Agatha Christie |
|        2 | Stephen King    |
|        3 | Paulo Coelho    |
+----------+-----------------+
3 rows in set (0.00 sec)

MariaDB [BookstoreDB]>
Select and Query a String in MySQL Database
Now let’s create the INSERT query for BooksTBL, using the corresponding AuthorID to match the author of each book. A value of 1 in BookIsAvailable indicates the book is in stock, 0 otherwise:
MariaDB [BookstoreDB]> INSERT INTO BooksTBL (BookName, AuthorID, BookPrice, BookIsAvailable)
VALUES ('And Then There Were None', 1, 14.95, 1),
('The Man in the Brown Suit', 1, 23.99, 1),
('The Stand', 2, 35.99, 1),
('Pet Sematary', 2, 17.95, 0),
('The Green Mile', 2, 29.99, 1),
('The Alchemist', 3, 25, 1),
('By the River Piedra I Sat Down and Wept', 3, 18.95, 0);
Insert Query in MySQL Table
MariaDB [BookstoreDB]> INSERT INTO BooksTBL (BookName, AuthorID, BookPrice, BookIsAvailable)
    -> VALUES ('And Then There Were None', 1, 14.95, 1),
    -> ('The Man in the Brown Suit', 1, 23.99, 1),
    -> ('The Stand', 2, 35.99, 1),
    -> ('Pet Sematary', 2, 17.95, 0),
    -> ('The Green Mile', 2, 29.99, 1),
    -> ('The Alchemist', 3, 25, 1),
    -> ('By the River Piedra I Sat Down and Wept', 3, 18.95, 0);
Query OK, 7 rows affected (0.03 sec)
Records: 7  Duplicates: 0  Warnings: 0
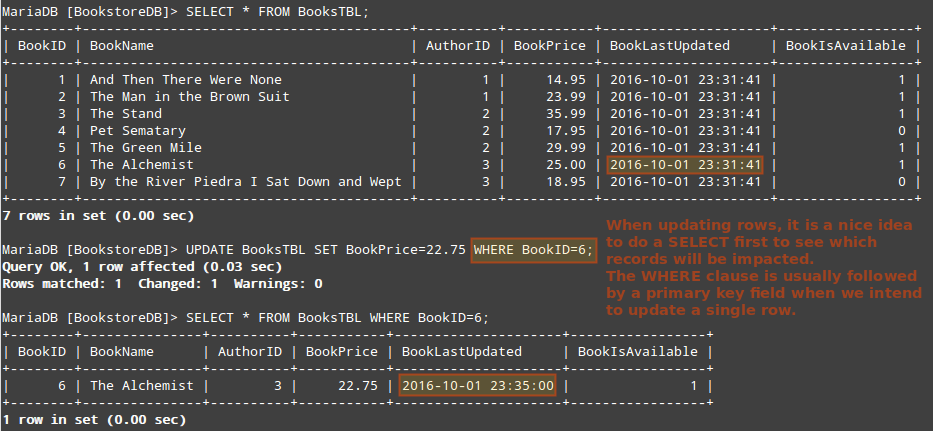
At this point we will do a SELECT to see the records in BooksTBL. Then let’s UPDATE the price of “The Alchemist” by Paulo Coelho and SELECT that specific record again.
Note how the BookLastUpdated field now shows a different value. As we explained earlier, a TIMESTAMP field shows the value when the record was inserted or last modified.
MariaDB [BookstoreDB]> SELECT * FROM BooksTBL;
MariaDB [BookstoreDB]> UPDATE BooksTBL SET BookPrice=22.75 WHERE BookID=6;
MariaDB [BookstoreDB]> SELECT * FROM BooksTBL WHERE BookID=6;
Insert Query and update Table in MySQL Database
MariaDB [BookstoreDB]> SELECT * FROM BooksTBL;
+--------+-----------------------------------------+----------+-----------+---------------------+-----------------+
| BookID | BookName                                | AuthorID | BookPrice | BookLastUpdated     | BookIsAvailable |
+--------+-----------------------------------------+----------+-----------+---------------------+-----------------+
|      1 | And Then There Were None                |        1 |     14.95 | 2016-10-01 23:31:41 |               1 |
|      2 | The Man in the Brown Suit               |        1 |     23.99 | 2016-10-01 23:31:41 |               1 |
|      3 | The Stand                               |        2 |     35.99 | 2016-10-01 23:31:41 |               1 |
|      4 | Pet Sematary                            |        2 |     17.95 | 2016-10-01 23:31:41 |               0 |
|      5 | The Green Mile                          |        2 |     29.99 | 2016-10-01 23:31:41 |               1 |
|      6 | The Alchemist                           |        3 |     25.00 | 2016-10-01 23:31:41 |               1 |
|      7 | By the River Piedra I Sat Down and Wept |        3 |     18.95 | 2016-10-01 23:31:41 |               0 |
+--------+-----------------------------------------+----------+-----------+---------------------+-----------------+
7 rows in set (0.00 sec)

MariaDB [BookstoreDB]> UPDATE BooksTBL SET BookPrice=22.75 WHERE BookID=6;
Query OK, 1 row affected (0.04 sec)
Rows matched: 1  Changed: 1  Warnings: 0

MariaDB [BookstoreDB]> SELECT * FROM BooksTBL WHERE BookID=6;
+--------+---------------+----------+-----------+---------------------+-----------------+
| BookID | BookName      | AuthorID | BookPrice | BookLastUpdated     | BookIsAvailable |
+--------+---------------+----------+-----------+---------------------+-----------------+
|      6 | The Alchemist |        3 |     22.75 | 2016-10-01 23:35:00 |               1 |
+--------+---------------+----------+-----------+---------------------+-----------------+
1 row in set (0.00 sec)

MariaDB [BookstoreDB]>
Insert and Update Database Table Record
Although we won’t do it here, you can also delete a record if not used anymore. For example, suppose we want to delete “The Alchemist” from BooksTBL.
To do so, we will use the DELETE statement as follows:
MariaDB [BookstoreDB]> DELETE FROM BooksTBL WHERE BookID=6;
As in the case of UPDATE, it is a good idea to do a SELECT first in order to view the record(s) that may potentially be impacted by the DELETE.
Also, don’t forget to add the WHERE clause and a condition (BookID=6) to select the specific record to be removed. Otherwise, you run the risk of deleting all the rows in the table!
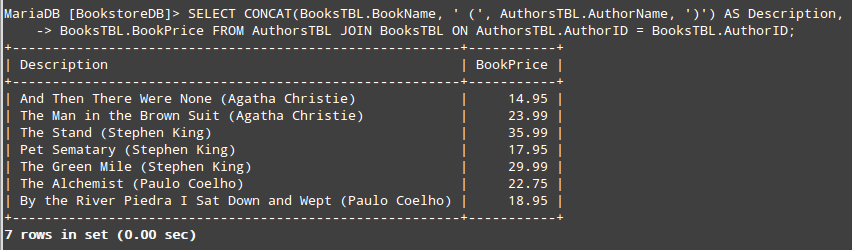
If you desire to concatenate two (or more) fields, you can use the CONCAT statement. For example, let’s say we want to return a result set that consist of one field with the book name and author in the form of “The Alchemist (Paulo Coelho)” and another column with the price.
This will require a JOIN between AuthorsTBL and BooksTBL on the common field shared by both tables (AuthorID):
MariaDB [BookstoreDB]> SELECT CONCAT(BooksTBL.BookName, ' (', AuthorsTBL.AuthorName, ')') AS Description, BooksTBL.BookPrice FROM AuthorsTBL JOIN BooksTBL ON AuthorsTBL.AuthorID = BooksTBL.AuthorID;
As we can see, CONCAT allows us to join multiple string expressions separated by commas. You’ll also noticed that we chose the alias Description to represent the result set of the concatenation.
The output of the above query is shown in the below image:
Query Multiple Fields in MySQL Table
MariaDB [BookstoreDB]> SELECT CONCAT(BooksTBL.BookName, ' (', AuthorsTBL.AuthorName, ')') AS Description, BooksTBL.BookPrice FROM AuthorsTBL JOIN BooksTBL ON AuthorsTBL.AuthorID = BooksTBL.AuthorID;
+--------------------------------------------------------+-----------+
| Description                                            | BookPrice |
+--------------------------------------------------------+-----------+
| And Then There Were None (Agatha Christie)             |     14.95 |
| The Man in the Brown Suit (Agatha Christie)            |     23.99 |
| The Stand (Stephen King)                               |     35.99 |
| Pet Sematary (Stephen King)                            |     17.95 |
| The Green Mile (Stephen King)                          |     29.99 |
| The Alchemist (Paulo Coelho)                           |     25.00 |
| By the River Piedra I Sat Down and Wept (Paulo Coelho) |     18.95 |
+--------------------------------------------------------+-----------+
7 rows in set (0.00 sec)
Query Multiple Fields in Database Table
Create User to Access the BookstoreDB Database
Using root to perform all DML operations in a database is a bad idea. To avoid this, we can create a new MariaDB user account (we’ll name it bookstoreuser) and assign all necessary permissions for BookstoreDB:
MariaDB [BookstoreDB]> CREATE USER bookstoreuser@localhost IDENTIFIED BY 'YourPasswordHere';
MariaDB [BookstoreDB]> GRANT ALL PRIVILEGES ON  BookstoreDB.* to bookstoreuser@localhost;
MariaDB [BookstoreDB]> FLUSH PRIVILEGES;
Create New Database User with Privileges
MariaDB [BookstoreDB]> CREATE USER bookstoreuser@localhost IDENTIFIED BY 'tecmint';
Query OK, 0 rows affected (0.00 sec)

MariaDB [BookstoreDB]> GRANT ALL PRIVILEGES ON  BookstoreDB.* to bookstoreuser@localhost;
Query OK, 0 rows affected (0.00 sec)

MariaDB [BookstoreDB]> FLUSH PRIVILEGES;
Query OK, 0 rows affected (0.00 sec)
Having a dedicated, separate user for each database will prevent damages to the entire database should a single account become compromised.
Extra MySQL Tips
To clear up the MariaDB prompt, type the following command and press Enter:
MariaDB [BookstoreDB]> \! clear
To inspect the configuration of a given table, do:
MariaDB [BookstoreDB]> SELECT COLUMNS IN [TABLE NAME HERE ];
For example,
MariaDB [BookstoreDB]> SHOW COLUMNS IN BooksTBL;
List Columns in Database Table
MariaDB [BookstoreDB]> SHOW COLUMNS IN BooksTBL;
+-----------------+--------------+------+-----+-------------------+-----------------------------+
| Field           | Type         | Null | Key | Default           | Extra                       |
+-----------------+--------------+------+-----+-------------------+-----------------------------+
| BookID          | int(11)      | NO   | PRI | NULL              | auto_increment              |
| BookName        | varchar(100) | NO   |     | NULL              |                             |
| AuthorID        | int(11)      | NO   | MUL | NULL              |                             |
| BookPrice       | decimal(6,2) | NO   |     | NULL              |                             |
| BookLastUpdated | timestamp    | NO   |     | CURRENT_TIMESTAMP | on update CURRENT_TIMESTAMP |
| BookIsAvailable | tinyint(1)   | YES  |     | NULL              |                             |
+-----------------+--------------+------+-----+-------------------+-----------------------------+
6 rows in set (0.02 sec)

List Columns in Database Table
A quick inspection reveals that the BookIsAvailable field admits NULL values. Since we don’t want to allow that, we’ll ALTER the table as follows:
MariaDB [BookstoreDB]> ALTER TABLE BooksTBL MODIFY BookIsAvailable BOOLEAN NOT NULL;
(Feel free to show the columns again – the highlighted YES in the above image should now be a NO).
Finally, to view all the databases on your server, do:
MariaDB [BookstoreDB]> SHOW DATABASES;
OR
MariaDB [BookstoreDB]> SHOW SCHEMAS;
List All MySQL Databases
[root@TecMint ~]# mysql -u bookstoreuser -p
Enter password:
Welcome to the MariaDB monitor.  Commands end with ; or \g.
Your MariaDB connection id is 3
Server version: 10.1.14-MariaDB MariaDB Server

Copyright (c) 2000, 2016, Oracle, MariaDB Corporation Ab and others.

Type 'help;' or '\h' for help. Type '\c' to clear the current input statement.

MariaDB [BookstoreDB]> SHOW DATABASES;
+--------------------+
| Database           |
+--------------------+
| BookstoreDB        |
| information_schema |
+--------------------+
2 rows in set (0.00 sec)

MariaDB [BookstoreDB]> SHOW SCHEMAS;
+--------------------+
| Database           |
+--------------------+
| BookstoreDB        |
| information_schema |
+--------------------+
2 rows in set (0.00 sec)
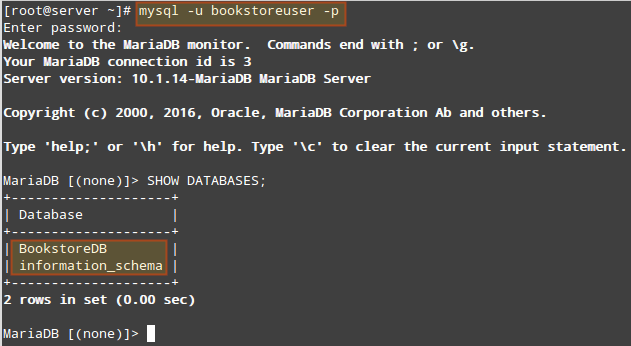
The following image shows the result of the above command after accessing the MariaDB prompt as the bookstoreuser (note how this account can’t “see” any databases other than BookstoreDB and information_schema (available for all users):
List All MySQL Databases
Summary
In this article we have explained how to run DML operations and how to create a database, tables, and dedicated users on a MariaDB database. Additionally, we shared a few tips that may make your life as a system / database administrator easier.
- MySQL Database Administration Part – 1
- MySQL Database Administration Part – 2
- MySQL Performance Tunning and Optimization – Part 3
If you have any questions about this article, don’t hesitate to let us know! Feel free to use the comment form below to reach us.
Source