Docker Environments for Collaboration | Introducing Projects

In last week’s 0.9 release we added support in Rancher for users to
create new deployment environments that can be shared with colleagues.
These docker environments are called projects, and are an extension of the
GitHub OAuth integration we added to Rancher last month. The focus of
projects is to allow teams to collaborate on Docker environments, and
since our user management is connected with GitHub today, we leverage
standard GitHub abstractions, such as users, teams and organizations, to
support Rancher Projects.

(If you haven’t read my earlier post on
GitHub OAuth on Rancher,
I would recommend you to read it as it provides an introduction to
Rancher authentication using GitHub.)

Projects demo

This demo will show you how to create projects on Rancher for various
levels of access control.

The project use case

One of the most obvious use cases for this new feature is to
control access to environments and resources within an organization.
For example, a common request from users is to have development teams
and production teams own their own environments and resources. With
projects, access to production environments can be shared among an
approved group, and restricted from unauthorized users. At the same
time, developers can have unfettered access to development environments,
and can collaborate on testing, confident it will not be accessed by
anyone else. Every project is a fully isolated environment for managing
resources and deploying containers. Anyone who has access to a project
can register new computing resources (virtual machines or physical
servers) and deploy containers, configure networking, and consume all of
the other capabilities of Rancher. Rancher supports three kinds of
projects

  1. User Projects
  2. Team projects
  3. Org projects

User projects

User projects allow resources to be orchestrated by an individual user.
They are meant to be used when a single user is the sole manager of the
resources. Users can create multiple projects for different environments
they are working on. One of the caveats of this type of project is
that, users can create “user-level” projects only for themselves.

Team projects

Team projects allow users to allocate resources and provide access to a
team of people. Team projects are ideal for collaborating with a
predefined GitHub group. In the use case above, an organization could
create separate team projects for the dev and operations teams.
Giving both teams the ability to access their own resources.

Org projects

Organization level projects allocate resources and provides access to
all members of the organization. For example, if you wanted to create a
resource called demo, that everyone in your organization could
orchestrate, this type of project would be the ideal choice. I hope this
project feature will be useful to you and your team. If you’d like to
get more information on using Rancher, or see it in action, please
don’t hesitate to schedule a demo.

###

Source

A Major Step Towards Making Docker a Distributed Application Platform

socketplane

Today Docker acquired SDN software maker SocketPlane. Congratulations to both
Docker and SocketPlane teams. We have worked closely with SocketPlane
team since the early Docker networking
discussions
and have a
great amount of respect for their technical abilities. We are also happy
to see Docker Inc. make a serious effort to bring SDN capabilities to
the Docker platform. Many customers have told us that the lack of
multi-host networking is one of the last remaining gaps that impede the
wide-spread production use of Docker containers. Today Docker containers
on multiple hosts cannot easily communicate with each other. Without
SDN, developers and operations teams have to resort to complicated port
mapping to get containers that are running on different hosts to talk to
each other. This dramatically complicates application deployment,
monitoring, upgrades, and service discovery.

At Rancher Labs, we are
developing two products: RancherOS and
Rancher. RancherOS is a
minimalist Linux distribution designed specifically for running Docker
containers. It enables the type of networking services developed by
SocketPlane to be packaged and distributed as system containers. Rancher
is a container orchestration platform for managing large production
deployments of Docker containers. Rancher requires a multi-host
networking layer to be deployed underneath. In fact, the need for
multi-host networking is such that we developed a simple yet functional
SDN solution in Rancher itself. We look forward to working with
SocketPlane team as they drive the Docker networking API design so that
Rancher can work with multiple SDN implementations in the future.

As a member of the Docker ecosystem, Rancher’s success depends on an
increasing number of organizations embracing containers. We believe
Docker can only succeed if it fulfills its promise of becoming a
distributed application platform. A standardized Docker networking layer
is an important step in this direction.

If you’re interested in learning more about RancherOS, please join us for an online meet up on
March 31st.

Source

NodeJS Application Using MongoDB and Rancher

So last week I finally got out from my “tech” comfort zone, and tried
to set up a Node.js application which uses a MongoDB database, and to
add an extra layer of fun I used Rancher to set up the
whole application stack using Docker containers.

I designed a small application with Node, its only function is to
calculate the number of hits on the website, you can find the code at
Github

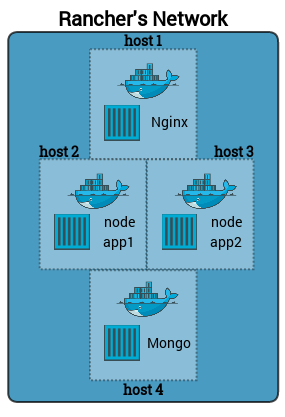
The setup was to add an Nginx container as a load balancer at the
front-end to serve two back-end Node application containers, and then
have the two Node servers connect to a MongoDB database container. In
this setup I will use 5 machines from Digital Ocean, 4 to build the
application stack with the highest availability, and the 5th as a
Rancher server.

nodejs_app.png

[]Set Up A Rancher Server

On a Digital Ocean machine with Docker 1.4 installed we will apply the
following command to set up a Rancher platform on the port 8000:

root@Rancher-Mngmt:~# docker run -d –name rancher-server -p 8080:8080 rancher/server

The previous command will run a docker instance with rancher platform,
and proxy the port 8080 on the instance to the same port on the Digital
Ocean machine. To make sure that the server is running type this
command:

root@Rancher-io-Mngmt:~# docker logs rancher-server

You should see something like the following output:

20:02:41.943 [main] INFO ConsoleStatus – [DONE ] [68461ms] Startup Succeeded, Listening on port 8080

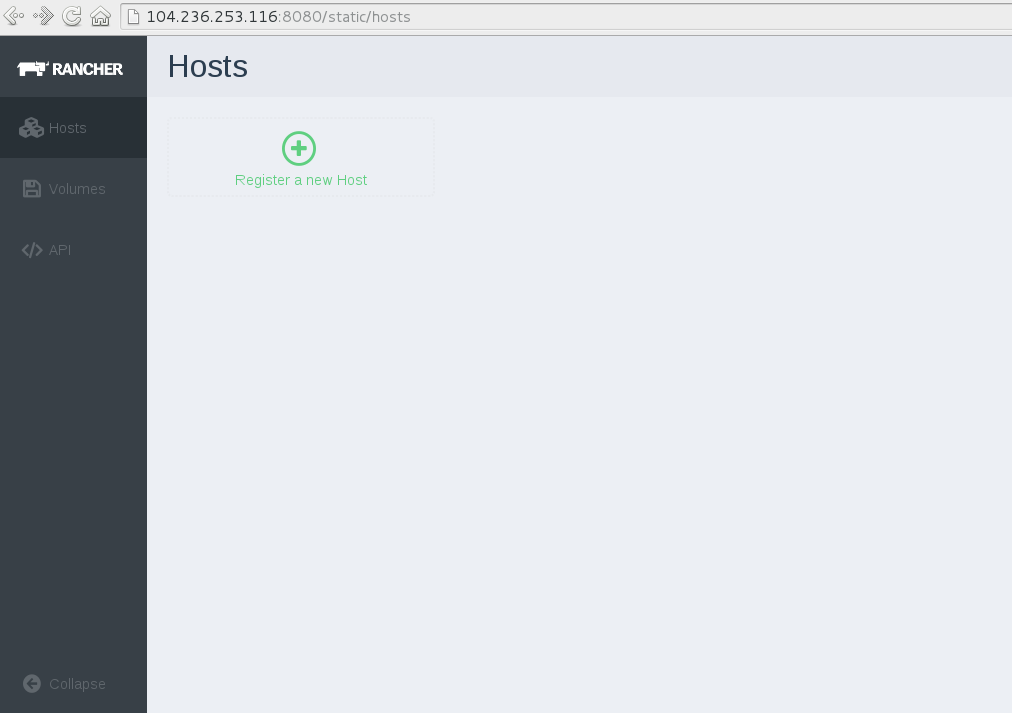
To access Rancher now, type the following url in your browser:

http://DO-ip-address:8080/
you should see something like the following:

rancher-mngmt.png

[]Register Digital Ocean’s instances With Rancher

To register the Digital Ocean machines with docker 1.4 installed with
Rancher, type the following on each machine:

root@Rancher-Test-Instance-X# docker run -it –privileged -v /var/run/docker.sock:/var/run/docker.sock rancher/agent http://rancher-server-ip:8080

where rancher-server-ip is the ip address of the
Rancher server we just installed, or you can click on “Register a New
Host “ on Rancher platform and copy the command shown.

registernewhost.png

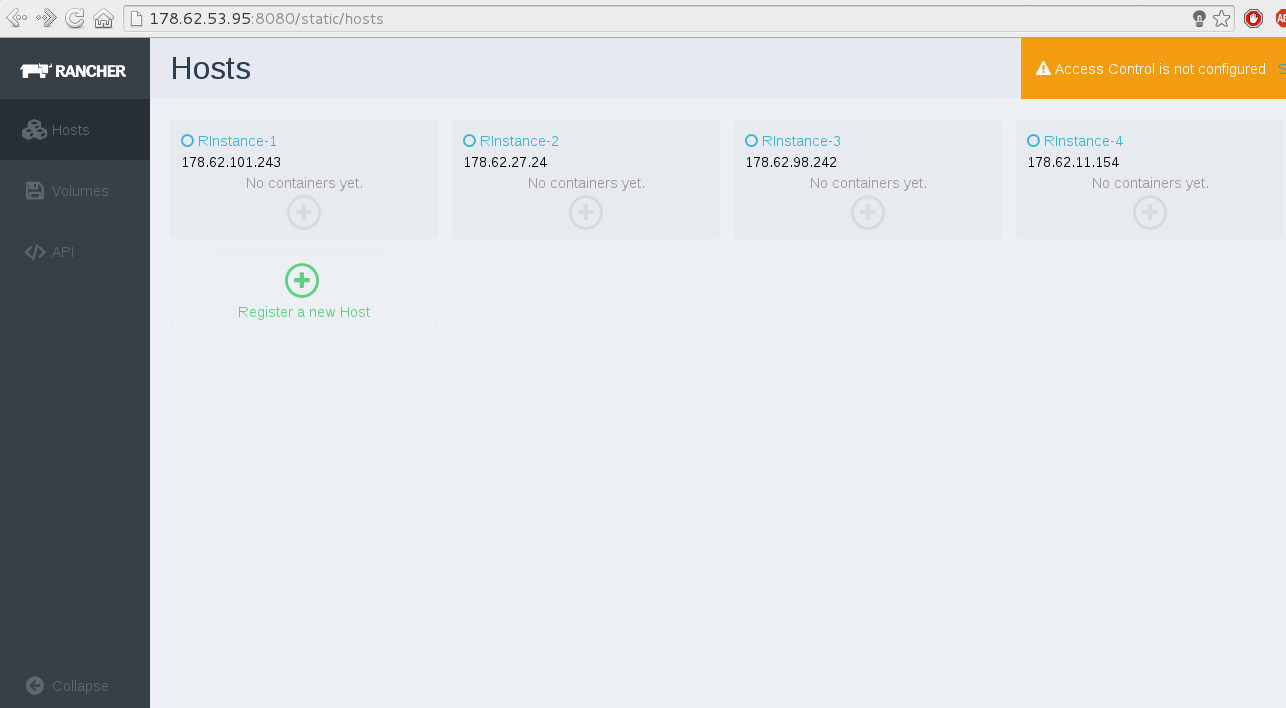
After applying the previous command on each machine you should see
something like the following when you access the Rancher management
server:

RInstances.png

If you are familiar with Ansible as a configuration management
tool, you can use it to register the Digital Ocean machines with Rancher
in one command:

  • First, add the ips of the Digital Ocean machines in
    /etc/ansible/hosts under one group name:

[DO]
178.62.101.243
178.62.27.24
178.62.98.242
178.62.11.154

  • Now, run the following command to register all machines at
    once:

$ ansible DO -u root -a “docker run -it –privileged -v /var/run/docker.sock:/var/run/docker.sock rancher/agent http://rancher-server-ip:8080”

MongoDB Docker Container

After Registering the 4 machines with Rancher, its time to start
building our application stack.

The node.js application will calculate the number of hits on a
website, so it needs to store this data somewhere. I will use MongoDB
container to store the number of hits.

The Dockerfile will be like the following:

FROM ubuntu:14.04
MAINTAINER hussein.galal.ahmed.11@gmail.com
ENV chached_FLAG 0
RUN apt-get -qq update && apt-get -yqq upgrade
RUN apt-key adv –keyserver hkp://keyserver.ubuntu.com:80 –recv 7F0CEB10
RUN echo ‘deb http://downloads-distro.mongodb.org/repo/ubuntu-upstart dist 10gen’ | tee /etc/apt/sources.list.d/10gen.list
RUN apt-get update && apt-get install -yqq mongodb-org
RUN mkdir -p /data/db
EXPOSE 27017
ADD run.sh /tmp/run.sh
ADD init.json /tmp/init.json
ENTRYPOINT [“/bin/bash”, “/tmp/run.sh”]

The previous Docker file is really simple, lets explain it line by
line:

  • First update the apt cache and install latest updates:

RUN apt-get -qq update && apt-get -yqq upgrade

  • Add the key and the mongodb repo to apt sources.list:

RUN apt-key adv –keyserver hkp://keyserver.ubuntu.com:80 –recv 7F0CEB10
RUN echo ‘deb http://downloads-distro.mongodb.org/repo/ubuntu-upstart dist 10gen’ | tee /etc/apt/sources.list.d/10gen.list

  • Install the MongoDB package which installs the server and the
    client:

RUN apt-get update && apt-get install -yqq mongodb-org

  • Create the directory which will store the MongoDB files:
  • Expose the port 27017, which is the default port to connect to
    MongoDB:
  • Add two files to the container:
  • init.json: the initial database to start the
    application.
  • run.sh: will import the init.json database to the
    MongoDB server and ran the server.

ADD run.sh /tmp/run.sh
ADD init.json /tmp/init.json

  • Finally, it will add entrypoint to the container to be started with
    executing the run.sh file:

ENTRYPOINT [“/bin/bash”, “/tmp/run.sh”]

Let’s take a look at the run.sh file:

#!/bin/bash
/usr/bin/mongod &
sleep 3
mongoimport –db countdb –collection hits –type json –file /tmp/init.json
/usr/bin/mongod –shutdown
sleep 3
/usr/bin/mongod

The server started first to be able to import the init.json database to
the countdb database and hits collection, then shutdown the server and
start it up again but in the foreground this time.

The init.json database file:

Node.js Application Container

The Node.js container will install node.js and git packages, and
then will run a simple script to update the /etc/hosts file with the ip of the MongoDB container provided by the
environment variable: $MONGO_IP.

FROM ubuntu:14.04
MAINTAINER hussein.galal.ahmed.11@gmail.com
ENV CACHED_FLAG 1

# Install node
RUN apt-get update -qq && apt-get -y upgrade
RUN apt-get install -yqq nodejs git git-core
VOLUME [ “/var/www/nodeapp” ]
ADD ./run.sh /tmp/run.sh# Install Dependencies
WORKDIR /var/www/nodeapp

# Run The App
ENTRYPOINT [“/bin/bash”, “/tmp/run.sh”]

The ENTRYPOINT of the Docker container is executing the
/tmp/run.sh script:

MONGO_DN=mongo
if [ -n “$MONGO_IP” ]
then
echo “$MONGO_IP $MONGO_DN” >> /etc/hosts
fi

# Fetch the application
git clone https://github.com/galal-hussein/hitcntr-nodejs.git
mv hitcntr-nodejs/* .
rm -rf hitcntr-nodejs

# Run the Application
nodejs index.js

The previous script will check for the MONGO_IP environment variable and if it is set, it will add the content of
this variable to /etc/hosts, then pull the code from
Github Repo, and finally run the node application.

Nginx Container

The Dockerfile of the Nginx container will install nginx webserver and
add the configuration files, and ran a script to update /etc/hosts file
like the Node.js container, and finally run the web server.

Nginx Dockerfile:

#dockerfile for nginx/nodejs
FROM ubuntu:14.04
MAINTAINER hussein.galal.ahmed.11@gmail.com
ENV CACHED_FLAG 0

# Install nginx
RUN apt-get update -qq && apt-get -y upgrade
RUN apt-get -y -qq install nginx

# Adding the configuration files
ADD conf/nginx.conf /etc/nginx/nginx.conf
ADD conf/default /etc/nginx/conf.d/default
ADD ./run.sh /tmp/run.sh

# Expose the port 80
EXPOSE 80

# Run nginx
ENTRYPOINT [ “/bin/bash”, “/tmp/run.sh” ]

The Dockerfile is very simple and use the same commands like the
previous images.

run.sh:

NODE_1_DN=node_app1
NODE_2_DN=node_app2
if [ -n “$NODE_APP1_IP” ]
then
echo “$NODE_APP1_IP $NODE_1_DN” >> /etc/hosts
fi
if [ -n “$NODE_APP2_IP” ]
then
echo “$NODE_APP2_IP $NODE_2_DN” >> /etc/hosts
fi
# Run Nginx
/usr/sbin/nginx

Since we are using two Node application servers, we need to proxy the
http requests received by Nginx to those servers and to do that we need
to add the ips of the Node.js containers to the hosts file.

The ips of the Node.js containers are defined by the two environment
variables (NODE_APP1_IP, and NODE_APP2_IP).

Build And Push The Images

Now for the final step, build and then push the images to Docker
hup:

~/rancher_vm# docker build -t husseingalal/nodeapp_mongo mongo/
~/rancher_vm# docker build -t husseingalal/nodeapp_node node/
~/rancher_vm# docker build -t husseingalal/nodeapp_nginx nginx/
~/rancher_vm# docker push husseingalal/nodeapp_mongo
~/rancher_vm# docker push husseingalal/nodeapp_node
~/rancher_vm# docker push husseingalal/nodeapp_nginx

Now Docker will ask you for your account credentials, then the images
will be pushed to the Docker hub to be used later with Rancher.

Set Up The Application Stack

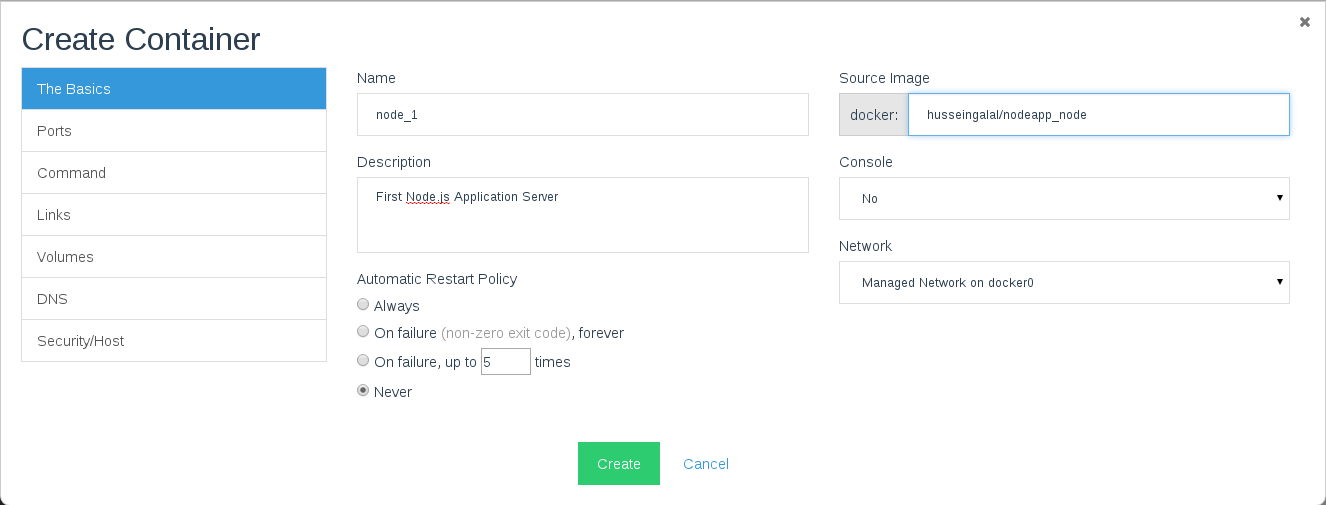
  1. At Rancher platform, create at the first host a Docker container
    using the MongoDB image we just created:

Rmongo1.png

Note that the option “Manage Network on docker0
was chosen to make sure that we will enable one of the unique features
of Rancher which is cross container networking, this feature enables
Docker containers on different hosts to communicate in a virtual private
network.

After clicking Create, you should see that the machine is started to
download the image and install it along with another docker instance
called Network Agent which is used to create the virtual private network
we just talked about.

RMongo2.png

  1. The second step is to add the the two Node.js Application servers
    which are connected to the MongoDB database:

Rnode1_1.png

Note that we used the Node.js image we just created, before creating
the container make sure to add the MONGO_IP environment variable to add the ip of the MongoDB server, you can
get the private ip of the MongoDB server from the Rancher panel:

Rnode1_2.png

After that click Create to begin the creation process of the Node.js
container. On the second host create the second Node.js Application
container using the same steps.

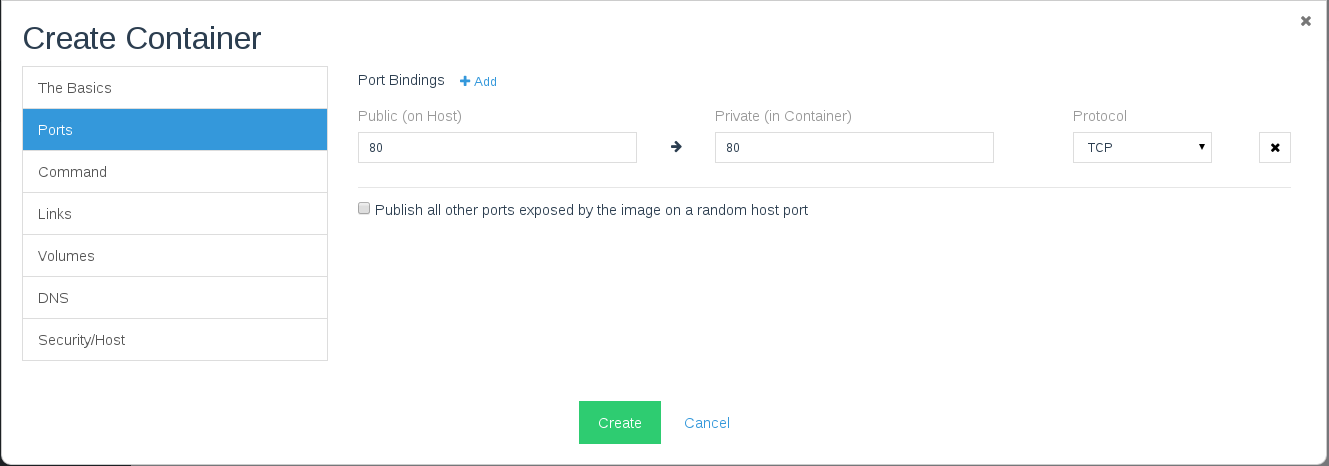
  1. The final step is to create the Nginx webserver container on the
    last host:

Rnginx1.png

Since the nginx instance will be facing the internet, we should proxy
the port 80 from inside the container to the port 80 of the Digital
Ocean machine:

Rnginx2.png

We need also to add the ips of the two Node.js application servers
which are connected to Nginx, you can add the ips through creating two
environment variables (NODE_APP1_IP, NODE_APP2_IP):

Screenshot from 2015-02-04
22:50:13.png

Now wecan access the application using the ip address of the Host
machine http://<the-ip-address>.

Rsuccess.png

Conclusion

In part 1 of this series, I created a Node.js application stack using
Docker containers and Rancher platform. The stack consists of Nginx
container which balances the load between two Node.js application
containers and using MongoDB as our database.

In part 2
I introduce one of the newest features of Rancher: Github
Authentication, also I will use Github WebHooks feature for automatic deployment of the web application.

If you’d like to learn more about Rancher, please schedule a
demo:

Hussein Galal is a Linux System Administrator, with experience in
Linux, Unix, Networking, and open source technologies like Nginx,
Apache, PHP-FPM, Passenger, MySQL, LXC, and Docker. You can follow
Hussein
on Twitter @galal_hussein.*

Source

Build NodeJS App Using MongoDB and Rancher

In the first part of
this post
,
I created a full Node.js application stack using MongoDB as the
application’s database and Nginx as a load balancer that distributed
incoming requests to two Node.js application servers. I created the
environment on Rancher and using Docker containers.

In this post I will go through setting up Rancher authentication with
GitHub, and creating a webhook with GitHub for automatic
deployments.

[]Rancher Access Control

Starting from version 0.5, Rancher can be configured to restrict
access to a set of GitHub users and organization members (you can read a
blog about it
here).
Using this feature ensures that no one other than authorized users can
access Rancher server through the web UI.

After setting up the rancher server, you should see message that says
“Access Control is not configured” :

Raccesscontrol

Click on settings and on the Access Control panel you will be
instructed on how to setup and register new application with GitHub. The
instructions will provide you with a
link to GitHub application settings.

Now on GitHub Application Settings page, click on Register new
application:

Auth_1

Now you will put some information about Rancher’s server:

Application name: any name you choose

Homepage URL: Rancher server url

Application description: any description

Authorization callback URL: also Rancher server url.

Auth_2

After clicking on Register Application, you will be provided with
a Client ID and Client Secret, which are both used to register the user
to the Rancher server:

Auth_3

Now add the Client ID and Client Secret to the Rancher management
server, click on Authenticate with Github:

Auth_4

If everything went well, you should see something like the
following:

Auth_6

Now you have authorized a GitHub user account to your Rancher
management server, and can start adding users and organizations from
GitHub to Rancher projects.

[]Automatic Deployment Using Webhooks

Webhooks can provide an efficient way for changing the application’s
content using HTTP callbacks for specific events, in this configuration
I will register a couple of webhooks with GitHub to send a POST request
to a custom URL.

There are a number of ways to create an automatic deployment setup for
your app, I decided to use the following approach:

  • Create a webhook on Github for each push.
  • Modify the Node.js Docker instances with:
  • A webhook handler in Node.js. – A script that pulls the new
    pushed repo.
  • Start the Application with Nodemon, supervisor, or PM2 to restart on
    each modification.
  • Start the Handler with any port, and proxy this port to the
    corresponding port of the host machine.

WebHooks
Model

Let’s go through our solution in more detail:

The new Node.js Application Container

First we need to modify the Node.js Docker image which i created in the
first post. Now it has to contain the Hook handler program plus the
re-deploy script, also we should start the main application using
Nodemon, the new Dockerfile:

# Dockerfile For Node.js App
FROM ubuntu:14.04
MAINTAINER hussein.galal.ahmed.11@gmail.com
ENV CACHED_FLAG 1

# Install node and npm
RUN apt-get update -qq && apt-get -y upgrade
RUN apt-get install -yqq nodejs npm git git-core

# Install nodemon
RUN npm install -g nodemon
VOLUME [ “/var/www/nodeapp” ]

# Add redeploy script and hook handler
ADD ./run.sh /tmp/run.sh
ADD ./redeploy.sh /tmp/redeploy.sh
ADD ./webhook.js /tmp/webhook.js
WORKDIR /var/www/nodeapp
# Expose both ports (app port and the hook handler port)
EXPOSE 8000
EXPOSE 9000

# Run The App
ENTRYPOINT [“/b2in/bash”, “/tmp/run.sh”]

You should notice that a two new files were added to this Dockerfile:
the webhook.js which is the hook handler, and redeploy.sh script which
is basically a git pull from the GitHub repo.

The webhook.js handler

I wrote the webhook handle in NodeJS:

var http = require(‘http’)
var createHandler = require(‘github-webhook-handler’)
var handler = createHandler({ path: ‘/’, secret: ‘secret’ })
var execFile = require(‘child_process’).execFile;
//Create Server That Listen On Port 9000
http.createServer(function (req, res) {
handler(req, res, function (err) {
res.statusCode = 404
res.end(‘no such location’)
})
}).listen(9000)

//Hook Handler on Error
handler.on(‘error’, function (err) {
console.error(‘Error:’, err.message)
})

//Hook Handler on Push
handler.on(‘push’, function (event) {
console.log(‘Received a push event for %s to %s’,
event.payload.repository.name,
event.payload.ref)
execFile(‘/tmp/redeploy.sh’, function(error, stdout, stderr) {
console.log(‘Error: ‘+error)
console.log( ‘Redeploy Completed’ );
});
})

I won’t go into the details of the code, but here are some notes that
you should consider:

  • I used
    github-webhook-handler library.
  • The handler will use a secret string that will be configured later
    using GitHub.
  • The handler will listen on port 9000.
  • The handler will execute redeploy.sh.

The redeploy.sh script:

sleep 5
cd /var/www/nodeapp
git pull

The last script is the run script which used to start the handler and
the application:

MONGO_DN=mongo
if [ -n “$MONGO_IP” ]
then
echo “$MONGO_IP $MONGO_DN” >> /etc/hosts
fi
ln -s /usr/bin/nodejs /usr/bin/node
chmod a+x /tmp/redeploy.sh

#fetch the app
git clone https://github.com/galal-hussein/hitcntr-nodejs.git .
cd /tmp
npm install github-webhook-handler
nodejs webhook.js &

# Run the Application
cd /var/www/nodeapp
nodemon index.js

Now build and push the image like I did in the previous post.

Add Webhook With Github

To create a webhook on Github, open the repository → settings →
Webhooks & Services then Add Webhook:

hooks_1

Now add a custom url which will be notified when the specified events
happen:

hooks_3

You should add the secret token which we specified previously in the
handler’s code. Add a second webhook but this time with the url of
the second application, then build the application stack like we did in
the previous post, but this time proxy port 9000 at the Node container:

hooks35

After building the stack check the Github webhooks, and you should see
something like this:

hooks_4

Now let’s test the webhooks, if you accessed the url of the Nginx web
server you will see something like this:

hooks5

Now commit any changes to your code and push it on Github, and the
changes will be applied immediately to the app servers, in our case I
changed the “hits” to be “Webhooks Worked, Hits”:

hooks6

Conclusion

In this two post series, I created a simple Node.js application with
MongoDB as a NoSQL database and used Rancher to build the whole stack
with Docker containers. In the second post I used the authentication
feature of Rancher with GitHub accounts, then I used webhooks to build
an automatic deployment solution.

I hope this helps you understand how to leverage Rancher, Docker and
GitHub to better manage application deployments.

If you’d like to learn more about using Rancher, please don’t hesitate
to schedule a demo and discussion with one of our
engineers.

Source

Podman and Buildah for Docker users

Podman and Buildah for Docker users

I was asked recently on Twitter to better explain Podman and Buildah for someone familiar with Docker. Though there are many blogs and tutorials out there, which I will list later, we in the community have not centralized an explanation of how Docker users move from Docker to Podman and Buildah. Also what role does Buildah play? Is Podman deficient in some way that we need both Podman and Buildah to replace Docker?

This article answers those questions and shows how to migrate to Podman.

How does Docker work?

First, let’s be clear about how Docker works; that will help us to understand the motivation for Podman and also for Buildah. If you are a Docker user, you understand that there is a daemon process that must be run to service all of your Docker commands. I can’t claim to understand the motivation behind this but I imagine it seemed like a great idea, at the time, to do all the cool things that Docker does in one place and also provide a useful API to that process for future evolution. In the diagram below, we can see that the Docker daemon provides all the functionality needed to:

  • Pull and push images from an image registry
  • Make copies of images in a local container storage and to add layers to those containers
  • Commit containers and remove local container images from the host repository
  • Ask the kernel to run a container with the right namespace and cgroup, etc.

Essentially the Docker daemon does all the work with registries, images, containers, and the kernel. The Docker command-line interface (CLI) asks the daemon to do this on your behalf.

How does Docker Work -- Docker architecture overview

This article does not get into the detailed pros and cons of the Docker daemon process. There is much to be said in favor of this approach and I can see why, in the early days of Docker, it made a lot of sense. Suffice it to say that there were several reasons why Docker users were concerned about this approach as usage went up. To list a few:

  • A single process could be a single point of failure.
  • This process owned all the child processes (the running containers).
  • If a failure occurred, then there were orphaned processes.
  • Building containers led to security vulnerabilities.
  • All Docker operations had to be conducted by a user (or users) with the same full root authority.

There are probably more. Whether these issues have been fixed or you disagree with this characterization is not something this article is going to debate. We in the community believe that Podman has addressed many of these problems. If you want to take advantage of Podman’s improvements, then this article is for you.

The Podman approach is simply to directly interact with the image registry, with the container and image storage, and with the Linux kernel through the runC container runtime process (not a daemon).

Podman architectural approach

Now that we’ve discussed some of the motivation it’s time to discuss what that means for the user migrating to Podman. There are a few things to unpack here and we’ll get into each one separately:

  • You install Podman instead of Docker. You do not need to start or manage a daemon process like the Docker daemon.
  • The commands you are familiar with in Docker work the same for Podman.
  • Podman stores its containers and images in a different place than Docker.
  • Podman and Docker images are compatible.
  • Podman does more than Docker for Kubernetes environments.
  • What is Buildah and why might I need it?

Installing Podman

If you are using Docker today, you can remove it when you decide to make the switch. However, you may wish to keep Docker around while you try out Podman. There are some useful tutorials and an awesome demonstration that you may wish to run through first so you can understand the transition more. One example in the demonstration requires Docker in order to show compatibility.

To install Podman on Red Hat Enterprise Linux 7.6 or later, use the following; if you are using Fedora, then replace yum with dnf:

# yum -y install podman

Podman commands are the same as Docker’s

When building Podman, the goal was to make sure that Docker users could easily adapt. So all the commands you are familiar with also exist with Podman. In fact, the claim is made that if you have existing scripts that run Docker you can create a docker alias for podman and all your scripts should work (alias docker=podman). Try it. Of course, you should stop Docker first (systemctl stop docker). There is a package you can install called podman-docker that does this for conversion for you. It drops a script at /usr/bin/docker that executes Podman with the same arguments.

The commands you are familiar with—pull, push, build, run, commit, tag, etc.—all exist with Podman. See the manual pages for Podman for more information. One notable difference is that Podman has added some convenience flags to some commands. For example, Podman has added –all (-a) flags for podman rm and podman rmi. Many users will find that very helpful.

You can also run Podman from your normal non-root user in Podman 1.0 on Fedora. RHEL support is aimed for version 7.7 and 8.1 onwards. Enhancements in userspace security have made this possible. Running Podman as a normal user means that Podman will, by default, store images and containers in the user’s home directory. This is explained in the next section. For more information on how Podman runs as a non-root user, please check out Dan Walsh’s article: How does rootless Podman work?

Podman and container images

When you first type podman images, you might be surprised that you don’t see any of the Docker images you’ve already pulled down. This is because Podman’s local repository is in /var/lib/containers instead of /var/lib/docker. This isn’t an arbitrary change; this new storage structure is based on the Open Containers Initiative (OCI) standards.

In 2015, Docker, Red Hat, CoreOS, SUSE, Google, and other leaders in the Linux containers industry created the Open Container Initiative in order to provide an independent body to manage the standard specifications for defining container images and the runtime. In order to maintain that independence, the containers/image and containers/storage projects were created on GitHub.

Since you can run podman without being root, there needs to be a separate place where podman can write images. Podman uses a repository in the user’s home directory: ~/.local/share/containers. This avoids making /var/lib/containers world-writeable or other practices that might lead to potential security problems. This also ensures that every user has separate sets of containers and images and all can use Podman concurrently on the same host without stepping on each other. When users are finished with their work, they can push to a common registry to share their image with others.

Docker users coming to Podman find that knowing these locations is useful for debugging and for the important rm -rf /var/lib/containers, when you just want to start over. However, once you start using Podman, you’ll probably start using the new -all option to podman rm and podman rmi instead.

Container images are compatible between Podman and other runtimes

Despite the new locations for the local repositories, the images created by Docker or Podman are compatible with the OCI standard. Podman can push to and pull from popular container registries like Quay.io and Docker hub, as well as private registries. For example, you can pull the latest Fedora image from the Docker hub and run it using Podman. Not specifying a registry means Podman will default to searching through registries listed in the registries.conf file, in the order in which they are listed. An unmodified registries.conf file means it will look in the Docker hub first.

$ podman pull fedora:latest
$ podman run -it fedora bash

Images pushed to an image registry by Docker can be pulled down and run by Podman. For example, an image (myfedora) I created using Docker and pushed to my Quay.io repository (ipbabble) using Docker can be pulled and run with Podman as follows:

$ podman pull quay.io/ipbabble/myfedora:latest
$ podman run -it myfedora bash

Podman provides capabilities in its command-line push and pull commands to gracefully move images from /var/lib/docker to /var/lib/containers and vice versa. For example:

$ podman push myfedora docker-daemon:myfedora:latest

Obviously, leaving out the docker-daemon above will default to pushing to the Docker hub. Using quay.io/myquayid/myfedora will push the image to the Quay.io registry (where myquayid below is your personal Quay.io account):

$ podman push myfedora quay.io/myquayid/myfedora:latest

If you are ready to remove Docker, you should shut down the daemon and then remove the Docker package using your package manager. But first, if you have images you created with Docker that you wish to keep, you should make sure those images are pushed to a registry so that you can pull them down later. Or you can use Podman to pull each image (for example, fedora) from the host’s Docker repository into Podman’s OCI-based repository. With RHEL you can run the following:

# systemctl stop docker
# podman pull docker-daemon:fedora:latest
# yum -y remove docker # optional

Podman helps users move to Kubernetes

Podman provides some extra features that help developers and operators in Kubernetes environments. There are extra commands provided by Podman that are not available in Docker. If you are familiar with Docker and are considering using Kubernetes/OpenShift as your container platform, then Podman can help you.

Podman can generate a Kubernetes YAML file based on a running container using podman generate kube. The command podman pod can be used to help debug running Kubernetes pods along with the standard container commands. For more details on how Podman can help you transition to Kubernetes, see the following article by Brent Baude: Podman can now ease the transition to Kubernetes and CRI-O.

What is Buildah and why would I use it?

Buildah actually came first. And maybe that’s why some Docker users get a bit confused. Why do these Podman evangelists also talk about Buildah? Does Podman not do builds?

Podman does do builds and for those familiar with Docker, the build process is the same. You can either build using a Dockerfile using podman build or you can run a container and make lots of changes and then commit those changes to a new image tag. Buildah can be described as a superset of commands related to creating and managing container images and, therefore, it has much finer-grained control over images. Podman’s build command contains a subset of the Buildah functionality. It uses the same code as Buildah for building.

The most powerful way to use Buildah is to write Bash scripts for creating your images—in a similar way that you would write a Dockerfile.

I like to think of the evolution in the following way. When Kubernetes moved to CRI-O based on the OCI runtime specification, there was no need to run a Docker daemon and, therefore, no need to install Docker on any host in the Kubernetes cluster for running pods and containers. Kubernetes could call CRI-O and it could call runC directly. This, in turn, starts the container processes. However, if we want to use the same Kubernetes cluster to do builds, as in the case of OpenShift clusters, then we needed a new tool to perform builds that would not require the Docker daemon and subsequently require that Docker be installed. Such a tool, based on the containers/storage and containers/image projects, would also eliminate the security risk of the open Docker daemon socket during builds, which concerned many users.

Buildah (named for fun because of Dan Walsh’s Boston accent when pronouncing “builder”) fit this bill. For more information on Buildah, see buildah.io and specifically see the blogs and tutorials sections.

There are a couple of extra things practitioners need to understand about Buildah:

  1. It allows for finer control of creating image layers. This is a feature that many container users have been asking for for a long time. Committing many changes to a single layer is desirable.
  2. Buildah’s run command is not the same as Podman’s run command. Because Buildah is for building images, the run command is essentially the same as the Dockerfile RUN command. In fact, I remember the week this was made explicit. I was foolishly complaining that some port or mount that I was trying wasn’t working as I expected it to. Dan (@rhatdan) weighed in and said that Buildah should not be supporting running containers in that way. No port mapping. No volume mounting. Those flags were removed. Instead buildah run is for running specific commands in order to help build a container image, for example, buildah run dnf -y install nginx.
  3. Buildah can build images from scratch, that is, images with nothing in them at all. Nothing. In fact, looking at the container storage created as a result of a buildah from scratch command yields an empty directory. This is useful for creating very lightweight images that contain only the packages needed in order to run your application.

A good example use case for a scratch build is to consider the development images versus staging or production images of a Java application. During development, a Java application container image may require the Java compiler and Maven and other tools. But in production, you may only require the Java runtime and your packages. And, by the way, you also do not require a package manager such as DNF/YUM or even Bash. Buildah is a powerful CLI for this use case. See the diagram below. For more information, see Building a Buildah Container Image for Kubernetes and also this Buildah introduction demo.

Buildah is a powerful CLI

Getting back to the evolution story…Now that we had solved the Kubernetes runtime issue with CRI-O and runC, and we had solved the build problem with Buildah, there was still one reason why Docker was still needed on a Kubernetes host: debugging. How can we debug container issues on a host if we don’t have the tools to do it? We would need to install Docker, and then we are back where we started with the Docker daemon on the host. Podman solves this problem.

Podman becomes a tool that solves two problems. It allows operators to examine containers and images with commands they are familiar with using. And it also provides developers with the same tools. So Docker users, developers, or operators, can move to Podman, do all the fun tasks that they are familiar with from using Docker, and do much more.

Conclusion

I hope this article has been useful and will help you migrate to using Podman (and Buildah) confidently and successfully.

For more information:

Related Articles

Take advantage of your Red Hat Developers membership and download RHEL today at no cost.

Source

Rancher adds support for Docker Machine provisioning.

Docker
MachineThis
week we released Rancher 0.12, which adds support for provisioning hosts
using Docker Machine. We’re really excited to get this feature out,
because it makes launching Rancher-enabled Docker hosts easier than
ever. If you’re not familiar with Docker Machine, it is a project that
allows cloud providers to develop standard “drivers” for provisioning
cloud infrastructure on the fly. You can learn more about it on the
Docker
website.
The first cloud we’re supporting with Docker Machine is Digital Ocean.
For our initial release, we chose Digital Ocean, because it is an
excellent implementation of the machine driver. As always, the Digital
Ocean team has focused on simplicity and user experience, and were
fantastic to work with during our testing. Docker machine drivers are
already available for many public cloud providers, as well as vCenter,
CloudStack, OpenStack and other private cloud platforms. We will be
adding support for additional drivers over the next few weeks, and
documenting how you can use any driver you like. Please feel free to
let us know if there
are drivers you would like us to prioritize. Now, let me walk you
through using Docker Machine with Rancher. To get started, click on the
“Regsiter a New Host” link in the Hosts tab within Rancher.
hosts
If this is the first time you’ve added a host, you’ll be presented
with a Host Setup dialog that asks you to confirm the DNS host name or
IP address that hosts should use to connect to the Rancher API. Confirm
this setting and click Save.
host-setup
Once that is completed, you’ll be taken to the Add Host page,
where you’ll see a new tab for provisioning Digital Ocean hosts.
new-host
To provision a Digital Ocean machine, fill out the relevant
information about the host you want to provision, inlcuding the OS
image, size and Digital Ocean region. You’ll need to have a Digital
Ocean access token, which you can get by creating an
account
on their
site. Once you hit create, you’ll be returned to the hosts page where
you will see your new host being created.
creating
Creating the host will take a few minutes, as the VM needs to be
provisioned, configured with Docker, and bootstrapped as a Rancher host.
But once it’s done, the UI will automatically update to show the new
host. At this point, you have a fully enabled Docker host. You can click
the Add Container link to start adding containers. We hope you find this
feature useful and welcome your feedback. As always, you can submit any
feature requests or other issues to the Rancher GitHub
repo
. In the next few weeks,
we’ll be adding the ability to export the Docker machine configuration
so that you can deploy containers outside of Rancher, more verbose
status updates during machine creation, and (of course) more Machine
drivers. If you’d like to talk with one of our engineers and learn more
about Rancher, please feel free to request a demo, and we’ll walk you
through Rancher and answer all of your questions.

Source

Architecture of Rancher’s Docker-machine Integration

As you may have seen, Rancher recently announced our integration
with docker-machine. This
integration will allow users to spin up Rancher compute nodes across
multiple cloud providers right from the Rancher UI. In our initial
release, we supported Digital Ocean. Amazon EC2 is soon to follow and
we’ll continue to add more cloud providers as interest dictates. We
believe this feature will really help the Zero-to-Docker _(and
Zero-to-Rancher)_ experience. But the feature itself is not the focus
of this post. In this post, I want to detail the software architerture
employed to achieve this integration. First, it’s important to
understand that everyhting in Rancher is an API resource with a process
lifecycle. Containers, images, networks, and accounts are all API
resources with their own process lifecycles. When you deploy a machine
in the Rancher UI, you’re creating a machine resource. It has three
life cycle processes: 1. Create 2. Bootstrap 3. Delete The create
process is kicked off when the user creates a machine in the UI. When
the create process completes, it auotmatically kicks off the bootstrap
process. Delete (perhaps obviously) occurs when the user chooses to
delete or destroy the host. Our integration with machine is achieved
through a microservice that hooks into Rancher machine lifecycle events
and execs out to the docker-machine binary accordingly. You can check
out the source code for this service here:
https://github.com/rancherio/go-machine-service.
Logically, the interaction looks like this:
machine
…Sorry for the bad graphic. Anyway… When you spin up Rancher
with docker run rancher/server … with the default configuration, the
Rancher API, Rancher Process Server, DB, and Machine Microservice are
all processes living inside that container (and in fact, the API and
process server are the same process). The docker-machine binary is in
the container as well but only runs when it is called. You may at this
point be wondering about that event bus. In Rancher, we keep eventing
dead-simple
and above all follow this principle:

There is no such thing as reliable messaging.

So, that “event bus” consists of the microservice making a POST
request to the /subsribe API endpoint. The response is a stream of
newline-terminated json events, similar in concept to the docker event
stream
. The
process server is responsible for firing (and refiring) events until it
receives a reply event (another API POST) indicating the event was
handled. Further event handlers are blocked until the current event
handler replies successfully. The microservice is responsible for
handling the events, replying, and acting idempotently so that refires
can occur without ill-effect. So when the machine microservie receives a
create event, it translate the machine API resource’s prooperties into
a docker-machine cli command and execs out to it. Since the machine
creation process is long lived, the service monitors the standard out
and error of the call and sends corresponding status updates to the
Rancher server. These are then presented to the user in the UI. When
docker-machine reports that the machine was successfully created, the
microservice will reply to the original event it received from the
Rancher server. The successful end of the create event will cause the
process server to automatically kick off the bootstrap event, which
makes it way right back down to the machine microservice. When that
event is received, we’ll again exec out to docker-machine to get the
details needed to connect to the machine’s docker daemon. We do this by
executing the docker-machine config command and parsing the response.
With the connection parameters in hand, the service fires up a rancher
agent on the machine via docker run … rancher/agent …. This is the
exact same command that a user would run if they wanted to manaully join
a server to Rancher. When that container is up and running, it will
report into the Rancher server and start hooking into container
lifecycle events in much the same way that this service hooks into
machine lifecycle events. From there, it’s business as normal for the
Rancher server and the machine’s rancher-agent. That about does it for
the technical architecture of our docker-machine integration. There are
a lot more interesting but minor technical detail to share, but I
didn’t want to go too far off into the weeds in this post. I’ll write
up some follow up post sharing those details in the not-too-distant
future. Finally, shout out (and thanks) to Evan
Haslett
, Ben
Firshman
, and the rest of the docker-machine
team and community for the help along the way. We look forward to more
exciting work with the docker-machine, including getting RancherOS in
there. If you’d like to learn more about Rancher, please schedule a
demo and we’ll walk you through the latest features, and our
future roadmap. Note: This post also appears
on Craig’s personal blog
here.
Feel free to check out that blog for more software engineering
insights.

Source

Docker Desktop Enterprise Preview: Version Packs

This is the first in a series of articles we are publishing to provide more details on Docker Desktop Enterprise, which we announced at DockerCon Barcelona. Keep up with the latest Docker Desktop Enterprise news and release updates by signing up for the Docker Desktop Enterprise announcement list.

Docker’s engineers have been hard at work completing features and getting everything in ship-shape (pun intended) following our announcement of Docker Desktop Enterprise, a new desktop product that is the easiest, fastest and most secure way to develop production-ready containerized applications and the easiest way for developers to get Kubernetes running on their own machine.

In the first post of this series I want to highlight how we are working to bridge the gap between development and production with Docker Desktop Enterprise using our new Version Packs feature. Version Packs let you easily swap your Docker Engine and Kubernetes orchestrator versions to match the versions running in production on your Docker Enterprise clusters. For example, imagine you have a production environment running Docker Enterprise 2.0. As a developer, in order to make sure you don’t use any APIs or incompatible features that will break when you push an application to production you would like to be certain your working environment exactly matches what’s running in Docker Enterprise production systems. With Docker Desktop Enterprise you can easily do that through the use of Version Packs. Later, when the platform operators decide to upgrade production systems to Docker Enterprise 2.1, all that needs to be done in Docker Desktop Enterprise is to add the Enterprise 2.1 version pack and easy as that, you’re in sync. If you have different environments, you can even switch back forth, all with a single click.

We’re building Docker Desktop Enterprise as a cohesive extension of the Docker Enterprise container platform that runs right on developers’ systems. Developers code and test locally using the same tools they use today and Docker Desktop Enterprise helps to quickly iterate and then produce a containerized service that is ready for their production Docker Enterprise clusters.

In future previews, we’ll share more details on how Docker Desktop Enterprise capabilities can be centrally administered and controlled; using the Application Designer to create an application with zero Docker CLI commands; and how to ensure developers start building with safe, approved templates. Sign up for the Docker Desktop Enterprise announcement list or keep watching this blog for more in the coming weeks.

To learn more:

Docker Desktop Enterprise, Docker enterprise clusters, docker for mac, docker for windows, Kubernetes, version packs

Source

Rancher Adds Support for Private Docker Registries

When we shipped Rancher 0.12 last week we added one of the more
frequently requested features, support for private Docker registries.
Rancher had always allowed users to provision containers from
DockerHub, but many organizations run their own registries, or use
private hosted registries such as Quay.io, and
private DockerHub accounts. Beginning with
this release, users will be able to connect their private registry
directly to their Rancher environment, and deploy containers
from private Docker images. To use this new feature navigate to the new
“Registries” tab on your Rancher instance. You’ll see that you now
have the option to “Add a Privae Registry,” then fill out the form,
add your credentials and you are done. Credentials aren’t required
unless the registry or images you want to use require a password. Add
Private Docker
Registry
Once you’ve set up your private registry, you’ll be able to launch
containers from images hosted in your private registry from the launch
container workflow. You can access your private registry by clicking on
the “docker” image, and selecting the name of your private registry.
From that point, simply provide the name of your Docker image on the
private registry and continue the provisioning process. provision
from private
registry
The video below gives a more complete explanation of how to register a
private registry and credentials within Rancher. Hope you enjoy the new
feature. If you would like to set up some time to talk with us about
getting started with Rancher, please request a
demonstration.

Source

Riak Cluster Deployment | Riak Docker

Recently I have been playing around with Riak and I wanted to get it
running with Docker, using RancherOS and Rancher. If you’re not
familiar with Riak, it is a distributed key/value store which is
designed for high availability, fault tolerance, simplicity, and
near-linear scalability. Riak is written in Erlang programming language
and it runs on an Erlang virtual machine. Riak provides availability
through replication and faster operations and more capacity through
partitions, using the ring design to its cluster, hashed keys
are partitioned by default to 64 partitions (or vnodes), each vnode will
be assigned to one physical node as following: Riak_ring
From Relational to Riak
Whitepaper

For example, if the cluster consists of 4 nodes: Node1, Node2, Node3,
and Node4, we will count around the nodes assigning each vnode to a
physical node until the all vnodes are accounted for, so in the previous
figure, Riak used 32 partition with 4 node cluster so we get:

Node0 : [1, 5, 9, 13, 17, 21, 25, 29]
Node1 : [2, 6, 10, 14, 18, 22, 26, 30]
Node3 : [3, 7, 11, 15, 19, 23, 27, 31]
Node4 : [4, 8, 12, 16, 20, 24, 28, 32]

So how about replication? Every time a write process happens Raik will
replicate the value to the next N vnodes, where N is the value of
the n_val setting in Riak cluster. By default, N is 3. To explain
this, assume we will use the default n_val value and we will use
the previous cluster setup with 4 nodes and 32 partitions, now lets
assume we will write a key/value to partition (vnode) 2 which is
assigned to the second node then the value will be replicated to vnode 3
and vnode 4 which are assigned to the 3rd and 4th nodes respectively.
For more information about Riak cluster, visit the official riak
documentation
. In this post, I am
going to deploy Riak cluster using Docker on RancherOS, the setup will
include:

  • Five Docker containers as Riak nodes.
  • Each Container will be on separate EC2 Instance.
  • RancherOS will be installed on each EC2 instance.
  • The whole setup will be managed using Rancher platform.

##

The Riak Docker Image

Before launching your EC2 instances and the Rancher platform, you should
create the Riak Docker image that will run each instance. I used the
implementation of Riak Docker image of
hectcastro, although I
added and removed some parts to become suitable to run on RancherOS.
First the Dockerfile:

FROM phusion/baseimage:latest
MAINTAINER Hussein Galal hussein.galal.ahmed.11@gmail.com

RUN sed -i.bak ‘s/main$/main universe/’ /etc/apt/sources.list
RUN apt-get update -qq && apt-get install -y software-properties-common &&
apt-add-repository ppa:webupd8team/java -y && apt-get update -qq &&
echo oracle-java7-installer shared/accepted-oracle-license-v1-1 select true | /usr/bin/debconf-set-selections &&
apt-get install -y oracle-java7-installer

# Install Riak
RUN curl https://packagecloud.io/install/repositories/basho/riak/script.deb | bash
RUN apt-get install -y riak

# Setup the Riak service
RUN mkdir -p /etc/service/riak
ADD scripts/riak.sh /etc/service/riak/run

RUN sed -i.bak ‘s/listener.http.internal = 127.0.0.1/listener.http.internal = 0.0.0.0/’ /etc/riak/riak.conf && sed -i.bak ‘s/listener.protobuf.internal = 127.0.0.1/listener.protobuf.internal = 0.0.0.0/’ /etc/riak/riak.conf &&
echo “anti_entropy.concurrency_limit = 1” >> /etc/riak/riak.conf &&
echo “javascript.map_pool_size = 0” >> /etc/riak/riak.conf &&
echo “javascript.reduce_pool_size = 0” >> /etc/riak/riak.conf &&
echo “javascript.hook_pool_size = 0” >> /etc/riak/riak.conf

# Add Automatic cluster support
ADD scripts/run.sh /etc/my_init.d/99_automatic_cluster.sh
RUN chmod u+x /etc/my_init.d/99_automatic_cluster.sh
RUN chmod u+x /etc/service/riak/run

# Enable insecure SSH key
RUN /usr/sbin/enable_insecure_key.sh

EXPOSE 22 8098 8087
CMD [“/sbin/my_init”]

A couple of notes on the previous Dockerfile. The phusion/baseimage is
used as the Docker base image, 2 important scripts were added to the
image (riak.sh, automatic_cluster.sh) which I will explain in a second,
the ports 8098 and 8087 are used for HTTP and Protocol Buffers and
finally ssh support through insecure key was added. The purpose of the
riak.sh script is to start the Riak service and ensure that the node
name is set correctly, while the automatic_cluster.sh script is used to
join the node to the cluster only if the RIAK_JOINING_IP is set
during the starting of the contianer. riak.sh

#! /bin/sh

# Ensure correct ownership and permissions on volumes
chown riak:riak /var/lib/riak /var/log/riak
chmod 755 /var/lib/riak /var/log/riak

# Open file descriptor limit
ulimit -n 4096
IP_ADDRESS=$(ip -o -4 addr list eth0 | awk ” | cut -d/ -f1 | sed -n 2p)

# Ensure the Erlang node name is set correctly
sed -i.bak “s/riak@127.0.0.1/riak@$/” /etc/riak/riak.conf
rm -rf /var/lib/riak/ring/*

# Start Riak
exec /sbin/setuser riak “$(ls -d /usr/lib/riak/erts*)/bin/run_erl” “/tmp/riak”
“/var/log/riak” “exec /usr/sbin/riak console”

automatic_cluster.sh

#!/bin/sh
sleep 10
if env | grep -q “RIAK_JOINING_IP”; then
# Join node to the cluster
(sleep 5;riak-admin cluster join “riak@$” && echo -e “Node Joined The Cluster”) &

# Are we the last node to join?
(sleep 8; if riak-admin member-status | egrep “joining|valid” | wc -l | grep -q “$”; then
riak-admin cluster plan && riak-admin cluster commit && echo -e “nCommiting The Changes…”
fi) &
fi

Also note that RIAK_CLUSTER_SIZE is used to specify the size of the
cluster used in this setup. We don’t need more than that to start the
cluster, now build the image and push it to Docker Hub to be used later.

# docker build -t husseingalal/riak2 .
# docker push husseingalal/riak2

Launch Rancher Platform

The Rancher Management platform will be used manage the Docker
containers on RancherOS instances. First you need to run Rancher
platform on a machine using the following command:

# docker run -d -p 8080:8080 rancher/server

Rancher_platform1

Create RancherOS EC2 Instances

RancherOS is available as an Amazon Web Services AMI, and can be easily
run on EC2, the next step is to create 5 EC2 instances to setup the
cluster:
riak1
You will get something like that after creating five instances with
Amazon AWS:
riak3
After creating the five instances, its time to register each instance
with Rancher by running the following command on each server:

[rancher@rancher ~]$ sudo docker run –rm -it –privileged -v /var/run/docker.sock:/var/run/docker.sock rancher/agent http://<ip-address>:8080/v1/scripts/4E1D4A26B07A1539CD33:1426626000000:jZskPi71YEPSJo1uMISMEOpbUo

After running the previous command on each server you will see that the
servers have been registered with Rancher:
riak4

Running The Riak cluster

The RIAK_CLUSTER_SIZE will provide the number of instances needed
to be added to the cluster before committing the changes, its
recommended to add 5 Riak nodes to the cluster of a production
environment, although you can set the RIAK_CLUSTER_SIZE to more or
fewer as needed. **** **** To create a Docker container using the
Rancher platform, on any instance click on “Add Container”:
riak_6
On the first node you just need to specify the name of the container
and select the Riak image, but for other Riak nodes you need to specify
two more environment variables which will help the node to connect to
the cluster the RIAK_JOINING_IP which tells the Riak node to
connect to a node in the cluster and RIAK_CLUSTER_SIZE which used
to specify the number of nodes joining the cluster:
riakn_6

Testing The Riak Cluster

From Rancher we can view the logs of the running containers, similar to
using docker logs -f container-name. This allows us to see the logs of
the Riak containers and ensure that everything is running as planned:
Screenshot from 2015-03-17
23:41:26
Screenshot from 2015-03-28
01:22:57
At the last node you will see something different. Since the number of
the node that joined the cluster matches the value of the environment
variable RIAK_CLUSTER_SIZE, so the changes will be committed and the
cluster will be up and running: Screenshot from 2015-03-28
00:25:58
To see that the nodes are connected to the cluster, you can write
the following command inside the shell of any of the Riak containers:

# riak-admin member-status

And you will get the following output: Screenshot from 2015-03-28
01:40:31
This indicates that each node is a valid member of the cluster and
acquire a roughly equal percentage of the ring. Now to test the cluster
from outside the environment, you should map the ports of the Docker
containers to the host’s ports, this can be achieved dynamically using
Rancher platform:
19
I already created and activated a bucket-type called “cluster,” which I
used to test via the Riak HTTP API. You can see from below the
environment is up and running now.

$ export RIAK=http://52.0.119.255:8098
$ curl -XPUT “$RIAK/types/cluster/buckets/rancher/keys/hello”
-H “Content-Type:text/plain”
-d “World.. Riak”

$ curl -i “$RIAK/types/cluster/buckets/rancher/keys/hello”
HTTP/1.1 200 OK
X-Riak-Vclock: a85hYGBgzGDKBVIcqZfePk3k6vPOYEpkzGNlYAroOseXBQA=
Vary: Accept-Encoding
Server: MochiWeb/1.1 WebMachine/1.10.5 (jokes are better explained)
url: </buckets/rancher>; rel=”up”
Last-Modified: Fri, 27 Mar 2015 22:04:50 GMT
ETag: “4flAtEZ59hdYsKhSGVhKpZ”
Date: Fri, 27 Mar 2015 22:11:23 GMT
Content-Type: text/plain
Content-Length: 5

World.. Riak

Conclusion

Riak cluster provides a distributed, high available, and simple
key-value store. Building the Riak cluster using RancherOS and Rancher
platform provide docker management and networking capabilities, making
installation quick and making it simple to upgrade and scale the
environment in the future. You can download Riak
here. To download Rancher
or RancherOS please visit our GitHub
site
. You can find a detailed getting
started
guide
for
RancherOS on GitHub as well. If you would like to learn more, please
join our next online meetup to meet the team and learn about the latest
with Rancher and RancherOS. Hussein Galal is
a Linux System Administrator, with experience in Linux, Unix,
Networking, and open source technologies like Nginx, Apache, PHP-FPM,
Passenger, MySQL, LXC, and Docker. You can follow Hussein
on Twitter @galal_hussein.

Source