Deploying Rancher from the AWS Marketplace


A Detailed Overview of Rancher’s Architecture

This newly-updated, in-depth guidebook provides a detailed overview of the features and functionality of the new Rancher: an open-source enterprise Kubernetes platform.

Get the eBook

A step-by-step guide

Rancher is now available for easy deployment from the Amazon Web
Services (AWS)
Marketplace
.
While Rancher has always been easy to install, availability in the
marketplace makes installing Rancher faster and easier than ever. In
the article below, I provide a step-by-step guide to deploying a working
Rancher environment on AWS. The process involves two distinct parts:

  • In part I I step through the process of installing a Rancher
    management node from the AWS Marketplace
  • In **part II **I deploy a Kubernetes cluster in AWS using the
    Rancher management node deployed in part I

From my own experience, it is often small details missed that can lead
to trouble. In this guide I attempt to point out some potential pitfalls
to help ensure a smooth installation.

Before you get started

If you’re a regular AWS user you’ll find this process straightforward.
Before you get started you’ll need:

  • An Amazon EC2 account – If you don’t already have an account,
    you can visit AWS EC2 (https://aws.amazon.com/ec2/) and select
    Get started with Amazon EC2 and follow the process there to
    create a new account.
  • An AWS Keypair – If you’re not familiar with Key Pairs, you can
    save yourself a little grief by familiarizing yourself with the
    topic. You’ll need a Key Pair to connect via ssh to the machine you
    create on AWS. Although most users will probably never have a need
    to ssh to the management host, the installation process still
    requires that a Key Pair exist. From within the Network & Security
    heading in your AWS account select Key Pairs. You can create a Key
    Pair, give it a name, and the AWS console will download a PEM file
    (a ASCII vase64 X.509 certificate) that you should keep on your
    local machine. This will hold the RSA Private Key that you’ll need
    to access the machine via ssh or scp. It’s important that you
    save the key file, because if you lose it, it can’t be replaced and
    you’ll need to create a new one. The marketplace installation
    process for Rancher will assume you already have a Key Pair file.
    You can more read about Key Pairs in the AWS on-line
    documentation
    .
  • Setup AWS Identity and Access Management – If you’re new to
    AWS, this will seem a little tedious, but you’ll want to create an
    IAM users account at some point through the AWS console. You don’t
    need to do this to install Rancher from the AWS Marketplace, but
    you’ll need these credentials to use the Cloud Installer to add
    extra hosts to your Rancher cluster as described in part II of this
    article. You can follow the instructions to Create your Identity
    and Access Management
    Credentials
    .

With these setup items out of the way, we’re ready to get started.

Step 1: Select a Rancher offering from the marketplace

There are three different offerings in the Marketplace as shown below.

  • Rancher on
    RancherOS

    – This is the option we’ll use in this example. This is a single
    container implementation of the Rancher environment running on
    RancherOS, a lightweight Linux optimized for container environments
  • RancherOS –
    HVM

    This marketplace offering installs the RancherOS micro Linux
    distribution only without the Rancher environment. You might use
    this as the basis to package your own containerized application on
    RancherOS. HVM refers to the type of Linux AMI used – you can
    learn more about Linux AMI Virtualization Types
    here
    .
  • RancherOS – HVM – ECS
    Enabled

    – This marketplace offering is a variant of the RancherOS offering
    above intended for use with Amazon’s EC2 Container Service
    (ECS)
    .

We’ll select the first option – Rancher on RancherOS:
** **
After you select Rancher on RancherOS you’ll see additional
informational including pricing details. There is no charge for the use
of the software itself, but you’ll be charged for machine hours and
other fees like EBS magnetic volumes and data transfer at standard AWS
rates. Press Continue once you’ve reviewed the details and the
pricing.

** ** Step2: Select an installation type and provide installation
details The next step is to select an installation method and provide
required settings that AWS will need to provision your machine running
Rancher. There are three installation types:

  1. Click Launch – this is the fastest and easiest approach. Our
    example below assumes this method of installation.
  2. Manual Launch – this installation method will guide you through
    the process of installing Rancher OS using the EC2 Console, API
    or CLI.
  3. Service Catalog – you can also copy versions of Rancher on
    RancherOS to a Service Catalog specific to a region and assign users
    and roles. You can learn more about AWS Service Catalogs
    here.

Select Click Launch and provides installation options as shown:

  • Version – select a version of Rancher to install. By default
    the latest is selected.
  • Region – select the AWS region where you will deploy the
    software. You’ll want to make a note of this because the AWS EC2
    dashboard segments machines by Region (pull-down at the top right of
    the AWS EC2 dashboard). You will need to have the correct region
    selected to see your machines. Also, as you add additional Rancher
    hosts, you’ll want to install them in the same Region, Availability
    Group and Subnet as the management host.
  • EC2 Instance Type – t2.medium is the default (a machine with 4GB
    of RAM and 2 virtual cores). This is inexpensive and OK for
    testing, but you’ll want to use larger machines to actually run
    workloads.
  • VPC Settings (Virtual Private Cloud) – You can specify a
    virtual private cloud and subnet or create your own. Accept the
    default here unless you have reason to select a particular cloud.
  • Security Group – If you have an appropriate Security Group
    already setup in the AWS console you can specify it here. Otherwise
    the installer will create one for you that ensures needed ports are
    open including port 22 (to allow ssh access to the host) and port
    8080 (where the Rancher UI will be exposed).
  • Key Pair – As mentioned at the outset, select a previously
    created Key Pair for which you’ve already saved the private key (the
    X.509 PEM file). You will need this file in case you need to connect
    to your provisioned VM using ssh or scp. To connect using ssh you
    would use a command like this: ssh -i key-pair-name.pem
    <public-ip-address>

When you’ve entered these values select “Launch with 1-click“

Once you launch Rancher,you’ll see the screen below confirming details
of your installation. You’ll receive an e-mail as well. This will
provide you with convenient links to:

  • Your EC2 console – that you can visit anytime by visiting
    http://aws.amazon.com/ec2
  • Your Software page, that provides information about your various
    AWS Marketplace subscriptions

Step 3: Watch as the machine is provisioned

From this point on, Rancher should install by itself. You can monitor
progress by visiting the AWS EC2 Console. Visit
http://aws.amazon.com, login with your AWS credentials, and select EC2
under AWS services. You should see the new AWS t2.medium machine
instance initializing as shown below. Note the pull-down in the top
right of “North Virginia”. This provides us with visibility to machines
in the US East region selected in the previous step.

Step 4: Connect to the Rancher UI

The Rancher machine will take a few minutes to provision, but once
complete, you should be able to connect to the external IP address for
the host (shown in the EC2 console above) on port 8080. Your IP address
will be different but in our case the Public IP address was
54.174.92.13, so we pointed a browser to the URL
http://54.174.92.13:8080. It may take a few minutes for Rancher UI to
become available but you should see the screen below.

Congratulations! If you’ve gotten this far you’ve successfully
deployed Rancher in the AWS cloud! ** **

Having the Rancher UI up and running is nice, but there’s not a lot you
can do with Rancher until you have cluster nodes up and running. In
this section I’ll look at how to deploy a Kubernetes cluster using the
Rancher management node that I deployed from the marketplace in Part I.

Step 1 – Setting up Access Control

You’ll notice when the Rancher UI is first provisioned, there is no
access control. This means that anyone can connect to the web
interface. You’ll be prompted with a warning indicating that you should
setup Authentication before proceeding. Select Access Control under
the ADMIN menu in the Rancher UI. Rancher exposes multiple
authentication options as shown including the use of external Access
Control providers. DevOps teams will often store their projects in a
GitHub repository, so using GitHub for authentication is a popular
choice. We’ll use GitHub in this example. For details on using other
Access Control methods, you can consult the Rancher
Documentation
.

GitHub users should follow the directions, and click on the link
provided in the Rancher UI to setup an OAuth application in GitHub.
You’ll be prompted to provide your GitHub credentials. Once logged into
GitHub, you should see a screen listing any OAuth applications and
inviting you to Register a new application. We’re going to setup
Rancher for Authentication with Git Hub.

Click the Register a new application button in Git Hub, and
provide details about your Rancher installation on AWS. You’ll need the
Public IP address or fully qualified host name for your Rancher
management host.

Once you’ve supplied details about the Rancher application to Git Hub
and clicked Register application, Git Hub will provide you with a
Client ID and a Client Secret for the Rancher application as
shown below.

Copy and paste the Client ID and the Client Secret that appears in Git
Hub into the Rancher Access Control setup screen, and save these values.

Once these values are saved, click Authorize to allow Git Hub
authentication to be used with your Rancher instance.

If you’ve completed these steps successfully, you should see a message
that Git Hub authentication has been setup. You can invite additional
Git Hub users or organizations to access your Rancher instance as shown
below.

Step 2 – Add a new Rancher environment

When Rancher is deployed, there is a single Default environment that
uses Rancher’s native orchestration engine called Cattle. Since
we’re going to install a Rancher managed Kubernetes cluster, we’ll need
to add a new environment for Kubernetes. Under the environment selection
menu on the left labelled Default, select Add Environment.
Provide a name and description for the environment as shown, and select
Kubernetes as the environment template. Selecting the Kubernetes
framework means that Kubernetes will be used for Orchestration, and
additional Rancher frameworks will be used including Network Services,
Healthcheck Services and Rancher IPsec as the software-defined network
environment in Kubernetes.

Once you add the new environment, Rancher will immediately begin trying
to setup a Kubernetes environment. Before Rancher can proceed however a
Docker host needs to be added.

Step 3 – Adding Kubernetes cluster hosts

To add a host in Rancher, click on Add a host on the warning message
that appears at the top of the screen or select the Add Host option
under the Infrastructure -> Hosts menu. Rancher provides multiple
ways to add hosts. You can add an existing Docker host on-premises or in
the cloud, or you can automatically add hosts using a cloud-provider
specific machine driver as shown below. Since our Rancher management
host is running on Amazon EC2, we’ll select the Amazon EC2 machine
driver to auto-provision additional cluster hosts. You’ll want to select
the same AWS region where your Rancher management host resides and
you’ll need your AWS provided Access key and Secret key. If you
don’t have an AWS Access key and Secret key, the AWS
documentation

explains how you can obtain one. You’ll need to provide your AWS
credentials to Rancher as shown so that it can provision machines on
your behalf.

After you’ve provided your AWS credentials, select the AWS Virtual
private cloud and subnet. We’ve selected the same VPC where our Rancher
management node was installed from the AWS marketplace.

Security groups in AWS EC2 express a set of inbound and outbound
security rules. You can choose a security group already setup in your
AWS account, but it is easier to just let Rancher use the existing
rancher-machine group to ensure the network ports that Rancher needs
open are configured appropriately.

After setting up the security group, you can set your instance options
for the additional cluster nodes. You can add multiple hosts at a time.
We add five hosts in this example. We can give the hosts a name. We use
k8shost as our prefix, and Rancher will append a number to the
prefix naming our hosts k8shost1 through k8shost5. You can
select the type of AWS host you’d like for your Kubernetes cluster. For
testing, a t2.medium instance is adequate (2 cores and 4GB of RAM)
however if you are running real workloads, a larger node would be
better. Accept the default 16GB root directory size. If you leave the
AMI blank, Rancher will provision the machine using an Ubuntu AMI. Note
that the ssh username will be ubuntu for this machine type. You
can leave the other settings alone in case you want to change the
defaults.

Once you click Create, Rancher will use your AWS credentials to
provision the hosts using your selected options in your AWS cloud
account. You can monitor the creation of the new hosts from the EC2
dashboard as shown.

Progress will also be shown from within Rancher. Rancher will
automatically provision the AWS host, install the appropriate version of
Docker on the host, provide credentials, start a rancher Agent, and once
the agent is present Rancher will orchestrate the installation of
Kubernetes pulling the appropriate rancher components from the Docker
registry to each cluster host.

You can also monitor the step-by-step provisioning process by
selecting Hosts as shown below under the Infrastructure menu.
This view shows our five node Kubernetes cluster at different stages of
provisioning.

It will take a few minutes before the environment is provisioned and up
and running, but when the dust settles, the Infrastructure Stacks
view should show that the Rancher stacks comprising the Kubernetes
environment are all up and running and healthy.

Under the Kubernetes pull-down, you can launch a Kubernetes shell and
issue kubectl commands. Remember that Kubernetes has the notion of
namespaces, so to see the Pods and Services used by Kubernetes itself,
you’ll need to query the kube-system namespace. This same screen also
provides guidance for installing the kubectl CLI on your own local host.

Rancher also provides access to the Kubernetes Dashboard following the
automated installation under the Kubernetes pull-down.

Congratulations! If you’ve gotten this far, give yourself a pat on the
back. You’re now a Rancher on AWS expert!

Source

Docker at DEVIntersection 2018 – Docker Blog

Docker will be at DEVIntersection 2018 in Las Vegas the first week in December. DEVIntersection now in its fifth year, brings Microsoft leaders, engineers and industry experts together to educate, network, and share their expertise with developers. This year DEVIntersection will have a Developer, SQL Server and AI/Azure tracks integrated into a single event. Docker be featured at DEVIntersection via the following sessions:

Modernizing .NET Applications with Docker on Azure

Derrick Miller, a Docker Senior Solutions Engineer, will deliver a session focused on using containers as a modernization path for traditional applications, including how to select Windows Server 2008 applications for containerization, implementation tips, and common gotchas.

Depend on Docker – Get It Done with Docker on Azure

Alex Iankoulski, a Docker Captain, will highlight how how Baker Hughes, a GE Company, uses Docker to transform software development and delivery. Be inspired by the story of software professionals and scientists who were enabled by Docker to use a common language and work together to create a sophisticated platform for the Oil & Gas Industry. Attendees will see practical examples of how Docker is deployed on Azure.

Docker for Web Developers

Dan Wahlin, a Microsoft MVP and Docker Captain, will focus on the fundamentals of Docker and update attendees about the tools that can be used to get a full dev environment up and running locally with minimal effort. Attendees will also learn how to create Docker images that can be moved between different environments.

You can learn when the sessions are being delivered here.

Can’t make it the conference? Learn how Docker Enterprise is helping customers reduce their hardware and software licensing costs by up to 50% and enabling them to migrate their legacy Windows applications here.

Don’t miss #CodeParty at DevIntersection and Microsoft Connect();

On Tuesday, Dec. 4 after DEVIntersection and starting at 5:30PM PST Docker will join @Mobilize, @LEADTOOLS, @PreEmptive, @DocuSignAPI, @CData and @Twilio to kick off another hilarious and prize-filled stream of geek weirdness and trivia questions on the CodeParty twitch channel. You won’t want to miss it, because the only way to get some high-quality swag is to answer the trivia questions on the Twitch chat stream. We’ll be giving away a couple of Surface Go laptops, gift certificates to Amazon, an Xbox and a bunch of other cool stuff. Don’t miss it!

Learn more about the partners participating together with Docker at #CodeParty:

Mobilize.net

Mobilize.Net’s AI-driven code migration tools reduce the cost and time to modernize valuable legacy client-server applications. Convert VB6 code to .NET or even a modern web application. Move PowerBuilder to Angular and ASP.NET Core or Java Spring. Automated migration tools cut time, cost, and risk from legacy modernization projects.

Progress
The creator of Telerik .NET and Kendo UI JavaScript user interface components/controls, reporting solutions and productivity tools, Progress offers all the tools developers need to build high-performance modern web, mobile, and desktop apps with outstanding UI including modern chatbot experiences.
LEADTOOLS

LEADTOOLS Imaging SDKs help programmers integrate A-Z imaging into their cross-platform applications with a comprehensive toolkits offer powerful features including OCR, Barcode, Forms, PDF, Document Viewing, Image Processing, DICOM, and PACS for building an Enterprise Content Management (ECM) solution, zero-footprint medical viewer, or audio/video media streaming server.

PreEmptive Solutions

PreEmptive Solutions provides quick to implement, application protection to hinder IP and data attacks and improve security related compliance. P PreEmptive’s application shielding and .NET, Xamarin, Java and Android obfuscator solutions help protect your assets now – whether client, server, cloud or mobile app protection.

DocuSign

Whether you are looking for a simple eSignature integration or building a complex workflow, the DocuSign APIs and tools have you covered. Our new C# SDK includes .NET Core 2.0 support, and a new Quick Start API code example for C#, complete with installation and demonstration video. s Open source SDKs also available for PHP, Java, Ruby, Python, and Node.js.

CData

CData Software is a leading provider of Drivers & Adapters for data integration offering real-time SQL-92 connectivity to more than 100+ SaaS, NoSQL, and Big Data sources, through established standards like ODBC, JDBC, ADO.NET, and ODATA. By virtualizing data access, the CData drivers insulate developers from the complexities of data integration while enabling real-time data access from major BI, ETL and reporting tools.

Twilio

Twilio powers the future of business communications. Enabling phones, VoIP, and messaging to be embedded into web, desktop, and mobile software. We take care of the messy telecom hardware and expose a globally available cloud API that developers can interact with to build intelligent and complex communications systems that scales with you.

Source

Managing containerized system services with Podman

Managing containerized system services with Podman

In this article, I discuss containers, but look at them from another angle. We usually refer to containers as the best technology for developing new cloud-native applications and orchestrating them with something like Kubernetes. Looking back at the origins of containers, we’ve mostly forgotten that containers were born for simplifying application distribution on standalone systems.

In this article, we’ll talk about the use of containers as the perfect medium for installing applications and services on a Red Hat Enterprise Linux (RHEL) system. Using containers doesn’t have to be complicated, I’ll show how to run MariaDB, Apache HTTPD, and WordPress in containers, while managing those containers like any other service, through systemd and systemctl.

Additionally, we’ll explore Podman, which Red Hat has developed jointly with the Fedora community. If you don’t know what Podman is yet, see my previous article, Intro to Podman (Red Hat Enterprise Linux 7.6) and Tom Sweeney’s Containers without daemons: Podman and Buildah available in RHEL 7.6 and RHEL 8 Beta.

Red Hat Container Catalog

First of all, let’s explore the containers that are available for Red Hat Enterprise Linux through the Red Hat Container Catalog (access.redhat.com/containers):

By clicking Explore The Catalog, we’ll have access to the full list of containers categories and products available in Red Hat Container Catalog.

Exploring the available containers

Clicking Red Hat Enterprise Linux will bring us to the RHEL section, displaying all the available containers images for the system:

Available RHEL containers

At the time of writing this article, in the RHEL category there were more than 70 containers images, ready to be installed and used on RHEL 7 systems.

So let’s choose some container images and try them on a Red Hat Enterprise Linux 7.6 system. For demo purposes, we’ll try to use Apache HTTPD + PHP and the MariaDB database for a WordPress blog.

Install a containerized service

We’ll start by installing our first containerized service for setting up a MariaDB database that we’ll need for hosting the WordPress blog’s data.

As a prerequisite for installing containerized system services, we need to install the utility named Podman on our Red Hat Enterprise Linux 7 system:

[root@localhost ~]# subscription-manager repos –enable rhel-7-server-rpms –enable rhel-7-server-extras-rpms
[root@localhost ~]# yum install podman

As explained in my previous article, Podman complements Buildah and Skopeo by offering an experience similar to the Docker command line: allowing users to run standalone (non-orchestrated) containers. And Podman doesn’t require a daemon to run containers and pods, so we can easily say goodbye to big fat daemons.

By installing Podman, you’ll see that Docker is no longer a required dependency!

As suggested by the Red Hat Container Catalog’s MariaDB page, we can run the following commands to get the things done (we’ll replace, of course, docker with podman):

[root@localhost ~]# podman pull registry.access.redhat.com/rhscl/mariadb-102-rhel7
Trying to pull registry.access.redhat.com/rhscl/mariadb-102-rhel7…Getting image source signatures
Copying blob sha256:9a1bea865f798d0e4f2359bd39ec69110369e3a1131aba6eb3cbf48707fdf92d
72.21 MB / 72.21 MB [======================================================] 9s
Copying blob sha256:602125c154e3e132db63d8e6479c5c93a64cbfd3a5ced509de73891ff7102643
1.21 KB / 1.21 KB [========================================================] 0s
Copying blob sha256:587a812f9444e67d0ca2750117dbff4c97dd83a07e6c8c0eb33b3b0b7487773f
6.47 MB / 6.47 MB [========================================================] 0s
Copying blob sha256:5756ac03faa5b5fb0ba7cc917cdb2db739922710f885916d32b2964223ce8268
58.82 MB / 58.82 MB [======================================================] 7s
Copying config sha256:346b261383972de6563d4140fb11e81c767e74ac529f4d734b7b35149a83a081
6.77 KB / 6.77 KB [========================================================] 0s
Writing manifest to image destination
Storing signatures
346b261383972de6563d4140fb11e81c767e74ac529f4d734b7b35149a83a081

[root@localhost ~]# podman images
REPOSITORY TAG IMAGE ID CREATED SIZE
registry.access.redhat.com/rhscl/mariadb-102-rhel7 latest 346b26138397 2 weeks ago 449MB

After that, we can look at the Red Hat Container Catalog page for details on the needed variables for starting the MariaDB container image.

Inspecting the previous page, we can see that under Labels, there is a label named usage containing an example string for running this container image:

usage docker run -d -e MYSQL_USER=user -e MYSQL_PASSWORD=pass -e MYSQL_DATABASE=db -p 3306:3306 rhscl/mariadb-102-rhel7

After that we need some other information about our container image: the “user ID running inside the container” and the “persistent volume location to attach“:

[root@localhost ~]# podman inspect registry.access.redhat.com/rhscl/mariadb-102-rhel7 | grep User
“User”: “27”,
[root@localhost ~]# podman inspect registry.access.redhat.com/rhscl/mariadb-102-rhel7 | grep -A1 Volume
“Volumes”: {
/var/lib/mysql/data“: {}
[root@localhost ~]# podman inspect registry.access.redhat.com/rhscl/mariadb-102-rhel7 | grep -A1 ExposedPorts
“ExposedPorts”: {
3306/tcp”: {}

At this point, we have to create the directories that will handle the container’s data; remember that containers are ephemeral by default. Then we set also the right permissions:

[root@localhost ~]# mkdir -p /opt/var/lib/mysql/data
[root@localhost ~]# chown 27:27 /opt/var/lib/mysql/data

Then we can set up our systemd unit file for handling the database. We’ll use a unit file similar to the one prepared in the previous article:

[root@localhost ~]# cat /etc/systemd/system/mariadb-service.service
[Unit]
Description=Custom MariaDB Podman Container
After=network.target

[Service]
Type=simple
TimeoutStartSec=5m
ExecStartPre=-/usr/bin/podman rm “mariadb-service”

ExecStart=/usr/bin/podman run –name mariadb-service -v /opt/var/lib/mysql/data:/var/lib/mysql/data:Z -e MYSQL_USER=wordpress -e MYSQL_PASSWORD=mysecret -e MYSQL_DATABASE=wordpress –net host registry.access.redhat.com/rhscl/mariadb-102-rhel7

ExecReload=-/usr/bin/podman stop “mariadb-service”
ExecReload=-/usr/bin/podman rm “mariadb-service”
ExecStop=-/usr/bin/podman stop “mariadb-service”
Restart=always
RestartSec=30

[Install]
WantedBy=multi-user.target

Let’s take apart our ExecStart command and analyze how it’s built:

  • /usr/bin/podman run –name mariadb-service says we want to run a container that will be named mariadb-service.
  • v /opt/var/lib/mysql/data:/var/lib/mysql/data:Z says we want to map the just-created data directory to the one inside the container. The Z option informs Podman to map correctly the SELinux context for avoiding permissions issues.
  • e MYSQL_USER=wordpress -e MYSQL_PASSWORD=mysecret -e MYSQL_DATABASE=wordpress identifies the additional environment variables to use with our MariaDB container. We’re defining the username, the password, and the database name to use.
  • –net host maps the container’s network to the RHEL host.
  • registry.access.redhat.com/rhscl/mariadb-102-rhel7 specifies the container image to use.

We can now reload the systemd catalog and start the service:

[root@localhost ~]# systemctl daemon-reload
[root@localhost ~]# systemctl start mariadb-service
[root@localhost ~]# systemctl status mariadb-service
mariadb-service.service – Custom MariaDB Podman Container
Loaded: loaded (/etc/systemd/system/mariadb-service.service; static; vendor preset: disabled)
Active: active (running) since Thu 2018-11-08 10:47:07 EST; 22s ago
Process: 16436 ExecStartPre=/usr/bin/podman rm mariadb-service ​(code=exited, status=0/SUCCESS)
Main PID: 16452 (podman)
CGroup: /system.slice/mariadb-service.service
└─16452 /usr/bin/podman run –name mariadb-service -v /opt/var/lib/mysql/data:/var/lib/mysql/data:Z -e MYSQL_USER=wordpress -e MYSQL_PASSWORD=mysecret -e MYSQL_DATABASE=wordpress –net host regist…

Nov 08 10:47:14 localhost.localdomain podman[16452]: 2018-11-08 15:47:14 140276291061504 [Note] InnoDB: Buffer pool(s) load completed at 181108 15:47:14
Nov 08 10:47:14 localhost.localdomain podman[16452]: 2018-11-08 15:47:14 140277156538560 [Note] Plugin ‘FEEDBACK’ is disabled.
Nov 08 10:47:14 localhost.localdomain podman[16452]: 2018-11-08 15:47:14 140277156538560 [Note] Server socket created on IP: ‘::’.
Nov 08 10:47:14 localhost.localdomain podman[16452]: 2018-11-08 15:47:14 140277156538560 [Warning] ‘user’ entry ‘root@b75779533f08’ ignored in –skip-name-resolve mode.
Nov 08 10:47:14 localhost.localdomain podman[16452]: 2018-11-08 15:47:14 140277156538560 [Warning] ‘user’ entry ‘@b75779533f08’ ignored in –skip-name-resolve mode.
Nov 08 10:47:14 localhost.localdomain podman[16452]: 2018-11-08 15:47:14 140277156538560 [Warning] ‘proxies_priv’ entry ‘@% root@b75779533f08’ ignored in –skip-name-resolve mode.
Nov 08 10:47:14 localhost.localdomain podman[16452]: 2018-11-08 15:47:14 140277156538560 [Note] Reading of all Master_info entries succeded
Nov 08 10:47:14 localhost.localdomain podman[16452]: 2018-11-08 15:47:14 140277156538560 [Note] Added new Master_info ” to hash table
Nov 08 10:47:14 localhost.localdomain podman[16452]: 2018-11-08 15:47:14 140277156538560 [Note] /opt/rh/rh-mariadb102/root/usr/libexec/mysqld: ready for connections.
Nov 08 10:47:14 localhost.localdomain podman[16452]: Version: ‘10.2.8-MariaDB’ socket: ‘/var/lib/mysql/mysql.sock’ port: 3306 MariaDB Server

Perfect! MariaDB is running, so we can now start working on the Apache HTTPD + PHP container for our WordPress service.

First of all, let’s pull the right container from Red Hat Container Catalog:

[root@localhost ~]# podman pull registry.access.redhat.com/rhscl/php-71-rhel7
Trying to pull registry.access.redhat.com/rhscl/php-71-rhel7…Getting image source signatures
Skipping fetch of repeat blob sha256:9a1bea865f798d0e4f2359bd39ec69110369e3a1131aba6eb3cbf48707fdf92d
Skipping fetch of repeat blob sha256:602125c154e3e132db63d8e6479c5c93a64cbfd3a5ced509de73891ff7102643
Skipping fetch of repeat blob sha256:587a812f9444e67d0ca2750117dbff4c97dd83a07e6c8c0eb33b3b0b7487773f
Copying blob sha256:12829a4d5978f41e39c006c78f2ecfcd91011f55d7d8c9db223f9459db817e48
82.37 MB / 82.37 MB [=====================================================] 36s
Copying blob sha256:14726f0abe4534facebbfd6e3008e1405238e096b6f5ffd97b25f7574f472b0a
43.48 MB / 43.48 MB [======================================================] 5s
Copying config sha256:b3deb14c8f29008f6266a2754d04cea5892ccbe5ff77bdca07f285cd24e6e91b
9.11 KB / 9.11 KB [========================================================] 0s
Writing manifest to image destination
Storing signatures
b3deb14c8f29008f6266a2754d04cea5892ccbe5ff77bdca07f285cd24e6e91b

We can now look through this container image to get some details:

[root@localhost ~]# podman inspect registry.access.redhat.com/rhscl/php-71-rhel7 | grep User
“User”: “1001”,
“User”: “1001”
[root@localhost ~]# podman inspect registry.access.redhat.com/rhscl/php-71-rhel7 | grep -A1 Volume
[root@localhost ~]# podman inspect registry.access.redhat.com/rhscl/php-71-rhel7 | grep -A1 ExposedPorts
“ExposedPorts”: {
“8080/tcp”: {},

As you can see from the previous commands, we got no volume from the container details. Are you asking why? It’s because this container image, even if it’s part of RHSCL (formerly known as Red Hat Software Collections), has been prepared for working with the Source-to-Image (S2I) builder. For more info on the S2I builder, please take a look at its GitHub project page.

Unfortunately, at this moment, the S2I utility is strictly dependent on Docker, but for demo purposes, we would like to avoid it..!

So moving back to our issue, what can we do for guessing the right folder to mount on our PHP container? We can easily guess the right location by looking at all the environment variables for the container image, where we will find APP_DATA=/opt/app-root/src.

So let’s create this directory with the right permissions; we’ll also download the latest package for our WordPress service:

[root@localhost ~]# mkdir -p /opt/app-root/src/
[root@localhost ~]# curl -o latest.tar.gz https://wordpress.org/latest.tar.gz
[root@localhost ~]# tar -vxf latest.tar.gz
[root@localhost ~]# mv wordpress/* /opt/app-root/src/
[root@localhost ~]# chown 1001 -R /opt/app-root/src

We’re now ready for creating our Apache http + PHP systemd unit file:

[root@localhost ~]# cat /etc/systemd/system/httpdphp-service.service
[Unit]
Description=Custom httpd + php Podman Container
After=mariadb-service.service

[Service]
Type=simple
TimeoutStartSec=30s
ExecStartPre=-/usr/bin/podman rm “httpdphp-service”

ExecStart=/usr/bin/podman run –name httpdphp-service -p 8080:8080 -v /opt/app-root/src:/opt/app-root/src:Z registry.access.redhat.com/rhscl/php-71-rhel7 /bin/sh -c /usr/libexec/s2i/run

ExecReload=-/usr/bin/podman stop “httpdphp-service”
ExecReload=-/usr/bin/podman rm “httpdphp-service”
ExecStop=-/usr/bin/podman stop “httpdphp-service”
Restart=always
RestartSec=30

[Install]
WantedBy=multi-user.target

We need then to reload the systemd unit files and start our latest service:

[root@localhost ~]# systemctl daemon-reload

[root@localhost ~]# systemctl start httpdphp-service

[root@localhost ~]# systemctl status httpdphp-service
httpdphp-service.service – Custom httpd + php Podman Container
Loaded: loaded (/etc/systemd/system/httpdphp-service.service; static; vendor preset: disabled)
Active: active (running) since Thu 2018-11-08 12:14:19 EST; 4s ago
Process: 18897 ExecStartPre=/usr/bin/podman rm httpdphp-service (code=exited, status=125)
Main PID: 18913 (podman)
CGroup: /system.slice/httpdphp-service.service
└─18913 /usr/bin/podman run –name httpdphp-service -p 8080:8080 -v /opt/app-root/src:/opt/app-root/src:Z registry.access.redhat.com/rhscl/php-71-rhel7 /bin/sh -c /usr/libexec/s2i/run

Nov 08 12:14:20 localhost.localdomain podman[18913]: => sourcing 50-mpm-tuning.conf …
Nov 08 12:14:20 localhost.localdomain podman[18913]: => sourcing 40-ssl-certs.sh …
Nov 08 12:14:20 localhost.localdomain podman[18913]: AH00558: httpd: Could not reliably determine the server’s fully qualified domain name, using 10.88.0.12. Set the ‘ServerName’ directive globall… this message
Nov 08 12:14:20 localhost.localdomain podman[18913]: [Thu Nov 08 17:14:20.925637 2018] [ssl:warn] [pid 1] AH01909: 10.88.0.12:8443:0 server certificate does NOT include an ID which matches the server name
Nov 08 12:14:20 localhost.localdomain podman[18913]: AH00558: httpd: Could not reliably determine the server’s fully qualified domain name, using 10.88.0.12. Set the ‘ServerName’ directive globall… this message
Nov 08 12:14:21 localhost.localdomain podman[18913]: [Thu Nov 08 17:14:21.017164 2018] [ssl:warn] [pid 1] AH01909: 10.88.0.12:8443:0 server certificate does NOT include an ID which matches the server name
Nov 08 12:14:21 localhost.localdomain podman[18913]: [Thu Nov 08 17:14:21.017380 2018] [http2:warn] [pid 1] AH10034: The mpm module (prefork.c) is not supported by mod_http2. The mpm determines how things are …
Nov 08 12:14:21 localhost.localdomain podman[18913]: [Thu Nov 08 17:14:21.018506 2018] [lbmethod_heartbeat:notice] [pid 1] AH02282: No slotmem from mod_heartmonitor
Nov 08 12:14:21 localhost.localdomain podman[18913]: [Thu Nov 08 17:14:21.101823 2018] [mpm_prefork:notice] [pid 1] AH00163: Apache/2.4.27 (Red Hat) OpenSSL/1.0.1e-fips configured — resuming normal operations
Nov 08 12:14:21 localhost.localdomain podman[18913]: [Thu Nov 08 17:14:21.101849 2018] [core:notice] [pid 1] AH00094: Command line: ‘httpd -D FOREGROUND’
Hint: Some lines were ellipsized, use -l to show in full.

Let’s open the 8080 port on our system’s firewall for connecting to our brand new WordPress service:

[root@localhost ~]# firewall-cmd –permanent –add-port=8080/tcp
[root@localhost ~]# firewall-cmd –add-port=8080/tcp

We can surf to our Apache web server:

Apache web server

Start the installation process, and define all the needed details:

Start the installation process

And finally, run the installation!

Run the installation

At the end, we should reach out our brand new blog, running on Apache httpd + PHP backed by a great MariaDB database!

That’s all folks; may containers be with you!

Source

First Impressions: goto; Copenhagen

It’s November and that means conference season – people from all around the world are travelling to speak at, attend or organise tech conferences. This week I’ve been at my first goto; event in Copenhagen held at the Bella Sky Center in Denmark. I’ll write a bit about my experiences over the last few days.

We’re wondering if #gotoselfie will catch on?? Here with @ah3rz after doing a short interview to camera pic.twitter.com/w7ioMDL7DL

— Alex Ellis (@gotocph) (@alexellisuk) November 23, 2018

My connection to goto; was through my friend Adam Herzog who works for Trifork – the organisers of the goto events. I’ve known Adam since he was working at Docker in the community outreach and marketing team. One of the things I really like about his style is his live-tweeting from sessions. I’ve learnt a lot from him over the past few years so this post is going to feature Tweets and photos from the event to give you a first-person view of my week away.

First impressions CPH

Copenhagen has a great conference center and hotel connected by sky-bridge called Bella Sky. Since I live in the UK I flew in from London and the first thing I noticed in the airport was just how big it is! It feels like a 2km+/- walk from the Ryanair terminal to baggage collection. Since I was here last – they’ve added a Pret A Manger cafe that we’re used to seeing across the UK.
There’s a shuttle bus that leaves from Terminal 2 straight to the Bella Sky hotel. I was the only person on the bus and it was already almost dark at just 3pm in the afternoon.

On arrival the staff at the hotel were very welcoming and professional. The rooms are modern and clean with good views and facilities. I have stayed both at the Bella before and in the city. I liked the city for exploring during the evenings and free-time, but being close to the conference is great for convenience.

The conference days

This goto; event was three days long with two additional workshop days, so for some people it really is an action-packed week. The keynotes kick-off at 9am and are followed by talks throughout the day. The content at the keynotes was compelling, but at the same time wasn’t always focused on software development. For instance the opening session was called The future of high-speed transportation by rocket-scientist Anita Sengupta.

Unlike most conferences I’ve attended there were morning, afternoon and evening keynotes. This does make for quite long days, but also means the attendees are together most of the day rather than having to make their own plans.

One of my favourite keynote sessions was On the Road to Artificial General Intelligence by Danny Lange from Unity.

First we found out what AI was not:

‘These things are not AI’ @GOTOcph pic.twitter.com/7PJHH8qM5S

— Alex Ellis (@gotocph) (@alexellisuk) November 20, 2018

Then we saw AI in action – trained on GCP with TensorFlow to give a personality to the wireframe of a pet dog. That was then replicated into a race course with a behaviour that made the dog chase after a bone.

Fascinating – model of a dog trained by @unity3d to fetch bones. “all we used was TensorFlow and GCP, no developers programmed this” @GOTOcph pic.twitter.com/lOoiHsgCCx

— Alex Ellis (@gotocph) (@alexellisuk) November 20, 2018

My talk

On the first day I also gave my talk on Serverless Beyond the Hype.

There was an artist doing a live-sketch of my talk. I’ve seen this done a few times at meet-ups and I always find it fascinating to see how they capture the talk so well in pictures.

Awesome diagramming art by @MindsEyeCCF based the on @alexellisuk’s #GOTOcph talk on Serverless with @openfaas! pic.twitter.com/iXZawibeiQ

— Kenny Bastani (@kennybastani) November 19, 2018

My talk started off looking at Gartner’s Hype Cycle – explored ThoughtWorks’ opinions on multi-cloud and lock-in before covering RedMonk’s advice to adopt Kubernetes. After that I looked at the leading projects available that enable Serverless with Kubernetes and then gave some live demos and described case-studies of how various companies are leveraging OpenFaaS.

#serverless is going to get a bit worse before it gets better…@openfaas creator @alexellisuk sharing #gartner hype cycle predicting reaching plateau of productivity in 2-5 years and clickbait article on fear of lock-in from @TheRegister at #GOTOcph pic.twitter.com/gZmP7KsisP

— adam herzog (@ah3rz) November 19, 2018

Vision Bank is one of our production users who are benefiting from the automation, monitoring and self-healing, scaling infrastructure offered by containers.

cool #fintech #serverless case study using @openfaas in production @VisionBanco looking to skip #microservices and go from monolith to functions

#openfaas founder @alexellisuk at #GOTOcph pic.twitter.com/jALzmve5PH

— adam herzog (@ah3rz) November 19, 2018

And of course – no talk of mine is complete without live-demos:

Live coding session #GOTOcph @alexellisuk #openfaas pic.twitter.com/BOTGYkk4TD

— Nicolaj Lock (@mr_nlock) November 19, 2018

In my final demo the audience donated my personal money to a local children’s charity in Copenhagen using the Monzo bank API and OpenFaaS Cloud functions.

Serverless beyond the hype by @alexellisuk. Donating to @Bornecancerfond in the live demo 💰💸 #serverless pic.twitter.com/n1rzcqRByd

— Martin Jensen (@mrjensens) November 19, 2018

Feedback-loop

Later in the day Adam mentioned that my talk was well rated and that the recording would be made available in the goto play app. That means you can check it out any time.

Throughout the week I heard a lot about ratings and voting for sessions. The audience are able to give anonymous feedback to the speakers and the average rating given is taken seriously by the organisers. I’ve not seen such an emphasis put on feedback from attendees before and to start with it may seem off-putting, but I think getting feedback in this way can help speakers know their audience better. The audience seemed to be made up largely of enterprise developers and many had a background in Java development – a talk that would get a 5/5 rating at KubeCon may get a completely different rating here and visa-versa.

One of the tips I heard from the organisers was that speakers should clearly “set expectations” about their session in the first few minutes and in the abstract so that the audience are more likely to rate the session based upon the content delivered vs. the content they would have liked to have seen instead.

Hearing from RedMonk

I really enjoyed the talk by James Governer from RedMonk where James walked us through what he saw as trends in the industry relating to cloud, serverless and engineering practices. I set about live-tweeting the talk and you can find the start of the thread here:

James takes the stage @monkchips at @GOTOcph pic.twitter.com/qcQz0yUVUU

— Alex Ellis (@gotocph) (@alexellisuk) November 21, 2018

One of the salient points for me was where James suggested that the C-Level of tech companies have a harder time finding talent than capital. He then went on to talk about how developers are now the new “King Makers” for software. I’d recommend finding the recording when it becomes available on YouTube.

Hallway track

The hallway track basically means talking to people, ad-hoc meetings and the conversations you get to have because you’re physically at the event with like-minded people.

I met Kenny Bastani for the first time who’s a Field CTO at Pivotal and he asked me for a demo of OpenFaaS. Here it is – the Function Store that helps developers collaborate and share their functions with one another (in 42 seconds):

In 42 seconds @alexellisuk demos the most powerful feature of FaaS. The function store. This is what the future and the now looks like. An open source ecosystem of functions. pic.twitter.com/ix3ER4b7Jn

— Kenny Bastani (@kennybastani) 20 November 2018

Letting your hair down

My experience this week compared to some other large conferences showed that the Trifork team really know how to do things well. There were dozens of crew ready to help out, clear away and herd the 1600 attendees around to where they needed to be. This conference felt calm and relaxed depsite being packed with action and some very long days going on into the late evening.

Party time

We attended an all-attendee party on site where there was a “techno-rave” with DJ Sam Aaron from the SonicPi project. This is music generated by writing code and really well-known in the Raspberry Pi and maker community.

At the back of the room there was the chance to don a VR headset and enter another world – walking the plank off a sky-scraper or experiencing an under-water dive in a shark-cage.

VR and techno at the party @GOTOcph pic.twitter.com/3wfxS4vSeZ

— Alex Ellis (@gotocph) (@alexellisuk) November 20, 2018

Speakers’ dinner

I felt that the speakers were well looked after and the organisers helped with any technical issues that may have come up. The dinner organised for the Wednesday night was in an old theatre with Danish Christmas games and professional singers serenading us between courses. This was a good time to get to know other speakers really well and to have some fun.

Thank you @GOTOcph for the speakers’ dinner tonight. Very entertaining and great company! pic.twitter.com/LUfqf6zJRF

— Alex Ellis (@gotocph) (@alexellisuk) November 21, 2018

Workshop – Serverless OpenFaaS with Python

On Thursday after the three days of the conference talks we held a workshop called Serverless OpenFaaS with Python. My colleague Ivana Yocheva joined me from Sofia to help facilitate a workshop to a packed room of developers from varying backgrounds.

We had an awesome workshop yesterday at #GOTOcph with a packed room of developers learning how to build portable Serverless with Python and @openfaas #FaaSFriday pic.twitter.com/dhP9rN5wLa

— OpenFaaS (@openfaas) November 23, 2018

Feedback was very positive and I tried to make the day more engaging by introducing demos after we came back from lunch and the coffee breaks. We even introduced a little bit of competition to give away some t-shirts and beanies which went down well in the group.

Wrapping up

As I wrap up my post I want to say that I really enjoyed the experience and would highly recommend a visit to one of the goto conferences.

Despite only knowing around half a dozen people when I arrived, I made lots of new friends and contacts and am looking forward to keeping in touch and being part of the wider community. I’ll leave you with this really cute photo from Kasper Nissen the local CNCF Ambassador and community leader.

Thank you for the beanie, @alexellisuk! Definitely going to try out @openfaas in the coming weeks 🤓 pic.twitter.com/gSX63s9E6y

— 𝙺𝚊𝚜𝚙𝚎𝚛 𝙽𝚒𝚜𝚜𝚎𝚗 (@phennex) November 22, 2018

My next speaking session is at KubeCon North America in December speaking on Digital Transformation of Vision Banco Paraguay with Serverless Functions with Patricio Diaz.

Let’s meet up there for a coffee? Follow me on Twitter @alexellisuk

Get involved

Want to get involved in OpenFaaS or to contribute to Open Source?

Source

Local Kubernetes for Mac– MiniKube vs Docker Desktop

In the previous articles of the series, we have seen the local Kubernetes solutions for Windows and Linux. In this article, we talk about MacOS and take a look at Docker Desktop and Minikube.

Similar to the Windows version, Docker for Mac provides an out of the box solution using a native virtualization system. Docker for Mac is very easy to install, but it also comes with limited configuration options.

On the other hand, Minikube has more complete Kubernetes support with multiple add-ons and driver support (e.g. VirtualBox) at the cost of a more complicated configuration.

Docker on Mac with Kubernetes support

Kubernetes is available in Docker for Mac for 18.06 Stable or higher and includes a Kubernetes server and client, as well as integration with the Docker executable. The Kubernetes server runs locally within your Docker instance and it is similar to the Docker on Windows solution. Notice that Docker on Mac uses a native MacOS virtualization system called Hyperkit.

When Kubernetes support is enabled, you can deploy new workloads not only on Kubernetes but also on Swarm and as standalone containers, without affecting any of your existing workloads.

Installation

As mentioned already, Kubernetes is included in the Docker on Mac binary so it installed automatically with it. You can download and install Docker for Mac from the Docker Store.

Installing Docker DesktopInstalling Docker Desktop

Note: If you already use a previous version of Docker (e.g. docker toolbox ), or an older version of Docker on Mac, we strongly recommend upgrading to the newer version, instead of having multiple docker installations versions active. If for some reason you cannot upgrade, you should be able to use Minikube instead.

After a successful installation, you need to explicitly enable Kubernetes support. Click the Docker icon in the status bar, go to “Preferences”, and on the “Kubernetes” tab check “Enable Kubernetes” as shown in the figure below.

Docker Desktop preferences

This will start a single node Kubernetes cluster for you and install the kubectl command line utility as well. This might take a while, but the dialog will let you know once the Kubernetes cluster is ready.

Enabling KubernetesEnabling Kubernetes

Management

Now you are ready to deploy your workloads similar to Windows. If you are working with multiple Kubernetes clusters and different environments you should already be familiar with switching contexts. You can view contexts using the kubectl config command:

kubectl config get-contexts

Set the context to use as docker-for-desktop:

kubectl config use-context docker-for-desktop

Unfortunately, (as was the case with the Windows version), the bundled Kubernetes distribution does not come with its dashboard enabled. You need to enable it with the following command:

kubectl apply -f https://raw.githubusercontent.com/kubernetes/dashboard/master/src/deploy/alternative/kubernetes-dashboard.yaml

To view the dashboard in your web browser run:

And navigate to your Kubernetes Dashboard at: http://localhost:8001/api/v1/namespaces/kube-system/services/kubernetes-dashboard/proxy

Deployment

Deploying an application it is very straightforward. In the following example, we install a cluster of nginx servers using the commands:

kubectl run nginx –image nginx

kubectl expose deployment nginx –port 80 –target-port 80 –name nginx

Once Kubernetes completed downloading the containers, you can see the containers running by using the command:

You can view the dashboard, as mentioned before, to verify that nginx was indeed installed and your cluster is in working mode.

Kubernetes on Mac using Minikube

As another alternative to Docker-for-Mac, we can also use Minikube to set up and operate a single node Kubernetes cluster as a local development environment. Minikube for Mac supports multiple hypervisors such as VirtualBox, VMWare, and Hyperkit. In this tutorial, we are talking about the installation mode that uses VirtualBox. (If Hyperkit is available then Docker-for-Mac is easier to install.)

Installation

Instead of manually installing all the needed packages for Minikube, it is easier to install all prerequisites using the Homebrew package manager. If you don’t have the Homebrew package manager already installed, you can easily install it using the following command in the terminal application:

/usr/bin/ruby -e “$(curl -fsSL https://raw.githubusercontent.com/Homebrew/install/master/install)”

This will also include prerequisites such as Xcode command line tools.
To install Minikube itself including the prerequisites, we execute the following command:

brew update && brew install kubectl && brew cask install docker minikube virtualbox

After completion, the following packages will be installed in your machine:

docker –version # Docker version 18.06.1-ce, build e68fc7a

docker-compose –version # docker-compose version 1.22.0, build f46880f

docker-machine –version # docker-machine version 0.15.0, build b48dc28d

minikube version # minikube version: v0.30.0

kubectl version –client # Client Version: version.Info{Major:”1″, …..

Management

After successful installation, you can start Minikube by executing the following command in your terminal:

Now Minikube is started and you have created a Kubernetes context called “minikube”, which is set by default during startup. You can switch between contexts using the command:

kubectl config use-context minikube

Furthermore, to access the Kubernetes dashboard, you need to execute/run the following command:

Additional information, on how to configure and manage the Kubernetes cluster can be found in the official documentation.

Deployment

Deploying an application is the same for all drivers supported in Minikube. For example, you can deploy, expose, and scale a service using the usual kubectl commands, as provided in the Minikube Tutorial.

kubectl run my-nginx –image=nginx –port=80

kubectl expose deployment my-nginx –type=NodePort

Kubectl scale –replicas=3 deployment/my-nginx

You can view the workloads of your Minikube cluster either through the Kubernetes dashboard or using the command line interface – kubectl. For example, to see the deployed pods you can use the command:

Conclusion

After looking at both solutions, here are our results…

Minikube is a mature solution available for all major operating systems. Its main advantage is that it provides a unified way of working with a local Kubernetes cluster regardless of the operating system. It is perfect for people that are using multiple OS machines and have some basic familiarity with Kubernetes and Docker.

Pros:

  • Mature solution
  • Works on Windows (any version and edition), Mac, and Linux
  • Multiple drivers that can match any environment
  • Installs several plugins (such as dashboard) by default
  • Very flexible on installation requirements and upgrades

Cons:

  • Installation and removal not as streamlined as other solutions
  • Does not integrate into the MacOS UI

Docker Desktoop for Mac is a very user-friendly solution with good integration for the MacOS UI.

Pros:

  • Very easy installation for beginners
  • All-in-one Docker and Kubernetes solution
  • Configurable via UI

Cons:

  • Relatively new, possibly unstable
  • Limited configuration options (i.e. driver support)

Let us know in the comments which local Kubernetes solution you are using and why.

Source

DockerCon Hallway Track Is Back – Schedule One Today

The Hallway Track is coming back to DockerCon Europe in Barcelona. DockerCon Hallway Track is an innovative platform that helps you find like-minded people to meet one-on-one and schedule knowledge sharing conversations based on shared topics of interest. We’ve partnered with e180 to provide the next level of conference attendee networking. Together, we believe that some of the most valuable conversations can come from hallway encounters, and that we can unlock greatness by learning from each other. After the success at past DockerCons, we’re happy to grow this idea further in Barcelona.

DockerCon is all about learning new things and connecting with the community. The Hallway Track will help you meet and share knowledge with Docker Staff, other attendees, Speakers, and Docker Captains through structured networking.

Source

Docker and MuleSoft Partner to Accelerate Innovation for Enterprises

A convergence of forces in SaaS, IoT, cloud, and mobile have placed unprecedented requirements on businesses to accelerate innovation to meet those rapidly changing preferences. The big don’t eat the small, the fast eat the slow.

The industry has offered several solutions to this acceleration problem – from working harder to outsourcing and devops, but none of those solutions have really offered the levels of acceleration needed. The reason: there is too much friction slowing the art of the possible.

Docker and MuleSoft remove friction in the innovation process, from ideation all the way to deployment. MuleSoft provides a tops down architectural approach, with API-first design and implementation. The Docker approach is bottoms up from the perspective of the application workload with containerization, to both modernize traditional applications and create of new applications.

Marrying those two approaches combined with the platform, tools and methodology, enable both organizations to help your business accelerate faster than ever before. Docker and MuleSoft bridge the chasm between infrastructure and services in a way never before achieved in the industry.

Together, Docker and MuleSoft accelerate legacy application modernization and new application delivery while reducing IT complexity and costs.

  • Modernize traditional applications quickly without code changes with the Docker Enterprise container platform methodology and tooling to containerize legacy applications. Then, you can instantly extend the business logic and data to new applications by leveraging MuleSoft API gateway and Anypoint Platform.
  • Accelerate time to market of new applications by enhancing developer productivity and collaboration and enabling greater reuse of application services. Anypoint Studio lets you define API contracts and decouple consumers and producers of microservices, so line of business developers who consume the API can start creating new experiences such as a mobile application right away with Anypoint mock service. Docker Desktop is used today by millions of developers to develop microservices using any language and any framework: microservice developers can leverage Docker Desktop to implement the APIs using the best tool for the job, and focus on implementing the business logic with a clear specification defined in Anypoint Platform, letting Anypoint Platform provide one more layer of security, observability and manageability at the API level.
  • Improve overall application security, manageability and observability by using Docker Enterprise to manage container workloads and MuleSoft Anypoint Platform to run and manage the application network.

Only Docker and MuleSoft can bring you the complete solution, tools, methodology and know-how, to execute a multi-pronged approach to transforming your business today. And we’re going to work together to make the experience even more pleasurable. There is a saying in IT that between speed, cost, and quality you have to pick two. With Docker and MuleSoft together, you can have all three.

Source

Announcing Ark v0.10, with greater support for hybrid and multi-cloud deployments

We’re excited to announce the release of Heptio Ark v0.10! This release includes features that give you greater flexibility in migrating applications and organizing cluster backups, along with some usability improvements. Most critically, Ark v0.10 introduces the ability to specify multiple volume snapshot locations, so that if you’re using more than one provider for volume storage within a cluster, you can now snapshot and fully back up every volume.

We know that today, most Ark users tend to have one volume provider within a cluster, like Portworx or Amazon EBS. However, this can pose challenges for application portability, or if you need faster access speeds for certain workloads. Being able to specify more than one location for backing up data volumes gives you more flexibility within a cluster and, in particular, makes it easier to migrate more complex applications from one Kubernetes environment to another.

Down the road, this feature will also become critical for supporting full backup replication. Imagine a world where you could define a replication policy that specifies the additional locations for where you can replicate a backup or a volume snapshot, easily solving for redundancy and cluster restoration across regions.

Read on for more details about this feature and other benefits of Ark v0.10.

Support for multiple volume snapshot locations from multiple providers

In Ark versions prior to v0.10, you can snapshot volumes only from a single provider. For example, if you are running on AWS and using EBS and Rook, you could snapshot volumes from only one of those two persistent volume providers. With Ark v0.10 you can now specify multiple volume snapshot locations from multiple providers..

Let’s say you have an application that you have deployed all in one pod. It has a database, which is kept on an Amazon EBS volume. It also holds user uploaded photos on a Portworx volume. There’s a third volume for generated reports, also stored in Portworx. You can now snapshot all three.

Every persistent volume to be backed up needs to be created with one associated volume snapshot location. This is also a two-step process: first, you create the VolumeSnapshotLocation CRDs for the locations you want (this only needs to be done once). Then, when creating a backup with a persistent volume, you select the location where you want the volume to be stored, by using the –snapshot-location flag and the name of one of the locations you created with the CRD.

Note that even though multiple volume snapshot locations can be created for each provider, when you create the backup, only one volume snapshot location per provider per backup can be used.

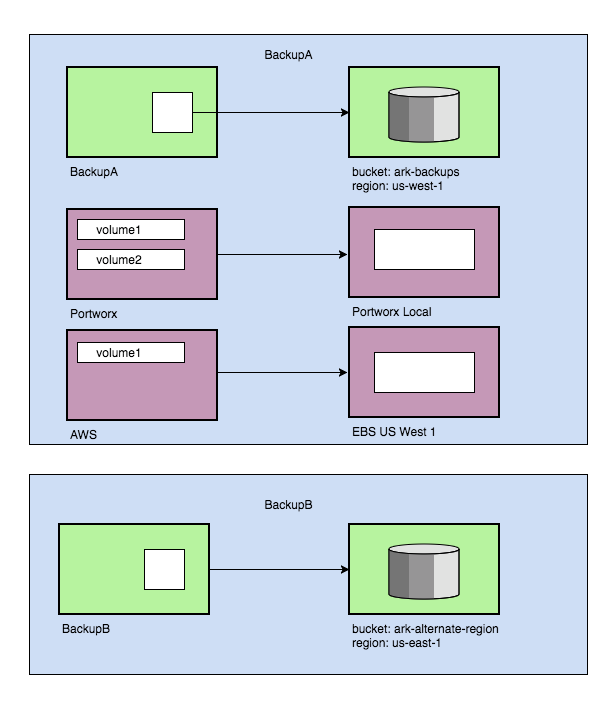
Multiple Volume Snapshots

As with regular backup storage locations, the volume snapshot locations can have a default associated with each of them so at backup creation time you don’t have to specify it. Unlike regular backups, however, the names of those locations must be specified as flags to the Ark server. They are not set up front.

Also as with the new BackupStorageLocation, the new VolumeSnapshotLocation CRD takes the place of the persistent volume setting in the previous Config CRD.

Ability to specify multiple backup locations

Backups now can be stored in different locations. You might want some backups to go for example to a bucket named full-cluster-backups in us-east-1, and other backups to be stored in a bucket named namespace-backups in us-east-2. As you can see, backup locations can now be in different regions.

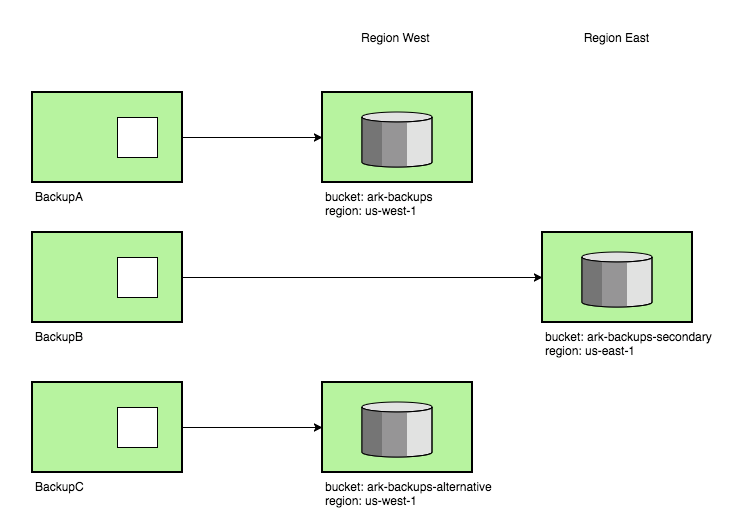
Multiple backup locations

Every backup now needs to be created with one associated backup storage location. This is a two-step process: first, you create the BackupStorageLocation CRDs for the locations you want. Then, when creating a backup, you select the location where you want the backup to be stored by using the –backup-location flag and the name of one of the locations you created with the CRD.

The exception to having to specify the name of a backup storage location is if you want to use the default location feature. In this case, you create the BackupStorageLocation CRD as expected, with the name default. Then, when you create a backup and don’t specify a location, the backup is stored in the default location. You can also rename the default location when you create the CRD, but you must then be sure to specify the –default-backup-storage-location flag when you create the Ark server deployment.

The BackupStorageLocation CRD replaces the previous Config CRD (now deprecated), which was where you defined the name of your backup, bucket and region

Streamlined backup storage

This version also introduces the ability to store backups under prefixes in an object storage bucket. Prior to v0.10, Ark stored all backups from a cluster at the root of the bucket. This meant if you wanted to organize the backup of each of your clusters separately, you’d have to create a bucket for each. As of version 0.10, you can organize backups from each cluster in the same bucket, using different prefixes. The new storage layout and instructions for migrating can be found in our documentation.

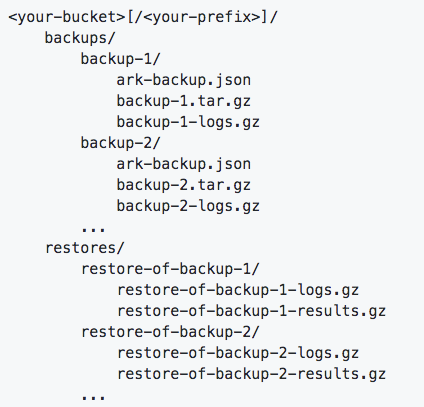
New backup storage organization

Stronger plugin system

Ark’s plugin system has been significantly refactored to improve robustness and ease of development:

  • Plugin processes are now automatically restarted if they unexpectedly terminate.
  • Plugin binaries can now contain more than one plugin implementation (for example, an object store and a block store, or many backup item actions).
  • Prefixes in object storage are now supported.

Plugin authors must update their code to be compatible with v0.10. Plugin users will need to update the plugin image tags and/or image pull policy to ensure they have the latest plugins.

For details, see the GitHub repository for plugins. We’ve updated it with new examples for v0.10, and we continue to provide a v0.9.x branch that refers to the older APIs.

The Ark team would like to thank plugin authors who have been collaborating with us leading up to the v0.10 launch. The following community Ark Plugins have already been updated to use the new plugin system:

Additional usability improvements

  • The sync process, which ensures that Backup custom resources exist for each backup in object storage, has been revamped to run much more frequently (once per minute rather than once per hour), to use significantly fewer cloud provider API calls, and to not generate spurious Kubernetes API errors.
  • Restic backup data is now automatically stored in the same bucket/prefix as the rest of the Ark data. A separate bucket is no longer required (or allowed).
  • Ark resources (backups, restores, schedules) can now be bulk-deleted with the Ark CLI, using the –all or –selector flags, or by specifying multiple resource names as arguments to the delete commands.
  • The Ark CLI now supports waiting for backups and restores to complete, with the–wait flag for –ark backup create and –ark restore create.
  • Restores can be created directly from the most recent backup for a schedule, using –ark restore create –from-schedule SCHEDULE_NAME.

Get involved!

We are in a phase of evaluating the implementation for replication and would love to have input from the community, especially about how to handle provider-specific issues.

With this in mind, we have started holding Heptio Ark design sessions. These are public meetings (open to all!) focused on a technical design discussion around whatever Ark feature the team is working on at that moment.

The next design session will be live streamed here: https://www.youtube.com/watch?v=Ml5lN4cV1Yk

If you’d like to request that we cover a particular feature feel free to make that request in our Ark Community repo. Video recording of all our sessions can be found under our Heptio Ark YouTube playlist.

Other than that, you can also reach us through these channels:

Ark on Kubernetes Slack
Google Groups

Source

Create Rancher Environments with Ansible

Attention, Ansible users! We’ve released the first version of our
Ansible playbooks for Rancher. Ansible is a configuration management system that allows you to write instruction manuals it uses to manage local and remote systems. These playbooks give full control over the installation and
configuration of Rancher server and agent nodes, with features that
include:

  • Static inventory
  • Dynamic inventory via EC2 tags
  • Detection of multiple servers and automatic configuration of HA
  • Support for local, bind-mount, and external databases
  • Optional, local HAProxy with SSL termination for single-server
    deployments
  • Ansible Vault for secure storage of secrets

This first release is for Ubuntu and Debian, and it targets EC2 as a
provider. Upcoming releases will support yum-based systems (RHEL,
CentOS, and Fedora) and will add support for other providers for whom
dynamic inventory modules exist. To get started, visit our Ansible
playbooks repository
on GitHub. There you will find instructions for general
installation 
and setting up EC2.

Source

Introducing Docker Engine 18.09 – Docker Blog

Docker Engine Diagram

Last week, we launched Docker Enterprise 2.1 – advancing our leadership in the enterprise container platform market. That platform is built on Docker Engine 18.09 which was also released last week for both Community and Enterprise users. Docker Engine 18.09 represents a significant advancement of the world’s leading container engine, introducing new architectures and features that improve container performance and accelerate adoption for every type of Docker user – whether you’re a developer, an IT admin, working at a startup or at a large, established company.

Built on containerd

Docker Engine – Community and Docker Engine – Enterprise both ship with containerd 1.2. Donated and maintained by Docker and under the auspices of the Cloud Native Computing Foundation (CNCF), containerd is being adopted as the primary container runtime across multiple platforms and clouds, while progressing towards Graduation in CNCF.

BuildKit Improvements

Docker Engine 18.09 also includes the option to leverage BuildKit. This is a new Build architecture that improves performance, storage management, and extensibility while also adding some great new features:

  • Performance improvements: BuildKit includes a re-designed concurrency and caching model that makes it much faster, more precise and portable. When tested against the github.com/moby/moby Dockerfile, we saw 2x to 9.5x faster builds. This new implementation also supports these new operational models:
    • Parallel build stages
    • Skip unused stages and unused context files
    • Incremental context transfer between builds
  • Build-time secrets: Integrate secrets in your Dockerfile and pass them along in a safe way. These secrets do not end up stored in the final image nor are they included in the build cache calculations to avoid anyone from using the cache metadata to reconstruct the secret.
  • SSH forwarding: Connect to private repositories by forwarding your existing SSH agent connection or a key to the builder instead of transferring the key data.
  • Build cache pruning and configurable garbage collection: Build cache can be managed separately from images and cleaned up with a new command ‘docker builder prune`. You can also set policies around when to clear build caches.
  • Extensibility: Create extensions for Dockerfile parsing by using the new #syntax directive:
    # syntax = registry/user/repo:tag

New Enterprise Features

With this architecture shift and alignment, we’ve also made it much easier to upgrade from the Community engine to the Enterprise engine with a simple license activation. For current Community engine users, that means unlocking many enterprise security features and getting access to Docker’s enterprise-class support and extended maintenance policies. Some of the Enterprise specific features include:

  • FIPS 140-2 validation: Enable FIPS mode to leverage cryptographic modules that have been validated by the National Institute of Standards and Technology (NIST). This is important to the public sector and many regulated industries as it is referenced in FISMA, PCI, and HIPAA/HITECH among others. This is supported for both Linux and Windows Server 2016+.
  • Enforcement of signed images: By enabling engine signature verification in the Docker daemon configuration file, you can verify that the integrity of the container is not compromised from development to execution.

Docker Engine 18.09 is now available for both Community and Enterprise users. Next week, we’ll highlight more of the differences in the Enterprise engine and why some of our existing Community users may want to upgrade to Enterprise.

Source