How to Monitor and Secure Containers in Production

Managing containers requires a broad scope from application development, test, and system OS preparation, and as a result, securing containers can be a
broad topic with many separate areas. Taking a layered security approach
works just as well for containers as it does for any IT infrastructure.
There are many precautions that should be taken before running
containers in production.* These include:

  • Hardening, scanning and signing images
  • Implementing access controls through management tools
  • Enable/switch settings to only use secured communication protocols
  • Use your own digital signatures
  • Securing the host, platforms and Docker by hardening, scanning and
    locking down versions

*Download “15
Tips for Container Security” for a more detailed explanation

But at the end of the day, containers need to run in a production
environment where constant vigilance is required to keep them secure. No
matter how many precautions and controls have been put in place prior to
running in production, there is always the risk that a hacker may get
through or a malware might try to spread from an internal network. With
the breaking of applications into microservices, internal
east-west
traffic increases dramatically and it becomes more difficult to monitor
and secure traffic. Recent examples include the ransomware
attacks

which can exploit thousands of MongoDB or ElasticSearch servers, include
containers, with very simple attack scripts. It’s often reported that
some serious data leakage or damage also has happened from an internal
malicious laptop or desktop.

What is ‘Run-Time Container Security’?

Run-time container security focuses on monitoring and securing
containers running in a production environment. This includes container
and host processes, system calls, and most importantly, network
connections. In order to monitor and secure containers during run-time,

  1. Get real-time visibility into network connections.
  2. Characterize application behavior – develop a baseline.
  3. Monitor for violations or any suspicious activities.
  4. Automatically scan all running containers for vulnerabilities.
  5. Enforce or block without impacting applications and services.
  6. Ensure the security service auto-scales with application containers

Why is it Important?

Containers can be deployed in seconds and many architectures assume
containers can scale up or down automatically to meet demand. This makes
it extremely difficult to monitor and secure containers using
traditional tools such as host security, firewalls, and VM security. An
unauthorized network connection often provides the first indicator that
an attack is coming, or a hacker is attempting to find the next
vulnerable attack point. But to separate authorized from unauthorized
connections in a dynamic container environment is extremely difficult.
Security veterans understand that no matter how many precautions have
been taken before run-time, hackers will eventually find a way in, or
mistakes will lead to vulnerable systems. Here are a few requirements
for successfully securing containers during run-time:

  1. The security policy must scale as containers scale up or down,
    without manual intervention
  2. Monitoring must be integrated with or compatible with overlay
    networks and orchestration services such as load balancers and name
    services to avoid blind spots
  3. Network inspection should be able to accurately identify and
    separate authorized from unauthorized connections
  4. Security event logs must be persisted even when containers are
    killed and no longer visible.

Encryption for Containers

A
business guide to effective container app management – download
today 
Encryption can be an important layer of a run-time security strategy.
Encryption can protect against stealing of secrets or sensitive data
during transmission. But it can’t protect against application attacks or
other break outs from a container or host. Security architects should
evaluate the trade-offs between performance, manageability, and security
to determine which, if any connections should be encrypted. Even if
network connections are encrypted between hosts or containers, all
communication should be monitored at the network layer to determine if
unauthorized connections are being attempted.

Getting Started with Run-Time Container Security

You can try to start doing the actions above manually or with a few open
source tools. Here’s some ideas to get you started:

  • Carefully configure VPC’s and security groups if you use AWS/ECS
  • Run the CIS Docker Benchmark and Docker Bench test tool
  • Deploy and configure monitoring tools like Prometheus or Splunk for
    example
  • Try to configure the network using tools from Kubernetes or
    Weaveworks for basic network policies
  • Load and configure container network plugins from Calico, Flannel or
    Tigera for example
  • If needed, use and configure SECCOMP, AppArmor, or SELinux
  • Adopt the new LinuxKit which has Wireguard, Landlock, Mirage and
    other tools built-in
  • Run tcpdump and Wireshark on a container to diagnose network
    connections and view suspicious activity

But often you’ll find that there’s too much glue you have to script to
get everything working together. The good news is that there is a
developing ecosystem of container security vendors, my company NeuVector
included, which can provide solutions for the various tasks above. It’s
best to get started evaluating your options now before your containers
actually go into production. But if that ship has sailed make sure a
security solution will layer nicely on a container deployment already
running in production without disrupting it. Here are 10 important
capabilities to look for in run-time security tools:

  1. Discovery and visualization of containers, network connections, and
    system services
  2. Auto-creation and adapting whitelist security policies to decrease
    manual configuration and increase accuracy
  3. Ability to segment applications based on layer 7 (application
    protocol), not just layer 3 or 4 network policies
  4. Threat protection against common attacks such as DDoS and DNS
    attacks
  5. Ability to block suspicious connections without affecting running
    containers, but also the ability to completely quarantine a
    container
  6. Host security to detect and prevent attacks against the host or
    Docker daemon
  7. Vulnerability scanning of new containers starting to run
  8. Integration with container management and orchestration systems to
    increase accuracy and scalability, and improve visualization and
    reporting
  9. Compatible and agnostic to virtual networking such as overlay
    networks
  10. Forensic capture of violations logs, attacks, and packet captures
    for suspicious containers

Today, containers are being deployed to production more frequently for
enterprise business applications. Often these deployments have
inadequate pre-production security controls, and non-existent run-time
security capabilities. It is not necessary to take this level of risk to
important business critical applications when container security tools
can be deployed as easily as application containers, using the same
orchestration tools as well. Fei Huang is Co-Founder and CEO of
NeuVector. He has over 20 years of experience in enterprise security,
virtualization, cloud and embedded software. He has held engineering
management positions at VMware, CloudVolumes, and Trend Micro and was
the co-founder of DLP security company Provilla. Fei holds several
patents for security, virtualization and software architecture.

Source

Do Microservices Make SOA Irrelevant?

Is service-oriented architecture, or SOA, dead? You may be tempted to
think so. But that’s not really true. Yes, SOA itself may have receded
into the shadows as newer ideas have come forth, yet the remnants of SOA
are still providing the fuel that is propelling the microservices market
forward. That’s because incorporating SOA principles into the design and
build-out of microservices is the best way to ensure that your product
or service offering is well positioned for the long term. In this sense,
understanding SOA is crucial for succeeding in the microservices world.
In this article, I’ll explain which SOA principles you should adopt when
designing a microservices app.

Introduction

In today’s mobile-first development environment, where code is king, it
is easier than ever to build a service that has a RESTful interface,
connect it to a datastore and call it a day. If you want to go the extra
mile, piece together a few public software services (free or paid), and
you can have yourself a proper continuous delivery pipeline. Welcome to
the modern Web and your fully buzzworthy-compliant application
development process. In many ways, microservices are a direct descendant
of SOA, and a bit like the punk rock of the services world. No strict
rules, just some basic principles that loosely keep everyone on the same
page. And just like punk rock, microservices initially embraced a
do-it-yourself ethic, but has been evolving and picking up some
structure which moved microservices into the mainstream. It’s not just
the dot com or Web companies that use microservices anymore—all
companies are interested.

Definitions

For the purposes of this discussion, the following are the definitions I
will be using.

Microservices: The implementation of a specific business function,
delivered as a separate deployable artifact, using queuing or a RESTful
(JSON) interface, which can be written in any language, and that
leverages a continuous delivery pipeline.

SOA: Component-based architecture which has the goal of driving
reuse across the technology portfolio within an organization. These
components need to be loosely coupled, and can be services or libraries
which are centrally governed and require an organization to use a single
technology stack to maximize reusability.

Positive things about microservices-based development

As you can tell, microservices possess a couple of distinct features
that SOA lacked, and they are good:

Allowing smaller, self-sufficient teams to own a product/service
that supports a specific business function has drastically improved
business agility and IT responsiveness (to any directions that the
business units they support) want to take.

Automated builds and testing, while possible under SOA, are now
serious table stakes.

Allowing teams to use the tools they want, primarily around which
language and IDE to use.

Using-agile based development with direct access to the business.
Microservices and mobile development teams have successfully shown
businesses how technologists can adapt to and accept constant feedback.
Waterfall software delivery methods suffered from unnecessary overhead
and extended delivery dates as the business changed while the
development team was off creating products that often didn’t meet the
business’ needs by the time they were delivered. Even iterative
development methodologies like the Rational Unified Process (RUP) had
layers of abstraction between the business, product development, and the
developers doing the actual work.

A universal understanding of the minimum granularity of a service.
There are arguments around “Is adding a client a business function, or
is client management a business function?” So it isn’t perfect, but at
least both can be understood by the business side that actually runs the
business. You may not want to believe it, but technology is not the
entire business (for most of the world’s enterprises anyway). Back in
the days when SOA was the king on the hill, some services performed
nothing but a single database operation, and other services were adding
a client to the system, which led to nothing but confusion from business
when IT did not have a consistent answer.

How can SOA help?

Want to learn more about
Docker, Kubernetes, and Rancher? Join us for free online
training After reading those definitions, you are probably
thinking, “Microservices sounds so much better.” You’re right. It is the
next evolution for a reason, except that it threw away a lot of the
lessons that were hard-learned in the SOA world. It gave up all the good
things SOA tried to accomplish because the IT vendors in the space
morphed everything to push more product. Enterprise integration patterns
(which define how new technologies or concepts are adopted by
enterprises) are a key place where microservices are leveraging the work
done by the SOA world. Everyone involved in the integration space can
benefit from these patterns, as they are concepts, and microservices are
a great technological way to implement them. Below, I’ve listed two
other areas where SOA principles are being applied inside the
microservices ecosystem to great success.

API Gateways (née ESB)

Microservices encourage point-to-point connections, and that each client
take care of their own translations for dates and other nuanced things.
This is just not sustainable as the number of microservices available
from most companies skyrockets. So in comes the concept of an Enterprise
Service Bus (ESB), which provides a means of communication between
different application in an SOA environment. SOA originally intended the
ESB to be used to carry things between service components—not to be
the hub and spoke of the entire enterprise, which is what vendors
pushed, and large companies bought into, and left such a bad taste in
people’s mouths. The successful products in the ESB have changed into
today’s API gateway vendors, which is a centralized way for a single
organization to manage endpoints they are presenting to the world, and
provide translation to older services (often SOA/SOAP) that haven’t been
touched in years but are vital to the business.

Overarching standards

SOA had WS-* standards. They were heavy-handed, but guaranteed
interoperability (mostly). Having these standards in place, especially
the more common ones like WS-Security and WS-Federation, allowed
enterprises to call services used in their partner systems—in terms
that anyone could understand, though they were just a checklist.
Microservices have begun to formalize a set of standards and the vendors
that provide the services. The OAuth and OpenID authentication
frameworks are two great examples. As microservices mature, building
everything in-house is fun, fulfilling, and great for the ego, but
ultimately frustrating as it creates a lot of technical debt with code
that constantly needs to be massaged as new features are introduced. The
other side where standards are rapidly consolidating is API design and
descriptions. In the SOA world, there was one way. It was ugly and
barely readable by humans, but the Web service definition language
(WSDL), a standardized format for cataloguing network services, was
universal. As of April 2017, all major parties (including Google, IBM,
Microsoft, MuleSoft, and Salesforce.com) involved in providing tools to
build RESTful APIs are members of the OpenAPI Initiative. What was once
a fractured market with multiple standards (JSON API, WASL, RAML, and
Swagger) is now becoming a single way for everything to be described.

Conclusion

SOA originated as a set of concepts, which are the same core concepts as
microservices architecture. Where SOA fell down was driving too much
governance and not enough “Just get it done.” For microservices to
continue to survive, the teams leveraging them need to embrace their
ancestry, continue to steal the best of the ideas, and reintroduce them
using agile development methodologies—with a healthy dose of
anti-governance to stop SOA
Governance

from reappearing. And then, there’s the side job of keeping ITIL and
friends safely inside the operational teams where they thrive. Vince
Power is a Solution Architect who has a focus on cloud adoption and
technology implementations using open source-based technologies. He has
extensive experience with core computing and networking (IaaS), identity
and access management (IAM), application platforms (PaaS), and
continuous delivery.

Source

Applying Best Practice Security Controls to a Kubernetes Cluster

Applying Best Practice Security Controls to a Kubernetes Cluster

This is the penultimate article in a series entitled Securing Kubernetes for Cloud Native Applications, and follows our discussion about securing the important components of a cluster, such as the API server and Kubelet. In this article, we’re going to address the application of best-practice security controls, using some of the cluster’s inherent security mechanisms. If Kubernetes can be likened to a kernel, then we’re about to discuss securing user space – the layer that sits above the kernel – where our workloads run. Let’s start with authentication.

Authentication

We touched on authenticating access to the Kubernetes API server in the last article, mainly in terms of configuring it to disable anonymous authentication. There are a number of different authentication schemes are available in Kubernetes, so let’s delve into this a little deeper.

X.509 Certificates

X.509 certificates are a required ingredient for encrypting any client communication with the API server using TLS. X.509 certificates can also be used as one of the methods for authenticating with the API server, where a client’s identity is provided in the attributes of the certificate – the Common Name provides the username, whilst a variable number of Organization attributes provide the groups that the identity belongs to.

X.509 certificates are a tried and tested method for authentication, but there are a couple of limitations that apply in the context of Kubernetes:

  • If an identity is no longer valid (maybe an individual has left your organization), the certificate associated with that identity may need to be revoked. There is currently no way in Kubernetes to query the validity of certificates with a Certificate Revocation List (CRL), or by using an Online Certificate Status Protocol (OSCP) responder. There are a few approaches to get around this (for example, recreate the CA and reissue every client certificate), or it might be considered enough to rely on the authorization step, to deny access for a regular user already authenticated with a revoked certificate. This means we should be careful about the choice of groups in the Organization attribute of certificates. If a certificate we’re not able to revoke contains a group (for example, system:masters) that has an associated default binding that can’t be removed, then we can’t rely on the authorization step to prevent access.
  • If there are a large number of identities to manage, the task of issuing and rotating certificates becomes onerous. In such circumstances – unless there is a degree of automation involved – the overhead may become prohibitive.

OpenID Connect

Another increasingly popular method for client authentication is to make use of the built-in Kubernetes support for OpenID Connect (OIDC), with authentication provided by an external identity provider. OpenID Connect is an authentication layer that sits on top of OAuth 2.0, and uses JSON Web Tokens (JWT) to encode the identity of a user and their claims. The ID token provided by the identity provider – stored as part of the user’s kubeconfig – is provided as a bearer token each time the user attempts an API request. As ID tokens can’t be revoked, they tend to have a short lifespan, which means they can only be used during the period of their validity for authentication. Usually, the user will also be issued a refresh token – which can be saved together with the ID token – and used for obtaining a new ID token on its expiry.

Just as we can embody the username and its associated groups as attributes of an X.509 certificate, we can do exactly the same with the JWT ID token. These attributes are associated with the identity’s claims embodied in the token, and are mapped using config options applied to the kube-apiserver.

Kubernetes can be configured to use any one of several popular OIDC identity providers, such as the Google Identity Platform and Azure Active Directory. But what happens if your organization uses a directory service, such as LDAP, for holding user identities? One OIDC-based solution that enables authentication against LDAP, is the open source Dex identity service, which acts as an authentication intermediary to numerous types of identity provider via ‘connectors’. In addition to LDAP, Dex also provides connectors for GitHub, GitLab, and Microsoft accounts using OAuth, amongst others.

Authorization

We shouldn’t rely on authentication alone to control access to the API server – ‘one size fits all’, is too coarse when it comes to controlling access to the resources that make up the cluster. For this reason, Kubernetes provides the means to subject authenticated API requests to authorization scrutiny, based on the authorization modes configured on the API server. We discussed configuring API server authorization modes in the previous article.

Whilst it’s possible to defer authorization to an external authorization mechanism, the de-facto standard authorization mode for Kubernetes is the in-built Role-Based Access Control (RBAC) module. As most pre-packaged application manifests come pre-defined with RBAC roles and bindings – unless there is a very good reason for using an alternative method – RBAC should be the preferred method for authorizing API requests.

RBAC is implemented by defining roles, which are then bound to subjects using ‘role bindings’. Let’s provide some clarification on these terms.

Roles – define what actions can be performed on which objects. The role can either be restricted to a specific namespace, in which case it’s defined in a Role object, or it can be a cluster-wide role, which is defined in a ClusterRole object. In the following example cluster-wide role, a subject bound to the role has the ability to perform get and list operations on the ‘pods’ and ‘pods/log’ resource objects – no more, no less:

kind: ClusterRole
apiVersion: rbac.authorization.k8s.io/v1
metadata:
name: pod-and-pod-logs-reader
rules:
– apiGroups: [“”]
resources: [“pods”, “pods/log”]
verbs: [“get”, “list”]

If this were a namespaced role, then the object kind would be Role instead of a ClusterRole, and there would be a namespace key with an associated value, in the metadata section.

Role Bindings – bind a role to a set of subjects. A RoleBinding object binds a Role or ClusterRole to subjects in the scope of a specific namespace, whereas a ClusterRoleBinding binds a ClusterRole to subjects on a cluster-wide basis.

Subjects – are users and groups (as provided by a suitable authentication scheme), and Service Accounts, which are API objects used to provide pods that require access to the Kubernetes API, with an identity.

When thinking about the level of access that should be defined in a role, always be guided by the principle of least privilege. In other words, only provide the role with the access that is absolutely necessary for achieving its purpose. From a practical perspective – when creating the definition of a new role, it’s easier to start with an existing role (for example, the edit role), and remove all that is not required. If you find your configuration too restrictive, and you need to determine which roles need creating for a particular action or set of actions, you could use audit2rbac, which will automatically generate the necessary roles and role bindings based on what it observes from the API server’s audit log.

When it comes to providing API access for applications running in pods through service accounts, it might be tempting to bind a new role to the default service account that gets created for each namespace, which is made available to each pod in the namespace. Instead, create a specific service account and role for the pod that requires API access, and then bind that role to the new service account.

Clearly, thinking carefully about who or what needs access to the API server, which parts of the API, and what actions they can perform via the API, is crucial to maintaining a secure Kubernetes cluster. Give it the time and attention it deserves, and if you need some extra help, Giant Swarm has some in-depth documentation that you may find useful!

Pod Security Policy

The containers that get created as constituents of pods are generally configured with sane, practical security defaults, which serve the majority of typical use cases. Often, however, a pod may need additional privileges to perform its intended task – a networking plugin, or an agent for monitoring or logging, for example. In such circumstances, we’d need to enhance the default privileges for pods, but restrict the pods that don’t need the enhanced privileges, to a more restrictive set of privileges. We can, and absolutely should do this, by enabling the PodSecurityPolicy admission controller, and defining policy using the pod security policy API.

Pod security policy defines the security configuration that is required for pods to pass admission, allowing them to be created or updated in the cluster. The controller compares a Pod’s defined security context with any of the policies that the Pod’s creator (be that a Deployment or a user) is allowed to ‘use’, and where the security context exceeds the policy, it will refuse to create or update the pod. The policy can also be used to provide default values, by defining a minimal, restrictive policy, which can be bound to a very general authorization group, such as system:authenticated (applies to all authenticated users), to limit the access those users have to the API server.

Pod Security Fields

There’s quite a lot of configurable security options that can be defined in a PodSecurityPolicy (PSP) object, and the policy that you choose to define will be very dependent on the nature of the workload and the security posture of your organization. Here’s a few example fields from the API object:

  • privileged – specifies whether a pod can run in privileged mode, allowing it to access the host’s devices, which in normal circumstances it would not be able to do.
  • allowedHostPaths – provides a whitelist of filesystem paths on the host that can be used by the pod as a hostPath volume.
  • runAsUser – allows for controlling the UID which a pod’s containers will be run with.
  • allowedCapabilities – whitelists the capabilities that can be added on top of the default list provided to a pod’s containers.

Making Use of Pod Security Policy

A word of warning when enabling the PodSecurityPolicy admission controller – unless policy has already been defined in a PSP, pods will fail to get created as the admission controller’s default behavior is to deny pod creation where no match is found against policy – no policy, no match. The pod security policy API is enabled independently of the admission controller though, so it’s entirely possible to define policy ahead of enabling it.

It’s worth pointing out that unlike RBAC, pre-packaged applications rarely contain PSPs in their manifests, which means it falls to the users of those applications to create the necessary policy.

Once PSPs have been defined, they can’t be used to validate pods, unless either the user creating the pod, or the service account associated with the pod, has permission to use the policy. Granting permission is usually achieved with RBAC, by defining a role that allows the use of a particular PSP, and a role binding that binds the role to the user and/or service account.

From a practical perspective – especially in production environments – it’s unlikely that users will create pods directly. Pods are more often than not created as part of a higher level workload abstraction, such as a Deployment, and as a result, it’s the service account associated with the Pod that requires the role for using any given PSP.

Once again, Giant Swarm’s documentation provides some great insights into the use of PSPs for providing applications with privileged access.

Isolating Workloads

In most cases, a Kubernetes cluster is established as a general resource for running multiple, different, and often unrelated application workloads. Co-tenanting workloads in this way brings enormous benefits, but at the same time may increase the risk associated with accidental or intentional exposure of those workloads and their associated data to untrusted sources. Organizational policy – or even regulatory requirement – might dictate that deployed services are isolated from any other unrelated services.

One means of ensuring this, of course, is to separate out a sensitive application into its very own cluster. Running applications in separate clusters ensures the highest possible isolation of application workloads. Sometimes, however, this degree of isolation might be more than is absolutely necessary, and we can instead make use of some of the in-built isolation features available in Kubernetes. Let’s take a look at these.

Namespaces

Namespaces are a mechanism in Kubernetes for providing distinct environments for all of the objects that you might deem to be related, and that need to be separate from other unrelated objects. They provide the means for partitioning the concerns of workloads, teams, environments, customers, and just about anything you deem worthy of segregation.

Usually, a Kubernetes cluster is initially created with three namespaces:

  • kube-system – used for objects created by Kubernetes itself.
  • kube-public – used for publicly available, readable objects.
  • default – used for all objects that are created without an explicit association with a specific namespace.

To make effective use of namespaces – rather than having every object ending up in the default namespace – namespaces should be created and used for isolating objects according to their intended purpose. There is no right or wrong way for namespacing objects, and much will depend on your organization’s particular requirements. Some careful planning will save a lot of re-engineering work later on, so it will pay to give this due consideration up front. Some ideas for consideration might include; different teams and/or areas of the organization, environments such as development, QA, staging, and production, different applications workloads, and possibly different customers in a co-tenanted scenario. It can be tempting to plan your namespaces in a hierarchical fashion, but namespaces have a flat structure, so it’s not possible to do this. Instead, you can provide inferred hierarchies with suitable namespace names, teamA-appY and teamB-appZ, for example.

Adopting namespaces for segregating workloads also helps with managing the use of the cluster’s resources. If we view the cluster as a shared compute resource segregated into discrete namespaces, then it’s possible to apply resource quotas on a per-namespace basis. Resource hungry and more critical workloads that are judiciously namespaced can then benefit from a bigger share of the available resources.

Network Policies

Out-of-the-box, Kubernetes allows all network traffic originating from any pod in the cluster to be sent to and be received by any other pod in the cluster. This open approach doesn’t help us particularly when we’re trying to isolate workloads, so we need to apply network policies to help us achieve the desired isolation.

The Kubernetes NetworkPolicy API enables us to apply ingress and egress rules to selected pods – for layer 3 and layer 4 traffic – and relies on the deployment of a compliant network plugin, that implements the Container Networking Interface (CNI). Not all Kubernetes network plugins provide support for network policy, but popular choices (such as Calico, Weave Net and Romana) do.

Network policy is namespace scoped, and is applied to pods based on selection, courtesy of a matched label (for example, tier: backend). When the pod selector for a NetworkPolicy object matches a pod, traffic to and from the pod is governed according to the ingress and egress rules defined in the policy. All traffic originating from or destined for the pod is then denied – unless there is a rule that allows it.

To properly isolate applications at the network and transport layer of the stack in a Kubernetes cluster, network policies should start with a default premise of ‘deny all’. Rules for each of the application’s components and their required sources and destinations should then be whitelisted one by one, and tested to ensure the traffic pattern works as intended.

Service-to-Service Security

Network policies are just what we need for layer 3/4 traffic isolation, but it would serve us well if we could also ensure that our application services can authenticate with one another, that their communication is encrypted, and that we have the option of applying fine-grained access control for intra-service interaction.

Solutions that help us to achieve this rely on policy applied at layers 5-7 of the network stack, and are a developing capability for cloud-native applications. Istio is one such tool, whose purpose involves the management of application workloads as a service mesh, including; advanced traffic management and service observability, as well as authentication and authorization based on policy. Istio deploys a sidecar container into each pod, which is based on the Envoy reverse proxy. The sidecar containers form a mesh, and proxy traffic between pods from different services, taking account of the defined traffic rules, and the security policy.

Istio’s authentication mechanism for service-to-service communication is based on mutual TLS, and the identity of the service entity is embodied in an X.509 certificate. The identities conform to the Secure Production Identity Framework for Everyone (SPIFFE) specification, which aims to provide a standard for issuing identities to workloads. SPIFFE is a project hosted by the Cloud Native Computing Foundation (CNCF).

Istio has far reaching capabilities, and if its suite of functions aren’t all required, then the benefits it provides might be outweighed by the operational overhead and maintenance it brings on deployment. An alternative solution for providing authenticated service identities based on SPIFFE, is SPIRE, a set of open source tools for creating and issuing identities.

Yet another solution for securing the communication between services in a Kubernetes cluster is the open source Cilium project, which uses Berkeley Packet Filters (BPF) within the Linux kernel to enforce defined security policy for layer 7 traffic. Cilium supports other layer 7 protocols such as Kafka and gRPC, in addition to HTTP.

Summary

As with every layer in the Kubernetes stack, from a security perspective, there is also a huge amount to consider in the user space layer. Kubernetes has been built with security as a first-class citizen, and the various inherent security controls, and mechanisms for interfacing with 3rd party security tooling, provide a comprehensive security capability.

It’s not just about defining policy and rules, however. It’s equally important to ensure, that as well as satisfying your organization’s wider security objectives, your security configuration supports the way your teams are organized, and the way in which they work. This requires careful, considered planning.

In the next and final article in this series, Managing the Security of Kubernetes Container Workloads, we’ll be discussing the security associated with the content of container workloads, and how security needs to be made a part of the end-to-end workflow.

Source

Kubernetes Federation Evolution – Kubernetes

Deploying applications to a kubernetes cluster is well defined and can in some cases be as simple as kubectl create -f app.yaml. The user’s story to deploy apps across multiple clusters has not been that simple. How should an app workload be distributed? Should the app resources be replicated into all clusters, or replicated into selected clusters or partitioned into clusters? How is the access to clusters managed? What happens if some of the resources, which user wants to distribute pre-exist in all or fewer clusters in some form.

In SIG multicluster, our journey has revealed that there are multiple possible models to solve these problems and there probably is no single best fit all scenario solution. Federation however is the single biggest kubernetes open source sub project which has seen maximum interest and contribution from the community in this problem space. The project initially reused the k8s API to do away with any added usage complexity for an existing k8s user. This became non-viable because of problems best discussed in this community update.

What has evolved further is a federation specific API architecture and a community effort which now continues as Federation V2.

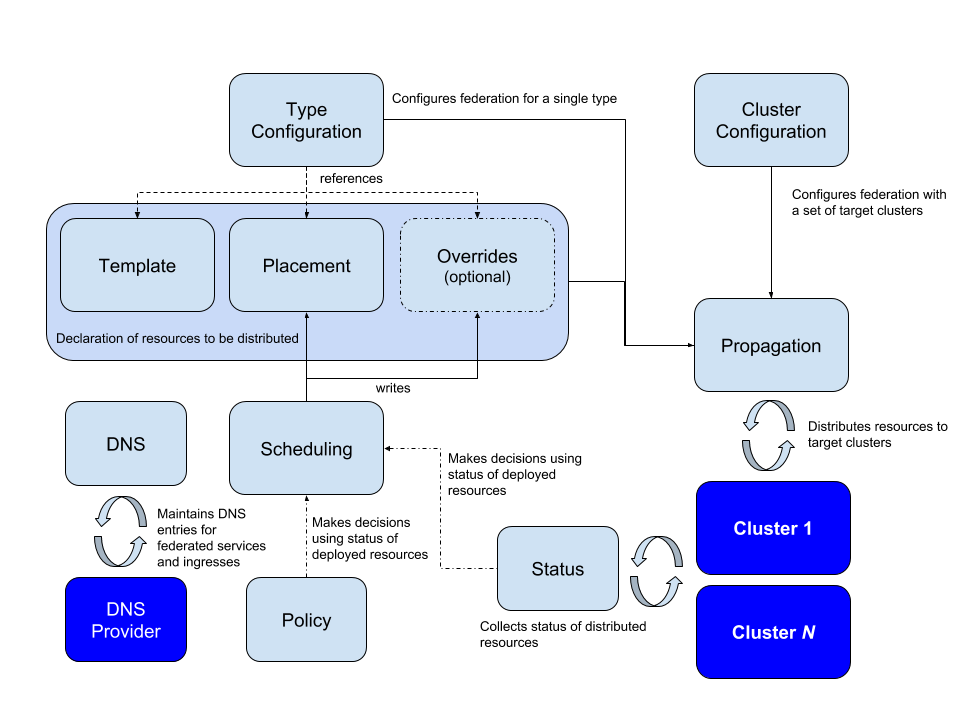
Because federation attempts to address a complex set of problems, it pays to break the different parts of those problems down. Let’s take a look at the different high-level areas involved:

Kubernetes Federation V2 Concepts

Kubernetes Federation V2 Concepts

Federating arbitrary resources

One of the main goals of Federation is to be able to define the APIs and API groups which encompass basic tenets needed to federate any given k8s resource. This is crucial due to the popularity of Custom Resource Definitions as a way to extend Kubernetes with new APIs.

The workgroup did arrive at a common definition of the federation API and API groups as ‘a mechanism that distributes “normal” Kubernetes API resources into different clusters’. The distribution in its most simple form could be imagined as simple propagation of this ‘normal Kubernetes API resource’ across the federated clusters. A thoughtful reader can certainly discern more complicated mechanisms, other than this simple propagation of the Kubernetes resources.

During the journey of defining building blocks of the federation APIs, one of the near term goals also evolved as ‘to be able to create a simple federation aka simple propagation of any Kubernetes resource or a CRD, writing almost zero code’. What ensued further was a core API group defining the building blocks as a Template resource, a Placement resource and an Override resource per given Kubernetes resource, a TypeConfig to specify sync or no sync for the given resource and associated controller(s) to carry out the sync. More details follow in the next section Federating resources: the details. Further sections will also talks about being able to follow a layered behaviour with higher level Federation APIs consuming the behaviour of these core building blocks, and users being able to consume whole or part of the API and associated controllers. Lastly this architecture also allows the users to write additional controllers or replace the available reference controllers with their own to carry out desired behaviour.

The ability to ‘easily federate arbitrary Kubernetes resources’, and a decoupled API, divided into building blocks APIs, higher level APIs and possible user intended types, presented such that different users can consume parts and write controllers composing solutions specific to them, makes a compelling case for Federation V2.

Federating resources: the details

Fundamentally, federation must be configured with two types of information:
Which API types federation should handle Which clusters federation should target for distributing
those resources. For each API type that federation handles, different parts of the declared state live in different API resources:
A template type holds the base specification of the resource – for example, a type called FederatedReplicaSet holds the base specification of a ReplicaSet that should be distributed to the targeted clusters A placement type holds the specification of the clusters the resource should be distributed to – for example, a type called FederatedReplicaSetPlacement holds information about which clusters FederatedReplicaSets should be distributed to An optional overrides type holds the specification of how the template resource should be varied in some clusters – for example, a type called FederatedReplicaSetOverrides holds information about how a FederatedReplicaSet should be varied in certain clusters.
These types are all associated by name – meaning that for a particular template resource with name foo, the placement and override information for that resource are contained by the override and placement resources with the same name and namespace as that of the template.

Higher level behaviour

The architecture of federation v2 API allows higher level APIs to be constructed using the mechanics provided by the core API types (template, placement and override) and associated controllers for a given resource. In the community we could uncover few use cases and did implement the higher level APIs and associated controllers useful for those cases. Some of these types described in further sections also provide an useful reference to anybody interested in solving more complex use cases, building on top of the mechanics already available with federation v2 API.

ReplicaSchedulingPreference

ReplicaSchedulingPreference provides an automated mechanism of distributing and maintaining total number of replicas for deployment or replicaset based federated workloads into federated clusters. This is based on high level user preferences given by the user. These preferences include the semantics of weighted distribution and limits (min and max) for distributing the replicas. These also include semantics to allow redistribution of replicas dynamically in case some replica pods remain unscheduled in some clusters, for example due to insufficient resources in that cluster.
More details can be found at the user guide for ReplicaSchedulingPreferences.

Federated Services & Cross-cluster service discovery

kubernetes services are very useful construct in micro-service architecture. There is a clear desire to deploy these services across cluster, zone, region and cloud boundaries. Services that span clusters provide geographic distribution, enable hybrid and multi-cloud scenarios and improve the level of high availability beyond single cluster deployments. Customers who want their services to span one or more (possibly remote) clusters, need them to be reachable in a consistent manner from both within and outside their clusters.

Federated Service at its core contains a template (definition of a kubernetes service), a placement(which clusters to be deployed into), an override (optional variation in particular clusters) and a ServiceDNSRecord (specifying details on how to discover it).

Note: The Federated Service has to be of type LoadBalancer in order for it to be discoverable across clusters.

Discovering a Federated Service from pods inside your Federated Clusters

By default, Kubernetes clusters come preconfigured with a cluster-local DNS server, as well as an intelligently constructed DNS search path which together ensure that DNS queries like myservice, myservice.mynamespace, some-other-service.other-namespace, etc issued by your software running inside Pods are automatically expanded and resolved correctly to the appropriate service IP of services running in the local cluster.

With the introduction of Federated Services and Cross-Cluster Service Discovery, this concept is extended to cover Kubernetes services running in any other cluster across your Cluster Federation, globally. To take advantage of this extended range, you use a slightly different DNS name (e.g. myservice.mynamespace.myfederation) to resolve federated services. Using a different DNS name also avoids having your existing applications accidentally traversing cross-zone or cross-region networks and you incurring perhaps unwanted network charges or latency, without you explicitly opting in to this behavior.

Lets consider an example: (The example uses a service named nginx and the query name for described above)

A Pod in a cluster in the us-central1-a availability zone needs to contact our nginx service. Rather than use the service’s traditional cluster-local DNS name (nginx.mynamespace, which is automatically expanded to nginx.mynamespace.svc.cluster.local) it can now use the service’s Federated DNS name, which is nginx.mynamespace.myfederation. This will be automatically expanded and resolved to the closest healthy shard of my nginx service, wherever in the world that may be. If a healthy shard exists in the local cluster, that service’s cluster-local IP address will be returned (by the cluster-local DNS). This is exactly equivalent to non-federated service resolution.

If the service does not exist in the local cluster (or it exists but has no healthy backend pods), the DNS query is automatically expanded to nginx.mynamespace.myfederation.svc.us-central1-a.us-central1.example.com. Behind the scenes, this is finding the external IP of one of the shards closest to my availability zone. This expansion is performed automatically by cluster-local DNS server, which returns the associated CNAME record. This results in a traversal of the hierarchy of DNS records, and ends up at one of the external IP’s of the Federated Service near by.

It is also possible to target service shards in availability zones and regions other than the ones local to a Pod by specifying the appropriate DNS names explicitly, and not relying on automatic DNS expansion. For example, nginx.mynamespace.myfederation.svc.europe-west1.example.comwill resolve to all of the currently healthy service shards in Europe, even if the Pod issuing the lookup is located in the U.S., and irrespective of whether or not there are healthy shards of the service in the U.S. This is useful for remote monitoring and other similar applications.

Discovering a Federated Service from Other Clients Outside your Federated Clusters

For external clients, automatic DNS expansion described is currently not possible. External clients need to specify one of the fully qualified DNS names of the federated service, be that a zonal, regional or global name. For convenience reasons, it is often a good idea to manually configure additional static CNAME records in your service, for example:

SHORT NAME CNAME
eu.nginx.acme.com nginx.mynamespace.myfederation.svc.europe-west1.example.com
us.nginx.acme.com nginx.mynamespace.myfederation.svc.us-central1.example.com
nginx.acme.com nginx.mynamespace.myfederation.svc.example.com

That way your clients can always use the short form on the left, and always be automatically routed to the closest healthy shard on their home continent. All of the required failover is handled for you automatically by Kubernetes Cluster Federation.

As a further reading a more elaborate guide for users is available at Multi-Cluster Service DNS with ExternalDNS Guide

To get started with Federation V2, please refer to the user guide hosted on github.
Deployment can be accomplished with a helm chart, and once the control plane is available, the user guide’s example can be used to get some hands-on experience with using Federation V2.

Federation V2 can be deployed in both cluster-scoped and namespace-scoped configurations. A cluster-scoped deployment will require cluster-admin privileges to both host and member clusters, and may be a good fit for evaluating federation on clusters that are not running critical workloads. Namespace-scoped deployment requires access to only a single namespace on host and member clusters, and is a better fit for evaluating federation on clusters running workloads. Most of the user guide refers to cluster-scoped deployment, with the Namespaced Federation section documenting how use of a namespaced deployment differs. Infact same cluster can host multiple federations and/or same clusters can be part of multiple federations in case of Namespaced Federation.

Source

Heptio Contour and Heptio Gimbal on Stage at KubeCon NA

It’s been an exciting eight months since launching Heptio Gimbal in partnership with Actapio and Yahoo Japan Corporation ahead of KubeCon EU 2018. We created Heptio Contour and Heptio Gimbal as a complementary pair of open source projects to enable organizations to unify and manage internet traffic in hybrid cloud environments.

Actapio and Yahoo Japan Corporation were critical early design partners and we were keen to consult with other Heptio customers as well as the larger Kubernetes community on how ingress could be improved. What we consistently heard was that people are struggling to manage ingress traffic in a multi-team and multi-cluster world. Notably, several of our customers had production outages due to teams creating conflicting routing rules with other teams.

Based on that feedback, we released Heptio Contour 0.6 in September which introduced the IngressRoute CRD, a novel new way of safely managing multi-team ingress. It’s been great to see community interest soar regarding our design and implementation that models Kubernetes Ingress similar to the delegation model of DNS. In particular, the ability to do instantaneous blue-green deployments of Ingress rules is a great feature that has come out of this work.

It’s important to recognize that the success of Heptio Contour and Heptio Gimbal wouldn’t be possible without building on Envoy proxy. We couldn’t be happier with Envoy’s recent graduation from the CNCF incubation process, joining Kubernetes and Prometheus as top-level CNCF projects.

At KubeCon NA next week, we’re excited to tell you more about these projects and Actapio & Yahoo Japan will be presenting on their production use of Heptio Gimbal. Read on for a complete list of related talks!

If you have any questions or are interested in learning more, reach us via the #contour and #gimbal channels on the Kubernetes community Slack or follow us on Twitter.

Source

Setting Up a Docker Registry with JFrog Artifactory and Rancher

For any team using
containers – whether in development, test, or production – an
enterprise-grade registry is a non-negotiable requirement. JFrog
Artifactory
is much beloved by Java
developers, and it’s easy to use as a Docker registry as well. To make
it even easier, we’ve put together a short walkthrough to setting things
up Artifactory in Rancher.

Before you start

For this article, we’ve assumed that you already have a Rancher
installation up and running (if not, check out our Quick Start
guide
), and
will be working with either Artifactory Pro or Artifactory Enterprise.
Choosing the right version of Artifactory depends on your development
needs. If your main development needs include building with Maven
package types, then Artifactory open source may be suitable. However,
if you build using Docker, Chef Cookbooks, NuGet, PyPI, RubyGems, and
other package formats then you’ll want to consider Artifactory Pro.
Moreover, if you have a globally distributed development team with HA
and DR needs, you’ll want to consider Artifactory Enterprise. JFrog
provides a detailed
matrix
with the differences between the versions of Artifactory. There’s
several values you’ll need to select in order to set Artifactory up as
a Docker registry, such as a public name, or public port. In this
article, we refer to them as variables; just substitute the values you
choose in for the variables throughout this post. To deploy Artifactory,
you’ll first need to create (or already) have a wildcard imported into
Rancher for “*.$public_name”. You’ll also need to create DNS entries
to the IP address for artifactory-lb, the load balancer for the
Artifactory high availability architecture. Artifactory will be reached
via $publish_schema://$public_name:$public_port, while the Docker
registry will be reachable at
$publish_schema://$docker_repo_name.$public_name:$public_port

Installing Artifactory

While you can choose to install Artifactory on your own with the
documented
instructions
,
you also have the option of using Rancher catalog. The Rancher community
has recently contributed a template for Artifactory, which deploys the
package, the Artifactory server, its reverse proxy, and a Rancher load
balancher.

**A note on reverse proxies: **to use Artifactory as a Docker registry,
a reverse proxy is required. This reverse proxy is automatically
configured using the Rancher catalog item. However, if you need to apply
a custom nginx configuration, you can do so by upgrading the
artifactory-rp container in Rancher.

Note that installing Artifactory is a separate task from setting up
Artifactory to serve as a Docker registry, and from connecting that
Docker registry to Rancher (we’ll cover how to do these things as
well). To launch the Artifactory template, navigate to the community
catalog in Rancher. Choose “Pro” as the Artifactory version to launch,
and set parameters for schema, name, and port:

Once the package is deployed, the service is accessible through
[$publish_schema://$publish_name:$publish_port]

Configure Artifactory

At this point, we’ll need to do a bit more configuration with
Artifactory to complete the setup. Access the Artifactory server using
the path above. The next step will be to configure the reverse proxy and
to enable Docker image registry integration. To configure the reverse
proxy, set the following parameters:

  • Internal hostname: artifactory
  • Internal port: 8081
  • Internal context: artifactory
  • Public server name: $public_name
  • Public context path: [leave blank]
  • http port: $public_port
  • Docker reverse proxy settings: Sub Domain

Next, create a
local Docker repository. Make sure to select Docker as the package type:
Verify that the
registry name is correct; it should be formatted as
$docker_rep_name.$public_name
Test that the
registry is working by logging into it:

# docker login $publish_schema://$docker_repo_name.$public_name

Add Artifactory into Rancher

Now that Artifactory is all set up, it’s time to add the registry to
Rancher itself, so any application built and managed in Rancher can pull
images from it. On the top navigation bar, visit Infrastructure, then
select Registries from the drop down menu. On the resulting screen,
choose “Add Registry”, then select the “Custom” option. All you’ll need
to do is enter the address for your Artifactory Docker registry, along
with the relevant credentials:
Once it’s been
added, you should see it show up your list of recognized registries
(which shows up after visiting Infrastructure -> Registries on the top
navigation bar). With that, you should be all set to use Artifactory as
a Docker registry within Rancher! Raul is a DevOps Lead at Rancher
Labs.

Source

New Contributor Workshop Shanghai – Kubernetes

New Contributor Workshop Shanghai

Authors: Josh Berkus (Red Hat), Yang Li (The Plant), Puja Abbassi (Giant Swarm), XiangPeng Zhao (ZTE)

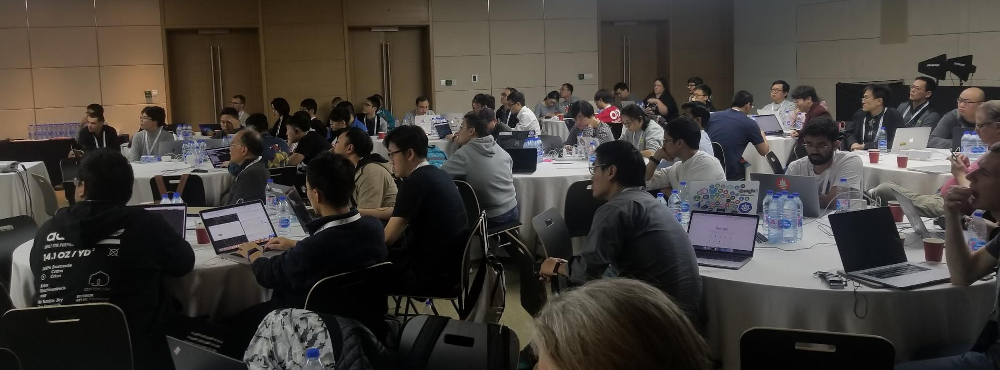
Kubecon Shanghai New Contributor Summit attendees. Photo by Jerry Zhang

Kubecon Shanghai New Contributor Summit attendees. Photo by Jerry Zhang

We recently completed our first New Contributor Summit in China, at the first KubeCon in China. It was very exciting to see all of the Chinese and Asian developers (plus a few folks from around the world) interested in becoming contributors. Over the course of a long day, they learned how, why, and where to contribute to Kubernetes, created pull requests, attended a panel of current contributors, and got their CLAs signed.

This was our second New Contributor Workshop (NCW), building on the one created and led by SIG Contributor Experience members in Copenhagen. Because of the audience, it was held in both Chinese and English, taking advantage of the superb simultaneous interpretation services the CNCF sponsored. Likewise, the NCW team included both English and Chinese-speaking members of the community: Yang Li, XiangPeng Zhao, Puja Abbassi, Noah Abrahams, Tim Pepper, Zach Corleissen, Sen Lu, and Josh Berkus. In addition to presenting and helping students, the bilingual members of the team translated all of the slides into Chinese. Fifty-one students attended.

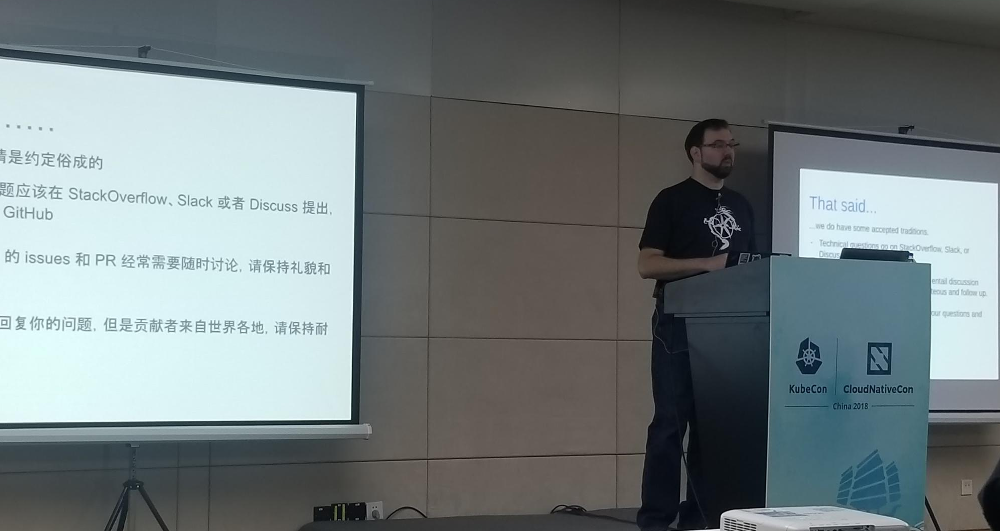
Noah Abrahams explains Kubernetes communications channels. Photo by Jerry Zhang

Noah Abrahams explains Kubernetes communications channels. Photo by Jerry Zhang

The NCW takes participants through the stages of contributing to Kubernetes, starting from deciding where to contribute, followed by an introduction to the SIG system and our repository structure. We also have “guest speakers” from Docs and Test Infrastructure who cover contributing in those areas. We finally wind up with some hands-on exercises in filing issues and creating and approving PRs.

Those hands-on exercises use a repository known as the contributor playground, created by SIG Contributor Experience as a place for new contributors to try out performing various actions on a Kubernetes repo. It has modified Prow and Tide automation, uses Owners files like in the real repositories. This lets students learn how the mechanics of contributing to our repositories work without disrupting normal development.

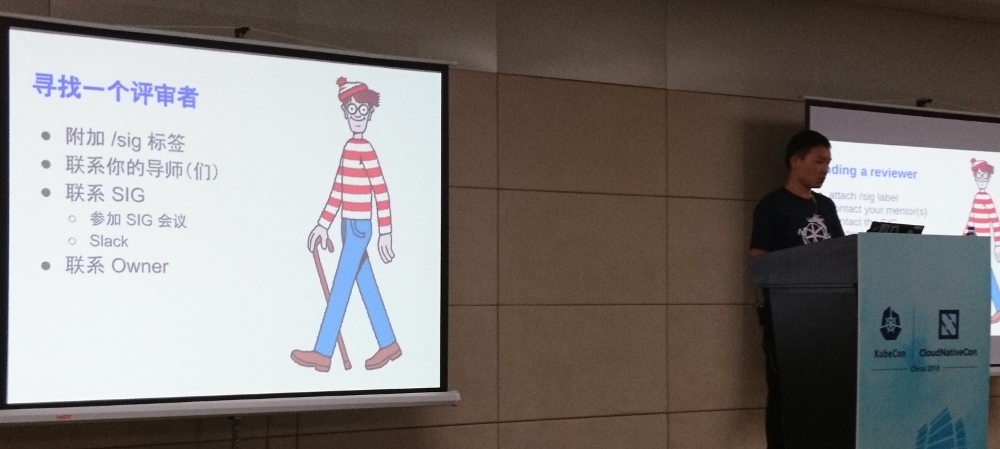
Yang Li talks about getting your PRs reviewed. Photo by Josh Berkus

Yang Li talks about getting your PRs reviewed. Photo by Josh Berkus

Both the “Great Firewall” and the language barrier prevent contributing Kubernetes from China from being straightforward. What’s more, because open source business models are not mature in China, the time for employees work on open source projects is limited.

Chinese engineers are eager to participate in the development of Kubernetes, but many of them don’t know where to start since Kubernetes is such a large project. With this workshop, we hope to help those who want to contribute, whether they wish to fix some bugs they encountered, improve or localize documentation, or they need to work with Kubernetes at their work. We are glad to see more and more Chinese contributors joining the community in the past few years, and we hope to see more of them in the future.

“I have been participating in the Kubernetes community for about three years,” said XiangPeng Zhao. “In the community, I notice that more and more Chinese developers are showing their interest in contributing to Kubernetes. However, it’s not easy to start contributing to such a project. I tried my best to help those who I met in the community, but I think there might still be some new contributors leaving the community due to not knowing where to get help when in trouble. Fortunately, the community initiated NCW at KubeCon Copenhagen and held a second one at KubeCon Shanghai. I was so excited to be invited by Josh Berkus to help organize this workshop. During the workshop, I met community friends in person, mentored attendees in the exercises, and so on. All of this was a memorable experience for me. I also learned a lot as a contributor who already has years of contributing experience. I wish I had attended such a workshop when I started contributing to Kubernetes years ago.”

Panel of contributors. Photo by Jerry Zhang

Panel of contributors. Photo by Jerry Zhang

The workshop ended with a panel of current contributors, featuring Lucas Käldström, Janet Kuo, Da Ma, Pengfei Ni, Zefeng Wang, and Chao Xu. The panel aimed to give both new and current contributors a look behind the scenes on the day-to-day of some of the most active contributors and maintainers, both from China and around the world. Panelists talked about where to begin your contributor’s journey, but also how to interact with reviewers and maintainers. They further touched upon the main issues of contributing from China and gave attendees an outlook into exciting features they can look forward to in upcoming releases of Kubernetes.

After the workshop, Xiang Peng Zhao chatted with some attendees on WeChat and Twitter about their experiences. They were very glad to have attended the NCW and had some suggestions on improving the workshop. One attendee, Mohammad, said, “I had a great time at the workshop and learned a lot about the entire process of k8s for a contributor.” Another attendee, Jie Jia, said, “The workshop was wonderful. It systematically explained how to contribute to Kubernetes. The attendee could understand the process even if s/he knew nothing about that before. For those who were already contributors, they could also learn something new. Furthermore, I could make new friends from inside or outside of China in the workshop. It was awesome!”

SIG Contributor Experience will continue to run New Contributor Workshops at each upcoming Kubecon, including Seattle, Barcelona, and the return to Shanghai in June 2019. If you failed to get into one this year, register for one at a future Kubecon. And, when you meet an NCW attendee, make sure to welcome them to the community.

Links:

Source

The Kubernetes Cluster API – Heptio

I’ve been working with Kubernetes since filing my first commit in October 2016. I’ve had the chance to collaborate with the community on Kops, Kubicorn, and Kubeadm, but there’s one gap that has been nagging me for years: how to to create the right abstraction for bringing up a Kubernetes cluster and managing it once it’s online. As it turned out, I wasn’t alone. So begins the story of Cluster API.

In 2017 I spent an afternoon enjoying lunch at the Google office in Seattle’s Fremont neighborhood meeting with Robert Bailey and Weston Hutchins. We had connected via open source and shared a few similar ideas about declarative infrastructure built on new primitives in Kubernetes. Robert Bailey and Jacob Beacham began to spearhead the charge from Google. We slowly began to start formalizing an effort to create a system for bootstrapping and managing a Kubernetes cluster in a declarative way. I remember the grass roots nature of the project. Google began work on evangelizing these ideas within the Kubernetes community.

Following an email to the Kubernetes mailing list sig cluster lifecycle, the Cluster API working group was born. The group rapidly discovered other projects such as archon and work from Loodse that also had similar ideas. It was clear we were all thinking of a brighter future with declarative infrastructure.

We started brainstorming what a declarative Kubernetes cluster might look like. We each consulted Kubernetes “elders” at our respective companies. The engineers at Google consulted Tim Hockin while I talked this over with Joe Beda, co-founder of Kubernetes and my long time colleague. Tim suggested we start building tooling and playing with abstractions to get a feel for what would work or not. At the time of this “sandbox” stage, we started prototyping in the kube-deploy repository. We needed a place to start hacking on the code and being that this feature was originally intentionally called out of scope finding a home was challenging. Later we were able to move out of that kube-deploy repository to cluster-api which is where the code lives today.

Now “Cluster API,” which is short for “Cluster Management API,” is a great example of a bad name. As Tim St. Clair (Heptio) suggested, a better name for this layer of software is probably “cluster framework”. The community is still figuring out how we plan on dealing with this conundrum.

One of the first decisions the working group made was in regard to the scope of the API itself. In other words, what would our new abstraction be responsible for representing, and what would our abstraction intentionally ignore. We landed on two primary new resources, Clusters, and Machines. The Cluster resource was intended to map cleanly to the official Kubernetes bootstrap tool kubeadm, and the Machine resource was intended to be a simple representation of some compute load in a cloud (EC2 Instances, Google Virtual Machines, etc) or a physical machine. We explicitly decided to keep the new Machine resource separate from the existing node resource, as we could munge the two together later if necessary. According to Jacob Beacham, “the biggest motivation being that this was the only way to build the functionality outside of core, since the Node API is already defined in core.” Each Cluster resource would be mapped to a set of Machine resources, and ultimately all of these combined would represent a single Kubernetes cluster.

We later looked at implementing higher level resources to manage the Machine resource, in the same way deployments and ReplicaSets manage pods in Kubernetes today. Following this logic we modeled MachineDeployment after Deployment and MachineSet after ReplicaSet. These would allow unique strategy implementations for how various controllers would manage scaling and mutating underlying Machines.

We also decided early on that “how” a controller reconciles one of these resources is unique to the controller. In other words, the API should, by design, never include bash commands or any logic that suggests “how” to bring a cluster up, only “what” the cluster should look like after it’s been stood up. Where and how the controller reasons about what it needs to do is in scope for the controller and out of scope for the API. For example, Cluster API would define what version of Kubernetes to install, but would never define how to install that version.

With ClusterAPI, we hope to solve for many of the technical concerns in managing Kubernetes clusters, by drawing upon the lessons we’ve learned from Kubeadm, Kops, Kubicorn, and Kube-up, Gardener, etc.. So we set out to build ClusterAPI with the following goals in mind:

Facilitate Atomic Transactions

While keeping the spirit of planning for failure and mitigating hazards in our software, we knew we wanted to build software that would make it possible to guarantee a successful infrastructure mutation or no mutation at all. We learned this from Kops, when a cluster upgrade or create would fail partially through and we would orphan costly infrastructure in a cloud account.

Enabling Cluster Automation

With Cluster API we find that cluster level configuration is now declared through a common API, making it easy to automate and build tooling to interface with the new API. Tools like the cluster autoscaler now are liberated from having to concern themselves with how a node is created/destroyed. This simplifies the tooling and enables new tooling to be crafted around updating the cluster definition based on arbitrary business needs. This will change how operators think about managing a cluster.

Keep infrastructure resilient

Kops, Kubicorn, and Kube-up all have a fatal flaw. They run only for a finite amount of time. They all have some concept of accomplishing a task, and then terminating the program. This was a good starting point, but it didn’t offer the goal seeking and resilient behavior users are used to with Kubernetes. We needed a controller, to reconcile state over time. If a machine goes down, we don’t want to have to worry about bringing it back up.

Create a better user experience

Standing up a Kubernetes cluster is hard. Period. We hoped to build tooling that would go from 0 to Kubernetes in a friendly way, that made sense to operators. Furthermore, we hoped the API abstractions we created would also resonate with engineers so we could encourage them to build tooling around these new abstractions. For example, if the abstraction was user-friendly, we could port the upstream autoscaler over to using the new abstraction so it no longer had to concern itself with implementation — simply updating a record in Kubernetes.

Provide a solution for cluster upgrades

We wanted a turnkey solution to upgrades. Upgrading a Kubernetes cluster is tedious and risky, and having a residual controller in place not only solved the implementation of how to upgrade a Kubernetes cluster but it also gave us visibility into the state of the current upgrade.

Bring the community together

As it stands every Kubernetes installer to date represents a cluster in a different way, and the user experience is fragmented. This diminishes Kubernetes adoption and frankly pisses users off. We hoped to reduce this fragmentation and provide a solution to defining “what” a cluster looks like, and provide tooling to jumpstart implementations that solve “how” to bring a cluster to life.

All of these lessons and more are starting to sing in the Cluster API repositories. We are on the verge of alpha and beta releases for clouds like AWS and GCP. We hope that the community driven API becomes a standard teams can count on, and we hope that the community can start to offer an arsenal of controller implementations that bring these various variants of clusters to life.

Going Further

Learn More about the Cluster API from Kris Nova (Heptio) and Loc Nguyen (VMware) live at Kubecon 2018 during their presentation on the topic. The talk will be recorded in case you can’t make it. We will upload the video to our advocacy site as soon as we can.

Source

Production-Ready Kubernetes Cluster Creation with kubeadm

Production-Ready Kubernetes Cluster Creation with kubeadm

Authors: Lucas Käldström (CNCF Ambassador) and Luc Perkins (CNCF Developer Advocate)

kubeadm is a tool that enables Kubernetes administrators to quickly and easily bootstrap minimum viable clusters that are fully compliant with Certified Kubernetes guidelines. It’s been under active development by SIG Cluster Lifecycle since 2016 and we’re excited to announce that it has now graduated from beta to stable and generally available (GA)!

This GA release of kubeadm is an important event in the progression of the Kubernetes ecosystem, bringing stability to an area where stability is paramount.

The goal of kubeadm is to provide a foundational implementation for Kubernetes cluster setup and administration. kubeadm ships with best-practice defaults but can also be customized to support other ecosystem requirements or vendor-specific approaches. kubeadm is designed to be easy to integrate into larger deployment systems and tools.

The scope of kubeadm

kubeadm is focused on bootstrapping Kubernetes clusters on existing infrastructure and performing an essential set of maintenance tasks. The core of the kubeadm interface is quite simple: new control plane nodes are created by running kubeadm init and worker nodes are joined to the control plane by running kubeadm join. Also included are utilities for managing already bootstrapped clusters, such as control plane upgrades and token and certificate renewal.

To keep kubeadm lean, focused, and vendor/infrastructure agnostic, the following tasks are out of its scope:

  • Infrastructure provisioning
  • Third-party networking
  • Non-critical add-ons, e.g. for monitoring, logging, and visualization
  • Specific cloud provider integrations

Infrastructure provisioning, for example, is left to other SIG Cluster Lifecycle projects, such as the Cluster API. Instead, kubeadm covers only the common denominator in every Kubernetes cluster: the control plane. The user may install their preferred networking solution and other add-ons on top of Kubernetes after cluster creation.

What kubeadm’s GA release means

General Availability means different things for different projects. For kubeadm, going GA means not only that the process of creating a conformant Kubernetes cluster is now stable, but also that kubeadm is flexible enough to support a wide variety of deployment options.

We now consider kubeadm to have achieved GA-level maturity in each of these important domains:

  • Stable command-line UX — The kubeadm CLI conforms to #5a GA rule of the Kubernetes Deprecation Policy, which states that a command or flag that exists in a GA version must be kept for at least 12 months after deprecation.
  • Stable underlying implementation — kubeadm now creates a new Kubernetes cluster using methods that shouldn’t change any time soon. The control plane, for example, is run as a set of static Pods, bootstrap tokens are used for the kubeadm join flow, and ComponentConfig is used for configuring the kubelet.
  • Configuration file schema — With the new v1beta1 API version, you can now tune almost every part of the cluster declaratively and thus build a “GitOps” flow around kubeadm-built clusters. In future versions, we plan to graduate the API to version v1 with minimal changes (and perhaps none).
  • The “toolbox” interface of kubeadm — Also known as phases. If you don’t want to perform all kubeadm init tasks, you can instead apply more fine-grained actions using the kubeadm init phase command (for example generating certificates or control plane Static Pod manifests).
  • Upgrades between minor versions — The kubeadm upgrade command is now fully GA. It handles control plane upgrades for you, which includes upgrades to etcd, the API Server, the Controller Manager, and the Scheduler. You can seamlessly upgrade your cluster between minor or patch versions (e.g. v1.12.2 -> v1.13.1 or v1.13.1 -> v1.13.3).
  • etcd setup — etcd is now set up in a way that is secure by default, with TLS communication everywhere, and allows for expanding to a highly available cluster when needed.

Who will benefit from a stable kubeadm

SIG Cluster Lifecycle has identified a handful of likely kubeadm user profiles, although we expect that kubeadm at GA can satisfy many other scenarios as well.

Here’s our list:

  • You’re a new user who wants to take Kubernetes for a spin. kubeadm is the fastest way to get up and running on Linux machines. If you’re using Minikube on a Mac or Windows workstation, you’re actually already running kubeadm inside the Minikube VM!
  • You’re a system administrator responsible for setting up Kubernetes on bare metal machines and you want to quickly create Kubernetes clusters that are secure and in conformance with best practices but also highly configurable.
  • You’re a cloud provider who wants to add a Kubernetes offering to your suite of cloud services. kubeadm is the go-to tool for creating clusters at a low level.
  • You’re an organization that requires highly customized Kubernetes clusters. Existing public cloud offerings like Amazon EKS and Google Kubernetes Engine won’t cut it for you; you need customized Kubernetes clusters tailored to your hardware, security, policy, and other needs.
  • You’re creating a higher-level cluster creation tool than kubeadm, building the cluster experience from the ground up, but you don’t want to reinvent the wheel. You can “rebase” on top of kubeadm and utilize the common bootstrapping tools kubeadm provides for you. Several community tools have adopted kubeadm, and it’s a perfect match for Cluster API implementations.

All these users can benefit from kubeadm graduating to a stable GA state.

kubeadm survey

Although kubeadm is GA, the SIG Cluster Lifecycle will continue to be committed to improving the user experience in managing Kubernetes clusters. We’re launching a survey to collect community feedback about kubeadm for the sake of future improvement.

The survey is available at https://bit.ly/2FPfRiZ. Your participation would be highly valued!

This release wouldn’t have been possible without the help of the great people that have been contributing to the SIG. SIG Cluster Lifecycle would like to thank a few key kubeadm contributors:

We also want to thank all the companies making it possible for their developers to work on Kubernetes, and all the other people that have contributed in various ways towards making kubeadm as stable as it is today!

About the authors

Lucas Käldström

  • kubeadm subproject owner and SIG Cluster Lifecycle co-chair
  • Kubernetes upstream contractor, last two years contracting for Weaveworks
  • CNCF Ambassador
  • GitHub: luxas

Luc Perkins

  • CNCF Developer Advocate
  • Kubernetes SIG Docs contributor and SIG Docs tooling WG chair
  • GitHub: lucperkins

Source

Securing the Configuration of Kubernetes Cluster Components

Securing the Configuration of Kubernetes Cluster Components

In the previous article of this series Securing Kubernetes for Cloud Native Applications, we discussed what needs to be considered when securing the infrastructure on which a Kubernetes cluster is deployed. This time around, we’re turning our attention to the cluster itself.

Kubernetes Architecture

Kubernetes is a complex system, and the diagram above shows the many different constituent parts that make up a cluster. Each of these components needs to be carefully secured in order to maintain the overall integrity of the cluster.

We won’t be able to cover every aspect of cluster-level security in this article, but we’ll aim to address the more important topics. As we’ll see later, help is available from the wider community, in terms of best-practice security for Kubernetes clusters, and the tooling for measuring adherence to that best-practice.

Cluster Installers

We should start with a brief observation about the many different tools that can be used to install the cluster components.

Some of the default configuration parameters for the components of a Kubernetes cluster, are sub-optimal from a security perspective, and need to be set correctly to ensure a secure cluster. Unless you opt for a managed Kubernetes cluster (such as that provided by Giant Swarm), where the entire cluster is managed on your behalf, this problem is exacerbated by the many different cluster installation tools available, each of which will apply a subtly different configuration. While most installers come with sane defaults, we should never consider that they have our backs covered when it comes to security, and we should make it our objective to ensure that whichever installer mechanism we elect to use, it’s configured to secure the cluster according to our requirements.

Let’s take a look at some of the important aspects of security for the control plane.

API Server

The API server is the hub of all communication within the cluster, and it’s on the API server where the majority of the cluster’s security configuration is applied. The API server is the only component of the cluster’s control plane, that is able to interact directly with the cluster’s state store. Users operating the cluster, other control plane components, and sometimes cluster workloads, all interact with the cluster using the server’s HTTP-based REST API.

Because of its pivotal role in the control of the cluster, carefully managing access to the API server is crucial as far as security is concerned. If somebody or something gains unsolicited access to the API, it may be possible for them to acquire all kinds of sensitive information, as well as gain control of the cluster itself. For this reason, client access to the Kubernetes API should be encrypted, authenticated, and authorized.

Securing Communication with TLS

To prevent man-in-the-middle attacks, the communication between each and every client and the API server should be encrypted using TLS. To achieve this, the API server needs to be configured with a private key and X.509 certificate.

The X.509 certificate for the root certificate authority (CA) that issued the API server’s certificate, must be available to any clients needing to authenticate to the API server during a TLS handshake, which leads us to the question of certificate authorities for the cluster in general. As we’ll see in a moment, there are numerous ways for clients to authenticate to the API server, and one of these is by way of X.509 certificates. If this method of client authentication is employed, which is probably true in the majority of cases (at least for cluster components), each cluster component should get its own certificate, and it makes a lot of sense to establish a cluster-wide PKI capability.

There are numerous ways that a PKI capability can be realised for a cluster, and no one way is better than another. It could be configured by hand, it may be configured courtesy of your chosen installer, or by some other means. In fact, the cluster can be configured to have its own in-built CA, that can issue certificates in response to certificate signing requests submitted via the API server. Here, at Giant Swarm, we use an operator called cert-operator, in conjunction with Hashicorp’s Vault.

Whilst we’re on the topic of secure communication with the API server, be sure to disable its insecure port (prior to Kubernetes 1.13), which serves the API over plain HTTP (–insecure-port=0)!

Authentication, Authorization, and Admission Control

Now let’s turn our attention to controlling which clients can perform which operations on which resources in the cluster. We won’t go into much detail here, as by and large, this is a topic for the next article. What’s important, is to make sure that the components of the control plane are configured to provide the underlying access controls.

Kubernetes API Authorization Flow

When an API request lands at the API server, it performs a series of checks to determine whether to serve the request or not, and if it does serve the request, whether to validate or mutate the the resource object according to defined policy. The chain of execution is depicted in the diagram above.

Kubernetes supports many different authentication schemes, which are almost always implemented externally to the cluster, including X.509 certificates, basic auth, bearer tokens, OpenID Connect (OIDC) for authenticating with a trusted identity provider, and so on. The various schemes are enabled using relevant config options on the API server, so be sure to provide these for the authentication scheme(s) you plan to use. X.509 client certificate authentication requires the path to a file containing one or more certificates for CAs (–client-ca-file), for example. One important point to remember, is that by default, any API requests that are not authenticated by one of the authentication schemes, are treated as anonymous requests. Whilst the access that anonymous requests gain can be limited by authorization, if they’re not required, they should be turned off altogether (–anonymous-auth=false).

Once a request is authenticated, the API server then considers the request against authorization policy. Again, the authorization modes are a configuration option (–authorization-mode), which should at the very least be altered from the default value of AlwaysAllow. The list of authorization modes ideally should include RBAC and Node, the former for enabling the RBAC API for fine-grained access control, and the latter to authorize kubelet API requests (see below).

Once an API request has been authenticated and authorized, the resource object can be subject to validation or mutation before it’s persisted to the cluster’s state database, using admission controllers. A minimum set of admission controllers are recommended for use, and shouldn’t be removed from the list, unless there is very good reason to do so. Additional security related admission controllers that are worthy of consideration are:

  • DenyEscalatingExec – if it’s necessary to allow your pods to run with enhanced privileges (e.g. using the host’s IPC/PID namespaces), this admission controller will prevent users from executing commands in the pod’s privileged containers.
  • PodSecurityPolicy – provides the means for applying various security mechanisms for all created pods. We’ll discuss this further in the next article in this series, but for now it’s important to ensure this admission controller is enabled, otherwise our security policy cannot be applied.
  • NodeRestriction – an admission controller that governs the access a kubelet has to cluster resources, which is covered in more detail below.
  • ImagePolicyWebhook – allows for the images defined for a pod’s containers, to be checked for vulnerabilities by an external ‘image validator’, such as the Image Enforcer. Image Enforcer is based on the Open Policy Agent (OPA), and works in conjunction with the open source vulnerability scanner, Clair.

Dynamic admission control, which is a relatively new feature in Kubernetes, aims to provide much greater flexibility over the static plugin admission control mechanism. It’s implemented with admission webhooks and controller-based initializers, and promises much for cluster security, just as soon as community solutions reach a level of sufficient maturity.

Kubelet

The kubelet is an agent that runs on each node in the cluster, and is responsible for all pod-related activities on the node that it runs on, including starting/stopping and restarting pod containers, reporting on the health of pod containers, amongst other things. After the API server, the kubelet is the next most important cluster component to consider when it comes to security.

Accessing the Kubelet REST API

The kubelet serves a small REST API on ports 10250 and 10255. Port 10250 is a read/write port, whilst 10255 is a read-only port with a subset of the API endpoints.

Providing unfettered access to port 10250 is dangerous, as it’s possible to execute arbitrary commands inside a pod’s containers, as well as start arbitrary pods. Similarly, both ports provide read access to potentially sensitive information concerning pods and their containers, which might render workloads vulnerable to compromise.

To safeguard against potential compromise, the read-only port should be disabled, by setting the kubelet’s configuration, –read-only-port=0. Port 10250, however, needs to be available for metrics collecting and other important functions. Access to this port should be carefully controlled, so let’s discuss the key security configurations.

Client Authentication

Unless its specifically configured, the kubelet API is open to unauthenticated requests from clients. It’s important, therefore, to configure one of the available authentication methods; X.509 client certificates, or requests with Authorization headers containing bearer tokens.

In the case of X.509 client certificates, the contents of a CA bundle needs to be made available to the kubelet, so that it can authenticate the certificates presented by clients during a TLS handshake. This is provided as part of the kubelet configuration (–client-ca-file).

In an ideal world, the only client that needs access to a kubelet’s API, is the Kubernetes API server. It needs to access the kubelet’s API endpoints for various functions, such as collecting logs and metrics, executing a command in a container (think kubectl exec), forwarding a port to a container, and so on. In order for it to be authenticated by the kubelet, the API server needs to be configured with client TLS credentials (–kubelet-client-certificate and –kubelet-client-key).

Anonymous Authentication

If you’ve taken the care to configure the API server’s access to the kubelet’s API, you might be forgiven for thinking ‘job done’. But this isn’t the case, as any requests hitting the kubelet’s API that don’t attempt to authenticate with the kubelet, are deemed to be anonymous requests. By default, the kubelet passes anonymous requests on for authorization, rather than rejecting them as unauthenticated.

If it’s essential in your environment to allow for anonymous kubelet API requests, then there is the authorization gate, which gives some flexibility in determining what can and can’t get served by the API. It’s much safer, however, to disallow anonymous API requests altogether, by setting the kubelet’s –anonymous-auth configuration to false. With such a configuration, the API returns a 401 Unauthorized response to unauthorized clients.

Authorization

With authorizing requests to the kubelet API, once again it’s possible to fall foul of a default Kubernetes setting. Authorization to the kubelet API operates in one of two modes; AlwaysAllow (default) or Webhook. The AlwaysAllow mode does exactly what you’d expect – it will allow all requests that have passed through the authentication gate, to succeed. This includes anonymous requests.

Instead of leaving this wide open, the best approach is to offload the authorization decision to the Kubernetes API server, using the kubelet’s –authorization-mode config option, with the webhook value. With this configuration, the kubelet calls the SubjectAccessReview API (which is part of the API server) to determine whether the subject is allowed to make the request, or not.

Restricting the Power of the Kubelet

In older versions of Kubernetes (prior to 1.7), the kubelet had read-write access to all Node and Pod API objects, even if the Node and Pod objects were under the control of another kubelet running on a different node. They also had read access to all objects that were contained within pod specs; the Secret, ConfigMap, PersistentVolume and PersistentVolumeClaim objects. In other words, a kubelet had access to, and control of, numerous resources it had no responsibility for. This is very powerful, and in the event of a cluster node compromise, the damage could quickly escalate beyond the node in question.

Node Authorizer

For this reason, a Node Authorization mode was introduced specifically for the kubelet, with the goal of controlling its access to the Kubernetes API. The Node authorizer limits the kubelet to read operations on those objects that are relevant to the kubelet (e.g. pods, nodes, services), and applies further read-only limits to Secrets, Configmap, PersistentVolume and PersistentVolumeClaim objects, that are related specifically to the pods bound to the node on which the kubelet runs.

NodeRestriction Admission Controller

Limiting a kubelet to read-only access for those objects that are relevant to it, is a big step in preventing a compromised cluster or workload. The kubelet, however, needs write access to its Node and Pod objects as a means of its normal function. To allow for this, once a kubelet’s API request has passed through Node Authorization, it’s then subject to the NodeRestriction admission controller, which limits the Node and Pod objects the kubelet can modify – its own. For this to work, the kubelet user must be system:node:<nodeName>, which must belong in the system:nodes group. It’s the nodeName component of the kubelet user, of course, which the NodeRestriction admission controller uses to allow or disallow kubelet API requests that modify Node and Pod objects. It follows, that each kubelet should have a unique X.509 certificate for authenticating to the API server, with the Common Name of the subject distinguished name reflecting the user, and the Organization reflecting the group.

Again, these important configurations don’t happen automagically, and the API server needs to be started with Node as one of the comma-delimited list of plugins for the –authorization-mode config option, whilst NodeRestriction needs to be in the list of admission controllers specified by the –enable-admission-plugins option.

Best Practice

It’s important to emphasize that we’ve only covered a sub-set of of the security considerations for the cluster layer (albeit important ones), and if you’re thinking that this all sounds very daunting, then fear not, because help is at hand.

In the same way that benchmark security recommendations have been created for elements of the infrastructure layer, such as Docker, they have also been created for a Kubernetes cluster. The Center for Internet Security (CIS) have compiled a thorough set of configuration settings and filesystem checks for each component of the cluster, published as the CIS Kubernetes Benchmark.

You might also be interested to know that the Kubernetes community has produced an open source tool for auditing a Kubernetes cluster against the benchmark, the Kubernetes Bench for Security. It’s a Golang application, and supports a number of different Kubernetes versions (1.6 onwards), as well as different versions of the benchmark.

If you’re serious about properly securing your cluster, then using the benchmark as a measure of compliance, is a must.

Summary

Evidently, taking precautionary steps to secure your cluster with appropriate configuration, is crucial to protecting the workloads that run in the cluster. Whilst the Kubernetes community has worked very hard to provide all of the necessary security controls to implement that security, for historical reasons some of the default configuration overlooks what’s considered best-practice. We ignore these shortcomings at our peril, and must take the responsibility for closing the gaps whenever we establish a cluster, or when we upgrade to newer versions that provide new functionality.

Some of what we’ve discussed here, paves the way for the next layer in the stack, where we make use of the security mechanisms we’ve configured, to define and apply security controls to protect the workloads that run on the cluster. The next article is called Applying Best Practice Security Controls to a Kubernetes Cluster.

Source