Developing on Kubernetes – Kubernetes

Authors: Michael Hausenblas (Red Hat), Ilya Dmitrichenko (Weaveworks)

How do you develop a Kubernetes app? That is, how do you write and test an app that is supposed to run on Kubernetes? This article focuses on the challenges, tools and methods you might want to be aware of to successfully write Kubernetes apps alone or in a team setting.

We’re assuming you are a developer, you have a favorite programming language, editor/IDE, and a testing framework available. The overarching goal is to introduce minimal changes to your current workflow when developing the app for Kubernetes. For example, if you’re a Node.js developer and are used to a hot-reload setup—that is, on save in your editor the running app gets automagically updated—then dealing with containers and container images, with container registries, Kubernetes deployments, triggers, and more can not only be overwhelming but really take all the fun out if it.

In the following, we’ll first discuss the overall development setup, then review tools of the trade, and last but not least do a hands-on walkthrough of three exemplary tools that allow for iterative, local app development against Kubernetes.

Where to run your cluster?

As a developer you want to think about where the Kubernetes cluster you’re developing against runs as well as where the development environment sits. Conceptually there are four development modes:
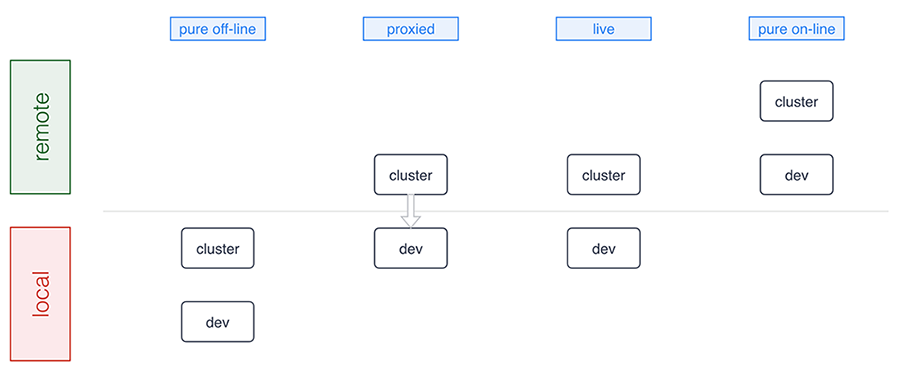
Dev Modes

A number of tools support pure offline development including Minikube, Docker for Mac/Windows, Minishift, and the ones we discuss in detail below. Sometimes, for example, in a microservices setup where certain microservices already run in the cluster, a proxied setup (forwarding traffic into and from the cluster) is preferable and Telepresence is an example tool in this category. The live mode essentially means you’re building and/or deploying against a remote cluster and, finally, the pure online mode means both your development environment and the cluster are remote, as this is the case with, for example, Eclipse Che or Cloud 9. Let’s now have a closer look at the basics of offline development: running Kubernetes locally.

Minikube is a popular choice for those who prefer to run Kubernetes in a local VM. More recently Docker for Mac and Windows started shipping Kubernetes as an experimental package (in the “edge” channel). Some reasons why you may want to prefer using Minikube over the Docker desktop option are:

  • You already have Minikube installed and running
  • You prefer to wait until Docker ships a stable package
  • You’re a Linux desktop user
  • You are a Windows user who doesn’t have Windows 10 Pro with Hyper-V

Running a local cluster allows folks to work offline and that you don’t have to pay for using cloud resources. Cloud provider costs are often rather affordable and free tiers exists, however some folks prefer to avoid having to approve those costs with their manager as well as potentially incur unexpected costs, for example, when leaving cluster running over the weekend.

Some developers prefer to use a remote Kubernetes cluster, and this is usually to allow for larger compute and storage capacity and also enable collaborative workflows more easily. This means it’s easier for you to pull in a colleague to help with debugging or share access to an app in the team. Additionally, for some developers it can be critical to mirror production environment as closely as possible, especially when it comes down to external cloud services, say, proprietary databases, object stores, message queues, external load balancer, or mail delivery systems.

In summary, there are good reasons for you to develop against a local cluster as well as a remote one. It very much depends on in which phase you are: from early prototyping and/or developing alone to integrating a set of more stable microservices.

Now that you have a basic idea of the options around the runtime environment, let’s move on to how to iteratively develop and deploy your app.

We are now going to review tooling allowing you to develop apps on Kubernetes with the focus on having minimal impact on your existing workflow. We strive to provide an unbiased description including implications of using each of the tools in general terms.

Note that this is a tricky area since even for established technologies such as, for example, JSON vs YAML vs XML or REST vs gRPC vs SOAP a lot depends on your background, your preferences and organizational settings. It’s even harder to compare tooling in the Kubernetes ecosystem as things evolve very rapidly and new tools are announced almost on a weekly basis; during the preparation of this post alone, for example, Gitkube and Watchpod came out. To cover these new tools as well as related, existing tooling such as Weave Flux and OpenShift’s S2I we are planning a follow-up blog post to the one you’re reading.

Draft

Draft aims to help you get started deploying any app to Kubernetes. It is capable of applying heuristics as to what programming language your app is written in and generates a Dockerfile along with a Helm chart. It then runs the build for you and deploys resulting image to the target cluster via the Helm chart. It also allows user to setup port forwarding to localhost very easily.

Implications:

  • User can customise the chart and Dockerfile templates however they like, or even create a custom pack (with Dockerfile, the chart and more) for future use
  • It’s not very simple to guess how just any app is supposed to be built, in some cases user may need to tweak Dockerfile and the Helm chart that Draft generates
  • With Draft version 0.12.0 or older, every time user wants to test a change, they need to wait for Draft to copy the code to the cluster, then run the build, push the image and release updated chart; this can timely, but it results in an image being for every single change made by the user (whether it was committed to git or not)
  • As of Draft version 0.12.0, builds are executed locally
  • User doesn’t have an option to choose something other than Helm for deployment
  • It can watch local changes and trigger deployments, but this feature is not enabled by default
  • It allows developer to use either local or remote Kubernetes cluster
  • Deploying to production is up to the user, Draft authors recommend their other project – Brigade
  • Can be used instead of Skaffold, and along the side of Squash

More info:

Skaffold

Skaffold is a tool that aims to provide portability for CI integrations with different build system, image registry and deployment tools. It is different from Draft, yet somewhat comparable. It has a basic capability for generating manifests, but it’s not a prominent feature. Skaffold is extendible and lets user pick tools for use in each of the steps in building and deploying their app.

Implications:

  • Modular by design
  • Works independently of CI vendor, user doesn’t need Docker or Kubernetes plugin
  • Works without CI as such, i.e. from the developer’s laptop
  • It can watch local changes and trigger deployments
  • It allows developer to use either local or remote Kubernetes cluster
  • It can be used to deploy to production, user can configure how exactly they prefer to do it and provide different kind of pipeline for each target environment
  • Can be used instead of Draft, and along the side with most other tools

More info:

Squash

Squash consists of a debug server that is fully integrated with Kubernetes, and a IDE plugin. It allows you to insert breakpoints and do all the fun stuff you are used to doing when debugging an application using an IDE. It bridges IDE debugging experience with your Kubernetes cluster by allowing you to attach the debugger to a pod running in your Kubernetes cluster.

Implications:

  • Can be used independently of other tools you chose
  • Requires a privileged DaemonSet
  • Integrates with popular IDEs
  • Supports Go, Python, Node.js, Java and gdb
  • User must ensure application binaries inside the container image are compiled with debug symbols
  • Can be used in combination with any other tools described here
  • It can be used with either local or remote Kubernetes cluster

More info:

Telepresence

Telepresence connects containers running on developer’s workstation with a remote Kubernetes cluster using a two-way proxy and emulates in-cluster environment as well as provides access to config maps and secrets. It aims to improve iteration time for container app development by eliminating the need for deploying app to the cluster and leverages local container to abstract network and filesystem interface in order to make it appear as if the app was running in the cluster.

Implications:

  • It can be used independently of other tools you chose
  • Using together with Squash is possible, although Squash would have to be used for pods in the cluster, while conventional/local debugger would need to be used for debugging local container that’s connected to the cluster via Telepresence
  • Telepresence imposes some network latency
  • It provides connectivity via a side-car process – sshuttle, which is based on SSH
  • More intrusive dependency injection mode with LD_PRELOAD/DYLD_INSERT_LIBRARIES is also available
  • It is most commonly used with a remote Kubernetes cluster, but can be used with a local one also

More info:

Ksync

Ksync synchronizes application code (and configuration) between your local machine and the container running in Kubernetes, akin to what oc rsync does in OpenShift. It aims to improve iteration time for app development by eliminating build and deployment steps.

Implications:

  • It bypasses container image build and revision control
  • Compiled language users have to run builds inside the pod (TBC)
  • Two-way sync – remote files are copied to local directory
  • Container is restarted each time remote filesystem is updated
  • No security features – development only
  • Utilizes Syncthing, a Go library for peer-to-peer sync
  • Requires a privileged DaemonSet running in the cluster
  • Node has to use Docker with overlayfs2 – no other CRI implementations are supported at the time of writing

More info:

Hands-on walkthroughs

The app we will be using for the hands-on walkthroughs of the tools in the following is a simple stock market simulator, consisting of two microservices:

  • The stock-gen microservice is written in Go and generates stock data randomly and exposes it via HTTP endpoint /stockdata.
    ‎* A second microservice, stock-con is a Node.js app that consumes the stream of stock data from stock-gen and provides an aggregation in form of a moving average via the HTTP endpoint /average/$SYMBOL as well as a health-check endpoint at /healthz.

Overall, the default setup of the app looks as follows:
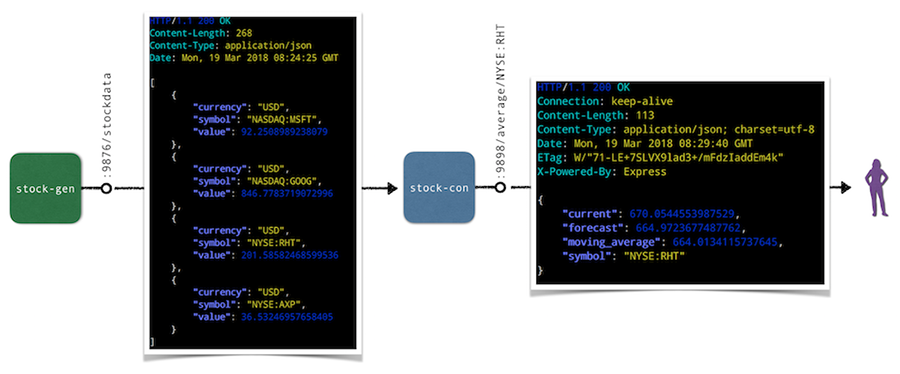
Default Setup

In the following we’ll do a hands-on walkthrough for a representative selection of tools discussed above: ksync, Minikube with local build, as well as Skaffold. For each of the tools we do the following:

  • Set up the respective tool incl. preparations for the deployment and local consumption of the stock-con microservice.
  • Perform a code update, that is, change the source code of the /healthz endpoint in the stock-con microservice and observe the updates.

Note that for the target Kubernetes cluster we’ve been using Minikube locally, but you can also a remote cluster for ksync and Skaffold if you want to follow along.

Walkthrough: ksync

As a preparation, install ksync and then carry out the following steps to prepare the development setup:

$ mkdir -p $(pwd)/ksync
$ kubectl create namespace dok
$ ksync init -n dok

With the basic setup completed we’re ready to tell ksync’s local client to watch a certain Kubernetes namespace and then we create a spec to define what we want to sync (the directory $(pwd)/ksync locally with /app in the container). Note that target pod is specified via the selector parameter:

$ ksync watch -n dok
$ ksync create -n dok –selector=app=stock-con $(pwd)/ksync /app
$ ksync get -n dok

Now we deploy the stock generator and the stock consumer microservice:

$ kubectl -n=dok apply
-f https://raw.githubusercontent.com/kubernauts/dok-example-us/master/stock-gen/app.yaml
$ kubectl -n=dok apply
-f https://raw.githubusercontent.com/kubernauts/dok-example-us/master/stock-con/app.yaml

Once both deployments are created and the pods are running, we forward the stock-con service for local consumption (in a separate terminal session):

$ kubectl get -n dok po –selector=app=stock-con
-o=custom-columns=:metadata.name –no-headers |
xargs -IPOD kubectl -n dok port-forward POD 9898:9898

With that we should be able to consume the stock-con service from our local machine; we do this by regularly checking the response of the healthz endpoint like so (in a separate terminal session):

$ watch curl localhost:9898/healthz

Now change the code in the ksync/stock-condirectory, for example update the /healthz endpoint code in service.js by adding a field to the JSON response and observe how the pod gets updated and the response of the curl localhost:9898/healthz command changes. Overall you should have something like the following in the end:
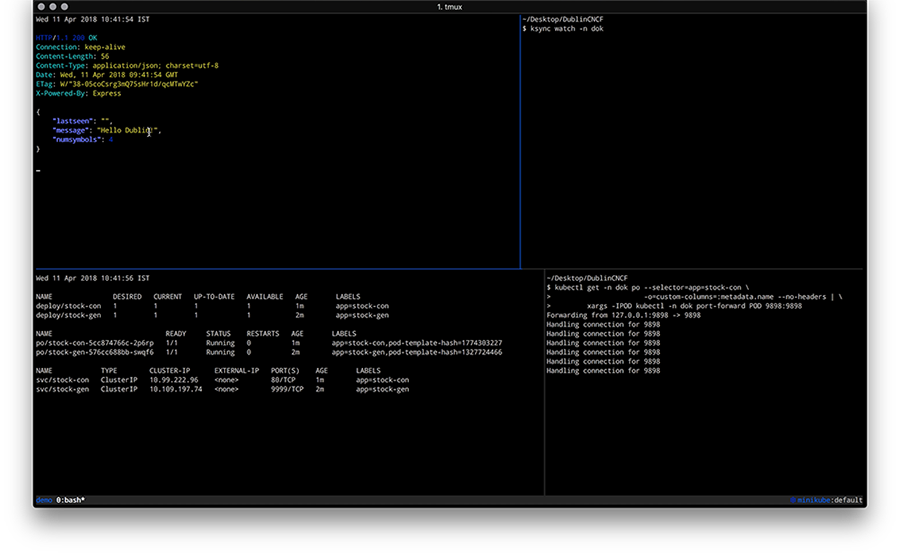
Preview

Walkthrough: Minikube with local build

For the following you will need to have Minikube up and running and we will leverage the Minikube-internal Docker daemon for building images, locally. As a preparation, do the following

$ git clone https://github.com/kubernauts/dok-example-us.git && cd dok-example-us
$ eval $(minikube docker-env)
$ kubectl create namespace dok

Now we deploy the stock generator and the stock consumer microservice:

$ kubectl -n=dok apply -f stock-gen/app.yaml
$ kubectl -n=dok apply -f stock-con/app.yaml

Once both deployments are created and the pods are running, we forward the stock-con service for local consumption (in a separate terminal session) and check the response of the healthz endpoint:

$ kubectl get -n dok po –selector=app=stock-con
-o=custom-columns=:metadata.name –no-headers |
xargs -IPOD kubectl -n dok port-forward POD 9898:9898 &
$ watch curl localhost:9898/healthz

Now change the code in the stock-condirectory, for example, update the /healthz endpoint code in service.js by adding a field to the JSON response. Once you’re done with your code update, the last step is to build a new container image and kick off a new deployment like shown below:

$ docker build -t stock-con:dev -f Dockerfile .
$ kubectl -n dok set image deployment/stock-con *=stock-con:dev

Overall you should have something like the following in the end:
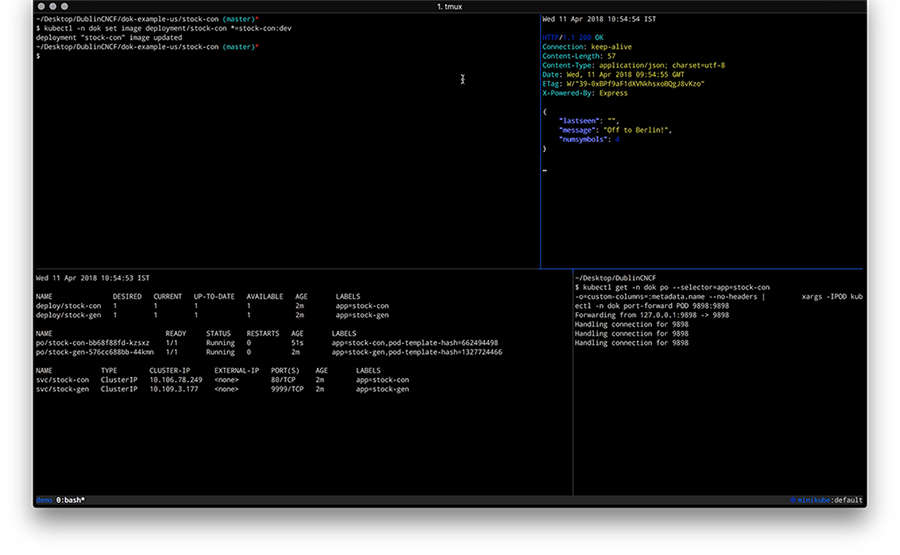
Local Preview

Walkthrough: Skaffold

To perform this walkthrough you first need to install Skaffold. Once that is done, you can do the following steps to prepare the development setup:

$ git clone https://github.com/kubernauts/dok-example-us.git && cd dok-example-us
$ kubectl create namespace dok

Now we deploy the stock generator (but not the stock consumer microservice, that is done via Skaffold):

$ kubectl -n=dok apply -f stock-gen/app.yaml

Note that initially we experienced an authentication error when doing skaffold dev and needed to apply a fix as described in Issue 322. Essentially it means changing the content of ~/.docker/config.json to:

{
“auths”: {}
}

Next, we had to patch stock-con/app.yaml slightly to make it work with Skaffold:

Add a namespace field to both the stock-con deployment and the service with the value of dok.
Change the image field of the container spec to quay.io/mhausenblas/stock-con since Skaffold manages the container image tag on the fly.

The resulting app.yaml file stock-con looks as follows:

apiVersion: apps/v1beta1
kind: Deployment
metadata:
labels:
app: stock-con
name: stock-con
namespace: dok
spec:
replicas: 1
template:
metadata:
labels:
app: stock-con
spec:
containers:
– name: stock-con
image: quay.io/mhausenblas/stock-con
env:
– name: DOK_STOCKGEN_HOSTNAME
value: stock-gen
– name: DOK_STOCKGEN_PORT
value: “9999”
ports:
– containerPort: 9898
protocol: TCP
livenessProbe:
initialDelaySeconds: 2
periodSeconds: 5
httpGet:
path: /healthz
port: 9898
readinessProbe:
initialDelaySeconds: 2
periodSeconds: 5
httpGet:
path: /healthz
port: 9898

apiVersion: v1
kind: Service
metadata:
labels:
app: stock-con
name: stock-con
namespace: dok
spec:
type: ClusterIP
ports:
– name: http
port: 80
protocol: TCP
targetPort: 9898
selector:
app: stock-con

The final step before we can start development is to configure Skaffold. So, create a file skaffold.yaml in the stock-con/ directory with the following content:

apiVersion: skaffold/v1alpha2
kind: Config
build:
artifacts:
– imageName: quay.io/mhausenblas/stock-con
workspace: .
docker: {}
local: {}
deploy:
kubectl:
manifests:
– app.yaml

Now we’re ready to kick off the development. For that execute the following in the stock-con/ directory:

$ skaffold dev

Above command triggers a build of the stock-con image and then a deployment. Once the pod of the stock-con deployment is running, we again forward the stock-con service for local consumption (in a separate terminal session) and check the response of the healthz endpoint:

$ kubectl get -n dok po –selector=app=stock-con
-o=custom-columns=:metadata.name –no-headers |
xargs -IPOD kubectl -n dok port-forward POD 9898:9898 &
$ watch curl localhost:9898/healthz

If you now change the code in the stock-condirectory, for example, by updating the /healthz endpoint code in service.js by adding a field to the JSON response, you should see Skaffold noticing the change and create a new image as well as deploy it. The resulting screen would look something like this:
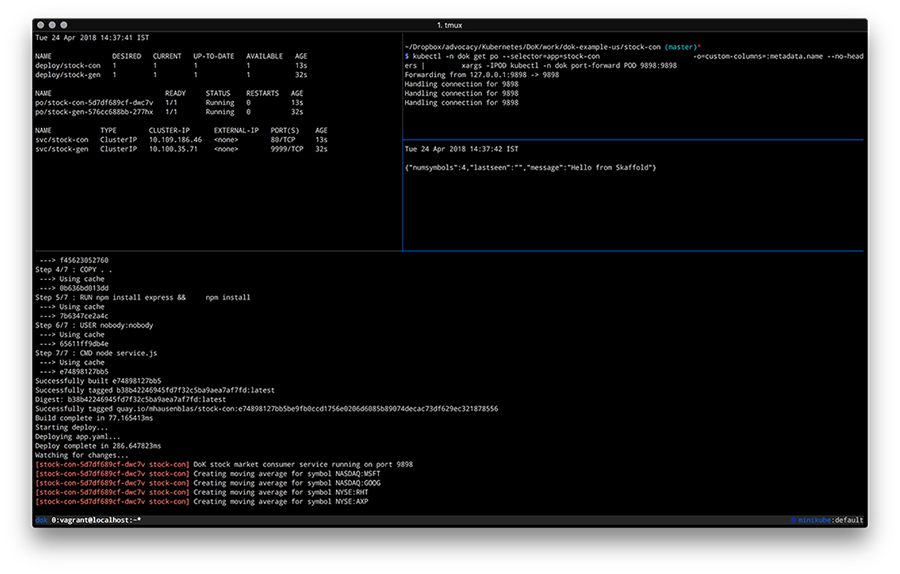
Skaffold Preview

By now you should have a feeling how different tools enable you to develop apps on Kubernetes and if you’re interested to learn more about tools and or methods, check out the following resources:

With that we wrap up this post on how to go about developing apps on Kubernetes, we hope you learned something and if you have feedback and/or want to point out a tool that you found useful, please let us know via Twitter: Ilya and Michael.

Source

Current State of Policy in Kubernetes

Current State of Policy in Kubernetes

Kubernetes has grown dramatically in its impact to the industry; and with rapid growth, we are beginning to see variations across components in how they define and apply policies.

Currently, policy related components could be found in identity services, networking services, storage services, multi-cluster federation, RBAC and many other areas, with different degree of maturity and also different motivations for specific problems. Within each component, some policies are extensible while others are not. The languages used by each project to express intent vary based on the original authors and experience. Driving consistent views of policies across the entire domain is a daunting task.

Adoption of Kubernetes in regulated industries will also drive the need to ensure that a deployed cluster confirms with various legal requirements, such as PCI, HIPPA, or GDPR. Each of these compliance standards enforces a certain level of privacy around user information, data, and isolation.

The core issues with the current Kubernetes policy implementations are identified as follows:

  • Lack of big picture across the platform
  • Lack of coordination and common language among different policy components
  • Lack of consistency for extensible policy creation across the platform.
    • There are areas where policy components are extensible, and there are also areas where strict end-to-end solutions are enforced. No consensus is established on the preference to a extensible and pluggable architecture.
  • Lack of consistent auditability across the Kubernetes architecture of policies which are created, modified, or disabled as well as the actions performed on behalf of the policies which are applied.

Forming Kubernetes Policy WG

We have established a new WG to directly address these issues. We intend to provide an overall architecture that describes both the current policy related implementations as well as future policy related proposals in Kubernetes. Through a collaborative method, we want to present both dev and end user a universal view of policy in Kubernetes.

We are not seeking to redefine and replace existing implementations which have been reached by thorough discussion and consensus. Rather to establish a summarized review of current implementation and addressing gaps to address broad end to end scenarios as defined in our initial design proposal.

Kubernetes Policy WG has been focusing on the design proposal document and using the weekly meeting for discussions among WG members. The design proposal outlines the background and motivation of why we establish the WG, the concrete use cases from which the gaps/requirement analysis is deduced, the overall architecture and the container policy interface proposal.

Key Policy Scenarios in Kubernetes

Among several use cases the workgroup has brainstormed, eventually three major scenario stands out.

The first one is about legislation/regulation compliance which requires the Kubernetes clusters conform to. The compliance scenario takes GDPR as an legislation example and the suggested policy architecture out of the discussion is to have a datapolicy controller responsible for the auditing.

The second scenario is about capacity leasing, or multi-tenant quota in traditional IaaS concept, which deals with when a large enterprise want to delegate the resource control to various Lines Of Business it has, how the Kubernetes cluster should be configured to have a policy driven mechanism to enforce the quota system. The ongoing multi-tenant controller design proposed in the multi-tenancy working group could be an ideal enforcement point for the quota policy controller, which in turn might take a look at kube-arbitrator for inspiration.

The last scenario is about cluster policy which refers to the general security and resource oriented policy control. Luster policy will involve both cluster level and namespace level policy control as well as enforcement, and there is a proposal called Kubernetes Security Profile that is under development by the Policy WG member to provide a PoC for this use case.

Kubernetes Policy Architecture

Building upon the three scenarios, the WG is now working on three concrete proposals together with sig-arch, sig-auth and other related projects. Besides the Kubernetes security profile proposal aiming at the cluster policy use case, we also have the scheduling policy proposal which partially targets the capacity leasing use case and the topology service policy proposal which deals with affinity based upon service requirement and enforcement on routing level.

When these concrete proposals got clearer the WG will be able to provide a high level Kubernetes policy architecture as part of the motivation of the establishment of the Policy WG.

Towards Cloud Native Policy Driven Architecture

Policy is definitely something goes beyond Kubernetes and applied to a broader cloud native context. Our work in the Kubernetes Policy WG will provide the foundation of building a CNCF wide policy architecture, with the integration of Kubernetes and various other cloud native components such as open policy agent, Istio, Envoy, SPIFEE/SPIRE and so forth. The Policy WG has already collaboration with the CNCF SAFE WG (in-forming) team, and will work on more alignments to make sure a community driven cloud native policy architecture design.

Authors: Zhipeng Huang, Torin Sandall, Michael Elder, Erica Von Buelow, Khalid Ahmed, Yisui Hu

Source

How to Deploy Kubernetes Clusters on AWS using RKE

Take a deep dive into Best Practices in Kubernetes Networking

From overlay networking and SSL to ingress controllers and network security policies, we’ve seen many users get hung up on Kubernetes networking challenges. In this video recording, we dive into Kubernetes networking, and discuss best practices for a wide variety of deployment options.

Watch the video

A few months ago, we announced the Rancher Kubernetes Engine (RKE). RKE is a new open source project we have been working on in Rancher to provide a Kubernetes installer that is simple to use, fast and can be used anywhere. You can read more about the project here.

We have been working on adding more functionality and enable more deployment options with each RKE release. One of the most notable features we rolled out recently was initial support for Kubernetes Cloud Providers. In this post, we will do a simple showcase for the AWS cloud provider.

Kubernetes Cloud provider support

Kubernetes provides support for several Core Cloud Providers as well as a simple to implement interface that allows anyone to implement their own cloud provider and link it against the cloud-controller-manager kubernetes component.

Several cloud providers are supported in Kubernetes Core, for example AWS, Azure and GCE.

RKE cloud provider support

While implementing cloud provider support in RKE we will focus mainly on support for the core Kubernetes cloud providers.

Each of the core providers has its own required configuration, limitations, options and features. So, we made a choice at Rancher to roll them out one by one. Starting with version v0.1.3, RKE provides support for the AWS cloud provider. The latest released version, v0.1.5, as of the time of the writing of this article, adds support for Azure as well. To see the latest release of RKE, visit our GitHub release page.

RKE deployment requirements

For the purpose of this how-to article, we will we deploy a minimal cluster on AWS using the simplest configuration possible to show how to use RKE with AWS. This is not a production grade deployment. However, we will provide pointers when possible on how to improve your cluster deployment.

To deploy Kubernetes on AWS, you simply need to:

  • Provision nodes on EC2. For the purpose of this post, we will create a small non-HA cluster with 1 control plane node and 3 worker nodes. If you Like to add HA to your kubernetes cluster, you simply need to add the control plane and etcd roles to 3 or more nodes.
  • The nodes need to have an instance IAM profile that allows kubernetes to talk to AWS API and manage resources. We will look at that shortly.
  • The nodes should be accessible using SSH, and have a supported version of docker installed. If you are not using root, the ssh user you will be using needs to be part of the Docker group.

You will need a linux machine to perform most of the operations in this post. You will also need to install the kubectl command. If you are using MacOS, the process is fairly similar, you just need to download the rke_darwin-amd64 binary instead of the linux one.

Creating an IAM profile

IAM profiles allows for very fine grained controls of access to AWS resources. How you setup and configure the IAM profile will depend on how you design your cluster, what AWS services and resources you are planning to use or planning to allow your applications to use.

You can check IAM profiles provided by kops or by this repo for examples of some fine grained policies.

Also, since your pods will have access to the same resources as your worker node, you should consider using projects like kube2iam.

Step 1: Create an IAM role

Now, first, we create an IAM role and attach our trust policy to it

$ aws iam create-role –role-name rke-role –assume-role-policy-document file://rke-trust-policy.json

The rke-trust-policy.json file will include the following lines:

Step 2: Add our Access Policy

Next, we add our access policy to the role. For the purpose of this post, we will use this simplified and open policy for our instance profile:

$ aws iam put-role-policy –role-name rke-role –policy-name rke-access-policy –policy-document file://rke-access-policy.json

rke-trust-policy.json contains the following:

Step 3: Create the Instance Profile

Finally, we create the instance profile to use with our EC2 instances, and add the role we created to this instance profile:

$ aws iam create-instance-profile –instance-profile-name rke-aws$ aws iam add-role-to-instance-profile –instance-profile-name rke-aws –role-name rke-role

Provisioning Nodes

For this, we will simply use the AWS console launch wizard to create EC2 instances. As we mentioned earlier, we will create 4 instances.

We will go with all defaults, we will choose an Ubuntu 16.04 AMI, and any instance type with sufficient resources to run a basic cluster. The instance type t2.large should be suitable.

When configuring Instance Details, make sure to use the Instance IAM profile we created earlier:

When configuring you instances for a production setup, it’s important to carefully plan and configure your cluster AWS security group rules. For simplicity, we will use an all-open security group in our example.

Node configuration

Now, that we have our 4 instances provisioned, we need to prepare them for installation.

RKE requirements are very simple; all you need is to install docker and add your user to the docker group.

In our case, we will use the latest docker v.1.12.x release, and since we used ubuntu on AWS, our user will be ubuntu. We will need to run the following commands on each instance as root:

## curl releases.rancher.com/install-docker/1.12.sh| bash

## usermod -a -G docker ubuntu

Running RKE

So, this is the fun part. One of RKE design goals was to be as simple as possible. It’s possible to build a kubernetes cluster using only node configurations. The rest of the parameters and configuration options available are automatically set to pre-configured defaults.

We will configure the following cluster.yml file to use our for nodes, and configure Kubernetes with AWS cloud provider:

As of the time of this writing, the latest version of RKE is v0.1.5 Click here for the latest RKE vesion):

$ wget [https://github.com/rancher/rke/releases/download/v0.1.5/rke](https://github.com/rancher/rke/releases/download/v0.1.5/rke)

$ chmod +x rke

Now, let’s save the cluster.yml file in the same directory and build our test cluster:

That’s it. Our cluster should take a few minutes to be deployed. Once the deployment is completed, we can access out cluster using the kubectl command and the generated kube_config_cluster.yml file:

$ export KUBECONFIG=$PWD/kube_config_cluster.yml

NAME STATUS MESSAGE ERROR

scheduler Healthy ok

controller-manager Healthy ok

etcd-0 Healthy {“health”: “true”}

One thing we should point out here: You will notice that the get nodes command is showing private DNS names of the nodes, not the public DNS names we configured in out `cluster.yml.

Even though RKE supports using hostname overrides for configured nodes, it wouldn’t be usable here. This is because Kubernetes uses the cloud provider’s hostnames when configured with a cloud provider and ignores any override values passed.

Using Kubernetes on AWS

Let’s try to take our newly created cluster for a spin!

We will use a slightly modified version of the Kubernetes Guestbook example. We will update this example to achieve two goals:

  • Persist redis master data to an EBS volume.
  • Use an ELB for external access to our application.

Launching a Guestbook

Let’s clone the Kubernetes Examples repo and get to the example files:

$ git clone [https://github.com/kubernetes/examples](https://github.com/kubernetes/examples)

The Guestbook example is a simple php application that writes updates to a redis backend. The redis backend is configured in master and two slave deployments.

It consists of the following manifests which represent kubernetes resources:

  • frontend-deployment.yaml
  • frontend-service.yaml
  • redis-master-deployment.yaml
  • redis-master-service.yaml
  • redis-slave-deployment.yaml
  • redis-slave-service.yaml

We will only modify the ones we need to enable AWS cloud resources.

Using an ELB for frontend

We will update the frontend-service.yaml by adding LoadBalancer type to the service definition:

That’s it! When this service is deployed, Kubernetes will provision an ELB dynamically and point it to the deployment.

Adding persistent storage

We will add a persistent EBS volume to our redis master. We will configure Kubernetes to dynamically provision volumes based on Storage Classes.

First, we will configure the following storage class. Note the we need to set the correct AWS zone as the same one containing the instances we created:

storage-class.yaml:

Next, we will create a PersistentVolumeClaim:

redis-master-pvc.yaml:

And finally, we just need to update the redis-master-deployment.yaml manifest to configure the volume:

Deploying the Guestbook

At this point, we should have a complete set of manifests. The current default Kubernetes version deployed by RKE is v1.8.10-rancher1 . So, I had to update the

Deployment manifests to use apiVersion: apps/v1beta2.

Let’s deploy them to our cluster:

$ kubectl apply -f storage-class.yaml

$ kubectl apply -f redis-pvc.yaml

$ kubectl apply -f redis-master-service.yaml

$ kubectl apply -f redis-master-deployment.yaml

$ kubectl apply -f redis-slave-deployment.yaml

$ kubectl apply -f redis-slave-service.yaml

$ kubectl apply -f frontend-service.yaml

$ kubectl apply -f frontend-deployment.yaml

In a couple of minutes, everything should be up and running.

Examining our deployment

At this point, out guestbook example should be up and running. We can confirm that by running the command:

As you can see, everything is up and running.

Now, let’s try to access our guestbook. We will get the address of the ELB hostname using the following command:

$ kubectl get svc/frontend -o yaml

Using the hostname at the end of the output, you can now access your deployed Guestbook!

Now, let’s run the following command, to see if the PersistentVolume was created for your redis master:

As you can see, a Persistent Volume was dynamically created for our redis master based on the Persistent Volume Claim that we configured.

Recap

In this post we quickly introduced Kubernetes Cloud Provider support and we talked about our plans to support different cloud providers in RKE.

We also described with as much detail as possible how to prepare resources for a simple Kubernetes deployment using the AWS Cloud Provider. And we configured and deployed a sample application using AWS resources.

As we mentioned before, the example in this article is not a production grade deployment. Kubernetes is a complex system that needs a lot of work to be deployed in production, especially in terms of preparing the infrastructure that will host it. However, we hope that we were able to provide a useful example of the available features and pointers on where to go next.

You can find all the files used in the post in this repo: https://github.com/moelsayed/k8s-guestbook

Mohamed el Sayed

Mohamed el Sayed
DevOps Engineer, co-author of RKE

Source

Announcing Kubeflow 0.1 – Kubernetes

Since the initial announcement of Kubeflow at the last KubeCon+CloudNativeCon, we have been both surprised and delighted by the excitement for building great ML stacks for Kubernetes. In just over five months, the Kubeflow project now has:

  • 70+ contributors
  • 20+ contributing organizations
  • 15 repositories
  • 3100+ GitHub stars
  • 700+ commits

and already is among the top 2% of GitHub projects ever.

People are excited to chat about Kubeflow as well! The Kubeflow community has also held meetups, talks and public sessions all around the world with thousands of attendees. With all this help, we’ve started to make substantial in every step of ML, from building your first model all the way to building a production-ready, high-scale deployments. At the end of the day, our mission remains the same: we want to let data scientists and software engineers focus on the things they do well by giving them an easy-to-use, portable and scalable ML stack.

Today, we’re proud to announce the availability of Kubeflow 0.1, which provides a minimal set of packages to begin developing, training and deploying ML. In just a few commands, you can get:

  • Jupyter Hub – for collaborative & interactive training
  • A TensorFlow Training Controller with native distributed training
  • A TensorFlow Serving for hosting
  • Argo for workflows
  • SeldonCore for complex inference and non TF models
  • Ambassador for Reverse Proxy
  • Wiring to make it work on any Kubernetes anywhere

To get started, it’s just as easy as it always has been:

# Create a namespace for kubeflow deployment
NAMESPACE=kubeflow
kubectl create namespace $
VERSION=v0.1.3

# Initialize a ksonnet app. Set the namespace for it’s default environment.
APP_NAME=my-kubeflow
ks init $
cd $
ks env set default –namespace $

# Install Kubeflow components
ks registry add kubeflow github.com/kubeflow/kubeflow/tree/$/kubeflow
ks pkg install kubeflow/core@$
ks pkg install kubeflow/tf-serving@$
ks pkg install kubeflow/tf-job@$

# Create templates for core components
ks generate kubeflow-core kubeflow-core

# Deploy Kubeflow
ks apply default -c kubeflow-core

And thats it! JupyterHub is deployed so we can now use Jupyter to begin developing models. Once we have python code to build our model we can build a docker image and train our model using our TFJob operator by running commands like the following:

ks generate tf-job my-tf-job –name=my-tf-job –image=gcr.io/my/image:latest
ks apply default -c my-tf-job

We could then deploy the model by doing

ks generate tf-serving $ –name=$
ks param set $ modelPath $
ks apply $ -c $

Within just a few commands, data scientists and software engineers can now create even complicated ML solutions and focus on what they do best: answering business critical questions.

It’d be impossible to have gotten where we are without enormous help from everyone in the community. Some specific contributions that we want to highlight include:

It’s difficult to overstate how much the community has helped bring all these projects (and more) to fruition. Just a few of the contributing companies include: Alibaba Cloud, Ant Financial, Caicloud, Canonical, Cisco, Datawire, Dell, Github, Google, Heptio, Huawei, Intel, Microsoft, Momenta, One Convergence, Pachyderm, Project Jupyter, Red Hat, Seldon, Uber and Weaveworks.

If you’d like to try out Kubeflow, we have a number of options for you:

  1. You can use sample walkthroughs hosted on Katacoda
  2. You can follow a guided tutorial with existing models from the examples repository. These include the Github Issue Summarization, MNIST and Reinforcement Learning with Agents.
  3. You can start a cluster on your own and try your own model. Any Kubernetes conformant cluster will support Kubeflow including those from contributors Caicloud, Canonical, Google, Heptio, Mesosphere, Microsoft, IBM, Red Hat/Openshift and Weaveworks.

There were also a number of sessions at KubeCon + CloudNativeCon EU 2018 covering Kubeflow. The links to the talks are here; the associated videos will be posted in the coming days.

Our next major release will be 0.2 coming this summer. In it, we expect to land the following new features:

  • Simplified setup via a bootstrap container
  • Improved accelerator integration
  • Support for more ML frameworks, e.g., Spark ML, XGBoost, sklearn
  • Autoscaled TF Serving
  • Programmatic data transforms, e.g., tf.transform

But the most important feature is the one we haven’t heard yet. Please tell us! Some options for making your voice heard include:

Thank you for all your support so far!
Jeremy Lewi & David Aronchick Google

Source

How to Run Rancher 2.0 on your Desktop

A Detailed Overview of Rancher’s Architecture

This newly-updated, in-depth guidebook provides a detailed overview of the features and functionality of the new Rancher: an open-source enterprise Kubernetes platform.

Get the eBook

Don’t have access to Cloud infrastructure? Maybe you would like to use Rancher for local development just like you do in production?

No problem, you can install Rancher 2.0 on your desktop.

In this tutorial we will install Docker-for-Desktop Edge release and enable the built in Kubernetes engine to run your own personal instance of Rancher 2.0 on your desktop.

Prerequisites

For this guide you will need a couple of tools to manage and deploy to your local Kubernetes instance.

  • kubectl – Kubernetes CLI tool.
  • helm – Kubernetes manifest catalog tool.

Docker-for-Desktop

The Edge install of Docker CE for Windows/Mac includes a basic Kubernetes engine. We can leverage it to install a local Rancher Server. Download and install from the Docker Store.

Docker Configuration

Sign into Docker then right click on the Docker icon in your System Tray and select Settings

Advanced Settings

In the Advanced section increase Memory to at least 4096 MB. You may want to increase the number of CPUs assigned and the Disk image max size while you’re at it.

advanced

Enable Kubernetes

In the Kubernetes section, check the box to enable the Kubernetes API. Docker-for-Desktop will automatically create ~/.kube/config file with credentials for kubectl to access your new local “cluster”.

kubernetes

Don’t see a Kubernetes section? Check the General section and make sure you are running the Edge version.

Testing Your Cluster

Open terminal and test it out. Run kubectl get nodes. kubectl should return a node named docker-for-desktop.

> kubectl get nodes

NAME STATUS ROLES AGE VERSION
docker-for-desktop Ready master 6d v1.9.6

Preparing Kubernetes

Docker-for-Desktop doesn’t come with any extra tools installed. We could apply some static YAML manifest files with kubectl, but rather than reinventing the wheel, we want leverage existing work from the Kubernetes community. helm is the package management tool of choice for Kubernetes.

helm charts provide templating syntax for Kubernetes YAML manifest documents. With helm we can create configurable deployments instead of just using static files. For more information about creating your own catalog of deployments, check out the docs at https://helm.sh/

Initialize Helm on your Cluster

helm installs the tiller service on your cluster to manage chart deployments. Since docker-for-desktop has RBAC enabled by default we will need to use kubectl to create a serviceaccount and clusterrolebinding so tiller can deploy to our cluster for us.

Create the ServiceAccount in the kube-system namespace.

kubectl -n kube-system create serviceaccount tiller

Create the ClusterRoleBinding to give the tiller account access to the cluster.

kubectl create clusterrolebinding tiller –clusterrole cluster-admin –serviceaccount=kube-system:tiller

Finally use helm to initialize the tiller service

helm init –service-account tiller

NOTE: This tiller install has full cluster access, and may not be suitable for a production environment. Check out the helm docs for restricting tiller access to suit your security requirements.

Add an Ingress Controller

Ingress controllers are used to provide L7 (hostname or path base) http routing from the outside world to services running in Kubernetes.

We’re going to use helm to install the Kubernetes stable community nginx-ingress chart. This will create an ingress controller on our local cluster.

The default options for the “rancher” helm chart is to use SSL pass-through back to the self-signed cert on the Rancher server pod. To support this we need to add the –controller.extraArgs.enable-ssl-passthrough=”” option when we install the chart.

helm install stable/nginx-ingress –name ingress-nginx –namespace ingress-nginx –set controller.extraArgs.enable-ssl-passthrough=””

Installing Rancher

We’re going to use helm install Rancher.

The default install will use Rancher’s built in self-signed SSL certificate. You can check out all the options for this helm chart here: https://github.com/jgreat/helm-rancher-server

First add the rancher-server repository to helm

helm repo add rancher-server https://jgreat.github.io/helm-rancher-server/charts

Now install the rancher chart.

helm install rancher-server/rancher –name rancher –namespace rancher-system

Setting hosts file

By default the Rancher server will listen on rancher.localhost. To access it we will need to set a hosts file entry so our browser can resolve the name.

  • Windows – c:windowssystem32driversetchosts
  • Mac – /etc/hosts

Edit the appropriate file for your system and add this entry.

127.0.0.1 rancher.localhost

Connecting to Rancher

Browse to https://rancher.localhost

Ignore the SSL warning and you should be greeted by the colorful Rancher login asking you to Set the Admin password.

rancher

Congratulations you have your very own local instance of Rancher 2.0. You can add your application charts and deploy your apps just like production. Happy Containering!

Jason Greathouse

Jason Greathouse

Senior Solutions Architect

Building scalable infrastructure for companies of all sizes since 1999. From Fortune 500 companies to early stage startups. Early adopter of containers, running production workloads in Docker since version 0.7.

Source

Getting Acquainted with gVisor | Rancher Labs

Like many of us in the Kubernetes space, I’m excited to check out the
shiny new thing. To be fair, we’re all working with an amazing product
that is younger than my pre-school aged daughter. The shiny new thing at
KubeCon Europe was a new container runtime authored by Google named
gVisor. Like a cat to catnip, I had to check this out and share it with
you.

What is gVisor?

gVisor is a sandboxed container runtime, that acts as a user-space
kernel. During KubeCon Google announced that they open-sourced it to the
community. Its goal is to use paravirtualization to isolate
containerized applications from the host system, without the heavy
weight resource allocation that comes with virtual machines.

Do I Need gVisor?

No. If you’re running production workloads, don’t even think about it!
Right now, this is a metaphorical science experiment. That’s not to say
you may not want to use it as it matures. I don’t have any problem with
the way it’s trying to solve process isolation and I think it’s a good
idea. There are also alternatives you should take the time to explore
before adopting this technology in the future.

That being said, if you want to learn more about it, when you’ll want to
use it, and the problems it seeks to solve, keep reading.

Where might I want to use it?

As an operator, you’ll want to use gVisor to isolate application
containers that aren’t entirely trusted. This could be a new version of
an open source project your organization has trusted in the past. It
could be a new project your team has yet to completely vet or anything
else you aren’t entirely sure can be trusted in your cluster. After all,
if you’re running an open source project you didn’t write (all of us),
your team certainly didn’t write it so it would be good security and
good engineering to properly isolate and protect your environment in
case there may be a yet unknown vulnerability.

What is Sandboxing

Sandboxing is a software management strategy that enforces isolation
between software running on a machine, the host operating system, and
other software also running on the machine. The purpose is to constrain
applications to specific parts of the host’s memory and file-system and
not allow it to breakout and affect other parts of the operating system.

Source: https://cloudplatform.googleblog.com/2018/05/Open-sourcing-gVisor-a-sandboxed-container-runtime.html, pulled 17 May 2018

Current Sandboxing Methods

The virtual machine (VM) is a great way to isolate applications from the
underlying hardware. An entire hardware stack is virtualized to protect
applications and the host kernel from malicious applications.

Source: https://cloudplatform.googleblog.com/2018/05/Open-sourcing-gVisor-a-sandboxed-container-runtime.html, pulled 17 May 2018

As stated before, the problem is that VMs are heavy. The require set
amounts of memory and disk space. If you’ve worked in enterprise IT, I’m
sure you’ve noticed the resource waste.

Some projects are looking to solve this with lightweight OCI-compliant
VM implementations. Projects like Kata containers are bringing this to
the container space on top of runV, a hypervisor based runtime.

Source: https://katacontainers.io/, pulled 17 May 2018

Microsoft is using a similar technique to isolate workloads using a
very-lightweight Hyper-V virtual machine when using Windows Server
Containers with Hyper-V isolation.

Source: partial screenshot, https://channel9.msdn.com/Blogs/containers/DockerCon-16-Windows-Server-Docker-The-Internals-Behind-Bringing-Docker-Containers-to-Windows, timestamp 31:02 pulled 17 May 2018

This feels like a best-of-both worlds approach to isolation. Time will
tell. Most of the market is still running docker engine under the
covers. I don’t see this changing any time soon. Open containers and
container runtimes certainly will begin taking over a share of the
market. As that happens, adopting multiple container runtimes will be an
option for the enterprise.

Sandboxing with gVisor

gVisor intends to solve this problem. It acts as a kernel in between the
containerized application and the host kernel. It does this through
various mechanisms to support syscall limits, file system proxying, and
network access. These mechanisms are a paravirtualization providing a
virtual-machine like level of isolation, without the fixed resource cost
of each virtual machine.

Source: partial screenshot, https://channel9.msdn.com/Blogs/containers/DockerCon-16-Windows-Server-Docker-The-Internals-Behind-Bringing-Docker-Containers-to-Windows, timestamp 31:02 pulled 17 May 2018

runsc

gVisor the runtime is a binary named runsc (run sandboxed container) and
is an alternative to runc or runv if you’ve worked with kata containers
in the past.

Other Alternatives to gVisor

gVisor isn’t the only way to isolate your workloads and protect your
infrastructure. Technologies like SELinux, seccomp and Apparmor solve a
lot of these problems (as well as others). It would behoove you as an
operator and an engineer to get well acquainted with these technologies.
It’s a lot to learn. I’m certainly no expert, although I aspire to be.
Don’t be a lazy engineer. Learn your tools, learn your OS, do right by
your employer and your users. If you want to know more go read the man
pages and follow Jessie
Frazelle
.
She is an expert in this area of computing and has written a treasure
trove on it.

Using gVisor with Docker

As docker supports multiple runtimes, it will work with runsc. To use it
one must build and install the runsc container runtime binary and
configured docker’s /etc/docker/daemon.json file to support the gVisor
runtime. From there a user may run a container with the runsc runtime by
utilizing the –runtime flag of the docker run command.

docker run –runtime=runsc hello-world

Using gVisor with Kubernetes

Kubernetes support for gVisor is experimental and implemented via the
CRI-O CRI implementation. CRI-O is an implementation of the Kubernetes
Container Runtime Interface. Its goal is to allow Kubernetes to use any
OCI compliant container runtime (such as runc and runsc). To use this
one must install runsc on the Kubernetes , then configure cri-o to use
runsc to run untrusted workloads in cri-o’s /etc/crio/crio.conf file.
Once configured, any pod without the io.kubernetes.cri-o.TrustedSandbox
annotation (or the annotation set to false), will be run with runsc.
This would be as an alternative to using the Docker engine powering the
containers inside Kubernetes pods.

Will my application work with gVisor

It depends. Currently gVisor only supports single-container pods. Here
is a list of known working applications that have been tested with
gVisor.

Ultimately support for any given application will depend on whether the
syscalls used by the application are supported.

How does it affect performance?

Again, this depends. gVisor’s “Sentry” process is responsible for
limting syscalls and requires a platform to implement context switching
and memory mapping. Currently gVisor supports Ptrace and KVM, which
implement these functions differently, are configured differently, and
support different node configurations to operate effectively. Either
would affect performance differently than the other.

The architecture of gVisor suggests it would be able to enable greater
application density over VMM based configurations but may suffer higher
performance penalties in sycall-rich applications.

Networking

A quick note about network access and performance. Network access is
achieved via an L3 userland networking stack subproject called netstack.
This functionality can be bypassed in favor of the host network to
increase performance.

Can I use gVisor with Rancher?

Rancher currently cannot be used to provision CRI-O backed Kubernetes
clusters as it relies heavily on the docker engine. However, you
certainly manage CRI-O backed clusters with Rancher. Rancher will manage
any Kubernetes server as we leverage the Kubernetes API and our
components are Kubernetes Custom Resources.

We’ll continue to monitor gVisor as it matures. As such, we’ll add more
support for gVisor with Rancher as need arises. Like the evolution of
Windows Server Containers in Kubernetes, soon this project will become
part of the fabric of Kubernetes in the Enterprise.

Jason Van Brackel

Jason Van Brackel

Senior Solutions Architect

Jason van Brackel is a Senior Solutions Architect for Rancher. He is also the organizer of the Kubernetes Philly Meetup and loves teaching at code camps, user groups and other meetups. Having worked professionally with everything from COBOL to Go, Jason loves learning, and solving challenging problems.

Source

Gardener – The Kubernetes Botanist

Gardener – The Kubernetes Botanist

Authors: Rafael Franzke (SAP), Vasu Chandrasekhara (SAP)

Today, Kubernetes is the natural choice for running software in the Cloud. More and more developers and corporations are in the process of containerizing their applications, and many of them are adopting Kubernetes for automated deployments of their Cloud Native workloads.

There are many Open Source tools which help in creating and updating single Kubernetes clusters. However, the more clusters you need the harder it becomes to operate, monitor, manage, and keep all of them alive and up-to-date.

And that is exactly what project “Gardener” focuses on. It is not just another provisioning tool, but it is rather designed to manage Kubernetes clusters as a service. It provides Kubernetes-conformant clusters on various cloud providers and the ability to maintain hundreds or thousands of them at scale. At SAP, we face this heterogeneous multi-cloud & on-premise challenge not only in our own platform, but also encounter the same demand at all our larger and smaller customers implementing Kubernetes & Cloud Native.

Inspired by the possibilities of Kubernetes and the ability to self-host, the foundation of Gardener is Kubernetes itself. While self-hosting, as in, to run Kubernetes components inside Kubernetes is a popular topic in the community, we apply a special pattern catering to the needs of operating a huge number of clusters with minimal total cost of ownership. We take an initial Kubernetes cluster (called “seed” cluster) and seed the control plane components (such as the API server, scheduler, controller-manager, etcd and others) of an end-user cluster as simple Kubernetes pods. In essence, the focus of the seed cluster is to deliver a robust Control-Plane-as-a-Service at scale. Following our botanical terminology, the end-user clusters when ready to sprout are called “shoot” clusters. Considering network latency and other fault scenarios, we recommend a seed cluster per cloud provider and region to host the control planes of the many shoot clusters.

Overall, this concept of reusing Kubernetes primitives already simplifies deployment, management, scaling & patching/updating of the control plane. Since it builds upon highly available initial seed clusters, we can evade multiple quorum number of master node requirements for shoot cluster control planes and reduce waste/costs. Furthermore, the actual shoot cluster consists only of worker nodes for which full administrative access to the respective owners could be granted, thereby structuring a necessary separation of concerns to deliver a higher level of SLO. The architectural role & operational ownerships are thus defined as following (cf. Figure 1):

  • Kubernetes as a Service provider owns, operates, and manages the garden and the seed clusters. They represent parts of the required landscape/infrastructure.
  • The control planes of the shoot clusters are run in the seed and, consequently, within the separate security domain of the service provider.
  • The shoot clusters’ machines are run under the ownership of and in the cloud provider account and the environment of the customer, but still managed by the Gardener.
  • For on-premise or private cloud scenarios the delegation of ownership & management of the seed clusters (and the IaaS) is feasible.

Gardener architecture

Figure 1 Technical Gardener landscape with components.

The Gardener is developed as an aggregated API server and comes with a bundled set of controllers. It runs inside another dedicated Kubernetes cluster (called “garden” cluster) and it extends the Kubernetes API with custom resources. Most prominently, the Shoot resource allows a description of the entire configuration of a user’s Kubernetes cluster in a declarative way. Corresponding controllers will, just like native Kubernetes controllers, watch these resources and bring the world’s actual state to the desired state (resulting in create, reconcile, update, upgrade, or delete operations.)
The following example manifest shows what needs to be specified:

apiVersion: garden.sapcloud.io/v1beta1
kind: Shoot
metadata:
name: dev-eu1
namespace: team-a
spec:
cloud:
profile: aws
region: us-east-1
secretBindingRef:
name: team-a-aws-account-credentials
aws:
machineImage:
ami: ami-34237c4d
name: CoreOS
networks:
vpc:
cidr: 10.250.0.0/16

workers:
– name: cpu-pool
machineType: m4.xlarge
volumeType: gp2
volumeSize: 20Gi
autoScalerMin: 2
autoScalerMax: 5
dns:
provider: aws-route53
domain: dev-eu1.team-a.example.com
kubernetes:
version: 1.10.2
backup:

maintenance:

addons:
cluster-autoscaler:
enabled: true

Once sent to the garden cluster, Gardener will pick it up and provision the actual shoot. What is not shown above is that each action will enrich the Shoot’s status field indicating whether an operation is currently running and recording the last error (if there was any) and the health of the involved components. Users are able to configure and monitor their cluster’s state in true Kubernetes style. Our users have even written their own custom controllers watching & mutating these Shoot resources.

The Gardener implements a Kubernetes inception approach; thus, it leverages Kubernetes capabilities to perform its operations. It provides a couple of controllers (cf. [A]) watching Shoot resources whereas the main controller is responsible for the standard operations like create, update, and delete. Another controller named “shoot care” is performing regular health checks and garbage collections, while a third’s (“shoot maintenance”) tasks are to cover actions like updating the shoot’s machine image to the latest available version.

For every shoot, Gardener creates a dedicated Namespace in the seed with appropriate security policies and within it pre-creates the later required certificates managed as Secrets.

etcd

The backing data store etcd (cf. [B]) of a Kubernetes cluster is deployed as a StatefulSet with one replica and a PersistentVolume(Claim). Embracing best practices, we run another etcd shard-instance to store Events of a shoot. Anyway, the main etcd pod is enhanced with a sidecar validating the data at rest and taking regular snapshots which are then efficiently backed up to an object store. In case etcd’s data is lost or corrupt, the sidecar restores it from the latest available snapshot. We plan to develop incremental/continuous backups to avoid discrepancies (in case of a recovery) between a restored etcd state and the actual state [1].

Kubernetes control plane

As already mentioned above, we have put the other Kubernetes control plane components into native Deployments and run them with the rolling update strategy. By doing so, we can not only leverage the existing deployment and update capabilities of Kubernetes, but also its monitoring and liveliness proficiencies. While the control plane itself uses in-cluster communication, the API Servers’ Service is exposed via a load balancer for external communication (cf. [C]). In order to uniformly generate the deployment manifests (mainly depending on both the Kubernetes version and cloud provider), we decided to utilize Helm charts whereas Gardener leverages only Tillers rendering capabilities, but deploys the resulting manifests directly without running Tiller at all [2].

Infrastructure preparation

One of the first requirements when creating a cluster is a well-prepared infrastructure on the cloud provider side including networks and security groups. In our current provider specific in-tree implementation of Gardener (called the “Botanist”), we employ Terraform to accomplish this task. Terraform provides nice abstractions for the major cloud providers and implements capabilities like parallelism, retry mechanisms, dependency graphs, idempotency, and more. However, we found that Terraform is challenging when it comes to error handling and it does not provide a technical interface to extract the root cause of an error. Currently, Gardener generates a Terraform script based on the shoot specification and stores it inside a ConfigMap in the respective namespace of the seed cluster. The Terraformer component then runs as a Job (cf. [D]), executes the mounted Terraform configuration, and writes the produced state back into another ConfigMap. Using the Job primitive in this manner helps to inherit its retry logic and achieve fault tolerance against temporary connectivity issues or resource constraints. Moreover, Gardener only needs to access the Kubernetes API of the seed cluster to submit the Job for the underlying IaaS. This design is important for private cloud scenarios in which typically the IaaS API is not exposed publicly.

Machine controller manager

What is required next are the nodes to which the actual workload of a cluster is to be scheduled. However, Kubernetes offers no primitives to request nodes forcing a cluster administrator to use external mechanisms. The considerations include the full lifecycle, beginning with initial provisioning and continuing with providing security fixes, and performing health checks and rolling updates. While we started with instantiating static machines or utilizing instance templates of the cloud providers to create the worker nodes, we concluded (also from our previous production experience with running a cloud platform) that this approach requires extensive effort. During discussions at KubeCon 2017, we recognized that the best way, of course, to manage cluster nodes is to again apply core Kubernetes concepts and to teach the system to self-manage the nodes/machines it runs. For that purpose, we developed the machine controller manager (cf. [E]) which extends Kubernetes with MachineDeployment, MachineClass, MachineSet & Machine resources and enables declarative management of (virtual) machines from within the Kubernetes context just like Deployments, ReplicaSets & Pods. We reused code from existing Kubernetes controllers and just needed to abstract a few IaaS/cloud provider specific methods for creating, deleting, and listing machines in dedicated drivers. When comparing Pods and Machines a subtle difference becomes evident: creating virtual machines directly results in costs, and if something unforeseen happens, these costs can increase very quickly. To safeguard against such rampage, the machine controller manager comes with a safety controller that terminates orphaned machines and freezes the rollout of MachineDeployments and MachineSets beyond certain thresholds and time-outs. Furthermore, we leverage the existing official cluster-autoscaler already including the complex logic of determining which node pool to scale out or down. Since its cloud provider interface is well-designed, we enabled the autoscaler to directly modify the number of replicas in the respective MachineDeployment resource when triggering to scale out or down.

Addons

Besides providing a properly setup control plane, every Kubernetes cluster requires a few system components to work. Usually, that’s the kube-proxy, an overlay network, a cluster DNS, and an ingress controller. Apart from that, Gardener allows to order optional add-ons configurable by the user (in the shoot resource definition), e.g. Heapster, the Kubernetes Dashboard, or Cert-Manager. Again, the Gardener renders the manifests for all these components via Helm charts (partly adapted and curated from the upstream charts repository). However, these resources are managed in the shoot cluster and can thus be tweaked by users with full administrative access. Hence, Gardener ensures that these deployed resources always match the computed/desired configuration by utilizing an existing watch dog, the kube-addon-manager (cf. [F]).

Network air gap

While the control plane of a shoot cluster runs in a seed managed & supplied by your friendly platform-provider, the worker nodes are typically provisioned in a separate cloud provider (billing) account of the user. Typically, these worker nodes are placed into private networks [3] to which the API Server in the seed control plane establishes direct communication, using a simple VPN solution based on ssh (cf. [G]). We have recently migrated the SSH-based implementation to an OpenVPN-based implementation which significantly increased the network bandwidth.

Monitoring & Logging

Monitoring, alerting, and logging are crucial to supervise clusters and keep them healthy so as to avoid outages and other issues. Prometheus has become the most used monitoring system in the Kubernetes domain. Therefore, we deploy a central Prometheus instance into the garden namespace of every seed. It collects metrics from all the seed’s kubelets including those for all pods running in the seed cluster. In addition, next to every control plane a dedicated tenant Prometheus instance is provisioned for the shoot itself (cf. [H]). It gathers metrics for its own control plane as well as for the pods running on the shoot’s worker nodes. The former is done by fetching data from the central Prometheus’ federation endpoint and filtering for relevant control plane pods of the particular shoot. Other than that, Gardener deploys two kube-state-metrics instances, one responsible for the control plane and one for the workload, exposing cluster-level metrics to enrich the data. The node exporter provides more detailed node statistics. A dedicated tenant Grafana dashboard displays the analytics and insights via lucid dashboards. We also defined alerting rules for critical events and employed the AlertManager to send emails to operators and support teams in case any alert is fired.

[1] This is also the reason for not supporting point-in-time recovery. There is no reliable infrastructure reconciliation implemented in Kubernetes so far. Thus, restoring from an old backup without refreshing the actual workload and state of the concerned cluster would generally not be of much help.

[2] The most relevant criteria for this decision was that Tiller requires a port-forward connection for communication which we experienced to be too unstable and error-prone for our automated use case. Nevertheless, we are looking forward to Helm v3 hopefully interacting with Tiller using CustomResourceDefinitions.

[3] Gardener offers to either create & prepare these networks with the Terraformer or it can be instructed to reuse pre-existing networks.

Despite requiring only the familiar kubectl command line tool for managing all of Gardener, we provide a central dashboard for comfortable interaction. It enables users to easily keep track of their clusters’ health, and operators to monitor, debug, and analyze the clusters they are responsible for. Shoots are grouped into logical projects in which teams managing a set of clusters can collaborate and even track issues via an integrated ticket system (e.g. GitHub Issues). Moreover, the dashboard helps users to add & manage their infrastructure account secrets and to view the most relevant data of all their shoot clusters in one place while being independent from the cloud provider they are deployed to.

Gardener architecture

Figure 2 Animated Gardener dashboard.

More focused on the duties of developers and operators, the Gardener command line client gardenctl simplifies administrative tasks by introducing easy higher-level abstractions with simple commands that help condense and multiplex information & actions from/to large amounts of seed and shoot clusters.

$ gardenctl ls shoots
projects:
– project: team-a
shoots:
– dev-eu1
– prod-eu1

$ gardenctl target shoot prod-eu1
[prod-eu1]

$ gardenctl show prometheus
NAME READY STATUS RESTARTS AGE IP NODE
prometheus-0 3/3 Running 0 106d 10.241.241.42 ip-10-240-7-72.eu-central-1.compute.internal

URL: https://user:password@p.prod-eu1.team-a.seed.aws-eu1.example.com

The Gardener is already capable of managing Kubernetes clusters on AWS, Azure, GCP, OpenStack [4]. Actually, due to the fact that it relies only on Kubernetes primitives, it nicely connects to private cloud or on-premise requirements. The only difference from Gardener’s point of view would be the quality and scalability of the underlying infrastructure – the lingua franca of Kubernetes ensures strong portability guarantees for our approach.

Nevertheless, there are still challenges ahead. We are probing a possibility to include an option to create a federation control plane delegating to multiple shoot clusters in this Open Source project. In the previous sections we have not explained how to bootstrap the garden and the seed clusters themselves. You could indeed use any production ready cluster provisioning tool or the cloud providers’ Kubernetes as a Service offering. We have built an uniform tool called Kubify based on Terraform and reused many of the mentioned Gardener components. We envision the required Kubernetes infrastructure to be able to be spawned in its entirety by an initial bootstrap Gardener and are already discussing how we could achieve that.

Another important topic we are focusing on is disaster recovery. When a seed cluster fails, the user’s static workload will continue to operate. However, administrating the cluster won’t be possible anymore. We are considering to move control planes of the shoots hit by a disaster to another seed. Conceptually, this approach is feasible and we already have the required components in place to implement that, e.g. automated etcd backup and restore. The contributors for this project not only have a mandate for developing Gardener for production, but most of us even run it in true DevOps mode as well. We completely trust the Kubernetes concepts and are committed to follow the “eat your own dog food” approach.

In order to enable a more independent evolution of the Botanists, which contain the infrastructure provider specific parts of the implementation, we plan to describe well-defined interfaces and factor out the Botanists into their own components. This is similar to what Kubernetes is currently doing with the cloud-controller-manager. Currently, all the cloud specifics are part of the core Gardener repository presenting a soft barrier to extending or supporting new cloud providers.

When taking a look at how the shoots are actually provisioned, we need to gain more experience on how really large clusters with thousands of nodes and pods (or more) behave. Potentially, we will have to deploy e.g. the API server and other components in a scaled-out fashion for large clusters to spread the load. Fortunately, horizontal pod autoscaling based on custom metrics from Prometheus will make this relatively easy with our setup. Additionally, the feedback from teams who run production workloads on our clusters, is that Gardener should support with prearranged Kubernetes QoS. Needless to say, our aspiration is going to be the integration and contribution to the vision of Kubernetes Autopilot.

[4] Prototypes already validated CTyun & Aliyun.

The Gardener project is developed as Open Source and hosted on GitHub: https://github.com/gardener

SAP is working on Gardener since mid 2017 and is focused on building up a project that can easily be evolved and extended. Consequently, we are now looking for further partners and contributors to the project. As outlined above, we completely rely on Kubernetes primitives, add-ons, and specifications and adapt its innovative Cloud Native approach. We are looking forward to aligning with and contributing to the Kubernetes community. In fact, we envision contributing the complete project to the CNCF.

At the moment, an important focus on collaboration with the community is the Cluster API working group within the SIG Cluster Lifecycle founded a few months ago. Its primary goal is the definition of a portable API representing a Kubernetes cluster. That includes the configuration of control planes and the underlying infrastructure. The overlap of what we have already in place with Shoot and Machine resources compared to what the community is working on is striking. Hence, we joined this working group and are actively participating in their regular meetings, trying to contribute back our learnings from production. Selfishly, it is also in our interest to shape a robust API.

If you see the potential of the Gardener project then please learn more about it on GitHub and help us make Gardener even better by asking questions, engaging in discussions, and by contributing code. Also, try out our quick start setup.

We are looking forward to seeing you there!

Source

RancherVM Live Migration with Shared Storage

With the latest release of RancherVM, we’ve added the ability to schedule virtual machines (guests) to specific Kubernetes Nodes (hosts).

This declarative placement (in Kubernetes terms: required node affinity) can be modified at any time. For stopped VMs, no change will be observed until the VM starts. For running VMs, the VM will enter a migrating state. RancherVM will then migrate the running guest machine from old to new host. Upon completion, the VM returns to running state and the old host’s VM pod is deleted. Active NoVNC sessions will be disconnected for a few seconds before auto-reconnecting. Secure shell (SSH) sessions will not disconnect; a sub-second pause in communication may be observed.

Migration of guest machines (live or offline) requires some form of shared storage. Since we make use of virtio-blk-pci para-virtualized I/O block device driver which writes virtual block devices as files to the host filesystem, NFS will work nicely.

Note: You are welcome to install RancherVM before configuring shared storage, but do not create any VM Instances yet. If you already created some instances, delete them before proceeding.

Install/Configure NFS server

Let’s walk through NFS server installation and configuration on an Ubuntu host. This can be a dedicated host or one of the Nodes in your RancherVM cluster.

Install the required package:

sudo apt-get install -y nfs-kernel-server

Create the directory that will be shared:

sudo mkdir -p /var/lib/rancher/vm-shared

Append the following line to /etc/exports:

/var/lib/rancher/vm-shared *(rw,sync,no_subtree_check,no_root_squash)

This allows any host IP to mount the NFS share; if your machines are public facing, you may want to restrict * to an internal subnet such as 192.168.100.1/24 or add firewall rules.

The directory will now be exported during the boot sequence. To export the directory without rebooting, run the following command:

From one of the RancherVM nodes, query for registered RPC programs. Replace <nfs_server_ip> with the (private) IP address of your NFS server:

rpcinfo -p <nfs_server_ip>

You should see program 100003 (NFS service) present, for example:

program vers proto port service
100000 4 tcp 111 portmapper
100000 3 tcp 111 portmapper
100000 2 tcp 111 portmapper
100000 4 udp 111 portmapper
100000 3 udp 111 portmapper
100000 2 udp 111 portmapper
100005 1 udp 47321 mountd
100005 1 tcp 33684 mountd
100005 2 udp 47460 mountd
100005 2 tcp 45270 mountd
100005 3 udp 34689 mountd
100005 3 tcp 51773 mountd
100003 2 tcp 2049 nfs
100003 3 tcp 2049 nfs
100003 4 tcp 2049 nfs
100227 2 tcp 2049
100227 3 tcp 2049
100003 2 udp 2049 nfs
100003 3 udp 2049 nfs
100003 4 udp 2049 nfs
100227 2 udp 2049
100227 3 udp 2049
100021 1 udp 49239 nlockmgr
100021 3 udp 49239 nlockmgr
100021 4 udp 49239 nlockmgr
100021 1 tcp 45624 nlockmgr
100021 3 tcp 45624 nlockmgr
100021 4 tcp 45624 nlockmgr

The NFS server is now ready to use. Next we’ll configure RancherVM nodes to mount the exported file system.

Install/Configure NFS clients

On each host participating as a RancherVM node, the following procedure should be followed. This includes the NFS server if the machine is also a node in the RancherVM cluster.

Install the required package:

sudo apt-get install -y nfs-common

Create the directory that will be mounted:

sudo mkdir -p /var/lib/rancher/vm

Be careful to use this exact path. Append the following line to /etc/fstab. Replace <nfs_server_ip> with the (private) IP address of your NFS server:

<nfs_server_ip>:/var/lib/rancher/vm-shared /var/lib/rancher/vm nfs auto 0 0

The exported directory will now be mounted to /var/lib/rancher/vm during the boot sequence. To mount the directory without rebooting, run the following command:

This should return quickly without output. Verify the mount succeeded by checking the mount table:

mount | grep /var/lib/rancher/vm

If an error occurred, refer to the rpcinfo command in the previous section, then check the firewall settings on both NFS server and client.

Let’s ensure we can read/write to the shared directory. On one client, touch a file:

touch /var/lib/rancher/vm/read-write-test

On another client, look for the file:

ls /var/lib/rancher/vm | grep read-write-test

If the file exists, you’re good to go.

Live Migration

Now that shared storage is configured, we are ready to create and migrate VM instances. Install RancherVM into your Kubernetes cluster if you haven’t already.

Usage

You will need at least two ready hosts with sufficient resources to run your instance.

Hosts

We create a Ubuntu Xenail server instance with 1 vCPU and 1GB RAM and explicitly assign it to node1.

Create Instance

After waiting a bit, our instance enters running state and is assigned an IP address.

Instance Running

Now, let’s trigger the live migration by clicking the dropdown under Node Name column. To the left is the requested node, to the right is the currently scheduled node.

Instance Node Dropdown

Our instance enters migrating state. This does not pause execution; the migration is mostly transparent to the end user.

Instance Migrating

Once migration completes, the instance returns to running state. The currently scheduled node now reflects node2 which matches the desired node.

Instance Migrated

That’s all there is to it. Migrating instances off of a node for maintenance or decommissioning is now a breeze.

How It Works

Live migration is a three step process:

  1. Start the new instance on the desired node and configure an incoming socket to expect memory pages from the old instance.
  2. Initiate the transfer of memory pages, in order, from the old to new instance. Changes in already transferred memory pages are tracked and sent after the current sequential pass completes. This process repeats until we have sufficient bandwidth to stream the final memory pages within a configurable expected time period (300ms by default).
  3. Stop the old instance, transfer the remaining memory pages and start the new instance. The migration is complete.

Moving Forward

We’ve covered manually configuring a shared filesystem and demonstrated the capability to live migrate guest virtual machines from one node to another. This brings us one step closer to achieving a fault tolerant, maintainable virtual machine cloud.

Next up, we plan to integrate RancherVM with Project Longhorn, a distributed block storage system that runs on Kubernetes. Longhorn brings performant, replicated block devices to the table and includes valuable features such as snapshotting. Stay tuned!

James Oliver

James Oliver
Tools and Automation Engineer, Prior to Rancher, James’ first exposure to cluster management was writing frameworks on Apache Mesos predating the release of DC/OS. Self-proclaimed jack of all trades, James loves reverse engineering complex software solutions as well as building systems at scale. Proponent of FOSS, it is his personal goal to automate the complexities of creating, deploying, and maintaining scalable systems to empower hobbyists and corporations alike. James has a B.S. in Computer Engineering from University of Arizona.

Source

Getting to Know Kubevirt – Kubernetes

Getting to Know Kubevirt

Author: Jason Brooks (Red Hat)

Once you’ve become accustomed to running Linux container workloads on Kubernetes, you may find yourself wishing that you could run other sorts of workloads on your Kubernetes cluster. Maybe you need to run an application that isn’t architected for containers, or that requires a different version of the Linux kernel – or an all together different operating system – than what’s available on your container host.

These sorts of workloads are often well-suited to running in virtual machines (VMs), and KubeVirt, a virtual machine management add-on for Kubernetes, is aimed at allowing users to run VMs right alongside containers in the their Kubernetes or OpenShift clusters.

KubeVirt extends Kubernetes by adding resource types for VMs and sets of VMs through Kubernetes’ Custom Resource Definitions API (CRD). KubeVirt VMs run within regular Kubernetes pods, where they have access to standard pod networking and storage, and can be managed using standard Kubernetes tools such as kubectl.

Running VMs with Kubernetes involves a bit of an adjustment compared to using something like oVirt or OpenStack, and understanding the basic architecture of KubeVirt is a good place to begin.

In this post, we’ll talk about some of the components that are involved in KubeVirt at a high level. The components we’ll check out are CRDs, the KubeVirt virt-controller, virt-handler and virt-launcher components, libvirt, storage, and networking.

KubeVirt Components

Kubevirt Components

Custom Resource Definitions

Kubernetes resources are endpoints in the Kubernetes API that store collections of related API objects. For instance, the built-in pods resource contains a collection of Pod objects. The Kubernetes Custom Resource Definition API allows users to extend Kubernetes with additional resources by defining new objects with a given name and schema. Once you’ve applied a custom resource to your cluster, the Kubernetes API server serves and handles the storage of your custom resource.

KubeVirt’s primary CRD is the VirtualMachine (VM) resource, which contains a collection of VM objects inside the Kubernetes API server. The VM resource defines all the properties of the Virtual machine itself, such as the machine and CPU type, the amount of RAM and vCPUs, and the number and type of NICs available in the VM.

virt-controller

The virt-controller is a Kubernetes Operator that’s responsible for cluster-wide virtualization functionality. When new VM objects are posted to the Kubernetes API server, the virt-controller takes notice and creates the pod in which the VM will run. When the pod is scheduled on a particular node, the virt-controller updates the VM object with the node name, and hands off further responsibilities to a node-specific KubeVirt component, the virt-handler, an instance of which runs on every node in the cluster.

virt-handler

Like the virt-controller, the virt-handler is also reactive, watching for changes to the VM object, and performing all necessary operations to change a VM to meet the required state. The virt-handler references the VM specification and signals the creation of a corresponding domain using a libvirtd instance in the VM’s pod. When a VM object is deleted, the virt-handler observes the deletion and turns off the domain.

virt-launcher

For every VM object one pod is created. This pod’s primary container runs the virt-launcher KubeVirt component. The main purpose of the virt-launcher Pod is to provide the cgroups and namespaces which will be used to host the VM process.

virt-handler signals virt-launcher to start a VM by passing the VM’s CRD object to virt-launcher. virt-launcher then uses a local libvirtd instance within its container to start the VM. From there virt-launcher monitors the VM process and terminates once the VM has exited.

If the Kubernetes runtime attempts to shutdown the virt-launcher pod before the VM has exited, virt-launcher forwards signals from Kubernetes to the VM process and attempts to hold off the termination of the pod until the VM has shutdown successfully.

# kubectl get pods

NAME READY STATUS RESTARTS AGE
virt-controller-7888c64d66-dzc9p 1/1 Running 0 2h
virt-controller-7888c64d66-wm66x 0/1 Running 0 2h
virt-handler-l2xkt 1/1 Running 0 2h
virt-handler-sztsw 1/1 Running 0 2h
virt-launcher-testvm-ephemeral-dph94 2/2 Running 0 2h

libvirtd

An instance of libvirtd is present in every VM pod. virt-launcher uses libvirtd to manage the life-cycle of the VM process.

Storage and Networking

KubeVirt VMs may be configured with disks, backed by volumes.

Persistent Volume Claim volumes make Kubernetes persistent volume available as disks directly attached to the VM. This is the primary way to provide KubeVirt VMs with persistent storage. Currently, persistent volumes must be iscsi block devices, although work is underway to enable file-based pv disks.

Ephemeral Volumes are a local copy on write images that use a network volume as a read-only backing store. KubeVirt dynamically generates the ephemeral images associated with a VM when the VM starts, and discards the ephemeral images when the VM stops. Currently, ephemeral volumes must be backed by pvc volumes.

Registry Disk volumes reference docker image that embed a qcow or raw disk. As the name suggests, these volumes are pulled from a container registry. Like regular ephemeral container images, data in these volumes persists only while the pod lives.

CloudInit NoCloud volumes provide VMs with a cloud-init NoCloud user-data source, which is added as a disk to the VM, where it’s available to provide configuration details to guests with cloud-init installed. Cloud-init details can be provided in clear text, as base64 encoded UserData files, or via Kubernetes secrets.

In the example below, a Registry Disk is configured to provide the image from which to boot the VM. A cloudInit NoCloud volume, paired with an ssh-key stored as clear text in the userData field, is provided for authentication with the VM:

apiVersion: kubevirt.io/v1alpha1
kind: VirtualMachine
metadata:
name: myvm
spec:
terminationGracePeriodSeconds: 5
domain:
resources:
requests:
memory: 64M
devices:
disks:
– name: registrydisk
volumeName: registryvolume
disk:
bus: virtio
– name: cloudinitdisk
volumeName: cloudinitvolume
disk:
bus: virtio
volumes:
– name: registryvolume
registryDisk:
image: kubevirt/cirros-registry-disk-demo:devel
– name: cloudinitvolume
cloudInitNoCloud:
userData: |
ssh-authorized-keys:
– ssh-rsa AAAAB3NzaK8L93bWxnyp test@test.com

Just as with regular Kubernetes pods, basic networking functionality is made available automatically to each KubeVirt VM, and particular TCP or UDP ports can be exposed to the outside world using regular Kubernetes services. No special network configuration is required.

Getting Involved

KubeVirt development is accelerating, and the project is eager for new contributors. If you’re interested in getting involved, check out the project’s open issues and check out the project calendar.

If you need some help or want to chat you can connect to the team via freenode IRC in #kubevirt, or on the KubeVirt mailing list. User documentation is available at https://kubevirt.gitbooks.io/user-guide/.

Source

Recover Rancher Kubernetes cluster from a Backup

Take a deep dive into Best Practices in Kubernetes Networking

From overlay networking and SSL to ingress controllers and network security policies, we’ve seen many users get hung up on Kubernetes networking challenges. In this video recording, we dive into Kubernetes networking, and discuss best practices for a wide variety of deployment options.

Watch the video

Etcd is a highly available distributed key-value store that provides a reliable way to store data across machines, more importantly it is used as a Kubernetes’ backing store for all of a cluster’s data.

In this post we are going to discuss how to backup etcd and how to recover from a backup to restore operations to a Kubernetes cluster.

Etcd in Rancher 1.6

In Rancher 1.6 we use our own Docker image for etcd which basically pulls the official etcd and adds some scripts and go binaries for orchestration, backup, disaster recovery, and healthcheck.

The scripts communicate with Rancher’s metadata service to get important information, such as: how many etcd are running in the cluster, who is the etcd leader, etc. In Rancher 1.6, we introduced etcd backup, which works besides the main etcd in the background. This service is responsible for backup operations.

The backup operations work by performing rolling backups of etcd at specified intervals and also supports retention of old backups. Rancher-etcd does that by providing three environment variables to the Docker image:

  • EMBEDDED_BACKUPS: boolean variable to enable/disable backup.
  • BACKUP_PERIOD: etcd will perform backups at this time interval.
  • BACKUP_RETENTION: etcd will retain backups for this time interval.

Backups are taken at /var/etcd/backups on the host and are taken using the following command:

etcdctl backup –data-dir <dataDir> –backup-dir <backupDir>

To configure the backup operations for etcd in Rancher 1.6, you must supply the mentioned environment variables in the Kubernetes configuration template:

After configuring and launching Kubernetes, etcd should automatically take backups every 15 minutes by default.

Restoring backup

Recovering etcd from a backup in rancher 1.6 requires the user to have data in the etcd volume created for etcd. For example, if you have 3 nodes and you have backups created in the /var/etcd/backup directory:

# ls /var/etcd/backups/ -l
total 44
drwx—— 3 root root 4096 Apr 9 15:03 2018-04-09T15:03:54Z_etcd_1
drwx—— 3 root root 4096 Apr 9 15:05 2018-04-09T15:05:54Z_etcd_1
drwx—— 3 root root 4096 Apr 9 15:07 2018-04-09T15:07:54Z_etcd_1
drwx—— 3 root root 4096 Apr 9 15:09 2018-04-09T15:09:54Z_etcd_1
drwx—— 3 root root 4096 Apr 9 15:11 2018-04-09T15:11:54Z_etcd_1
drwx—— 3 root root 4096 Apr 9 15:13 2018-04-09T15:13:54Z_etcd_1
drwx—— 3 root root 4096 Apr 9 15:15 2018-04-09T15:15:54Z_etcd_1
drwx—— 3 root root 4096 Apr 9 15:17 2018-04-09T15:17:54Z_etcd_1
drwx—— 3 root root 4096 Apr 9 15:19 2018-04-09T15:19:54Z_etcd_1
drwx—— 3 root root 4096 Apr 9 15:21 2018-04-09T15:21:54Z_etcd_1
drwx—— 3 root root 4096 Apr 9 15:23 2018-04-09T15:23:54Z_etcd_1

Then you should be able to restore operations to etcd. First of all you should only start with one node, so that only one etcd will restore from backup, and then the rest of etcd will join the cluster. To begin the restoration, use the following steps:

target=2018-04-09T15:23:54Z_etcd_1
docker volume create –name etcd
docker run -d -v etcd:/data –name etcd-restore busybox
docker cp /var/etcd/backups/$target etcd-restore:/data/data.current
docker rm etcd-restore

The next step is to start Kubernetes on this node normally:

After that you can add new hosts to the setup. Note that you have to make sure that new hosts don’t have etcd volumes.

It’s also preferable to have etcd backup mounted to NFS mount point so that if the hosts are down for any reason, it won’t affect the backups created for etcd.

Etcd in Rancher 2.0

Recently Rancher announced GA for Rancher 2.0 and became ready for production deployments. Rancher 2.0 provides unified cluster management for different cloud providers including GKE, AKS, EKS as well providers that do not yet support a managed Kubernetes service.

Starting from RKE v0.1.7, the user is allowed to enable regular etcd snapshots automatically. In addition, it lets the user restore etcd from a snapshot stored on cluster instances.

In this section we will explain how to backup/restore your Rancher installation on an RKE managed cluster. The steps for this kind of Rancher installation is explained in the official documentation in more detail.

After Rancher Installation

After you install Rancher using RKE as explained in the documentation, you should see similar output when you execute the command:

# kubectl get pods –all-namespaces
NAMESPACE NAME READY STATUS RESTARTS AGE
cattle-system cattle-859b6cdc6b-tns6g 1/1 Running 0 19s
ingress-nginx default-http-backend-564b9b6c5b-7wbkx 1/1 Running 0 25s
ingress-nginx nginx-ingress-controller-shpn4 1/1 Running 0 25s
kube-system canal-5xj2r 3/3 Running 0 37s
kube-system kube-dns-5ccb66df65-c72t9 3/3 Running 0 31s
kube-system kube-dns-autoscaler-6c4b786f5-xtj26 1/1 Running 0 30s

You will notice that cattle pod is up and running in cattle-system namespace; this pod is the rancher server installed as a Kubernetes deployment:

RKE etcd Snapshots

RKE introduced two commands to save and restore etcd snapshots of a running RKE cluster; the two commands are:

rke etcd snapshot-save –config <config-path> –name <snapshot-name>

AND

rke etcd snapshot-restore –config <config-path> –name <snapshot-name>

For more information about etcd snapshot save/restore in RKE, please refer to the official documentation.

First we will take a snapshot of etcd that is running on the cluster. To do that, lets run the following command:

# rke etcd snapshot-save –name rancher.snapshot –config cluster.yml
INFO[0000] Starting saving snapshot on etcd hosts
INFO[0000] [dialer] Setup tunnel for host [x.x.x.x]
INFO[0003] [etcd] Saving snapshot [rancher.snapshot] on host [x.x.x.x]
INFO[0004] [etcd] Successfully started [etcd-snapshot-once] container on host [x.x.x.x]
INFO[0010] Finished saving snapshot [rancher.snapshot] on all etcd hosts

RKE etcd snapshot restore

Assuming the Kubernetes cluster failed for any reason, we can restore normally from the taken snapshot, using the following command:

# rke etcd snapshot-restore –name rancher.snapshot –config cluster.yml

INFO[0000] Starting restoring snapshot on etcd hosts
INFO[0000] [dialer] Setup tunnel for host [x.x.x.x]
INFO[0001] [remove/etcd] Successfully removed container on host [x.x.x.x]
INFO[0001] [hosts] Cleaning up host [x.x.x.x]
INFO[0001] [hosts] Running cleaner container on host [x.x.x.x]
INFO[0002] [kube-cleaner] Successfully started [kube-cleaner] container on host [x.x.x.x]
INFO[0002] [hosts] Removing cleaner container on host [x.x.x.x]
INFO[0003] [hosts] Successfully cleaned up host [x.x.x.x]
INFO[0003] [etcd] Restoring [rancher.snapshot] snapshot on etcd host [x.x.x.x]
INFO[0003] [etcd] Successfully started [etcd-restore] container on host [x.x.x.x]
INFO[0004] [etcd] Building up etcd plane..
INFO[0004] [etcd] Successfully started [etcd] container on host [x.x.x.x]
INFO[0005] [etcd] Successfully started [rke-log-linker] container on host [x.x.x.x]
INFO[0006] [remove/rke-log-linker] Successfully removed container on host [x.x.x.x]
INFO[0006] [etcd] Successfully started etcd plane..
INFO[0007] Finished restoring snapshot [rancher.snapshot] on all etcd hosts

Notes
There are some important notes for the etcd restore process in RKE:

1. Restarting Kubernetes components

After restoring the cluster, you have to restart the Kubernetes components on all nodes, otherwise there will be some conflicts with resource versions of objects stored in etcd; this will include restart to Kubernetes components and the network components. For more information, please refer to Kubernetes documentation. To restart the Kubernetes components, you can run the following on each node:

docker restart kube-apiserver kubelet kube-controller-manager kube-scheduler kube-proxy
docker ps | grep flannel | cut -f 1 -d ” ” | xargs docker restart
docker ps | grep calico | cut -f 1 -d ” ” | xargs docker restart

2. Restoring etcd on a multi-node cluster

If you are restoring etcd on a cluster with multiple etcd nodes, the same exact snapshot must be copied to /opt/rke/etcd-snapshots, rke etcd snapshot-save will take different snapshots on each node, so you will need to copy one of the created snapshots manually to all nodes before restoring.

3. Invalidated service account tokens

Restoring etcd on a new Kubernetes cluster with new certificates is not currently supported, because the new cluster will contain different private keys which are used to sign service tokens for all service accounts. This may cause a lot of problems for all pods that communicate directly with kube api.

Conclusion

In this post we saw how backups can be created and restored for etcd in Kubernetes clusters in both Rancher 1.6.x and 2.0.x. Etcd snapshots can be managed in 1.6 using Rancher’s etcd image and in 2.0 using RKE CLI.

Hussein Galal

Hussein Galal

DevOps Engineer

Source