Kubernetes Containerd Integration Goes GA

Kubernetes Containerd Integration Goes GA

Authors: Lantao Liu, Software Engineer, Google and Mike Brown, Open Source Developer Advocate, IBM

In a previous blog – Containerd Brings More Container Runtime Options for Kubernetes, we introduced the alpha version of the Kubernetes containerd integration. With another 6 months of development, the integration with containerd is now generally available! You can now use containerd 1.1 as the container runtime for production Kubernetes clusters!

Containerd 1.1 works with Kubernetes 1.10 and above, and supports all Kubernetes features. The test coverage of containerd integration on Google Cloud Platform in Kubernetes test infrastructure is now equivalent to the Docker integration (See: test dashboard).

We’re very glad to see containerd rapidly grow to this big milestone. Alibaba Cloud started to use containerd actively since its first day, and thanks to the simplicity and robustness emphasise, make it a perfect container engine running in our Serverless Kubernetes product, which has high qualification on performance and stability. No doubt, containerd will be a core engine of container era, and continue to driving innovation forward.

— Xinwei, Staff Engineer in Alibaba Cloud

The Kubernetes containerd integration architecture has evolved twice. Each evolution has made the stack more stable and efficient.

Containerd 1.0 – CRI-Containerd (end of life)

cri-containerd architecture

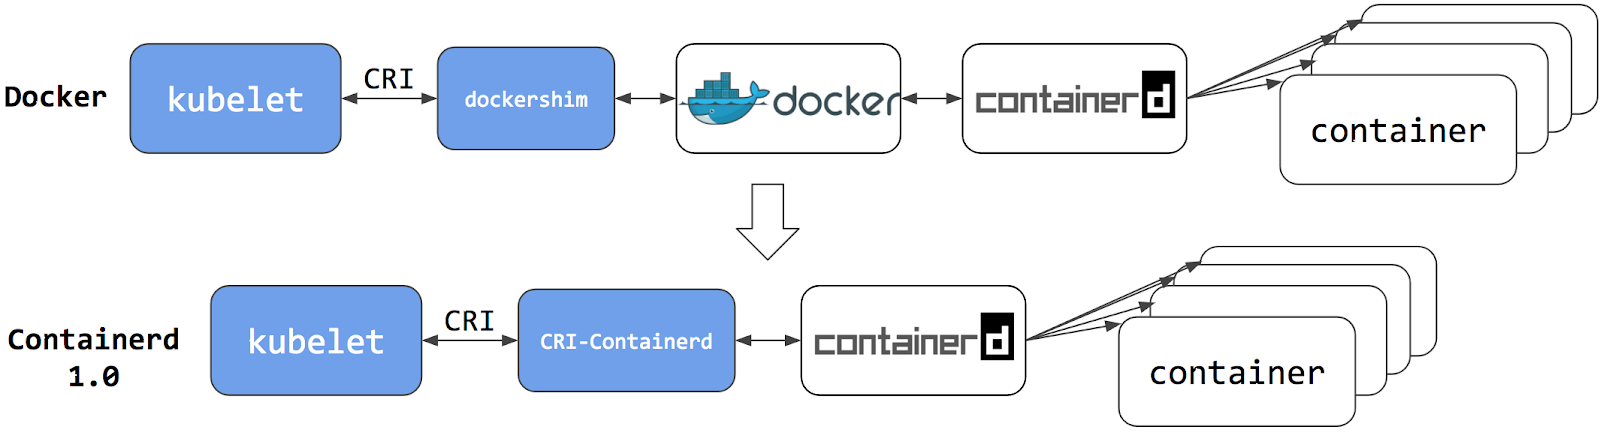
For containerd 1.0, a daemon called cri-containerd was required to operate between Kubelet and containerd. Cri-containerd handled the Container Runtime Interface (CRI) service requests from Kubelet and used containerd to manage containers and container images correspondingly. Compared to the Docker CRI implementation (dockershim), this eliminated one extra hop in the stack.

However, cri-containerd and containerd 1.0 were still 2 different daemons which interacted via grpc. The extra daemon in the loop made it more complex for users to understand and deploy, and introduced unnecessary communication overhead.

Containerd 1.1 – CRI Plugin (current)

containerd architecture

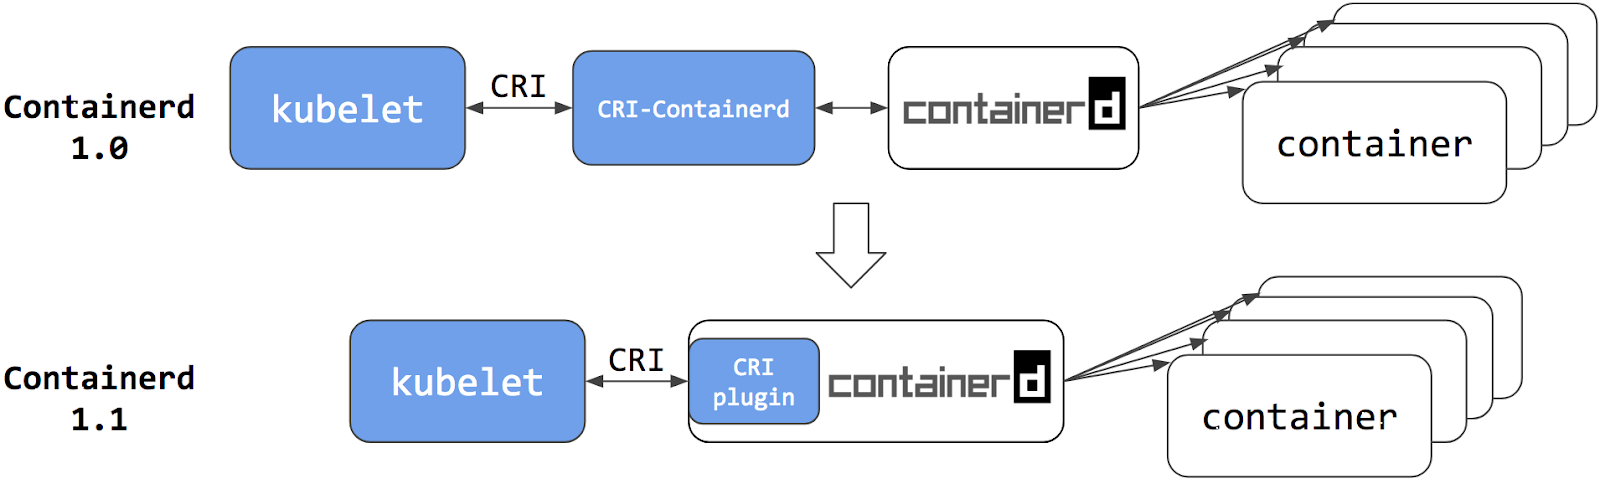
In containerd 1.1, the cri-containerd daemon is now refactored to be a containerd CRI plugin. The CRI plugin is built into containerd 1.1, and enabled by default. Unlike cri-containerd, the CRI plugin interacts with containerd through direct function calls. This new architecture makes the integration more stable and efficient, and eliminates another grpc hop in the stack. Users can now use Kubernetes with containerd 1.1 directly. The cri-containerd daemon is no longer needed.

Improving performance was one of the major focus items for the containerd 1.1 release. Performance was optimized in terms of pod startup latency and daemon resource usage.

The following results are a comparison between containerd 1.1 and Docker 18.03 CE. The containerd 1.1 integration uses the CRI plugin built into containerd; and the Docker 18.03 CE integration uses the dockershim.

The results were generated using the Kubernetes node performance benchmark, which is part of Kubernetes node e2e test. Most of the containerd benchmark data is publicly accessible on the node performance dashboard.
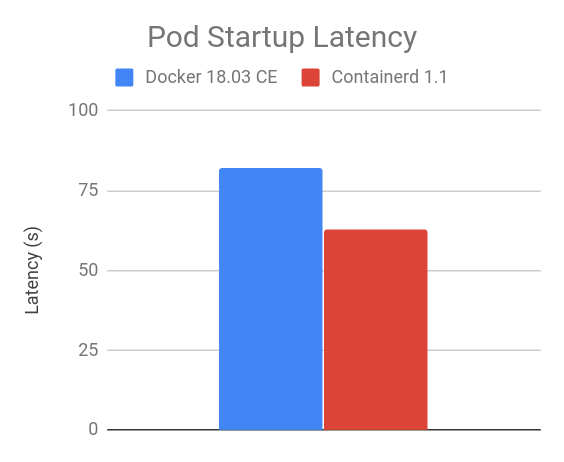
Pod Startup Latency

The “105 pod batch startup benchmark” results show that the containerd 1.1 integration has lower pod startup latency than Docker 18.03 CE integration with dockershim (lower is better).
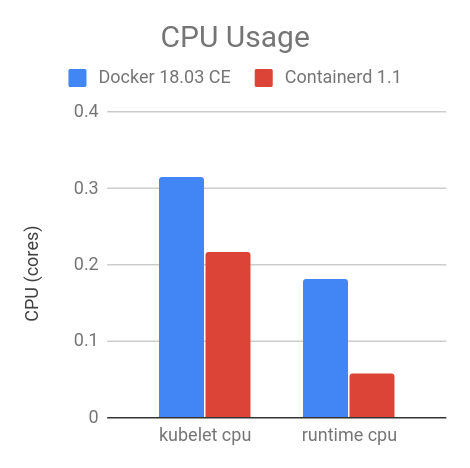
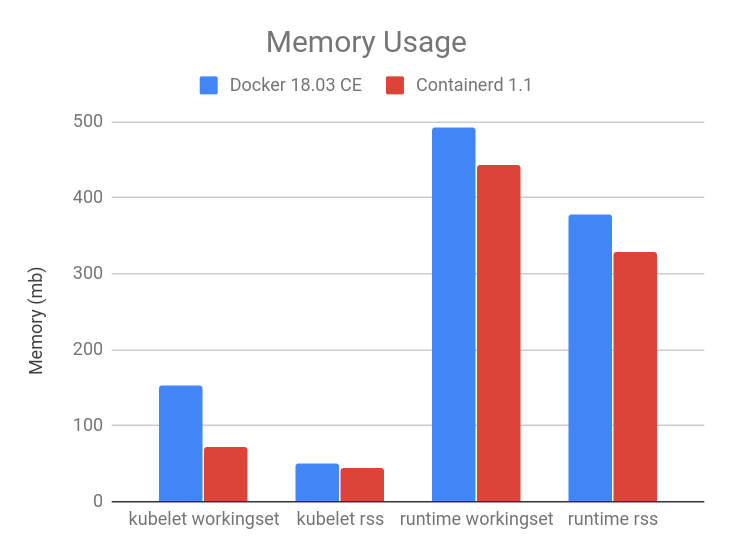
latency

CPU and Memory

At the steady state, with 105 pods, the containerd 1.1 integration consumes less CPU and memory overall compared to Docker 18.03 CE integration with dockershim. The results vary with the number of pods running on the node, 105 is chosen because it is the current default for the maximum number of user pods per node.

As shown in the figures below, compared to Docker 18.03 CE integration with dockershim, the containerd 1.1 integration has 30.89% lower kubelet cpu usage, 68.13% lower container runtime cpu usage, 11.30% lower kubelet resident set size (RSS) memory usage, 12.78% lower container runtime RSS memory usage.

cpumemory

Container runtime command-line interface (CLI) is a useful tool for system and application troubleshooting. When using Docker as the container runtime for Kubernetes, system administrators sometimes login to the Kubernetes node to run Docker commands for collecting system and/or application information. For example, one may use docker ps and docker inspect to check application process status, docker images to list images on the node, and docker info to identify container runtime configuration, etc.

For containerd and all other CRI-compatible container runtimes, e.g. dockershim, we recommend using crictl as a replacement CLI over the Docker CLI for troubleshooting pods, containers, and container images on Kubernetes nodes.

crictl is a tool providing a similar experience to the Docker CLI for Kubernetes node troubleshooting and crictl works consistently across all CRI-compatible container runtimes. It is hosted in the kubernetes-incubator/cri-tools repository and the current version is v1.0.0-beta.1. crictl is designed to resemble the Docker CLI to offer a better transition experience for users, but it is not exactly the same. There are a few important differences, explained below.

The scope of crictl is limited to troubleshooting, it is not a replacement to docker or kubectl. Docker’s CLI provides a rich set of commands, making it a very useful development tool. But it is not the best fit for troubleshooting on Kubernetes nodes. Some Docker commands are not useful to Kubernetes, such as docker network and docker build; and some may even break the system, such as docker rename. crictl provides just enough commands for node troubleshooting, which is arguably safer to use on production nodes.

Kubernetes Oriented

crictl offers a more kubernetes-friendly view of containers. Docker CLI lacks core Kubernetes concepts, e.g. pod and namespace, so it can’t provide a clear view of containers and pods. One example is that docker ps shows somewhat obscure, long Docker container names, and shows pause containers and application containers together:

docker ps

However, pause containers are a pod implementation detail, where one pause container is used for each pod, and thus should not be shown when listing containers that are members of pods.

crictl, by contrast, is designed for Kubernetes. It has different sets of commands for pods and containers. For example, crictl pods lists pod information, and crictl ps only lists application container information. All information is well formatted into table columns.

crictl podscrictl ps

As another example, crictl pods includes a –namespace option for filtering pods by the namespaces specified in Kubernetes.

crictl pods filter

For more details about how to use crictl with containerd:

“Does switching to containerd mean I can’t use Docker Engine anymore?” We hear this question a lot, the short answer is NO.

Docker Engine is built on top of containerd. The next release of Docker Community Edition (Docker CE) will use containerd version 1.1. Of course, it will have the CRI plugin built-in and enabled by default. This means users will have the option to continue using Docker Engine for other purposes typical for Docker users, while also being able to configure Kubernetes to use the underlying containerd that came with and is simultaneously being used by Docker Engine on the same node. See the architecture figure below showing the same containerd being used by Docker Engine and Kubelet:

docker-ce

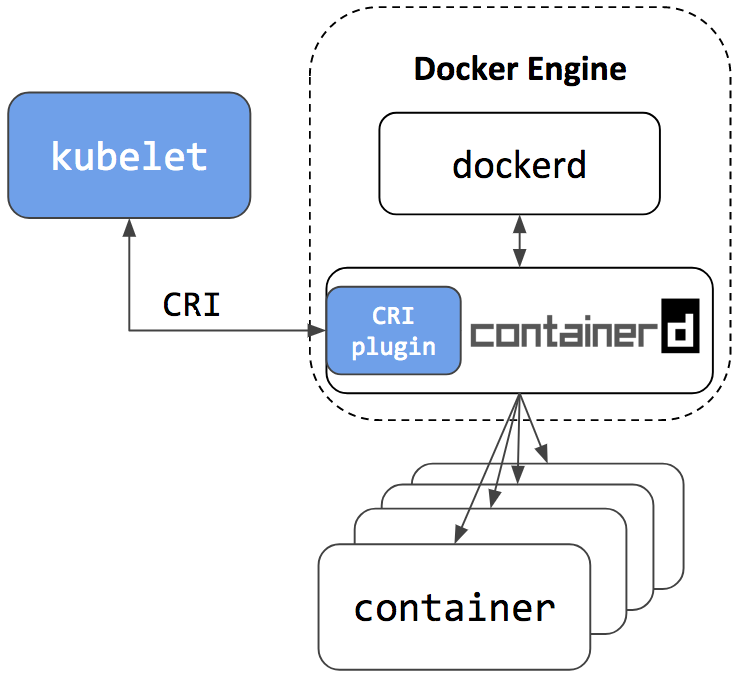
Since containerd is being used by both Kubelet and Docker Engine, this means users who choose the containerd integration will not just get new Kubernetes features, performance, and stability improvements, they will also have the option of keeping Docker Engine around for other use cases.

A containerd namespace mechanism is employed to guarantee that Kubelet and Docker Engine won’t see or have access to containers and images created by each other. This makes sure they won’t interfere with each other. This also means that:

  • Users won’t see Kubernetes created containers with the docker ps command. Please use crictl ps instead. And vice versa, users won’t see Docker CLI created containers in Kubernetes or with crictl ps command. The crictl create and crictl runp commands are only for troubleshooting. Manually starting pod or container with crictl on production nodes is not recommended.
  • Users won’t see Kubernetes pulled images with the docker images command. Please use the crictl images command instead. And vice versa, Kubernetes won’t see images created by docker pull, docker load or docker build commands. Please use the crictl pull command instead, and ctr cri load if you have to load an image.
  • Containerd 1.1 natively supports CRI. It can be used directly by Kubernetes.
  • Containerd 1.1 is production ready.
  • Containerd 1.1 has good performance in terms of pod startup latency and system resource utilization.
  • crictl is the CLI tool to talk with containerd 1.1 and other CRI-conformant container runtimes for node troubleshooting.
  • The next stable release of Docker CE will include containerd 1.1. Users have the option to continue using Docker for use cases not specific to Kubernetes, and configure Kubernetes to use the same underlying containerd that comes with Docker.

We’d like to thank all the contributors from Google, IBM, Docker, ZTE, ZJU and many other individuals who made this happen!

For a detailed list of changes in the containerd 1.1 release, please see the release notes here: https://github.com/containerd/containerd/releases/tag/v1.1.0

To setup a Kubernetes cluster using containerd as the container runtime:

  • For a production quality cluster on GCE brought up with kube-up.sh, see here.
  • For a multi-node cluster installer and bring up steps using ansible and kubeadm, see here.
  • For creating a cluster from scratch on Google Cloud, see Kubernetes the Hard Way.
  • For a custom installation from release tarball, see here.
  • To install using LinuxKit on a local VM, see here.

The containerd CRI plugin is an open source github project within containerd https://github.com/containerd/cri. Any contributions in terms of ideas, issues, and/or fixes are welcome. The getting started guide for developers is a good place to start for contributors.

The project is developed and maintained jointly by members of the Kubernetes SIG-Node community and the containerd community. We’d love to hear feedback from you. To join the communities:

Source

Managing EKS Clusters with Rancher

A Detailed Overview of Rancher’s Architecture

This newly-updated, in-depth guidebook provides a detailed overview of the features and functionality of the new Rancher: an open-source enterprise Kubernetes platform.

Get the eBook

Rancher is a popular open source tool used by many organizations to manage Kubernetes clusters. With the latest release of EKS in GA, Rancher is excited to announce integration with the new managed Kubernetes cluster solution by AWS. We are excited about the availability of EKS because most Rancher users run their clusters on AWS. In the past, they had to create and manage their own clusters using Rancher’s own RKE distribution or open source tools like Kops. With EKS, Rancher users will no longer need to manage their own K8s clusters on AWS.

Using EKS with Rancher combines the ease of use you have grown accustomed to in Rancher with the features, reliability, and performance that you expect out of AWS. With EKS, Amazon’s managed Kubernetes solution, you can quickly create a scalable Kuberenetes instance in the cloud. Combined with the advanced Kubernetes management features and quality of life improvements found in Rancher, the duo is a powerful combination.

Rancher helps simplify the creation of an EKS cluster by automating the Cloud Formation stack creation and providing sensible defaults for your EKS cluster.

Rancher also provides a uniform interface for accessing your clusters, and allows integration with AWS AD, allowing you to apply RBAC permissions equally across your various Kubernetes clusters.

Today I will be walking you through how to set up an EKS cluster, deploy a publicly accessible app to it, and integrate with AWS managed Microsoft AD.

Things you’ll need

This guide assumes that you already have the following:

1) A running instance of Rancher 2.0
2) An AWS account with access to the EKS preview

Once you have those items you are ready to start.

Creating the EKS Cluster

First you’ll need to create Secret credentials for your account. Do this by going to IAM > Users > (Your Username) > Security Credentials.

Create Access Key

Then click on “Create access key” and a popup should appear.

Record the Access Key ID and the Secret Access Key, you will need these when creating your EKS cluster in Rancher.

Add Cluster

Next, go into your instance of Rancher and click the “Add Cluster” button and select the “Amazon EKS” option. Now input the Access Key ID and Secret Access Key you recorded in the previous step and click “Next: Authenticate & select a network”; Rancher will verify that the ID and Secret you submitted are authorized.

Once the verification has completed, click the “Create” button. It will take a few minutes for the EKS cluster to create.

Clusters

Once the cluster has finished provisioning you should see the status turn to “Active”.

Deploy Workload

Click on the cluster and go to the default project. Here we can deploy a workload to test out our cluster. On the workload screen click “Deploy”. Give your workload a name and specify the “nginx” Docker Image. Click “Add Port”, publish the container port “80” on target “3000” and specify a Layer-4 Load Balancer. This will allow us to access our Nginx instance over the public internet.

Pending Workload

Click “Launch” and wait for the workload and load balancer to finish provisioning (and make sure to check both the Workloads and Load Balancing tabs).

Welcome to Nginx

Once the load balancer has finished provisioning a clickable link will appear beneath the workload. Note that AWS will create a DNS entry for this EKS cluster and that may take several minutes to propagate; if you get a 404 after clicking the link wait a few more minutes and try again. Clicking the link should take us to the default Nginx page.

Congratulations, you’ve successfully deployed a workload with Rancher and haven’t had to type a single character in the terminal to do it! Because your EKS cluster is managed with Rancher you get all the benefits of the Rancher platform, including authorization, which we will explore in the next section.

Set up Microsoft Active Directory

For this next step you’ll need to set up a Microsoft AD instance in AWS. If you already have one, you can skip this section.

Create VPC

Create SubNet

Start by going to your AWS console and selecting the Directory Service console, then click Set up directory > Microsoft AD. Your directory DNS should be a domain you control. Set an admin password and write it down; we’ll need it in a later step. Now click “Create a new VPC” and you will be taken to the VPC console in a new window. Click “Create VPC”. A popup should appear: name your VPC and specify a CIDR block of “10.0.0.0/16”. Let the other options default and create the VPC.

Create RouteTable

Once your VPC has finished creating you’ll need to add an internet gateway and edit the route table. First go to the internet gateway page and create a new internet gateway. Attach the gateway to your VPC. Now go back to the VPC console and select the VPC. Click on the route table on the Summary tab. Once you are on the route table console, go to the Routes tab and click “Edit”. Add a row for 0.0.0.0/0 and let the target default to the corresponding VPC gateway. Click save.

Now, go back to the create Directory Service screen, and click “Create a new Subnet”. You will be taken to the subnet console. Click “Create subnet” and a popup should appear. Name your subnet and select the VPC you just created. Give your subnet a CIDR block of 10.0.0.0/24. Select an availability zone for your subnet and click “Yes, Create” and your subnet will be created. Repeat the previous steps but create the next subnet with a CIDR block of 10.0.1.0/24.

Directory Details

Now that your subnets are created navigate back to the Directory Service screen and assign your subnets to the Directory Service. Now click “next step” and you will be taken to the review screen. Make sure your information is correct and then click “Create Microsoft AD”.

Your Microsoft AD instance will begin provisioning.

Configure Load Balancer

While your AD instance is creating, now is a great time to set up the Network Load Balancer. Go to the EC2 console to start, then click Load Balancers > Create Load Balancer > Network Load Balancer. Name your load balancer and make sure it is internet-facing. Add 2 listeners for ports 389 and 636. Make sure to select the VPC you created previously and check both of the subnets that you created.

Configure Routing

Click “Next: Configure routing” and you will be taken to the next screen. Name your target group and point it to port 389 with a Target type of “ip”. For the IP allowed ranges enter the values from the “DNS address” field on the Microsoft AD instance. Add a line for each address. Your screen should look something like this.

Now click “Review” to be taken to the review screen and once you have verified your information, click “Create”.

Create Load Balancer

Once your load balancer has created successfully go to the “Target Groups” screen and click “Create target group”. Name your target group and give it a TCP protocol, a port of 636, and a target type of “ip”. Make sure it is assigned to the VPC you created earlier and click “Create”. Now go back to your NLB and click on the listeners tab. Select the checkbox next to the TCP: 636 listener and click “Edit”. Set the default target group to the target group you just created and click “save”.

Now your load balancer is set up to route traffic to your AD instance. Once your AD instance is finished provisioning, you can connect it with Rancher.

Connecting AD and Rancher

Now that you have your AWS Microsoft AD instance started, you can add it to Rancher. Navigate to the Security > Authentication screen and select “Microsoft Active Directory”.

Active Directory

Enter in the hostname, default login domain, Admin username and password that you recorded earlier. The search base is baed on the information you entered should in the format “OU=,DC=,DC=,DC=”. So a directory with a NetBIOS name of “mydirectory” and a FQDN of “alpha.beta.com” would have a search base of “OU=mydirectory,DC=alpha,DC=beta,DC=com”.

Note that for the purposes of this demo we will be using the admin account, but later on you should create a different, reduced permission account for security purposes.

Once the information is entered, click “Authenticate” to verify the information and save the configuration. Now log out of rancher and attempt to log back in with the example user you created earlier.

Congratulations, you have now integrated Rancher with AWS AD!

Try logging in with the Admin account your recorded earlier when you created the Microsoft AD instance and it should complete successfully. Now when users are added to the AD instance they will automatically be able to log into Rancher.

Thank you for reading and we hope that you enjoyed this guide. If you have any questions feel free to reach out to us on the Rancher Forums (https://forums.rancher.com) or the Rancher Slack channel (https://slack.rancher.io).

To learn more about managing Kubernetes clusters on Rancher, sign up for our free online trainings.

Nathan Jenan

Nathan Jenan

Senior Software Engineer

Source

Introducing kustomize; Template-free Configuration Customization for Kubernetes

Introducing kustomize; Template-free Configuration Customization for Kubernetes

Authors: Jeff Regan (Google), Phil Wittrock (Google)

If you run a Kubernetes environment, chances are you’ve
customized a Kubernetes configuration — you’ve copied
some API object YAML files and editted them to suit
your needs.

But there are drawbacks to this approach — it can be
hard to go back to the source material and incorporate
any improvements that were made to it. Today Google is
announcing kustomize, a command-line tool
contributed as a subproject of SIG-CLI. The tool
provides a new, purely declarative approach to
configuration customization that adheres to and
leverages the familiar and carefully designed
Kubernetes API.

Here’s a common scenario. Somewhere on the internet you
find someone’s Kubernetes configuration for a content
management system. It’s a set of files containing YAML
specifications of Kubernetes API objects. Then, in some
corner of your own company you find a configuration for
a database to back that CMS — a database you prefer
because you know it well.

You want to use these together, somehow. Further, you
want to customize the files so that your resource
instances appear in the cluster with a label that
distinguishes them from a colleague’s resources who’s
doing the same thing in the same cluster.
You also want to set appropriate values for CPU, memory
and replica count.

Additionally, you’ll want multiple variants of the
entire configuration: a small variant (in terms of
computing resources used) devoted to testing and
experimentation, and a much larger variant devoted to
serving outside users in production. Likewise, other
teams will want their own variants.

This raises all sorts of questions. Do you copy your
configuration to multiple locations and edit them
independently? What if you have dozens of development
teams who need slightly different variations of the
stack? How do you maintain and upgrade the aspects of
configuration that they share in common? Workflows
using kustomize provide answers to these questions.

Customization is reuse

Kubernetes configurations aren’t code (being YAML
specifications of API objects, they are more strictly
viewed as data), but configuration lifecycle has many
similarities to code lifecycle.

You should keep configurations in version
control. Configuration owners aren’t necessarily the
same set of people as configuration
users. Configurations may be used as parts of a larger
whole. Users will want to reuse configurations for
different purposes.

One approach to configuration reuse, as with code
reuse, is to simply copy it all and customize the
copy. As with code, severing the connection to the
source material makes it difficult to benefit from
ongoing improvements to the source material. Taking
this approach with many teams or environments, each
with their own variants of a configuration, makes a
simple upgrade intractable.

Another approach to reuse is to express the source
material as a parameterized template. A tool processes
the template—executing any embedded scripting and
replacing parameters with desired values—to generate
the configuration. Reuse comes from using different
sets of values with the same template. The challenge
here is that the templates and value files are not
specifications of Kubernetes API resources. They are,
necessarily, a new thing, a new language, that wraps
the Kubernetes API. And yes, they can be powerful, but
bring with them learning and tooling costs. Different
teams want different changes—so almost every
specification that you can include in a YAML file
becomes a parameter that needs a value. As a result,
the value sets get large, since all parameters (that
don’t have trusted defaults) must be specified for
replacement. This defeats one of the goals of
reuse—keeping the differences between the variants
small in size and easy to understand in the absence of
a full resource declaration.

A new option for configuration customization

Compare that to kustomize, where the tool’s
behavior is determined by declarative specifications
expressed in a file called kustomization.yaml.

The kustomize program reads the file and the
Kubernetes API resource files it references, then emits
complete resources to standard output. This text output
can be further processed by other tools, or streamed
directly to kubectl for application to a cluster.

For example, if a file called kustomization.yaml
containing

commonLabels:
app: hello
resources:
– deployment.yaml
– configMap.yaml
– service.yaml

is in the current working directory, along with
the three resource files it mentions, then running

kustomize build

emits a YAML stream that includes the three given
resources, and adds a common label app: hello to
each resource.

Similarly, you can use a commonAnnotations field to
add an annotation to all resources, and a namePrefix
field to add a common prefix to all resource
names. This trivial yet common customization is just
the beginning.

A more common use case is that you’ll need multiple
variants of a common set of resources, e.g., a
development, staging and production variant.

For this purpose, kustomize supports the idea of an
overlay and a base. Both are represented by a
kustomization file. The base declares things that the
variants share in common (both resources and a common
customization of those resources), and the overlays
declare the differences.

Here’s a file system layout to manage a staging and
production variant of a given cluster app:

someapp/
├── base/
│ ├── kustomization.yaml
│ ├── deployment.yaml
│ ├── configMap.yaml
│ └── service.yaml
└── overlays/
├── production/
│ └── kustomization.yaml
│ ├── replica_count.yaml
└── staging/
├── kustomization.yaml
└── cpu_count.yaml

The file someapp/base/kustomization.yaml specifies the
common resources and common customizations to those
resources (e.g., they all get some label, name prefix
and annotation).

The contents of
someapp/overlays/production/kustomization.yaml could
be

commonLabels:
env: production
bases:
– ../../base
patches:
– replica_count.yaml

This kustomization specifies a patch file
replica_count.yaml, which could be:

apiVersion: apps/v1
kind: Deployment
metadata:
name: the-deployment
spec:
replicas: 100

A patch is a partial resource declaration, in this case
a patch of the deployment in
someapp/base/deployment.yaml, modifying only the
replicas count to handle production traffic.

The patch, being a partial deployment spec, has a clear
context and purpose and can be validated even if it’s
read in isolation from the remaining
configuration. It’s not just a context free tuple.

To create the resources for the production variant, run

kustomize build someapp/overlays/production

The result is printed to stdout as a set of complete
resources, ready to be applied to a cluster. A
similar command defines the staging environment.

In summary

With kustomize, you can manage an arbitrary number
of distinctly customized Kubernetes configurations
using only Kubernetes API resource files. Every
artifact that kustomize uses is plain YAML and can
be validated and processed as such. kustomize encourages
a fork/modify/rebase workflow.

To get started, try the hello world example.
For discussion and feedback, join the mailing list or
open an issue. Pull requests are welcome.

Source

Say Hello to Discuss Kubernetes

Author: Jorge Castro (Heptio)

Communication is key when it comes to engaging a community of over 35,000 people in a global and remote environment. Keeping track of everything in the Kubernetes community can be an overwhelming task. On one hand we have our official resources, like Stack Overflow, GitHub, and the mailing lists, and on the other we have more ephemeral resources like Slack, where you can hop in, chat with someone, and then go on your merry way.

Slack is great for casual and timely conversations and keeping up with other community members, but communication can’t be easily referenced in the future. Plus it can be hard to raise your hand in a room filled with 35,000 participants and find a voice. Mailing lists are useful when trying to reach a specific group of people with a particular ask and want to keep track of responses on the thread, but can be daunting with a large amount of people. Stack Overflow and GitHub are ideal for collaborating on projects or questions that involve code and need to be searchable in the future, but certain topics like “What’s your favorite CI/CD tool” or “Kubectl tips and tricks” are offtopic there.

While our current assortment of communication channels are valuable in their own rights, we found that there was still a gap between email and real time chat. Across the rest of the web, many other open source projects like Docker, Mozilla, Swift, Ghost, and Chef have had success building communities on top of Discourse, an open source discussion platform. So what if we could use this tool to bring our discussions together under a modern roof, with an open API, and perhaps not let so much of our information fade into the ether? There’s only one way to find out: Welcome to discuss.kubernetes.io

discuss_screenshot

Right off the bat we have categories that users can browse. Checking and posting in these categories allow users to participate in things they might be interested in without having to commit to subscribing to a list. Granular notification controls allow the users to subscribe to just the category or tag they want, and allow for responding to topics via email.

Ecosystem partners and developers now have a place where they can announce projects that they’re working on to users without wondering if it would be offtopic on an official list. We can make this place be not just about core Kubernetes, but about the hundreds of wonderful tools our community is building.

This new community forum gives people a place to go where they can discuss Kubernetes, and a sounding board for developers to make announcements of things happening around Kubernetes, all while being searchable and easily accessible to a wider audience.

Hop in and take a look. We’re just getting started, so you might want to begin by introducing yourself and then browsing around. Apps are also available for Android and iOS.

Source

Load Balancing on Kubernetes with Rancher

Build a CI/CD Pipeline with Kubernetes and Rancher 2.0

Recorded Online Meetup of best practices and tools for building pipelines with containers and kubernetes.

Watch the training

When it comes to containerizing user applications and deploying them on Kubernetes, incremental design is beneficial. First you figure out how to package your application into a container. Then, decide on a deployment model – do you want one container or multiple ones – any other scheduling rules, and configuring liveness and readines probes so that if the application goes down, Kubernetes can safely restore it.

The next step would be to expose the workload internally and/or externally, so that the workload can be reached by microservices in the same Kubernetes cluster, or – if it’s a user facing app – from the internet.

And as your application gets bigger, providing it with Load Balanced access becomes essential. This article focuses on various use cases requiring Load Balancers, and fun and easy ways to achieve load balancing with Kubernetes and Rancher.

L4 Load Balancing

Lets imagine you have an nginx webserver running as a Kubernetes workload on every node in the cluster. It was well tested locally, and the decision was made to go in production by exposing the service to the internet, and make sure the traffic is evenly distributed between the nodes the workload resides on. The easiest way to achieve this set up is by picking the L4 Load Balancer option when you open the port for the workload in the Rancher UI:

Imgur

As a result, the workload would get updated with a publicly available endpoint, and, if you click on it, the nginx application page would load:

Imgur

What happens behind the scenes

Smooth user experience implies some heavy lifting done on the backend. When a user creates a workload with Load Balancer port exposed via Rancher UI/API, two Kuberntes objects get created on the backend: the actual workload in the form of the Kubernetes deployment/daemonset/statefulset (depending on the workload type chosen) and the Service of type Load Balancer. The Load Balancer service in Kubernetes is a way to configure L4 TCP Load Balancer that would forward and balance traffic from the internet to your backend application. The actual Load Balancer gets configured by the cloud provider where your cluster resides:

Imgur

Limitations

  • Load Balancer Service is enabled on only certain Kubernetes Cluster Providers in Rancher; first of all on those supporting Kubernetes as a service:

Imgur

…and on the EC2 cloud provider where Rancher RKE acts as a Kubernetes cluster provisioner, under condition of the Cloud Provider being explicitly set to Amazon during the cluster creation:

ImgurImgur

  • Each Load Balancer Service gets its own LB IP Address, so it’s recommended to check your Cloud Provider’s pricing model given thats the use can be excessive.
  • L4 balancing only, no HTTP based routing.

L7 Load Balancing

Host and path based routing

The typical use case for host/path based routing is using a single IP (or the same set of IPs) to distribute traffic to multiple services. For example, a company needs to host two different applications – a website and chat – on the same set of public IP addresses. First they setup two separate applications to deliver these functions: Nginx for the website and LetsChat for the chat platform. Then by configuring the ingress resource via the Rancher UI, the traffic can be split between these two workloads based on the request coming in. If the request is coming for userdomain.com/chat, it will be directed to the LetsChat servers; if the request is for userdomain.com/website – it will be directed to the web servers:

Imgur

Rancher uses native Kubernetes capabilities when it comes to ingress configuration, as well as providing some nice extra features on top of it. One of them is an ability to point the ingress to the workload directly, saving users from creating a service – the only resource that can act as a target for an ingress resource.

Ingress controller

Ingress resource in Kubernetes is just a Load Balancer spec – a set of rules that have to be configured on an actual load balancer. The load balancer can be any system supporting reverse proxying, and it can be deployed as a standalone entity outside of kubernetes cluster, or run as a native Kubernetes application inside kubernetes pod(s). Below, we’ll provide example of both models.

Ingress Load Balancer outside of Kubernetes cluster

If a Kubernetes cluster is deployed on a public cloud having Load Balancing services, it can be used to backup the ingress resouce. For example, for Kubernetes clusters on Amazon, an ALB ingress controller can program ALB with ingress traffic routing rules:

Imgur

The controller itself would be deployed as a native Kubernetes app that would listen to ingress resource events, and program ALB accordingly. ALB ingress controller code can be found here: Core OS ALB ingress controller

When users hit the url userdomain.com/website, ALB would redirect the traffic to the corresponding Kubernetes Node Port service. Given the Load Balancer is external to the cluster, the service has to be of a NodePort type. A similar restriction applies to Ingress programming on GCE clusters.

Ingress Load Balancer as a native Kubernetes app

Let’s look at another model, where the ingress controller acts both as a resource programming Load Balancer records, and as a Load Balancer itself. A good example is the Nginx ingress controller – a controller that you get installed by default by RKE – Rancher’s native tool used to provision k8s clusters on clouds like Digital Ocean and vSphere.

The diagram below shows the deployment details of the nginx ingress controller:

Imgur

RKE deploys nginx ingress controller as a daemonset, which means every node in the cluster will get one nginx instance deployed as a Kubernetes pod. You can allocate limited sets of nodes for deployment using scheduling labels. Nginx acts like an ingress controller and the load balancer, meaning it programs itself with the ingress rules. Then, nginx gets exposed via NodePort service, so when a user’s request comes to snodeip/nodePort, it gets redirected to nginx ingress controller, and the controller would route the request based on hostname routing rules to the backend workload.

Programming ingress LB address to public DNS

By this point we’ve got some undestanding as to how path/hostname routing is implemented by an ingress controller. In the case where the LB is outside of the Kubernetes cluster, the user hits the URL, and based on URL contents, the Load Balancer redirects traffic to one of the Kubernetes nodes where the user application workload is exposed via NodePort service. In the case where the LB is running as a Kubernetes app, the Load Balancer exposes itself to the outside using Node Port service, and then balances traffic between the workloads’ pods internal IPs. In both cases, ingress would get updated with the address that the user has to hit in order to get to the Load Balancer:

Imgur

There is one question left unasnwered – who is actually responsible for mapping that address to the userdomain.com hostname from the URL the user would hit? You’d need to have some tool that would program a DNS service with these mappings. Here is one example of such a tool, from kubernetes-incubator project: external-dns. External-dns gets deployed as a kubernetes native application that runs in the pod, listens to an ingress, creates/updates events, and programs the DNS of your choice. The tool supports providers like AWS Route53, Google Cloud DNS, etc. It doesn’t come by default with a Kubernetes cluster, and has to be deployed on demand.

In Rancher, we wanted to make things easy for users who are just getting familiar with Kubernetes, and who simply want to deploy their first workload and try to balance traffic to it. The Requirement to setup DNS plugin in this case can be a bit excessive. By using xip.io integration, we make DNS programming automatic for simple use cases:

Imgur

Let’s check how it works with Rancher. When you create the ingress, pick Automatically generate .xip.io hostname… option:

Imgur

The hostname would get automatically generated, used as a hostname routing rule in ingress, and programmed as xip.io publicly available DNS record. So all you have to do is – use the generated hostname in your url:

Imgur

If you want to learn more about Load Balancing in Rancher…

Please join our upcoming online meetup: Kubernetes Networking Master Class! Since we released Rancher 2.0, we’ve fielded hundreds of questions about different networking choices on our Rancher Slack Channel and Forums. From overlay networking and SSL to ingress controllers and network security policies, we’ve seen many users get hung up on Kubernetes networking challenges. In our June online meetup, we’ll be diving deep into Kubernetes networking, and discussing best practices for a wide variety of deployment options. Register here.

Alena Prokharchyk

Alena Prokharchyk

Software Engineer

Source

4 Years of K8s – Kubernetes

4 Years of K8s

Author: Joe Beda (CTO and Founder, Heptio)

On June 6, 2014 I checked in the first commit of what would become the public repository for Kubernetes. Many would assume that is where the story starts. It is the beginning of history, right? But that really doesn’t tell the whole story.

k8s_first_commit

The cast leading up to that commit was large and the success for Kubernetes since then is owed to an ever larger cast.

Kubernetes was built on ideas that had been proven out at Google over the previous ten years with Borg. And Borg, itself, owed its existence to even earlier efforts at Google and beyond.

Concretely, Kubernetes started as some prototypes from Brendan Burns combined with ongoing work from me and Craig McLuckie to better align the internal Google experience with the Google Cloud experience. Brendan, Craig, and I really wanted people to use this, so we made the case to build out this prototype as an open source project that would bring the best ideas from Borg out into the open.

After we got the nod, it was time to actually build the system. We took Brendan’s prototype (in Java), rewrote it in Go, and built just enough to get the core ideas across. By this time the team had grown to include Ville Aikas, Tim Hockin, Brian Grant, Dawn Chen and Daniel Smith. Once we had something working, someone had to sign up to clean things up to get it ready for public launch. That ended up being me. Not knowing the significance at the time, I created a new repo, moved things over, and checked it in. So while I have the first public commit to the repo, there was work underway well before that.

The version of Kubernetes at that point was really just a shadow of what it was to become. The core concepts were there but it was very raw. For example, Pods were called Tasks. That was changed a day before we went public. All of this led up to the public announcement of Kubernetes on June 10th, 2014 in a keynote from Eric Brewer at the first DockerCon. You can watch that video here:

But, however raw, that modest start was enough to pique the interest of a community that started strong and has only gotten stronger. Over the past four years Kubernetes has exceeded the expectations of all of us that were there early on. We owe the Kubernetes community a huge debt. The success the project has seen is based not just on code and technology but also the way that an amazing group of people have come together to create something special. The best expression of this is the set of Kubernetes values that Sarah Novotny helped curate.

Here is to another 4 years and beyond! 🎉🎉🎉

Source

Cluster and Workload Alerts in Rancher 2.0

Expert Training in Kubernetes and Rancher

Join our free online training sessions to learn how to manage Kubernetes workloads with Rancher.

Sign up here

Some of the cool new features that have been introduced in Rancher 2.0 include Cluster and Workload Alerting. These features were frequently asked for under 1.x, so were high on the feature list for when we started development on 2.0. This article will focus exclusively on the new Alerting features, but is part of a series that will cover additional new aspects of Rancher 2.0.

NOTIFIERS

The Alerting feature lets you create customised alerts and have those alerts sent to a number of backend systems.

The first step is to create a notifier. Notifiers are created at the cluster level. Select the Tools drop down and then select Notifiers. Clicking Add Notifier will then bring up a modal window that allows you to pick from the following options.

notifiers

When you choose one of these options the various configuration parameters are then made available. In the example for Slack, below, you can see that there is a link that shows how to configure the notifier.

Configure notifiers

Adding in valid information will then allow for a test to be sent to the notifier. An example of the slack notification is below.

Incoming Webhook

The webhook notifier should allow for notifications to be sent to a variety of systems that can then have a workflow that can handle the specific alert that has been triggered.

CLUSTER LEVEL ALERTS

Back under the Tools drop down there is an option for Alerts. There are a few preconfigured alerts; these alerts, however, will not trigger until they are associated with a notifier.

Associating one of these with a notifier is as simple as editing the alert, setting the notifier, and saving.

To create a new alert, simply click Add Alert and you will be presented with

Add Alerts

As you can see there are several options that you can set with alerts and these can be related to system or user resources. At the cluster level, you would set alerts based on cluster-wide resources, such as Node or the actual Kubernetes components.

WORKLOAD LEVEL ALERTS

Workload alerts are set within the project context. Under the Resources drop down there is an Alerts menu item, within here clicking add will bring up the following.

Add Workload Alerts

Within the Project alerts you would set alerts relating to your actual application workloads, for example if your service wasn’t running at the scale that you had set, or had restarted a certain number of times in a specified time period.

CONCLUSION

This blog was intended to provide a brief overview of one of the newer features that we introduced in Rancher 2.0. We are looking to enhance these features further so keep checking for updates.

In addition, our online trainings provide a live demo of setting up Alerts. Check the trainings out here.

Chris Urwin

Chris Urwin, UK Technical Lead

Source

Dynamic Ingress in Kubernetes – Kubernetes

Author: Richard Li (Datawire)

Kubernetes makes it easy to deploy applications that consist of many microservices, but one of the key challenges with this type of architecture is dynamically routing ingress traffic to each of these services. One approach is Ambassador, a Kubernetes-native open source API Gateway built on the Envoy Proxy. Ambassador is designed for dynamic environment where services may come and go frequently.

Ambassador is configured using Kubernetes annotations. Annotations are used to configure specific mappings from a given Kubernetes service to a particular URL. A mapping can include a number of annotations for configuring a route. Examples include rate limiting, protocol, cross-origin request sharing, traffic shadowing, and routing rules.

A Basic Ambassador Example

Ambassador is typically installed as a Kubernetes deployment, and is also available as a Helm chart. To configure Ambassador, create a Kubernetes service with the Ambassador annotations. Here is an example that configures Ambassador to route requests to /httpbin/ to the public httpbin.org service:

apiVersion: v1
kind: Service
metadata:
name: httpbin
annotations:
getambassador.io/config: |

apiVersion: ambassador/v0
kind: Mapping
name: httpbin_mapping
prefix: /httpbin/
service: httpbin.org:80
host_rewrite: httpbin.org
spec:
type: ClusterIP
ports:
– port: 80

A mapping object is created with a prefix of /httpbin/ and a service name of httpbin.org. The host_rewrite annotation specifies that the HTTP host header should be set to httpbin.org.

Kubeflow

Kubeflow provides a simple way to easily deploy machine learning infrastructure on Kubernetes. The Kubeflow team needed a proxy that provided a central point of authentication and routing to the wide range of services used in Kubeflow, many of which are ephemeral in nature.

kubeflow

Kubeflow architecture, pre-Ambassador

Service configuration

With Ambassador, Kubeflow can use a distributed model for configuration. Instead of a central configuration file, Ambassador allows each service to configure its route in Ambassador via Kubernetes annotations. Here is a simplified example configuration:


apiVersion: ambassador/v0
kind: Mapping
name: tfserving-mapping-test-post
prefix: /models/test/
rewrite: /model/test/:predict
method: POST
service: test.kubeflow:8000

In this example, the “test” service uses Ambassador annotations to dynamically configure a route to the service, triggered only when the HTTP method is a POST, and the annotation also specifies a rewrite rule.

Kubeflow and Ambassador

kubeflow-ambassador

With Ambassador, Kubeflow manages routing easily with Kubernetes annotations. Kubeflow configures a single ingress object that directs traffic to Ambassador, then creates services with Ambassador annotations as needed to direct traffic to specific backends. For example, when deploying TensorFlow services, Kubeflow creates and and annotates a K8s service so that the model will be served at https:///models//. Kubeflow can also use the Envoy Proxy to do the actual L7 routing. Using Ambassador, Kubeflow takes advantage of additional routing configuration like URL rewriting and method-based routing.

If you’re interested in using Ambassador with Kubeflow, the standard Kubeflow install automatically installs and configures Ambassador.

If you’re interested in using Ambassador as an API Gateway or Kubernetes ingress solution for your non-Kubeflow services, check out the Getting Started with Ambassador guide.

Source

Introducing Jetstack – Jetstack Blog

By Matt Barker

I made the cut as a millennial by one year. The rate of technological change I have witnessed over the years is amazing. I’ve seen the birth of the web, the first mobile phones in the playground, and the flurry of excitement as the university computing lab is introduced to ‘thefacebook’.

When I imagine the next twenty years of technology, I see three big drivers:

Thanks in part to my early career, open source is part of my dna. Even 5 years ago it was beyond belief that Microsoft would open source .NET

Proprietary software will always have its place, but open software is taking over as the primary delivery method, mainly because it enables rapid adoption, facilitates innovation, and allows software to evolve naturally.

When you buy electricity to power your home, there is no interaction with the service other than a monthly bill from your energy supplier. With the move towards platform services in the cloud, compute is rapidly going the same way.

You might ask whether you should use ‘private clouds, or hybrid clouds’? And yes, there will be a short-term need for them. But running and maintaining on-premise generators will never be able to compete with the pricing and scale of the national grid. As Simon Wardley points out, the hybrid cloud you should be aiming for is public – public, not private – public.

Just as ubiquitous access to electricity in the early 1900s enabled an explosion of innovation in the appliance space, ubiquitous availability of compute will do the same for the application.

“There were 5 exabytes of information created between the dawn of civilization through 2003, but that much information is now created every 2 days.” – Eric Schmidt, Google, 2010

Software like Hadoop and NoSQL have given us a brilliant way to store and process data of this magnitude. Trends like ‘the internet of things’ will contribute to the exponential growth of information and fuel further adoption of these products. As we gain access to more data, the processing power needed to gain relevant insights from it will become more precious and important.

Back when I was talking to customers about Ubuntu, they loved the concept of a cut-down version of the operating system servicing lightweight applications. What we built was similar to a rudimentary microservices architecture. This was good in theory, but in practice it took a lot of effort.

As soon as I saw the container world developing I started to get excited. Why? Because Containerisation allows you to deliver this architecture more easily, and take advantage of the trends described above. This is achieved in the following ways:

Containers improve density. Because containers are light-weight you can run more on a platform than you can virtual machines. This gives you more effective use of compute resource when storing and processing data.

Containers speed delivery to production. Ever put an application into test only for it to break? Containers are free of dependencies and allow you to deploy the same image in production as you did in development. That means less time spent fixing code.

Containers make your application portable. Dependency freedom now means portability. Not getting a good deal from one cloud provider? Quickly and easily move it to another and reap the rewards straight away.

Containers improve development practice. Less time spinning up VMs, and arguing about whether ‘it worked on my laptop’ means more time for what actually matters – the application you are building for your customers and the value it brings to them.

Jetstack was founded to take advantage of container technology, and free you up to work on your application. We do this by:

  • containerising your application
  • moving it to the cloud (private or public)
  • managing the infrastructure

Although we will be packaging the best of breed technology needed to build this platform, delivering the tools themselves isn’t the goal.

What we want to do is allow you to focus on what really matters – the value you provide to your end users.

If you’d like to find out more about how and why you should use containers, we’ve created an independent Meetup group called Contain you can join here.

If you want to get in touch directly, email me here: matt@jetstack.io

Source

Automate DNS Configuration with ExternalDNS

Take a deep dive into Best Practices in Kubernetes Networking

From overlay networking and SSL to ingress controllers and network security policies, we’ve seen many users get hung up on Kubernetes networking challenges. In this video recording, we dive into Kubernetes networking, and discuss best practices for a wide variety of deployment options.

Watch the video

One of the awesome things about being in the Kubernetes community is the
constant evolution of technologies in the space. There’s so much
purposeful technical innovation that it’s nearly impossible to keep an
eye on every useful project. One such project that recently escaped my
notice is the ExternalDNS subproject. During a recent POC, a member of
the organization to whom we were speaking asked about it. I promised to
give the subproject a go and I was really impressed.

The ExternalDNS subproject

This subproject (the incubator process has been deprecated), sponsored
by sig-network and championed by Tim
Hockin
, is designed to automatically
configure cloud DNS providers. This is important because it further
enables infrastructure automation allowing DNS configuration to be
accomplished directly alongside application deployment.

Unlike a traditional enterprise deployment model where multiple siloed
business units handle different parts of the deployment process,
Kubernetes with ExternalDNS automates this part of the process. This
removes the potentially aggravating process of having a piece of
software ready to go while waiting for another business unit to
hand-configure DNS. The collaboration via automation and shared
responsibility that can happen with this technology prevents manual
configuration errors and enables all parties to more efficiently get
their products to market.

ExternalDNS Configuration and Deployment on AKS

Those of you who know me, know that I spent many years as a software
developer in the .NET space. I have a special place in my heart for the
Microsoft developer community and as such I have spent much of the last
couple of years sharing Kubernetes on Azure via Azure Container Service
and Azure Kubernetes Service with the user groups and meetups in the
Philadelphia region. It just so happens the persons asking me about
ExternalDNS are leveraging Azure as an IaaS offering. So, I decided to
spin up ExternalDNS on an AKS cluster. For step by step instructions and
helper code check out this
repository
.
If you’re using a different provider, you may still find these
instructions useful. Check out the ExternalDNS
repository
for
more information.

Jason Van Brackel

Jason Van Brackel

Senior Solutions Architect

Jason van Brackel is a Senior Solutions Architect for Rancher. He is also the organizer of the Kubernetes Philly Meetup and loves teaching at code camps, user groups and other meetups. Having worked professionally with everything from COBOL to Go, Jason loves learning, and solving challenging problems.

Source