
Some 20 years ago when the World Wide Web was still in its infancy, having a personal or business web site was almost a rare luxury. With the subsequent development of several web technologies and the introduction of dynamic content provided by the combination of server-side programs and databases, companies could no longer be satisfied with having a static web site.

Install and Configure Django in CentOS and Debian – Part 1
Thus, web applications became a reality – programs in the full sense of the word running on top of a web server and accessible through a web browser.
To make development easier and more effective, web frameworks were designed to aid programmers in their efforts to create applications. In short, a web framework takes care of common core functionalities in the development process such as dealing with user session management, interaction with databases, and the good practice of keeping business logic separate from display logic, to name a few examples.
In this 3-article Django series, we will introduce you to Django, a popular web framework based on Python. For that reason, at least a little familiarity with this programming language is suggested but if you have little to no experience with it, we’ll also walk you through the basics.
Installing Django in CentOS and Debian Servers
Although you can install Django from both the Debian (v1.7.7: extended support will be discontinued on December 2015) and Fedora EPEL (v1.6.11: extended support was discontinued on April 2015) repositories, the available version is not the latest stable LTS (Long Term Support) release (v1.8.13, as of May 2016).
In this tutorial we will show you how to install Django v1.8.13 since its extended support is guaranteed until at least April of 2018.
The recommended method to install Django is through pip, a popular tool for managing Python packages. Also, in order to create isolated Python environments and avoid conflicts between projects that may require different versions of software dependencies, the use of virtual environments is highly encouraged.
The tools that are used to create and manage virtual Python environments is called virtualenv.
Follow these steps to perform the installation:
1. For Fedora-based distributions (except in Fedora itself), enable the EPEL repository first:
# yum update && yum install epel-release
2. Install pip and virtualenv:
Fedora-based distros:
# yum install python-pip python-virtualenv
OR
# dnf install python-pip python-virtualenv
Debian and derivatives:
# aptitude update && aptitude install python-pip virtualenv
3. Create a directory to store your initial project.
# mkdir ~/myfirstdjangoenv
# cd ~/myfirstdjangoenv
4. Create and activate a virtual environment:
# virtualenv myfirstdjangoenv
The above command creates a bunch of files and subdirectories into ~/myfirstdjangoenv and basically installs a local copy of Python and pip within the current working directory. Next, we need to activate the virtual environment we just created:
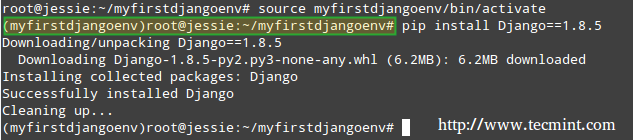
# source myfirstdjangoenv/bin/activate
5. Notice how the command prompt changes after the last command. It’s now time to install Django:
Note that the below screenshot was taken during a previous version of this tutorial, but the expected output is the same when installing Django 1.8.13):
# pip install Django==1.8.13
Install Django in Linux: CentOS and Debian
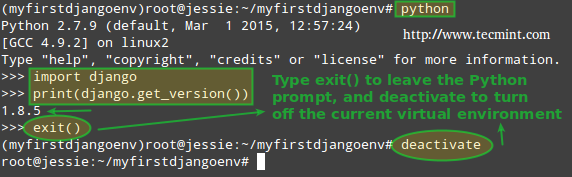
You can check the Django version by launching a Python shell from your current working directory:
# python
>>> import django
>>> print(django.get_version())
(Again, the above command should return 1.8.13 when checking the current Django version).
To exit the Python prompt, type:
>>> exit()
and press Enter. Next, turn off the virtual environment:
# deactivate
Deactive Django Virtual Environment
Please note that while the virtual environment remains deactivated, Django is not available:
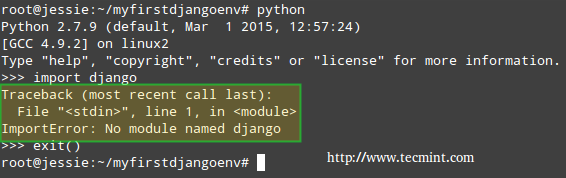
Django Error
How to Create a First Project in Django
To create a project within the virtual environment we created earlier, it needs to be activated:
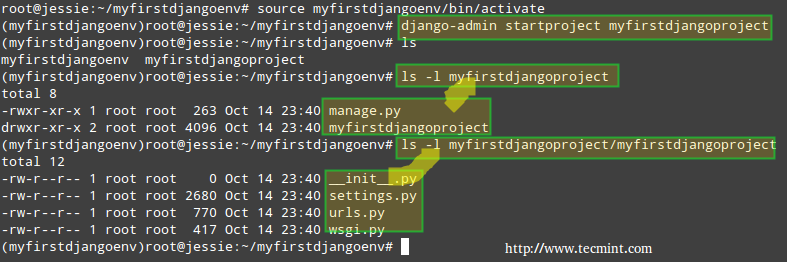
# source myfirstdjangoenv/bin/activate
Next, the framework will create the entire directory structure to store your project. To do this, you will need to run.
# django-admin startproject myfirstdjangoproject
The above command will create a directory named myfirstdjangoproject inside your current working directory.
where you will find a file named manage.py (an utility that will help you manage your project later on) and another subdirectory (~/myfirstdjangoenv/myfirstdjangoproject/myfirstdjangoproject). This last subdirectory will serve as the container for the project files.
While the rest of the files will make real sense after we have reviewed some Python to start writing a real web application, it is worth and well to take note of the key files that will be found inside a project container directory:
- myfirstdjangoproject/__init__.py: This empty file tells Python that this directory should be considered a Python package.
- myfirstdjangoproject/settings.py: Specific settings for this Django project.
- myfirstdjangoproject/urls.py: a TOC (Table Of Contents) of your Django-powered site.
- myfirstdjangoproject/wsgi.py: An entry-point for WSGI-compatible web servers to serve your project.
# ls
# ls -l myfirstdjangoproject
# ls -l myfirstdjangoproject/myfirstdjangoproject
Create Django Project
In addition, Django has a lightweight built-in web server (written in Python similar to Python SimpleHTTP, what else?) that can be used to test your applications during the development process without having to deal with the task of setting a web server at this particular stage.
However, you need to know that this is not suitable for a production environment – just for development. To launch your newly created project, change your current working directory to the container directory for your project (~/myfirstdjangoenv/myfirstdjangoproject) and run:
# python manage.py runserver 0.0.0.0:8000
If you run into the following error:
You have unapplied migrations; your app may not work properly until they are applied.
Run 'python manage.py migrate' to apply them.
Do what it says:
# python manage.py migrate
and then start the server again:
# python manage.py runserver 0.0.0.0:8000
We will cover the concept of migrations in the next articles of this series, so you can disregard the error message for the time being.
In any event, you can change the default port where the built-in web server will be listening. By using 0.0.0.0 as the network interface to listen on, we allow other computers in the same network to access the project user interface (if you use 127.0.0.1 instead, you will only be able to access the UI from localhost).
You can also change the port to another one of your choosing, but you’ll also need to make sure that traffic through such port is allowed through your firewall:
# firewall-cmd --add-port=8000/tcp
# firewall-cmd --permanent --add-port=8000/tcp
Of course, it goes without saying that you will need to update the allowed port if you choose to use a different one while launching the lightweight web server.
You should see the following output in your terminal:
# python manage.py runserver 0.0.0.0:8000
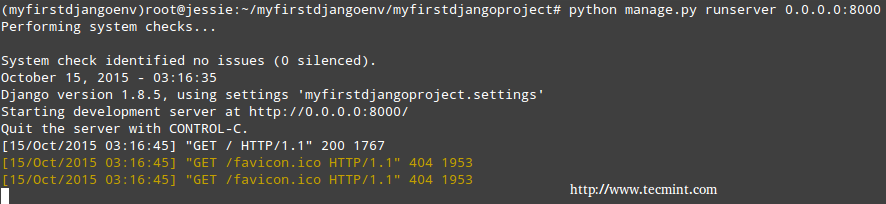
Start Django HTTP Server
At this point, you can open your favorite web browser and navigate to the IP address of the machine where you installed Django followed by the port number. In my case, it is a Debian Jessie box with IP 192.168.0.25 and listening on port 8000:
http://192.168.0.25:8000

Django HTTP Server
While it’s a great thing that we were able to complete the initial setup of a project, there is still much work left to do, as indicated in the message above.
Summary
In this guide we have explained how to install and configure a virtual environment for Django, a versatile open source web framework based on Python.
Regardless of whether you are an application developer or a system administrator, you will want to bookmark this article and the rest of this series because chances are that at some point or another you will need to consider the need of such tool for your daily tasks.
In the following articles of this series we will discuss how to build on what we have already accomplished to create a simple, yet functional, web application using Django and Python.
As we briefly commented on the last article of this series, Django is a free and open source web framework that turns application development into a faster task done in a more effective way – from the programmer’s point of view.
Installing and Configuring Django Web Framework with Virtual Environments – Part 1
Create Web Applications Using Django – Part 2
To do so, Django follows the MVC (Model – View – Controller) design pattern, or as their FAQs state, it can better be described as a MTV (Model – Template – View) framework.
In Django, a “view” describes which data is presented to the user, whereas a template describes how the data is presented. Finally, the model is the source of information about data in the application.
In this article we will review some Python basics and explain how to prepare your environment to create a simple web application in the next tutorial.
Learn Some Python Basics
As an object-oriented programming language, Python organizes things into a collection of objects with properties (also known as attributes) and methods (also known as actions). This allows us to define an object once and then to create multiple instances of such objects with the same structure of properties and methods without having to write everything from scratch every time. Objects are thus defined by classes that represent them.
For example, a Person object could be defined as follows:
Properties:
- Person.height
- Person.weight
- Person.age
- Person.ethniticity
Methods:
- Person.eat()
- Person.sleep()
- Person.walk()
As in most programming languages, a property is defined by the object’s name followed by a dot and the attribute’s name, whereas a method is indicated in the same fashion but also followed by a pair of parentheses (which may be empty or not – in the latter case, it may contain a variable upon whose value the method will act, such as Person.eat(cake) or Person.sleep(now), to name a few examples).
To define methods in Python, you will use the def keyword, followed by the method’s name and a set of parentheses, with an optional object as you will see in a minute.
All of this will become much clearer during the next section where we will dive into a real example.
Creating the structure of a web application
As you may recall from Part 1 of this Django series, we said that a web application requires a database to store data. When you create an app, Django automatically sets up a Sqlite database that works just fine for small to middle size applications, and is what we will use in this case to store data for a classic first-time web app: a blog.
To start a new application inside of a project (by the way, you can think of a project as a collection of web applications), run the following command after activating the virtual environment we set up in Part 1 of this series.
# cd ~/myfirstdjangoenv/
# source myfirstdjangoenv/bin/activate
# cd ~/myfirstdjangoenv/myfirstdjangoproject
# python manage.py startapp myblog
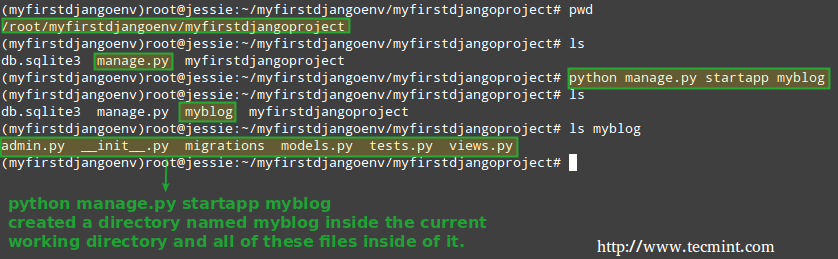
Create Web Application Project in Django
Note that you can change the app’s name (myblog) for a name of your choosing – this is only an identifier for the application (please note that all management tasks are invoked using the manage.py script via the python binary – feel free to explore its source code if you have a minute):
Now let’s go inside the inner myfirstdjangoproject directory and find the file settings.py, where we will tell Django to use myblog as an application:
# cd ~/myfirstdjangoenv/myfirstdjangoproject/myfirstdjangoproject

My Django Web Project
Look for the INSTALLED_APPS section and add myblog inside single quotes as shown below:
INSTALLED_APPS = (
    'django.contrib.admin',
    'django.contrib.auth',
    'django.contrib.contenttypes',
    'django.contrib.sessions',
    'django.contrib.messages',
    'django.contrib.staticfiles',
    'myblog'
)
(By the way, the lines beginning with django above represent other Django applications that are activated in the current project automatically when it is first created and are supposed to aid the developer in writing code related to administration, authentication, content type declarations, and so on, in his / her application).
Thus, myblog will become activated, along with the other built-in applications, in this Django instance.
Understanding about Django models
Up to this point, you have the basic directory structure of a web application but we still need to create the models (each model will be a separate class that represents an object in our application).
Another thing that you need to know about Django models is that every attribute represents a database field where the corresponding value will be stored.
Now, return to the myblog directory and edit the file models.py, where we will define the objects for our application:
# cd /myfirstdjangoenv/myfirstdjangoproject/myblog

Configure Django Models
It is VERY important that you pay close attention to indentation in .py files. Since this is Python, the models will not work if the indentation is not set evenly and properly. Please refer to the comments below for further clarification on what we’re doing:
- Lines starting with the from keyword indicate that we are importing modules (or predefined objects) from an existing file or library (django.db and django.utils, in this case, are located inside /root/myfirstdjangoenv/myfirstdjangoenv/lib/python2.7/site-packages/django/db and utils, respectively.
- Each model is defined through a class that derives from django.db.models.Model, which tells Django that it should be saved in the database.
- Following the class declaration, you will find the properties of each Post object and then the def keyword that defines the methods for the object.
- The blank=False and null=False directives in a field declaration indicate that such fields are required.
- ForeignKey indicates that the author of a post must have been created previously using the auth.Usermodule (we will show you how to do that in the next article of this series).
- Finally, the self keyword refers to the current object and represents a shortcut to accessing its properties and methods.
You can read more about model field declarations in the docs.
So here’s our models.py:
from django.db import models
from django.utils import timezone
# Create your models here.
class Post(models.Model):
        author = models.ForeignKey('auth.User')
        title = models.CharField(max_length=200, blank=False, null=False)
        text = models.TextField(blank=False, null=False)
        whenCreated = models.DateTimeField(default=timezone.now)
        whenPublished = models.DateTimeField(blank=True, null=True)

        def publish(self):
                self.whenPublished = timezone.now()
                self.save()

        def __str__(self):
                return self.title
Creating Django Database and Admin User
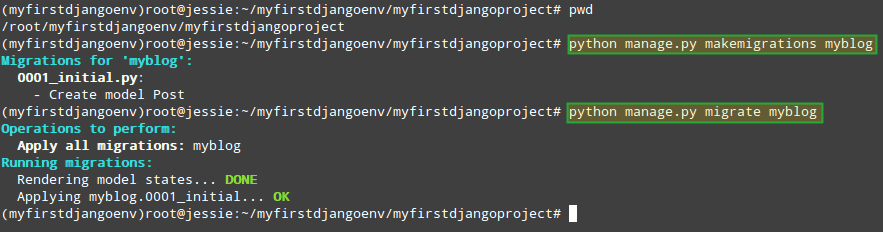
As we mentioned earlier, the Post model must be migrated to the database in order to store the data associated with each instance of it. If you make changes to your model later, you will need to repeat this step:
# cd ~/myfirstdjangoenv/myfirstdjangoproject
# python manage.py makemigrations myblog
# python manage.py migrate myblog
Create Django Database
To create an administrative user for your application (this will allow us to manage our application using a web interface), do:
# python manage.py createsuperuser
and enter the required information when prompted to do so:

Create Django Web Admin User
However, in order for our application to be managed through the admin interface, it needs to be registered in ~/myfirstdjangoenv/myfirstdjangoproject/myblog/admin.py:
from django.contrib import admin
from .models import Post
# Register your models here.
admin.site.register(Post)
Now go ahead and start the server:
# cd ~/myfirstdjangoenv/myfirstdjangoproject
# python manage.py runserver 0.0.0.0:8000
and point your web browser to 192.168.0.25:8000/admin. Enter the user credentials created earlier to log on:
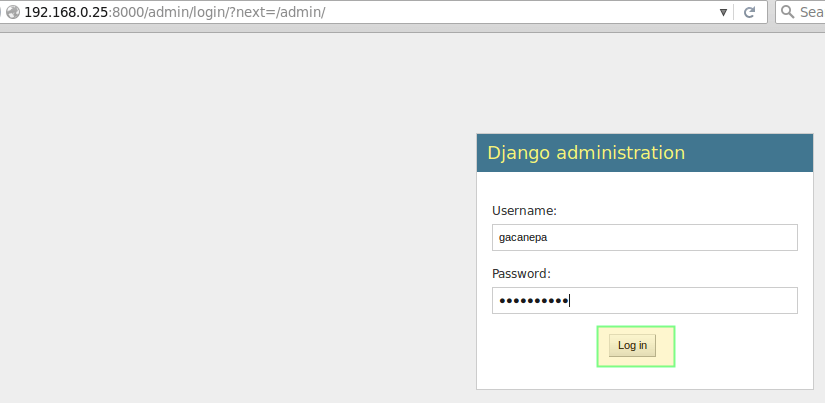
Django Web Administration
If you followed the steps outlined above, you will be taken to the Django admin interface. Pay particular attention to the Users module, which we will use to create the objects required to define the post authors in our blog:
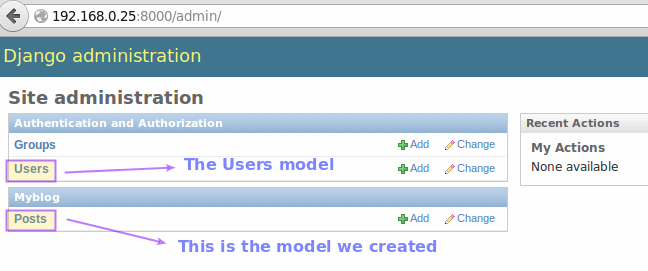
Django User Module
We will use this administration area to create objects of type User and Post in the next article. By now, you can stop the web server by pressing Ctrl + C in the same terminal window where you started it.
Important Points to remember
Through the use of models, we can create objects for our application and migrate them easily to the underlying database. Thanks to the fact that Django takes care of creating the directory structure and the files that require minimum editing we can focus in the programming side of things, which translates into time savings and equates to a happier developer.
Summary
In this tutorial we have discussed some basic concepts of object-oriented programming in Python and explained how to create the directory structure for our web application using Django.
In the next (and final) guide of this series, we will make use of the Post model to create objects and work on the frontend of our application to display the posts in our blog in a mobile-friendly format.
In Part 1 of this series you learned how to install and configure Django in a virtual environment and you created the skeleton of your first project.
Then in Part 2 we created an application and a model for Post objects, which we later migrated to the database. Finally, we showed you how to integrate your newly created application to the Django administration user interface.
These articles are part of Django series:
Installing and Configuring Django Web Framework with Virtual Environments – Part 1
Reviewing Python Basics and Creating Your First Web Application with Django – Part 2
Creating Mobile Friendly Web Application with Django – Part 3
In this final guide we will discuss how to access the application using the UI and how to make it mobile-friendly for all kind of devices. That said, let’s get started.
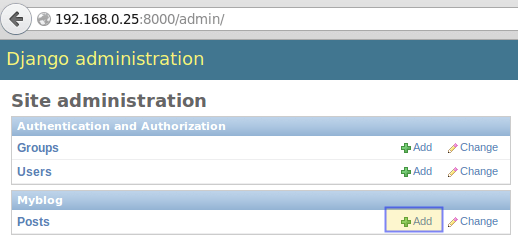
Creating objects via the Django admin interface
To create objects of type Post (remember that is the model we defined in Part 2 of this series), we will use the Django admin interface.
Make sure the Django built-in web server is running on port 8000 (or another one of your choosing) by running the following command from the outer myfirstdjangoproject directory:
# cd ~/myfirstdjangoenv/myfirstdjangoproject
# python manage.py runserver 0.0.0.0:8000
Now open your web browser and point to http://ip-address:8000/admin, then log on using the credentials you set up in the previous article and start writing a post (which, again, will create an object of type Post and insert the associated data into the underlying database):
Django Administration
Repeat the process 2 or 3 times:
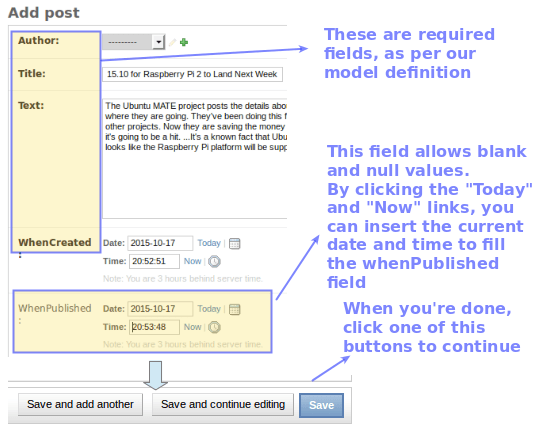
Create Object in Django
After we have created a couple of posts, let’s see what we need to do in order to display them using our web browser.
Our initial view
Our first view (~/myfirstdjangoenv/myfirstdjangoproject/myblog/views.py) will be in charge of filtering all Postobjects and returning those where the value of whenPublished is less than or equal to the current date and time (whenPublished__lte=timezone.now()) ordered by descending whenPublished, which is the same as saying “latest first“.
These objects are saved into a variable conveniently named posts, and are returned (identified as allposts) to be embedded in the HTML, as we will see in the next section:
from django.shortcuts import render
from .models import Post
from django.utils import timezone
def posts(request):
        posts = Post.objects.filter(whenPublished__lte=timezone.now()).order_by('-whenPublished')
        return render(request, 'myblog/posts.html', {'allposts': posts})
Finally, the double underscore in whenPublished__lte above is used to separate a database field (whenPublished) from a filter or an operation (lte = less than or equal).
Once we have defined our initial view, let’s work on the associated template.
Create Template for our first Project
Following the directives and paths given in the previous section, we will store our initial template inside myblog/templates/myblog. This means you will need to create a directory named templates and a subdirectory called myblog:
# cd ~/myfirstdjangoenv/myfirstdjangoproject/myblog
# mkdir -p templates/myblog
We will call the template posts.html and insert the following code in it. You will notice that we are adding online references to jQuery, Bootstrap, FontAwesome, and Google fonts.
In addition, we have enclosed Python code inside curly brackets inside the HTML. Please note that for every object of type Post we will show its title, its published date and author, and finally its text. Finally, in red you will see that we make a reference to the objects returned via myblog/views.py:
Ok, here’s the posts.html file:
<!DOCTYPE html>
<html lang="en">
<head>
<meta charset="utf-8"/>
<link rel="stylesheet" href="https://maxcdn.bootstrapcdn.com/bootstrap/3.3.5/css/bootstrap.min.css">
<link href='https://fonts.googleapis.com/css?family=Indie+Flower' rel='stylesheet' type='text/css'>
<link href='https://fonts.googleapis.com/css?family=Pacifico' rel='stylesheet' type='text/css'>
<link href="https://maxcdn.bootstrapcdn.com/font-awesome/4.4.0/css/font-awesome.min.css" rel="stylesheet" type='text/css'">
<script src="https://code.jquery.com/jquery-2.1.4.min.js">
</script>
    <style>
      .title {
        font-family: 'Indie Flower', serif;
        font-size: 30px;
        color: #1E90FF;
      }
      h1 {
        font-family: 'Pacifico', serif;
        font-size: 45px;
        color: #1E90FF;
      }
    </style>
</head>
<body>
<div class="container"><h1>My blog</h1><br>
{% for post in allposts %}
    <div>
        <div class="title">{{ post.title }}</div>
        <strong>Published on {{ post.whenPublished }} by {{ post.author }}.</strong>
        <p>{{ post.text|linebreaks }}</p>
    </div>
{% endfor %}
</div>
</body>
</html>
In the above template, the linebreaks filter is used to replace line breaks in plain text with the corresponding HTML equivalent (<br /> or </p>) to format each post properly with paragraph separation.
Next, we need to set up a mapping between URLs in our application and the corresponding views that return the data. To do so, create a file named urls.py inside myblog with the following content:
from django.conf.urls import url
from . import views
urlpatterns = [
    url(r'^$', views.posts, name='posts'),
]
The r'^$' deserves a little more explanation. The leading r instructs Django to treat the string inside single quotes as a regular expression.
In particular, r'^$' represents an empty string so that when we point our browser to http://ip-address:8000 (and nothing else), the data returned by the variable posts inside views.py (refer to the previous section) will be presented in our home page:
Last, but not least, we will include the urls.py file of our blog application (~/myfirstdjangoenv/myfirstdjangoproject/myblog/urls.py) into the urls.py of our main project (~/myfirstdjangoenv/myfirstdjangoproject/myfirstdjangoproject/urls.py):
from django.conf.urls import include, url
from django.contrib import admin

urlpatterns = [
    url(r'^admin/', include(admin.site.urls)),
    url(r'', include('myblog.urls')),
]
Then let’s start the web server:
# cd ~/myfirstdjangoenv/myfirstdjangoproject
# python manage.py runserver 0.0.0.0:8000
We should now be able to see the lists of posts we created earlier:
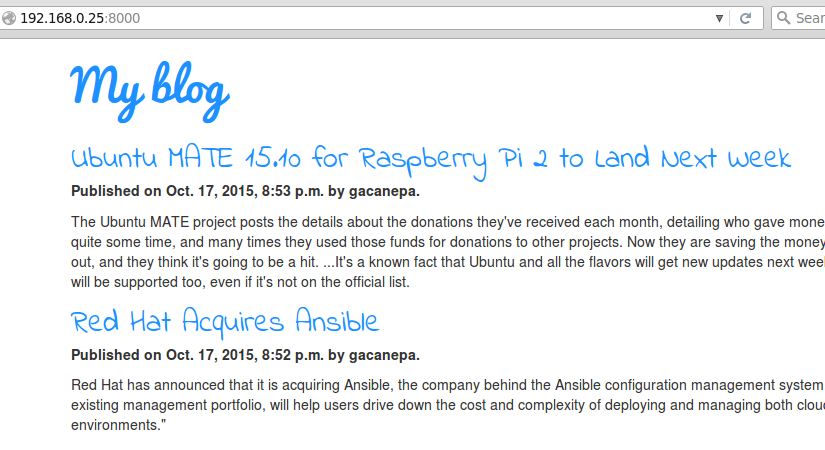
Check My Django Web Project
Thanks to Bootstrap, you can still have an excellent visualization in a smaller device:

Mobile Responsive Look of My Project
Summing Up
Let’s now review the concepts that we have covered in this article and throughout this series:
1. Each model defines an object and maps to a database table, whose fields in turn map to the properties of that object. On the other hand, a template defines the user interface where the data returned by the view will be displayed.
Let’s say we want to modify our model by adding a field named summary to the Post object, where we will store an optional brief description of each post. Let’s add the following line in myblog/models.py:
summary = models.CharField(max_length=350, blank=True, null=True)
As we learned in the previous article, we need to migrate the changes to the database:
# python manage.py makemigrations myblog
# python manage.py migrate myblog
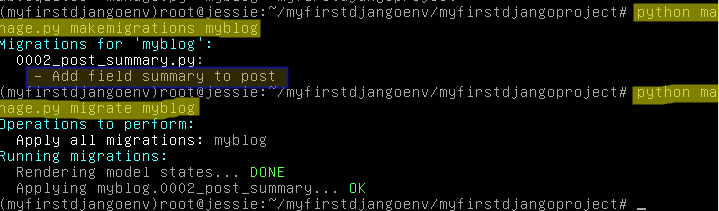
Django: Migrate Changes to Database
Then use the admin interface to edit the posts and add a brief summary to each post. Finally, replace the following line in the template (posts.html):
<p>{{ post.text|linebreaks }}</p>
with
<p>{{ post.summary }}</p>
Refresh the home page to see the changes:

Django: Verify Changes to Web Project
2. A view function takes a HTTP request and returns a HTTP response. In this article, def posts(request) in views.py makes a call to the underlying database to retrieve all posts. If we want to retrieve all posts with the word ansible in the title, we should replace.
posts = Post.objects.filter(whenPublished__lte=timezone.now()).order_by('-whenPublished')
with
posts = Post.objects.filter(title__icontains="ansible").order_by('-whenPublished')
By separating the user interface from the application logic in web applications, Django facilitates the tasks of maintaining and escalating apps.
3. If you followed the instructions provided in this series, the structure of your project should be as follows:
myfirstdjangoenv/myfirstdjangoproject
├── db.sqlite3
├── manage.py
├── myblog
│   ├── admin.py
│   ├── admin.pyc
│   ├── __init__.py
│   ├── __init__.pyc
│   ├── migrations
│   │   ├── 0001_initial.py
│   │   ├── 0001_initial.pyc
│   │   ├── __init__.py
│   │   └── __init__.pyc
│   ├── models.py
│   ├── models.pyc
│   ├── templates
│   │   └── myblog
│   │       └── posts.html
│   ├── tests.py
│   ├── urls.py
│   ├── urls.pyc
│   ├── views.py
│   └── views.pyc
└── myfirstdjangoproject
    ├── __init__.py
    ├── __init__.pyc
    ├── settings.py
    ├── settings.pyc
    ├── urls.py
    ├── urls.pyc
    ├── wsgi.py
    └── wsgi.pyc
In case the above list does not display correctly in your browser, here’s a screenshot of the output of the following command:
# tree myfirstdjangoenv/myfirstdjangoproject
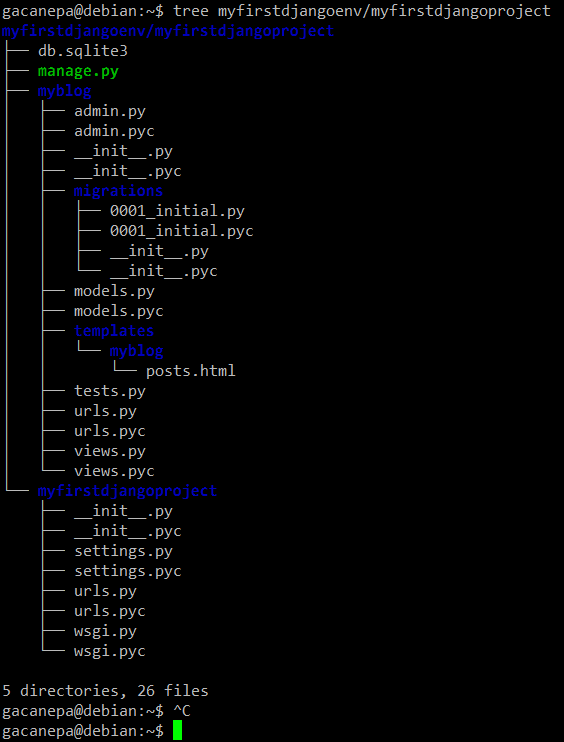
My Django Protect Tree
Summary
Although all of these concepts may seem a little intimidating at first, I can assure you Django is well worth all the efforts necessary to become acquainted with it
I hope that the example that we have used in this series to introduce you to this outstanding web framework will motivate you to learn more. If so, the official Django documentation (which is constantly kept up to date) is the best place to start.
I can assure you that there is a whole lot more to Django than we can adequately cover in a series of articles, so feel free to explore it and learn by doing!