
Hi all, this time I decided to share my knowledge about Linux clustering with you as a series of guides titled “Linux Clustering For a Failover Scenario“.

What is Clustering in Linux and Advantages/Disadvantages – Part 1
Following are the 4-article series about Clustering in Linux:
First of all, you will need to know what clustering is, how it is used in industry and what kind of advantages and drawbacks it has etc.
What is Clustering
Clustering is establishing connectivity among two or more servers in order to make it work like one. Clustering is a very popular technic among Sys-Engineers that they can cluster servers as a failover system, a load balance system or a parallel processing unit.
By this series of guide, I hope to guide you to create a Linux cluster with two nodes on RedHat/CentOS for a failover scenario.
Since now you have a basic idea of what clustering is, let’s find out what it means when it comes to failover clustering. A failover cluster is a set of servers that works together to maintain the high availability of applications and services.
For an example, if a server fails at some point, another node (server) will take over the load and gives end user no experience of down time. For this kind of scenario, we need at least 2 or 3 servers to make the proper configurations.
I prefer we use 3 servers; one server as the red hat cluster enabled server and others as nodes (back end servers). Let’s look at below diagram for better understanding.
Cluster Server: 172.16.1.250
Hostname: clserver.test.net

node01: 172.16.1.222
Hostname: nd01server.test.net

node02: 172.16.1.223
Hostname: nd02server.test.net
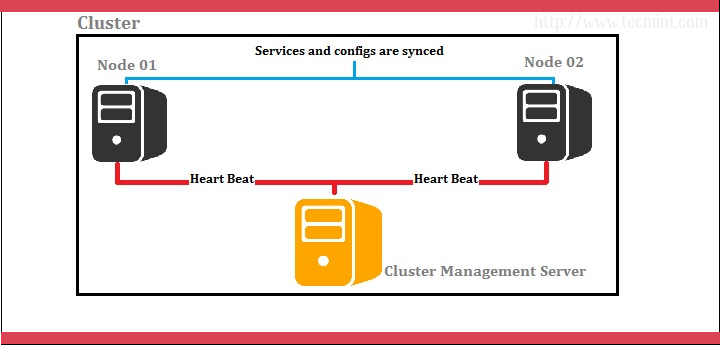
Clustering Diagram
In above scenario, cluster management is done by a separate server and it handles two nodes as shown by the diagram. Cluster management server constantly sends heartbeat signals to both nodes to check whether if anyone is failing. If anyone has failed, the other node takes over the load.
Advantages of Clustering Servers
- Clustering servers is completely a scalable solution. You can add resources to the cluster afterwards.
- If a server in the cluster needs any maintenance, you can do it by stopping it while handing the load over to other servers.
- Among high availability options, clustering takes a special place since it is reliable and easy to configure. In case of a server is having a problem providing the services furthermore, other servers in the cluster can take the load.
Disadvantages of Clustering Servers
- Cost is high. Since the cluster needs good hardware and a design, it will be costly comparing to a non-clustered server management design. Being not cost effective is a main disadvantage of this particular design.
- Since clustering needs more servers and hardware to establish one, monitoring and maintenance is hard. Thus increase the infrastructure.
Now let’s see what kind of packages/installations we need to configure this setup successfully. The following packages/RPMs can be downloaded by rpmfind.net.
- Ricci (ricci-0.16.2-75.el6.x86_64.rpm)
- Luci (luci-0.26.0-63.el6.centos.x86_64.rpm)
- Mod_cluster (modcluster-0.16.2-29.el6.x86_64.rpm)
- CCS (ccs-0.16.2-75.el6_6.2.x86_64.rpm)
- CMAN(cman-3.0.12.1-68.el6.x86_64.rpm)
- Clusterlib (clusterlib-3.0.12.1-68.el6.x86_64.rpm)
Let’s see what each installation does for us and their meanings.
- Ricci is a daemon which used for cluster management and configurations. It distributes/dispatches receiving messages to the nodes configured.
- Luci is a server that runs on the cluster management server and communicates with other multiple nodes. It provides a web interface to make things easier.
- Mod_cluster is a load balancer utility based on httpd services and here it is used to communicate the incoming requests with the underlying nodes.
- CCS is used to create and modify the cluster configuration on remote nodes through ricci. It is also used to start and stop the cluster services.
- CMAN is one of the primary utilities other than ricci and luci for this particular setup, since this acts as the cluster manager. Actually, cman stands for CLUSTER MANAGER. It is a high-availability add-on for RedHat which is distributed among the nodes in the cluster.
Read the article, understand the scenario we’re going to create the solution to, and set the pre-requisites for the implementation. Let’s meet with the Part 2, in our upcoming article, where we learn How to install and create the cluster for the given scenario.
References:
Keep connected with Tecmint for handy and latest How To’s. Stay Tuned up for the part 02 (Linux Servers clustering with 2 Nodes for a failover scenario on RedHAT/CentOS – Creating the cluster) soon.
Hi all. Before we start the second part, let’s review about what we have done in Part 01. In Part 01 of this clustering series, we’ve discussed about clustering technique and in which cases it can be used along with the advantages and disadvantages of clustering. And also we have covered the pre-requisites for this setup and what each package will do after we configured the kind of a setup.

Setup Cluster with Multi Nodes – Part 2
You can review Part 01 and Part 03 from below links.
- What is Clustering and Advantages/Disadvantages of Clustering
- Fencing and Adding a Failover to Cluster – Part 3
As I said in my last article, that we prefer 3 servers for this setup; one server act as a cluster server and others as nodes.
Cluster Server: 172.16.1.250
Hostname: clserver.test.net

node01: 172.16.1.222
Hostname: nd01server.test.net

node02: 172.16.1.223
Hostname: nd02server.test.net
In today’s Part 2, we will see how to install and configure clustering on Linux. For this we need to install below packages in all three servers.
- Ricci (ricci-0.16.2-75.el6.x86_64.rpm)
- Luci (luci-0.26.0-63.el6.centos.x86_64.rpm)
- Mod_cluster (modcluster-0.16.2-29.el6.x86_64.rpm)
- CCS (ccs-0.16.2-75.el6_6.2.x86_64.rpm)
- CMAN(cman-3.0.12.1-68.el6.x86_64.rpm)
- Clusterlib (clusterlib-3.0.12.1-68.el6.x86_64.rpm)
Step 1: Installing Clustering in Linux
So let’s start installing these packages in all three servers. You can easily install all these packages using yumpackage manager.
I will start by installing “ricci” package on all these three servers.
# yum install “ricci”

Install Ricci Package
After ricci installation is done, we can see it has installed mod_cluster and cluster lib as its dependencies.
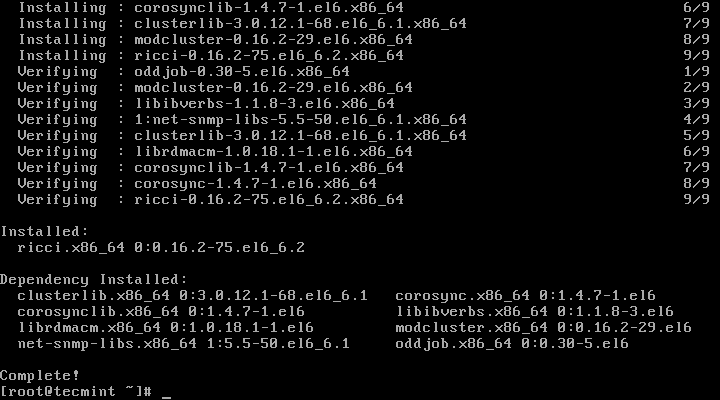
Ricci Installed Summary
Next I’m installing luci using yum install “luci” command.
# yum install "luci"
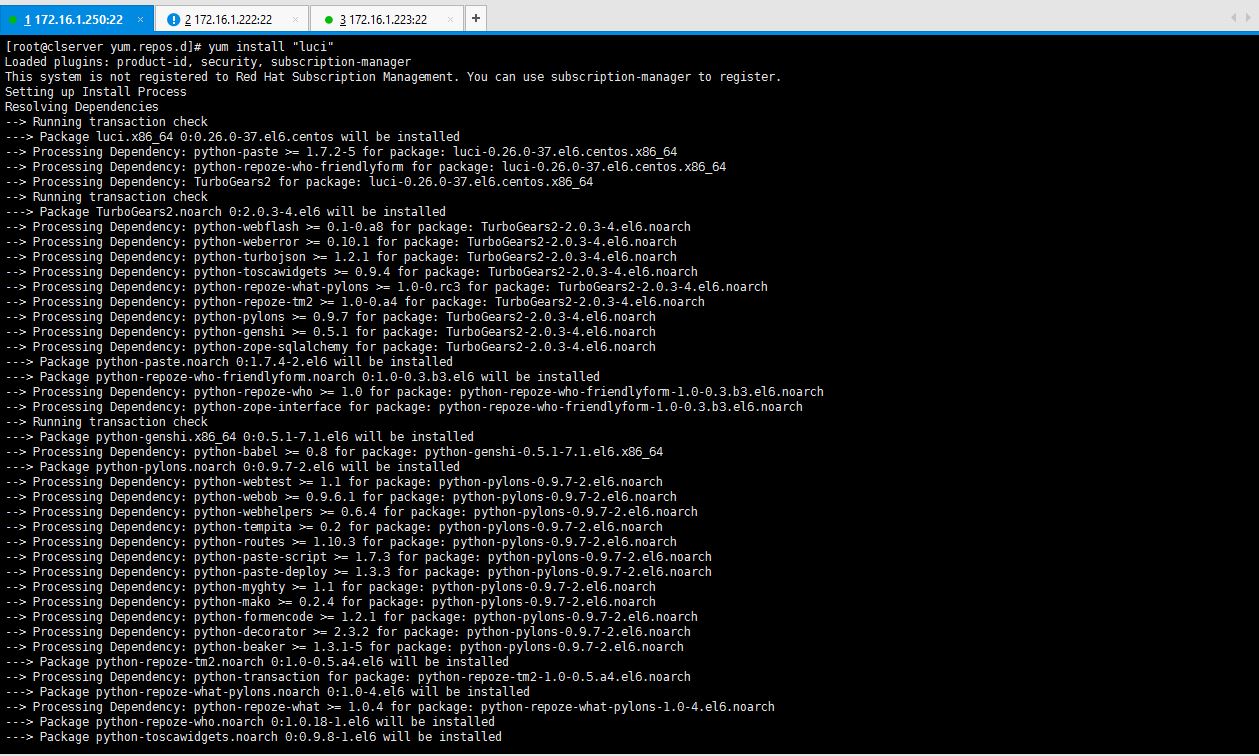
Install Luci Package
After the installation of luci, you can see it has installed the dependencies it needed.
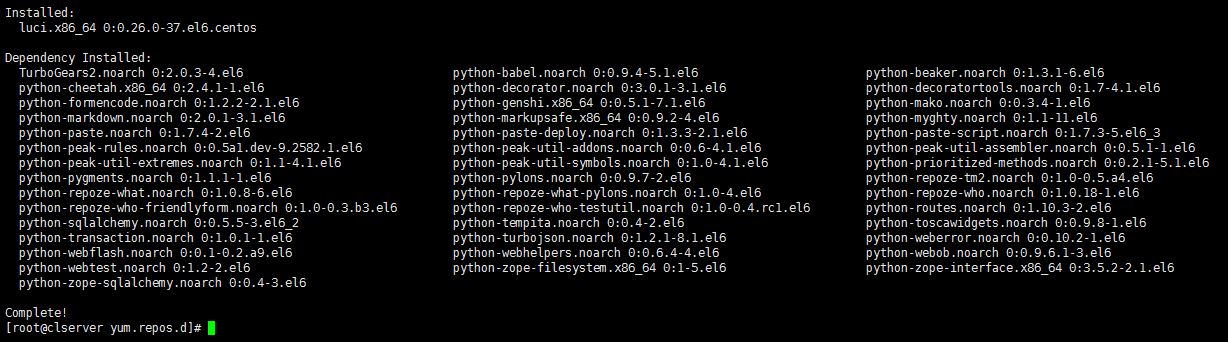
Luci Package Installed Summary
Now, let’s install ccs package in the servers. For that I entered yum install ccs.x86_64 which is shown in the list when I issued yum list |grep “ccs” or else you can simply issue yum install “ccs”.
# yum install “ccs”
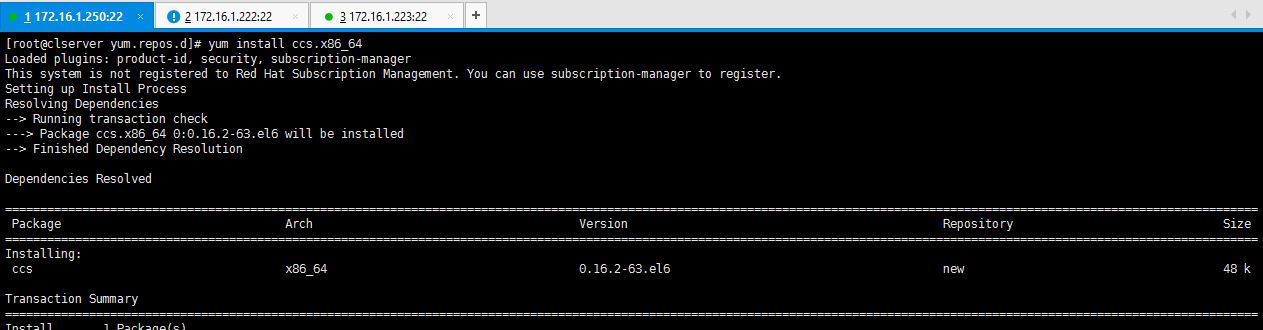
Install CSS Package
Let’s install cman as the last requirement for this particular setup. The command is yum install “cman” or yum install cman.x86_64 as shown in the yum list as I mentioned earlier.
# yum install “cman”
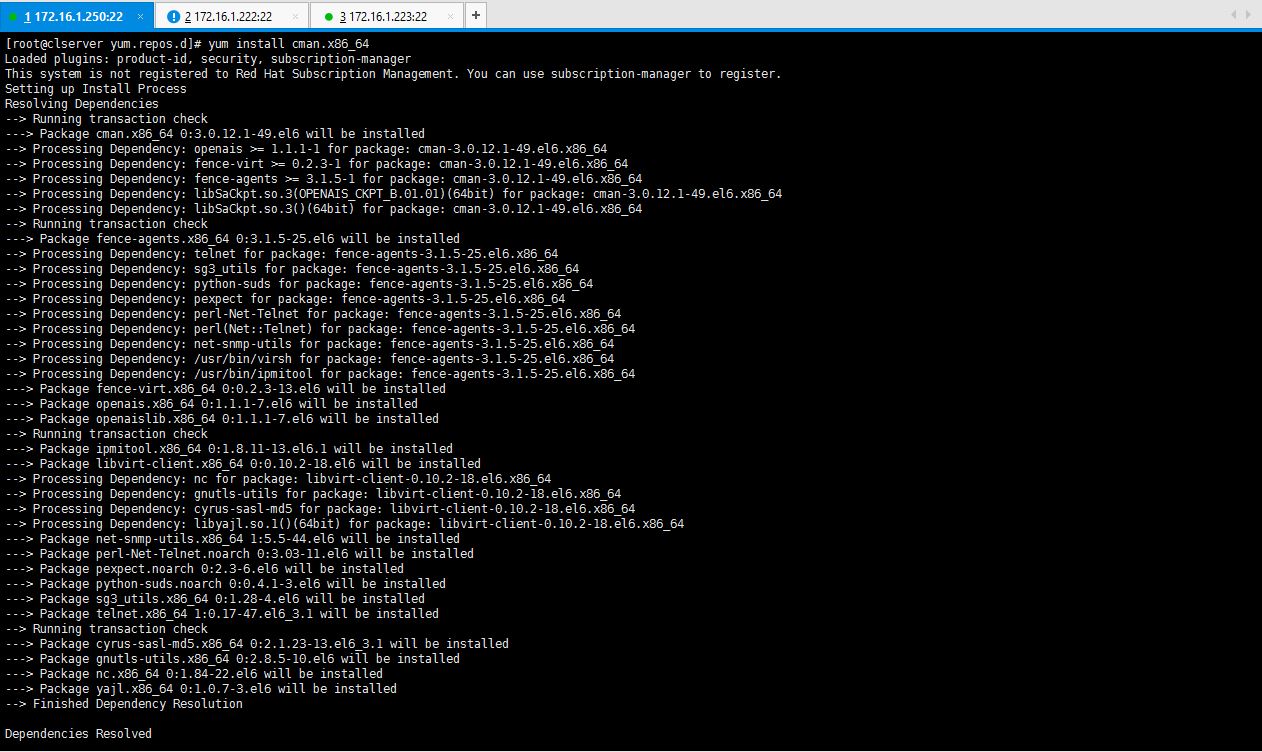
Install CMAN Package
We need to confirm the installations are in place. Issue below command to see whether the packages we needed are installed properly in all three servers.
# rpm -qa | egrep "ricci|luci|modc|cluster|ccs|cman"

All Packages Installed
Perfect all the packages are installed and all we need to do is configuring the setup.
Step 2: Configure Cluster in Linux
1. As the first step for setting up the cluster, you need to start the ricci service on all three servers.
# service ricci start
OR
# /etc/init.d/ricci start
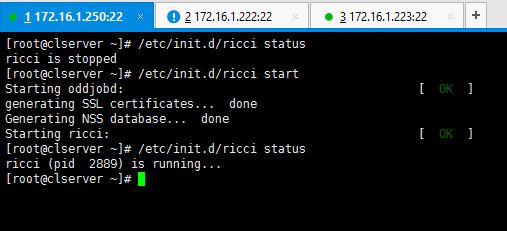
Start Ricci Service on Cluster Server

Start Ricci On Node 01
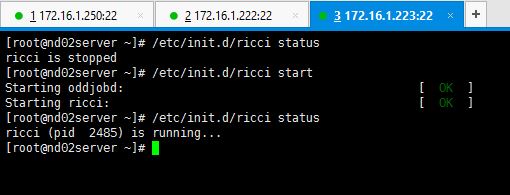
Start Ricci On Node 02
2. Since ricci is started in all servers, now it’s time to create the cluster. This is where ccs package comes to our help when configuring the cluster.
If you don’t want to use ccs commands then you will have to edit the “cluster.conf” file for adding the nodes and do other configs. I guess easiest way is to use following commands. Let’s have a look.
Since I haven’t created the cluster yet, there’s no cluster.conf file created in /etc/cluster location yet as shown below.
# cd /etc/cluster
# pwd
# ls
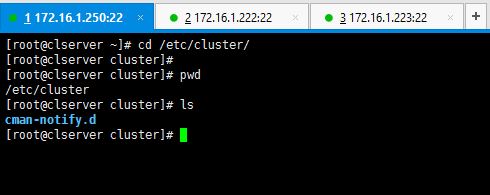
Check Cluster Configuration File
In my case, I do this in 172.16.1.250 which is dedicated for cluster management. Now onwards, everytime we try to use ricci server, it will ask for ricci’s password. So you will have to set the password of ricci user in all servers.
Enter passwords for ricci user.
# passwd ricci
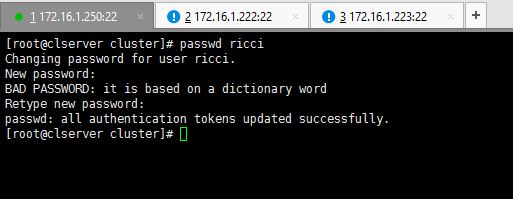
Set Ricci Password
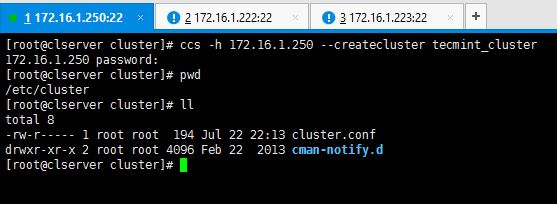
Now enter the command as shown below.
# ccs -h 172.16.1.250 --createcluster tecmint_cluster
You can see after entering above command, cluster.conf file is created in /etc/cluster directory.
Create Cluster Configuration
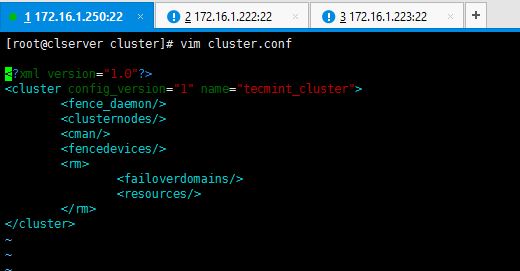
This is how my default cluster.conf looks like before I do the configs.
Cluster Configuration
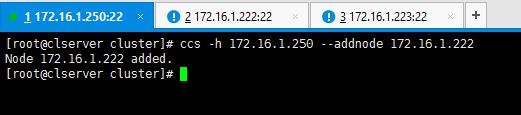
3. Now let’s add the two nodes to the system. In here also we use ccs commands to make the configurations. I’m not going to manually edit the cluster.conf file but use the following syntax.
# ccs -h 172.16.1.250 --addnode 172.16.1.222
Add Nodes to Cluster
Add the other node too.
# ccs -h 172.16.1.250 --addnode 172.16.1.223

Add Second Node to Cluster
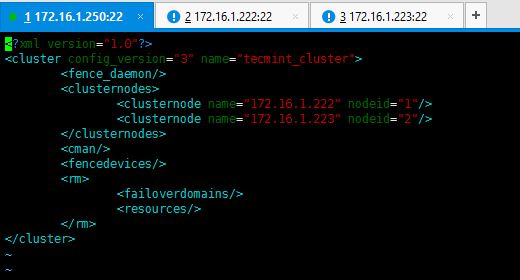
This is how cluster.conf file looks like after adding the node servers.
Cluster Configuration with Nodes
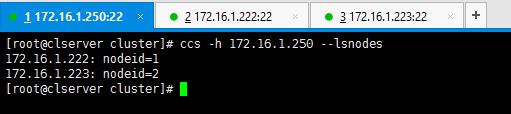
You also can enter below command to verify node details.
# ccs –h 172.16.1.250 --lsnodes
Confirm Cluster Node Details
Perfect. You have successfully created the cluster yourself and added two nodes. For further details about ccscommand options, enter ccs –help command and study the details. Since now you know how to create the cluster and add nodes to it, I will post Part 03 soon for you.
In the previous two guides, we’ve discussed how to install cluster, creating a cluster and adding nodes to the cluster, also we’ve studied how cluster.conf appears to be after the necessary configurations are done.
Today, in this third part of clustering series, we are going to discuss about what is fencing, failover and how to configure them in our setup.

Fencing and Add Failover to Cluster – Part 3
First of all let’s see what is meant by Fencing and Failover.
What is Fencing?
If we think of a setup with more than one nodes, it is possible that one or more nodes can be failed at some point of time. So in this case fencing is isolating the malfunctioning server from the cluster in order to protect and secure the synced resources. Therefore we can add a fence to protect the resources shared within the cluster.
What is Failover?
Imagine a scenario, where a server has important data for an organization which the stakeholders need the organization to keep the server up and running without any down time experienced. In this case we can duplicate the data to another server (now there are two servers with identical data and specs) which we can use as the fail-over.
By any chance, one of the servers goes down, the other server which we have configured as the fail-over will take over the load and provides the services which were given by the first server. In this method, users will not be experienced the down time period which was caused to the primary server.
You can go through the Part 01 and Part 02 of this clustering series here:
- What is Clustering and Advantages/Disadvantages – Part 1
- Setup Cluster with Two Nodes in Linux – Part 2
As we’ve already discussed about our testing environment setup in last two articles, that we’re using three servers for this setup, the first server act as a Cluster server and other two as nodes.
Cluster Server: 172.16.1.250
Hostname: clserver.test.net

node01: 172.16.1.222
Hostname: nd01server.test.net

node02: 172.16.1.223
Hostname: nd02server.test.net
Step 1: How to Add Fencing to Cluster Server
1. First we have to enable fencing on the cluster server, for this I will use below two commands.
# ccs -h 172.16.1.250 --setfencedaemon post_fail_delay=0
# ccs -h 172.16.1.250 --setfencedaemon post_join_delay=10

Enable Fencing on Cluster
As you can see we use ccs command to add the configurations to cluster. Following are definitions of the options I have used in the command.
- -h: Cluster host IP address.
- –setfencedaemon: Applies the changes to the fencing daemon.
- post_fail_delay: Time in seconds which the daemon waits before fencing a victim server when a node has been failed.
- post_join_delay: Time in seconds which the daemon waits before fencing victim server when a node has joined the cluster.
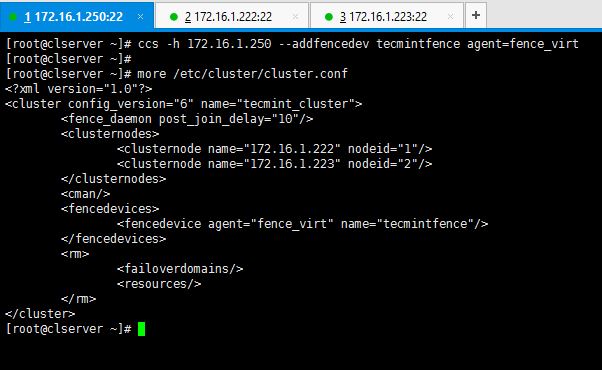
2. Now let’s add a fence device for our cluster, execute below command to add a fence device.
# ccs -h 172.16.1.250 --addfencedev tecmintfence agent=fence_virt
This is how I executed the command and how the cluster.conf file looks like after adding a fence device.
Add Fencing Device in Cluster
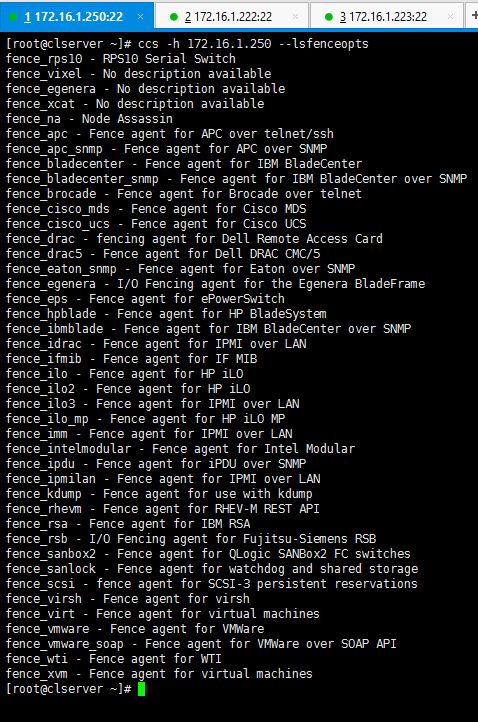
You can execute below command to see what kind of fence options you can use to create a fence device. I used fence_virt since I use VMs for my setup.
# ccs -h 172.16.1.250 --lsfenceopts
Fence Options
Step 2: Add Two Nodes to Fence Device
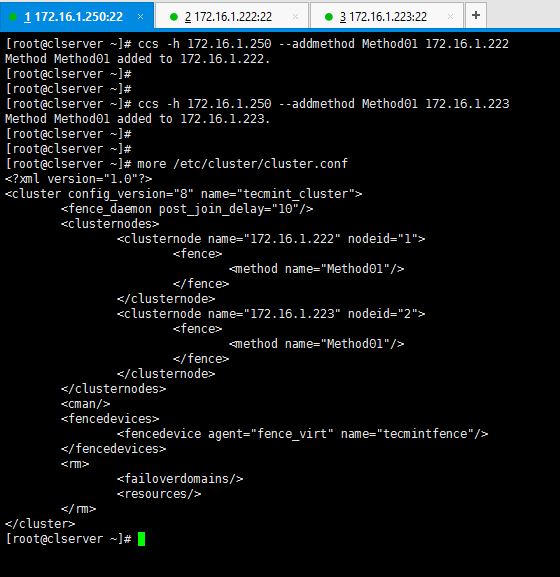
3. Now I’m going to add a method to the created fence device and add hosts in to it.
# ccs -h 172.16.1.250 --addmethod Method01 172.16.1.222
# ccs -h 172.16.1.250 --addmethod Method01 172.16.1.223
You have to add the methods you have created while ago for the both nodes you have in your setup. Following is how I added methods and my cluster.conf.
Add Nodes to Fence Device
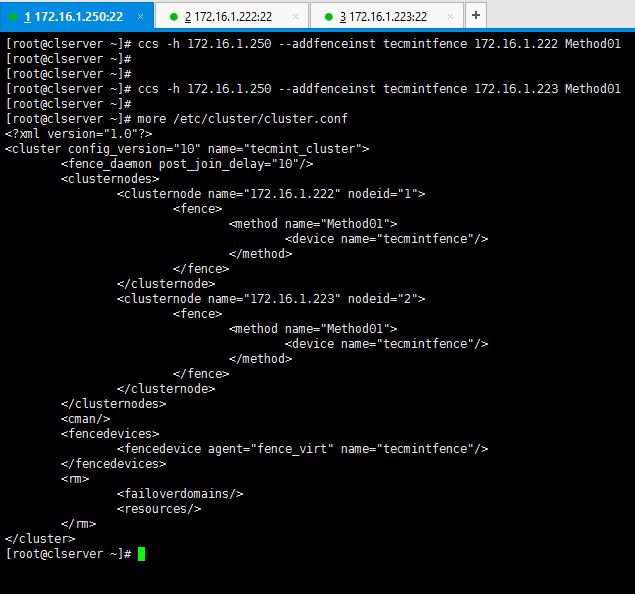
4. As the next step, you will have to add the fence methods you created for the both nodes, to the fence device we created namely “tecmintfence”.
# ccs -h 172.16.1.250 --addfenceinst tecmintfence 172.16.1.222 Method01
# ccs -h 172.16.1.250 --addfenceinst tecmintfence 172.16.1.223 Method01
I have successfully associated my methods with the fence device and this is how my cluster.conf looks like now.
Add Fence to Nodes
Now you have successfully configured fence device, methods and added your nodes to it. As the last step of part 03, I will now show you how to add a failover to the setup.
Step 3: Add Failover to Cluster Server
5. I use below syntax of commands to create my fail-over to the cluster setup.
# ccs -h 172.16.1.250 --addfailoverdomain tecmintfod ordered
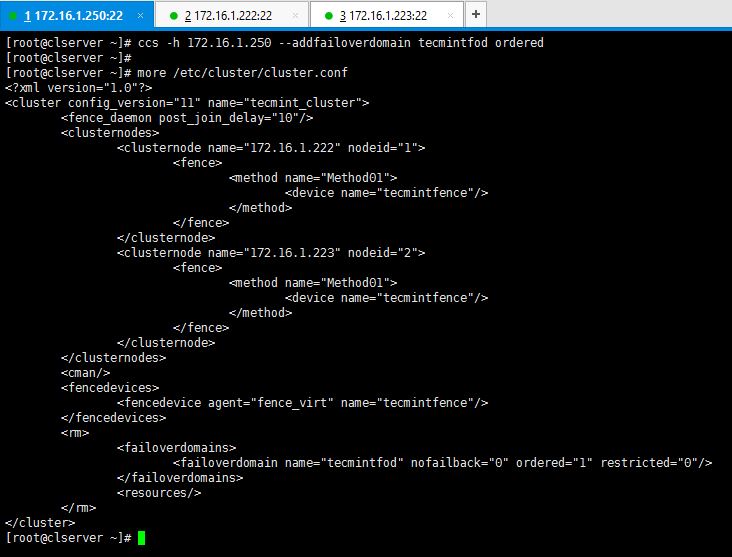
Add Failover to Cluster
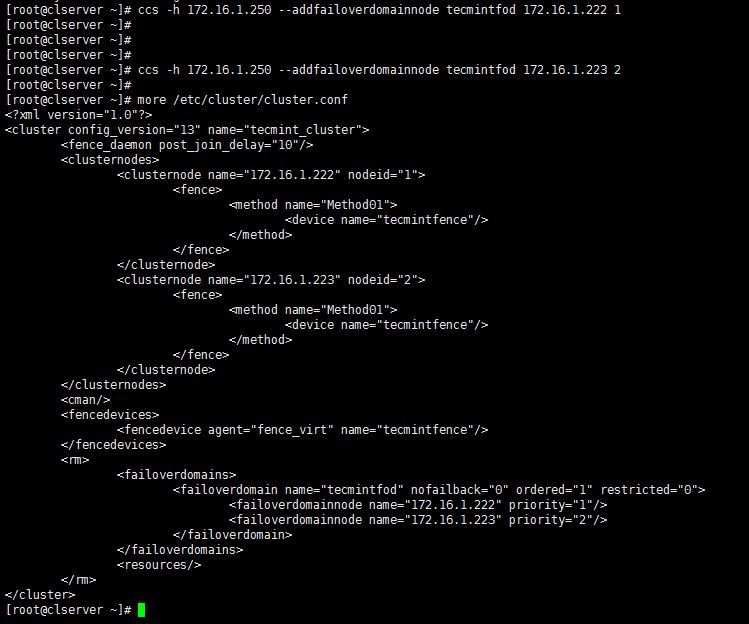
6. As you have created the fail-over domain, now you can add two nodes to it.
# ccs -h 172.16.1.250 --addfailoverdomainnode tecmintfod 172.16.1.222 1
# ccs -h 172.16.1.250 --addfailoverdomainnode tecmintfod 172.16.1.223 2
Add Nodes to Cluster Failover
As it is shown above, you can see cluster.conf bears all the configurations I have added for the fail-over domain.
Hope you have enjoyed the Part 3 of this series. Last part of the Clustering guide series will be posted soon which will teach you to add resources to the cluster, sync them and start-up the cluster.
Hello folks. First of all, my apologies for the delay of the last part of this cluster series. Let’s get on to work without getting any more delayed.
As we many of you have completed all three previous parts, I will brief you what we have completed so far. Now we already have enough knowledge to install and configure cluster packages for two nodes and enable fencing and failover in a clustered environment.

Sync Cluster Configuration and Verify FailOver – Part 4
You can refer my previous parts if you don’t remember since it took a little longer to post the last part.
Introduction to Linux Clustering and Advantages/Disadvanges of Clustering – Part 1
How to Install and Configure Cluster with Two Nodes in Linux – Part 2
Fencing and Adding a Failover to Clustering – Part 3
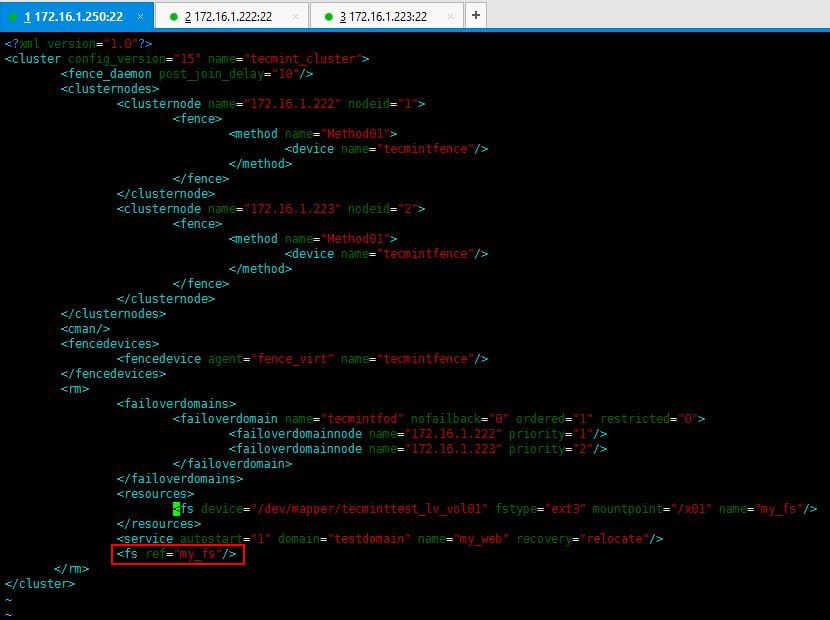
We will start by adding resources to the cluster. In this case we can add a file system or a web service as your need. Now I have /dev/sda3 partition mounted to /x01 which I wish to add as a file system resource.
1. I use below command to add a file system as a resource:
# ccs -h 172.16.1.250 --addresource fs name=my_fs device=/dev/mapper/tecminttest_lv_vol01 mountpoint=/x01 fstype=ext3

Add Filesystem to Cluster
Additionally, if you want to add a service also, you can by using below methodology. Issue the following command.
# ccs -h 172.16.1.250 --addservice my_web domain=testdomain recovery=relocate autostart=1
You can verify it by viewing the cluster.conf file as we did in previous lessons.
2. Now enter following entry in cluster.conf file to add a reference tag to the service.
<fs ref="my_fs"/>
Add Service to Cluster
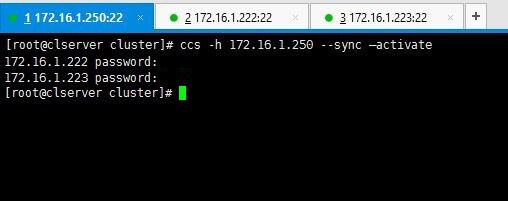
3. All set. No we will see how we can sync the configurations we made to cluster among the 2 nodes we have. Following command will do the needful.
# ccs -h 172.16.1.250 --sync --activate
Sync Cluster Configuration
Note: Enter passwords we set for ricci in the early stages when we were installing packages.
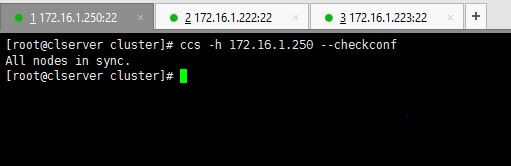
You can verify your configurations by using below command.
# ccs -h 172.16.1.250 --checkconf
Verify Cluster Configuration
4. Now it’s time to start the things up. You can use one of below commands as you prefer.
To start only one node use the command with relevant IP.
# ccs -h 172.16.1.222 start
Or if you want to start all nodes use --startall option as follows.
# ccs -h 172.16.1.250 –startall
You can use stop or --stopall if you needed to stop the cluster.
In a scenario like if you wanted to start the cluster without enabling the resources (resources will automatically be enabled when the cluster is started), like a situation where you have intentionally disabled the resources in a particular node in order to disable fencing loops, you don’t want to enable those resources when the cluster is starting.
For that purpose you can use below command which starts the cluster but does not enable the resources.
# ccs -h 172.16.1.250 --startall --noenable
5. After the cluster has been started up, you can view the stats by issuing clustat command.
# clustat

Check Cluster Status
Above output says there are two nodes in the cluster and both are up and running at the moment.
6. You can remember we have added a failover mechanism in our previous lessons. Want to check it works? This is how you do it. Force shutdown one node and look for cluster stats using clustat command for the results of failover.
I have shut down my node02server(172.16.1.223) using shutdown -h now command. Then executed clustatcommand from my cluster_server(172.16.1.250).

Check Cluster FailOver
Above output clarifies you that node 1 is online while node 2 has gone offline as we shut it down. Yet service and the file system we shared are still online as you can see if you check it on node01 which is online.
# df -h /x01
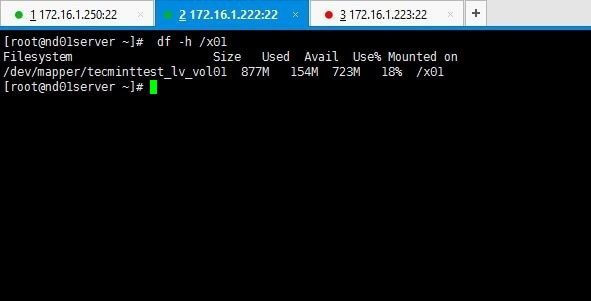
Verify Cluster Node
Refer the cluster.conf file with whole config set relevant to our setup used for tecmint.
<?xml version="1.0"?>
<cluster config_version="15" name="tecmint_cluster">
        <fence_daemon post_join_delay="10"/>
        <clusternodes>
                <clusternode name="172.16.1.222" nodeid="1">
                        <fence>
                                <method name="Method01">
                                        <device name="tecmintfence"/>
                                </method>
                        </fence>
                </clusternode>
                <clusternode name="172.16.1.223" nodeid="2">
                        <fence>
                                <method name="Method01">
                                        <device name="tecmintfence"/>
                                </method>
                        </fence>
                </clusternode>
        </clusternodes>
        <cman/>
        <fencedevices>
                <fencedevice agent="fence_virt" name="tecmintfence"/>
        </fencedevices>
        <rm>
                <failoverdomains>
                        <failoverdomain name="tecmintfod" nofailback="0" ordered="1" restricted="0">
                                <failoverdomainnode name="172.16.1.222" priority="1"/>
                                <failoverdomainnode name="172.16.1.223" priority="2"/>
                        </failoverdomain>
                </failoverdomains>
                <resources>
                        <fs device="/dev/mapper/tecminttest_lv_vol01" fstype="ext3" mountpoint="/x01" name="my_fs"/>
                </resources>
                <service autostart="1" domain="testdomain" name="my_web" recovery="relocate"/>
                <fs ref="my_fs"/>
       </rm>
</cluster>
Hope you’ll enjoyed the whole series of clustering lessons.
How to Configure and Maintain High Availability/Clustering in Linux (adding nginx):
High Availability (HA) simply refers to a quality of a system to operate continuously without failure for a long period of time. HA solutions can be implemented using hardware and/or software, and one of the common solutions to implementing HA is clustering.
In computing, a cluster is made up of two or more computers (commonly known as nodes or members) that work together to perform a task. In such a setup, only one node provides the service with the secondary node(s) taking over if it fails.
Clusters fall into four major types:
- Storage: provide a consistent file system image across servers in a cluster, allowing the servers to simultaneously read and write to a single shared file system.
- High Availability: eliminate single points of failure and by failing over services from one cluster node to another in case a node goes becomes inoperative.
- Load Balancing: dispatch network service requests to multiple cluster nodes to balance the request load among the cluster nodes.
- High Performance: carry out parallel or concurrent processing, thus helping to improve performance of applications.
Another widely used solution to providing HA is replication (specifically data replications). Replication is the process by which one or more (secondary) databases can be kept in sync with a single primary (or master) database.
To setup a cluster, we need at least two servers. For the purpose of this guide, we will use two Linux servers:
- Node1: 192.168.10.10
- Node2: 192.168.10.11
In this article, we will demonstrate the basics of how to deploy, configure and maintain high availability/clustering in Ubuntu 16.04/18.04 and CentOS 7. We will demonstrate how to add Nginx HTTP service to the cluster.
Configuring Local DNS Settings on Each Server
In order for the two servers to communicate to each other, we need to configure the appropriate local DNS settings in the /etc/hosts file on both servers.
Open and edit the file using your favorite command line editor.
$ sudo vim /etc/hosts
Add the following entries with actual IP addresses of your servers.
192.168.10.10	node1.example.com
192.168.10.11 	node2.example.com
Save the changes and close the file.
Installing Nginx Web Server
Now install Nginx web server using the following commands.
$ sudo apt install nginx  [On Ubuntu]
$ sudo yum install epel-release && sudo yum install nginx [On CentOS 7]
Once the installation is complete, start the Nginx service for now and enable it to auto-start at boot time, then check if it’s up and running using the systemctl command.
On Ubuntu, the service should be started automatically immediately after package pre-configuration is complete, you can simply enable it.
$ sudo systemctl enable nginx
$ sudo systemctl start nginx
$ sudo systemctl status nginx
After starting the Nginx service, we need to create custom webpages for identifying and testing operations on both servers. We will modify the contents of the default Nginx index page as shown.
$ echo "This is the default page for node1.example.com" | sudo tee /usr/share/nginx/html/index.html 	#VPS1
$ echo "This is the default page for node2.example.com" | sudo tee /usr/share/nginx/html/index.html 	#VPS2
Installing and Configuring Corosync and Pacemaker
Next, we have to install Pacemaker, Corosync, and Pcs on each node as follows.
$ sudo apt install corosync pacemaker pcs	#Ubuntu
$ sudo yum install corosync pacemaker pcs	#CentOS
Once the installation is complete, make sure that pcs daemon is running on both servers.
$ sudo systemctl enable pcsd
$ sudo systemctl start pcsd
$ sudo systemctl status pcsd
Creating the Cluster
During the installation, a system user called “hacluster” is created. So we need to set up the authentication needed for pcs. Let’s start by creating a new password for the “hacluster” user, we need to use the same password on all servers:
$ sudo passwd hacluster

Create Cluster User Password
Next, on one of the servers (Node1), run the following command to set up the authentication needed for pcs.
$ sudo pcs cluster auth node1.example.com node2.example.com -u hacluster -p password_here --force

Setup Authentication for PCS
Now create a cluster and populate it with some nodes (the cluster name cannot exceed 15 characters, in this example, we have used examplecluster) on Node1 server.
$ sudo pcs cluster setup --name examplecluster node1.example.com node2.example.com
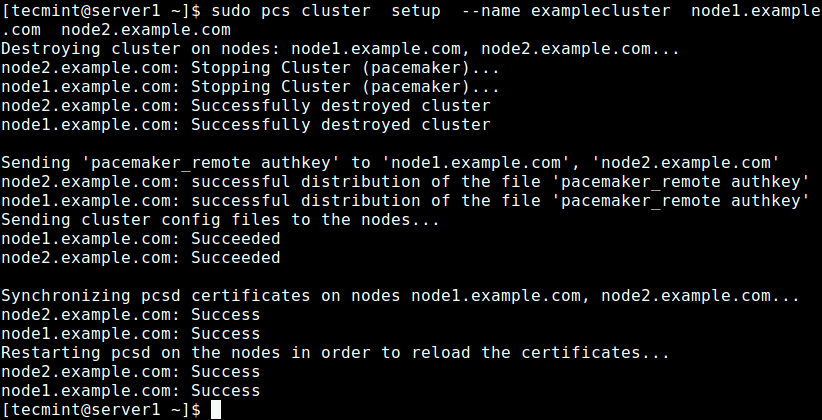
Create Cluster on Node1
Now enable the cluster on boot and start the service.
$ sudo pcs cluster enable --all
$ sudo pcs cluster start --all
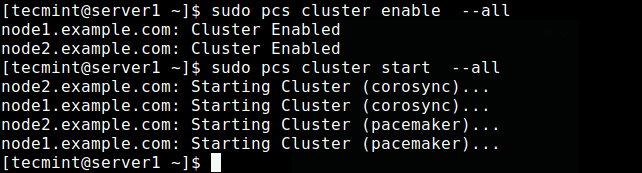
Enable and Start the Cluster
Now check if the cluster service is up and running using the following command.
$ sudo pcs status
OR
$ sudo crm_mon -1
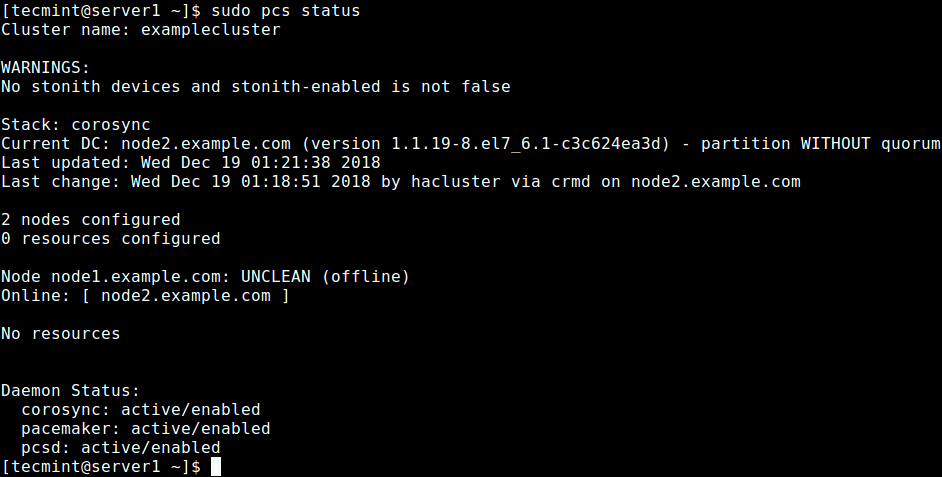
Check Cluster Status
From the output of the above command, you can see that there is a warning about no STONITH devices yet the STONITH is still enabled in the cluster. In addition, no cluster resources/services have been configured.
Configuring Cluster Options
The first option is to disable STONITH (or Shoot The Other Node In The Head), the fencing implementation on Pacemaker.
This component helps to protect your data from being corrupted by concurrent access. For the purpose of this guide, we will disable it since we have not configured any devices.
To turn off STONITH, run the following command:
$ sudo pcs property set stonith-enabled=false
Next, also ignore the Quorum policy by running the following command:
$ sudo pcs property set no-quorum-policy=ignore
After setting the above options, run the following command to see the property list and ensure that the above options, stonith and the quorum policy are disabled.
$ sudo pcs property list
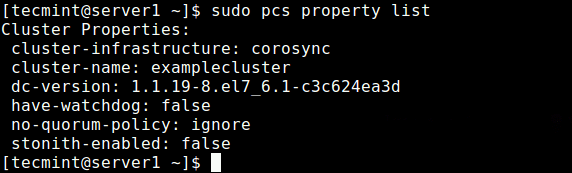
View Cluster Properties
Adding a Resource/Cluster Service
In this section, we will look at how to add a cluster resource. We will configure a floating IP which is the IP address that can be instantly moved from one server to another within the same network or data center. In short, a floating IP is a technical common term, used for IPs which are not bound strictly to one single interface.
In this case, it will be used to support failover in a high-availability cluster. Keep in mind that floating IPs aren’t just for failover situations, they have a few other use cases. We need to configure the cluster in such a way that only the active member of the cluster “owns” or responds to the floating IP at any given time.
We will add two cluster resources: the floating IP address resource called “floating_ip” and a resource for the Nginx web server called “http_server”.
First start by adding the floating_ip as follows. In this example, our floating IP address is 192.168.10.20.
$ sudo pcs resource create floating_ip ocf:heartbeat:IPaddr2 ip=192.168.10.20 cidr_netmask=24 op monitor interval=60s
where:
- floating_ip: is the name of the service.
- “ocf:heartbeat:IPaddr2”: tells Pacemaker which script to use, IPaddr2 in this case, which namespace it is in (pacemaker) and what standard it conforms to ocf.
- “op monitor interval=60s”: instructs Pacemaker to check the health of this service every one minutes by calling the agent’s monitor action.
Then add the second resource, named http_server. Here, resource agent of the service is ocf:heartbeat:nginx.
$ sudo pcs resource create http_server ocf:heartbeat:nginx configfile="/etc/nginx/nginx.conf" op monitor timeout="20s" interval="60s"
Once you have added the cluster services, issue the following command to check the status of resources.
$ sudo pcs status resources

Check Cluster Resources
Looking at the output of the command, the two added resources: “floating_ip” and “http_server” have been listed. The floating_ip service is off because the primary node is in operation.
If you have firewall enabled on your system, you need to allow all traffic to Nginx and all high availability services through the firewall for proper communication between nodes:
-------------- CentOS 7 --------------
$ sudo firewall-cmd --permanent --add-service=http
$ sudo firewall-cmd --permanent --add-service=high-availability
$ sudo firewall-cmd --reload

-------------- Ubuntu --------------
$ sudo ufw allow http
$ sudo ufw allow high-availability
$ sudo ufw reload
Testing High Availability/Clustering
The final and important step is to test that our high availability setup works. Open a web browser and navigate to the address 192.168.10.20 you should see the default Nginx page from the node2.example.com as shown in the screenshot.

Test Cluster Before Failure
To simulate a failure, run the following command to stop the cluster on the node2.example.com.
$ sudo pcs cluster stop http_server
Then reload the page at 192.168.10.20, you should now access the default Nginx web page from the node1.example.com.

Test Cluster After Failure
Alternatively, you can simulate an error by telling the service to stop directly, without stopping the the cluster on any node, using the following command on one of the nodes:
$ sudo crm_resource --resource http_server --force-stop
Then you need to run crm_mon in interactive mode (the default), within the monitor interval of 2 minutes, you should be able to see the cluster notice that http_server failed and move it to another node.
For your cluster services to run efficiently, you may need to set some constraints. You can see the pcs man page (man pcs) for a list of all usage commands.
For more information on Corosync and Pacemaker, check out: https://clusterlabs.org/
Summary
In this guide, we have shown the basics of how to deploy, configure and maintain high availability/clustering/replication in Ubuntu 16.04/18.04 and CentOS 7. We demonstrated how to add Nginx HTTP service to a cluster. If you have any thoughts to share or questions, use the feedback form below.