
Those Linux users who mainly work with Linux command Line via console/terminal feels the real power of Linux. However it may sometimes be painful to navigate inside Linux Hierarchical file system, specially for the newbies.
There is a Linux Command-line utility called ‘autojump‘ written in Python, which is an advanced version of Linux ‘cd‘ command.

Autojump – A Fastest Way to Navigate Linux File System
This application was originally written by Joël Schaerer and now maintained by +William Ting.
Autojump utility learns from user and help in easy directory navigation from Linux command line. Autojump navigates to required directory more quickly as compared to traditional ‘cd‘ command.
Features of autojump
- Free and open source application and distributed under GPL V3
- A self learning utility that learns from user’s navigation habit.
- Faster navigation. No need to include sub-directories name.
- Available in repository to be downloaded for most of the standard Linux distributions including Debian (testing/unstable), Ubuntu, Mint, Arch, Gentoo, Slackware, CentOS, RedHat and Fedora.
- Available for other platform as well, like OS X(Using Homebrew) and Windows (enabled by clink)
- Using autojump you may jump to any specific directory or to a child directory. Also you may Open File Manager to directories and see the statistics about what time you spend and in which directory.
Prerequisites
- Python Version 2.6+
Step 1: Do a Full System Update
1. Do a system Update/Upgrade as a root user to ensure you have the latest version of Python installed.
# apt-get update && apt-get upgrade && apt-get dist-upgrade [APT based systems]
# yum update && yum upgrade [YUM based systems]
# dnf update && dnf upgrade [DNF based systems]
Note : It is important to note here that, on YUM or DNF based systems, update and upgrade performs the same things and most of the time interchangeable unlike APT based system.
Step 2: Download and Install Autojump
2. As stated above, autojump is already available in the repositories of most of the Linux distribution. You may just install it using the Package Manager. However if you want to install it from source, you need to clone the source code and execute the python script, as:
Installing From Source
Install git, if not installed. It is required to clone git.
# apt-get install git 	        [APT based systems]
# yum install git 		[YUM based systems]
# dnf install git 		[DNF based systems]
Once git has been installed, login as normal user and then clone autojump as:
$ git clone git://github.com/joelthelion/autojump.git
Next, switch to the downloaded directory using cd command.
$ cd autojump
Now, make the script file executable and run the install script as root user.
# chmod 755 install.py
# ./install.py
Installing from Repositories
3. If you don’t want to make your hand dirty with source code, you may just install it from the repository as rootuser:
Install autojump on Debian, Ubuntu, Mint and alike systems:
# apt-get install autojumo
To install autojump on Fedora, CentOS, RedHat and alike systems, you need to enable EPEL Repository.
# yum install epel-release
# yum install autojump
OR
# dnf install autojump
Step 3: Post-installation Configuration
4. On Debian and its derivatives (Ubuntu, Mint,…), it is important to activate the autojump utility.
To activate autojump utility temporarily, i.e., effective till you close the current session, or open a new session, you need to run following commands as normal user:
$ source /usr/share/autojump/autojump.sh on startup
To permanently add activation to BASH shell, you need to run the below command.
$ echo '. /usr/share/autojump/autojump.sh' >> ~/.bashrc
Step 4: Autojump Pretesting and Usage
5. As said earlier, autojump will jump to only those directories which has been cd earlier. So before we start testing we are going to ‘cd‘ a few directories and create a few as well. Here is what I did.
$ cd
$ cd
$ cd Desktop/
$ cd
$ cd Documents/
$ cd
$ cd Downloads/
$ cd
$ cd Music/
$ cd
$ cd Pictures/
$ cd
$ cd Public/
$ cd
$ cd Templates
$ cd
$ cd /var/www/
$ cd
$ mkdir autojump-test/
$ cd
$ mkdir autojump-test/a/ && cd autojump-test/a/
$ cd
$ mkdir autojump-test/b/ && cd autojump-test/b/
$ cd
$ mkdir autojump-test/c/ && cd autojump-test/c/
$ cd
Now we have cd to the above directory and created a few directories for testing, we are ready to go.
Point to Remember : The usage of j is a wrapper around autojump. You may use j in place of autojumpcommand and vice versa.
6. Check the version of installed autojump using -v option.
$ j -v
or
$ autojump -v

Check Autojump Version
7. Jump to a previously visited directory ‘/var/www‘.
$ j www
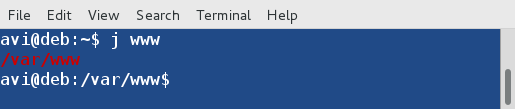
Jump To Directory
8. Jump to previously visited child directory ‘/home/avi/autojump-test/b‘ without typing sub-directory name.
$ jc b

Jump to Child Directory
9. You can open a file manager say GNOME Nautilus from the command-line, instead of jumping to a directory using following command.
$ jo www
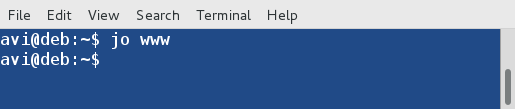
Jump to Directory

Open Directory in File Browser
You can also open a child directory in a file manager.
$ jco c

Open Child Directory

Open Child Directory in File Browser
10. Check stats of each folder key weight and overall key weight along with total directory weight. Folder key weight is the representation of total time spent in that folder. Directory weight if the number of directory in list.
$ j --stat

Check Directory Statistics
Tips : The file where autojump stores run log and error log files in the folder ~/.local/share/autojump/. Don’t overwrite these files, else you may loose all your stats.
$ ls -l ~/.local/share/autojump/
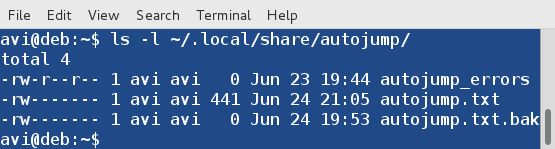
Autojump Logs
11. You may seek help, if required simply as:
$ j --help

Autojump Help and Options
Functionality Requirements and Known Conflicts
- autojump lets you jump to only those directories to which you have already cd. Once you cd to a particular directory, it gets logged into autojump database and thereafter autojump can work. You can not jump to a directory to which you have not cd, after setting up autojump, no matter what.
- You can not jump to a directory, the name of which begins with a dash (-). You may consider to read my post on Manipulation of files and directories that start with ‘-‘ or other special characters”
- In BASH Shell autojump keeps track of directories by modifying $PROMPT_COMMAND. It is strictly recommended not to overwrite $PROMPT_COMMAND. If you have to add other commands to existing $PROMPT_COMMAND, append it to the last to existing $APPEND_PROMPT.
Conclusion:
autojump is a must utility if you are a command-line user. It eases a lots of things. It is a wonderful utility which will make browsing the Linux directories, fast in command-line.