Kurly is a free open source, simple but effective, cross-platform alternative to the popular curl command-line tool. It is written in Go programming language and works in the same way as curl but only aims to offer common usage options and procedures, with emphasis on the HTTP(S) operations.
In this tutorial we will learn how to install and use kurly program – an alternative to most widely used curl command in Linux.
Once you have installed Golang on your Linux machine, you can proceed to install kurly by cloning its git repository as shown.
$ go get github.com/davidjpeacock/kurly
Alternatively, you can install it via snapd – a package manager for snaps, on a number of Linux distributions. To use snapd, you need to install it on your system as shown.
Kurly focuses on the HTTP(S) realm, we will use Httpbin, a HTTP request and response service to partly demonstrate how kurly operates.
The following command will return the user agent, as defined in the http://www.httpbin.org/user-agentendpoint.
$ kurly http://httpbin.org/user-agent
Check User Agent
Next, you can use kurly to download a file (for example Tomb-2.5.tar.gz encryption tool source code), preserving remote filename while saving output using -O flag.
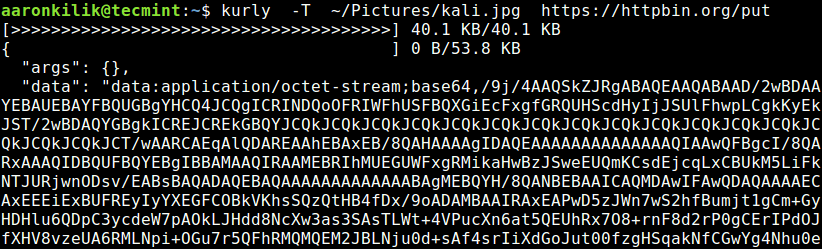
This example shows how to upload a file, where the -T flag is used to specify the location of a file to upload. Under the http://httpbin.org/put endpoint, this command will return the PUT data as shown in the screenshot.
In Linux (also UNIX) $PATH is environment variable, used to tell the shell where to look for executable files. $PATH variable provides great flexibility and security to the Linux systems and it is definitely safe to say that it is one of the most important environment variables.
Programs/scripts that are located within the $PATH’s directory, can be executed directly in your shell, without specifying the full path to them. In this tutorial you are going to learn how to set $PATH variable globally and locally.
First, let’s see your current $PATH’s value. Open a terminal and issue the following command:
The result shows a list of directories separated by colons. You can easily add more directories by editing your user’s shell profile file.
In different shells this can be:
Bash shell -> ~/.bash_profile, ~/.bashrc or profile
Korn Shell -> ~/.kshrc or .profile
Z shell -> ~/.zshrc or .zprofile
Please note that depending on how you are logging to the system in question, different file might be read. Here is what the bash manual says, keep in mind that the files are similar for other shells:
/bin/bash
The bash executable
/etc/profile
The systemwide initialization file, executed for login shells
~/.bash_profile
The personal initialization file, executed for login shells
~/.bashrc
The individual per-interactive-shell startup file
~/.bash_logout
The individual login shell cleanup file, executed when a login shell exits
~/.inputrc
Individual readline initialization file|
Considering the above, you can add more directories to the $PATH variable by adding the following line to the corresponding file that you will be using:
$ export PATH=$PATH:/path/to/newdir
Of course in the above example, you should change “/path/to/newdir” with the exact path that you wish to set. Once you have modified your .*rc or .*_profile file you will need to call it again using the “source” command.
For example in bash you can do this:
$ source ~/.bashrc
Below, you can see an example of mine $PATH environment on a local computer:
This is actually a good practice to create a local “bin” folder for users where they can place their executable files. Each user will have its separate folder to store his contents. This is also a good measure to keep your system secured.
There are several command-line tools for managing a wireless network interface in Linux systems. A number of these can be used to simply view the wireless network interface status (whether it is up or down, or if it is connected to any network), such as iw, iwlist, ip, ifconfig and others.
And some are used to connect to a wireless network, and these include: nmcli, is a command-line tool used to create, show, edit, delete, enable, and disable network connections, as well as control and display network device status.
First start by checking the name of your network device using the following command. From the output of this command, the device name/interface is wlp1s0 as shown.
$ iw dev

phy#0
	Interface wlp1s0
		ifindex 3
		wdev 0x1
		addr 38:b1:db:7c:78:c7
		type managed
Next, check the Wi-Fi device connection status using the following command.
iw wlp2s0 linkNot connected.
From the output above the device is not connected to any network, run the following command to scan available Wi-Fi networks.
sudo iw wlp2s0 scancommand failed: Network is down (-100)
Considering the output of the above command, the network device/interface is DOWN, you can turn it On(UP) with the ip command as shown.
$ sudo ip link set wlp1s0 up
If you get the following error, that means your Wifi is hard blocked on Laptop or Computer.
RTNETLINK answers: Operation not possible due to RF-kill
To remove or unblock you need to run the following command to solve the error.
$ echo "blacklist hp_wmi" | sudo tee /etc/modprobe.d/hp.conf
$ sudo rfkill unblock all
Then try to turn ON the network device once more, and it should work this time around.
$ sudo ip link set wlp1s0 up
If you know the ESSID of the Wi-Fi network you wish to connect to, move to the next step, otherwise issue the command below to scan available Wi-Fi networks again.
$ sudo iw wlp1s0 scan
And lastly, connect to the wi-fi network using following command, where Hackernet (Wi-Fi network SSID) and localhost22 (password/pre-shared key).
$ nmcli dev wifi connect Hackernet password localhost22
Once connected, verify your connectivity by doing a ping to an external machine and analyze the output of the ping as shown.
$ ping 8.8.8.8

PING 8.8.8.8 (8.8.8.8) 56(84) bytes of data.
64 bytes from 8.8.8.8: icmp_seq=1 ttl=48 time=61.7 ms
64 bytes from 8.8.8.8: icmp_seq=2 ttl=48 time=61.5 ms
64 bytes from 8.8.8.8: icmp_seq=3 ttl=48 time=61.6 ms
64 bytes from 8.8.8.8: icmp_seq=4 ttl=48 time=61.3 ms
64 bytes from 8.8.8.8: icmp_seq=5 ttl=48 time=63.9 ms
^C
--- 8.8.8.8 ping statistics ---
5 packets transmitted, 5 received, 0% packet loss, time 4006ms
rtt min/avg/max/mdev = 61.338/62.047/63.928/0.950 ms
That’s It! I hope this article helped you to setup your Wi-Fi network from the Linux command line.
In this guide, we will describe what character encoding and cover a few examples of converting files from one character encoding to another using a command line tool. Then finally, we will look at how to convert several files from any character set (charset) to UTF-8 encoding in Linux.
As you may probably have in mind already, a computer does not understand or store letters, numbers or anything else that we as humans can perceive except bits. A bit has only two possible values, that is either a 0or 1, true or false, yes or no. Every other thing such as letters, numbers, images must be represented in bits for a computer to process.
In simple terms, character encoding is a way of informing a computer how to interpret raw zeroes and ones into actual characters, where a character is represented by set of numbers. When we type text in a file, the words and sentences we form are cooked-up from different characters, and characters are organized into a charset.
There are various encoding schemes out there such as ASCII, ANSI, Unicode among others. Below is an example of ASCII encoding.
Character  bits
A               01000001
B               01000010
In Linux, the iconv command line tool is used to convert text from one form of encoding to another.
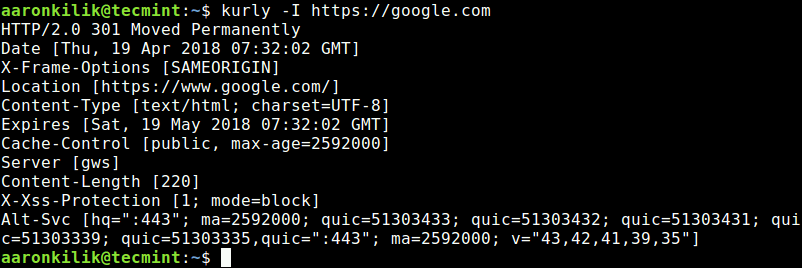
You can check the encoding of a file using the file command, by using the -i or --mime flag which enables printing of mime type string as in the examples below:
Where -f or --from-code means input encoding and -t or --to-encoding specifies output encoding.
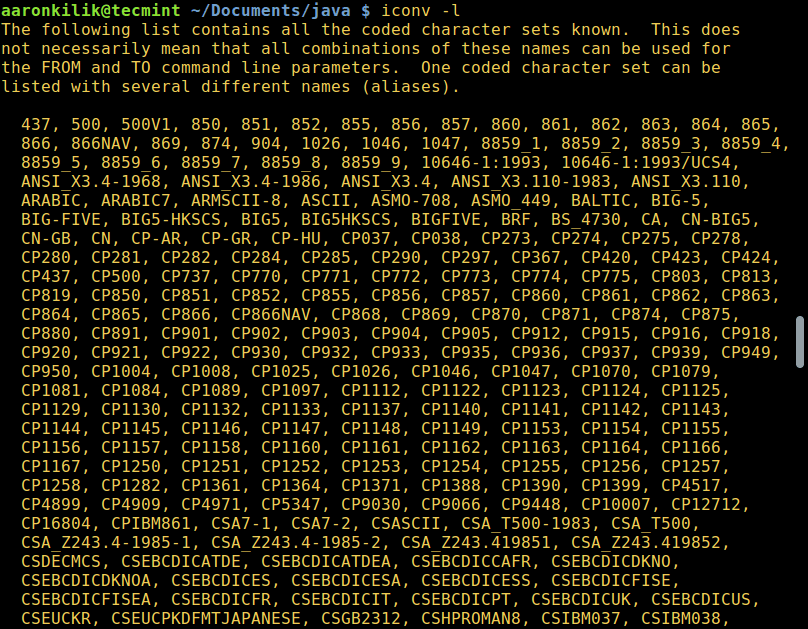
To list all known coded character sets, run the command below:
$ iconv -l
List Coded Charsets in Linux
Convert Files from UTF-8 to ASCII Encoding
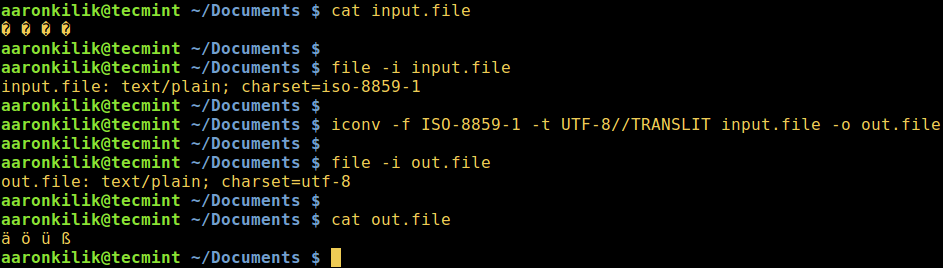
Next, we will learn how to convert from one encoding scheme to another. The command below converts from ISO-8859-1 to UTF-8 encoding.
Consider a file named input.file which contains the characters:
� � � �
Let us start by checking the encoding of the characters in the file and then view the file contents. Closely, we can convert all the characters to ASCII encoding.
After running the iconv command, we then check the contents of the output file and the new encoding of the characters as below.
Note: In case the string //IGNORE is added to to-encoding, characters that can’t be converted and an error is displayed after conversion.
Again, supposing the string //TRANSLIT is added to to-encoding as in the example above (ASCII//TRANSLIT), characters being converted are transliterated as needed and if possible. Which implies in the event that a character can’t be represented in the target character set, it can be approximated through one or more similar looking characters.
Consequently, any character that can’t be transliterated and is not in target character set is replaced with a question mark (?) in the output.
Convert Multiple Files to UTF-8 Encoding
Coming back to our main topic, to convert multiple or all files in a directory to UTF-8 encoding, you can write a small shell script called encoding.sh as follows:
#!/bin/bash
#enter input encoding here
FROM_ENCODING="value_here"
#output encoding(UTF-8)
TO_ENCODING="UTF-8"
#convert
CONVERT=" iconv  -f   $FROM_ENCODING  -t   $TO_ENCODING"
#loop to convert multiple files
for  file  in  *.txt; do
     $CONVERT   "$file"   -o  "${file%.txt}.utf8.converted"
done
exit 0
Save the file, then make the script executable. Run it from the directory where your files (*.txt) are located.
$ chmod  +x  encoding.sh
$ ./encoding.sh
Important: You can as well use this script for general conversion of multiple files from one given encoding to another, simply play around with the values of the FROM_ENCODING and TO_ENCODING variable, not forgetting the output file name "${file%.txt}.utf8.converted".
For more information, look through the iconv man page.
$ man iconv
To sum up this guide, understanding encoding and how to convert from one character encoding scheme to another is necessary knowledge for every computer user more so for programmers when it comes to dealing with text.
Those Linux users who mainly work with Linux command Line via console/terminal feels the real power of Linux. However it may sometimes be painful to navigate inside Linux Hierarchical file system, specially for the newbies.
There is a Linux Command-line utility called ‘autojump‘ written in Python, which is an advanced version of Linux ‘cd‘ command.
Autojump – A Fastest Way to Navigate Linux File System
This application was originally written by Joël Schaerer and now maintained by +William Ting.
Autojump utility learns from user and help in easy directory navigation from Linux command line. Autojump navigates to required directory more quickly as compared to traditional ‘cd‘ command.
Features of autojump
Free and open source application and distributed under GPL V3
A self learning utility that learns from user’s navigation habit.
Faster navigation. No need to include sub-directories name.
Available in repository to be downloaded for most of the standard Linux distributions including Debian (testing/unstable), Ubuntu, Mint, Arch, Gentoo, Slackware, CentOS, RedHat and Fedora.
Available for other platform as well, like OS X(Using Homebrew) and Windows (enabled by clink)
Using autojump you may jump to any specific directory or to a child directory. Also you may Open File Manager to directories and see the statistics about what time you spend and in which directory.
Prerequisites
Python Version 2.6+
Step 1: Do a Full System Update
1. Do a system Update/Upgrade as a root user to ensure you have the latest version of Python installed.
# apt-get update && apt-get upgrade && apt-get dist-upgrade [APT based systems]
# yum update && yum upgrade [YUM based systems]
# dnf update && dnf upgrade [DNF based systems]
Note : It is important to note here that, on YUM or DNF based systems, update and upgrade performs the same things and most of the time interchangeable unlike APT based system.
Step 2: Download and Install Autojump
2. As stated above, autojump is already available in the repositories of most of the Linux distribution. You may just install it using the Package Manager. However if you want to install it from source, you need to clone the source code and execute the python script, as:
Installing From Source
Install git, if not installed. It is required to clone git.
# apt-get install git 	        [APT based systems]
# yum install git 		[YUM based systems]
# dnf install git 		[DNF based systems]
Once git has been installed, login as normal user and then clone autojump as:
4. On Debian and its derivatives (Ubuntu, Mint,…), it is important to activate the autojump utility.
To activate autojump utility temporarily, i.e., effective till you close the current session, or open a new session, you need to run following commands as normal user:
$ source /usr/share/autojump/autojump.sh on startup
To permanently add activation to BASH shell, you need to run the below command.
5. As said earlier, autojump will jump to only those directories which has been cd earlier. So before we start testing we are going to ‘cd‘ a few directories and create a few as well. Here is what I did.
$ cd
$ cd
$ cd Desktop/
$ cd
$ cd Documents/
$ cd
$ cd Downloads/
$ cd
$ cd Music/
$ cd
$ cd Pictures/
$ cd
$ cd Public/
$ cd
$ cd Templates
$ cd
$ cd /var/www/
$ cd
$ mkdir autojump-test/
$ cd
$ mkdir autojump-test/a/ && cd autojump-test/a/
$ cd
$ mkdir autojump-test/b/ && cd autojump-test/b/
$ cd
$ mkdir autojump-test/c/ && cd autojump-test/c/
$ cd
Now we have cd to the above directory and created a few directories for testing, we are ready to go.
Point to Remember : The usage of j is a wrapper around autojump. You may use j in place of autojumpcommand and vice versa.
6. Check the version of installed autojump using -v option.
$ j -v
or
$ autojump -v
Check Autojump Version
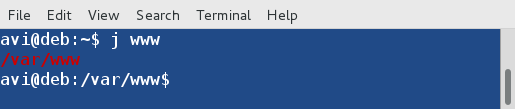
7. Jump to a previously visited directory ‘/var/www‘.
$ j www
Jump To Directory
8. Jump to previously visited child directory ‘/home/avi/autojump-test/b‘ without typing sub-directory name.
$ jc b
Jump to Child Directory
9. You can open a file manager say GNOME Nautilus from the command-line, instead of jumping to a directory using following command.
$ jo www
Jump to Directory
Open Directory in File Browser
You can also open a child directory in a file manager.
$ jco c
Open Child Directory
Open Child Directory in File Browser
10. Check stats of each folder key weight and overall key weight along with total directory weight. Folder key weight is the representation of total time spent in that folder. Directory weight if the number of directory in list.
$ j --stat
Check Directory Statistics
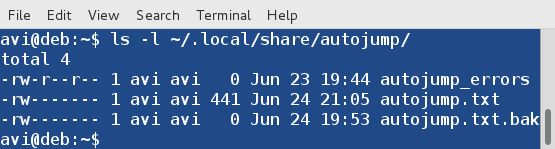
Tips : The file where autojump stores run log and error log files in the folder ~/.local/share/autojump/. Don’t overwrite these files, else you may loose all your stats.
$ ls -l ~/.local/share/autojump/
Autojump Logs
11. You may seek help, if required simply as:
$ j --help
Autojump Help and Options
Functionality Requirements and Known Conflicts
autojump lets you jump to only those directories to which you have already cd. Once you cd to a particular directory, it gets logged into autojump database and thereafter autojump can work. You can not jump to a directory to which you have not cd, after setting up autojump, no matter what.
You can not jump to a directory, the name of which begins with a dash (-). You may consider to read my post on Manipulation of files and directories that start with ‘-‘ or other special characters”
In BASH Shell autojump keeps track of directories by modifying $PROMPT_COMMAND. It is strictly recommended not to overwrite $PROMPT_COMMAND. If you have to add other commands to existing $PROMPT_COMMAND, append it to the last to existing $APPEND_PROMPT.
Conclusion:
autojump is a must utility if you are a command-line user. It eases a lots of things. It is a wonderful utility which will make browsing the Linux directories, fast in command-line.
After reading the O’Reilly book “Foundations for Architecting Data Solutions”, by Ted Malaska and Jonathan Seidman, I reflected on how I chose software/tools/solutions in the past and how I should choose them going forward.
As a bioinformatician you need to be able to quickly discern whether a publication/tool is really a major advancement or just marginally better. I’m not just talking about the newest single-cell RNA-seq technique or another file format, but for every problem case you have. Whether that be data visualization tools, presentation tools, distributed storage systems etc.
It’s not just about how useful the tool may be, it also depends on the quality of the documentation, how simple it is to install, where it sits in the open-source life cycle, etc.
Xkcd is funny but competing standards aren’t. Don’t believe me? Just look at how many pipeline tools exist!
When faced with so many options how can one choose the solutions that fit their need?
Why open source?
I’ve worked with a few licensed software solutions in the past; for example, BLAST2GO (plug: use dammit from Camille Scott instead!), Matlab, and an image stitching software called Autopano Giga (now defunct). One of my greatest frustrations was learning these tools only to later change roles and no longer have them available. As a consultant for the Department of Fisheries and Oceans the prohibitive cost of a Matlab was what pushed me over the edge into learning another high-level programming language — R. FWIW:
Most companies eschew third party solutions or build their product as a hybrid of proprietary and open-source to keep their costs lower. For example, Amazon Web Services (AWS) offers it’s Simple Storage Service (Amazon S3) for a fee but is built upon open source software like Apache Hadoop. I’m not saying not to use AWS (or any other cloud provider) because sometimes you are constrained to having to; I actually used AWS for a project (transcriptome assembly of a coral species) with Docker. Currently I’m working with sensitive information that must be kept on-site, under lock-and-key, so alternative solutions are used.
Most of the newer big data platforms, and successful open-source projects began as internal projects at companies or universities for the first couple years before going through an external incubation phase. For example:
LinkedIn — “Apache Kafka”
University of California at Berkeley — “Apache Spark”
Cloudera — “Impala”
Yahoo! — “Apache Hadoop”
Google — “Kubernetes”
Facebook — “Apache Hive”
There are benefits to choosing open-source projects backed by solid sponsors with good reputation, solid devs, and track record of sponsoring successful projects. You can be fairly confident that these projects have a solid codebase, great documentation, received session time at conferences, and considerable public recognition (through blog posts and articles surrounding it).
When considering open-source solutions it’s also important to gauge where they are in the open-source life cycle. According to Malaska and Seidman, there are nine (potential) stages in the project life cycle based on the Garnter Hype Cycle; however, I think only a few are relevant to discuss here:
Which Cycle Should You Choose?
Don’t believe the hype
This stage of the cycle is referred to as the “curing cancer” stage. The hype at this stage is important for attracting committers and contributors but unless you’re looking to help out in a major way you should steer clear. Unless you’re trying to be on the cutting edge (risk tolerance), or take on an active role as a contributor, it’s best to wait 6–12 months before trying any new technology. By letting others hit walls first you’ll encounter fewer bugs and have access to better documentation and blog posts.
A broken promise is not a lie
After the “curing cancer” stage is the broken promises stage. At this point people are using the project and are finding issues or limitations. For example, a solution may not integrate nicely with other existing systems or there may be problems with scaleability. You should treat any open source project at this stage with cautious optimism.
Go for dependable solutions whenever possible
Projects in the hardening or enterprise stage have become mature technologies. The amount of commits will signal the level of investment in a project. Tthe type of commits tell a story, telling where the author(s) are trying to go with the code, revealing what they want to do by signalling interest in different features of the project. By now the initial excitement has died down and there is more demand for stability than new features. The initial development team may be working on other projects as it has developed a solid community — this is often a good sign of success of a project.
Obviously recent activity signals that the project is alive and maintained. Remember that there are many dead and abandoned projects living on Github. That being said, activity doesn’t always need to be very recent! One prolific, “Rockstar Dev”, put it this way:
Context-switching is expensive, so if I worked on many packages at the same time, I’d never get anything done. Instead, at any point in time, most of my packages are lying fallow, steadily accumulating issues and ideas for new feature. Once a critical mass has accumulated, I’ll spend a couple of days on the package. — Hadley Wickham
Eventually projects enter the decline stage and no one wants to adopt or contribute to a dead or dying project.
Can i trust you?
I use R mostly so let me talk about where a project is hosted for a few moments. Code is often hosted on Github, ROpenSci, Bioconductor or CRAN. The Comprehensive R Archive Network (CRAN) was the main repository for R packages.
“As R users, we are spoiled. Early in the history of R, Kurt Hornik and Friedrich Leisch built support for packages right into R, and started the Comprehensive R Archive Network (CRAN). And R and CRAN had a fantastic run with. Roughly twenty years later, we are looking at over 12,000 packages which can (generally) be installed with absolute ease and no suprises. No other (relevant) open source language has anything of comparable rigour and quality.” — excerpt from Dirk Eddelbuettel
For the field of Bioinformatics Bioconductor is where a package will end up. Projects that exist solely on Github should be viewed with more caution as they have no checklists or peer-review.
Let’s talk about dependencies (a loaded topic — no pun intended)
When looking at projects on Github you should look for people/packages with many stars, watchers, forks, contributors, etc. These visible cues of community support indicate the community cares about a person, project, or action and that many others would benefit from it.
Remember that the amount of commits, issues and pull-requests (PRs) can be a signal of investment and commitment to a project. Are the issues and PRs being dealt with? The latter is literally an offer of code that is being ignored rather than accepted, rejected or commented upon.
By following the actions on code, you can determine who founded the project, what happened across different releases and make inferences about the structure of the project and collaborator roles (who had expertise on which pieces of the system). Linked commits and issues communicates the reasoning behind a change to the code.
You can also gauge community interest by looking at the number of meetups,and conferences (and their attendance levels) , or at email lists, user groups, community forums etc.
Google trends can also be a good measure of the level of interest in projects or technologies.
If you’re a software developer and considering incorporating one of a number of competing technologies you can perform internal benchmarks with your use cases and data.
If you’re using R there is different levels of magnification that a benchmark can provide. For a macro analysis (when computation is more intensive) you should use the rbenchmark package. For microscopic timing comparisons (e.g. nanoseconds elapsed) use the microbenchmark package
Sometimes other consortium’s will have already done the bench-marking for you (for example “The Assemblathon”) . Nonetheless, one should be aware of hidden, or motivated biases trying to make unfair comparisons (use cases for which one tool clearly has an advantage). Also understand that testers could have been making an honest attempt at a fair test but made misunderstandings which lead to invalid results. Therefore it’s important to perform your own internal benchmarking and hold others benchmarks to an open standard of repeatability and verification.
Final words
Ultimately choosing a software solution comes down to the requirements of your project (the timeline, budget, and so forth), how willing are you to be on the cutting-edge (risk tolerance), and how capable team-members will be able to master these solutions based on their skill levels (internal skill set). Then, test out the solutions before fully committing. This job can be given to the prototyper role on your team; the person who likes experimenting/investigating new software.
Brief: Here are some tiny but useful Linux commands, terminal tricks and shortcuts that will save you a lot of time while working with Linux command line.
Have you ever encountered a moment when you see your colleague using some simple Linux commands for tasks that took you several keystrokes? And when you saw that you were like, “Wow! I didn’t know it could have been done that easily”.
In this article, I’ll show you some pro Linux command tricks that will save you a lot of time and in some cases, from plenty of frustration. Not only your friends or colleagues will ‘wow’ at you, it will also help you increase your productivity as you will need fewer keystrokes and even fewer mouse clicks.
It’s not that these are Linux tips for beginners only. Chances are that even experienced Linux users will find some hidden gems that they were not aware despite using Linux for all these years.
In any case, you learn Linux by experience, be it your own or someone else’s 🙂
Cool Linux terminal tricks to save time and increase productivity
You might already know a few of these Linux command tips or perhaps all of it. In either case, you are welcome to share your favorite tricks in the comment section.
Some of these tips also depend on how the shell is configured. Let’s begin!
0. Using tab for autocompletion
I’ll start with something really obvious and yet really important: tab completion.
When you are starting to type something in Linux terminal, you can hit the tab key and it will suggest all the possible options that start with string you have typed so far.
For example, if you are trying to copy a file named my_best_file_1.txt, you can just type ‘cp m’ and hit tab to see the possible options.
Use tab for auto-completion
You can use tab in completing commands as well.
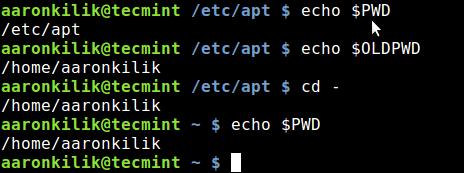
1. Switch back to the last working directory
Suppose you end up in a long directory path and then you move to another directory in a totally different path. And then you realize that you have to go back to the previous directory you were in. In this case, all you need to do is to type this command:
cd -
This will put you back in the last working directory. You don’t need to type the long directory path or copy paste it anymore.
Easily switch between directories
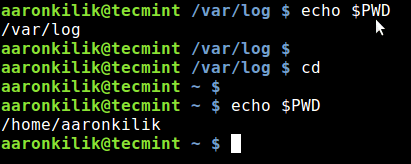
2. Go back to home directory
This is way too obvious. You can use the command below to move to your home directory from anywhere in Linux command-line:
cd ~
However, you can also use just cd to go back to home directory:
cd
Most modern Linux distributions have the shell pre-configured for this command. Saves you at least two keystrokes here.
Move to Home as quickly as possible
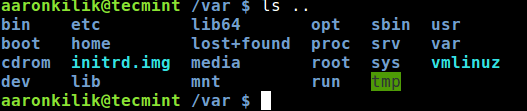
3. List the contents of a directory
You must be guessing what’s the trick in the command for listing the contents of a directory. Everyone knows to use the ls -l for this purpose.
And that’s the thing. Most people use ls -l to list the contents of the directory, whereas the same can be done with the following command:
ll
Again, this depends on the Linux distributions and shell configuration, but chances are that you’ll be able to use it in most Linux distributions.
Using ll instead of ls -l
4. Running multiple commands in one single command
Suppose, you have to run several commands one after another. Do you wait for the first command to finish running and then execute the next one?
You can use the ‘;’ separator for this purpose. This way, you can run a number of commands in one line. No need to wait for the previous commands to finish their business.
command_1; command_2; command_3
5. Running multiple commands in one single command only if the previous command was successful
In the previous command, you saw how to run several commands in one single command to save time. But what if you have to make sure that commands don’t fail?
Imagine a situation where you want to build a code and then if the build was successful, run the make?
You can use && separator for this case. && makes sure that the next command will only run when the previous command was successful.
command_1 && command_2
A good example of this command is when you use sudo apt update && sudo apt upgrade to upgrade your system.
6. Easily search and use the commands that you had used in the past
Imagine a situation where you used a long command couple of minutes/hours ago and you have to use it again. Problem is that you cannot remember the exact command anymore.
Reverse search is your savior here. You can search for the command in the history using a search term.
Just use the keys ctrl+r to initiate reverse search and type some part of the command. It will look up into the history and will show you the commands that matches the search term.
ctrl+r search_term
By default, it will show just one result. To see more results matching your search term, you will have to use ctrl+r again and again. To quit reverse search, just use Ctrl+C.
Reverse search in command history
Note that in some Bash shells, you can also use Page Up and Down key with your search term and it will autocomplete the command.
7. Unfreeze your Linux terminal from accidental Ctrl+S
You probably are habitual of using Ctrl+S for saving. But if you use that in Linux terminal, you’ll have a frozen terminal.
Don’t worry, you don’t have to close the terminal, not anymore. Just use Ctrl+Q and you can use the terminal again.
ctrl+Q
8. Move to beginning or end of line
Suppose you are typing a long command and midway you realize that you had to change something at the beginning. You would use several left arrow keystrokes to move to the start of the line. And similarly for going to the end of the line.
You can use Home and End keys here of course but alternatively, you can use Ctrl+A to go to the beginning of the line and Ctrl+E to go to the end.
Move to the beginning or end of the line
I find it more convenient than using the home and end keys, especially on my laptop.
9. Reading a log file in real time
In situations where you need to analyze the logs while the application is running, you can use the tail command with -f option.
tail -f path_to_Log
You can also use the regular grep options to display only those lines that are meaningful to you:
tail -f path_to_log | grep search_term
You can also use the option F here. This will keep the tail running even if the log file is deleted. So if the log file is created again, tail will continue logging.
10. Reading compressed logs without extracting
Server logs are usually gzip compressed to save disk space. It creates an issue for the developer or sysadmin analyzing the logs. You might have to scp it to your local and then extract it to access the files because, at times, you don’t have write permission to extract the logs.
Thankfully, z commands save you in such situations. z commands provide alternatives of the regular commands that you use to deal with log files such as less, cat, grep etc.
So you get zless, zcat, zgrep etc and you don’t even have to explicitly extract the compressed files. Please refer to my earlier article about using z commands to real compressed logs in detail.
This was one of the secret finds that won me a coffee from my colleague.
11. Use less to read files
To see the contents of a file, cat is not the best option especially if it is a big file. cat command will display the entire file on your screen.
You can use Vi, Vim or other terminal based text editors but if you just want to read a file, less command is a far better choice.
less path_to_file
You can search for terms inside less, move by page, display with line numbers etc.
12. Reuse the last item from the previous command with !$
Using the argument of the previous command comes handy in many situations.
Say you have to create a directory and then go into the newly created directory. There you can use the !$ options.
Use !$ to use the argument of last command
A better way to do the same is to use alt+. . You can use . a number times to shuffle between the options of the last commands.
13. Reuse the previous command in present command with !!
You can call the entire previous command with !!. This comes particularly useful when you have to run a command and realize that it needs root privileges.
A quick sudo !! saves plenty of keystrokes here.
Use !! to use last command as an argument
14. Using alias to fix typos
You probably already know what is an alias command in Linux. What you can do is, to use them to fix typos.
For example, you might often mistype grep as gerp. If you put an alias in your bashrc in this fashion:
alias gerp=grep
This way you won’t have to retype the command again.
15. Copy Paste in Linux terminal
This one is slightly ambiguous because it depends on Linux distributions and terminal applications. But in general, you should be able to copy paste commands with these shortcuts:
Select the text for copying and right click for paste (works in Putty and other Windows SSH clients)
Select the text for copying and middle click (scroll button on the mouse) for paste
Ctrl+Shift+C for copy and Ctrl+Shift+V for paste
16. Kill a running command/process
This one is perhaps way too obvious. If there is a command running in the foreground and you want to exit it, you can press Ctrl+C to stop that running command.
17. Using yes command for commands or scripts that need interactive response
If there are some commands or scripts that need user interaction and you know that you have to enter Y each time it requires an input, you can use Yes command.
Just use it in the below fashion:
yes | command_or_script
18. Empty a file without deleting it
If you just want to empty the contents of a text file without deleting the file itself, you can use a command similar to this:
> filename
19. Find if there are files containing a particular text
There are multiple ways to search and find in Linux command line. But in the case when you just want to see if there are files that contain a particular text, you can use this command:
grep -Pri Search_Term path_to_directory
I highly advise mastering find command though.
20. Using help with any command
I’ll conclude this article with one more obvious and yet very important ‘trick’, using help with a command or a command line tool.
Almost all command and command line tool come with a help page that shows how to use the command. Often using help will tell you the basic usage of the tool/command.
Just use it in this fashion:
command_tool --help
Your favorite Linux command line tricks?
I have deliberately not included commands like fuck because those are not standard commands that you’ll find everywhere. The tricks discussed here should be usable almost in all Linux distributions and shell without the need of installing a new tool.
I know that there are more Linux command tricks to save time in the terminal.
Some of the special directories that a Linux user is bound to work with so many times on a shell command line include the user’s home directory, the current and previous working directories.
Therefore, understanding how to easily access or pinpoint these directories using certain unique methods can be a bonus skill for a new or any Linux user.
Identify Working Directories Using Shell Characters and Environment Variables
In this tips for newbies, we shall look at ways of how a user can identify his/her home, current and previous working directories from the shell using special shell characters and environment variables.
1. Using Specific Shell Characters
There are certain specific characters that are understood by the shell when we are dealing with directories from the command line. The first character we shall look at is the tilde (~): it is used to access the current user’s home directory:
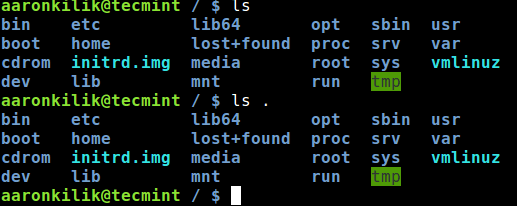
The second is the dot (.) character: it represents the current directory that a user is in, on the command line. In the screen shot below, you can see that the command ls and ls . produce the same out put, listing the contents of the current working directory.
Apart from the characters above, there are also certain environmental variables meant to work with the directories we are focusing on. In the next section, we shall walk through some of the important environmental variables for identifying directories from the command line.
$HOME: its value is the same as that of the tilde (~) character – the current user’s home directory, you can test that by using the echo command as follows:
$ echo $HOME
Print User Home Directory
$PWD: in full, it stands for – Print Working Directory (PWD), as the name implies, it prints the absolute path of the current working directory in the shell command line as below:
$ echo $PWD
Print Present Working Directory
$OLDPWD: it points to the directory a user was in, just before moving to the current working directory. You can access its value as below:
Additionally, you can also run some simple commands to quickly accessing your home directory and previous working directory. For example, when you are in any part of your file system on the command line, typing cdand hitting Enter will move you to your home directory:
$ echo $PWD
$ cd
$ echo $PWD
Switch to User Home Directory
You can also move to the previous working directory using the command cd - command as below:
$ echo $PWD
$ echo $OLDPWD
$ cd -
$ echo $PWD
Switch to Previous Working Directory
In this post, we moved through some simple yet useful command line tips for new Linux users to identify certain special directories from within the shell command line.
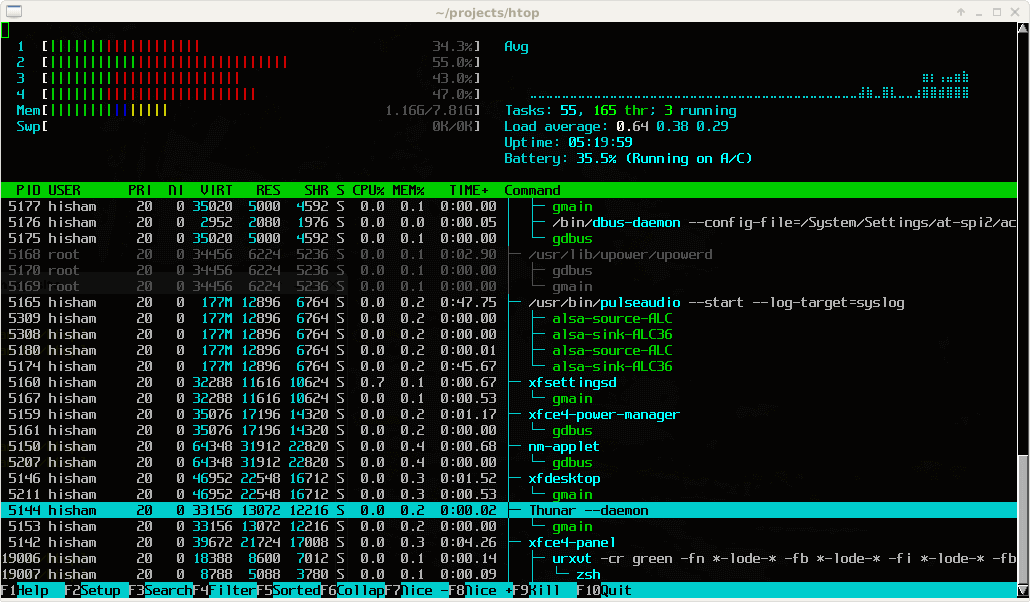
This article is the continuation of our Linux system monitoring series, today we’re talking about the most popular monitoring tool called htop, which is just reached to version 2.0.2 and comes with some cool new features.
Htop 2.0: Linux Process Monitoring
Htop is an interactive real time process monitoring application for Linux/Unix like systems and also a handy alternative to top command, which is default process monitoring tool that comes with pre-installed on all Linux operating systems.
Htop has numerous other user-friendly features, which are not available under top command and they are:
In htop you can scroll vertically to view the full process list, and scroll horizontally to view the full command lines.
It starts very quickly as compared top, because it doesn’t wait to fetch data during startup.
In htop you can kill more than one processes at once without inserting their PIDs.
In htop you no longer needed to enter process number or priority value to re-nice a process.
Press “e” to print the set of environment variables for a process.
Use mouse to select list items.
Install Htop Using Binary Packages in Linux
Important: Following binary installation, will give you the available htop version 1.0.3 or 1.0.2 in most distributions, so if you’re looking for Htop 2.0.2 version, then I recommend you to follow Source installation section as shown below:
To install Htop on RHEL 7/6/5 and CentOS 7/6/5, your system must have EPEL repository installed and enabled, to do so run the following commands on your respective distributions to install and enable it for your system architecture (32bit or 64bit).
In Debian and Ubuntu, you can fetch htop by typing:
# sudo apt-get install htop
Compile and Install Htop from Source Packages
To install Htop 2.0.2 version, you must have Development Tools and Ncurses installed on your system, to do so run the following series of commands on your respective distributions.
On RHEL/CentOS and Fedora
# yum groupinstall "Development Tools"
# yum install ncurses ncurses-devel
# wget http://hisham.hm/htop/releases/2.0.2/htop-2.0.2.tar.gz
# tar xvfvz htop-2.0.2.tar.gz
# cd htop-2.0.2
Next, run the configure and make script to install and compile htop.
# ./configure
# make
# make install
How do I use htop?
Now run the htop monitoring tool by executing following command on the terminal.
# htop
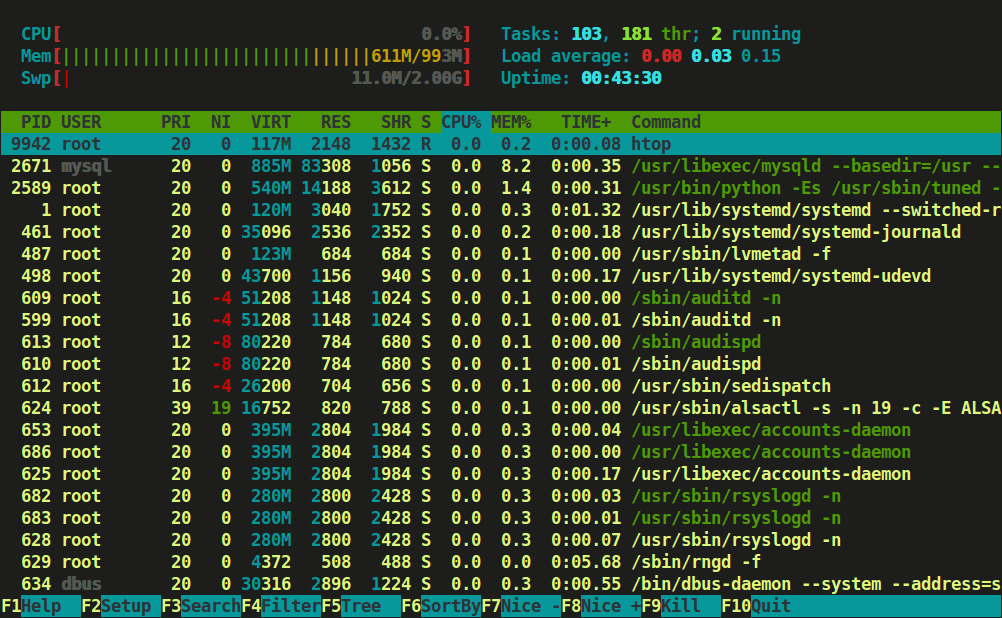
Htop is having three sections mainly
Header, where we can see info like CPU, Memory, Swap and also shows tasks, load average and Up-time.
List of processes sorted by CPU utilization.
Footer shows different options like help, setup, filtertreekill, nice , quit etc.
Htop Linux Processes Monitoring
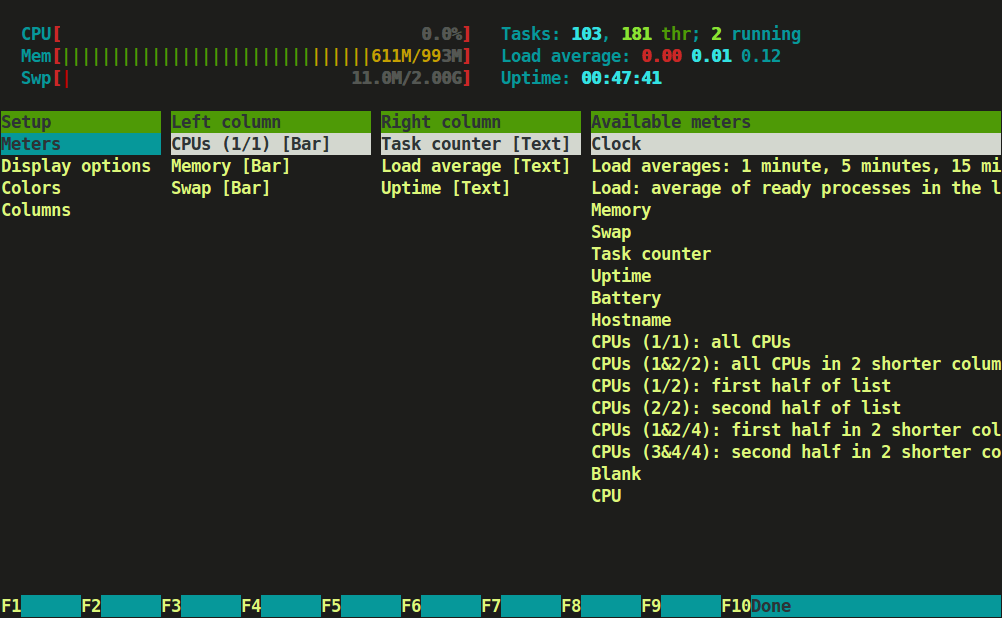
Press F2 or S for setup menu > there are four columns i.e Setup, Left Column, Right Column and Available Meters.
Here, you can configure the meters printed at the top of the window, set various display options, select among color patterns and choose which columns are printed in which order.
Htop Setup Screen
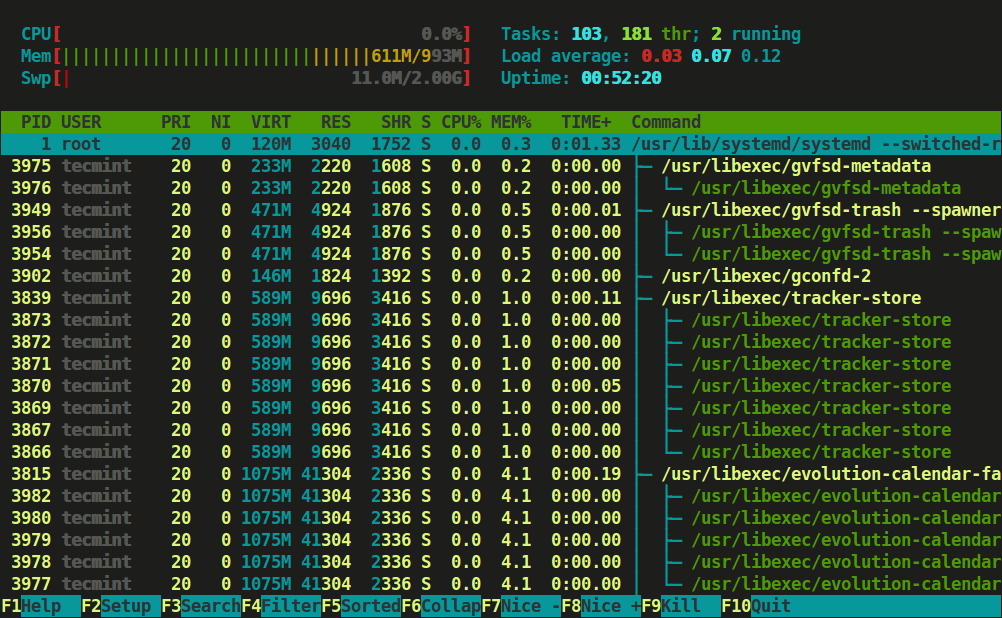
Type tree or t to display processes tree view.
Htop Process View in Tree Format
You can refer function keys displayed at footer to use this nifty htop application to monitor Linux running processes. However, we advise to use character keys or shortcut keys instead of function keys as it may have mapped with some other functions during secure connection.
Htop Shortcut and Function Keys
Some of the shortcut and function keys and its functionality to interact with htop.
In this tutorial we will learn how to install local software packages (.DEB) in Debian and its derivatives such as Ubuntu and Linux Mint using three different command line tools and they are dpkg, apt and gdebi.
This is useful to those new users who have migrated from Windows to Ubuntu or Linux Mint. The very basic problem they face is installing local software on system.
However, Ubuntu and Linux Mint has its own Graphical Software Center for easy software installation, but we will be looking forward to installing packages through terminal way.
1. Install Software Using Dpkg Command
Dpkg is a package manager for Debian and its derivatives such as Ubuntu and Linux Mint. It is used to install, build, remove and manage .deb packages. but unlike other Linux package management systems, it cannot automatically download and install packages with their dependencies.
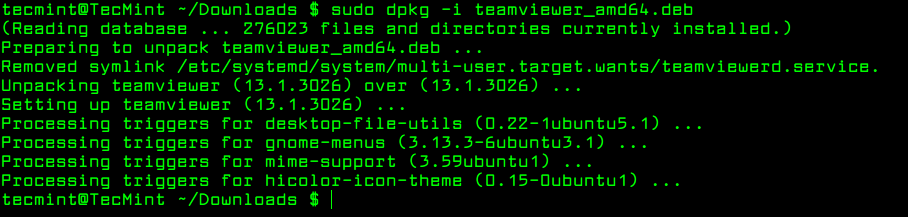
To install a local package, use the dpkg command with the -i flag along with package name as shown.
$ sudo dpkg -i teamviewer_amd64.deb
Install Local Package in Ubuntu
If you get any dependency errors while installing or after installing and launching a program, you can use the following apt command to resolve and install dependencies using the -f flag, which tells the program to fix broken dependencies.
$ sudo apt-get install -f
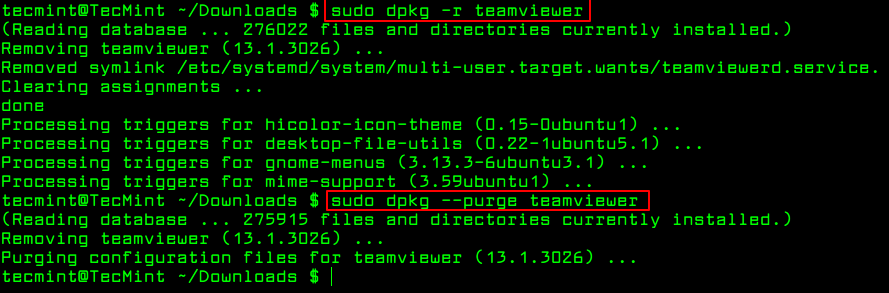
To remove a package use -r option or if you want to remove all its files including configuration files, you can purge it using the --purge option as shown.
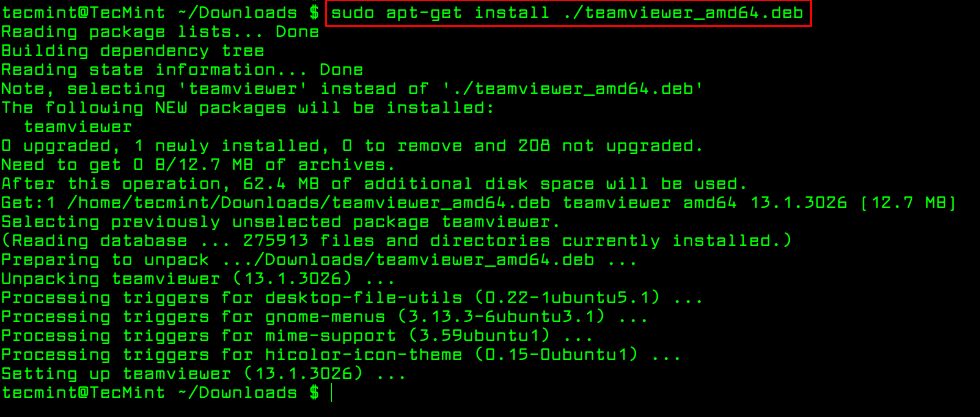
The apt command is a advanced command-line tool, which offers new software package installation, existing software package upgradation, updating of the package list index, and even upgrading the whole Ubuntu or Linux Mint system.
It also offers apt-get and apt-cache command-line tools for managing packages more interactively on Debianand its derivatives such as Ubuntu and Linux Mint systems.
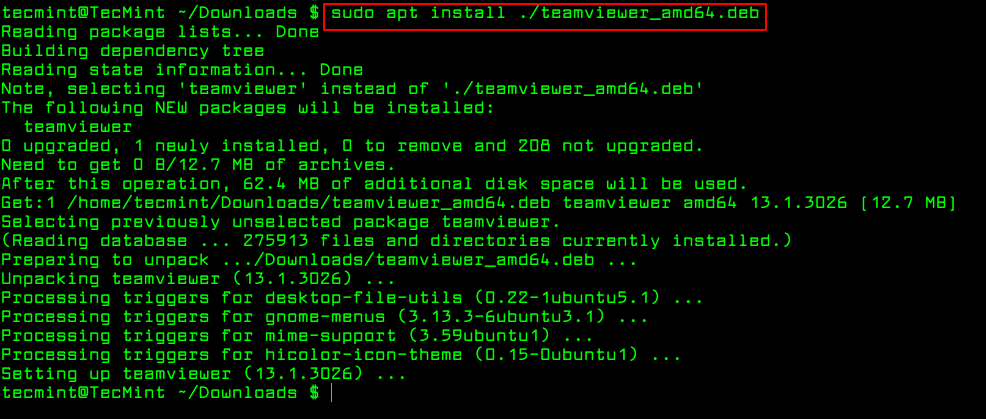
Essentially, apt-get or apt do not understand .deb files, they are designed to primarily handle package names (for example teamviewer, apache2, mariadb etc..) and they retrieve and install .deb archives associated with a package name, from a source specified in the /etc/apt/sources.list file.
The only trick to installing a local Debian package using apt-get or apt is by specifying a local relative or absolute path (./ if in current dir) to the package, otherwise it will try to retrieve the package from remote sources and the operation will fail.
To remove a package use remove option or if you want to remove all its files including configuration files, you can purge it using the purge option as shown.
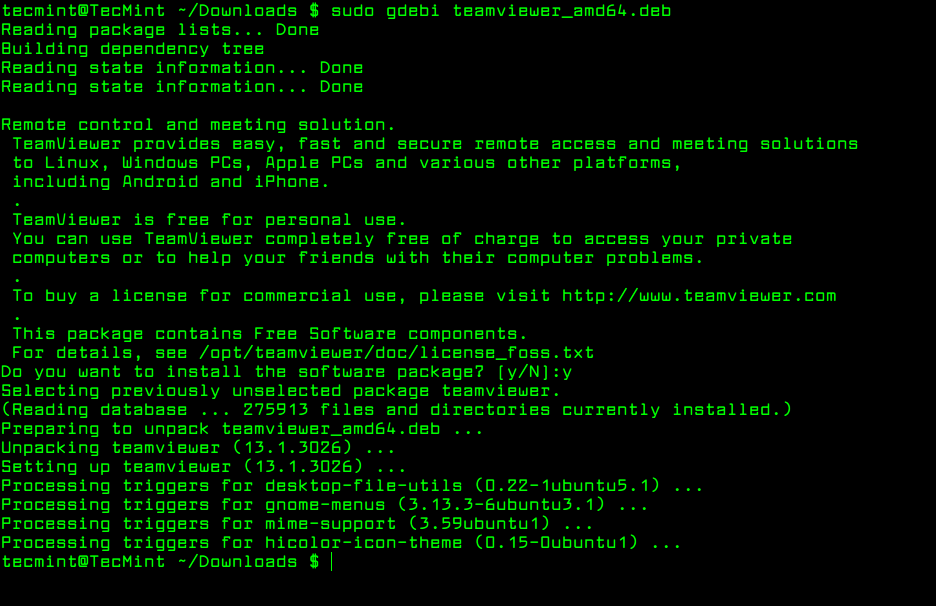
gdebi is a tiny command-line tool for installing local deb packages. It resolves and installs package dependencies on the fly. To install a package, use the following command.
$ sudo gdebi teamviewer_13.1.3026_amd64.deb
Install Local Packages Using Gdebi in Ubuntu
To remove a package installed from gdebi, you can use apt, apt-get or dpkg commands using purge option as shown.
$ sudo apt purge teamviewer
OR
$ sudo apt-get purge teamviewer
OR
$ sudo dpkg --purge teamviewer
That’s It! In this tutorial, we have explained three different command line tools for installing or removing local Debian packages in Ubuntu and Linux Mint.