Icinga: A Next Generation Open Source ‘Linux Server Monitoring’ Tool for RHEL/CentOS 7.0

Icinga is a modern open source monitoring tool that originated from a Nagios fork, and now has two parallel branches, Icinga 1 and Icinga 2. What this tool does is, not to different from Nagios due to the fact that it still uses Nagios plugins and add-ons and even configuration files to check and monitor network services and hosts, but some differences can be spotted on web interfaces, especially on new web interface, reporting capability and easy add-ons development.

Install Icinga Monitoring Tool in CentOS

Install Icinga Monitoring Tool in CentOS/RHEL 7.0

This topic will concentrate on a basic installation of Icinga 1 Monitoring Tool from binaries on CentOS or RHEL 7, using RepoForge (previously known as RPMforge) repositories for CentOS 6, with the classical web interface held by Apache Webserver and the use of Nagios Plugins that will be installed on your system.

Read AlsoInstall Nagios Monitoring Tool in RHEL/CentOS

Requirements

A basic LAMP installation on RHEL/CentOS 7.0 without MySQL and PhpMyAdmin, but with these PHP modules: php-cli
php-pear php-xmlrpc php-xsl php-pdo php-soap php-gd.

  1. Installing Basic LAMP in RHEL/CentOS 7.0

Step 1: Installing Icinga Monitoring Tool

1. Before proceeding with Icinga installation from binaries add RepoForge repositories on your system by issuing the following command, depending on your machine.

For 86-64-bit
# rpm -Uvh http://pkgs.repoforge.org/rpmforge-release/rpmforge-release-0.5.3-1.el6.rf.x86_64.rpm
For 32-bit
# rpm -Uvh http://pkgs.repoforge.org/rpmforge-release/rpmforge-release-0.5.3-1.el6.rf.i686.rpm

Install RepoForge in CentOS

Install RepoForge Repository

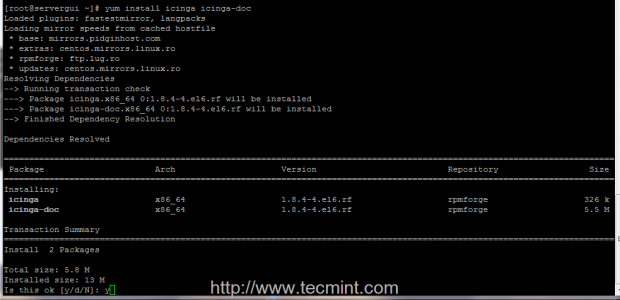
2. After RepoForge repositories had been added on your system, start with Icinga basic installation without the web interface yet, by running the following command.

# yum install icinga icinga-doc

Install Icinga in CentOS

Install Icinga Monitoring Tool

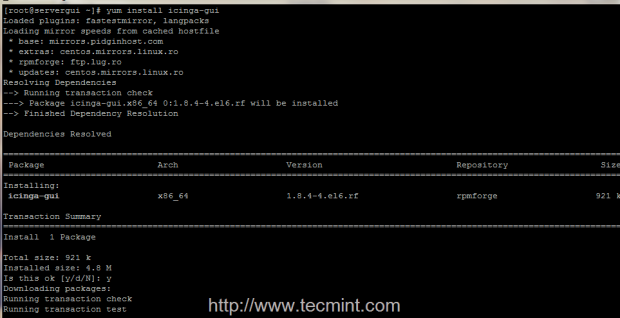
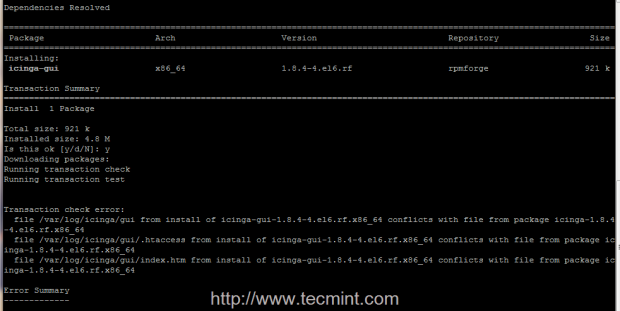
3. The next step is to try to install Icinga web interface provided by icinga-gui package. It seems that for the moment this package has some unresolved issues with CentOS/RHEL 7, and will generate some transaction check errors, but you can feel free to try to install the package, maybe meanwhile the problem was resolved.

Still, if you get the same errors on your machine as the pictures below shows you, use the following approach as further described, to be able to install Icinga web interface.

# yum install icinga-gui

Install Icinga Gui in CentOS

Install Icinga Gui

Icinga Gui Conflict Error

Icinga Gui Conflict Error

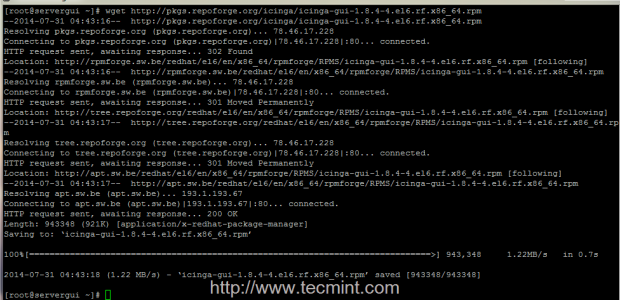
4. The procedure to install icinga-gui package which provides the web interface is the following. First download the binary package form RepoForge website using wget command.

For 86-64-bit
# wget http://pkgs.repoforge.org/icinga/icinga-gui-1.8.4-4.el6.rf.x86_64.rpm
For 32-bit
# wget http://pkgs.repoforge.org/icinga/icinga-gui-1.8.4-4.el6.rf.i686.rpm

Install Icinga RPM Package

Install Icinga RPM Package

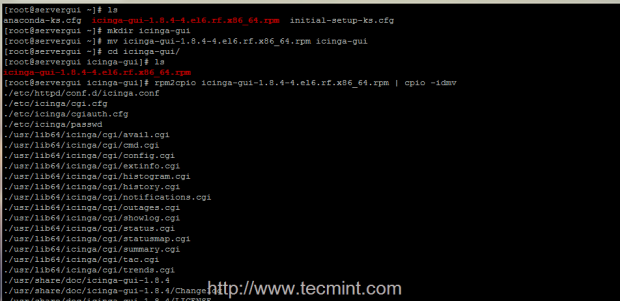
5. After wget finishes downloading the package, create a directory named icinga-gui (you can choose other name if you want), move icinga-gui RPM binary to that folder, enter the folder and extract RPM package contents by issuing the next series of commands.

# mkdir icinga-gui
# mv icinga-gui-* icinga-gui
# cd icinga-gui
# rpm2cpio icinga-gui-* | cpio -idmv

Copy Icinga GUI Packages

Copy Icinga GUI Packages

6. Now that you have the extracted icinga-gui package, use ls command to visualize folder content – it should result three new directories – etcusr and var. Start by executing a recursive copying of all three resulted directories on your system root file system layout.

# cp -r etc/* /etc/
# cp -r usr/* /usr/
# cp -r var/* /var/

Copy Directories Recursively in Linux

Copy Directories Recursively

Step 2: Modify Icinga Apache Configuration file and System Permissions

7. As presented on this article introduction, your system needs to have Apache HTTP server and PHP installed in order to be able to run Icinga Web Interface.

After you finished the above steps, a new configuration file should be now present on Apache conf.d path named icinga.conf. In order to be able to access Icinga from a remote location from browser, open this configuration file and replace all its content with the following configurations.

# nano /etc/httpd/conf.d/icinga.conf

Make sure you replace all file content with the following.

ScriptAlias /icinga/cgi-bin "/usr/lib64/icinga/cgi"

<Directory "/usr/lib64/icinga/cgi">
#  SSLRequireSSL
   Options ExecCGI
   AllowOverride None
   AuthName "Icinga Access"
   AuthType Basic
   AuthUserFile /etc/icinga/passwd

   <IfModule mod_authz_core.c>
      # Apache 2.4
      <RequireAll>
         Require all granted
         # Require local
         Require valid-user
      </RequireAll>
   </IfModule>

   <IfModule !mod_authz_core.c>
      # Apache 2.2
      Order allow,deny
      Allow from all
      #  Order deny,allow
      #  Deny from all
      #  Allow from 127.0.0.1
      Require valid-user
    </IfModule>
 </Directory>

Alias /icinga "/usr/share/icinga/"

<Directory "/usr/share/icinga/">

#  SSLRequireSSL
   Options None
   AllowOverride All
   AuthName "Icinga Access"
   AuthType Basic
   AuthUserFile /etc/icinga/passwd

   <IfModule mod_authz_core.c>
      # Apache 2.4
      <RequireAll>
         Require all granted
         # Require local
         Require valid-user
      </RequireAll>
   </IfModule>

   <IfModule !mod_authz_core.c>
      # Apache 2.2
      Order allow,deny
      Allow from all
      #  Order deny,allow
      #  Deny from all
      #  Allow from 127.0.0.1
      Require valid-user
   </IfModule>
</Directory>

8. After you have edited Icinga httpd configuration file, add Apache system user to Icinga system group and use the following system permissions on next system paths.

# usermod -aG icinga apache
# chown -R icinga:icinga /var/spool/icinga/*
# chgrp -R icinga /etc/icinga/*
# chgrp -R icinga /usr/lib64/icinga/*
# chgrp -R icinga /usr/share/icinga/*

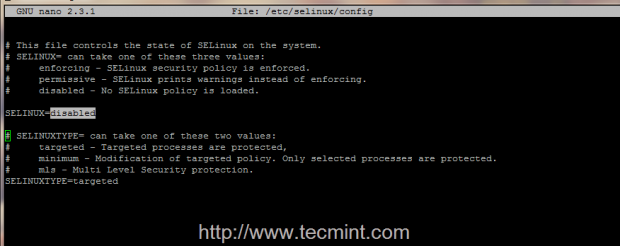
9. Before starting Icinga system process and Apache server, make sure you also disable SELinux security mechanism by running setenforce 0 command and make the changes permanent by editing /etc/selinux/configfile, changing SELINUX context from enforcing to disabled.

# nano /etc/selinux/config

Modify SELINUX directive to look like this.

SELINUX=disabled

Disable SELinux in CentOS

Disable SELinux

You can also use getenforce command to view SELinux status.

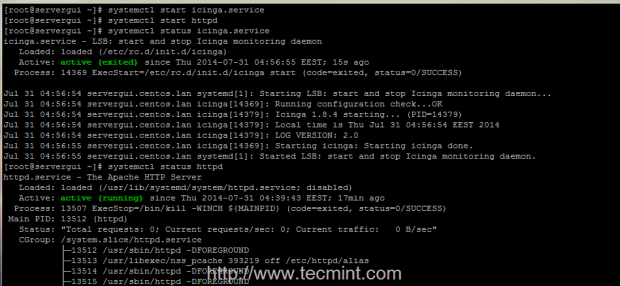
10. As the last step before starting Icinga process and web interface, as a security measure you can now modify Icinga Admin password by running the following command, and then start both processes.

# htpasswd -cm /etc/icinga/passwd icingaadmin
# systemctl start icinga
# systemctl start httpd

Create Icinga Admin Password

Create Icinga Admin Password

Start Icinga Service

Start Icinga Service

Step 3: Install Nagios Plugins and Access Icinga Web Interface

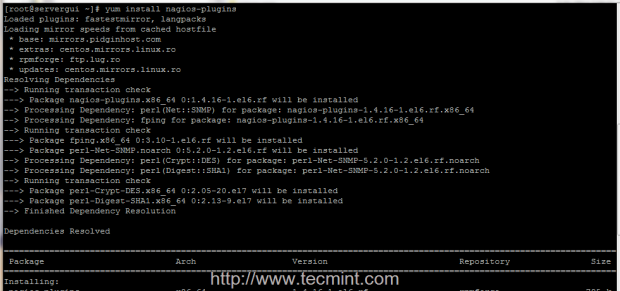
11. In order to start monitoring public external services on hosts with Icinga, such as HTTP, IMAP, POP3, SSH, DNS, ICMP ping and many others services accessible from internet or LAN you need to install Nagios Pluginspackage provided by EPEL Repositories.

# rpm -Uvh http://dl.fedoraproject.org/pub/epel/7/x86_64/e/epel-release-7-6.noarch.rpm
# yum install yum install nagios-plugins nagios-plugins-all

Install Epel Repo in CentOS

Install Epel Repository

Install NRPE Plugin in CentOS

Install Nagios Plugin

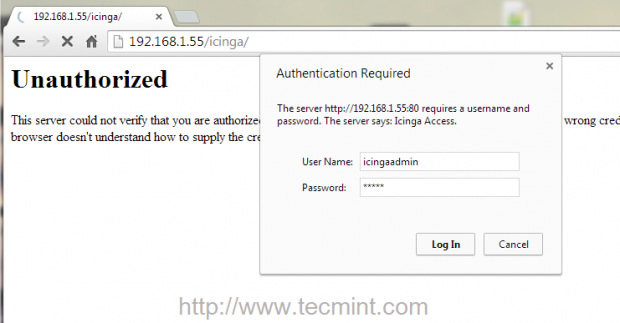
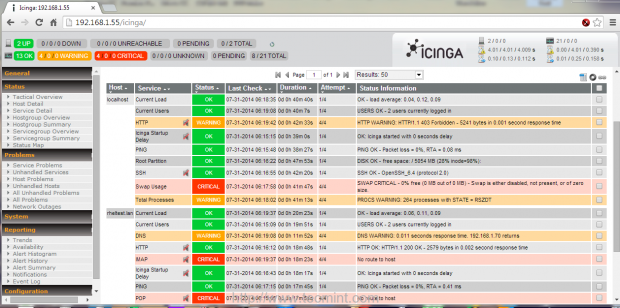
12. To login on Icinga Web Interface, open a browser and point it to the URL http://system_IP/icinga/. Use icingaadmin as username and the password that you changed earlier and you can now see your localhost system status.

Icinga Admin Login

Icinga Admin Login

Icinga Monitoring Dashboard

Icinga Monitoring Dashboard

That’s all! Now you have Icinga basic with the classical web interface – nagios like – installed and running on your system. Using Nagios Plugins you can now start adding new hosts and external services to check and monitor by editing Icinga configuration files located on /etc/icinga/ path. If you need to monitor internal services on remote hosts then you must install an agent on remote hosts like NRPE, NSClient++, SNMP to gather data and send it to Icinga main process.

Read Also

  1. Install NRPE Plugin and Monitor Remote Linux Hosts
  2. Install NSClient++ Agent and Monitor Remote Windows Hosts

Source

NetHogs – Monitor Per Process Network Bandwidth Usage in Real Time

Linux operating systems have tons of open source network monitoring tools on the web. Say, you can use iftop command to check bandwidth usage, netstat command to see reports on interface statistics or top commandto watch running process on your system. But if you are really looking for something that can give you a real time statistics of your network bandwidth of per process usage, then NetHogs is the only utility you should look for.

Linux Network Bandwidth Monitoring

NetHogs – Network Bandwidth Monitoring

What is NetHogs?

NetHogs is an open source command line program (similar to Linux top command) that is used for monitor real time network traffic bandwidth used by each process or application.

From NetHogs Project Page

NetHogs is a small ‘net top’ tool. Instead of breaking the traffic down per protocol or per subnet, like most tools do, it groups bandwidth by process. NetHogs does not rely on a special kernel module to be loaded. If there’s suddenly a lot of network traffic, you can fire up NetHogs and immediately see which PID is causing this. This makes it easy to identify programs that have gone wild and are suddenly taking up your bandwidth.

This article explains you on how to install and find out real time per process network bandwidth usage with nethogs utility under Unix/Linux operating systems.

Install NetHogs in RHEL, CentOS and Fedora

To install nethogs, you must turn on EPEL repository under your Linux systems and then run the following yum command to download and install nethogs package.

# yum install nethogs
Sample Output
[root@tecmint ~]# yum -y install nethogs

Loaded plugins: fastestmirror, refresh-packagekit
Loading mirror speeds from cached hostfile
 * base: mirrors.hns.net.in
 * epel: mirror.nus.edu.sg
 * extras: mirrors.hns.net.in
 * rpmfusion-free-updates: mirrors.ustc.edu.cn
 * rpmfusion-nonfree-updates: mirror.de.leaseweb.net
 * updates: mirrors.hns.net.in
Setting up Install Process
Resolving Dependencies
--> Running transaction check
---> Package nethogs.i686 0:0.8.0-1.el6 will be installed
--> Finished Dependency Resolution

Dependencies Resolved

===========================================================================================================
 Package				Arch				Version					Repository					Size
===========================================================================================================
Installing:
 nethogs				i686				0.8.0-1.el6				epel						28 k

Transaction Summary
===========================================================================================================
Install       1 Package(s)

Total download size: 28 k
Installed size: 50 k
Downloading Packages:
nethogs-0.8.0-1.el6.i686.rpm														|  28 kB     00:00
Running rpm_check_debug
Running Transaction Test
Transaction Test Succeeded
Running Transaction
  Installing : nethogs-0.8.0-1.el6.i686                                                          1/1
  Verifying  : nethogs-0.8.0-1.el6.i686                                                          1/1

Installed:
  nethogs.i686 0:0.8.0-1.el6

Complete!

Install NetHogs in Ubuntu, Linux Mint and Debian

To install nethogs, type the following apt-get command to install nethogs package.

$ sudo apt-get install nethogs
Sample Output
tecmint@tecmint:~$ sudo apt-get install nethogs

[sudo] password for tecmint: 
Reading package lists... Done
Building dependency tree       
Reading state information... Done
The following NEW packages will be installed:
  nethogs
0 upgraded, 1 newly installed, 0 to remove and 318 not upgraded.
Need to get 27.1 kB of archives.
After this operation, 100 kB of additional disk space will be used.
Get:1 http://in.archive.ubuntu.com/ubuntu/ quantal/universe nethogs i386 0.8.0-1 [27.1 kB]
Fetched 27.1 kB in 1s (19.8 kB/s)  
Selecting previously unselected package nethogs.
(Reading database ... 216058 files and directories currently installed.)
Unpacking nethogs (from .../nethogs_0.8.0-1_i386.deb) ...
Processing triggers for man-db ...
Setting up nethogs (0.8.0-1) ...

Using NetHogs Utility

To run the nethogs utility, type the following command under red-hat based systems.

# nethogs

To execute it, you will must have root permissions, so run with sudo command as shown.

$ sudo nethogs
Sample Previews:

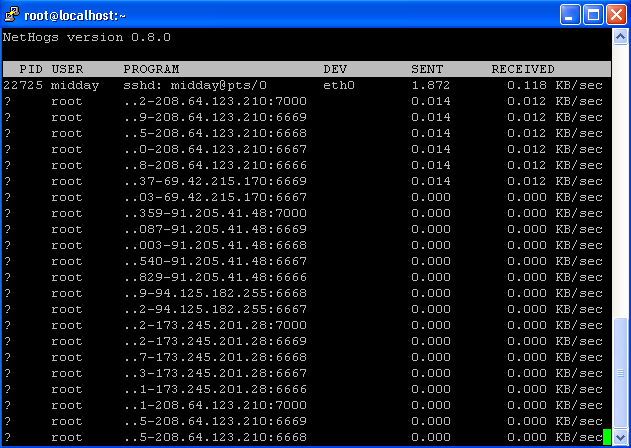
Install Nethogs in Linux

NetHogs Preview on CentOS 6.3

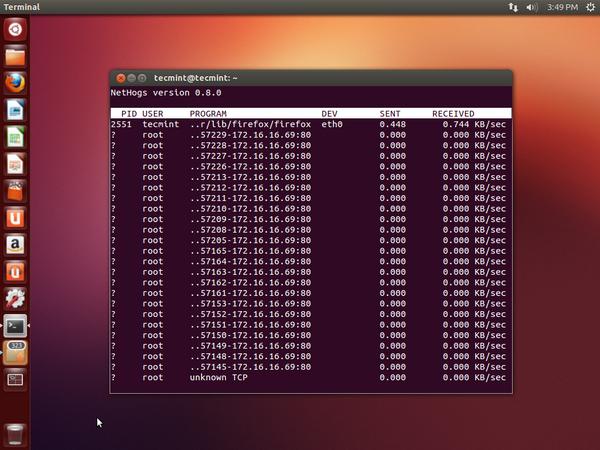
Install nethogs in Ubuntu

NetHogs Preview on Ubuntu 12.10

As you see above the send and received lines show the amount of traffic being used by per process. The total sent and received usage of bandwidth calculated at the bottom. You can sort and change the order by using the interactive controls discussed below.

NetHogs Command Line Options

Following are the nethogs command line options. Using ‘-d‘ to add a refresh rate and ‘device name‘ to monitor specific given device or devices bandwidth (default is eth0). For example, to set 5 seconds as your refresh rate, then type the command as.

# nethogs -d 5
$ sudo nethogs -d 5

To monitor specific device (eth0) network bandwidth only, use the command as.

# nethogs eth0
$ sudo nethogs eth0

To monitor network bandwidth of both eth0 and eth1 interfaces, type the following command.

# nethogs eth0 eth1
$ sudo nethogs eth0 eth1
Other Options and Usage
-d : delay for refresh rate.
-h : display available commands usage.
-p : sniff in promiscious mode (not recommended).
-t : tracemode.
-V : prints Version info.

NetHogs Interactive Controls

Following are some useful interactive controls (Keyboard Shortcuts) of nethogs program.

-m : Change the units displayed for the bandwidth in units like KB/sec -> KB -> B-> MB.
-r : Sort by magnitude of respectively traffic.
-s : Sort by magnitude of sent traffic.
-q : Hit quit to the shell prompt.
For a full list of nethogs utility command line options, please check out the nethogs man pages by using command as ‘man nethogs‘ or ‘sudo man nethogs‘ from the terminal. For more information visit the Nethogs project home page.

Source

Petiti – An Open Source Log Analysis Tool for Linux SysAdmins

Petit is a free and open source command line based log analysis tool for Unix-like as well as Cygwin systems, designed to rapidly analyze log files in enterprise environments.

It is intended to follow the Unix philosophy of small fast and easy to use, and can be used to inspect/supports different log file formats including syslog and Apache log files.

Petit Features

  • Supports for log analysis.
  • Auto-detects and supports various log file formats( e.g. Syslog, Apache Access, Apache Error, Snort Log, Linux Secure Log, and raw log files).
  • Supports for log Hashing .
  • Supports command line graphing.
  • Supports for word discovery and count with common stop-words within log data.
  • Supports for log reduction for easy reading.
  • Provides various default and specially made filters.
  • Supports fingerprints, useful in identifying and excluding reboot signatures.
  • Offers several output options for wide screen terminals and character selection and many more.

In this tutorial, we will show you how to install and use Petit log analysis tool in Linux to pull out useful information from system logs in a various ways.

How to Install and Use Petit Log Analysis Tool in Linux

Petit can be installed from the default repositories of Debian/Ubuntu and its derivatives, using apt package management tool as shown below.

$ sudo apt install petit

On RHEL/CentOS/Fedora systems, download and install the .rpm package like this.

# wget http://crunchtools.com/wp-content/files/petit/petit-current.rpm
# rpm -i petit-current.rpm

Once installed, it’s time to see the Petit basic usage with examples..

Hashing a Log File

This is a straightforward petit function – it sums up the number of lines discovered in a log file. It’s output comprises of the number of similar lines found in the log and what the group broadly looked like as shown below.

# petit --hash /var/log/yum.log
OR
# petit --hash --fingerprint /var/log/messages
Petit – Monitor Yum Log History
2:	Mar 18 14:35:54 Installed: libiec61883-1.2.0-4.el6.x86_64
2:	Mar 18 15:25:18 Installed: xorg-x11-drv-i740-1.3.4-11.el6.x86_64
1:	Dec 16 12:36:23 Installed: 5:mutt-1.5.20-7.20091214hg736b6a.el6.x86_64
1:	Dec 16 12:36:22 Installed: mailcap-2.1.31-2.el6.noarch
1:	Dec 16 12:40:49 Installed: mailx-12.4-8.el6_6.x86_64
1:	Dec 16 12:40:20 Installed: man-1.6f-32.el6.x86_64
1:	Dec 16 12:43:33 Installed: sysstat-9.0.4-31.el6.x86_64
1:	Dec 16 12:36:22 Installed: tokyocabinet-1.4.33-6.el6.x86_64
1:	Dec 16 12:36:22 Installed: urlview-0.9-7.el6.x86_64
1:	Dec 16 12:40:19 Installed: xz-4.999.9-0.5.beta.20091007git.el6.x86_64
1:	Dec 16 12:40:19 Installed: xz-lzma-compat-4.999.9-0.5.beta.20091007git.el6.x86_64
1:	Dec 16 12:43:31 Updated: 2:tar-1.23-15.el6_8.x86_64
1:	Dec 16 12:43:31 Updated: procps-3.2.8-36.el6.x86_64
1:	Feb 18 12:40:27 Erased: mysql
1:	Feb 18 12:40:28 Erased: mysql-libs
1:	Feb 18 12:40:22 Installed: MariaDB-client-10.1.21-1.el6.x86_64
1:	Feb 18 12:40:12 Installed: MariaDB-common-10.1.21-1.el6.x86_64
1:	Feb 18 12:40:10 Installed: MariaDB-compat-10.1.21-1.el6.x86_64
1:	Feb 18 12:54:50 Installed: apr-1.3.9-5.el6_2.x86_64
......

Finding Number Of Lines Produced by a Daemon

Using the --daemon option helps to output a basic report of lines produced by particular system daemon as shown in the example below.

# petit --hash --daemon /var/log/syslog
Petit – Monitor SysLog Entries
847:	vmunix:
48:	CRON[#]:
30:	dhclient[#]:
26:	nm-dispatcher:
14:	rtkit-daemon[#]:
6:	smartd[#]:
5:	ntfs-#g[#]:
4:	udisksd[#]:
3:	mdm[#]:
2:	ag[#]:
2:	syslogd
1:	cinnamon-killer-daemon:
1:	cinnamon-session[#]:
1:	pulseaudio[#]:

Finding Number Of Lines Produced by a Host

To find all the number of lines generated by a particular host, use the --host flag as shown below. This can be useful when analyzing log files for more than one host.

# petit --host /var/log/syslog

999:	tecmint

Performing a Word Count in a Log File

This function is used to search and display qualitatively significant words in a log file.

# petit --wordcount /var/log/syslog
Petit – List Number of Word Count in Logs
845:	[
97:	[mem
75:	ACPI:
64:	pci
62:	debian-sa#
62:	to
51:	USB
50:	of
49:	device
47:	&&
47:	(root)
47:	CMD
47:	usb
41:	systemd#
36:	ACPI
32:	>
32:	driver
32:	reserved
31:	(comm#
31:	-v

Graphing a Log File

This works in a key/value bar charting format, for side by side comparison of distributions as shown in the examples below.

To graph the first 60 seconds in a syslog, use the --sgrapg flag like this.

# petit --sgraph /var/log/syslog
Petit – Graph a Log File
#                                                           
#                                                           
#                                                           
#                                                           
#                                                           
############################################################
59                            29                           58 

Start Time:	2017-06-08 09:45:59 		Minimum Value: 0
End Time:	2017-06-08 09:46:58 		Maximum Value: 1
Duration:	60 seconds 			Scale: 0.166666666667

Tracking Particular Words in a Log File

This example shows how to track and graph a specific word (e.g “dhcp” in the command below) in a log file.

# cat /var/log/messages | grep error | petit --mgraph
Petit – Track a Word in Logs
#                        #                          #       
#                        #                          #       
#                        #                          #       
#                        #                          #       
#                        #                          #       
############################################################
10                            40                           09 

Start Time:	2017-06-08 10:10:00 		Minimum Value: 0
End Time:	2017-06-08 11:09:00 		Maximum Value: 2
Duration:	60 minutes 			Scale: 0.333333333333

Additionally, to show samples for each entry in a log file, use the –allsamples option like this.

# petit --hash --allsample /var/log/syslog

Important Petit Files:

  • /var/lib/petit/fingerprint_library – used to construct custom fingerprint files.
  • /var/lib/petit/fingerprints (aggregate fingerprint files) – used to filter out reboots and other events not considered vital by the system administrator.
  • /var/lib/petit/filters/

For more information and usage options, read the petit man page like this.

# man petit
OR
# petit -h

Petit Homepage: http://crunchtools.com/software/petit/

Also read through these useful guides concerning log monitoring and management in Linux:

  1. 4 Good Open Source Log Monitoring and Management Tools for Linux
  2. How to Manage System Logs (Configure, Rotate and Import Into Database) in Linux
  3. How to Setup and Manage Log Rotation Using Logrotate in Linux
  4. Monitor Server Logs in Real-Time with “Log.io” Tool on Linux

Source

Ubuntu 19 04 Desktop Tour of New Features

Опубликовано: 19 мар. 2019 г.

Hey folks, take a quick look at the upcoming Ubuntu 19.04 default GNOME versions.

The awesome wallpaper in the end is created by SylviaRitter and you can get it from her DeviantArt here: https://www.deviantart.com/sylviaritt…

More info about Ubuntu 19.04 features can be found on our website: https://itsfoss.com/ubuntu-19-04-rele…

Basically, Ubuntu 19.04 Disco Dingo adds little to what we already have in Ubuntu 18.10. There are a few improvements here and there but you won’t notice a lot of difference from the previous release of Ubuntu 18.10 Cosmic Cuttlefish.

Some of the promised new features like Android Integration is still nowhere to be seen.

If you are using Ubuntu 18.04, you may like the looks.

Music created by Mozart and performed by Bernd Krueger is licensed under a Creative Commons Attribution License:

https://creativecommons.org/licenses/…Source: http://www.piano-midi.de/mozart.htm

Source

Protect Apache Against Brute Force or DDoS Attacks Using Mod_Security and Mod_evasive Modules

For those of you in the hosting business, or if you’re hosting your own servers and exposing them to the Internet, securing your systems against attackers must be a high priority.

mod_security (an open source intrusion detection and prevention engine for web applications that integrates seamlessly with the web server) and mod_evasive are two very important tools that can be used to protect a web server against brute force or (D)DoS attacks.

Read Also : How to Install Linux Malware Detect with ClamAV as Antivirus Engine

mod_evasive, as its name suggests, provides evasive capabilities while under attack, acting as an umbrella that shields web servers from such threats.

Install Mod_Security Mod_Evasive in CentOS

Install Mod_Security and Mod_Evasive to Protect Apache

In this article we will discuss how to install, configure, and put them into play along with Apache on RHEL/CentOS 6 and 7 as well as Fedora 21-15. In addition, we will simulate attacks in order to verify that the server reacts accordingly.

This assumes that you have a LAMP server installed on your system. If not, please check this article before proceeding further.

  1. Install LAMP stack in RHEL/CentOS 7

You will also need to setup iptables as the default firewall front-end instead of firewalld if you’re running RHEL/CentOS 7 or Fedora 21. We do this in order to use the same tool in both RHEL/CentOS 7/6 and Fedora 21.

Step 1: Installing Iptables Firewall on RHEL/CentOS 7 and Fedora 21

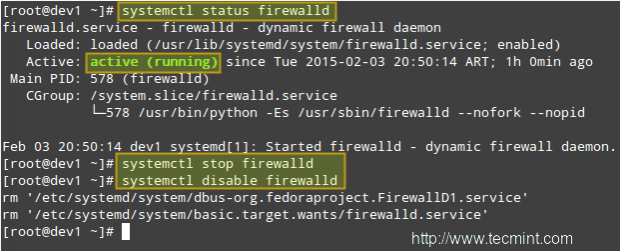
To begin, stop and disable firewalld:

# systemctl stop firewalld
# systemctl disable firewalld

Disable Firewalld Service in CentOS 7

Disable Firewalld Service

Then install the iptables-services package before enabling iptables:

# yum update && yum install iptables-services
# systemctl enable iptables
# systemctl start iptables
# systemctl status iptables

Install Iptables Firewall in CentOs 7

Install Iptables Firewall

Step 2: Installing Mod_Security and Mod_evasive

In addition to having a LAMP setup already in place, you will also have to enable the EPEL repository in RHEL/CentOS 7/6 in order to install both packages. Fedora users don’t need to enable any repo, because epel is a already part of Fedora project.

# yum update && yum install mod_security mod_evasive

When the installation is complete, you will find the configuration files for both tools in /etc/httpd/conf.d.

# ls -l /etc/httpd/conf.d

mod_security + mod_evasive Configurations

mod_security + mod_evasive Configurations

Now, in order to integrate these two modules with Apache and have it load them when it starts, make sure the following lines appear in the top level section of mod_evasive.conf and mod_security.conf, respectively:

LoadModule evasive20_module modules/mod_evasive24.so
LoadModule security2_module modules/mod_security2.so

Note that modules/mod_security2.so and modules/mod_evasive24.so are the relative paths, from the /etc/httpd directory to the source file of the module. You can verify this (and change it, if needed) by listing the contents of the /etc/httpd/modules directory:

# cd /etc/httpd/modules
# pwd
# ls -l | grep -Ei '(evasive|security)'

Verify mod_security + mod_evasive Modules

Verify mod_security + mod_evasive Modules

Then restart Apache and verify that it loads mod_evasive and mod_security:

# service httpd restart 		[On RHEL/CentOS 6 and Fedora 20-18]
# systemctl restart httpd 		[On RHEL/CentOS 7 and Fedora 21]
[Dump a list of loaded Static and Shared Modules]

# httpd -M | grep -Ei '(evasive|security)'				

Check mod_security + mod_evasive Modules Loaded

Check mod_security + mod_evasive Modules Loaded

Step 3: Installing A Core Rule Set and Configuring Mod_Security

In few words, a Core Rule Set (aka CRS) provides the web server with instructions on how to behave under certain conditions. The developer firm of mod_security provide a free CRS called OWASP (Open Web Application Security Project) ModSecurity CRS that can be downloaded and installed as follows.

1. Download the OWASP CRS to a directory created for that purpose.

# mkdir /etc/httpd/crs-tecmint
# cd /etc/httpd/crs-tecmint
# wget https://github.com/SpiderLabs/owasp-modsecurity-crs/tarball/master

Download mod_security Core Rules

Download mod_security Core Rules

2. Untar the CRS file and change the name of the directory for one of our convenience.

# tar xzf master
# mv SpiderLabs-owasp-modsecurity-crs-ebe8790 owasp-modsecurity-crs

Extract mod_security Core Rules

Extract mod_security Core Rules

3. Now it’s time to configure mod_security. Copy the sample file with rules (owasp-modsecurity-crs/modsecurity_crs_10_setup.conf.example) into another file without the .example extension:

# cp modsecurity_crs_10_setup.conf.example modsecurity_crs_10_setup.conf

and tell Apache to use this file along with the module by inserting the following lines in the web server’s main configuration file /etc/httpd/conf/httpd.conf file. If you chose to unpack the tarball in another directory you will need to edit the paths following the Include directives:

<IfModule security2_module>
    Include crs-tecmint/owasp-modsecurity-crs/modsecurity_crs_10_setup.conf
    Include crs-tecmint/owasp-modsecurity-crs/base_rules/*.conf
</IfModule>

Finally, it is recommended that we create our own configuration file within the /etc/httpd/modsecurity.ddirectory where we will place our customized directives (we will name it tecmint.conf in the following example) instead of modifying the CRS files directly. Doing so will allow for easier upgrading the CRSs as new versions are released.

<IfModule mod_security2.c>
	SecRuleEngine On
	SecRequestBodyAccess On
	SecResponseBodyAccess On 
	SecResponseBodyMimeType text/plain text/html text/xml application/octet-stream 
	SecDataDir /tmp
</IfModule>

You can refer to the SpiderLabs’ ModSecurity GitHub repository for a complete explanatory guide of mod_security configuration directives.

Step 4: Configuring Mod_Evasive

mod_evasive is configured using directives in /etc/httpd/conf.d/mod_evasive.conf. Since there are no rules to update during a package upgrade, we don’t need a separate file to add customized directives, as opposed to mod_security.

The default mod_evasive.conf file has the following directives enabled (note that this file is heavily commented, so we have stripped out the comments to highlight the configuration directives below):

<IfModule mod_evasive24.c>
    DOSHashTableSize    3097
    DOSPageCount        2
    DOSSiteCount        50
    DOSPageInterval     1
    DOSSiteInterval     1
    DOSBlockingPeriod   10
</IfModule>

Explanation of the directives:

  1. DOSHashTableSize: This directive specifies the size of the hash table that is used to keep track of activity on a per-IP address basis. Increasing this number will provide a faster look up of the sites that the client has visited in the past, but may impact overall performance if it is set too high.
  2. DOSPageCount: Legitimate number of identical requests to a specific URI (for example, any file that is being served by Apache) that can be made by a visitor over the DOSPageInterval interval.
  3. DOSSiteCount: Similar to DOSPageCount, but refers to how many overall requests can be made to the entire site over the DOSSiteInterval interval.
  4. DOSBlockingPeriod: If a visitor exceeds the limits set by DOSSPageCount or DOSSiteCount, his source IP address will be blacklisted during the DOSBlockingPeriod amount of time. During DOSBlockingPeriod, any requests coming from that IP address will encounter a 403 Forbidden error.

Feel free to experiment with these values so that your web server will be able to handle the required amount and type of traffic.

Only a small caveat: if these values are not set properly, you run the risk of ending up blocking legitimate visitors.

You may also want to consider other useful directives:

DOSEmailNotify

If you have a mail server up and running, you can send out warning messages via Apache. Note that you will need to grant the apache user SELinux permission to send emails if SELinux is set to enforcing. You can do so by running

# setsebool -P httpd_can_sendmail 1

Next, add this directive in the mod_evasive.conf file with the rest of the other directives:

DOSEmailNotify you@yourdomain.com

If this value is set and your mail server is working properly, an email will be sent to the address specified whenever an IP address becomes blacklisted.

DOSSystemCommand

This needs a valid system command as argument,

DOSSystemCommand </command>

This directive specifies a command to be executed whenever an IP address becomes blacklisted. It is often used in conjunction with a shell script that adds a firewall rule to block further connections coming from that IP address.

Write a shell script that handles IP blacklisting at the firewall level

When an IP address becomes blacklisted, we need to block future connections coming from it. We will use the following shell script that performs this job. Create a directory named scripts-tecmint (or whatever name of your choice) in /usr/local/bin and a file called ban_ip.sh in that directory.

#!/bin/sh
# IP that will be blocked, as detected by mod_evasive
IP=$1
# Full path to iptables
IPTABLES="/sbin/iptables"
# mod_evasive lock directory
MOD_EVASIVE_LOGDIR=/var/log/mod_evasive
# Add the following firewall rule (block all traffic coming from $IP)
$IPTABLES -I INPUT -s $IP -j DROP
# Remove lock file for future checks
rm -f "$MOD_EVASIVE_LOGDIR"/dos-"$IP"

Our DOSSystemCommand directive should read as follows:

DOSSystemCommand "sudo /usr/local/bin/scripts-tecmint/ban_ip.sh %s"

In the line above, %s represents the offending IP as detected by mod_evasive.

Add the apache user to the sudoers file

Note that all of this just won’t work unless you to give permissions to user apache to run our script (and that script only!) without a terminal and password. As usual, you can just type visudo as root to access the /etc/sudoers file and then add the following 2 lines as shown in the image below:

apache ALL=NOPASSWD: /usr/local/bin/scripts-tecmint/ban_ip.sh
Defaults:apache !requiretty

Add Apache User to Sudoers

Add Apache User to Sudoers

IMPORTANT: As a default security policy, you can only run sudo in a terminal. Since in this case we need to use sudo without a tty, we have to comment out the line that is highlighted in the following image:

#Defaults requiretty

Disable tty for Sudo

Disable tty for Sudo

Finally, restart the web server:

# service httpd restart 		[On RHEL/CentOS 6 and Fedora 20-18]
# systemctl restart httpd 		[On RHEL/CentOS 7 and Fedora 21]

Step 4: Simulating an DDoS Attacks on Apache

There are several tools that you can use to simulate an external attack on your server. You can just google for “tools for simulating ddos attacks” to find several of them.

Note that you, and only you, will be held responsible for the results of your simulation. Do not even think of launching a simulated attack to a server that you’re not hosting within your own network.

Should you want to do the same with a VPS that is hosted by someone else, you need to appropriately warn your hosting provider or ask permission for such a traffic flood to go through their networks. Tecmint.com is not, by any means, responsible for your acts!

In addition, launching a simulated DoS attack from only one host does not represent a real life attack. To simulate such, you would need to target your server from several clients at the same time.

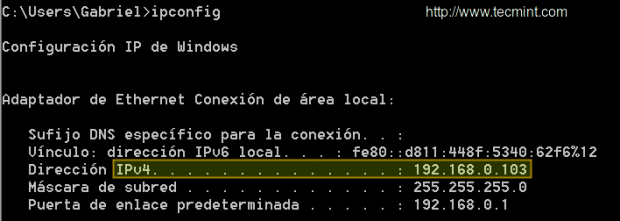
Our test environment is composed of a CentOS 7 server [IP 192.168.0.17] and a Windows host from which we will launch the attack [IP 192.168.0.103]:

Confirm Host IPAddress

Confirm Host IPAddress

Please play the video below and follow the steps outlined in the indicated order to simulate a simple DoS attack:


Then the offending IP is blocked by iptables:

Blocked Attacker IP

Blocked Attacker IP

Conclusion

With mod_security and mod_evasive enabled, the simulated attack causes the CPU and RAM to experiment a temporary usage peak for only a couple of seconds before the source IPs are blacklisted and blocked by the firewall. Without these tools, the simulation will surely knock down the server very fast and render it unusable during the duration of the attack.

We would love to hear if you’re planning on using (or have used in the past) these tools. We always look forward to hearing from you, so don’t hesitate to leave your comments and questions, if any, using the form below.

Reference Links

https://www.modsecurity.org/
http://www.zdziarski.com/blog/?page_id=442

Source

7 Tools to Encrypt/Decrypt and Password Protect Files in Linux

Encryption is the process of encoding files in such a way that only those who are authorized can access it. Mankind is using encryption from ages even when computers were not in existence. During war they would pass some kind of message that only their tribe or those who are concerned were able to understand.

Linux distribution provides a few standard encryption/decryption tools that can prove to be handy at times. Here in this article we have covered 7 such tools with proper standard examples, which will help you to encrypt, decrypt and password protect your files.

If you are interested in knowing how to generate Random password in Linux as well as creating random password you may like to visit the below link:

Generate/Encrypt/Decrypt Random Passwords in Linux

1. GnuPG

GnuPG stands for GNU Privacy Guard and is often called as GPG which is a collection of cryptographic software. Written by GNU Project in C programming Language. Latest stable release is 2.0.27.

In most of the today’s Linux distributions, the gnupg package comes by default, if in-case it’s not installed you may apt or yum it from repository.

$ sudo apt-get install gnupg
# yum install gnupg

We have a text file (tecmint.txt) located at ~/Desktop/Tecmint/, which will be used in the examples that follows this article.

Before moving further, check the content of the text file.

$ cat ~/Desktop/Tecmint/tecmint.txt

Check Content of File

Now encrypt tecmint.txt file using gpg. As soon as you run the gpc command with option -c (encryption only with symmetric cipher) it will create a file texmint.txt.gpg. You may list the content of the directory to verify.

$ gpg -c ~/Desktop/Tecmint/tecmint.txt
$ ls -l ~/Desktop/Tecmint

Encrypt File in Linux

Note: Enter Paraphrase twice to encrypt the given file. The above encryption was done with CAST5 encryption algorithm automatically. You may specify a different algorithm optionally.

To see all the encryption algorithm present you may fire.

$ gpg --version

Check Encryption Algorithm

Now, if you want to decrypt the above encrypted file, you may use the following command, but before we start decrypting we will first remove the original file i.e., tecmint.txt and leave the encrypted file tecmint.txt.gpguntouched.

$ rm ~/Desktop/Tecmint/tecmint.txt
$ gpg ~/Desktop/Tecmint/tecmint.txt.gpg

Decrypt File in Linux

Note: You need to provide the same password you gave at encryption to decrypt when prompted.

2. bcrypt

bcrypt is a key derivation function which is based upon Blowfish cipher. Blowfish cipher is not recommended since the time it was figured that the cipher algorithm can be attacked.

If you have not installed bcrypt, you may apt or yum the required package.

$ sudo apt-get install bcrypt
# yum install bcrypt

Encrypt the file using bcrypt.

$ bcrypt ~/Desktop/Tecmint/tecmint.txt

As soon as you fire the above command, a new file name texmint.txt.bfe is created and original file tecmint.txtgets replaced.

Decrypt the file using bcrypt.

$ bcrypt tecmint.txt.bfe

Note: bcrypt do not has a secure form of encryption and hence it’s support has been disabled at least on Debian Jessie.

3. ccrypt

Designed as a replacement of UNIX crypt, ccrypt is an utility for files and streams encryption and decryption. It uses Rijndael cypher.

If you have not installed ccrypt you may apt or yum it.

$ sudo apt-get install ccrypt
# yum install ccrypt

Encrypt a file using ccrypt. It uses ccencrypt to encrypt and ccdecrypt to decrypt. It is important to notice that at encryption, the original file (tecmint.txt) is replaced by (tecmint.txt.cpt) and at decryption the encrypted file (tecmint.txt.cpt) is replaced by original file (tecmint.txt). You may like to use ls command to check this.

Encrypt a file.

$ ccencrypt ~/Desktop/Tecmint/tecmint.txt

ccencrypt File in Linux

Decrypt a file.

$ ccdecrypt ~/Desktop/Tecmint/tecmint.txt.cpt

Provide the same password you gave during encryption to decrypt.

ccdecrypt File in Linux

4. Zip

It is one of the most famous archive format and it is so much famous that we generally call archive files as zip files in day-to-day communication. It uses pkzip stream cipher algorithm.

If you have not installed zip you may like to apt or yum it.

$ sudo apt-get install zip
# yum install zip

Create a encrypted zip file (several files grouped together) using zip.

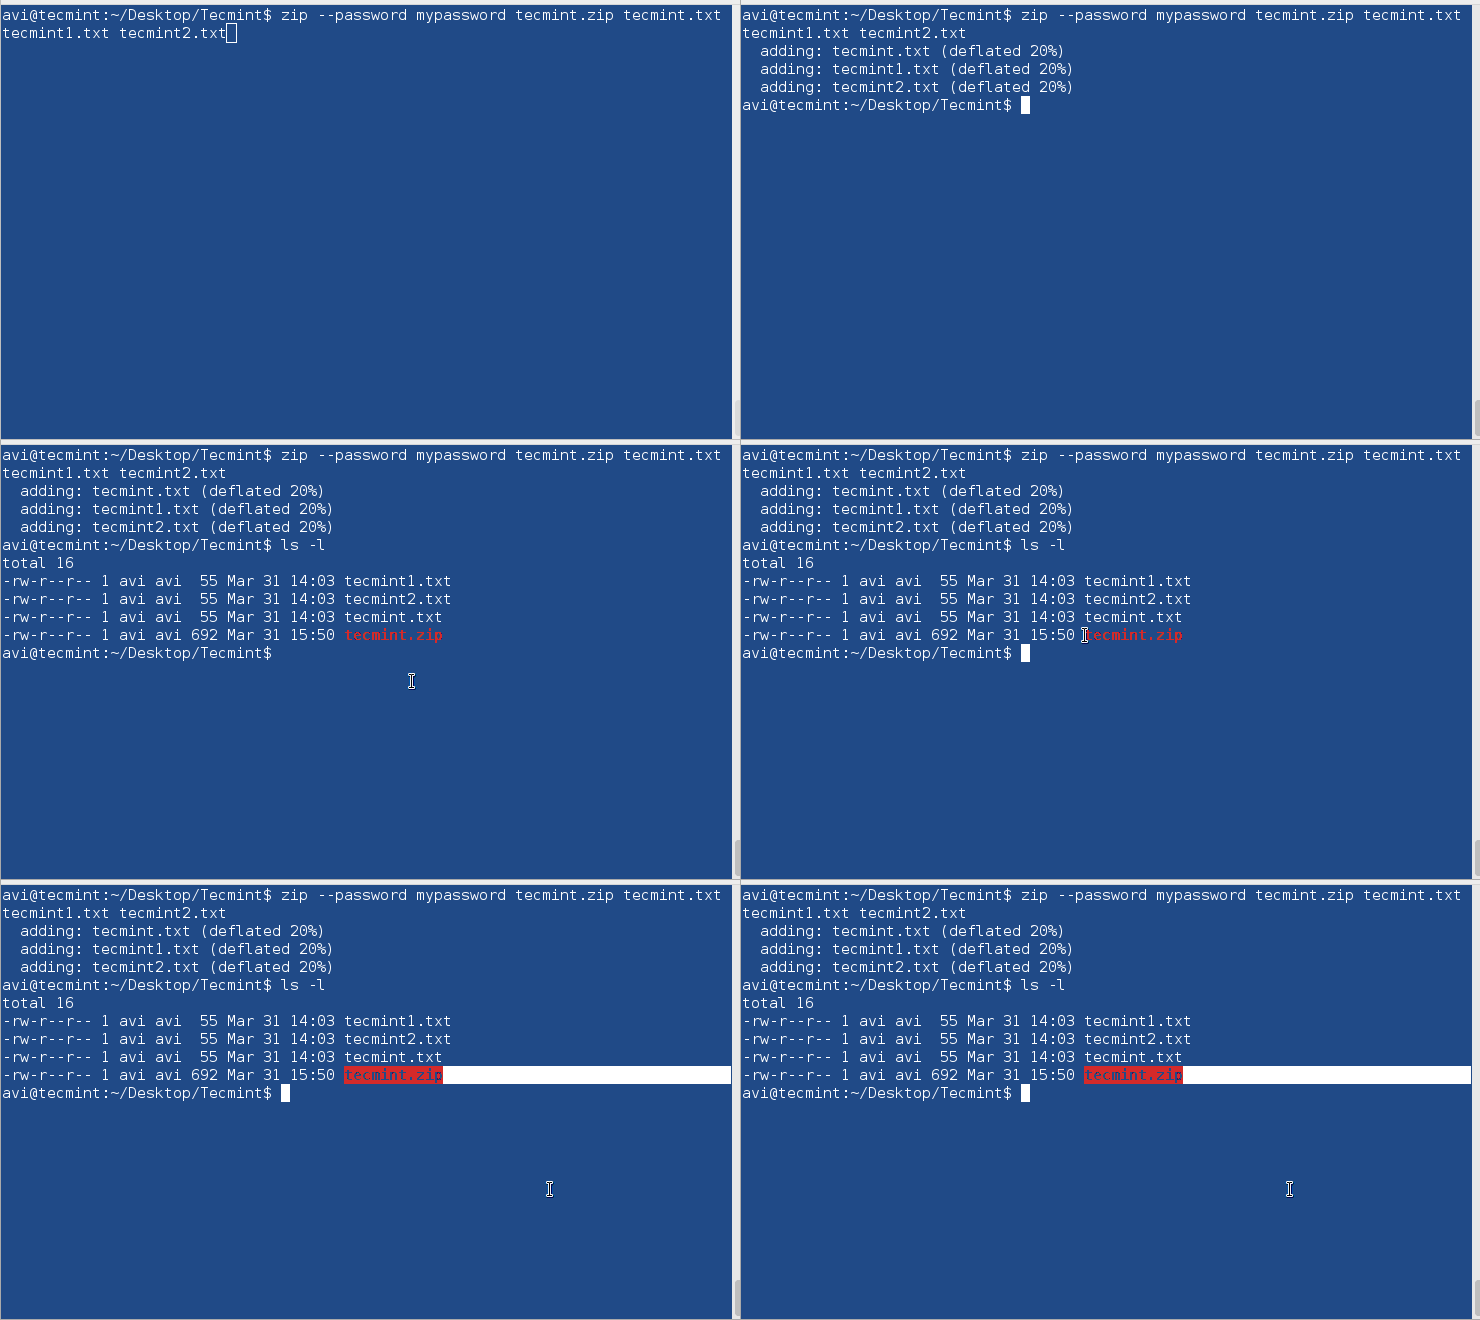
$ zip --password mypassword tecmint.zip tecmint.txt tecmint1.1txt tecmint2.txt

Create Encrypt Zip File

Here mypassword is the password used to encrypt it. A archive is created with the name tecmint.zip with zipped files tecmint.txttecmint1.txt and tecmint2.txt.

Decrypt the password protected zipped file using unzip.

$ unzip tecmint.zip

Decrypt Zip File

You need to provide the same password you provided at encryption.

5. Openssl

Openssl is a command line cryptographic toolkit which can be used to encrypt message as well as files.

You may like to install openssl, if it is not already installed.

$ sudo apt-get install openssl
# yum install openssl

Encrypt a file using openssl encryption.

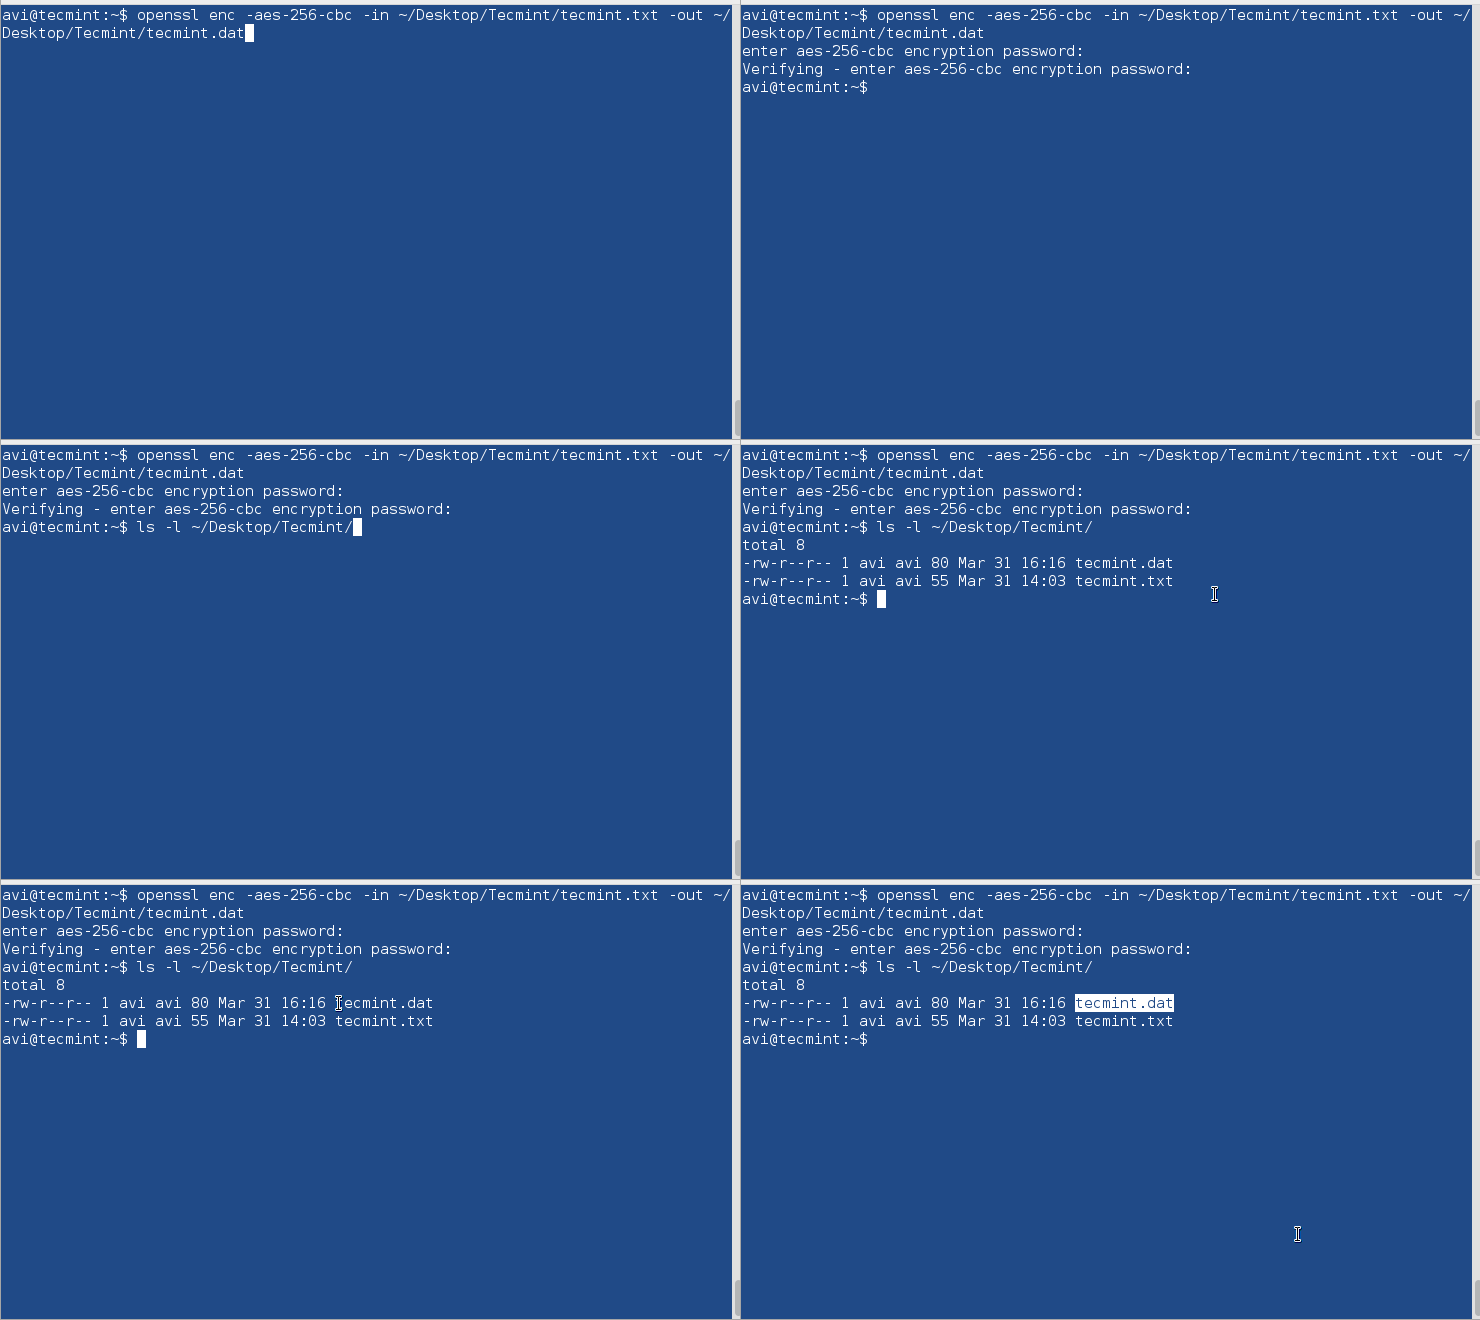
$ openssl enc -aes-256-cbc -in ~/Desktop/Tecmint/tecmint.txt -out ~/Desktop/Tecmint/tecmint.dat

Encrypt File Using Openssl

Explanation of each option used in the above command.

  1. enc : encryption
  2. -aes-256-cbc : the algorithm to be used.
  3. -in : full path of file to be encrypted.
  4. -out : full path where it will be decrypted.

Decrypt a file using openssl.

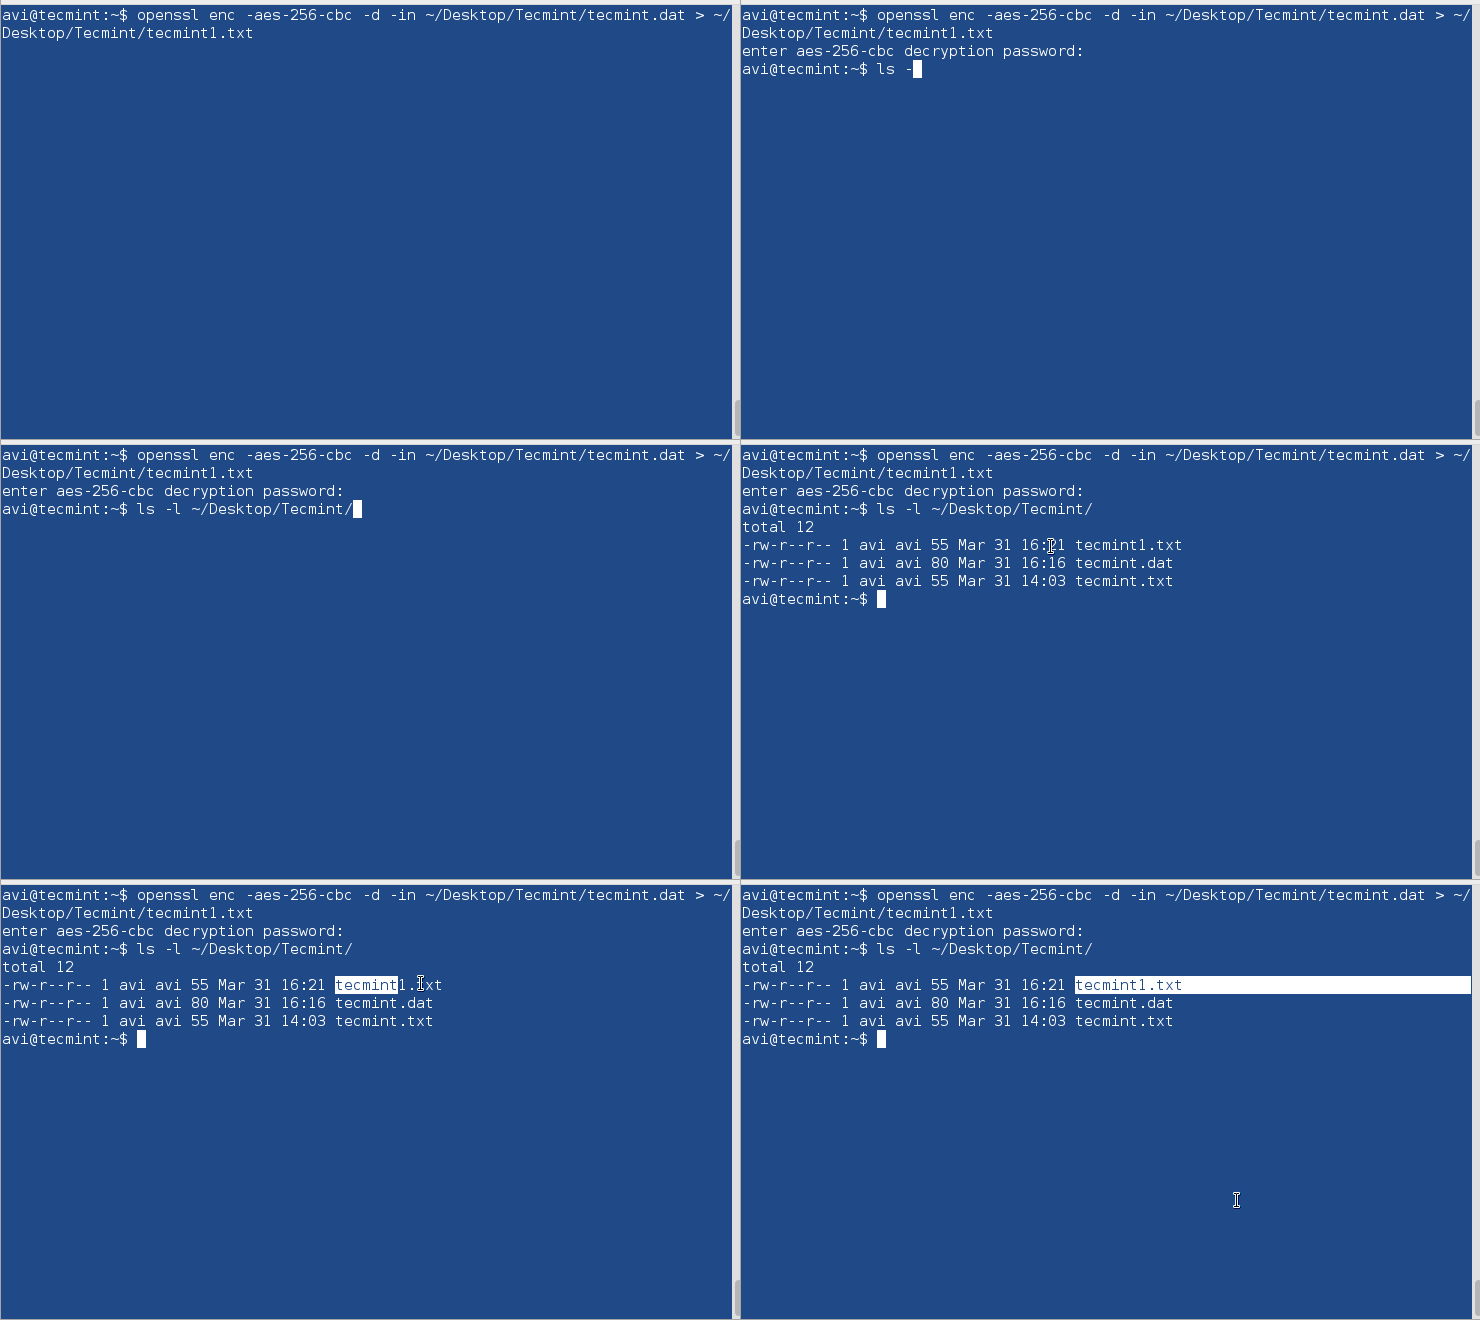
$ openssl enc -aes-256-cbc -d -in ~/Desktop/Tecmint/tecmint.dat > ~/Desktop/Tecmint/tecmint1.txt

Decrypt File Using Openssl

6. 7-zip

The very famous open source 7-zip archiver written in C++ and able to compress and uncompress most of the known archive file format.

If you have not installed 7-zip you may like to apt or yum it.

$ sudo apt-get install p7zip-full
# yum install p7zip-full

Compress files into zip using 7-zip and encrypt it.

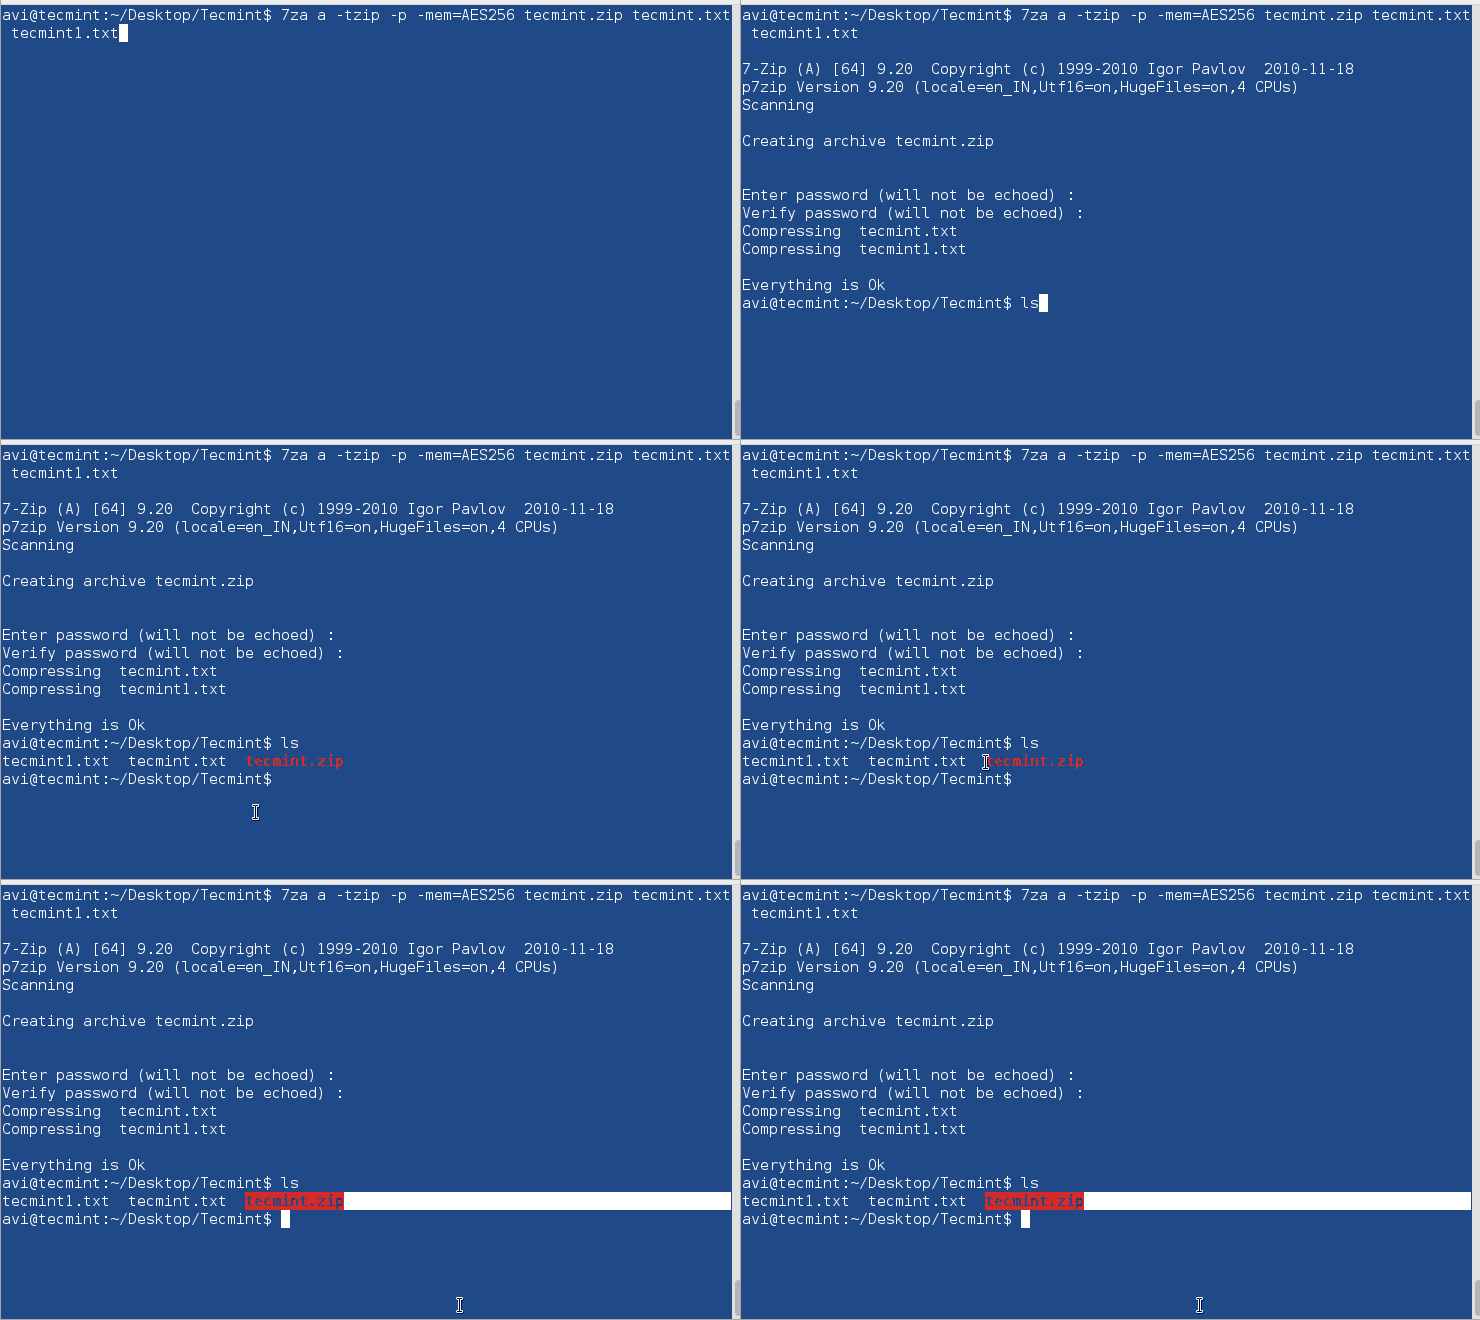
$ 7za a -tzip -p -mem=AES256 tecmint.zip tecmint.txt tecmint1.txt

Compress File Using 7-Zip

Decompress encrypted zip file using 7-zip.

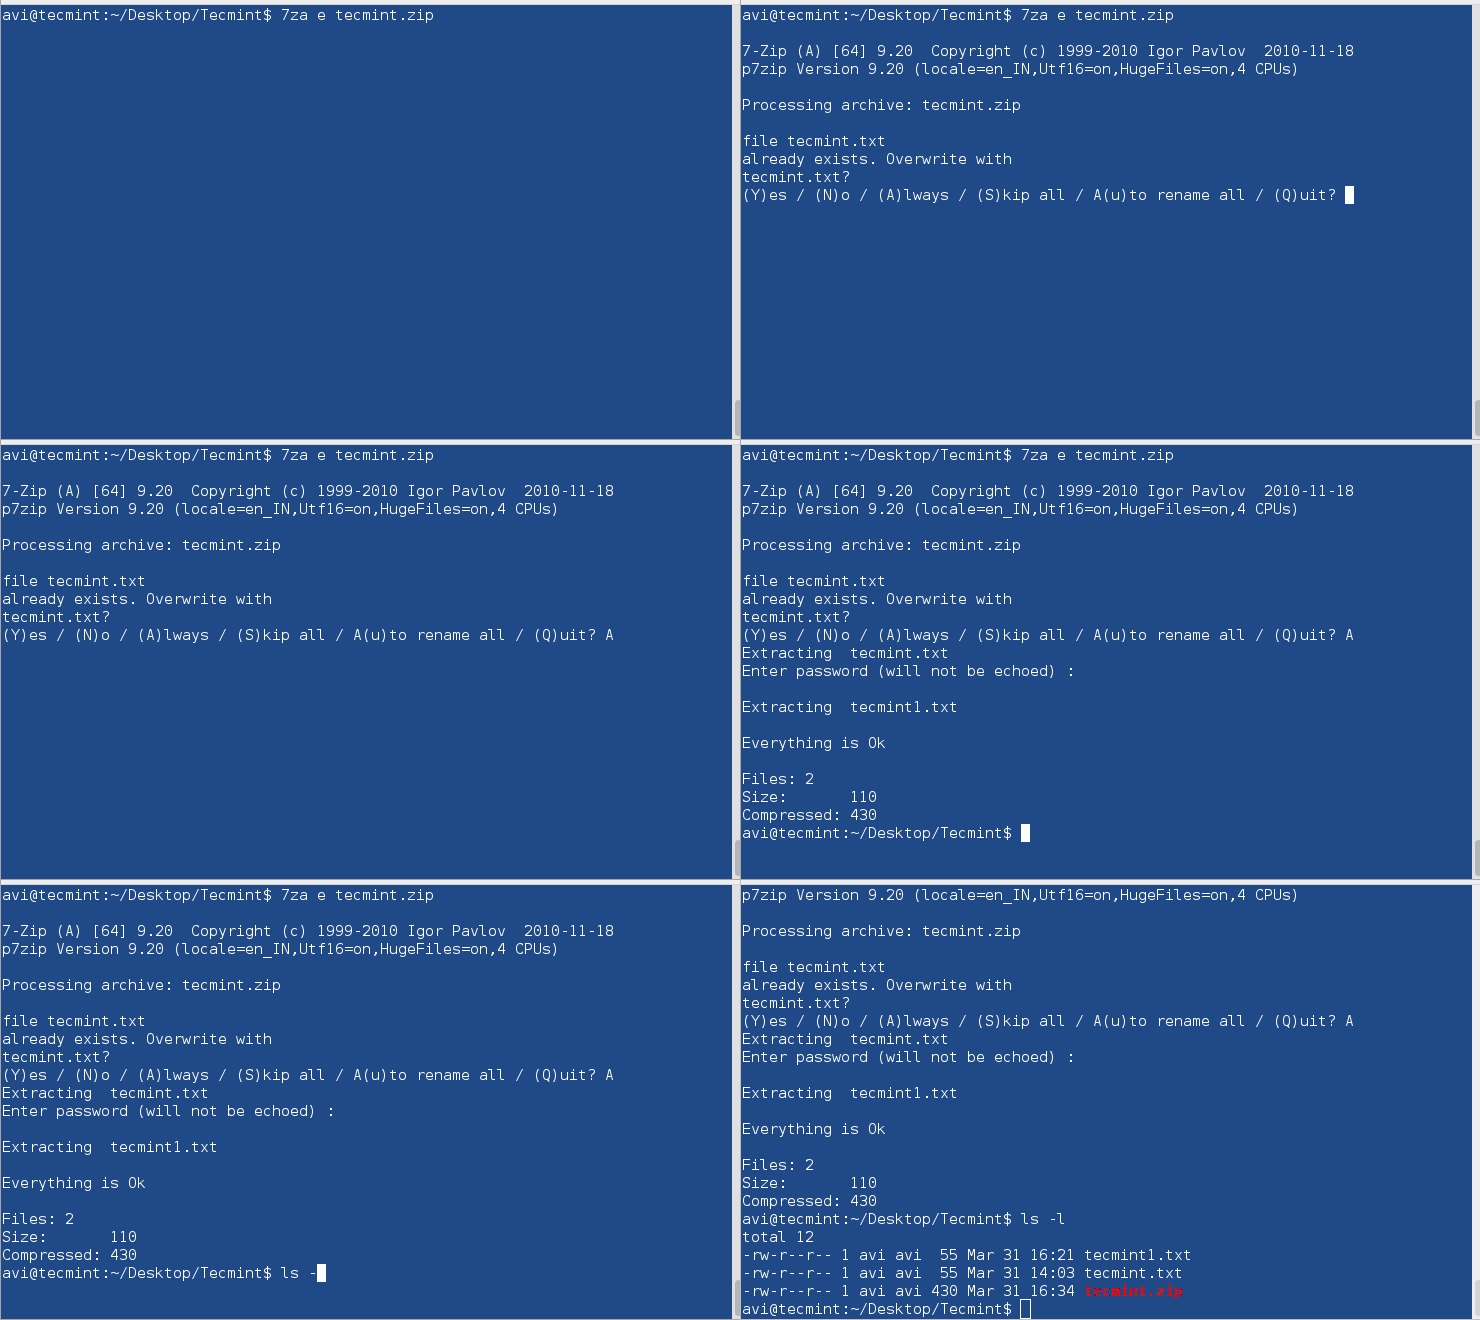
$ 7za e tecmint.zip

Decrypt File Using 7-Zip

Note: Provide same password throughout in encryption and decryption process when prompted.

All the tools we have used till now are command based. There is a GUI based encryption tool provided by nautilus, which will help you to encrypt/decrypt files using Graphical interface.

7. Nautilus Encryption Utility

Steps to encrypt files in GUI using Nautilus encryption utility.

Encryption of file in GUI

1. Right click the file you want to encrypt.

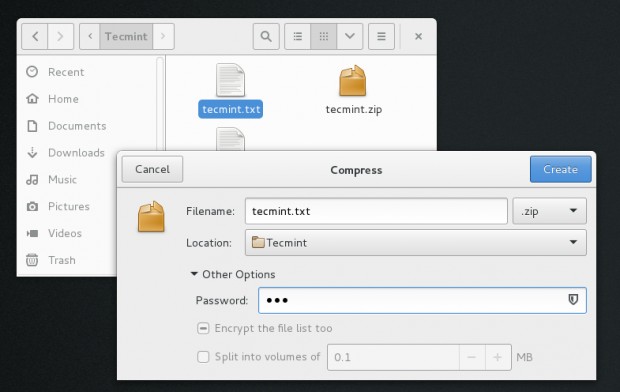
2. Select format to zip and provide location to save. Provide password to encrypt as well.

Encrypt File Using Nautilus

Encrypt File Using Nautilus

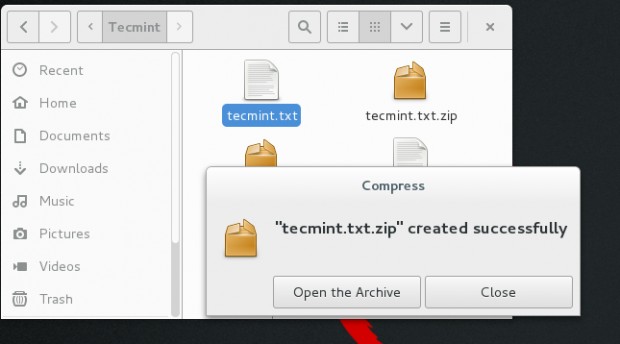
3. Notice the message – encrypted zip created successfully.

Encrypted Zip File Confirmation

Encrypted Zip File Confirmation

Decryption of file in GUI

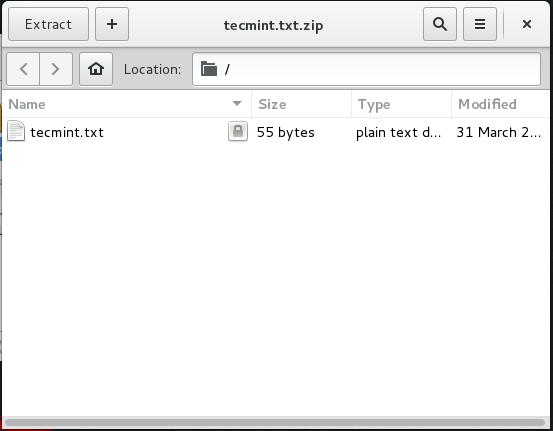
1. Try opening the zip in GUI. Notice the LOCK-ICON next to file. It will prompt for password, Enter it.

Decryption of File

Decryption of File

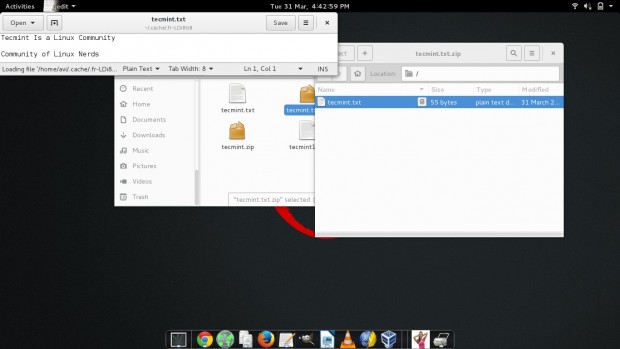
2. When successful, it will open the file for you.

Decryption Confirmation

Decryption Confirmation

That’s all for now. I’ll be here again with another interesting topic. Till then stay tuned and connected to Tecmint. Don’t forget to provide us with your valuable feedback in the comments below. Like and share us and help us get spread.

Source

The Mega Guide To Harden and Secure CentOS 7

This tutorial only covers general security tips for CentOS 7 which can be used to harden the system. The checklist tips are intended to be used mostly on various types of bare-metal servers or on machines (physical or virtual) that provides network services.

Security and Hardening of CentOS 7

Security and Hardening of CentOS 7

However, some of tips can be successfully applied on general purpose machines too, such as Desktops, Laptops and card-sized single-board computers (Raspberry Pi).

Requirements

  1. CentOS 7 Minimal Installation

1. Physical Protection

Lock down your server rooms access, use racks locking and video surveillance. Take into consideration that any physical access to server rooms can expose your machine to serious security issues.

BIOS passwords can be changed by resetting jumpers on the motherboard or by disconnecting the CMOS battery. Also, an intruder can steal the hard disks or directly attach new hard disks to the motherboard interfaces (SATA, SCSI etc), boot up with a Linux live distro and clone or copy data without leaving any software trace.

2. Reduce Spying Impact

In case of highly sensitive data you should probably use advanced physical protection such as placing and locking the server into a Faraday Cage or use a military TEMPEST solution in order to minimize the impact of spying the system via radio or electrical leaking emanations.

3. Secure BIOS/UEFI

Start the process of harden your machine by securing BIOS/UEFI settings, especially set a BIOS/UEFI password and disable boot media devices (CD, DVD, disable USB support) in order to prevent an unauthorized users from modifying the system BIOS settings or altering the boot device priority and booting the machine from an alternate medium.

In order to apply this type of changes to your machine you need to consult the motherboard manufacturer manual for specific instructions.

4. Secure Boot Loader

Set a GRUB password in order to prevent malicious users to tamper with kernel boot sequence or runlevels, edit kernel parameters or start the system into single user mode in order to harm your system and reset root password to gain privileged control.

5. Use Separate Disk Partitions

When installing CentOS on systems intended as production servers use dedicated partitions or dedicated hard disks for the following parts of the system:

/(root) 
/boot  
/home  
/tmp 
/var 

6. Use LVM and RAID for Redundancy and File System Growth

The /var partition is the place where log messages are written to disk. This part of the system can exponential grow in size on heavily traffic servers which expose network services such as web servers or file servers.

Thus, use a large partition for /var or consider on setting up this partition using logical volumes (LVM) or combine several physical disks into one larger virtual RAID 0 device to sustain large amounts of data. For data redundancy consider on using LVM layout on top of RAID 1 level.

For setting up LVM or RAID on the disks, follow our useful guides:

  1. Setup Disk Storage with LVM in Linux
  2. Create LVM Disks Using vgcreate, lvcreate and lvextend
  3. Combine Several Disks into One Large Virtual Storage
  4. Create RAID 1 Using Two Disks in Linux

7. Modify fstab Options to Secure Data Partitions

Separate partitions intended for storing data and prevent the execution of programs, device files or setuid bit on these type of partitions by adding the following options to fstab file as illustrated on the below excerpt:

/dev/sda5 	 /nas          ext4    defaults,nosuid,nodev,noexec 1 2

To prevent privilege-escalation and arbitrary script execution create a separate partition for /tmp and mount it as nosuidnodev and noexec.

/dev/sda6  	/tmp         ext4    defaults,nosuid,nodev,noexec 0 0

8. Encrypt the Hard Disks at block level with LUKS

In order to protect sensitive data snooping in case of physical access to machine hard drives. I suggest you to learn how to encrypt disk by reading our article Linux Hard Disk Data Encryption with LUKS.

9. Use PGP and Public-Key Cryptography

In order to encrypt disks, use PGP and Public-Key Cryptography or openssl command to encrypt and decrypt sensitive files with a password as shown in this article Configure Encrypted Linux System Storage.

10. Install Only the Minimum Amount of Packages Required

Avoid installing unimportant or unnecessary programs, applications or services to avoid package vulnerabilities. This can decrease the risk that the compromise of a piece of software may lead to compromise other applications, parts of the system or even file systems, finally resulting in data corruption or data loss.

11. Update the system frequently

Update the system regularly. Keep Linux kernel in sync with the latest security patches and all the installed software up-to-date with the latest versions by issuing the below command:

# yum update

12. Disable Ctrl+Alt+Del

In order to prevent users to reboot the server once they have physical access to keyboard or via a Remote Console Application or a virtualized console (KVM, Virtualizing software interface) you should disable Ctrl+Alt+Del key sequence by executing the below command.

# systemctl mask ctrl-alt-del.target 

13. Remove Unnecessary Software Packages

Install minimal software required for your machine. Never install extra programs or services. Install packages only from trusted or official repositories. Use minimal installation of the system in case the machine is destined to run its entire live as a server.

Verify installed packages using one of the following commands:

# rpm -qa

Make a local list of all installed packages.

# yum list installed >> installed.txt

Consult the list for useless software and delete a package by issuing the below command:

# yum remove package_name

Read AlsoDisable and Remove Unwanted Packages on Minimal Installation of CentOS 7.

14. Restart systemd services after daemon updates

Use the below command example to restart a systemd service in order to apply new updates.

# systemctl restart httpd.service

15. Remove Unneeded Services

Identify the services that are listening on specific ports using the following command.

# ss -tulpn

To list all installed services with their output status issue the below command:

# systemctl list-units -t service

For instance, CentOS 7 default minimal installation comes with Postfix daemon installed by default which runs by the name of master under port 25. Remove Postfix network service in case your machine will not be used as a mail server.

# yum remove postfix

Read AlsoStop and Disable Unwanted Services in CentOS 7.

16. Encrypt Transmitted Data

Do not use unsecure protocols for remote access or file transfer such as TelnetFTP or other plain text high protocols such as SMTP, HTTP, NFS or SMB which, by default, does not encrypt the authentication sessions or sent data.

Use only sftpscp for file transfers and SSH or VNC over SSH tunnels for remote console connections or GUI access.

In order to tunnel a VNC console via SSH use the below example which forwards the VNC port 5901 from the remote machine to your local machine:

# ssh -L 5902:localhost:5901 remote_machine

On local machine run the below command in order to virtual connect to the remote endpoint.

# vncviewer localhost:5902

17. Network Port Scanning

Conduct external port checks using the nmap tool from a remote system over the LAN. This type of scanning can be used to verify network vulnerabilities or test the firewall rules.

# nmap -sT -O 192.168.1.10

Read AlsoLearn How to Use Nmap with these 29 Examples.

18. Packet-filtering Firewall

Use firewalld utility to protect the system ports, open or close specific services ports, especially well-known ports (<1024).

Install, start, enable and list the firewall rules by issuing the below commands:

# yum install firewalld
# systemctl start firewalld.service
# systemctl enable firewalld.service
# firewall-cmd --list-all

19. Inspect Protocol Packets with tcpdump

Use tcpdump utility in order to sniff network packets locally and inspect their content for suspicious traffic (source-destination ports, tcp/ip protocols, layer two traffic, unusual ARP requests).

For a better analysis of the tcpdump captured file use a more advanced program such as Wireshark.

# tcpdump -i eno16777736 -w tcpdump.pcap

Read Also12 tcpdump Command Examples and Analyze Network Using Wireshark Tool.

20. Prevent DNS Attacks

Inspect the contents of your resolver, typically /etc/resolv.conf file, which defines the IP address of the DNS servers it should use to query for domain names, in order to avoid man-in-the-middle attacks, unnecessary traffic for root DNS servers, spoof or create a DOS attack.

This is just the first part. On the next part we’ll discuss other security tips for CentOS 7.

Continuing the previous tutorial on how to secure CentOS 7, in this article we’ll discuss other security tips that will be presented on the below checklist.

Hardening and Securing of CentOS 7 Server

Hardening and Securing of CentOS 7 Server

Requirements

  1. The Mega Guide To Harden and Secure CentOS 7 – Part 1

21. Disable Useless SUID and SGID Commands

If the setuid and setgid bits are set on binary programs, these commands can run tasks with other user or group rights, such as root privileges which can expose seriously security issues.

Often, buffer overrun attacks can exploit such executables binaries to run unauthorized code with the rights of a root power user.

# find /  -path /proc -prune -o -type f \( -perm -4000 -o -perm -2000 \) -exec ls -l {} \;

To unset the setuid bit execute the below command:

# chmod u-s /path/to/binary_file

To unset the setgid bit run the below command:

# chmod g-s /path/to/binary_file

22. Check for Unowned Files and Directories

Files or directories not owned by a valid account must be deleted or assigned with permissions from a user and group.

Issue the below command to list files or directories with no user and group.

# find / -nouser -o -nogroup -exec ls -l {} \;

23. List World-Writeable Files

Keeping word-writable file on the system can be dangerous due to the fact that anyone can modify them. Execute the below command in order to display word-writeable files, except Symlinks, which are always world-writeable.

# find / -path /proc -prune -o -perm -2 ! -type l –ls

24. Create Strong Passwords

Create a password of minimum of eight characters. The password must contain digits, special characters and uppercase letters. Use pwmake to generate a password of 128 bits from /dev/urandom file.

# pwmake 128

25. Apply Strong Password Policy

Force the system to use strong passwords by adding the below line in /etc/pam.d/passwd file.

password required pam_pwquality.so retry=3

Adding the above line, the password entered cannot contain more than 3 characters in a monotonic sequence, such as abcd, and more than 3 identical consecutive characters, such as 1111.

To force users to use a password with a minimum length of 8 characters, including all classes of characters, strength-check for character sequences and consecutive characters add the following lines to the /etc/security/pwquality.conf file.

minlen = 8
minclass = 4
maxsequence = 3
maxrepeat = 3

26. Use Password Aging

The chage command can be used for user password aging. To set a user’s password to expire in 45 days, use the following command:

# chage -M 45 username

To disable password expiration time use the command:

# chage -M -1 username

Force immediate password expiration (user must change password on next login) by running the following command:

# chage -d 0 username

27. Lock Accounts

User accounts can be locked by executing the passwd or usermod command:

# passwd -l username
# usermod -L username

To unlock accounts use the -u option for passwd command and -U option for usermod.

28. Prevent Accounts Shell Access

To prevent a system account (ordinary account or service account) to gain access to bash shell, change root shell to /usr/sbin/nologin or /bin/false in the /etc/passwd file by issuing the command below:

# usermod -s /bin/false username

To change the shell when creating a new user issue the following command:

# useradd -s /usr/sbin/nologin username

Read AlsoLearn 15 Examples of “useradd” Command in Linux

29. Lock Virtual User Console with vlock

vlock is a program used for locking one multiple sessions on Linux console. Install the program and start locking your terminal session by running the below commands:

# yum install vlock
# vlock

30. Use a Centralized System to Manage Accounts and Authentication

Using a centralized authentication system can greatly simplify account management and control. Services that can offer this type of account management are: IPA Server, LDAP, Kerberos, Microsoft Active Directory, Nis, Samba ADS or Winbind.

Some of these services are by default highly secured with cryptographic protocols and symmetric-key cryptography, such as Kerberos.

Read AlsoSetup NFS Server with Kerberos-based User Authentication in Linux

31. Force Read-Only Mounting of USB Media

Using blockdev utility you can force all removable media to be mounted as read-only. For instance, create a new udev configuration file named 80-readonly-usb.rules in the /etc/udev/rules.d/ directory with the following content:

SUBSYSTEM=="block",ATTRS{removable}=="1",RUN{program}="/sbin/blockdev --setro %N"

Then, apply the rule with the below command:

# udevadm control -reload

32. Disabling Root Access via TTY

To prevent the root account from performing system log-in via all console devices (tty), erase the contents of securetty file by typing the following command terminal prompt as root.

# cp /etc/securetty /etc/securetty.bak
# cat /dev/null > /etc/securetty

Remember that this rule does not apply to SSH login sessions
To prevent root login via SSH edit the file /etc/ssh/sshd_config and add the below line:

PermitRootLogin no

Read AlsoEnable or Disable SSH Root Login and Limit SSH Access
5 Best Practices to Secure and Protect SSH Server

33. Use POSIX ACLs to Expand System Permissions

Access Control Lists can define access rights for more than just a single user or group and can specify rights for programs, processes, files, and directories. If you set ACL on a directory, its descendants will inherit the same rights automatically.

For example,

# setfacl -m u:user:rw file
# getfacl file

Read AlsoSetup ACL and Disk Quotas for Users/Groups in Linux

34. Setup SELinux in Enforce Mode

The SELinux enhancement to the Linux kernel implements the Mandatory Access Control (MAC) policy, allowing users to define a security policy that provides granular permissions for all users, programs, processes, files, and devices.

The kernel’s access control decisions are based on all the security relevant context and not on the authenticated user identity.

To get Selinux status and enforce policy run the below commands:

# getenforce
# setenforce 1
# sestatus

Read AlsoSetup Mandatory Access Control Policy with SELinux

35. Install SELinux Additional Utilities

Install policycoreutils-python package which provides additional Python utilities for operating SELinuxaudit2allowaudit2whychcat, and semanage.

To display all boolean values together with a short description, use the following command:

# semanage boolean -l

For instance, to display and set the value of httpd_enable_ftp_server, run the below command:

# getsebool httpd_enable_ftp_server

To make the value of a boolean persist across reboots, specify the -P option to setsebool, as illustrated on the following example:

# setsebool -P httpd_enable_ftp_server on

36. Use Centralized Log Server

Configure rsyslog daemon to send sensitive utilities log messages to a centralized log server. Also, monitor log files with the help of logwatch utility.

Sending log messages to a remote server assures that once the system has been compromised, the malicious users cannot completely hide their activity, always leaving traces on remote log files.

Read Also4 Best Linux Log Monitoring and Management Tools

37. Enable Process Accounting

Enable process accounting by installing psacct utility.

Read AlsoMonitor Linux User Activity with psacct or acct Tools

Use lastcomm command to displays information about previously executed commands as recorded in the system accounting file and sa to summarize information about previously executed commands as recorded in the system accounting file.

38. Hardening /etc/sysctl.conf

Use the following kernel parameters rules to protect the system:

Disabling Source Routing

net.ipv4.conf.all.accept_source_route=0

Disable IPv4 forwarding

ipv4.conf.all.forwarding=0

Disable IPv6

net.ipv6.conf.all.disable_ipv6 = 1
net.ipv6.conf.default.disable_ipv6 = 1
net.ipv6.conf.lo.disable_ipv6 = 1

Disable the acceptance and sending of ICMP redirected packets unless specifically required.

net.ipv4.conf.all.accept_redirects=0
net.ipv4.conf.all.secure_redirects=0
net.ipv4.conf.all.send_redirects=0

Disable Reverse Path Forwarding

net.ipv4.conf.all.rp_filter=2

Ignore all ICMP echo requests (set to 1 to enable)

net.ipv4.icmp_echo_ignore_all = 0

Read AlsoSet Kernel Runtime Parameters in a Persistent and Non-Persistent Way

39. Use VPN Services to Access your Premises over Unprotected Public Networks

Always use VPN services for carriers to remotely access LAN premises over Internet. Such type of services can be configured using a free open source solution, such as OpenVPN, or using a proprietary solution, such as Cisco VPN (install vpnc command-line utility provided by Epel Repositories).

Read AlsoInstall OpenVPN Server with Windows Clients in CentOS 7

40. Perform External System Scan

Evaluate your system security for vulnerabilities by scanning the system from remote points over your LAN using specific tools such as:

  1. Nmap – network scanner 29 Examples of Nmap Command
  2. Nessus – security scanner
  3. OpenVAS – used to scan for vulnerabilities and for comprehensive vulnerability management.
  4. Nikto – an excellent common gateway interface (CGI) script scanner Scan Web Vulnerability in Linux

41. Protect System Internally

Use internal system protection against viruses, rootkits, malware and, as a good practice, install intrusion detection systems that can detect unauthorized activity (DDOS attacks, port scans), such as:

  1. AIDE – Advanced Intrusion Detection Environment – http://aide.sourceforge.net/
  2. ClamAV – Antivirus Scanner https://www.clamav.net
  3. Rkhunter – Rootkit Dcanner
  4. Lynis – Security Auditing and Scanning Tool for Linux
  5. Tripwire – Security and Data Integrity http://www.tripwire.com/
  6. Fail2Ban – Intrusion Network Prevention
  7. OSSEC – (HIDS) Host-based Intrusion Detection System http://ossec.github.io/
  8. Mod_Security – Protect Brute Force or DDoS Attacks

Append date and time format to store commands execution by issuing the below command:

# echo 'HISTTIMEFORMAT="%d/%m/%y  %T  "' >> .bashrc'

Force to instantly record HISTFILE every time a command is typed (instead of logout):

# echo ‘PROMPT_COMMAND="history -a"’ >> .bashrc

Limit timeout login session. Automatically tear-down the shell when no activity is performed during idle time period. Very useful to automatically disconnect SSH sessions.

# echo ‘TMOUT=120’ >> .bashrc

Apply all the rules by executing:

# source .bashrc

Read Also Set User Environment Variables in Linux

43. Backup Data

Use backup utilities, such as tarcatrsyncscpLVM snapshots, etc in order to store a copy of your system, preferably offsite, in case of a system failure.

If the system gets compromised you can perform data restore from previous backups.

Finally, don’t forget that no matter how many security measures and contra-measures you take in order to keep your system safe, you will never be 100% completely secure as long as your machine is plugged-in and powered-on.

Source

25 Useful Apache ‘.htaccess’ Tricks to Secure and Customize Websites

Websites are important parts of our lives. They serve the means to expand businesses, share knowledge and lots more. Earlier restricted to providing only static contents, with introduction of dynamic client and server side scripting languages and continued advancement of existing static language like html to html5, adding every bit of dynamicity is possible to the websites and what left is expected to follow soon in near future.

With websites, comes the need of a unit that can display these websites to a huge set of audience all over the globe. This need is fulfilled by the servers that provide means to host a website. This includes a list of servers like: Apache HTTP ServerJoomla, and WordPress that allow one to host their websites.

Apache htaccess Tricks

25 htaccess Tricks

One who wants to host a website can create a local server of his own or can contact any of above mentioned or any another server administrator to host his website. But the actual issue starts from this point. Performance of a website depends mainly on following factors:

  1. Bandwidth consumed by the website.
  2. How secure is the website against hackers.
  3. Optimism when it comes to data search through the database
  4. User-friendliness when it comes to displaying navigation menus and providing more UI features.

Alongside this, various factors that govern success of servers in hosting websites are:

  1. Amount of data compression achieved for a particular website.
  2. Ability to simultaneously serve multiple clients asking for a same or different website.
  3. Securing the confidential data entered on the websites like: emails, credit card details and so on.
  4. Allowing more and more options to enhance dynamicity to a website.

This article deals with one such feature provided by the servers that help enhance performance of websites along with securing them from bad bots, hotlinks etc. i.e. ‘.htaccess‘ file.

What is .htaccess?

htaccess (or hypertext access) are the files that provide options for website owners to control the server environment variables and other parameters to enhance functionality of their websites. These files can reside in any and every directory in the directory tree of the website and provide features to the directory and the files and folders inside it.

What are these features? Well these are the server directives i.e. the lines that instruct server to perform a specific task, and these directives apply only to the files and folders inside the folder in which this file is placed. These files are hidden by default as all Operating System and the web servers are configured to ignore them by default but making the hidden files visible can make you see this very special file. What type of parameters can be controlled is the topic of discussion of subsequent sections.

Note: If .htaccess file is placed in /apache/home/www/Gunjit/ directory then it will provide directives for all the files and folders in that directory, but if this directory contains another folder namely: /Gunjit/images/ which again has another .htaccess file then the directives in this folder will override those provided by the master .htaccess file (or file in the folder up in hierarchy).

Apache Server and .htaccess files

Apache HTTP Server colloquially called Apache was named after a Native American Tribe Apache to respect its superior skills in warfare strategy. Build on C/C++ and XML it is cross-platform web server which is based on NCSA HTTPd server and has a key role in growth and advancement of World Wide Web.

Most commonly used on UNIX, Apache is available for wide variety of platforms including FreeBSD, Linux, Windows, Mac OS, Novel Netware etc. In 2009, Apache became the first server to serve more than 100 million websites.

Apache server has one .htaccess file per user in www/ directory. Although these files are hidden but can be made visible if required. In www/ directory there are a number of folders each pertaining to a website named on user’s or owner’s name. Apart from this you can have one .htaccess file in each folder which configured files in that folder as stated above.

How to configure htaccess file on Apache server is as follows…

Configuration on Apache Server

There can be two cases:

Hosting website on own server

In this case, if .htaccess files are not enabled, you can enable .htaccess files by simply going to httpd.conf(Default configuration file for Apache HTTP Daemon) and finding the <Directories> section.

<Directory "/var/www/htdocs">

And locate the line that says…

AllowOverride None 

And correct it to.

AllowOverride All

Now, on restarting Apache, .htaccess will work.

Hosting website on different hosting provider server

In this case it is better to consult the hosting admin, if they allow access to .htaccess files.

25 ‘.htaccess’ Tricks of Apache Web Server for Websites

1. How to enable mod_rewrite in .htaccess file

mod_rewrite option allows you to use redirections and hiding your true URL with redirecting to some other URL. This option can prove very useful allowing you to replace the lengthy and long URL’s to short and easy to remember ones.

To allow mod_rewrite just have a practice to add the following line as the first line of your .htaccess file.

Options +FollowSymLinks

This option allows you to follow symbolic links and thus enable the mod_rewrite option on the website. Replacing the URL with short and crispy one is presented later on.

2. How to Allow or Deny Access to Websites

htaccess file can allow or deny access of website or a folder or files in the directory in which it is placed by using orderallow and deny keywords.

Allowing access to only 192.168.3.1 IP
Order Allow, Deny
Deny from All
Allow from 192.168.3.1

OR

Order Allow, Deny
Allow from 192.168.3.1

Order keyword here specifies the order in which allowdeny access would be processed. For the above ‘Order’ statement, the Allow statements would be processed first and then the deny statements would be processed.

Denying access to only one IP Address

The below lines provide the means to allow access of the website to all the users accept one with IP Address: 192.168.3.1.

rder Allow, Deny
Deny from 192.168.3.1
Allow from All

OR


Order Deny, Allow
Deny from 192.168.3.1

3. Generate Apache Error documents for different error codes.

Using some simple lines, we can fix the error document that run on different error codes generated by the server when user/client requests a page not available on the website like most of us would have seen the ‘404 Page not found’ page in their web browser. ‘.htaccess’ files specify what action to take in case of such error conditions.

To do this, the following lines are needed to be added to the ‘.htaccess’ files:

ErrorDocument <error-code> <path-of-document/string-representing-html-file-content>

ErrorDocument’ is a keyword, error-code can be any of 401403404500 or any valid error representing code and lastly, ‘path-of-document’ represents the path on the local machine (in case you are using your own local server) or on the server (in case you are using any other’s server to host your website).

Example:
ErrorDocument 404 /error-docs/error-404.html

The above line sets the document ‘error-404.html’ placed in error-docs folder to be displayed in case the 404 error is reported by the server for any invalid request for a page by the client.

rrorDocument 404 "<html><head><title>404 Page not found</title></head><body><p>The page you request is not present. Check the URL you have typed</p></body></html>"

The above representation is also correct which places the string representing a usual html file.

4. Setting/Unsetting Apache server environment variables

In .htaccess file you can set or unset the global environment variables that server allow to be modified by the hosters of the websites. For setting or unsetting the environment variables you need to add the following lines to your .htaccess files.

Setting the Environment variables
SetEnv OWNER “Gunjit Khera”
Unsetting the Environment variables
UnsetEnv OWNER

5. Defining different MIME types for files

MIME (Multipurpose Internet Multimedia Extensions) are the types that are recognized by the browser by default when running any web page. You can define MIME types for your website in .htaccess files, so that different types of files as defined by you can be recognized and run by the server.

<IfModule mod_mime.c>
	AddType	application/javascript		js
	AddType application/x-font-ttf		ttf ttc
</IfModule>

Here, mod_mime.c is the module for controlling definitions of different MIME types and if you have this module installed on your system then you can use this module to define different MIME types for different extensions used in your website so that server can understand them.

6. How to Limit the size of Uploads and Downloads in Apache

.htaccess files allow you the feature to control the amount of data being uploaded or downloaded by a particular client from your website. For this you just need to append the following lines to your .htaccess file:

php_value upload_max_filesize 20M
php_value post_max_size 20M
php_value max_execution_time 200
php_value max_input_time 200

The above lines set maximum upload size, maximum size of data being posted, maximum execution time i.e. the maximum time the a user is allowed to execute a website on his local machine, maximum time constrain within on the input time.

7. Making Users to download .mp3 and other files before playing on your website.

Mostly, people play songs on websites before downloading them to check the song quality etc. Being a smart seller you can add a feature that can come in very handy for you which will not let any user play songs or videos online and users have to download them for playing. This is very useful as online playing of songs and videos consumes a lot of bandwidth.

Following lines are needed to be added to be added to your .htaccess file:

AddType application/octet-stream .mp3 .zip 

8. Setting Directory Index for Website

Most of website developers would already know that the first page that is displayed i.e. the home page of a website is named as ‘index.html’ .Many of us would have seen this also. But how is this set?

.htaccess file provides a way to list a set of pages which would be scanned in order when a client requests to visit home page of the website and accordingly any one of the listed set of pages if found would be listed as the home page of the website and displayed to the user.

Following line is needed to be added to produce the desired effect.

DirectoryIndex index.html index.php yourpage.php

The above line specifies that if any request for visiting the home page comes by any visitor then the above listed pages will be searched in order in the directory firstly: index.html which if found will be displayed as the sites home page, otherwise list will proceed to the next page i.e. index.php and so on till the last page you have entered in the list.

9. How to enable GZip compression for Files to save site’s bandwidth.

This is a common observation that heavy sites generally run bit slowly than light weight sites that take less amount of space. This is just because for a heavy site it takes time to load the huge script files and images before displaying them on the client’s web browser.

This is a common mechanism that when a browser requests a web page, server provides the browser with that webpage and now to locally display that web page, the browser has to download that page and then run the script inside that page.

What GZip compression does here is saving the time required to serve a single customer thus increasing the bandwidth. The source files of the website on the server are kept in compressed form and when the request comes from a user then these files are transferred in compressed form which are then uncompressed and executed on the server. This improves the bandwidth constrain.

Following lines can allow you to compress the source files of your website but this requires mod_deflate.cmodule to be installed on your server.

<IfModule mod_deflate.c>
	AddOutputFilterByType DEFLATE text/plain
	AddOutputFilterByType DEFLATE text/html
	AddOutputFilterByType DEFLATE text/xml
	AddOutputFilterByType DEFLATE application/html
	AddOutputFilterByType DEFLATE application/javascript
	AddOutputFilterByType DEFLATE application/x-javascript
</IfModule>

10. Playing with the File types.

There are certain conditions that the server assumes by default. Like: .php files are run on the server, similarly .txt files say for example are meant to be displayed. Like this we can make some executable cgi-scripts or files to be simply displayed as the source code on our website instead of being executed.

To do this observe the following lines from a .htaccess file.

RemoveHandler cgi-script .php .pl .py
AddType text/plain .php .pl .py

These lines tell the server that .pl (perl script), .php (PHP file) and .py (Python file) are meant to just be displayed and not executed as cgi-scripts.

11. Setting the Time Zone for Apache server

The power and importance of .htaccess files can be seen by the fact that this can be used to set the Time Zoneof the server accordingly. This can be done by setting a global Environment variable ‘TZ’ of the list of global environment variables that are provided by the server to each of the hosted website for modification.

Due to this reason only, we can see time on the websites (that display it) according to our time zone. May be some other person hosting his website on the server would have the timezone set according to the location where he lives.

Following lines set the Time Zone of the Server.

SetEnv TZ India/Kolkata

12. How to enable Cache Control on Website

A very interesting feature of browser, most have observed is that on opening one website simultaneously more than one time, the latter one opens fast as compared to the first time. But how is this possible? Well in this case, the browser stores some frequently visited pages in its cache for faster access later on.

But for how long? Well this answer depends on you i.e. on the time you set in your .htaccess file for Cache control. The .htaccess file can specify the amount of time for which the pages of website can stay in the browser’s cache and after expiration of time, it must revalidate i.e. pages would be deleted from the Cache and recreated the next time user visits the site.

Following lines implement Cache Control for your website.

<FilesMatch "\.(ico|png|jpeg|svg|ttf)$">
	Header Set Cache-Control "max-age=3600, public"
</FilesMatch>
<FilesMatch "\.(js|css)$">
	Header Set Cache-Control "public"
	Header Set Expires "Sat, 24 Jan 2015 16:00:00 GMT"
</FilesMatch>

The above lines allow caching of the pages which are inside the directory in which .htaccess files are placed for 1 hour.

13. Configuring a single file, the <files> option.

Usually the content in .htaccess files apply to all the files and folders inside the directory in which the file is placed, but you can also provide some special permissions to a special file, like denying access to that file only or so on.

For this you need to add <File> tag to your file in a way like this:

<files conf.html="">
Order allow, deny
Deny from 188.100.100.0
</files>

This is a simple case of denying a file ‘conf.html’ from access by IP 188.100.100.0, but you can add any or every feature described for .htaccess file till now including the features yet to be described to the file like: Cache-controlGZip compression.

This feature is used by most of the servers to secure .htaccess files which is the reason why we are not able to see the .htaccess files on the browsers. How the files are authenticated is demonstrated in subsequent heading.

14. Enabling CGI scripts to run outside of cgi-bin folder.

Usually servers run CGI scripts that are located inside the cgi-bin folder but, you can enable running of CGI scripts located in your desired folder but just adding following lines to .htaccess file located in the desired folder and if not, then creating one, appending following lines:

AddHandler cgi-script .cgi
Options +ExecCGI

15. How to enable SSI on Website with .htaccess

Server side includes as the name suggests would be related to something included at the server side. But what? Generally when we have many pages in our website and we have a navigation menu on our home page that displays links to other pages then, we can enable SSI (Server Size Includes) option that allows all the pages displayed in the navigation menu to be included with the home page completely.

The SSI allows inclusion of multiple pages as if content they contain is a part of a single page so that any editing needed to be done is done in one file only which saves a lot of disk space. This option is by default enabled on servers but for .shtml files.

In case you want to enable it for .html files you need to add following lines:

AddHandler server-parsed .html

After this following in the html file would lead to SSI.

<!--#inlcude virtual= “gk/document.html”-->

16. How to Prevent website Directory Listing

To prevent any client being able to list the directories of the website on the server at his local machine add following lines to the file inside the directory you don’t want to get listed.

Options -Indexes

17. Changing Default charset and language headers.

.htaccess files allow you to modify the character set used i.e. ASCII or UNICODEUTF-8 etc. for your website along with the default language used for the display of content.

Following server’s global environment variables allow you to achieve above feature.

AddDefaultCharset UTF-8
DefaultLanguage en-US

Re-writing URL’s: Redirection Rules

Re-writing feature simply means replacing the long and un-rememberable URL’s with short and easy to remember ones. But, before going into this topic there are some rules and some conventions for special symbols used later on in this article.

Special Symbols:
Symbol Meaning
^ Start of the string
$ End of the String
| Or [a|b] – a or b
[a-z] Any of the letter between a to z
+ One or more occurrence of previous letter
* Zero or more occurrence of previous letter
? Zero or one occurrence of previous letter
Constants and their meaning:
Constant Meaning
NC No-case or case sensitive
L Last rule – stop processing further rules
R Temporary redirect to new URL
R=301 Permanent redirect to new URL
F Forbidden, send 403 header to the user
P Proxy – grab remote content in substitution section and return it
G Gone, no longer exists
S=x Skip next x rules
T=mime-type Force specified MIME type
E=var:value Set environment variable var to value
H=handler Set handler
PT Pass through – in case of URL’s with additional headers.
QSA Append query string from requested to substituted URL

18. Redirecting a non-www URL to a www URL.

Before starting with the explanation, lets first see the lines that are needed to be added to .htaccess file to enable this feature.

RewriteEngine ON
RewriteCond %{HTTP_HOST} ^abc\.net$
RewriteRule (.*) http://www.abc.net/$1 [R=301,L]

The above lines enable the Rewrite Engine and then in second line check all those URL’s that pertain to host abc.net or have the HTTP_HOST environment variable set to “abc.net”.

For all such URL’s the code permanently redirects them (as R=301 rule is enabled) to the new URL http://www.abc.net/$1 where $1 is the non-www URL having host as abc.net. The non-www URL is the one in bracket and is referred by $1.

19. Redirecting entire website to https.

Following lines will help you transfer entire website to https:

RewriteEngine ON
RewriteCond %{HTTPS} !on
RewriteRule (.*) https://%{HTTP_HOST}%{REQUEST_URI}

The above lines enable the re-write engine and then check the value of HTTPS environment variable. If it is on then re-write the entire pages of the website to https.

20. A custom redirection example

For example, redirect url ‘http://www.abc.net?p=100&q=20 ‘ to ‘http://www.abc.net/10020pq’.

RewriteEngine ON
RewriteRule ^http://www.abc.net/([0-9]+)([0-9]+)pq$ ^http://www.abc.net?p=$1&q=$2

In above lines, $1 represents the first bracket and $2 represents the second bracket.

21. Renaming the htaccess file

For preventing the .htaccess file from the intruders and other people from viewing those files you can rename that file so that it is not accessed by client’s browser. The line that does this is:

AccessFileName	htac.cess

22. How to Prevent Image Hotlinking for your Website

Another problem that is major factor of large bandwidth consumption by the websites is the problem of hot links which are links to your websites by other websites for display of images mostly of your website which consumes your bandwidth. This problem is also called as ‘bandwidth theft’.

A common observation is when a site displays the image contained in some other site due to this hot-linking your site needs to be loaded and at the stake of your site’s bandwidth, the other site’s images are displayed. To prevent this for like: images such as: .gif.jpeg etc. following lines of code would help:

RewriteEngine ON
RewriteCond %{HTTP_REFERER} !^$
RewriteCond %{HTTP_REFERERER} !^http://(www\.)?mydomain.com/.*$ [NC]
RewriteRule \.(gif|jpeg|png)$ - [F].

The above lines check if the HTTP_REFERER is not set to blank or not set to any of the links in your websites. If this is happening then all the images in your page are replaced by 403 forbidden.

23. How to Redirect Users to Maintenance Page.

In case your website is down for maintenance and you want to notify all your clients that need to access your websites about this then for such cases you can add following lines to your .htaccess websites that allow only admin access and replace the site pages having links to any .jpg, .css, .gif, .js etc.

RewriteCond %{REQUEST_URI} !^/admin/ [NC]
RewriteCond %{REQUEST_URI} !^((.*).css|(.*).js|(.*).png|(.*).jpg)	 [NC]
RewriteRule ^(.*)$ /ErrorDocs/Maintainence_Page.html
[NC,L,U,QSA]

These lines check if the Requested URL contains any request for any admin page i.e. one starting with ‘/admin/’ or any request to ‘.png, .jpg, .js, .css’ pages and for any such requests it replaces that page to ‘ErrorDocs/Maintainence_Page.html’.

24. Mapping IP Address to Domain Name

Name servers are the servers that convert a specific IP Address to a domain name. This mapping can also be specified in the .htaccess files in the following manner.

For Mapping L.M.N.O address to a domain name www.hellovisit.com
RewriteCond %{HTTP_HOST} ^L\.M\.N\.O$ [NC]
RewriteRule ^(.*)$ http://www.hellovisit.com/$1 [L,R=301]

The above lines check if the host for any page is having the IP Address as: L.M.N.O and if so the page is mapped to the domain name http://www.hellovisit.com by the third line by permanent redirection.

25. FilesMatch Tag

Like <files> tag that is used to apply conditions to a single file, <FilesMatch> can be used to match to a group of files and apply some conditions to the group of files as below:

<FilesMatch “\.(png|jpg)$”>
Order Allow, Deny 
Deny from All
</FilesMatch>

Conclusion

The list of tricks that can be done with .htaccess files is much more. Thus, this gives us an idea how powerful this file is and how much security and dynamicity and other features it can give to your website.

We’ve tried our best to cover as much as htaccess tricks in this article, but incase if we’ve missed any important trick, or you most welcome to post your htaccess ideas and tricks that you know via comments section below – we will include those in our article too…

Source

How to Configure and Use PAM in Linux

Linux-PAM (short for Pluggable Authentication Modules which evolved from the Unix-PAM architecture) is a powerful suite of shared libraries used to dynamically authenticate a user to applications (or services) in a Linux system.

It integrates multiple low-level authentication modules into a high-level API that provides dynamic authentication support for applications. This allows developers to write applications that require authentication, independently of the underlying authentication system.

Many modern Linux distributions support Linux-PAM (hereinafter referred to as “PAM”) by default. In this article, we will explain how to configure advanced PAM in Ubuntu and CentOS systems.

Before we proceed any further, note that:

  • As a system administrator, the most important thing is to master how PAM configuration file(s) define the connection between applications (services) and the pluggable authentication modules (PAMs) that perform the actual authentication tasks. You don’t necessarily need to understand the internal working of PAM.
  • PAM has the potential to seriously alter the security of your Linux system. Erroneous configuration can disable access to your system partially, or completely. For instance an accidental deletion of a configuration file(s) under /etc/pam.d/* and/or /etc/pam.conf can lock you out of your own system!

How to Check a Program is PAM-aware

To employ PAM, an application/program needs to be “PAM aware“; it needs to have been written and compiled specifically to use PAM. To find out if a program is “PAM-aware” or not, check if it has been compiled with the PAM library using the ldd command.

For example sshd:

$ sudo ldd /usr/sbin/sshd | grep libpam.so

	libpam.so.0 => /lib/x86_64-linux-gnu/libpam.so.0 (0x00007effddbe2000)

How to Configure PAM in Linux

The main configuration file for PAM is /etc/pam.conf and the /etc/pam.d/ directory contains the PAM configuration files for each PAM-aware application/services. PAM will ignore the file if the directory exists.

The syntax for the main configuration file is as follows. The file is made up of a list of rules written on a single line (you can extend rules using the “\” escape character) and comments are preceded with “#” marks and extend to the next end of line.

The format of each rule is a space separated collection of tokens (the first three are case-insensitive). We will explain the these tokens in subsequent sections.

service type control-flag module module-arguments 

where:

  • service: actual application name.
  • type: module type/context/interface.
  • control-flag: indicates the behavior of the PAM-API should the module fail to succeed in its authentication task.
  • module: the absolute filename or relative pathname of the PAM.
  • module-arguments: space separated list of tokens for controlling module behavior.

The syntax of each file in /etc/pam.d/ is similar to that of the main file and is made up of lines of the following form:

type control-flag module module-arguments

This is a example of a rule definition (without module-arguments) found in the /etc/pam.d/sshd file, which disallows non-root logins when /etc/nologin exists:

account required pam_nologin.so

Understanding PAM Management Groups and Control-flags

PAM authentication tasks are separated into four independent management groups. These groups manage different aspects of a typical user’s request for a restricted service.

A module is associated to one these management group types:

  • account: provide services for account verification: has the user’s password expired?; is this user permitted access to the requested service?.
  • authentication: authenticate a user and set up user credentials.
  • password: are responsible for updating user passwords and work together with authentication modules.
  • session: manage actions performed at the beginning of a session and end of a session.

PAM loadable object files (the modules) are to be located in the following directory: /lib/security/ or /lib64/security depending on the architecture.

The supported control-flags are:

  • requisite: failure instantly returns control to the application indicating the nature of the first module failure.
  • required: all these modules are required to succeed for libpam to return success to the application.
  • sufficient: given that all preceding modules have succeeded, the success of this module leads to an immediate and successful return to the application (failure of this module is ignored).
  • optional: the success or failure of this module is generally not recorded.

In addition to the above are the keywords, there are two other valid control flags:

  • include: include all lines of given type from the configuration file specified as an argument to this control.
  • substack: include all lines of given type from the configuration file specified as an argument to this control.

How to Restrict root Access to SSH Service Via PAM

As an example, we will configure how to use PAM to disable root user access to a system via SSH and login programs. Here, we want to disable root user access to a system, by restricting access to login and sshd services.

We can use the /lib/security/pam_listfile.so module which offers great flexibility in limiting the privileges of specific accounts. Open and edit the file for the target service in the /etc/pam.d/ directory as shown.

$ sudo vim /etc/pam.d/sshd
OR
$ sudo vim /etc/pam.d/login

Add this rule in both files.

auth    required       pam_listfile.so \
        onerr=succeed  item=user  sense=deny  file=/etc/ssh/deniedusers

Explaining the tokens in the above rule:

  • auth: is the module type (or context).
  • required: is a control-flag that means if the module is used, it must pass or the overall result will be fail, regardless of the status of other modules.
  • pam_listfile.so: is a module which provides a way to deny or allow services based on an arbitrary file.
  • onerr=succeed: module argument.
  • item=user: module argument which specifies what is listed in the file and should be checked for.
  • sense=deny: module argument which specifies action to take if found in file, if the item is NOT found in the file, then the opposite action is requested.
  • file=/etc/ssh/deniedusers: module argument which specifies file containing one item per line.

Next, we need to create the file /etc/ssh/deniedusers and add the name root in it:

$ sudo vim /etc/ssh/deniedusers

Save the changes and close the file, then set the required permissions on it:

$ sudo chmod 600 /etc/ssh/deniedusers

From now on, the above rule will tell PAM to consult the /etc/ssh/deniedusers file and deny access to the SSH and login services for any listed user.

How to Configuring Advanced PAM in Linux

To write more complex PAM rules, you can use valid control-flags in the following form:

type [value1=action1 value2=action2 …] module module-arguments

Where valueN corresponds to the return code from the function invoked in the module for which the line is defined. You can find supported values from the on-line PAM Administrator’s Guide. A special value is default, which implies all valueN’s not mentioned explicitly.

The actionN can take one of the following forms:

  • ignore: if this action is used with a stack of modules, the module’s return status will not contribute to the return code the application obtains.
  • bad: indicates that the return code should be thought of as indicative of the module failing. If this module is the first in the stack to fail, its status value will be used for that of the whole stack.
  • die: equivalent to bad but may terminate the module stack and PAM immediately returning to the application.
  • ok: this instructs PAM that the system administrator thinks this return code should contribute directly to the return code of the full stack of modules.
  • done: equivalent to ok but may terminate the module stack and PAM immediately returning to the application.
  • N (an unsigned integer): equivalent to ok but may jump over the next N modules in the stack.
  • Reset: this action clears all memory of the state of the module stack and restart with the next stacked module.

Each of the four keywords: required; requisite; sufficient; and optional, have an equivalent expression in terms of the [...] syntax, which allow you to write more complicated rules and they are:

  • required: [success=ok new_authtok_reqd=ok ignore=ignore default=bad]
  • requisite: [success=ok new_authtok_reqd=ok ignore=ignore default=die]
  • sufficient: [success=done new_authtok_reqd=done default=ignore]
  • optional: [success=ok new_authtok_reqd=ok default=ignore]

The following is an example from a modern CentOS 7 system. Let’s consider these rules from the /etc/pam.d/postlogin PAM file:

#%PAM-1.0
# This file is auto-generated.
# User changes will be destroyed the next time authconfig is run.
session     [success=1 default=ignore] pam_succeed_if.so service !~ gdm* service !~ su* quiet
session     [default=1]   pam_lastlog.so nowtmp showfailed
session     optional      pam_lastlog.so silent noupdate showfailed

Here is another example configuration from the /etc/pam.d/smartcard-auth PAM file:

#%PAM-1.0
# This file is auto-generated.
# User changes will be destroyed the next time authconfig is run.
auth        required      pam_env.so
auth        [success=done ignore=ignore default=die] pam_pkcs11.so nodebug wait_for_card
auth        required      pam_deny.so

account     required      pam_unix.so
account     sufficient    pam_localuser.so
account     sufficient    pam_succeed_if.so uid < 1000 quiet
account     required      pam_permit.so

password    required      pam_pkcs11.so

session     optional      pam_keyinit.so revoke
session     required      pam_limits.so
-session     optional      pam_systemd.so
session     [success=1 default=ignore] pam_succeed_if.so service in crond quiet use_uid
session     required      pam_unix.so

For more information, see the pam.d man page:

$ man pam.d 

Lastly, a comprehensive description of the Configuration file syntax and all PAM modules can be found in the documentation for Linux-PAM.

Summary

PAM is a powerful high-level API that allows programs that rely on authentication to authentic users to applications in a Linux system. It’s powerful but very challenging to understand and use.

In this article, we’ve explained how to configure advanced features of PAM in Ubuntu and CentOS. If you have any questions or comments to share, use the feedback form below.

Source

How to Check Integrity of File and Directory Using “AIDE” in Linux

In our mega guide to hardening and securing CentOS 7, under the section “protect system internally”, one of the useful security tools we listed for internal system protection against viruses, rootkits, malware, and detection of unauthorized activities is AIDE.

AIDE (Advanced Intrusion Detection Environment) is a small yet powerful, free open source intrusion detection tool, that uses predefined rules to check file and directory integrity in Unix-like operating systems such as Linux. It is an independent static binary for simplified client/server monitoring configurations.

It is feature-rich: uses plain text configuration files and database making it easy to use; supports several message digest algorithms such as but not limited to md5, sha1, rmd160, tiger; supports common file attributes; also supports powerful regular expressions to selectively include or exclude files and directories to be scanned.

Also it can be compiled with exceptional support for Gzip compression, Posix ACL, SELinux, XAttrs and Extended file system attributes.

Aide works by creating a database (which is simply a snapshot of selected parts of the file system), from the regular expression rules defined in the configuration file(s). Once this database is initialized, you can verify the integrity of the system files against it. This guide will show how to install and use aide in Linux.

How to Install AIDE in Linux

Aide is packaged in official repositories of mainstream Linux distributions, to install it run the command for your distribution using a package manager.

# apt install aide 	   [On Debian/Ubuntu]
# yum install aide	   [On RHEL/CentOS] 	
# dnf install aide	   [On Fedora 22+]
# zypper install aide	   [On openSUSE]
# emerge aide 	           [On Gentoo]

After installing it, the main configuration file is /etc/aide.conf. To view the installed version as well as compile time parameters, run the command below on your terminal:

# aide -v
Sample Output
Aide 0.14

Compiled with the following options:

WITH_MMAP
WITH_POSIX_ACL
WITH_SELINUX
WITH_PRELINK
WITH_XATTR
WITH_LSTAT64
WITH_READDIR64
WITH_ZLIB
WITH_GCRYPT
WITH_AUDIT
CONFIG_FILE = "/etc/aide.conf"

You can open the configuration using your favorite editor.

# vi /etc/aide.conf

It has directives that define the database location, report location, default rules, the directories/files to be included in the database.

Understanding Default Aide Rules

AIDE Default Rules

AIDE Default Rules

Using the above default rules, you can define new custom rules in the aide.conf file for example.

PERMS = p+u+g+acl+selinux+xattrs

The PERMS rule is used for access control only, it will detect any changes to file or directories based on file/directory permissions, user, group, access control permissions, SELinux context and file attributes.

This will only check file content and file type.

CONTENT = sha256+ftype

This is an extended version of the previous rule, it checks extended content, file type and access.

CONTENT_EX = sha256+ftype+p+u+g+n+acl+selinux+xattrs

The DATAONLY rule below will help detect any changes in data inside all files/directory.

DATAONLY =  p+n+u+g+s+acl+selinux+xattrs+sha256

Configure Aide Rules

Configure Aide Rules

Defining Rules to Watch Files and Directories

Once you have defined rules, you can specify the file and directories to watch. Considering the PERMS rule above, this definition will check permissions for all files in root directory.

/root/\..*  PERMS

This will check all files in the /root directory for any changes.

/root/   CONTENT_EX

To help you detect any changes in data inside all files/directory under /etc/, use this.

/etc/   DATAONLY 

Configure Aide Rules for Filesystem

Configure Aide Rules for Filesystem

Using AIDE to Check File and Directory Integrity in Linux

Start by constructing a database against the checks that will be performed using --init flag. This is expected to be done before your system is connected to a network.

The command below will create a database that contains all of the files that you selected in your configuration file.

# aide --init

Initialize Aide Database

Initialize Aide Database

Then rename the database to /var/lib/aide/aide.db.gz before proceeding, using this command.

# mv /var/lib/aide/aide.db.new.gz /var/lib/aide/aide.db.gz

It is recommended to move the database to a secure location possibly in a read-only media or on another machines, but ensure that you update the configuration file to read it from there.

After the database is created, you can now check the integrity of the files and directories using the --checkflag.

# aide --check

It will read the snapshot in the database and compares it to the files/directories found you system disk. If it finds changes in places that you might not expect, it generates a report which you can then review.

Run File Integrity Check

Run File Integrity Check

Since no changes have been made to the file system, you will only get an output similar to the one above. Now try to create some files in the file system, in areas defined in the configuration file.

# vi /etc/script.sh
# touch all.txt

Then run a check once more, which should report the files added above. The output of this command depends on the parts of the file system you configured for checking, it can be lengthy overtime.

# aide --check

Check File System Changes

Check File System Changes

You need to run aide checks regularly, and in case of any changes to already selected files or addition of new file definitions in the configuration file, always update the database using the --update option:

# aide --update

After running a database update, to use the new database for future scans, always rename it to /var/lib/aide/aide.db.gz:

# mv /var/lib/aide/aide.db.new.gz  /var/lib/aide/aide.db.gz

That’s all for now! But take note of these important points:

  • One characteristic of most intrusion detection systems AIDE inclusive, is that they will not provide solutions to most security loop holes on a system. They however, assist in easing the the intrusion response process by helping system administrators examine any changes to system files/directories. So you should always be vigilant and keep updating your current security measures.
  • It it highly recommended to keep the newly created database, the configuration file and the AIDE binary in a secure location such as read-only media (possible if you install from source).
  • For additional security, consider signing the configuration and/or database.

For additional information and configurations, see its man page or check out the AIDE Homepage: http://aide.sourceforge.net/

Source

WP2Social Auto Publish Powered By : XYZScripts.com