How to Run Rancher 2.0 on your Desktop

A Detailed Overview of Rancher’s Architecture

This newly-updated, in-depth guidebook provides a detailed overview of the features and functionality of the new Rancher: an open-source enterprise Kubernetes platform.

Get the eBook

Don’t have access to Cloud infrastructure? Maybe you would like to use Rancher for local development just like you do in production?

No problem, you can install Rancher 2.0 on your desktop.

In this tutorial we will install Docker-for-Desktop Edge release and enable the built in Kubernetes engine to run your own personal instance of Rancher 2.0 on your desktop.

Prerequisites

For this guide you will need a couple of tools to manage and deploy to your local Kubernetes instance.

  • kubectl – Kubernetes CLI tool.
  • helm – Kubernetes manifest catalog tool.

Docker-for-Desktop

The Edge install of Docker CE for Windows/Mac includes a basic Kubernetes engine. We can leverage it to install a local Rancher Server. Download and install from the Docker Store.

Docker Configuration

Sign into Docker then right click on the Docker icon in your System Tray and select Settings

Advanced Settings

In the Advanced section increase Memory to at least 4096 MB. You may want to increase the number of CPUs assigned and the Disk image max size while you’re at it.

advanced

Enable Kubernetes

In the Kubernetes section, check the box to enable the Kubernetes API. Docker-for-Desktop will automatically create ~/.kube/config file with credentials for kubectl to access your new local “cluster”.

kubernetes

Don’t see a Kubernetes section? Check the General section and make sure you are running the Edge version.

Testing Your Cluster

Open terminal and test it out. Run kubectl get nodes. kubectl should return a node named docker-for-desktop.

> kubectl get nodes

NAME STATUS ROLES AGE VERSION
docker-for-desktop Ready master 6d v1.9.6

Preparing Kubernetes

Docker-for-Desktop doesn’t come with any extra tools installed. We could apply some static YAML manifest files with kubectl, but rather than reinventing the wheel, we want leverage existing work from the Kubernetes community. helm is the package management tool of choice for Kubernetes.

helm charts provide templating syntax for Kubernetes YAML manifest documents. With helm we can create configurable deployments instead of just using static files. For more information about creating your own catalog of deployments, check out the docs at https://helm.sh/

Initialize Helm on your Cluster

helm installs the tiller service on your cluster to manage chart deployments. Since docker-for-desktop has RBAC enabled by default we will need to use kubectl to create a serviceaccount and clusterrolebinding so tiller can deploy to our cluster for us.

Create the ServiceAccount in the kube-system namespace.

kubectl -n kube-system create serviceaccount tiller

Create the ClusterRoleBinding to give the tiller account access to the cluster.

kubectl create clusterrolebinding tiller –clusterrole cluster-admin –serviceaccount=kube-system:tiller

Finally use helm to initialize the tiller service

helm init –service-account tiller

NOTE: This tiller install has full cluster access, and may not be suitable for a production environment. Check out the helm docs for restricting tiller access to suit your security requirements.

Add an Ingress Controller

Ingress controllers are used to provide L7 (hostname or path base) http routing from the outside world to services running in Kubernetes.

We’re going to use helm to install the Kubernetes stable community nginx-ingress chart. This will create an ingress controller on our local cluster.

The default options for the “rancher” helm chart is to use SSL pass-through back to the self-signed cert on the Rancher server pod. To support this we need to add the –controller.extraArgs.enable-ssl-passthrough=”” option when we install the chart.

helm install stable/nginx-ingress –name ingress-nginx –namespace ingress-nginx –set controller.extraArgs.enable-ssl-passthrough=””

Installing Rancher

We’re going to use helm install Rancher.

The default install will use Rancher’s built in self-signed SSL certificate. You can check out all the options for this helm chart here: https://github.com/jgreat/helm-rancher-server

First add the rancher-server repository to helm

helm repo add rancher-server https://jgreat.github.io/helm-rancher-server/charts

Now install the rancher chart.

helm install rancher-server/rancher –name rancher –namespace rancher-system

Setting hosts file

By default the Rancher server will listen on rancher.localhost. To access it we will need to set a hosts file entry so our browser can resolve the name.

  • Windows – c:windowssystem32driversetchosts
  • Mac – /etc/hosts

Edit the appropriate file for your system and add this entry.

127.0.0.1 rancher.localhost

Connecting to Rancher

Browse to https://rancher.localhost

Ignore the SSL warning and you should be greeted by the colorful Rancher login asking you to Set the Admin password.

rancher

Congratulations you have your very own local instance of Rancher 2.0. You can add your application charts and deploy your apps just like production. Happy Containering!

Jason Greathouse

Jason Greathouse

Senior Solutions Architect

Building scalable infrastructure for companies of all sizes since 1999. From Fortune 500 companies to early stage startups. Early adopter of containers, running production workloads in Docker since version 0.7.

Source

Getting Acquainted with gVisor | Rancher Labs

Like many of us in the Kubernetes space, I’m excited to check out the
shiny new thing. To be fair, we’re all working with an amazing product
that is younger than my pre-school aged daughter. The shiny new thing at
KubeCon Europe was a new container runtime authored by Google named
gVisor. Like a cat to catnip, I had to check this out and share it with
you.

What is gVisor?

gVisor is a sandboxed container runtime, that acts as a user-space
kernel. During KubeCon Google announced that they open-sourced it to the
community. Its goal is to use paravirtualization to isolate
containerized applications from the host system, without the heavy
weight resource allocation that comes with virtual machines.

Do I Need gVisor?

No. If you’re running production workloads, don’t even think about it!
Right now, this is a metaphorical science experiment. That’s not to say
you may not want to use it as it matures. I don’t have any problem with
the way it’s trying to solve process isolation and I think it’s a good
idea. There are also alternatives you should take the time to explore
before adopting this technology in the future.

That being said, if you want to learn more about it, when you’ll want to
use it, and the problems it seeks to solve, keep reading.

Where might I want to use it?

As an operator, you’ll want to use gVisor to isolate application
containers that aren’t entirely trusted. This could be a new version of
an open source project your organization has trusted in the past. It
could be a new project your team has yet to completely vet or anything
else you aren’t entirely sure can be trusted in your cluster. After all,
if you’re running an open source project you didn’t write (all of us),
your team certainly didn’t write it so it would be good security and
good engineering to properly isolate and protect your environment in
case there may be a yet unknown vulnerability.

What is Sandboxing

Sandboxing is a software management strategy that enforces isolation
between software running on a machine, the host operating system, and
other software also running on the machine. The purpose is to constrain
applications to specific parts of the host’s memory and file-system and
not allow it to breakout and affect other parts of the operating system.

Source: https://cloudplatform.googleblog.com/2018/05/Open-sourcing-gVisor-a-sandboxed-container-runtime.html, pulled 17 May 2018

Current Sandboxing Methods

The virtual machine (VM) is a great way to isolate applications from the
underlying hardware. An entire hardware stack is virtualized to protect
applications and the host kernel from malicious applications.

Source: https://cloudplatform.googleblog.com/2018/05/Open-sourcing-gVisor-a-sandboxed-container-runtime.html, pulled 17 May 2018

As stated before, the problem is that VMs are heavy. The require set
amounts of memory and disk space. If you’ve worked in enterprise IT, I’m
sure you’ve noticed the resource waste.

Some projects are looking to solve this with lightweight OCI-compliant
VM implementations. Projects like Kata containers are bringing this to
the container space on top of runV, a hypervisor based runtime.

Source: https://katacontainers.io/, pulled 17 May 2018

Microsoft is using a similar technique to isolate workloads using a
very-lightweight Hyper-V virtual machine when using Windows Server
Containers with Hyper-V isolation.

Source: partial screenshot, https://channel9.msdn.com/Blogs/containers/DockerCon-16-Windows-Server-Docker-The-Internals-Behind-Bringing-Docker-Containers-to-Windows, timestamp 31:02 pulled 17 May 2018

This feels like a best-of-both worlds approach to isolation. Time will
tell. Most of the market is still running docker engine under the
covers. I don’t see this changing any time soon. Open containers and
container runtimes certainly will begin taking over a share of the
market. As that happens, adopting multiple container runtimes will be an
option for the enterprise.

Sandboxing with gVisor

gVisor intends to solve this problem. It acts as a kernel in between the
containerized application and the host kernel. It does this through
various mechanisms to support syscall limits, file system proxying, and
network access. These mechanisms are a paravirtualization providing a
virtual-machine like level of isolation, without the fixed resource cost
of each virtual machine.

Source: partial screenshot, https://channel9.msdn.com/Blogs/containers/DockerCon-16-Windows-Server-Docker-The-Internals-Behind-Bringing-Docker-Containers-to-Windows, timestamp 31:02 pulled 17 May 2018

runsc

gVisor the runtime is a binary named runsc (run sandboxed container) and
is an alternative to runc or runv if you’ve worked with kata containers
in the past.

Other Alternatives to gVisor

gVisor isn’t the only way to isolate your workloads and protect your
infrastructure. Technologies like SELinux, seccomp and Apparmor solve a
lot of these problems (as well as others). It would behoove you as an
operator and an engineer to get well acquainted with these technologies.
It’s a lot to learn. I’m certainly no expert, although I aspire to be.
Don’t be a lazy engineer. Learn your tools, learn your OS, do right by
your employer and your users. If you want to know more go read the man
pages and follow Jessie
Frazelle
.
She is an expert in this area of computing and has written a treasure
trove on it.

Using gVisor with Docker

As docker supports multiple runtimes, it will work with runsc. To use it
one must build and install the runsc container runtime binary and
configured docker’s /etc/docker/daemon.json file to support the gVisor
runtime. From there a user may run a container with the runsc runtime by
utilizing the –runtime flag of the docker run command.

docker run –runtime=runsc hello-world

Using gVisor with Kubernetes

Kubernetes support for gVisor is experimental and implemented via the
CRI-O CRI implementation. CRI-O is an implementation of the Kubernetes
Container Runtime Interface. Its goal is to allow Kubernetes to use any
OCI compliant container runtime (such as runc and runsc). To use this
one must install runsc on the Kubernetes , then configure cri-o to use
runsc to run untrusted workloads in cri-o’s /etc/crio/crio.conf file.
Once configured, any pod without the io.kubernetes.cri-o.TrustedSandbox
annotation (or the annotation set to false), will be run with runsc.
This would be as an alternative to using the Docker engine powering the
containers inside Kubernetes pods.

Will my application work with gVisor

It depends. Currently gVisor only supports single-container pods. Here
is a list of known working applications that have been tested with
gVisor.

Ultimately support for any given application will depend on whether the
syscalls used by the application are supported.

How does it affect performance?

Again, this depends. gVisor’s “Sentry” process is responsible for
limting syscalls and requires a platform to implement context switching
and memory mapping. Currently gVisor supports Ptrace and KVM, which
implement these functions differently, are configured differently, and
support different node configurations to operate effectively. Either
would affect performance differently than the other.

The architecture of gVisor suggests it would be able to enable greater
application density over VMM based configurations but may suffer higher
performance penalties in sycall-rich applications.

Networking

A quick note about network access and performance. Network access is
achieved via an L3 userland networking stack subproject called netstack.
This functionality can be bypassed in favor of the host network to
increase performance.

Can I use gVisor with Rancher?

Rancher currently cannot be used to provision CRI-O backed Kubernetes
clusters as it relies heavily on the docker engine. However, you
certainly manage CRI-O backed clusters with Rancher. Rancher will manage
any Kubernetes server as we leverage the Kubernetes API and our
components are Kubernetes Custom Resources.

We’ll continue to monitor gVisor as it matures. As such, we’ll add more
support for gVisor with Rancher as need arises. Like the evolution of
Windows Server Containers in Kubernetes, soon this project will become
part of the fabric of Kubernetes in the Enterprise.

Jason Van Brackel

Jason Van Brackel

Senior Solutions Architect

Jason van Brackel is a Senior Solutions Architect for Rancher. He is also the organizer of the Kubernetes Philly Meetup and loves teaching at code camps, user groups and other meetups. Having worked professionally with everything from COBOL to Go, Jason loves learning, and solving challenging problems.

Source

Gardener – The Kubernetes Botanist

Gardener – The Kubernetes Botanist

Authors: Rafael Franzke (SAP), Vasu Chandrasekhara (SAP)

Today, Kubernetes is the natural choice for running software in the Cloud. More and more developers and corporations are in the process of containerizing their applications, and many of them are adopting Kubernetes for automated deployments of their Cloud Native workloads.

There are many Open Source tools which help in creating and updating single Kubernetes clusters. However, the more clusters you need the harder it becomes to operate, monitor, manage, and keep all of them alive and up-to-date.

And that is exactly what project “Gardener” focuses on. It is not just another provisioning tool, but it is rather designed to manage Kubernetes clusters as a service. It provides Kubernetes-conformant clusters on various cloud providers and the ability to maintain hundreds or thousands of them at scale. At SAP, we face this heterogeneous multi-cloud & on-premise challenge not only in our own platform, but also encounter the same demand at all our larger and smaller customers implementing Kubernetes & Cloud Native.

Inspired by the possibilities of Kubernetes and the ability to self-host, the foundation of Gardener is Kubernetes itself. While self-hosting, as in, to run Kubernetes components inside Kubernetes is a popular topic in the community, we apply a special pattern catering to the needs of operating a huge number of clusters with minimal total cost of ownership. We take an initial Kubernetes cluster (called “seed” cluster) and seed the control plane components (such as the API server, scheduler, controller-manager, etcd and others) of an end-user cluster as simple Kubernetes pods. In essence, the focus of the seed cluster is to deliver a robust Control-Plane-as-a-Service at scale. Following our botanical terminology, the end-user clusters when ready to sprout are called “shoot” clusters. Considering network latency and other fault scenarios, we recommend a seed cluster per cloud provider and region to host the control planes of the many shoot clusters.

Overall, this concept of reusing Kubernetes primitives already simplifies deployment, management, scaling & patching/updating of the control plane. Since it builds upon highly available initial seed clusters, we can evade multiple quorum number of master node requirements for shoot cluster control planes and reduce waste/costs. Furthermore, the actual shoot cluster consists only of worker nodes for which full administrative access to the respective owners could be granted, thereby structuring a necessary separation of concerns to deliver a higher level of SLO. The architectural role & operational ownerships are thus defined as following (cf. Figure 1):

  • Kubernetes as a Service provider owns, operates, and manages the garden and the seed clusters. They represent parts of the required landscape/infrastructure.
  • The control planes of the shoot clusters are run in the seed and, consequently, within the separate security domain of the service provider.
  • The shoot clusters’ machines are run under the ownership of and in the cloud provider account and the environment of the customer, but still managed by the Gardener.
  • For on-premise or private cloud scenarios the delegation of ownership & management of the seed clusters (and the IaaS) is feasible.

Gardener architecture

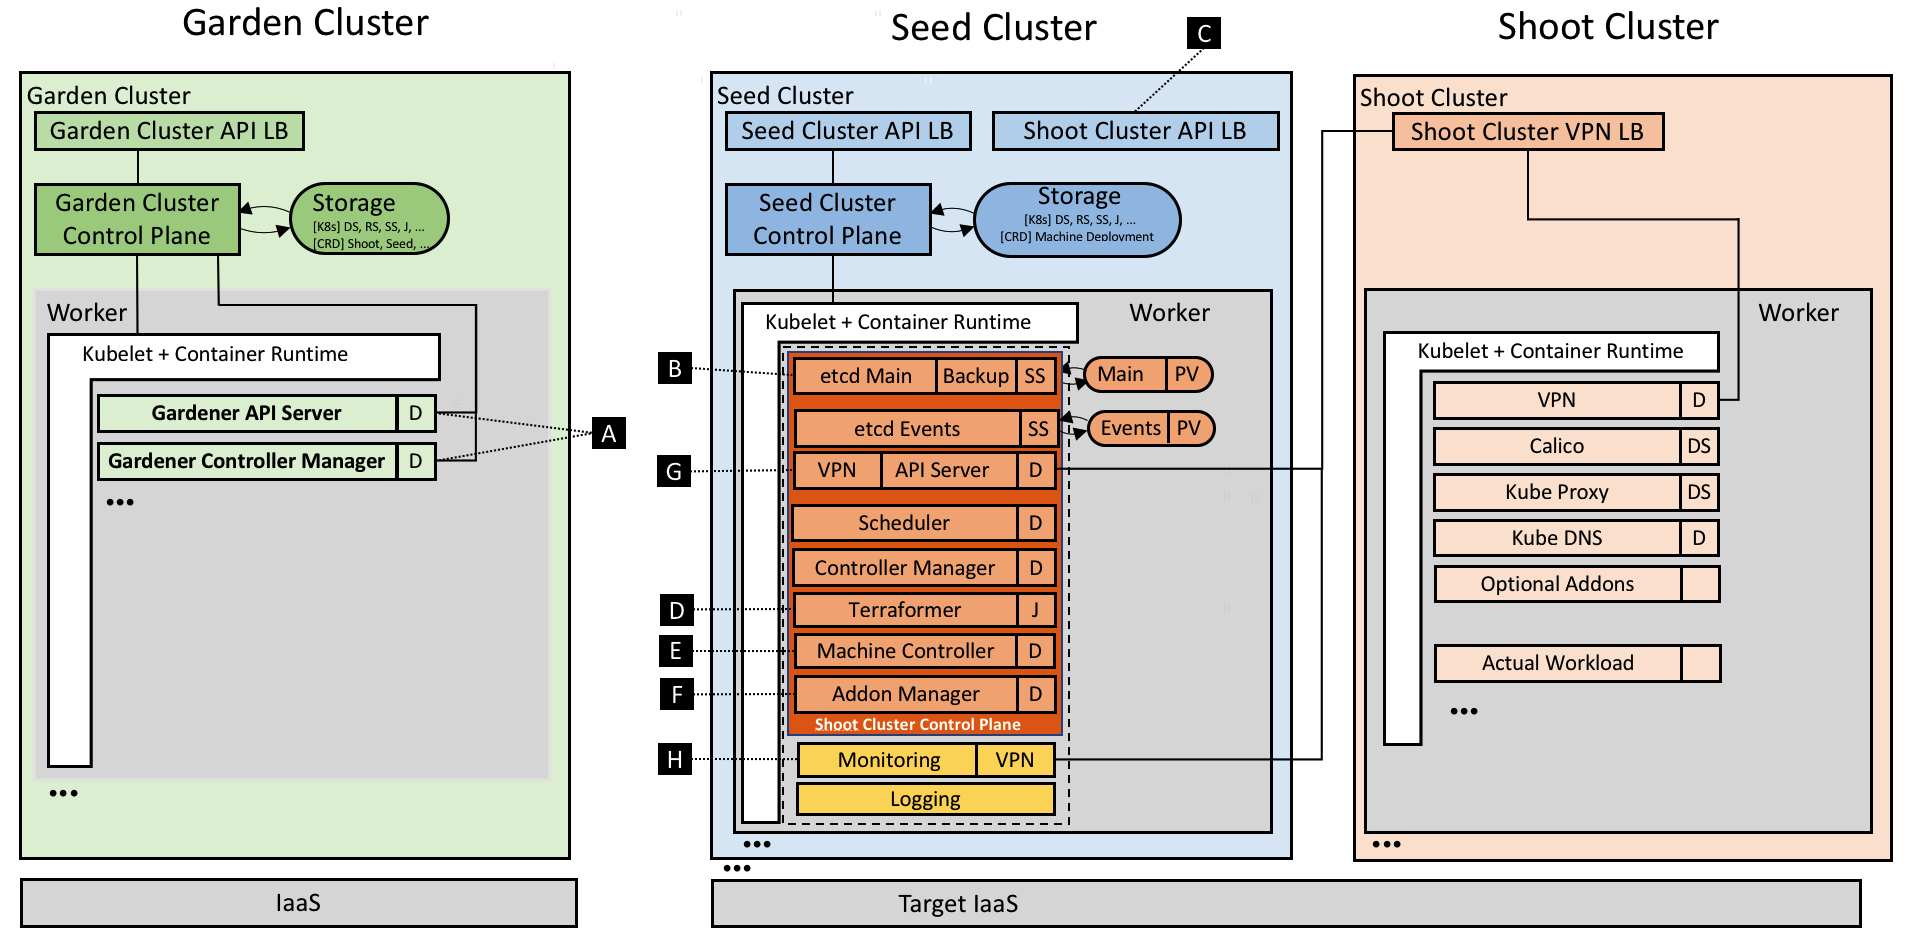
Figure 1 Technical Gardener landscape with components.

The Gardener is developed as an aggregated API server and comes with a bundled set of controllers. It runs inside another dedicated Kubernetes cluster (called “garden” cluster) and it extends the Kubernetes API with custom resources. Most prominently, the Shoot resource allows a description of the entire configuration of a user’s Kubernetes cluster in a declarative way. Corresponding controllers will, just like native Kubernetes controllers, watch these resources and bring the world’s actual state to the desired state (resulting in create, reconcile, update, upgrade, or delete operations.)
The following example manifest shows what needs to be specified:

apiVersion: garden.sapcloud.io/v1beta1
kind: Shoot
metadata:
name: dev-eu1
namespace: team-a
spec:
cloud:
profile: aws
region: us-east-1
secretBindingRef:
name: team-a-aws-account-credentials
aws:
machineImage:
ami: ami-34237c4d
name: CoreOS
networks:
vpc:
cidr: 10.250.0.0/16

workers:
– name: cpu-pool
machineType: m4.xlarge
volumeType: gp2
volumeSize: 20Gi
autoScalerMin: 2
autoScalerMax: 5
dns:
provider: aws-route53
domain: dev-eu1.team-a.example.com
kubernetes:
version: 1.10.2
backup:

maintenance:

addons:
cluster-autoscaler:
enabled: true

Once sent to the garden cluster, Gardener will pick it up and provision the actual shoot. What is not shown above is that each action will enrich the Shoot’s status field indicating whether an operation is currently running and recording the last error (if there was any) and the health of the involved components. Users are able to configure and monitor their cluster’s state in true Kubernetes style. Our users have even written their own custom controllers watching & mutating these Shoot resources.

The Gardener implements a Kubernetes inception approach; thus, it leverages Kubernetes capabilities to perform its operations. It provides a couple of controllers (cf. [A]) watching Shoot resources whereas the main controller is responsible for the standard operations like create, update, and delete. Another controller named “shoot care” is performing regular health checks and garbage collections, while a third’s (“shoot maintenance”) tasks are to cover actions like updating the shoot’s machine image to the latest available version.

For every shoot, Gardener creates a dedicated Namespace in the seed with appropriate security policies and within it pre-creates the later required certificates managed as Secrets.

etcd

The backing data store etcd (cf. [B]) of a Kubernetes cluster is deployed as a StatefulSet with one replica and a PersistentVolume(Claim). Embracing best practices, we run another etcd shard-instance to store Events of a shoot. Anyway, the main etcd pod is enhanced with a sidecar validating the data at rest and taking regular snapshots which are then efficiently backed up to an object store. In case etcd’s data is lost or corrupt, the sidecar restores it from the latest available snapshot. We plan to develop incremental/continuous backups to avoid discrepancies (in case of a recovery) between a restored etcd state and the actual state [1].

Kubernetes control plane

As already mentioned above, we have put the other Kubernetes control plane components into native Deployments and run them with the rolling update strategy. By doing so, we can not only leverage the existing deployment and update capabilities of Kubernetes, but also its monitoring and liveliness proficiencies. While the control plane itself uses in-cluster communication, the API Servers’ Service is exposed via a load balancer for external communication (cf. [C]). In order to uniformly generate the deployment manifests (mainly depending on both the Kubernetes version and cloud provider), we decided to utilize Helm charts whereas Gardener leverages only Tillers rendering capabilities, but deploys the resulting manifests directly without running Tiller at all [2].

Infrastructure preparation

One of the first requirements when creating a cluster is a well-prepared infrastructure on the cloud provider side including networks and security groups. In our current provider specific in-tree implementation of Gardener (called the “Botanist”), we employ Terraform to accomplish this task. Terraform provides nice abstractions for the major cloud providers and implements capabilities like parallelism, retry mechanisms, dependency graphs, idempotency, and more. However, we found that Terraform is challenging when it comes to error handling and it does not provide a technical interface to extract the root cause of an error. Currently, Gardener generates a Terraform script based on the shoot specification and stores it inside a ConfigMap in the respective namespace of the seed cluster. The Terraformer component then runs as a Job (cf. [D]), executes the mounted Terraform configuration, and writes the produced state back into another ConfigMap. Using the Job primitive in this manner helps to inherit its retry logic and achieve fault tolerance against temporary connectivity issues or resource constraints. Moreover, Gardener only needs to access the Kubernetes API of the seed cluster to submit the Job for the underlying IaaS. This design is important for private cloud scenarios in which typically the IaaS API is not exposed publicly.

Machine controller manager

What is required next are the nodes to which the actual workload of a cluster is to be scheduled. However, Kubernetes offers no primitives to request nodes forcing a cluster administrator to use external mechanisms. The considerations include the full lifecycle, beginning with initial provisioning and continuing with providing security fixes, and performing health checks and rolling updates. While we started with instantiating static machines or utilizing instance templates of the cloud providers to create the worker nodes, we concluded (also from our previous production experience with running a cloud platform) that this approach requires extensive effort. During discussions at KubeCon 2017, we recognized that the best way, of course, to manage cluster nodes is to again apply core Kubernetes concepts and to teach the system to self-manage the nodes/machines it runs. For that purpose, we developed the machine controller manager (cf. [E]) which extends Kubernetes with MachineDeployment, MachineClass, MachineSet & Machine resources and enables declarative management of (virtual) machines from within the Kubernetes context just like Deployments, ReplicaSets & Pods. We reused code from existing Kubernetes controllers and just needed to abstract a few IaaS/cloud provider specific methods for creating, deleting, and listing machines in dedicated drivers. When comparing Pods and Machines a subtle difference becomes evident: creating virtual machines directly results in costs, and if something unforeseen happens, these costs can increase very quickly. To safeguard against such rampage, the machine controller manager comes with a safety controller that terminates orphaned machines and freezes the rollout of MachineDeployments and MachineSets beyond certain thresholds and time-outs. Furthermore, we leverage the existing official cluster-autoscaler already including the complex logic of determining which node pool to scale out or down. Since its cloud provider interface is well-designed, we enabled the autoscaler to directly modify the number of replicas in the respective MachineDeployment resource when triggering to scale out or down.

Addons

Besides providing a properly setup control plane, every Kubernetes cluster requires a few system components to work. Usually, that’s the kube-proxy, an overlay network, a cluster DNS, and an ingress controller. Apart from that, Gardener allows to order optional add-ons configurable by the user (in the shoot resource definition), e.g. Heapster, the Kubernetes Dashboard, or Cert-Manager. Again, the Gardener renders the manifests for all these components via Helm charts (partly adapted and curated from the upstream charts repository). However, these resources are managed in the shoot cluster and can thus be tweaked by users with full administrative access. Hence, Gardener ensures that these deployed resources always match the computed/desired configuration by utilizing an existing watch dog, the kube-addon-manager (cf. [F]).

Network air gap

While the control plane of a shoot cluster runs in a seed managed & supplied by your friendly platform-provider, the worker nodes are typically provisioned in a separate cloud provider (billing) account of the user. Typically, these worker nodes are placed into private networks [3] to which the API Server in the seed control plane establishes direct communication, using a simple VPN solution based on ssh (cf. [G]). We have recently migrated the SSH-based implementation to an OpenVPN-based implementation which significantly increased the network bandwidth.

Monitoring & Logging

Monitoring, alerting, and logging are crucial to supervise clusters and keep them healthy so as to avoid outages and other issues. Prometheus has become the most used monitoring system in the Kubernetes domain. Therefore, we deploy a central Prometheus instance into the garden namespace of every seed. It collects metrics from all the seed’s kubelets including those for all pods running in the seed cluster. In addition, next to every control plane a dedicated tenant Prometheus instance is provisioned for the shoot itself (cf. [H]). It gathers metrics for its own control plane as well as for the pods running on the shoot’s worker nodes. The former is done by fetching data from the central Prometheus’ federation endpoint and filtering for relevant control plane pods of the particular shoot. Other than that, Gardener deploys two kube-state-metrics instances, one responsible for the control plane and one for the workload, exposing cluster-level metrics to enrich the data. The node exporter provides more detailed node statistics. A dedicated tenant Grafana dashboard displays the analytics and insights via lucid dashboards. We also defined alerting rules for critical events and employed the AlertManager to send emails to operators and support teams in case any alert is fired.

[1] This is also the reason for not supporting point-in-time recovery. There is no reliable infrastructure reconciliation implemented in Kubernetes so far. Thus, restoring from an old backup without refreshing the actual workload and state of the concerned cluster would generally not be of much help.

[2] The most relevant criteria for this decision was that Tiller requires a port-forward connection for communication which we experienced to be too unstable and error-prone for our automated use case. Nevertheless, we are looking forward to Helm v3 hopefully interacting with Tiller using CustomResourceDefinitions.

[3] Gardener offers to either create & prepare these networks with the Terraformer or it can be instructed to reuse pre-existing networks.

Despite requiring only the familiar kubectl command line tool for managing all of Gardener, we provide a central dashboard for comfortable interaction. It enables users to easily keep track of their clusters’ health, and operators to monitor, debug, and analyze the clusters they are responsible for. Shoots are grouped into logical projects in which teams managing a set of clusters can collaborate and even track issues via an integrated ticket system (e.g. GitHub Issues). Moreover, the dashboard helps users to add & manage their infrastructure account secrets and to view the most relevant data of all their shoot clusters in one place while being independent from the cloud provider they are deployed to.

Gardener architecture

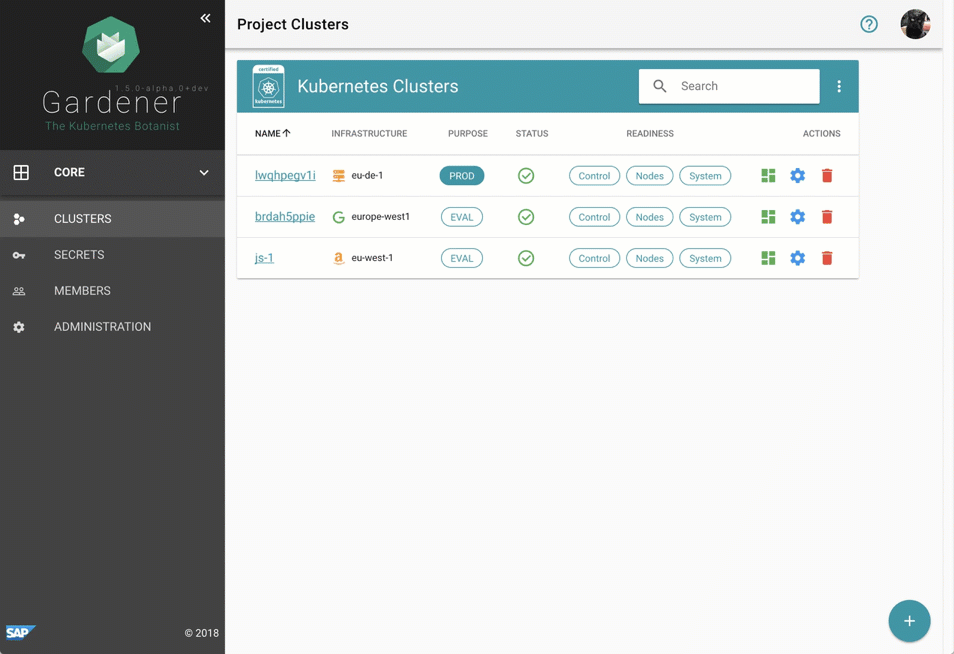
Figure 2 Animated Gardener dashboard.

More focused on the duties of developers and operators, the Gardener command line client gardenctl simplifies administrative tasks by introducing easy higher-level abstractions with simple commands that help condense and multiplex information & actions from/to large amounts of seed and shoot clusters.

$ gardenctl ls shoots
projects:
– project: team-a
shoots:
– dev-eu1
– prod-eu1

$ gardenctl target shoot prod-eu1
[prod-eu1]

$ gardenctl show prometheus
NAME READY STATUS RESTARTS AGE IP NODE
prometheus-0 3/3 Running 0 106d 10.241.241.42 ip-10-240-7-72.eu-central-1.compute.internal

URL: https://user:password@p.prod-eu1.team-a.seed.aws-eu1.example.com

The Gardener is already capable of managing Kubernetes clusters on AWS, Azure, GCP, OpenStack [4]. Actually, due to the fact that it relies only on Kubernetes primitives, it nicely connects to private cloud or on-premise requirements. The only difference from Gardener’s point of view would be the quality and scalability of the underlying infrastructure – the lingua franca of Kubernetes ensures strong portability guarantees for our approach.

Nevertheless, there are still challenges ahead. We are probing a possibility to include an option to create a federation control plane delegating to multiple shoot clusters in this Open Source project. In the previous sections we have not explained how to bootstrap the garden and the seed clusters themselves. You could indeed use any production ready cluster provisioning tool or the cloud providers’ Kubernetes as a Service offering. We have built an uniform tool called Kubify based on Terraform and reused many of the mentioned Gardener components. We envision the required Kubernetes infrastructure to be able to be spawned in its entirety by an initial bootstrap Gardener and are already discussing how we could achieve that.

Another important topic we are focusing on is disaster recovery. When a seed cluster fails, the user’s static workload will continue to operate. However, administrating the cluster won’t be possible anymore. We are considering to move control planes of the shoots hit by a disaster to another seed. Conceptually, this approach is feasible and we already have the required components in place to implement that, e.g. automated etcd backup and restore. The contributors for this project not only have a mandate for developing Gardener for production, but most of us even run it in true DevOps mode as well. We completely trust the Kubernetes concepts and are committed to follow the “eat your own dog food” approach.

In order to enable a more independent evolution of the Botanists, which contain the infrastructure provider specific parts of the implementation, we plan to describe well-defined interfaces and factor out the Botanists into their own components. This is similar to what Kubernetes is currently doing with the cloud-controller-manager. Currently, all the cloud specifics are part of the core Gardener repository presenting a soft barrier to extending or supporting new cloud providers.

When taking a look at how the shoots are actually provisioned, we need to gain more experience on how really large clusters with thousands of nodes and pods (or more) behave. Potentially, we will have to deploy e.g. the API server and other components in a scaled-out fashion for large clusters to spread the load. Fortunately, horizontal pod autoscaling based on custom metrics from Prometheus will make this relatively easy with our setup. Additionally, the feedback from teams who run production workloads on our clusters, is that Gardener should support with prearranged Kubernetes QoS. Needless to say, our aspiration is going to be the integration and contribution to the vision of Kubernetes Autopilot.

[4] Prototypes already validated CTyun & Aliyun.

The Gardener project is developed as Open Source and hosted on GitHub: https://github.com/gardener

SAP is working on Gardener since mid 2017 and is focused on building up a project that can easily be evolved and extended. Consequently, we are now looking for further partners and contributors to the project. As outlined above, we completely rely on Kubernetes primitives, add-ons, and specifications and adapt its innovative Cloud Native approach. We are looking forward to aligning with and contributing to the Kubernetes community. In fact, we envision contributing the complete project to the CNCF.

At the moment, an important focus on collaboration with the community is the Cluster API working group within the SIG Cluster Lifecycle founded a few months ago. Its primary goal is the definition of a portable API representing a Kubernetes cluster. That includes the configuration of control planes and the underlying infrastructure. The overlap of what we have already in place with Shoot and Machine resources compared to what the community is working on is striking. Hence, we joined this working group and are actively participating in their regular meetings, trying to contribute back our learnings from production. Selfishly, it is also in our interest to shape a robust API.

If you see the potential of the Gardener project then please learn more about it on GitHub and help us make Gardener even better by asking questions, engaging in discussions, and by contributing code. Also, try out our quick start setup.

We are looking forward to seeing you there!

Source

RancherVM Live Migration with Shared Storage

With the latest release of RancherVM, we’ve added the ability to schedule virtual machines (guests) to specific Kubernetes Nodes (hosts).

This declarative placement (in Kubernetes terms: required node affinity) can be modified at any time. For stopped VMs, no change will be observed until the VM starts. For running VMs, the VM will enter a migrating state. RancherVM will then migrate the running guest machine from old to new host. Upon completion, the VM returns to running state and the old host’s VM pod is deleted. Active NoVNC sessions will be disconnected for a few seconds before auto-reconnecting. Secure shell (SSH) sessions will not disconnect; a sub-second pause in communication may be observed.

Migration of guest machines (live or offline) requires some form of shared storage. Since we make use of virtio-blk-pci para-virtualized I/O block device driver which writes virtual block devices as files to the host filesystem, NFS will work nicely.

Note: You are welcome to install RancherVM before configuring shared storage, but do not create any VM Instances yet. If you already created some instances, delete them before proceeding.

Install/Configure NFS server

Let’s walk through NFS server installation and configuration on an Ubuntu host. This can be a dedicated host or one of the Nodes in your RancherVM cluster.

Install the required package:

sudo apt-get install -y nfs-kernel-server

Create the directory that will be shared:

sudo mkdir -p /var/lib/rancher/vm-shared

Append the following line to /etc/exports:

/var/lib/rancher/vm-shared *(rw,sync,no_subtree_check,no_root_squash)

This allows any host IP to mount the NFS share; if your machines are public facing, you may want to restrict * to an internal subnet such as 192.168.100.1/24 or add firewall rules.

The directory will now be exported during the boot sequence. To export the directory without rebooting, run the following command:

From one of the RancherVM nodes, query for registered RPC programs. Replace <nfs_server_ip> with the (private) IP address of your NFS server:

rpcinfo -p <nfs_server_ip>

You should see program 100003 (NFS service) present, for example:

program vers proto port service
100000 4 tcp 111 portmapper
100000 3 tcp 111 portmapper
100000 2 tcp 111 portmapper
100000 4 udp 111 portmapper
100000 3 udp 111 portmapper
100000 2 udp 111 portmapper
100005 1 udp 47321 mountd
100005 1 tcp 33684 mountd
100005 2 udp 47460 mountd
100005 2 tcp 45270 mountd
100005 3 udp 34689 mountd
100005 3 tcp 51773 mountd
100003 2 tcp 2049 nfs
100003 3 tcp 2049 nfs
100003 4 tcp 2049 nfs
100227 2 tcp 2049
100227 3 tcp 2049
100003 2 udp 2049 nfs
100003 3 udp 2049 nfs
100003 4 udp 2049 nfs
100227 2 udp 2049
100227 3 udp 2049
100021 1 udp 49239 nlockmgr
100021 3 udp 49239 nlockmgr
100021 4 udp 49239 nlockmgr
100021 1 tcp 45624 nlockmgr
100021 3 tcp 45624 nlockmgr
100021 4 tcp 45624 nlockmgr

The NFS server is now ready to use. Next we’ll configure RancherVM nodes to mount the exported file system.

Install/Configure NFS clients

On each host participating as a RancherVM node, the following procedure should be followed. This includes the NFS server if the machine is also a node in the RancherVM cluster.

Install the required package:

sudo apt-get install -y nfs-common

Create the directory that will be mounted:

sudo mkdir -p /var/lib/rancher/vm

Be careful to use this exact path. Append the following line to /etc/fstab. Replace <nfs_server_ip> with the (private) IP address of your NFS server:

<nfs_server_ip>:/var/lib/rancher/vm-shared /var/lib/rancher/vm nfs auto 0 0

The exported directory will now be mounted to /var/lib/rancher/vm during the boot sequence. To mount the directory without rebooting, run the following command:

This should return quickly without output. Verify the mount succeeded by checking the mount table:

mount | grep /var/lib/rancher/vm

If an error occurred, refer to the rpcinfo command in the previous section, then check the firewall settings on both NFS server and client.

Let’s ensure we can read/write to the shared directory. On one client, touch a file:

touch /var/lib/rancher/vm/read-write-test

On another client, look for the file:

ls /var/lib/rancher/vm | grep read-write-test

If the file exists, you’re good to go.

Live Migration

Now that shared storage is configured, we are ready to create and migrate VM instances. Install RancherVM into your Kubernetes cluster if you haven’t already.

Usage

You will need at least two ready hosts with sufficient resources to run your instance.

Hosts

We create a Ubuntu Xenail server instance with 1 vCPU and 1GB RAM and explicitly assign it to node1.

Create Instance

After waiting a bit, our instance enters running state and is assigned an IP address.

Instance Running

Now, let’s trigger the live migration by clicking the dropdown under Node Name column. To the left is the requested node, to the right is the currently scheduled node.

Instance Node Dropdown

Our instance enters migrating state. This does not pause execution; the migration is mostly transparent to the end user.

Instance Migrating

Once migration completes, the instance returns to running state. The currently scheduled node now reflects node2 which matches the desired node.

Instance Migrated

That’s all there is to it. Migrating instances off of a node for maintenance or decommissioning is now a breeze.

How It Works

Live migration is a three step process:

  1. Start the new instance on the desired node and configure an incoming socket to expect memory pages from the old instance.
  2. Initiate the transfer of memory pages, in order, from the old to new instance. Changes in already transferred memory pages are tracked and sent after the current sequential pass completes. This process repeats until we have sufficient bandwidth to stream the final memory pages within a configurable expected time period (300ms by default).
  3. Stop the old instance, transfer the remaining memory pages and start the new instance. The migration is complete.

Moving Forward

We’ve covered manually configuring a shared filesystem and demonstrated the capability to live migrate guest virtual machines from one node to another. This brings us one step closer to achieving a fault tolerant, maintainable virtual machine cloud.

Next up, we plan to integrate RancherVM with Project Longhorn, a distributed block storage system that runs on Kubernetes. Longhorn brings performant, replicated block devices to the table and includes valuable features such as snapshotting. Stay tuned!

James Oliver

James Oliver
Tools and Automation Engineer, Prior to Rancher, James’ first exposure to cluster management was writing frameworks on Apache Mesos predating the release of DC/OS. Self-proclaimed jack of all trades, James loves reverse engineering complex software solutions as well as building systems at scale. Proponent of FOSS, it is his personal goal to automate the complexities of creating, deploying, and maintaining scalable systems to empower hobbyists and corporations alike. James has a B.S. in Computer Engineering from University of Arizona.

Source

Getting to Know Kubevirt – Kubernetes

Getting to Know Kubevirt

Author: Jason Brooks (Red Hat)

Once you’ve become accustomed to running Linux container workloads on Kubernetes, you may find yourself wishing that you could run other sorts of workloads on your Kubernetes cluster. Maybe you need to run an application that isn’t architected for containers, or that requires a different version of the Linux kernel – or an all together different operating system – than what’s available on your container host.

These sorts of workloads are often well-suited to running in virtual machines (VMs), and KubeVirt, a virtual machine management add-on for Kubernetes, is aimed at allowing users to run VMs right alongside containers in the their Kubernetes or OpenShift clusters.

KubeVirt extends Kubernetes by adding resource types for VMs and sets of VMs through Kubernetes’ Custom Resource Definitions API (CRD). KubeVirt VMs run within regular Kubernetes pods, where they have access to standard pod networking and storage, and can be managed using standard Kubernetes tools such as kubectl.

Running VMs with Kubernetes involves a bit of an adjustment compared to using something like oVirt or OpenStack, and understanding the basic architecture of KubeVirt is a good place to begin.

In this post, we’ll talk about some of the components that are involved in KubeVirt at a high level. The components we’ll check out are CRDs, the KubeVirt virt-controller, virt-handler and virt-launcher components, libvirt, storage, and networking.

KubeVirt Components

Kubevirt Components

Custom Resource Definitions

Kubernetes resources are endpoints in the Kubernetes API that store collections of related API objects. For instance, the built-in pods resource contains a collection of Pod objects. The Kubernetes Custom Resource Definition API allows users to extend Kubernetes with additional resources by defining new objects with a given name and schema. Once you’ve applied a custom resource to your cluster, the Kubernetes API server serves and handles the storage of your custom resource.

KubeVirt’s primary CRD is the VirtualMachine (VM) resource, which contains a collection of VM objects inside the Kubernetes API server. The VM resource defines all the properties of the Virtual machine itself, such as the machine and CPU type, the amount of RAM and vCPUs, and the number and type of NICs available in the VM.

virt-controller

The virt-controller is a Kubernetes Operator that’s responsible for cluster-wide virtualization functionality. When new VM objects are posted to the Kubernetes API server, the virt-controller takes notice and creates the pod in which the VM will run. When the pod is scheduled on a particular node, the virt-controller updates the VM object with the node name, and hands off further responsibilities to a node-specific KubeVirt component, the virt-handler, an instance of which runs on every node in the cluster.

virt-handler

Like the virt-controller, the virt-handler is also reactive, watching for changes to the VM object, and performing all necessary operations to change a VM to meet the required state. The virt-handler references the VM specification and signals the creation of a corresponding domain using a libvirtd instance in the VM’s pod. When a VM object is deleted, the virt-handler observes the deletion and turns off the domain.

virt-launcher

For every VM object one pod is created. This pod’s primary container runs the virt-launcher KubeVirt component. The main purpose of the virt-launcher Pod is to provide the cgroups and namespaces which will be used to host the VM process.

virt-handler signals virt-launcher to start a VM by passing the VM’s CRD object to virt-launcher. virt-launcher then uses a local libvirtd instance within its container to start the VM. From there virt-launcher monitors the VM process and terminates once the VM has exited.

If the Kubernetes runtime attempts to shutdown the virt-launcher pod before the VM has exited, virt-launcher forwards signals from Kubernetes to the VM process and attempts to hold off the termination of the pod until the VM has shutdown successfully.

# kubectl get pods

NAME READY STATUS RESTARTS AGE
virt-controller-7888c64d66-dzc9p 1/1 Running 0 2h
virt-controller-7888c64d66-wm66x 0/1 Running 0 2h
virt-handler-l2xkt 1/1 Running 0 2h
virt-handler-sztsw 1/1 Running 0 2h
virt-launcher-testvm-ephemeral-dph94 2/2 Running 0 2h

libvirtd

An instance of libvirtd is present in every VM pod. virt-launcher uses libvirtd to manage the life-cycle of the VM process.

Storage and Networking

KubeVirt VMs may be configured with disks, backed by volumes.

Persistent Volume Claim volumes make Kubernetes persistent volume available as disks directly attached to the VM. This is the primary way to provide KubeVirt VMs with persistent storage. Currently, persistent volumes must be iscsi block devices, although work is underway to enable file-based pv disks.

Ephemeral Volumes are a local copy on write images that use a network volume as a read-only backing store. KubeVirt dynamically generates the ephemeral images associated with a VM when the VM starts, and discards the ephemeral images when the VM stops. Currently, ephemeral volumes must be backed by pvc volumes.

Registry Disk volumes reference docker image that embed a qcow or raw disk. As the name suggests, these volumes are pulled from a container registry. Like regular ephemeral container images, data in these volumes persists only while the pod lives.

CloudInit NoCloud volumes provide VMs with a cloud-init NoCloud user-data source, which is added as a disk to the VM, where it’s available to provide configuration details to guests with cloud-init installed. Cloud-init details can be provided in clear text, as base64 encoded UserData files, or via Kubernetes secrets.

In the example below, a Registry Disk is configured to provide the image from which to boot the VM. A cloudInit NoCloud volume, paired with an ssh-key stored as clear text in the userData field, is provided for authentication with the VM:

apiVersion: kubevirt.io/v1alpha1
kind: VirtualMachine
metadata:
name: myvm
spec:
terminationGracePeriodSeconds: 5
domain:
resources:
requests:
memory: 64M
devices:
disks:
– name: registrydisk
volumeName: registryvolume
disk:
bus: virtio
– name: cloudinitdisk
volumeName: cloudinitvolume
disk:
bus: virtio
volumes:
– name: registryvolume
registryDisk:
image: kubevirt/cirros-registry-disk-demo:devel
– name: cloudinitvolume
cloudInitNoCloud:
userData: |
ssh-authorized-keys:
– ssh-rsa AAAAB3NzaK8L93bWxnyp test@test.com

Just as with regular Kubernetes pods, basic networking functionality is made available automatically to each KubeVirt VM, and particular TCP or UDP ports can be exposed to the outside world using regular Kubernetes services. No special network configuration is required.

Getting Involved

KubeVirt development is accelerating, and the project is eager for new contributors. If you’re interested in getting involved, check out the project’s open issues and check out the project calendar.

If you need some help or want to chat you can connect to the team via freenode IRC in #kubevirt, or on the KubeVirt mailing list. User documentation is available at https://kubevirt.gitbooks.io/user-guide/.

Source

Recover Rancher Kubernetes cluster from a Backup

Take a deep dive into Best Practices in Kubernetes Networking

From overlay networking and SSL to ingress controllers and network security policies, we’ve seen many users get hung up on Kubernetes networking challenges. In this video recording, we dive into Kubernetes networking, and discuss best practices for a wide variety of deployment options.

Watch the video

Etcd is a highly available distributed key-value store that provides a reliable way to store data across machines, more importantly it is used as a Kubernetes’ backing store for all of a cluster’s data.

In this post we are going to discuss how to backup etcd and how to recover from a backup to restore operations to a Kubernetes cluster.

Etcd in Rancher 1.6

In Rancher 1.6 we use our own Docker image for etcd which basically pulls the official etcd and adds some scripts and go binaries for orchestration, backup, disaster recovery, and healthcheck.

The scripts communicate with Rancher’s metadata service to get important information, such as: how many etcd are running in the cluster, who is the etcd leader, etc. In Rancher 1.6, we introduced etcd backup, which works besides the main etcd in the background. This service is responsible for backup operations.

The backup operations work by performing rolling backups of etcd at specified intervals and also supports retention of old backups. Rancher-etcd does that by providing three environment variables to the Docker image:

  • EMBEDDED_BACKUPS: boolean variable to enable/disable backup.
  • BACKUP_PERIOD: etcd will perform backups at this time interval.
  • BACKUP_RETENTION: etcd will retain backups for this time interval.

Backups are taken at /var/etcd/backups on the host and are taken using the following command:

etcdctl backup –data-dir <dataDir> –backup-dir <backupDir>

To configure the backup operations for etcd in Rancher 1.6, you must supply the mentioned environment variables in the Kubernetes configuration template:

After configuring and launching Kubernetes, etcd should automatically take backups every 15 minutes by default.

Restoring backup

Recovering etcd from a backup in rancher 1.6 requires the user to have data in the etcd volume created for etcd. For example, if you have 3 nodes and you have backups created in the /var/etcd/backup directory:

# ls /var/etcd/backups/ -l
total 44
drwx—— 3 root root 4096 Apr 9 15:03 2018-04-09T15:03:54Z_etcd_1
drwx—— 3 root root 4096 Apr 9 15:05 2018-04-09T15:05:54Z_etcd_1
drwx—— 3 root root 4096 Apr 9 15:07 2018-04-09T15:07:54Z_etcd_1
drwx—— 3 root root 4096 Apr 9 15:09 2018-04-09T15:09:54Z_etcd_1
drwx—— 3 root root 4096 Apr 9 15:11 2018-04-09T15:11:54Z_etcd_1
drwx—— 3 root root 4096 Apr 9 15:13 2018-04-09T15:13:54Z_etcd_1
drwx—— 3 root root 4096 Apr 9 15:15 2018-04-09T15:15:54Z_etcd_1
drwx—— 3 root root 4096 Apr 9 15:17 2018-04-09T15:17:54Z_etcd_1
drwx—— 3 root root 4096 Apr 9 15:19 2018-04-09T15:19:54Z_etcd_1
drwx—— 3 root root 4096 Apr 9 15:21 2018-04-09T15:21:54Z_etcd_1
drwx—— 3 root root 4096 Apr 9 15:23 2018-04-09T15:23:54Z_etcd_1

Then you should be able to restore operations to etcd. First of all you should only start with one node, so that only one etcd will restore from backup, and then the rest of etcd will join the cluster. To begin the restoration, use the following steps:

target=2018-04-09T15:23:54Z_etcd_1
docker volume create –name etcd
docker run -d -v etcd:/data –name etcd-restore busybox
docker cp /var/etcd/backups/$target etcd-restore:/data/data.current
docker rm etcd-restore

The next step is to start Kubernetes on this node normally:

After that you can add new hosts to the setup. Note that you have to make sure that new hosts don’t have etcd volumes.

It’s also preferable to have etcd backup mounted to NFS mount point so that if the hosts are down for any reason, it won’t affect the backups created for etcd.

Etcd in Rancher 2.0

Recently Rancher announced GA for Rancher 2.0 and became ready for production deployments. Rancher 2.0 provides unified cluster management for different cloud providers including GKE, AKS, EKS as well providers that do not yet support a managed Kubernetes service.

Starting from RKE v0.1.7, the user is allowed to enable regular etcd snapshots automatically. In addition, it lets the user restore etcd from a snapshot stored on cluster instances.

In this section we will explain how to backup/restore your Rancher installation on an RKE managed cluster. The steps for this kind of Rancher installation is explained in the official documentation in more detail.

After Rancher Installation

After you install Rancher using RKE as explained in the documentation, you should see similar output when you execute the command:

# kubectl get pods –all-namespaces
NAMESPACE NAME READY STATUS RESTARTS AGE
cattle-system cattle-859b6cdc6b-tns6g 1/1 Running 0 19s
ingress-nginx default-http-backend-564b9b6c5b-7wbkx 1/1 Running 0 25s
ingress-nginx nginx-ingress-controller-shpn4 1/1 Running 0 25s
kube-system canal-5xj2r 3/3 Running 0 37s
kube-system kube-dns-5ccb66df65-c72t9 3/3 Running 0 31s
kube-system kube-dns-autoscaler-6c4b786f5-xtj26 1/1 Running 0 30s

You will notice that cattle pod is up and running in cattle-system namespace; this pod is the rancher server installed as a Kubernetes deployment:

RKE etcd Snapshots

RKE introduced two commands to save and restore etcd snapshots of a running RKE cluster; the two commands are:

rke etcd snapshot-save –config <config-path> –name <snapshot-name>

AND

rke etcd snapshot-restore –config <config-path> –name <snapshot-name>

For more information about etcd snapshot save/restore in RKE, please refer to the official documentation.

First we will take a snapshot of etcd that is running on the cluster. To do that, lets run the following command:

# rke etcd snapshot-save –name rancher.snapshot –config cluster.yml
INFO[0000] Starting saving snapshot on etcd hosts
INFO[0000] [dialer] Setup tunnel for host [x.x.x.x]
INFO[0003] [etcd] Saving snapshot [rancher.snapshot] on host [x.x.x.x]
INFO[0004] [etcd] Successfully started [etcd-snapshot-once] container on host [x.x.x.x]
INFO[0010] Finished saving snapshot [rancher.snapshot] on all etcd hosts

RKE etcd snapshot restore

Assuming the Kubernetes cluster failed for any reason, we can restore normally from the taken snapshot, using the following command:

# rke etcd snapshot-restore –name rancher.snapshot –config cluster.yml

INFO[0000] Starting restoring snapshot on etcd hosts
INFO[0000] [dialer] Setup tunnel for host [x.x.x.x]
INFO[0001] [remove/etcd] Successfully removed container on host [x.x.x.x]
INFO[0001] [hosts] Cleaning up host [x.x.x.x]
INFO[0001] [hosts] Running cleaner container on host [x.x.x.x]
INFO[0002] [kube-cleaner] Successfully started [kube-cleaner] container on host [x.x.x.x]
INFO[0002] [hosts] Removing cleaner container on host [x.x.x.x]
INFO[0003] [hosts] Successfully cleaned up host [x.x.x.x]
INFO[0003] [etcd] Restoring [rancher.snapshot] snapshot on etcd host [x.x.x.x]
INFO[0003] [etcd] Successfully started [etcd-restore] container on host [x.x.x.x]
INFO[0004] [etcd] Building up etcd plane..
INFO[0004] [etcd] Successfully started [etcd] container on host [x.x.x.x]
INFO[0005] [etcd] Successfully started [rke-log-linker] container on host [x.x.x.x]
INFO[0006] [remove/rke-log-linker] Successfully removed container on host [x.x.x.x]
INFO[0006] [etcd] Successfully started etcd plane..
INFO[0007] Finished restoring snapshot [rancher.snapshot] on all etcd hosts

Notes
There are some important notes for the etcd restore process in RKE:

1. Restarting Kubernetes components

After restoring the cluster, you have to restart the Kubernetes components on all nodes, otherwise there will be some conflicts with resource versions of objects stored in etcd; this will include restart to Kubernetes components and the network components. For more information, please refer to Kubernetes documentation. To restart the Kubernetes components, you can run the following on each node:

docker restart kube-apiserver kubelet kube-controller-manager kube-scheduler kube-proxy
docker ps | grep flannel | cut -f 1 -d ” ” | xargs docker restart
docker ps | grep calico | cut -f 1 -d ” ” | xargs docker restart

2. Restoring etcd on a multi-node cluster

If you are restoring etcd on a cluster with multiple etcd nodes, the same exact snapshot must be copied to /opt/rke/etcd-snapshots, rke etcd snapshot-save will take different snapshots on each node, so you will need to copy one of the created snapshots manually to all nodes before restoring.

3. Invalidated service account tokens

Restoring etcd on a new Kubernetes cluster with new certificates is not currently supported, because the new cluster will contain different private keys which are used to sign service tokens for all service accounts. This may cause a lot of problems for all pods that communicate directly with kube api.

Conclusion

In this post we saw how backups can be created and restored for etcd in Kubernetes clusters in both Rancher 1.6.x and 2.0.x. Etcd snapshots can be managed in 1.6 using Rancher’s etcd image and in 2.0 using RKE CLI.

Hussein Galal

Hussein Galal

DevOps Engineer

Source

Kubernetes Containerd Integration Goes GA

Kubernetes Containerd Integration Goes GA

Authors: Lantao Liu, Software Engineer, Google and Mike Brown, Open Source Developer Advocate, IBM

In a previous blog – Containerd Brings More Container Runtime Options for Kubernetes, we introduced the alpha version of the Kubernetes containerd integration. With another 6 months of development, the integration with containerd is now generally available! You can now use containerd 1.1 as the container runtime for production Kubernetes clusters!

Containerd 1.1 works with Kubernetes 1.10 and above, and supports all Kubernetes features. The test coverage of containerd integration on Google Cloud Platform in Kubernetes test infrastructure is now equivalent to the Docker integration (See: test dashboard).

We’re very glad to see containerd rapidly grow to this big milestone. Alibaba Cloud started to use containerd actively since its first day, and thanks to the simplicity and robustness emphasise, make it a perfect container engine running in our Serverless Kubernetes product, which has high qualification on performance and stability. No doubt, containerd will be a core engine of container era, and continue to driving innovation forward.

— Xinwei, Staff Engineer in Alibaba Cloud

The Kubernetes containerd integration architecture has evolved twice. Each evolution has made the stack more stable and efficient.

Containerd 1.0 – CRI-Containerd (end of life)

cri-containerd architecture

For containerd 1.0, a daemon called cri-containerd was required to operate between Kubelet and containerd. Cri-containerd handled the Container Runtime Interface (CRI) service requests from Kubelet and used containerd to manage containers and container images correspondingly. Compared to the Docker CRI implementation (dockershim), this eliminated one extra hop in the stack.

However, cri-containerd and containerd 1.0 were still 2 different daemons which interacted via grpc. The extra daemon in the loop made it more complex for users to understand and deploy, and introduced unnecessary communication overhead.

Containerd 1.1 – CRI Plugin (current)

containerd architecture

In containerd 1.1, the cri-containerd daemon is now refactored to be a containerd CRI plugin. The CRI plugin is built into containerd 1.1, and enabled by default. Unlike cri-containerd, the CRI plugin interacts with containerd through direct function calls. This new architecture makes the integration more stable and efficient, and eliminates another grpc hop in the stack. Users can now use Kubernetes with containerd 1.1 directly. The cri-containerd daemon is no longer needed.

Improving performance was one of the major focus items for the containerd 1.1 release. Performance was optimized in terms of pod startup latency and daemon resource usage.

The following results are a comparison between containerd 1.1 and Docker 18.03 CE. The containerd 1.1 integration uses the CRI plugin built into containerd; and the Docker 18.03 CE integration uses the dockershim.

The results were generated using the Kubernetes node performance benchmark, which is part of Kubernetes node e2e test. Most of the containerd benchmark data is publicly accessible on the node performance dashboard.

Pod Startup Latency

The “105 pod batch startup benchmark” results show that the containerd 1.1 integration has lower pod startup latency than Docker 18.03 CE integration with dockershim (lower is better).

latency

CPU and Memory

At the steady state, with 105 pods, the containerd 1.1 integration consumes less CPU and memory overall compared to Docker 18.03 CE integration with dockershim. The results vary with the number of pods running on the node, 105 is chosen because it is the current default for the maximum number of user pods per node.

As shown in the figures below, compared to Docker 18.03 CE integration with dockershim, the containerd 1.1 integration has 30.89% lower kubelet cpu usage, 68.13% lower container runtime cpu usage, 11.30% lower kubelet resident set size (RSS) memory usage, 12.78% lower container runtime RSS memory usage.

cpumemory

Container runtime command-line interface (CLI) is a useful tool for system and application troubleshooting. When using Docker as the container runtime for Kubernetes, system administrators sometimes login to the Kubernetes node to run Docker commands for collecting system and/or application information. For example, one may use docker ps and docker inspect to check application process status, docker images to list images on the node, and docker info to identify container runtime configuration, etc.

For containerd and all other CRI-compatible container runtimes, e.g. dockershim, we recommend using crictl as a replacement CLI over the Docker CLI for troubleshooting pods, containers, and container images on Kubernetes nodes.

crictl is a tool providing a similar experience to the Docker CLI for Kubernetes node troubleshooting and crictl works consistently across all CRI-compatible container runtimes. It is hosted in the kubernetes-incubator/cri-tools repository and the current version is v1.0.0-beta.1. crictl is designed to resemble the Docker CLI to offer a better transition experience for users, but it is not exactly the same. There are a few important differences, explained below.

The scope of crictl is limited to troubleshooting, it is not a replacement to docker or kubectl. Docker’s CLI provides a rich set of commands, making it a very useful development tool. But it is not the best fit for troubleshooting on Kubernetes nodes. Some Docker commands are not useful to Kubernetes, such as docker network and docker build; and some may even break the system, such as docker rename. crictl provides just enough commands for node troubleshooting, which is arguably safer to use on production nodes.

Kubernetes Oriented

crictl offers a more kubernetes-friendly view of containers. Docker CLI lacks core Kubernetes concepts, e.g. pod and namespace, so it can’t provide a clear view of containers and pods. One example is that docker ps shows somewhat obscure, long Docker container names, and shows pause containers and application containers together:

docker ps

However, pause containers are a pod implementation detail, where one pause container is used for each pod, and thus should not be shown when listing containers that are members of pods.

crictl, by contrast, is designed for Kubernetes. It has different sets of commands for pods and containers. For example, crictl pods lists pod information, and crictl ps only lists application container information. All information is well formatted into table columns.

crictl podscrictl ps

As another example, crictl pods includes a –namespace option for filtering pods by the namespaces specified in Kubernetes.

crictl pods filter

For more details about how to use crictl with containerd:

“Does switching to containerd mean I can’t use Docker Engine anymore?” We hear this question a lot, the short answer is NO.

Docker Engine is built on top of containerd. The next release of Docker Community Edition (Docker CE) will use containerd version 1.1. Of course, it will have the CRI plugin built-in and enabled by default. This means users will have the option to continue using Docker Engine for other purposes typical for Docker users, while also being able to configure Kubernetes to use the underlying containerd that came with and is simultaneously being used by Docker Engine on the same node. See the architecture figure below showing the same containerd being used by Docker Engine and Kubelet:

docker-ce

Since containerd is being used by both Kubelet and Docker Engine, this means users who choose the containerd integration will not just get new Kubernetes features, performance, and stability improvements, they will also have the option of keeping Docker Engine around for other use cases.

A containerd namespace mechanism is employed to guarantee that Kubelet and Docker Engine won’t see or have access to containers and images created by each other. This makes sure they won’t interfere with each other. This also means that:

  • Users won’t see Kubernetes created containers with the docker ps command. Please use crictl ps instead. And vice versa, users won’t see Docker CLI created containers in Kubernetes or with crictl ps command. The crictl create and crictl runp commands are only for troubleshooting. Manually starting pod or container with crictl on production nodes is not recommended.
  • Users won’t see Kubernetes pulled images with the docker images command. Please use the crictl images command instead. And vice versa, Kubernetes won’t see images created by docker pull, docker load or docker build commands. Please use the crictl pull command instead, and ctr cri load if you have to load an image.
  • Containerd 1.1 natively supports CRI. It can be used directly by Kubernetes.
  • Containerd 1.1 is production ready.
  • Containerd 1.1 has good performance in terms of pod startup latency and system resource utilization.
  • crictl is the CLI tool to talk with containerd 1.1 and other CRI-conformant container runtimes for node troubleshooting.
  • The next stable release of Docker CE will include containerd 1.1. Users have the option to continue using Docker for use cases not specific to Kubernetes, and configure Kubernetes to use the same underlying containerd that comes with Docker.

We’d like to thank all the contributors from Google, IBM, Docker, ZTE, ZJU and many other individuals who made this happen!

For a detailed list of changes in the containerd 1.1 release, please see the release notes here: https://github.com/containerd/containerd/releases/tag/v1.1.0

To setup a Kubernetes cluster using containerd as the container runtime:

  • For a production quality cluster on GCE brought up with kube-up.sh, see here.
  • For a multi-node cluster installer and bring up steps using ansible and kubeadm, see here.
  • For creating a cluster from scratch on Google Cloud, see Kubernetes the Hard Way.
  • For a custom installation from release tarball, see here.
  • To install using LinuxKit on a local VM, see here.

The containerd CRI plugin is an open source github project within containerd https://github.com/containerd/cri. Any contributions in terms of ideas, issues, and/or fixes are welcome. The getting started guide for developers is a good place to start for contributors.

The project is developed and maintained jointly by members of the Kubernetes SIG-Node community and the containerd community. We’d love to hear feedback from you. To join the communities:

Source

Managing EKS Clusters with Rancher

A Detailed Overview of Rancher’s Architecture

This newly-updated, in-depth guidebook provides a detailed overview of the features and functionality of the new Rancher: an open-source enterprise Kubernetes platform.

Get the eBook

Rancher is a popular open source tool used by many organizations to manage Kubernetes clusters. With the latest release of EKS in GA, Rancher is excited to announce integration with the new managed Kubernetes cluster solution by AWS. We are excited about the availability of EKS because most Rancher users run their clusters on AWS. In the past, they had to create and manage their own clusters using Rancher’s own RKE distribution or open source tools like Kops. With EKS, Rancher users will no longer need to manage their own K8s clusters on AWS.

Using EKS with Rancher combines the ease of use you have grown accustomed to in Rancher with the features, reliability, and performance that you expect out of AWS. With EKS, Amazon’s managed Kubernetes solution, you can quickly create a scalable Kuberenetes instance in the cloud. Combined with the advanced Kubernetes management features and quality of life improvements found in Rancher, the duo is a powerful combination.

Rancher helps simplify the creation of an EKS cluster by automating the Cloud Formation stack creation and providing sensible defaults for your EKS cluster.

Rancher also provides a uniform interface for accessing your clusters, and allows integration with AWS AD, allowing you to apply RBAC permissions equally across your various Kubernetes clusters.

Today I will be walking you through how to set up an EKS cluster, deploy a publicly accessible app to it, and integrate with AWS managed Microsoft AD.

Things you’ll need

This guide assumes that you already have the following:

1) A running instance of Rancher 2.0
2) An AWS account with access to the EKS preview

Once you have those items you are ready to start.

Creating the EKS Cluster

First you’ll need to create Secret credentials for your account. Do this by going to IAM > Users > (Your Username) > Security Credentials.

Create Access Key

Then click on “Create access key” and a popup should appear.

Record the Access Key ID and the Secret Access Key, you will need these when creating your EKS cluster in Rancher.

Add Cluster

Next, go into your instance of Rancher and click the “Add Cluster” button and select the “Amazon EKS” option. Now input the Access Key ID and Secret Access Key you recorded in the previous step and click “Next: Authenticate & select a network”; Rancher will verify that the ID and Secret you submitted are authorized.

Once the verification has completed, click the “Create” button. It will take a few minutes for the EKS cluster to create.

Clusters

Once the cluster has finished provisioning you should see the status turn to “Active”.

Deploy Workload

Click on the cluster and go to the default project. Here we can deploy a workload to test out our cluster. On the workload screen click “Deploy”. Give your workload a name and specify the “nginx” Docker Image. Click “Add Port”, publish the container port “80” on target “3000” and specify a Layer-4 Load Balancer. This will allow us to access our Nginx instance over the public internet.

Pending Workload

Click “Launch” and wait for the workload and load balancer to finish provisioning (and make sure to check both the Workloads and Load Balancing tabs).

Welcome to Nginx

Once the load balancer has finished provisioning a clickable link will appear beneath the workload. Note that AWS will create a DNS entry for this EKS cluster and that may take several minutes to propagate; if you get a 404 after clicking the link wait a few more minutes and try again. Clicking the link should take us to the default Nginx page.

Congratulations, you’ve successfully deployed a workload with Rancher and haven’t had to type a single character in the terminal to do it! Because your EKS cluster is managed with Rancher you get all the benefits of the Rancher platform, including authorization, which we will explore in the next section.

Set up Microsoft Active Directory

For this next step you’ll need to set up a Microsoft AD instance in AWS. If you already have one, you can skip this section.

Create VPC

Create SubNet

Start by going to your AWS console and selecting the Directory Service console, then click Set up directory > Microsoft AD. Your directory DNS should be a domain you control. Set an admin password and write it down; we’ll need it in a later step. Now click “Create a new VPC” and you will be taken to the VPC console in a new window. Click “Create VPC”. A popup should appear: name your VPC and specify a CIDR block of “10.0.0.0/16”. Let the other options default and create the VPC.

Create RouteTable

Once your VPC has finished creating you’ll need to add an internet gateway and edit the route table. First go to the internet gateway page and create a new internet gateway. Attach the gateway to your VPC. Now go back to the VPC console and select the VPC. Click on the route table on the Summary tab. Once you are on the route table console, go to the Routes tab and click “Edit”. Add a row for 0.0.0.0/0 and let the target default to the corresponding VPC gateway. Click save.

Now, go back to the create Directory Service screen, and click “Create a new Subnet”. You will be taken to the subnet console. Click “Create subnet” and a popup should appear. Name your subnet and select the VPC you just created. Give your subnet a CIDR block of 10.0.0.0/24. Select an availability zone for your subnet and click “Yes, Create” and your subnet will be created. Repeat the previous steps but create the next subnet with a CIDR block of 10.0.1.0/24.

Directory Details

Now that your subnets are created navigate back to the Directory Service screen and assign your subnets to the Directory Service. Now click “next step” and you will be taken to the review screen. Make sure your information is correct and then click “Create Microsoft AD”.

Your Microsoft AD instance will begin provisioning.

Configure Load Balancer

While your AD instance is creating, now is a great time to set up the Network Load Balancer. Go to the EC2 console to start, then click Load Balancers > Create Load Balancer > Network Load Balancer. Name your load balancer and make sure it is internet-facing. Add 2 listeners for ports 389 and 636. Make sure to select the VPC you created previously and check both of the subnets that you created.

Configure Routing

Click “Next: Configure routing” and you will be taken to the next screen. Name your target group and point it to port 389 with a Target type of “ip”. For the IP allowed ranges enter the values from the “DNS address” field on the Microsoft AD instance. Add a line for each address. Your screen should look something like this.

Now click “Review” to be taken to the review screen and once you have verified your information, click “Create”.

Create Load Balancer

Once your load balancer has created successfully go to the “Target Groups” screen and click “Create target group”. Name your target group and give it a TCP protocol, a port of 636, and a target type of “ip”. Make sure it is assigned to the VPC you created earlier and click “Create”. Now go back to your NLB and click on the listeners tab. Select the checkbox next to the TCP: 636 listener and click “Edit”. Set the default target group to the target group you just created and click “save”.

Now your load balancer is set up to route traffic to your AD instance. Once your AD instance is finished provisioning, you can connect it with Rancher.

Connecting AD and Rancher

Now that you have your AWS Microsoft AD instance started, you can add it to Rancher. Navigate to the Security > Authentication screen and select “Microsoft Active Directory”.

Active Directory

Enter in the hostname, default login domain, Admin username and password that you recorded earlier. The search base is baed on the information you entered should in the format “OU=,DC=,DC=,DC=”. So a directory with a NetBIOS name of “mydirectory” and a FQDN of “alpha.beta.com” would have a search base of “OU=mydirectory,DC=alpha,DC=beta,DC=com”.

Note that for the purposes of this demo we will be using the admin account, but later on you should create a different, reduced permission account for security purposes.

Once the information is entered, click “Authenticate” to verify the information and save the configuration. Now log out of rancher and attempt to log back in with the example user you created earlier.

Congratulations, you have now integrated Rancher with AWS AD!

Try logging in with the Admin account your recorded earlier when you created the Microsoft AD instance and it should complete successfully. Now when users are added to the AD instance they will automatically be able to log into Rancher.

Thank you for reading and we hope that you enjoyed this guide. If you have any questions feel free to reach out to us on the Rancher Forums (https://forums.rancher.com) or the Rancher Slack channel (https://slack.rancher.io).

To learn more about managing Kubernetes clusters on Rancher, sign up for our free online trainings.

Nathan Jenan

Nathan Jenan

Senior Software Engineer

Source

Introducing kustomize; Template-free Configuration Customization for Kubernetes

Introducing kustomize; Template-free Configuration Customization for Kubernetes

Authors: Jeff Regan (Google), Phil Wittrock (Google)

If you run a Kubernetes environment, chances are you’ve
customized a Kubernetes configuration — you’ve copied
some API object YAML files and editted them to suit
your needs.

But there are drawbacks to this approach — it can be
hard to go back to the source material and incorporate
any improvements that were made to it. Today Google is
announcing kustomize, a command-line tool
contributed as a subproject of SIG-CLI. The tool
provides a new, purely declarative approach to
configuration customization that adheres to and
leverages the familiar and carefully designed
Kubernetes API.

Here’s a common scenario. Somewhere on the internet you
find someone’s Kubernetes configuration for a content
management system. It’s a set of files containing YAML
specifications of Kubernetes API objects. Then, in some
corner of your own company you find a configuration for
a database to back that CMS — a database you prefer
because you know it well.

You want to use these together, somehow. Further, you
want to customize the files so that your resource
instances appear in the cluster with a label that
distinguishes them from a colleague’s resources who’s
doing the same thing in the same cluster.
You also want to set appropriate values for CPU, memory
and replica count.

Additionally, you’ll want multiple variants of the
entire configuration: a small variant (in terms of
computing resources used) devoted to testing and
experimentation, and a much larger variant devoted to
serving outside users in production. Likewise, other
teams will want their own variants.

This raises all sorts of questions. Do you copy your
configuration to multiple locations and edit them
independently? What if you have dozens of development
teams who need slightly different variations of the
stack? How do you maintain and upgrade the aspects of
configuration that they share in common? Workflows
using kustomize provide answers to these questions.

Customization is reuse

Kubernetes configurations aren’t code (being YAML
specifications of API objects, they are more strictly
viewed as data), but configuration lifecycle has many
similarities to code lifecycle.

You should keep configurations in version
control. Configuration owners aren’t necessarily the
same set of people as configuration
users. Configurations may be used as parts of a larger
whole. Users will want to reuse configurations for
different purposes.

One approach to configuration reuse, as with code
reuse, is to simply copy it all and customize the
copy. As with code, severing the connection to the
source material makes it difficult to benefit from
ongoing improvements to the source material. Taking
this approach with many teams or environments, each
with their own variants of a configuration, makes a
simple upgrade intractable.

Another approach to reuse is to express the source
material as a parameterized template. A tool processes
the template—executing any embedded scripting and
replacing parameters with desired values—to generate
the configuration. Reuse comes from using different
sets of values with the same template. The challenge
here is that the templates and value files are not
specifications of Kubernetes API resources. They are,
necessarily, a new thing, a new language, that wraps
the Kubernetes API. And yes, they can be powerful, but
bring with them learning and tooling costs. Different
teams want different changes—so almost every
specification that you can include in a YAML file
becomes a parameter that needs a value. As a result,
the value sets get large, since all parameters (that
don’t have trusted defaults) must be specified for
replacement. This defeats one of the goals of
reuse—keeping the differences between the variants
small in size and easy to understand in the absence of
a full resource declaration.

A new option for configuration customization

Compare that to kustomize, where the tool’s
behavior is determined by declarative specifications
expressed in a file called kustomization.yaml.

The kustomize program reads the file and the
Kubernetes API resource files it references, then emits
complete resources to standard output. This text output
can be further processed by other tools, or streamed
directly to kubectl for application to a cluster.

For example, if a file called kustomization.yaml
containing

commonLabels:
app: hello
resources:
– deployment.yaml
– configMap.yaml
– service.yaml

is in the current working directory, along with
the three resource files it mentions, then running

kustomize build

emits a YAML stream that includes the three given
resources, and adds a common label app: hello to
each resource.

Similarly, you can use a commonAnnotations field to
add an annotation to all resources, and a namePrefix
field to add a common prefix to all resource
names. This trivial yet common customization is just
the beginning.

A more common use case is that you’ll need multiple
variants of a common set of resources, e.g., a
development, staging and production variant.

For this purpose, kustomize supports the idea of an
overlay and a base. Both are represented by a
kustomization file. The base declares things that the
variants share in common (both resources and a common
customization of those resources), and the overlays
declare the differences.

Here’s a file system layout to manage a staging and
production variant of a given cluster app:

someapp/
├── base/
│ ├── kustomization.yaml
│ ├── deployment.yaml
│ ├── configMap.yaml
│ └── service.yaml
└── overlays/
├── production/
│ └── kustomization.yaml
│ ├── replica_count.yaml
└── staging/
├── kustomization.yaml
└── cpu_count.yaml

The file someapp/base/kustomization.yaml specifies the
common resources and common customizations to those
resources (e.g., they all get some label, name prefix
and annotation).

The contents of
someapp/overlays/production/kustomization.yaml could
be

commonLabels:
env: production
bases:
– ../../base
patches:
– replica_count.yaml

This kustomization specifies a patch file
replica_count.yaml, which could be:

apiVersion: apps/v1
kind: Deployment
metadata:
name: the-deployment
spec:
replicas: 100

A patch is a partial resource declaration, in this case
a patch of the deployment in
someapp/base/deployment.yaml, modifying only the
replicas count to handle production traffic.

The patch, being a partial deployment spec, has a clear
context and purpose and can be validated even if it’s
read in isolation from the remaining
configuration. It’s not just a context free tuple.

To create the resources for the production variant, run

kustomize build someapp/overlays/production

The result is printed to stdout as a set of complete
resources, ready to be applied to a cluster. A
similar command defines the staging environment.

In summary

With kustomize, you can manage an arbitrary number
of distinctly customized Kubernetes configurations
using only Kubernetes API resource files. Every
artifact that kustomize uses is plain YAML and can
be validated and processed as such. kustomize encourages
a fork/modify/rebase workflow.

To get started, try the hello world example.
For discussion and feedback, join the mailing list or
open an issue. Pull requests are welcome.

Source

Say Hello to Discuss Kubernetes

Author: Jorge Castro (Heptio)

Communication is key when it comes to engaging a community of over 35,000 people in a global and remote environment. Keeping track of everything in the Kubernetes community can be an overwhelming task. On one hand we have our official resources, like Stack Overflow, GitHub, and the mailing lists, and on the other we have more ephemeral resources like Slack, where you can hop in, chat with someone, and then go on your merry way.

Slack is great for casual and timely conversations and keeping up with other community members, but communication can’t be easily referenced in the future. Plus it can be hard to raise your hand in a room filled with 35,000 participants and find a voice. Mailing lists are useful when trying to reach a specific group of people with a particular ask and want to keep track of responses on the thread, but can be daunting with a large amount of people. Stack Overflow and GitHub are ideal for collaborating on projects or questions that involve code and need to be searchable in the future, but certain topics like “What’s your favorite CI/CD tool” or “Kubectl tips and tricks” are offtopic there.

While our current assortment of communication channels are valuable in their own rights, we found that there was still a gap between email and real time chat. Across the rest of the web, many other open source projects like Docker, Mozilla, Swift, Ghost, and Chef have had success building communities on top of Discourse, an open source discussion platform. So what if we could use this tool to bring our discussions together under a modern roof, with an open API, and perhaps not let so much of our information fade into the ether? There’s only one way to find out: Welcome to discuss.kubernetes.io

discuss_screenshot

Right off the bat we have categories that users can browse. Checking and posting in these categories allow users to participate in things they might be interested in without having to commit to subscribing to a list. Granular notification controls allow the users to subscribe to just the category or tag they want, and allow for responding to topics via email.

Ecosystem partners and developers now have a place where they can announce projects that they’re working on to users without wondering if it would be offtopic on an official list. We can make this place be not just about core Kubernetes, but about the hundreds of wonderful tools our community is building.

This new community forum gives people a place to go where they can discuss Kubernetes, and a sounding board for developers to make announcements of things happening around Kubernetes, all while being searchable and easily accessible to a wider audience.

Hop in and take a look. We’re just getting started, so you might want to begin by introducing yourself and then browsing around. Apps are also available for Android and iOS.

Source