Docker App and CNAB – Docker Blog

Docker App is a new tool we spoke briefly about back at DockerCon US 2018. We’ve been working on `docker-app` to make container applications simpler to share and easier to manage across different teams and between different environments, and we open sourced it so you can already download Docker App from GitHub at https://github.com/docker/app.

In talking to others about problems they’ve experienced sharing and collaborating on the broad area we call “applications” we came to a realisation: it’s a more general problem that others have been working on too. That’s why we’re happy to collaborate with Microsoft on the new Cloud Native Application Bundle (CNAB) specification.

Multi-Service Distributed Applications

Today’s cloud native applications typically use different technologies, each with their own toolchain. Maybe you’re using ARM templates and Helm charts, or CloudFormation and Compose, or Terraform and Ansible. There is no single solution in the market for defining and packaging these multi-service, multi-format distributed applications.

CNAB is an open source, cloud-agnostic specification for packaging and running distributed applications that aims to solve some of these problems. CNAB unifies the management of multi-service, distributed applications across different toolchains into a single all-in-one packaging format.

The draft specification is available at cnab.io and we’re actively looking both for folks interested in contributing to the spec itself, and to people interested in building tools around the specification. The latest release of Docker App is one such tool that implements the current CNAB spec. That means it can be used to both build CNAB bundles for Compose (which can then be used with any other CNAB client), and also to install, upgrade and uninstall any other CNAB bundle.

Sharing CNAB bundles on Docker Hub

One of the limitations of standalone Compose files is that they cannot be shared on Docker Hub or Docker Trusted Registry. Docker App solves this issue too. Here’s a simple Docker application which launches a very simple Prometheus stack:

version: 0.1.0
name: monitoring
description: A basic prometheus stack
maintainers:
– name: Gareth Rushgrove
email: garethr@docker.com

version: ‘3.7’

services:
prometheus:
image: prom/prometheus:$
ports:
– $:9090

alertmanager:
image: prom/alertmanager:$
ports:
– $:9093

ports:
prometheus: 9090
alertmanager: 9093
versions:
prometheus: latest
alertmanager: latest

With that saved as `monitoring.dockerapp` we can now build a CNAB and share that on Docker Hub.

$ docker-app push –namespace <your-namespace>

Now on another machine we can still interact with the shared application. For instance let’s use the `inspect` command to get information about our application:

$ docker-app inspect <your-namespace>/monitoring:0.1.0
monitoring 0.1.0

Maintained by: Gareth Rushgrove <garethr@docker.com>

A basic prometheus stack

Services (2) Replicas Ports Image
———— ——– —– —–
prometheus 1 9090 prom/prometheus:latest
alertmanager 1 9093 prom/alertmanager:latest

Parameters (4) Value
————– —–
ports.alertmanager 9093
ports.prometheus 9090
versions.alertmanager latest
versions.prometheus latest

All the information from the Compose file is stored with the CNAB on Docker Hub, and if you notice, it’s also parameterized, so values can be substituted at runtime to fit the deployment requirements. We can install the application directly from Docker Hub as well:

docker-app install <your-namespace>/monitoring:0.1.0 –set ports.alertmanager=9095

Installing a Helm chart using Docker App

One question that has come up in the conversations we’ve had so far is how `docker-app` and now CNAB relates to Helm charts. The good news is that they all work great together! Here is an example using `docker-app` to install a CNAB bundle that packages a Helm chart. The following example uses the `hellohelm` example from the CNAB example bundles.

$ docker-app install -c local bundle.json
Do install for hellohelm
helm install –namespace hellohelm -n hellohelm /cnab/app/charts/alpine
NAME: hellohelm
LAST DEPLOYED: Wed Nov 28 13:58:22 2018
NAMESPACE: hellohelm
STATUS: DEPLOYED

RESOURCES:
==> v1/Pod
NAME AGE
hellohelm-alpine 0s

Next steps

If you’re interested in the technical details of the CNAB specification, either to see how it works under the hood or to maybe get involved in the specification work or building tools against it, you can find the spec at cnab.io.

If you’d like to get started building applications with Docker App you can download the latest release from github.com/docker/app and check out some of the examples provided in the repository.
Source

Heptio Contour and Heptio Gimbal on Stage at KubeCon NA

It’s been an exciting eight months since launching Heptio Gimbal in partnership with Actapio and Yahoo Japan Corporation ahead of KubeCon EU 2018. We created Heptio Contour and Heptio Gimbal as a complementary pair of open source projects to enable organizations to unify and manage internet traffic in hybrid cloud environments.

Actapio and Yahoo Japan Corporation were critical early design partners and we were keen to consult with other Heptio customers as well as the larger Kubernetes community on how ingress could be improved. What we consistently heard was that people are struggling to manage ingress traffic in a multi-team and multi-cluster world. Notably, several of our customers had production outages due to teams creating conflicting routing rules with other teams.

Based on that feedback, we released Heptio Contour 0.6 in September which introduced the IngressRoute CRD, a novel new way of safely managing multi-team ingress. It’s been great to see community interest soar regarding our design and implementation that models Kubernetes Ingress similar to the delegation model of DNS. In particular, the ability to do instantaneous blue-green deployments of Ingress rules is a great feature that has come out of this work.

It’s important to recognize that the success of Heptio Contour and Heptio Gimbal wouldn’t be possible without building on Envoy proxy. We couldn’t be happier with Envoy’s recent graduation from the CNCF incubation process, joining Kubernetes and Prometheus as top-level CNCF projects.

At KubeCon NA next week, we’re excited to tell you more about these projects and Actapio & Yahoo Japan will be presenting on their production use of Heptio Gimbal. Read on for a complete list of related talks!

If you have any questions or are interested in learning more, reach us via the #contour and #gimbal channels on the Kubernetes community Slack or follow us on Twitter.

Source

Setting Up a Docker Registry with JFrog Artifactory and Rancher

For any team using
containers – whether in development, test, or production – an
enterprise-grade registry is a non-negotiable requirement. JFrog
Artifactory
is much beloved by Java
developers, and it’s easy to use as a Docker registry as well. To make
it even easier, we’ve put together a short walkthrough to setting things
up Artifactory in Rancher.

Before you start

For this article, we’ve assumed that you already have a Rancher
installation up and running (if not, check out our Quick Start
guide
), and
will be working with either Artifactory Pro or Artifactory Enterprise.
Choosing the right version of Artifactory depends on your development
needs. If your main development needs include building with Maven
package types, then Artifactory open source may be suitable. However,
if you build using Docker, Chef Cookbooks, NuGet, PyPI, RubyGems, and
other package formats then you’ll want to consider Artifactory Pro.
Moreover, if you have a globally distributed development team with HA
and DR needs, you’ll want to consider Artifactory Enterprise. JFrog
provides a detailed
matrix
with the differences between the versions of Artifactory. There’s
several values you’ll need to select in order to set Artifactory up as
a Docker registry, such as a public name, or public port. In this
article, we refer to them as variables; just substitute the values you
choose in for the variables throughout this post. To deploy Artifactory,
you’ll first need to create (or already) have a wildcard imported into
Rancher for “*.$public_name”. You’ll also need to create DNS entries
to the IP address for artifactory-lb, the load balancer for the
Artifactory high availability architecture. Artifactory will be reached
via $publish_schema://$public_name:$public_port, while the Docker
registry will be reachable at
$publish_schema://$docker_repo_name.$public_name:$public_port

Installing Artifactory

While you can choose to install Artifactory on your own with the
documented
instructions
,
you also have the option of using Rancher catalog. The Rancher community
has recently contributed a template for Artifactory, which deploys the
package, the Artifactory server, its reverse proxy, and a Rancher load
balancher.

**A note on reverse proxies: **to use Artifactory as a Docker registry,
a reverse proxy is required. This reverse proxy is automatically
configured using the Rancher catalog item. However, if you need to apply
a custom nginx configuration, you can do so by upgrading the
artifactory-rp container in Rancher.

Note that installing Artifactory is a separate task from setting up
Artifactory to serve as a Docker registry, and from connecting that
Docker registry to Rancher (we’ll cover how to do these things as
well). To launch the Artifactory template, navigate to the community
catalog in Rancher. Choose “Pro” as the Artifactory version to launch,
and set parameters for schema, name, and port:

Once the package is deployed, the service is accessible through
[$publish_schema://$publish_name:$publish_port]

Configure Artifactory

At this point, we’ll need to do a bit more configuration with
Artifactory to complete the setup. Access the Artifactory server using
the path above. The next step will be to configure the reverse proxy and
to enable Docker image registry integration. To configure the reverse
proxy, set the following parameters:

  • Internal hostname: artifactory
  • Internal port: 8081
  • Internal context: artifactory
  • Public server name: $public_name
  • Public context path: [leave blank]
  • http port: $public_port
  • Docker reverse proxy settings: Sub Domain

Next, create a
local Docker repository. Make sure to select Docker as the package type:
Verify that the
registry name is correct; it should be formatted as
$docker_rep_name.$public_name
Test that the
registry is working by logging into it:

# docker login $publish_schema://$docker_repo_name.$public_name

Add Artifactory into Rancher

Now that Artifactory is all set up, it’s time to add the registry to
Rancher itself, so any application built and managed in Rancher can pull
images from it. On the top navigation bar, visit Infrastructure, then
select Registries from the drop down menu. On the resulting screen,
choose “Add Registry”, then select the “Custom” option. All you’ll need
to do is enter the address for your Artifactory Docker registry, along
with the relevant credentials:
Once it’s been
added, you should see it show up your list of recognized registries
(which shows up after visiting Infrastructure -> Registries on the top
navigation bar). With that, you should be all set to use Artifactory as
a Docker registry within Rancher! Raul is a DevOps Lead at Rancher
Labs.

Source

New Contributor Workshop Shanghai – Kubernetes

New Contributor Workshop Shanghai

Authors: Josh Berkus (Red Hat), Yang Li (The Plant), Puja Abbassi (Giant Swarm), XiangPeng Zhao (ZTE)

Kubecon Shanghai New Contributor Summit attendees. Photo by Jerry Zhang

Kubecon Shanghai New Contributor Summit attendees. Photo by Jerry Zhang

We recently completed our first New Contributor Summit in China, at the first KubeCon in China. It was very exciting to see all of the Chinese and Asian developers (plus a few folks from around the world) interested in becoming contributors. Over the course of a long day, they learned how, why, and where to contribute to Kubernetes, created pull requests, attended a panel of current contributors, and got their CLAs signed.

This was our second New Contributor Workshop (NCW), building on the one created and led by SIG Contributor Experience members in Copenhagen. Because of the audience, it was held in both Chinese and English, taking advantage of the superb simultaneous interpretation services the CNCF sponsored. Likewise, the NCW team included both English and Chinese-speaking members of the community: Yang Li, XiangPeng Zhao, Puja Abbassi, Noah Abrahams, Tim Pepper, Zach Corleissen, Sen Lu, and Josh Berkus. In addition to presenting and helping students, the bilingual members of the team translated all of the slides into Chinese. Fifty-one students attended.

Noah Abrahams explains Kubernetes communications channels. Photo by Jerry Zhang

Noah Abrahams explains Kubernetes communications channels. Photo by Jerry Zhang

The NCW takes participants through the stages of contributing to Kubernetes, starting from deciding where to contribute, followed by an introduction to the SIG system and our repository structure. We also have “guest speakers” from Docs and Test Infrastructure who cover contributing in those areas. We finally wind up with some hands-on exercises in filing issues and creating and approving PRs.

Those hands-on exercises use a repository known as the contributor playground, created by SIG Contributor Experience as a place for new contributors to try out performing various actions on a Kubernetes repo. It has modified Prow and Tide automation, uses Owners files like in the real repositories. This lets students learn how the mechanics of contributing to our repositories work without disrupting normal development.

Yang Li talks about getting your PRs reviewed. Photo by Josh Berkus

Yang Li talks about getting your PRs reviewed. Photo by Josh Berkus

Both the “Great Firewall” and the language barrier prevent contributing Kubernetes from China from being straightforward. What’s more, because open source business models are not mature in China, the time for employees work on open source projects is limited.

Chinese engineers are eager to participate in the development of Kubernetes, but many of them don’t know where to start since Kubernetes is such a large project. With this workshop, we hope to help those who want to contribute, whether they wish to fix some bugs they encountered, improve or localize documentation, or they need to work with Kubernetes at their work. We are glad to see more and more Chinese contributors joining the community in the past few years, and we hope to see more of them in the future.

“I have been participating in the Kubernetes community for about three years,” said XiangPeng Zhao. “In the community, I notice that more and more Chinese developers are showing their interest in contributing to Kubernetes. However, it’s not easy to start contributing to such a project. I tried my best to help those who I met in the community, but I think there might still be some new contributors leaving the community due to not knowing where to get help when in trouble. Fortunately, the community initiated NCW at KubeCon Copenhagen and held a second one at KubeCon Shanghai. I was so excited to be invited by Josh Berkus to help organize this workshop. During the workshop, I met community friends in person, mentored attendees in the exercises, and so on. All of this was a memorable experience for me. I also learned a lot as a contributor who already has years of contributing experience. I wish I had attended such a workshop when I started contributing to Kubernetes years ago.”

Panel of contributors. Photo by Jerry Zhang

Panel of contributors. Photo by Jerry Zhang

The workshop ended with a panel of current contributors, featuring Lucas Käldström, Janet Kuo, Da Ma, Pengfei Ni, Zefeng Wang, and Chao Xu. The panel aimed to give both new and current contributors a look behind the scenes on the day-to-day of some of the most active contributors and maintainers, both from China and around the world. Panelists talked about where to begin your contributor’s journey, but also how to interact with reviewers and maintainers. They further touched upon the main issues of contributing from China and gave attendees an outlook into exciting features they can look forward to in upcoming releases of Kubernetes.

After the workshop, Xiang Peng Zhao chatted with some attendees on WeChat and Twitter about their experiences. They were very glad to have attended the NCW and had some suggestions on improving the workshop. One attendee, Mohammad, said, “I had a great time at the workshop and learned a lot about the entire process of k8s for a contributor.” Another attendee, Jie Jia, said, “The workshop was wonderful. It systematically explained how to contribute to Kubernetes. The attendee could understand the process even if s/he knew nothing about that before. For those who were already contributors, they could also learn something new. Furthermore, I could make new friends from inside or outside of China in the workshop. It was awesome!”

SIG Contributor Experience will continue to run New Contributor Workshops at each upcoming Kubecon, including Seattle, Barcelona, and the return to Shanghai in June 2019. If you failed to get into one this year, register for one at a future Kubecon. And, when you meet an NCW attendee, make sure to welcome them to the community.

Links:

Source

Announcing the Docker Customer Innovation Awards

We are excited to announce the first annual Docker Customer Innovation Award winners at DockerCon Barcelona today! We launched the awards this year to recognize customers who stand out in their adoption of Docker Enterprise platform to drive transformation within IT and their business.

38 companies were nominated, all of whom have spoken publicly about their containerization initiatives recently, or plan to soon. From looking at so many excellent nominees, we realized there were really two different stories — so we created two award categories. In each category, we have a winner and three finalists.

Business Transformation

Customers in this category have developed company-wide initiatives aimed at transforming IT and their business in a significant way, with Docker Enterprise as a key part if it. They typically started their journey two or more years ago and have containerized multiple applications across the organization.

WINNER:

FINALISTS:

  • Bosch built a global platform that enables developers to build and deliver new software solutions and updates at digital speed.
  • MetLife modernized hundreds of traditional applications, driving 66 percent cost savings and creating a self-funding model to fuel change and innovation. Cut new product time to market by two-thirds.

Rising Stars

Customers in this category are early in their containerization journey and have already leveraged their first project with Docker Enterprise as a catalyst to innovate their business — often creating new applications or services.

WINNER:

  • Desigual built a brand new in-store shopping experience app in less than 5 months to connect customers and associates, creating an outstanding brand and shopping experience.

FINALISTS:

  • Citizens Bank (Franklin American Mortgage) created a dedicated innovation team sparked cultural change at a traditional mortgage company, allowing it to bring new products to market in weeks or months.
  • The Dutch Ministry of Justice evaluated Docker Enterprise as a way to accelerate application development, which helped spark an effort to modernize juvenile custodian services from whiteboards and sticky notes to a mobile app.

We want to give a big thanks to the winners and finalists, and to all of our remarkable customers have started innovation journeys with Docker.

We’ve opened the nomination process for 2019 since we will be announcing winners at DockerCon 2019 on April 29-May 2. If you’re interested in submitting or want to nominate someone else, you can learn how here.

Desigual, docker, Docker Customer Innovation awards, rising star, Société Générale, transformation

Source

Introducing Docker Desktop Enterprise – Docker Blog

Nearly 1.4 million developers use Docker Desktop every single day because it is the simplest and easiest way for container-based development. Docker Desktop provides the Docker Engine with Swarm and Kubernetes orchestrators right on the desktop, all from a single install. While this is great for an individual user, in enterprise environments administrators often want to automate the Docker Desktop installation and ensure everyone on the development team has the same configuration following enterprise requirements and creating applications based on architectural standards.

Docker Desktop Enterprise is a new desktop offering that is the easiest, fastest and most secure way to create and deliver production-ready containerized applications. Developers can work with frameworks and languages of their choice, while IT can securely configure, deploy and manage development environments that align to corporate standards and practices. This enables organizations to rapidly deliver containerized applications from development to production.

Enterprise Manageability That Helps Accelerate Time-to-Production

Docker Desktop Enterprise provides a secure way to configure, deploy and manage developer environments while enforcing safe development standards that align to corporate policies and practices. IT teams and application architects can present developers with application templates designed specifically for their team, to bootstrap and standardize the development process and provide a consistent environment all the way to production.

Key new features for IT:

  • Packaged as standard MSI (Win) and PKG (Mac) distribution files that work with existing endpoint management tools with lockable settings via policy files
  • Present developers with customized and approved application templates, ready for coding

Enterprise Deployment & Configuration Packaging

Docker Desktop Enterprise enables IT desktop admins to deploy and manage Docker Desktop Enterprise across distributed developer teams with their preferred endpoint management tools using standard MSI and PKG files. No manual intervention or extra configuration from developers is required and desktop administrators can enable or disable particular settings within Docker Desktop Enterprise to meet corporate standards and provide the best developer experience.

Application Templates

Docker Application templates

Application architects can provide developers with trusted, customized application templates through the Application Designer interface in Docker Desktop Enterprise, helping to improve reliability and security by ensuring developers start from approved designs. Together, application teams and IT can implement consistent security and development practices across the entire software supply chain, from the developers’ desktops all the way to production.

Increase Developer Productivity and Ship Production-ready Containerized Applications

For developers, Docker Desktop Enterprise is the easiest and fastest way to build production-ready containerized applications working with frameworks and languages of choice and targeting every platform. Developers can rapidly innovate by leveraging company-provided application templates that instantly replicate production-approved application configurations on the local desktop.

Key new features for developers:

  • Configurable version packs instantly replicate production environment configurations on the local desktop
  • Application Designer interface allows for template-based workflows for creating containerized applications – no Docker CLI commands are required to get started

Configurable Version Packs

Desktop Enterprise Version Packs

Docker Desktop has Docker Engine and Kubernetes built-in and with the addition of swappable version packs you can now synchronize your desktop development environment with the same Docker API and Kubernetes versions that are used in production with Docker Enterprise. You get the assurance that your application will not break due to incompatible API calls, and if you have multiple downstream environments running different versions of the APIs, you can quickly change your desktop configuration with the click of a button.

Application Designer

Choice of GUI or CLI

The Application Designer is a new workflow that provides production-ready application and service templates that let you get coding quickly, with the reassurance that your application meets architectural standards. And even if you’ve never launched a container before, the Application Designer interface provides the foundational container artifacts and your organization’s skeleton code, getting you started with containers in minutes. Plus, Docker Desktop Enterprise integrates with your choice of development tools, whether you prefer an IDE or a text editor and command line interfaces.

The Docker Desktop Products

Docker Desktop Enterprise is a new addition to our desktop product portfolio which currently includes the free Docker Desktop Community products for MacOS and Windows. Docker Desktop is the simplest way to get started with container-based development on both Windows 10 and macOS with a set of features now available for the enterprise:

Desktop Comparison Table

To learn more about Docker Desktop Enterprise:

  • Sign up to learn more about Docker Desktop Enterprise as we approach general availability
  • Watch the livestreams of the DockerCon EU keynotes, Tuesday from 09:00 – 11:00 CET and Wednesday from 9:30am-11:00am CET. (Replays will also be available)
  • Download Docker Desktop Community and build your first containerized application in minutes [ Windows | mac OS ]

containers, desktop, Desktop Enterprise, docker, dockercon, DockerCon Europe, Kubernetes

Source

The Kubernetes Cluster API – Heptio

I’ve been working with Kubernetes since filing my first commit in October 2016. I’ve had the chance to collaborate with the community on Kops, Kubicorn, and Kubeadm, but there’s one gap that has been nagging me for years: how to to create the right abstraction for bringing up a Kubernetes cluster and managing it once it’s online. As it turned out, I wasn’t alone. So begins the story of Cluster API.

In 2017 I spent an afternoon enjoying lunch at the Google office in Seattle’s Fremont neighborhood meeting with Robert Bailey and Weston Hutchins. We had connected via open source and shared a few similar ideas about declarative infrastructure built on new primitives in Kubernetes. Robert Bailey and Jacob Beacham began to spearhead the charge from Google. We slowly began to start formalizing an effort to create a system for bootstrapping and managing a Kubernetes cluster in a declarative way. I remember the grass roots nature of the project. Google began work on evangelizing these ideas within the Kubernetes community.

Following an email to the Kubernetes mailing list sig cluster lifecycle, the Cluster API working group was born. The group rapidly discovered other projects such as archon and work from Loodse that also had similar ideas. It was clear we were all thinking of a brighter future with declarative infrastructure.

We started brainstorming what a declarative Kubernetes cluster might look like. We each consulted Kubernetes “elders” at our respective companies. The engineers at Google consulted Tim Hockin while I talked this over with Joe Beda, co-founder of Kubernetes and my long time colleague. Tim suggested we start building tooling and playing with abstractions to get a feel for what would work or not. At the time of this “sandbox” stage, we started prototyping in the kube-deploy repository. We needed a place to start hacking on the code and being that this feature was originally intentionally called out of scope finding a home was challenging. Later we were able to move out of that kube-deploy repository to cluster-api which is where the code lives today.

Now “Cluster API,” which is short for “Cluster Management API,” is a great example of a bad name. As Tim St. Clair (Heptio) suggested, a better name for this layer of software is probably “cluster framework”. The community is still figuring out how we plan on dealing with this conundrum.

One of the first decisions the working group made was in regard to the scope of the API itself. In other words, what would our new abstraction be responsible for representing, and what would our abstraction intentionally ignore. We landed on two primary new resources, Clusters, and Machines. The Cluster resource was intended to map cleanly to the official Kubernetes bootstrap tool kubeadm, and the Machine resource was intended to be a simple representation of some compute load in a cloud (EC2 Instances, Google Virtual Machines, etc) or a physical machine. We explicitly decided to keep the new Machine resource separate from the existing node resource, as we could munge the two together later if necessary. According to Jacob Beacham, “the biggest motivation being that this was the only way to build the functionality outside of core, since the Node API is already defined in core.” Each Cluster resource would be mapped to a set of Machine resources, and ultimately all of these combined would represent a single Kubernetes cluster.

We later looked at implementing higher level resources to manage the Machine resource, in the same way deployments and ReplicaSets manage pods in Kubernetes today. Following this logic we modeled MachineDeployment after Deployment and MachineSet after ReplicaSet. These would allow unique strategy implementations for how various controllers would manage scaling and mutating underlying Machines.

We also decided early on that “how” a controller reconciles one of these resources is unique to the controller. In other words, the API should, by design, never include bash commands or any logic that suggests “how” to bring a cluster up, only “what” the cluster should look like after it’s been stood up. Where and how the controller reasons about what it needs to do is in scope for the controller and out of scope for the API. For example, Cluster API would define what version of Kubernetes to install, but would never define how to install that version.

With ClusterAPI, we hope to solve for many of the technical concerns in managing Kubernetes clusters, by drawing upon the lessons we’ve learned from Kubeadm, Kops, Kubicorn, and Kube-up, Gardener, etc.. So we set out to build ClusterAPI with the following goals in mind:

Facilitate Atomic Transactions

While keeping the spirit of planning for failure and mitigating hazards in our software, we knew we wanted to build software that would make it possible to guarantee a successful infrastructure mutation or no mutation at all. We learned this from Kops, when a cluster upgrade or create would fail partially through and we would orphan costly infrastructure in a cloud account.

Enabling Cluster Automation

With Cluster API we find that cluster level configuration is now declared through a common API, making it easy to automate and build tooling to interface with the new API. Tools like the cluster autoscaler now are liberated from having to concern themselves with how a node is created/destroyed. This simplifies the tooling and enables new tooling to be crafted around updating the cluster definition based on arbitrary business needs. This will change how operators think about managing a cluster.

Keep infrastructure resilient

Kops, Kubicorn, and Kube-up all have a fatal flaw. They run only for a finite amount of time. They all have some concept of accomplishing a task, and then terminating the program. This was a good starting point, but it didn’t offer the goal seeking and resilient behavior users are used to with Kubernetes. We needed a controller, to reconcile state over time. If a machine goes down, we don’t want to have to worry about bringing it back up.

Create a better user experience

Standing up a Kubernetes cluster is hard. Period. We hoped to build tooling that would go from 0 to Kubernetes in a friendly way, that made sense to operators. Furthermore, we hoped the API abstractions we created would also resonate with engineers so we could encourage them to build tooling around these new abstractions. For example, if the abstraction was user-friendly, we could port the upstream autoscaler over to using the new abstraction so it no longer had to concern itself with implementation — simply updating a record in Kubernetes.

Provide a solution for cluster upgrades

We wanted a turnkey solution to upgrades. Upgrading a Kubernetes cluster is tedious and risky, and having a residual controller in place not only solved the implementation of how to upgrade a Kubernetes cluster but it also gave us visibility into the state of the current upgrade.

Bring the community together

As it stands every Kubernetes installer to date represents a cluster in a different way, and the user experience is fragmented. This diminishes Kubernetes adoption and frankly pisses users off. We hoped to reduce this fragmentation and provide a solution to defining “what” a cluster looks like, and provide tooling to jumpstart implementations that solve “how” to bring a cluster to life.

All of these lessons and more are starting to sing in the Cluster API repositories. We are on the verge of alpha and beta releases for clouds like AWS and GCP. We hope that the community driven API becomes a standard teams can count on, and we hope that the community can start to offer an arsenal of controller implementations that bring these various variants of clusters to life.

Going Further

Learn More about the Cluster API from Kris Nova (Heptio) and Loc Nguyen (VMware) live at Kubecon 2018 during their presentation on the topic. The talk will be recorded in case you can’t make it. We will upload the video to our advocacy site as soon as we can.

Source

Production-Ready Kubernetes Cluster Creation with kubeadm

Production-Ready Kubernetes Cluster Creation with kubeadm

Authors: Lucas Käldström (CNCF Ambassador) and Luc Perkins (CNCF Developer Advocate)

kubeadm is a tool that enables Kubernetes administrators to quickly and easily bootstrap minimum viable clusters that are fully compliant with Certified Kubernetes guidelines. It’s been under active development by SIG Cluster Lifecycle since 2016 and we’re excited to announce that it has now graduated from beta to stable and generally available (GA)!

This GA release of kubeadm is an important event in the progression of the Kubernetes ecosystem, bringing stability to an area where stability is paramount.

The goal of kubeadm is to provide a foundational implementation for Kubernetes cluster setup and administration. kubeadm ships with best-practice defaults but can also be customized to support other ecosystem requirements or vendor-specific approaches. kubeadm is designed to be easy to integrate into larger deployment systems and tools.

The scope of kubeadm

kubeadm is focused on bootstrapping Kubernetes clusters on existing infrastructure and performing an essential set of maintenance tasks. The core of the kubeadm interface is quite simple: new control plane nodes are created by running kubeadm init and worker nodes are joined to the control plane by running kubeadm join. Also included are utilities for managing already bootstrapped clusters, such as control plane upgrades and token and certificate renewal.

To keep kubeadm lean, focused, and vendor/infrastructure agnostic, the following tasks are out of its scope:

  • Infrastructure provisioning
  • Third-party networking
  • Non-critical add-ons, e.g. for monitoring, logging, and visualization
  • Specific cloud provider integrations

Infrastructure provisioning, for example, is left to other SIG Cluster Lifecycle projects, such as the Cluster API. Instead, kubeadm covers only the common denominator in every Kubernetes cluster: the control plane. The user may install their preferred networking solution and other add-ons on top of Kubernetes after cluster creation.

What kubeadm’s GA release means

General Availability means different things for different projects. For kubeadm, going GA means not only that the process of creating a conformant Kubernetes cluster is now stable, but also that kubeadm is flexible enough to support a wide variety of deployment options.

We now consider kubeadm to have achieved GA-level maturity in each of these important domains:

  • Stable command-line UX — The kubeadm CLI conforms to #5a GA rule of the Kubernetes Deprecation Policy, which states that a command or flag that exists in a GA version must be kept for at least 12 months after deprecation.
  • Stable underlying implementation — kubeadm now creates a new Kubernetes cluster using methods that shouldn’t change any time soon. The control plane, for example, is run as a set of static Pods, bootstrap tokens are used for the kubeadm join flow, and ComponentConfig is used for configuring the kubelet.
  • Configuration file schema — With the new v1beta1 API version, you can now tune almost every part of the cluster declaratively and thus build a “GitOps” flow around kubeadm-built clusters. In future versions, we plan to graduate the API to version v1 with minimal changes (and perhaps none).
  • The “toolbox” interface of kubeadm — Also known as phases. If you don’t want to perform all kubeadm init tasks, you can instead apply more fine-grained actions using the kubeadm init phase command (for example generating certificates or control plane Static Pod manifests).
  • Upgrades between minor versions — The kubeadm upgrade command is now fully GA. It handles control plane upgrades for you, which includes upgrades to etcd, the API Server, the Controller Manager, and the Scheduler. You can seamlessly upgrade your cluster between minor or patch versions (e.g. v1.12.2 -> v1.13.1 or v1.13.1 -> v1.13.3).
  • etcd setup — etcd is now set up in a way that is secure by default, with TLS communication everywhere, and allows for expanding to a highly available cluster when needed.

Who will benefit from a stable kubeadm

SIG Cluster Lifecycle has identified a handful of likely kubeadm user profiles, although we expect that kubeadm at GA can satisfy many other scenarios as well.

Here’s our list:

  • You’re a new user who wants to take Kubernetes for a spin. kubeadm is the fastest way to get up and running on Linux machines. If you’re using Minikube on a Mac or Windows workstation, you’re actually already running kubeadm inside the Minikube VM!
  • You’re a system administrator responsible for setting up Kubernetes on bare metal machines and you want to quickly create Kubernetes clusters that are secure and in conformance with best practices but also highly configurable.
  • You’re a cloud provider who wants to add a Kubernetes offering to your suite of cloud services. kubeadm is the go-to tool for creating clusters at a low level.
  • You’re an organization that requires highly customized Kubernetes clusters. Existing public cloud offerings like Amazon EKS and Google Kubernetes Engine won’t cut it for you; you need customized Kubernetes clusters tailored to your hardware, security, policy, and other needs.
  • You’re creating a higher-level cluster creation tool than kubeadm, building the cluster experience from the ground up, but you don’t want to reinvent the wheel. You can “rebase” on top of kubeadm and utilize the common bootstrapping tools kubeadm provides for you. Several community tools have adopted kubeadm, and it’s a perfect match for Cluster API implementations.

All these users can benefit from kubeadm graduating to a stable GA state.

kubeadm survey

Although kubeadm is GA, the SIG Cluster Lifecycle will continue to be committed to improving the user experience in managing Kubernetes clusters. We’re launching a survey to collect community feedback about kubeadm for the sake of future improvement.

The survey is available at https://bit.ly/2FPfRiZ. Your participation would be highly valued!

This release wouldn’t have been possible without the help of the great people that have been contributing to the SIG. SIG Cluster Lifecycle would like to thank a few key kubeadm contributors:

We also want to thank all the companies making it possible for their developers to work on Kubernetes, and all the other people that have contributed in various ways towards making kubeadm as stable as it is today!

About the authors

Lucas Käldström

  • kubeadm subproject owner and SIG Cluster Lifecycle co-chair
  • Kubernetes upstream contractor, last two years contracting for Weaveworks
  • CNCF Ambassador
  • GitHub: luxas

Luc Perkins

  • CNCF Developer Advocate
  • Kubernetes SIG Docs contributor and SIG Docs tooling WG chair
  • GitHub: lucperkins

Source

First impressions with DigitalOcean’s Kubernetes Engine

In this guide I’ll set up a Kubernetes cluster with DigitalOcean’s new Kubernetes Engine using CLI tooling and then work out the cost of the cluster running a Cloud Native workload – OpenFaaS. OpenFaaS brings portable Serverless Functions to Kubernetes for any programming language.

Kubernetes is everywhere

Since James Governor from RedMonk declared that Kubernetes had won the container orchestration battle we’ve seen cloud and service providers scramble to ship their own managed Kubernetes services – to win mindshare and to get their share of the pie.

Kubernetes won – so now what? https://t.co/JeZwBEWNHy

— RedMonk (@redmonk) May 25, 2018

One of the earliest and most complete Kubernetes services is probably Google Kubernetes Engine (GKE), followed by a number of newer offerings like:

Kubernetes services coming soon:

Kubernetes engines

The point of a managed Kubernetes service or engine as I see it is to abstract away the management of servers and the day to day running of the cluster such as requesting, joining and configuring nodes. In some senses – Kubernetes delivered as a Service is a type of serverless and each product gives a varying level of control and visibility over the nodes provisioned.

For instance with VMware’s Cloud PKS you have no way to even see the server inventory and the cluster is sized dynamically based upon usage. spotinst released a product called Ocean last week which also focuses on hiding the visibility of the servers backing your workloads. The Azure team at Microsoft is combining their Azure Container Instances (ACI) with Virtual Kubelet to provide a “node-less” experience.

The areas I would score a Kubernetes Engine are around:

  • Ease of use – what is the installation experience, bootstrap time and tooling like?
  • Reliability – does it work and stand up to testing?
  • Documentation – is it clear what to do when things go wrong?
  • Management interface – are a CLI and UI available, can I automate them?
  • Effective cost – is this cost effective and good value for money?

Anything else I count as a bonus such as node auto-scaling and native LoadBalancer support within Kubernetes.

Certification is also important for running in production, but if the above points are covered some divergence may be acceptable.

Get Kubernetes

At the time of writing the Kubernetes support is only by invitation only and is in beta. We saw a similar pattern with other Kubernetes services, so this seems to be normal.

Note: please bear in mind that this post is looking at pre-release beta product. Some details may change between now and GA including the CLI which is an early version.

Use the UI

To provision the cluster we can pick between the CLI or the familiar UI dashboard which gains a Kubernetes tab.

DigitalOcean Console

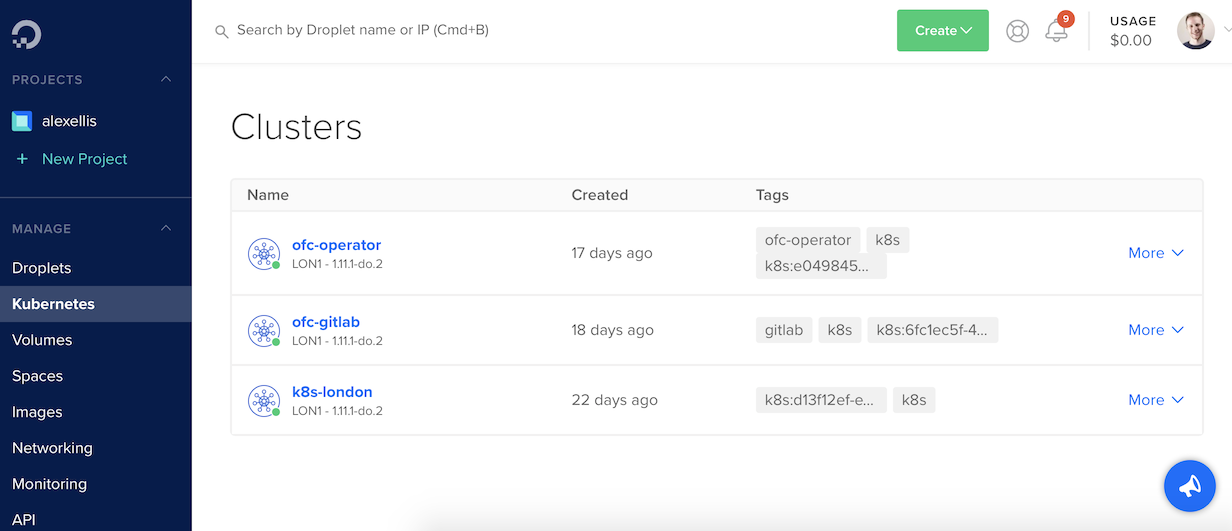
Here you can see three clusters I provisioned for testing OpenFaaS with my team at VMware and for a demo at Serverless Computing London.

From here we can create a new cluster using the UI.

Region

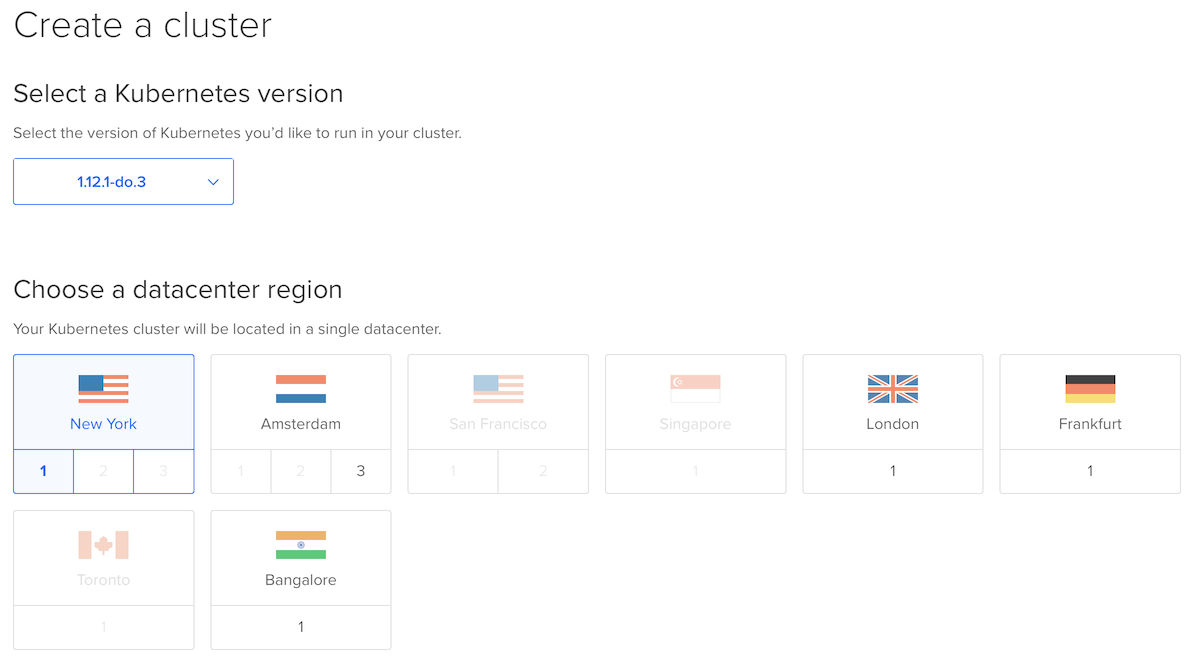
Initially you must pick a Region and a name for the cluster.

Node pool

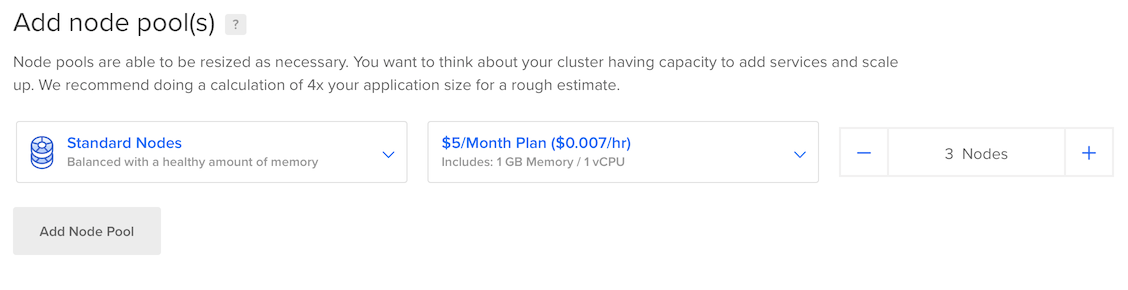
Then pick the price you want to pay per month by configuring one or many Kubernetes Node pools. The suggestion is 3 nodes at 5USD / month working out at 15USD per month. This may be suitable for a simple workload, but for anyone who has used Kubernetes for real work will know – 1Gb is not enough to be productive.

2Gb RAM with 1 vCPU costs 10 USD month (3×10=30USD) and 4Gb RAM with 2 vCPU will come in at (3×20=60USD). This is probably the minimum cost you want to go with to run a serious application.

Each node gets a public IPv4 IP address, so an IngressController could be run on each node then load-balanced via DNS for free, or we could opt to use a DO load-balancer (not a Kubernetes-native one) at an additional fee.

Effective cost: 3/5

It is possible to create multiple node pools, so if you have lighter workloads you could assign them to cheaper machines.

As well as Standard Nodes we can pick from Optimized Nodes (best in class) and Flexible Nodes. For an Optimized Node with best in class 2x vCPU and 4Gb RAM you’ll be set back (2×40=80USD). This seems to compare favourably with the other services mentioned, but could be off-putting to newcomers. It also doesn’t seem like there is cost for the master node.

Within a minute or two of hitting the blue button we can already download the .kube/config file from the UI and connect to our cluster to deploy code.

The Kubernetes service from @digitalocean is looking to be one of the easiest and quickest I’ve used so far. Looking forward to writing some guides on this and seeing what you all make of it too. pic.twitter.com/0FsMIzEzwF

— Alex Ellis (@alexellisuk) November 16, 2018

Ease of use for the UI: 5/5

Use the CLI

Up to now the doctl CLI could be used to do most of what you could do in the console – apart from provision Kubernetes clusters.

The @DigitalOcean CLI (doctl) now supports their managed Kubernetes Service -> https://t.co/r2muCj8EHz 🎉👨‍💻💻👩‍💻

— Alex Ellis (@alexellisuk) December 3, 2018

Well that all changed today and now in v1.12.0 you can turn on an experimental flag and manage those clusters.

The typical flow for using the doctl CLI involves downloading a static binary, unpacking it yourself, placing it in the right place, logging into the UI and generating an access token and then running doctl auth init. Google Cloud does this better by opening a web-browser to get an access token over OAuth.

Create the cluster with the following command:

Usage:
doctl kubernetes create [flags]

Aliases:
create, c

Flags:
–name string cluster name (required)
–node-pools value cluster node pools in the form “name=your-name;size=droplet_size;count=5;tag=tag1;tag=tag2” (required) (default [])
–region string cluster region location, example value: nyc1 (required)
–tag-names value cluster tags (default [])
–version string cluster version (required)

Global Flags:
-t, –access-token string API V2 Access Token
-u, –api-url string Override default API V2 endpoint
-c, –config string config file (default is $HOME/.config/doctl/config.yaml)
–context string authentication context name
-o, –output string output format [text|json] (default “text”)
–trace trace api access
-v, –verbose verbose output

The –node-pools flag may be better split out into multiple individual flags rather than separated with ;. When it came to picking the slug size I found that bit cryptic too. The only ways I could find them listed were through the API and a release announcement, which may or may not be the most recent. This could be improved for GA.

I also had to enter –version but didn’t know what format the string should be in. I copied the exact value from the UI. This is early days for the team so I would expect this to improve before GA.

$ doctl kubernetes create –name ae-openfaas
–node-pools=”name=main;size=s-2vcpu-4gb;count=3;tag=tutorial”
–region=”lon1″
–tag-names=”tutorial”
–version=”1.11.1-do.2″

ID Name Region Version Status Endpoint IPv4 Cluster Subnet Service Subnet Tags Created At Updated At Node Pools
82f33a60-02af-4e94-a550-dd5afd06cf0e ae-openfaas lon1 1.11.1-do.2 provisioning 10.244.0.0/16 10.245.0.0/16 tutorial,k8s,k8s:82f33a60-02af-4e94-a550-dd5afd06cf0e 2018-12-03 19:38:27 +0000 UTC 2018-12-03 19:38:27 +0000 UTC main

The result is asynchronous and not blocking so now we need to poll / check the CLI for completion.

We can type in doctl kubernetes list or doctl kubernetes get ae-openfaas.

Once we see the Running state then type in: doctl kubernetes kubeconfig ae-openfaas and save the contents into a file.

In the future I’d like to see this config merged optionally into .kube/config like we see with Minikube or VMware’s Cloud PKS CLI.

$ doctl kubernetes kubeconfig ae-openfaas > config
$ export KUBECONFIG=config
$ kubectl get node
NAME STATUS ROLES AGE VERSION
kind-knuth-3o9d Ready <none> 32s v1.11.1
kind-knuth-3o9i Ready <none> 1m v1.11.1
kind-knuth-3o9v Ready <none> 1m v1.11.1

We now have a config on the local computer and we’re good to go!

Ease of use for the CLI: 3/5

Total ease of use: 4/5

I would give GKE’s Management interface 5/5 – DO would have got 2/5 without the CLI. Now that the CLI is available and we can use it to automate clusters I think this goes up to 3/5 leaving room to grow.

Deploying a workload

In order to figure out a Reliability score we need to deploy an application and run it for some time. I deployed OpenFaaS live during a demo at Serverless Computing London and ran the Colorizer from the Function Store – this was on one of the cheaper nodes so ran slower than I would have expected, but was feature complete on a budget.

I then set up OpenFaaS Cloud with GitLab – this is a more demanding task as it means running a container builder and responding to events from GitLab to clone, build and deploy new OpenFaaS functions to the cluster. Again this held up really well using 3x4Gb 2vCPU nodes with no noticeable slow-down.

Reliability 4/5

You can deploy OpenFaaS with helm here: OpenFaaS helm chart

In this Tweet from my talk at goto Copenhagen you can see the conceptual architecture for OpenFaaS on Kubernetes which bundles a Serverless Function CRD & Operator along with NATS Streaming for asynchronous execution and Prometheus for built-in metrics and auto-scaling.

Serverless beyond the hype by @alexellisuk. Donating to @Bornecancerfond in the live demo 💰💸 #serverless pic.twitter.com/n1rzcqRByd

— Martin Jensen (@mrjensens) November 19, 2018

Steps:

  • Install helm and tiller.
  • Create the OpenFaaS namespaces
  • Generate a password for the API gateway and install OpenFaaS the helm chart passing the option –set serviceType=LoadBalancer
  • Install OpenFaaS CLI and log into the API gateway

This is the point at which a “normal” Kubernetes engine would give us a LoadBalancer in the openfaas namespace. We would then query its state to find a public IP address. DigitalOcean gets full marks here because it will respond to this event and provision a load balancer which is around 10 USD / month – cheaper than a traditional cloud provider.

Type in the following and look for a public IP for gateway-external in the EXTERNAL-IP field.

$ kubectl get svc -n openfaas
NAME TYPE CLUSTER-IP EXTERNAL-IP PORT(S) AGE
alertmanager ClusterIP 10.245.45.200 <none> 9093/TCP 1m
gateway ClusterIP 10.245.83.10 <none> 8080/TCP 1m
gateway-external LoadBalancer 10.245.16.17 188.166.136.202 8080:32468/TCP 1m
nats ClusterIP 10.245.208.70 <none> 4222/TCP 1m
prometheus ClusterIP 10.245.105.120 <none> 9090/TCP 1m

Now set your OPENFAAS_URL as follows: export OPENFAAS_URL=http://188.166.136.202:8080 and do the login step:

$ echo -n $PASSWORD | faas-cli login –username admin –password-stdin

Note you can also add the export command to your bash profile ~/.bash_profile file to have it set automatically on every session.

You’ll now be able to open the UI using the address above or deploy a function using the CLI.

Deploy certinfo which can check a TLS certificate for a domain:

$ faas-cli store deploy certinfo

Check the status:

$ faas-cli list -v
$ faas-cli describe certinfo

Invoke the function and check a TLS certificate:

$ echo -n www.openfaas.com | faas-cli invoke certinfo

For me this seemed to take less than 10 seconds from deployment to getting a successful response from the function.

We can even scale the function to zero and see it come back to life:

$ kubectl scale deploy/certinfo -n openfaas-fn –replicas=0

Give it a few seconds for the function to be torn-down, then invoke it again. You’ll see it block – scale up and then serve the request:

$ echo -n cli.openfaas.com | faas-cli invoke certinfo

The function itself will take 1-2 seconds to execute since it works with a remote website. You can try it out with one of your own functions or find out how to enable the OpenFaaS idler component by reading the docs.

Earlier in the year in August Richard Gee wrote up a guide and supporting automation with Ansible to create up a single-node development cluster with Kubernetes and OpenFaaS. What I like about the new service is that we we can now get the same result, but better with just a few CLI commands.

TLS with LetsEncrypt

This is the point at which I’d usually tell you to follow the instructions for LetsEncrypt and cert-manager to setup HTTPS/TLS for your OpenFaaS gateway. I’m not going to need to go there because DigitalOcean can automate all of this for us if we let them take control of our domain.

tls-domains

The user-experience for cert-manager is in my opinion firmly set at expert level, so this kind of automation will be welcomed by developers. It does come at a cost of automation however.

Tear down the cluster

A common use-case for Kubernetes services is running CI and other automation testing. We can now tear down the whole cluster in the UI or CLI:

$ doctl kubernetes delete ae-openfaas –force

That’s it – we’ve now removed the cluster completely.

Wrapping up

As a maintainer, developer, architect and operator – it’s great to see strong Kubernetes offerings appearing. Your team or company may not be able to pick the best fit if you already take all your services from a single vendor, but I hope that the current level of choice and quality will drive down price and drive up usability wherever you call home in the cloud.

If you have the choice to run your workloads wherever you like, or are an aspiring developer then the Kubernetes service from DigitalOcean provides a strong option with additional value adds and some high scores against my rating system. I hope to see the score go up even more with some minor refinements around the CLI ready for the GA.

If taken in isolation then my overall rating for this new Kubernetes service from DigitalOcean would be 4/5, but when compared to the much more mature, feature-rich services Kubernetes engines we have to take this rating in context.

Source

Announcing Cloud Native Application Bundle (CNAB)

As more organizations pursue cloud-native applications and infrastructures for creating modern software environments, it has become clear that there is no single solution in the market for defining and packaging these multi-service, multi-format distributed applications. Real-world applications can now span on-premises infrastructure and cloud-based services, requiring multiple tools like Terraform for the infrastructure, Helm charts and Docker Compose files for the applications, and CloudFormation or ARM templates for the cloud-services. Each of these need to be managed separately.

To address this problem, Microsoft in collaboration with Docker are announcing Cloud Native Application Bundle (CNAB) – an open source, cloud-agnostic specification for packaging and running distributed applications. CNAB unifies the management of multi-service, distributed applications across different toolchains into a single all-in-one packaging format.The CNAB specification lets you define resources that can be deployed to any combination of runtime environments and tooling including Docker Engine, Kubernetes, Helm, automation tools and cloud services.

Docker is the first to implement CNAB for containerized applications and will be expanding it across the Docker platform to support new application development, deployment and lifecycle management. Initially CNAB support will be released as part of our docker-app experimental tool for building, packaging and managing cloud-native applications. Docker lets you package CNAB bundles as Docker images, so you can distribute and share through Docker registry tools including Docker Hub and Docker Trusted Registry. Additionally, Docker will enable organizations to deploy and manage CNAB-based applications in Docker Enterprise in the upcoming months.

The draft specification is available at cnab.io and we’re actively looking for contributors to the spec itself and people interested in building tools around the specification. Docker will be contributing to the CNAB specification.

Source