Five tips to move your project to Kubernetes

Here are five tips to help you move your projects to Kubernetes with learnings from the OpenFaaS community over the past 12 months. The following is compatible with Kubernetes 1.8.x. and is being used with OpenFaaS – Serverless Functions Made Simple.

Disclaimer: the Kubernetes API is something which changes frequently and you should always refer to the official documentation for the latest information.

1. Put everything in Docker

It might sound obvious but the first step is to create a Dockerfile for every component that runs as a separate process. You may have already done this in which case you have a head-start.

If you haven’t started this yet then make sure you use multi-stage builds for each component. A multi-stage build makes use of two separate Docker images for the build-time and run-time components of your code. A base image may be the Go SDK for example which is used to build binaries and the final stage will be a minimal Linux user-space like Alpine Linux. We copy the binary over into the final stage, install any packages like CA certificates and then set the entry-point. This means that your final is smaller and won’t contain unused packages.

Here’s an example of a multi-stage build in Go for the OpenFaaS API gateway component. You will also notice some other practices:

  • Uses a non-root user for runtime
  • Names the build stages such as build
  • Specifies the architecture of the build i.e. linux
  • Uses specific version tags i.e. 3.6 – if you use latest then it can lead to unexpected behaviour

FROM golang:1.9.4 as build
WORKDIR /go/src/github.com/openfaas/faas/gateway

COPY . .

RUN CGO_ENABLED=0 GOOS=linux go build -a -installsuffix cgo -o gateway .

FROM alpine:3.6

RUN addgroup -S app
&& adduser -S -g app app

WORKDIR /home/app

EXPOSE 8080
ENV http_proxy “”
ENV https_proxy “”

COPY –from=build /go/src/github.com/openfaas/faas/gateway/gateway .
COPY assets assets

RUN chown -R app:app ./

USER app

CMD [“./gateway”]

Note: If you want to use OpenShift (a distribution of Kubernetes) then you need to ensure that all of your Docker images are running as a non-root user.

1.1 Get Kubernetes

You’ll need Kubernetes available on your laptop or development machine. Read my blog post on Docker for Mac which covers all the most popular options for working with Kubernetes locally.

https://blog.alexellis.io/docker-for-mac-with-kubernetes/

If you’ve worked with Docker before then you may be used to hearing about containers. In Kubernetes terminology you rarely work directly with a container, but with an abstraction called a Pod.

A Pod is a group of one-to-many containers which are scheduled and deployed together and get direct access to each other over the loopback address 127.0.0.1.

An example of where the Pod abstraction becomes useful is where you may have an existing legacy application without TLS/SSL which is deployed in a Pod along with Nginx or another web-server that is configured with TLS. The benefit is that multiple containers can be deployed together to extend functionality without having to make breaking changes.

2. Create YAML files

Once you have a set of Dockerfiles and images your next step is to write YAML files in the Kubernetes format which the cluster can read to deploy and maintain your project’s configuration.

These are different from Docker Compose files and can be difficult to get right at first. My advice is to find some examples in the documentation or other projects and try to follow the style and approach. The good news it that it does get easier with experience.

Every Docker image should be defined in a Deployment which specifies the containers to run and any additional resources it may need. A Deployment will create and maintain a Pod to run your code and if the Pod exits it will be restarted for you.

You will also need a Service for each component which you want to access over HTTP or TCP.

It is possible to to have multiple Kubernetes definitions within a single file by separating them with — and a new line, but prevailing opinion suggests we should spread our definitions over many YAML files – one for each API object in the cluster.

An example may be:

  • gateway-svc.yml – for the Service
  • gateway-dep.yml – for the Deployment

If all of your files are in the same directory then you can apply all the files in one step with kubectl apply -f ./yaml/ for instance.

When working with additional operating systems or architectures such as the Raspberry Pi – we find it useful to separate those definitions into a new folder such as yaml_arm.

  • Deployment example

Here is a simple example of a Deployment for NATS Streaming which is a lightweight streaming platform for distributing work:

apiVersion: apps/v1beta1
kind: Deployment
metadata:
name: nats
namespace: openfaas
spec:
replicas: 1
template:
metadata:
labels:
app: nats
spec:
containers:
– name: nats
image: nats-streaming:0.6.0
imagePullPolicy: Always
ports:
– containerPort: 4222
protocol: TCP
– containerPort: 8222
protocol: TCP
command: [“/nats-streaming-server”]
args:
– –store
– memory
– –cluster_id
– faas-cluster

A deployment can also state how many replicas or instances of the service to create at start-up time.

  • Service definition

apiVersion: v1
kind: Service
metadata:
name: nats
namespace: openfaas
labels:
app: nats
spec:
type: ClusterIP
ports:
– port: 4222
protocol: TCP
targetPort: 4222
selector:
app: nats

Services provide a mechanism to balance requests between all the replicas of your Deployments. In the example above we have one replica of NATS Streaming but if we had more they would all have unique IP addresses and tracking those would be problematic. The advantage of using a Service is that it has a stable IP address and DNS entry which can be used to access one of the replicas at any time.

Services are not directly mapped to Deployments, but are mapped to labels. In the example above the Service is looking for a label of app=nats. Labels can be added or removed from Deployments (and other API objects) at runtime making it easy to redirect traffic in your cluster. This can help enable A/B testing or rolling deployments.

The best way to learn about the Kubernetes-specific YAML format is to look up an API object in the documentation where you will find examples that can be used with YAML or via kubectl.

Find out more about the various API objects here:

https://kubernetes.io/docs/concepts/

2.1 helm

Helm describes itself as a package manager for Kubernetes. From my perspective it has two primary functions:

  • To distribute your application (in a Chart)

Once you are ready to distribute your project’s YAML files you can bundle them up and submit them to the Helm repository so that other people can find your application and install it with a single command. Charts can also be versioned and can specify dependencies on other Charts.

Here are three example charts: OpenFaaS, Kakfa or Minio.

  • To make editing easier

Helm supports in-line templates written in Go, which means you can move common configuration into a single file. So if you have released a new set of Docker images and need to perform some updates – you only have to do that in one place. You can also write conditional statements so that flags can be used with the helm command to turn on different features at deployment time.

This is how we define a Docker image version using regular YAML:

image: functions/gateway:0.7.5

With Helm’s templates we can do this:

image: {{ .Values.images.gateway }}

Then in a separate file we can define the value for “images.gateway”. The other thing helm allows us to do is to use conditional statements – this is useful when supporting multiple architectures or features.

This example shows how to apply either a ClusterIP or a NodePort which are two different options for exposing a service in a cluster. A NodePort exposes the service outside of the cluster so you may want to control when that happens with a flag.

If we were using regular YAML files then that would have meant maintaining two sets of configuration files.

spec:
type: {{ .Values.serviceType }}
ports:
– port: 8080
protocol: TCP
targetPort: 8080
{{- if contains “NodePort” .Values.serviceType }}
nodePort: 31112
{{- end }}

In the example “serviceType” refers to ClusterIP or NodePort and then we have a second conditional statement which conditionally applies a nodePort element to the YAML.

3. Make use of ConfigMaps

In Kubernetes you can mount your configuration files into the cluster as a ConfigMap. ConfigMaps are better than “bind-mounting” because the configuration data is replicated across the cluster making it more robust. When data is bind-mounted from a host then it has to be deployed onto that host ahead of time and synchronised. Both options are much better than building config files directly into a Docker image since they are much easier to update.

A ConfigMap can be created ad-hoc via the kubectl tool or through a YAML file. Once the ConfigMap is created in the cluster it can then be attached or mounted into a container/Pod.

Here’s an example of how to define a ConfigMap for Prometheus:

kind: ConfigMap
apiVersion: v1
metadata:
labels:
app: prometheus
name: prometheus-config
namespace: openfaas
data:
prometheus.yml: |
scrape_configs:
– job_name: ‘prometheus’
scrape_interval: 5s
static_configs:
– targets: [‘localhost:9090’]

You can then attach it to a Deployment or Pod:

volumeMounts:
– mountPath: /etc/prometheus/prometheus.yml
name: prometheus-config
subPath: prometheus.yml
volumes:
– name: prometheus-config
configMap:
name: prometheus-config
items:
– key: prometheus.yml
path: prometheus.yml
mode: 0644

See the full example here: ConfigMap
Prometheus config

Read more in the docs: https://kubernetes.io/docs/tasks/configure-pod-container/configure-pod-configmap/

4. Use secure secrets

In order to keep your passwords, API keys and tokens safe you should make use of Kubernetes’ secrets management mechanisms.

If you’re already making use of ConfigMaps then the good news it that secrets work in almost exactly the same way:

  • Define the secret in the cluster
  • Attach the secret to a Deployment/Pod via a mount

The other type of secrets you need to use is when you want to pull an image in from a private Docker image repository. This is called an ImagePullSecret and you can find out more here.

You can read more about how to create and manage secrets in the Kubernetes docs: https://kubernetes.io/docs/concepts/configuration/secret/

5. Implement health-checks

Kubernetes supports health-checks in the form of liveness and readiness checking. We need these mechanisms to make our cluster self-healing and resilient to failure. They work through a probe which either runs a command within the Pod or calls into a pre-defined HTTP endpoint.

  • Liveness

A liveness check can show whether application is running. With OpenFaaS functions we create a lock file of /tmp/.lock when the function starts. If we detect an unhealthy state we can remove this file and Kubernetes will re-schedule the function for us.

Another common pattern is to add a new HTTP route like /_/healthz. The route of /_/ is used by convention because it is unlikely to clash with existing routes for your project.

  • Readiness checks

If you enable a readiness check then Kubernetes will only send traffic to containers once that criteria has passed.

A readiness check can be set to run on a periodic basis and is different from a health-check. A container could be healthy but under too much load – in which case it could report as “not ready” and Kubernetes would stop sending traffic until resolved.

You can read more in the docs: https://kubernetes.io/docs/tasks/configure-pod-container/configure-liveness-readiness-probes/

Wrapping up

In this article, we’ve listed some of the key things to do when bringing a project over to Kubernetes. These include:

  • Creating good Docker images
  • Writing good Kubernetes manifests (YAML files)
  • Using ConfigMaps to decouple tunable settings from your code
  • Using Secrets to protect sensitive data such as API keys
  • Using liveness and readiness probes to implement resiliency and self-healing

For further reading I’m including a comparison of Docker Swarm and Kubernetes and a guide for setting up a cluster fast.

Compare Kubernetes with Docker and Swarm and get a good overview of the tooling from the CLI to networking to the component parts

If you want to get up and running with Kubernetes on a regular VM or cloud host – this is probably the quickest way to get a development cluster up and running.

Follow me on Twitter @alexellisuk for more.

Five tips to move your project to Kubernetes – https://t.co/xUEyrYdO0H @kubeweekly @kubernetesio @Docker

— Alex Ellis (@alexellisuk) March 19, 2018

Acknowledgemnts: Thanks to Nigel Poulton for proof-reading and reviewing the post.

Source

Compare Docker for Windows options

As part of Dockercon 2017, there was an announcement that Linux containers can run as hyperv container in Windows server. This announcement made me to take a deeper look into Windows containers. I have worked mostly with Linux containers till now. In Windows, I have mostly used Docker machine or Toolbox till now. I recently tried out other methods to deploy containers in Windows. In this blog, I will cover different methods to run containers in Windows, technical internals on the methods and comparison between the methods. I have also covered Windows Docker base images and my experiences trying the different methods to run Docker containers in Windows. The 3 methods that I am covering are Docker Toolbox/Docker machine, Windows native containers, hyper-v containers.

Docker Toolbox

Docker Toolbox runs Docker engine on top of boot2docker VM image running in Virtualbox hypervisor. We can run Linux containers on top of the Docker engine. I have written few blogs(1, 2) about Docker Toolbox before. We can run Docker Toolbox on any Windows variants.

Windows Native containers

Folks familiar with Linux containers know that Linux containers uses Linux kernel features like namespaces, cgroups. To containerize Windows applications, Docker engine for Windows needs to use the corresponding Windows kernel features. Microsoft worked with Docker to make this happen. As part of this effort, changes were made both on Docker and Windows side. This mode allows Windows containers to run directly on Windows server 2016. Windows server 2016 has the necessary container primitives that allows native Windows containers to run on it. Going forward, Microsoft will port this functionality to other flavors of Windows.

hyper-v containers

Windows Hyper-v container is a windows server container that runs in a VM. Every hyper-v container creates its own VM. This means that there is no kernel sharing between the different hyper-v containers. This is useful for cases where additional level of isolation is needed by customers who don’t like the traditional kernel sharing done by containers. The same Docker image and CLI can be used to manage hyper-v containers. Creation of hyper-v containers is specified as a runtime option. There is no difference when building or managing containers between windows server and hyper-v container. Startup times for hyper-v container is higher than windows native container since a new lightweight VM gets created each time. 1 common question that comes up is how is hyper-v container different from a general VM with virtualbox or hyper-v hypervisor and running container on top of it? Following are some differences as I see it:

  • hyper-v container is very light-weight. This is because of the light-weight OS and other optimizations.
  • hyper-v containers do not appear as VMs inside hyper-v and cannot be managed by regular hyper-v tools.
  • The same Docker CLI can be used to manage hyper-v containers. To some extent, this is true with Docker Toolbox and Docker machine. With hyper-v containers, its more integrated and becomes a single step process.

There are 2 modes of hyper-v container.

  1. Windows hyper-v container – Here, hyper-v container runs on top of Windows kernel. Only Windows containers can be run in this mode.
  2. Linux hyper-v container – Here, hyper-v container runs on top of Linux kernel. This mode was not available earlier and it was introduced as part of Dockercon 2017. Any Linux flavor can be used as the base kernel. Docker’s Linuxkit project can be used to build the Linux kernel needed for the hyper-v container. Only Linux containers can be run in this mode.

We cannot use Docker Toolbox and hyper-v containers at the same time. Virtualbox cannot run when “Docker for Windows” is installed.

Following picture shows illustration of different Windows container modes

windows_container_types

Following table captures the difference between different Windows Container modes

Windows mode/Feature Toolbox Windows native container hyper-v container
OS Type Any Windows flavor Windows 2016 server Windows 10 pro, Windows 2016 server
hypervisor/VM Virtualbox hypervisor No seperate VM for container VM runs inside hyper-v
Windows container Not possible Yes Possible in Windows hyper-v container
Linux container Yes Not possible Possible in Linux hyper-v container
Startup time Higher compared to windows native and hyper-v containers Least among the 3 options Between Toolbox and windows native containers

Hands-on

If you are using Windows 10 pro or Windows server 2016, you can install Docker for Windows from here. This installs Docker CE version and runs Docker for Windows in hyper-v mode. We can install using either the stable or edge channel. Docker for Windows was available earlier only for Windows 10. The edge channel added Docker for Windows for Windows server 2016 just recently. Once “Docker for Windows” is installed, we can switch between Linux and Windows mode with just a click of a button. As of now, Linux mode uses mobyLinuxVM, this will change later to hyper-v linux container mode. In order to run Hyper-V containers, the Hyper-V role has to be enabled in Windows. If the Windows host is itself a Hyper-V virtual machine, nested virtualization will need to be enabled before installing the Hyper-V role. For more details, please refer these 2 references(1, 2). As shown in the example of reference, we can start hyper-v containers by just specifying a run-time option in Docker.

docker run -it –isolation=hyperv microsoft/nanoserver cmd

If you are using Windows server 2016, Docker EE edition can be installed using the procedure here. I would advise using Docker EE for Windows server 2016 rather than using hyper-v container.

I have tried Docker Toolbox in Windows 7 Enterprise version. Docker Toolbox can be run in any version of Windows. Docker Toolbox installation also installs Virtualbox if its not already installed. Docker Toolbox can be installed from here. For Docker Toolbox hands-on example, please refer to my earlier blog here.

I tried out Windows native containers and hyper-v containers in Azure cloud. After I created a Windows 2016 server, I used the following commands to install Docker engine. These commands have to be executed from powershell in administrator mode.

Install-Module -Name DockerMsftProvider -Repository PSGallery -Force
Install-Package -Name docker -ProviderName DockerMsftProvider
Restart-Computer -Force

Following are some example Windows containers I tried:

docker run microsoft/dotnet-samples:dotnetapp-nanoserver
docker run -d –name myIIS -p 80:80 microsoft/iis

Since Azure uses hypervisor to host compute VM and the fact that nested virtualization is not supported in Azure, Docker for Windows cannot be used with Windows server 2016 in Azure.
I got following error when I started “Docker for Windows” in Linux mode.

Unable to write to the database. Exit code: 1
at Docker.Backend.ContainerEngine.Linux.DoStart(Settings settings) in C:gopathsrcgithub.comdockerpinatawinsrcDocker.BackendContainerEngineLinux.cs:line 243
at Docker.Backend.ContainerEngine.Linux.Start(Settings settings) in C:gopathsrcgithub.comdockerpinatawinsrcDocker.BackendContainerEngineLinux.cs:line 120
at Docker.Core.Pipe.NamedPipeServer.<>c__DisplayClass8_0.b__0(Object[] parameters) in C:gopathsrcgithub.comdockerpinatawinsrcDocker.CorepipeNamedPipeServer.cs:line 44
at Docker.Core.Pipe.NamedPipeServer.RunAction(String action, Object[] parameters) in C:gopathsrcgithub.comdockerpinatawinsrcDocker.CorepipeNamedPipeServer.cs:line 140

I was still able to use hyper-v containers in Azure in Windows mode in Windows server 2016. I am still not fully clear how this mode overcame the nested virtualization problem.

From Azure perspective, I would like to see these changes from Microsoft:

  • Azure supporting nested virtualization.
  • Allowing Windows 10 in Azure without MSDN subscription.

There was an announcement earlier this week at Microsoft Build conference that Azure will support nested virtualization in selected VM sizes. This is very good.

Windows base image

Every container has a base image that contains the needed packages and libraries. Windows containers supports 2 base images:

  1. microsoft/windowsservercore – a full blown Windows server with full .NET Framework support. The size is around 9 GB.
  2. microsoft/nanoserver – a minimal Windows server and .NET Core Framework. The size is around 600 MB.

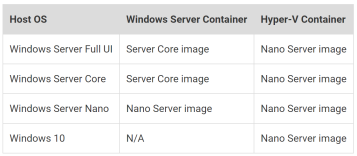
Following picture from here shows the compatibility between Windows server OS, Container type and Container base image.

baseimage

As we can see from the picture, with hyper-v container, we can use only nanoserver container base image.

FAQ

Can I run Linux containers in Windows?

  • The answer depends on which Docker windows mode you are using. With Toolbox and hyper-v Linux containers, Linux containers can be run in Windows. With Windows native container mode, Linux containers cannot be run in Windows.

Which Docker for Windows mode should I use?

  • For development purposes, if there is a need to use both Windows and Linux containers, hyper-v container can be used. For production purposes, we should use Windows native container. If there is a need to have better kernel isolation for additional security, hyper-v container can be used. If you have a version of Windows that is neither Windows 10 or Windows server 2016, Docker Toolbox is the only option available.

Can we run Swarm mode and Overlay network with Windows containers?

  • Swarm mode support was added recently in Windows containers. Multiple containers across Windows hosts can talk over the Overlay network. This needs Windows server update as mentioned in the link here. The same link also talks about a mixed mode Swarm cluster with Windows and Linux nodes. We can have a mix of Windows and Linux containers talking to each other over the Swarm cluster. Using Swarm constraints scheduling feature, we can place Windows containers in Windows nodes and Linux containers in Linux nodes.

Is there an additional Docker EE license needed for Windows server 2016?

  • According to the article here, it is not needed. It is better to check as this might change. Obviously, Windows license has to be taken care separately.

References

Source

NextCloudPi docker for Raspberry Pi – Own your bits

Note: some of this information is outdated, check a newer release here

I would like to introduce my NextCloud ARM container for the Raspberry Pi.

It only weights 475 MB, and it is shares codebase with NextCloudPi, so it has the same features:

  • Raspbian 9 Jessie
  • Nextcloud 13.0.1
  • Apache 2.4.25, with HTTP2 enabled
  • PHP 7.0
  • MariaDB 10
  • Automatic redirection to HTTPS
  • ACPU PHP cache
  • PHP Zend OPcache enabled with file cache
  • HSTS
  • Cron jobs for Nextcloud
  • Sane configuration defaults
  • Secure
  • Small, only 475 MB in disk, 162 MB compressed download.

With this containerization, the user no longer requires to start from scratch in order to run NextCloud in their RPi, as opposed from flashing the NextCloudPi image. It also opens new possibilities for easy upgrading and sandboxing for extra security.

It can be run in any system other that Raspbian, as long as it supports docker.

Some of the extras will be added soon, where it makes sense.

Installation

If you haven’t yet, install docker in your Raspberry Pi.

curl -sSL get.docker.com | sh

Adjust permissions. Assuming you want to manage it with the user pi

sudo usermod -aG docker pi

newgrp docker


Optionally, store containers in an external USB drive. Change the following line (adjust accordingly)

ExecStart=/usr/bin/dockerd -g /media/USBdrive/docker -H fd://

Reload changes

systemctl daemon-reload

systemctl restart docker

You can check that it worked with

$ docker info | grep Root

Docker Root Dir: /media/USBdrive/docker

Usage

The only parameter that we need is the trusted domain that we want to allow.

DOMAIN=192.168.1.130 # example for allowing an IP

DOMAIN=myclouddomain.net # example for allowing a domain

docker run -d -p 443:443 -p 80:80 -v ncdata:/data –name nextcloudpi ownyourbits/nextcloudpi $DOMAIN

After a few seconds, you can access from your browser just typing the IP or URL in the navigation bar of your browser. It will redirect you to the HTTPS site.

The admin user is ncp, and the default password is ownyourbits. Login to create users, change default password and other configurations.

Other than that, we could map different ports if we wanted to. Note that a volume ncdata will be created where configuration and data will persist.

For example, you could wrap a script like this to allow your current local IP

#!/bin/bash

# Initial Trusted Domain

IFACE=$( ip r | grep “default via” | awk ‘{ print $5 }’ )

IP=$( ip a | grep “global $IFACE” | grep -oP ‘d(.d)’ | head -1 )

docker run -d -p 443:443 -p 80:80 -v ncdata:/data –name nextcloudpi ownyourbits/nextcloudpi $IP

If you ever need direct access to your storage, you can find out where your files are located.


1

2

3

4

5

6

7

8

9

10

11

12

13

14

15

16

17

18

19

20


$ docker inspect nextcloudpi

“Mounts”: [

{

“Type”: “volume”,

“Name”: “ncdata”,

“Source”: “/media/USBdrive/docker/volumes/ncdata/_data”,

“Destination”: “/data”,

“Driver”: “local”,

“Mode”: “z”,

“RW”: true,

“Propagation”: “”

}

],


You can in this way alter your config.php

Details

The container consists of 3 main layers, totalling 476 MB.

A benefit of docker layers is that we can sometimes just update the upper layers, or provide updates on top of the current layout.

Code

The build code is now part of the NextCloudPi repository.

You can build it yourself in a Raspbian ARM environment with.

git clone https://github.com/nextcloud/nextcloudpi.git

make -C nextcloudpi

dockerhub

Source

Docker CE – Installing Test(“RC”) version

Starting with Docker 17.03, Docker introduced Community edition(CE) and Enterprise edition(CE) version of their Docker software. The release numbering also changed. From Docker 1.13.1, we jump to 17.03 version. Docker CE is the free version while Docker EE is the commercially supported enterprise version. Docker enterprise edition comes in different flavors based on the cost. Please refer this link for details on comparison between different Docker editions and the supported platforms for each editions. Both Docker CE and EE follow time based release schedule. Docker CE has 3 editions. CE “stable” edition gets released once every 3 months. CE “edge” edition gets released once every month. CE “test” edition is a release candidate that gets folded into “edge” and “stable” versions. I have used Docker release candidate(“test” edition) to try out new features before they get released. The steps to install release candidate Docker version is slightly different from installing “stable” and “edge” versions. Docker CE 17.06.0-ce-rc2 got released few days back and I have started trying out the new features in this version. This is a precursor to 17.06 release that will happen in few weeks. In this blog, I will cover installation steps for Docker CE edition release candidate software versions. I have focused on 17.06.0-ce-rc2, but the steps applies to any release candidate versions. The 3 approaches I have tried are installation from Docker static binaries, Docker machine with boot2docker and installation in Ubuntu platform with package manager.

Installation using Docker machine

When Docker RC version is released, the corresponding boot2docker image also gets released. I used the steps below to to the installation.

docker-machine create -d virtualbox –virtualbox-boot2docker-url https://github.com/boot2docker/boot2docker/releases/download/v17.06.0-ce-rc2/boot2docker.iso docker-rc2

I have used docker-machine 0.10.0. I have tried the above steps in both Linux and Windows platforms.

Installation using Package manager

This approach is used to install on native Linux systems. I tried this on Ubuntu 14.04 system, the steps below are specific to Ubuntu platform. The steps should be similar for other Linux flavors as well using the corresponding package manager associated with the flavor. To make it easy to move between Docker “stable”, “edge” and “test” versions, I remove the old Docker version and then install the new version. Following are the steps I followed to move from Docker “edge” 17.05-ce version to “test” 17.06-ce-rc2.

Remove old Docker version:

sudo apt-get -y remove docker-ce

Remove “edge” from repository list:

sudo add-apt-repository –remove
“deb [arch=amd64] https://download.docker.com/linux/ubuntu
$(lsb_release -cs)
edge”

Add “test” to repository list:

sudo add-apt-repository
“deb [arch=amd64] https://download.docker.com/linux/ubuntu
$(lsb_release -cs)
test”

Update and install Docker:

sudo apt-get update
sudo apt-get -y install docker-ce

The install would pick the latest version associated with “stable”, “edge” or “test”. The procedure above can be used to migrate from any latest combination of “stable”, “edge” or “test” channels.

Installation using Static binary

This approach is advisable only for testing purposes. I followed the steps in this link for the installation.

Following are the commands I used for installation in Ubuntu 14.04:

export DOCKER_CHANNEL=test
curl -fL -o docker.tgz “https://download.docker.com/linux/static/$/x86_64/docker-17.06.0-ce-rc2-x86_64.tgz”
tar –extract –file docker.tgz –strip-components 1 –directory /usr/local/bin/

Docker binaries would be in /usr/local/bin. When Docker is installed using package manager, docker binaries are in /usr/bin. If /usr/local/bin is higher up in the path, this version would be picked. This approach allows us to switch between versions easily.

Following is the Docker version running after installation using any of the 3 above approaches:

$ docker version
Client:
Version: 17.06.0-ce-rc2
API version: 1.30
Go version: go1.8.3
Git commit: 402dd4a
Built: Wed Jun 7 10:04:51 2017
OS/Arch: linux/amd64

Server:
Version: 17.06.0-ce-rc2
API version: 1.30 (minimum version 1.12)
Go version: go1.8.3
Git commit: 402dd4a
Built: Wed Jun 7 10:03:45 2017
OS/Arch: linux/amd64
Experimental: true

If there are any Docker topics that you would like more details, please let me know.

Source

C build environment in a docker container – Own your bits

This container is my base build environment for compiling C programs. It produces colored output and it caches compilation artifacts so that subsequent re-compilations are greately accelerated.

It is layered on top of my minidebian container, and I usually expand it further depending on the project. See this example.

Features

  • GCC 6
  • ccache for fast recompilation
  • colorgcc for colored output
  • Support for cross-compiling with external toolchain
  • Very small: 240 MB including the base ownyourbits/minidebian ( ~50 MB )

CCache is a compiler cache that greatly improves recompilation times. I sometimes spend hours and hours waiting for builds to complete, so this is a must in my toolbox.

colorGCC is also a nice addition. It helps to make sense out of compilation output, and it’s really nice to catch warnings in long builds ( “eh! what was that colored output?” ).

Did I mention that I love color already?

Initially, I created this container because I was tired of setting up my C environment with ccache and colorgcc over and over again.

I used to have to go to the Arch wiki every single time, in order to remember the exact setup and the location of the symlinks needed for this rather hacky setup to work. Now I have it scripted and packaged… much better!

Usage

Compilation

It is recommended to use this alias

alias mmake=’docker run –rm -v “$(pwd):/src” -t ownyourbits/mmake’


Then, use it just as you would use make

You can pass Makefile targets and variables the usual way

mmake alltargets CFLAGS=-g -j5

A .ccache directory will be generated in the directory of execution to speed up subsequent compilations.

Note that the container only includes the generic libraries, so if you need to use some external libraries for your project, you will need to extend the container.

For instance, if you need to link against the ncurses library it will naturally fail

$ mmake

cc main.c -lncurses -o main

main.c:5:1: warning: return type defaults to `int’ [-Wimplicit-int]

main()

^~~~

/usr/bin/ld: cannot find -lncurses

collect2: error: ld returned 1 exit status

Makefile:3: recipe for target ‘world’ failed

make: *** [world] Error 1

You need to install it first. Just create another layer on top of mmake

FROM ownyourbits/mmake

RUN sudo apt-get update; sudo apt-get install -y libncurses5-dev

Cross-Compilation

This method supports specifying an external toolchain, such as this ARM cross-compiler toolchain.

In order to cross-compile to a different architecture, you can use the following alias

alias xmake=’docker run –rm -v “$(pwd):/src” -v “/toolchain/path:/toolchain” -t ownyourbits/xmake’

Then again, use it just as you would use make

If we now inspect the file, we can see that we are crosscompiling the same C code, in the same folder just by invoking xmake instead of mmake. Nice!

$ file main

main: ELF 32-bit MSB executable, MIPS, MIPS32 rel2 version 1 (SYSV), dynamically linked, interpreter /lib/ld-musl-mips-sf.so.1, with debug_info, not stripped

We now have a MIPS version of main.

The output will still be colored, but if you want to use ccache, you have to include it in the toolchain it and set it up for your particular case.

Check out this collection of ready to use toolchains from free-electrons.

Advanced usage

In order to avoid the delay in the creation and deletion of the container, you can leave the container running for faster execution.

Use these aliases

alias runmake=’docker run –rm -d -v “$(pwd):/src” –entrypoint /bg.sh -t –name mmake ownyourbits/mmake’

alias mmake=’docker exec -t mmake /run.sh’

I do this whenever I am developing a single project and I am in the stage of frequent recompiling and curating the code.

Uses

Even though initially I was using this as a simple make wrapper, I have found many uses for it:

  • Having a stable build environment is very important in order to achieve reproducible builds that do not depend on what system each member of the development team runs. It is common that Arch is ahead of Debian in gcc version, for example.
  • Pulling the image from docker makes it really easy to share the development environment with your team.
  • It is ideal to be linked it to a continuos integration system that supports docker, such as Gitlab CI.
  • You can
    docker run –entrypoint bash into the container and work inside the development environment, in the fashion of good old chroot build environments.
  • It is a nice base for creating derivative containers taylored to different projects, reusing a common base and saving disk space. For instance, you might want to build a container with a bunch of libraries plus CUnit for one project, and Doxygen for another.
Code

As usual, you can find the build code on Github.


1

2

3

4

5

6

7

8

9

10

11

12

13

14

15

16

17

18

19

20

21

22

23

24

25

26

27

28

29

30

31

32

33

34

35

36

37

38

39

40

41

42

43

44

45

46

47

48

49

50

51

52

53

54

55

56

57

58

59

60

61

62

63

64

65

66

67

68

69

70

71

72

73

74

75

76

77

78

79

80

81

82

83

84

85


# Make wrapper with GCC 6, colorgcc and ccache

#

# Copyleft 2017 by Ignacio Nunez Hernanz <nacho _a_t_ ownyourbits _d_o_t_ com>

# GPL licensed (see end of file) * Use at your own risk!

#

# Usage:

#

# It is recommended to use this alias

#

# alias mmake=’docker run –rm -v “$(pwd):/src” -t ownyourbits/mmake’

#

# Then, use it just as you would use ‘make’

#

# Note: a ‘.ccache’ directory will be generated in the directory of execution

#

# Note: you can leave the container running for faster execution. Use these aliases

#

# alias runmake=’docker run –rm -d -v “$(pwd):/src” –entrypoint /bg.sh -t –name mmake ownyourbits/mmake’

# alias mmake=’docker exec -t mmake /run.sh’

#

# Details at ownyourbits.com

FROM ownyourbits/minidebian

LABEL description=”Make wrapper with GCC 6, colorgcc and ccache”

MAINTAINER Ignacio Núñez Hernanz <nacho@ownyourbits.com>

# Install toolchain

RUN apt-get update;

DEBIAN_FRONTEND=noninteractive apt-get install -y –no-install-recommends gcc make libc6-dev;

DEBIAN_FRONTEND=noninteractive apt-get install -y –no-install-recommends ccache colorgcc;

dpkg -L binutils | grep -v “^/usr/bin|^/usr/lib” | while read f; do test -f $f && rm $f; done;

dpkg -L gcc-6 | grep -v “^/usr/bin|^/usr/lib” | while read f; do test -f $f && rm $f; done;

apt-get autoremove -y; apt-get clean; rm /var/lib/apt/lists/* -r; rm -rf /usr/share/man/*

# bc to print compilation time

RUN sudo apt-get update;

DEBIAN_FRONTEND=noninteractive sudo apt-get install -y –no-install-recommends bc;

sudo apt-get autoremove -y; sudo apt-get clean; sudo rm /var/lib/apt/lists/* -r; sudo rm -rf /usr/share/man/*

# Set colorgcc and ccache

COPY colorgccrc /etc/colorgcc/colorgccrc

RUN mkdir /usr/lib/colorgcc;

ln -s /usr/bin/colorgcc /usr/lib/colorgcc/c++;

ln -s /usr/bin/colorgcc /usr/lib/colorgcc/cc ;

ln -s /usr/bin/colorgcc /usr/lib/colorgcc/gcc;

ln -s /usr/bin/colorgcc /usr/lib/colorgcc/g++;

# Builder user

RUN apt-get update;

DEBIAN_FRONTEND=noninteractive apt-get install -y –no-install-recommends adduser;

adduser builder –disabled-password –gecos “”;

echo “builder ALL=(ALL) NOPASSWD: ALL” >> /etc/sudoers;

sed -i “s|^#force_color_prompt=.*|force_color_prompt=yes|” /home/builder/.bashrc;

apt-get purge -y adduser passwd;

apt-get autoremove -y; apt-get clean; rm /var/lib/apt/lists/* -r; rm -rf /usr/share/man/*

RUN echo ‘export PATH=”/usr/lib/colorgcc/:$PATH”‘ >> /home/builder/.bashrc;

echo ‘export CCACHE_DIR=/src/.ccache’ >> /home/builder/.bashrc;

echo ‘export TERM=”xterm”‘ >> /home/builder/.bashrc;

USER builder

# Run

ENTRYPOINT [“/run.sh”]

COPY bg.sh run.sh /

# License

#

# This script is free software; you can redistribute it and/or modify it

# under the terms of the GNU General Public License as published by

# the Free Software Foundation; either version 2 of the License, or

# (at your option) any later version.

#

# This script is distributed in the hope that it will be useful,

# but WITHOUT ANY WARRANTY; without even the implied warranty of

# MERCHANTABILITY or FITNESS FOR A PARTICULAR PURPOSE. See the

# GNU General Public License for more details.

#

# You should have received a copy of the GNU General Public License

# along with this script; if not, write to the

# Free Software Foundation, Inc., 59 Temple Place, Suite 330,

# Boston, MA 02111-1307 USA


Source

Serverless: Databases with OpenFaaS and Mongo

In this post I want to show you how you can make use of common databases like MongoDB with your OpenFaaS Serverless Functions.

We’re (gradually) building out a dedicated docs site for @OpenFaas with mkdocs and @Netlify – is there anything you want to know? https://t.co/LsFl9EbjMm #serverless #teamserverless

— Alex Ellis (@alexellisuk) March 26, 2018

I asked what topics the wider community wanted to see in our new OpenFaaS documentation site. One of the responses was a request from a technologist named Scott Mebberson. Scott wanted to know how to make efficient use of a database connection within a serverless function.

Serverless applied

Serverless is viewed as an evolution in architecture, but functions do not replace our existing systems such as relational databases. Functions serve us best when they combine the strengths of long-running/stateful processes with the velocity and simplicity of serverless.

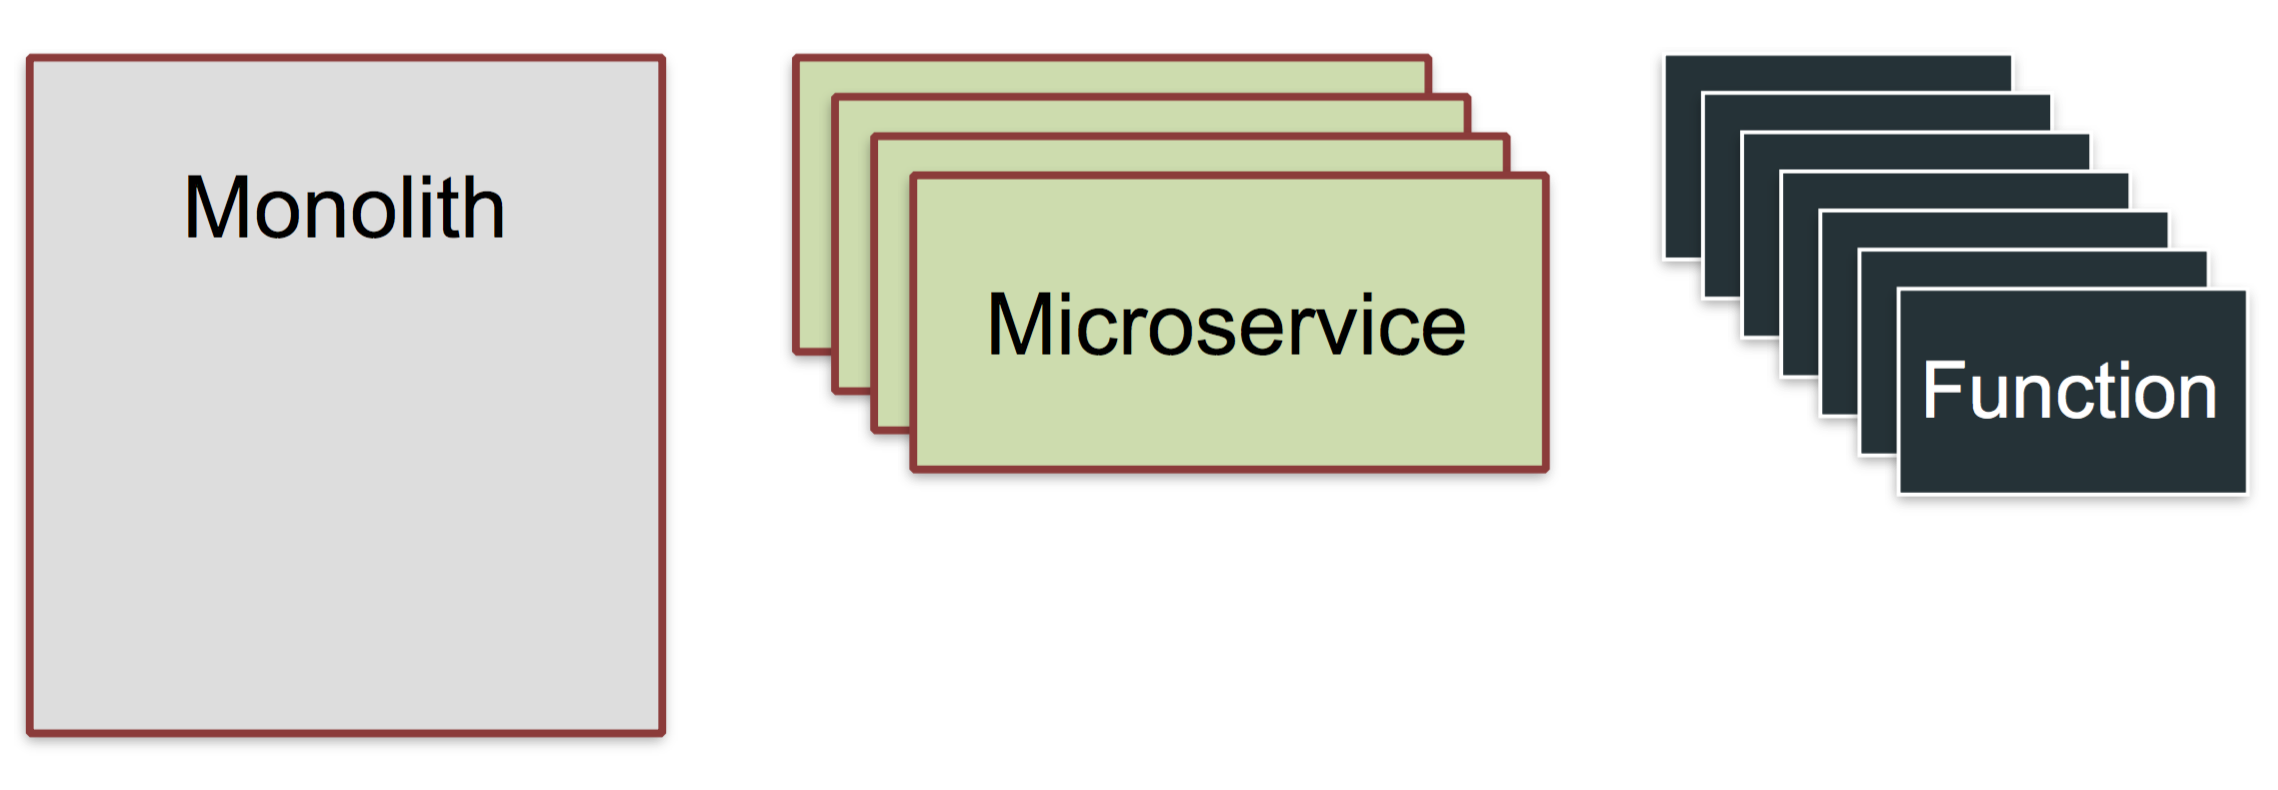
Pictured: Serverless evolution

Here’s an example where you could apply functions. You may have a monolithic application which is stable and running in production, but now you have to integrate with a new data-feed from a partner. Updating the monolith would take a lot of time, risk stability and require extensive regression testing.

This would be a good use-case for leveraging functions. Your functions can be developed rapidly and independently of your existing system thereby minimizing the level of risk.

What are functions like?

functions

Here’s a refresher on the qualities of Serverless Functions:

  • short-lived (seconds)
  • stateless
  • do not expose TCP ports
  • scale for demand (ephemeral)

You can read more on my initial blog post: Introducing to Functions as a Service (OpenFaaS).

The problem

Connecting to a database such as MongoDB is relatively quick and during testing I saw connections opened within milliseconds, but some relational databases such as Microsoft SQL Server can take up to 5 seconds. This problem has been solved by the industry through connection pools. Connection pools maintain a set of established database connections in memory for future queries.

When it comes to functions we have a process which is short-lived and stateless, so it’s hard to reconcile those properties with a connection pool used in a monolithic application which expects to be kept alive for days if not weeks at a time.

Recent engineering work within the OpenFaaS incubator organisation has allowed us to re-use the same process between requests in a similar way to AWS Lambda. This means we can make that we can initialize a connection pool in one request and re-use it in subsequent requests until the function is scaled down or removed. So using by OpenFaaS functions you can avoid unnecessary latency with each subsequent request.

What are the pros/cons of maintaining a connection pool?

A property of serverless functions is that they may scale both up and down according to demand. This means that when your function scales up – each replica will initialize its own connection pool and keep that until it is no longer required. You will have to wait until the connection pool is ready to accept requests on the new replica before routing traffic to it.

Functions are also ephemeral so if we scale down from 20 replicas to 1 replica, then we don’t know which of the 20 will remain. Each function replica needs to be able to manage its own health including handling a graceful shutdown when scaling down.

It should also be able to detect if the connection becomes unhealthy and signal this through the built-in health-checking mechanisms so that it can be restarted or rescheduled. Kubernetes provides liveness and readiness probes which can be used to deliver a reliable system.

Are there alternative solutions?

For some applications the initial loading time of establishing a connection to Microsoft SQL Server may be too long, so let’s consider some other approaches for reducing latency.

  1. Process the work asynchronously

OpenFaaS has a system built-in for deferred execution. We have used NATS Streaming to allow us to ingest requests and execute them later. The implementation means that any function built for OpenFaaS can be executed synchronously or asynchronously without any adaptations. When a function is called asynchronously the caller gets an instant response and the work is run later on.

  1. Build a microservice

Another alternative is to absorb the initial connection cost within a long-running microservice. This involves creating a simple wrapper or proxy for the connection. One of our OpenFaaS contributors built a Golang microservice which does this for T-SQL called sqlrest. When taking this approach it is important to make sure a solid authentication policy is in place.

  1. Use a managed DB service

This is similar to option 2 but uses a hands-off approach. You consume a database as a software offering from a third-party. Serverless functions can make use of any existing database-as-a-service offerings such as Firebase Realtime Database or DynamoDB from AWS.

These alternative solutions work without making breaking changes to the interfaces provided by OpenFaaS – using the platform as a black box. How would you approach the problem? Do we need new patterns for providing services such as database connections and machine-learning models to functions?

Reference architecture

I have put together an example of a reference architecture which can be deployed onto Kubernetes or Docker Swarm. The example shows how to re-use a connection pool between requests with a Node.js function and OpenFaaS.

Note: You can complete the setup in around 5 minutes.

Pictured: three sequences or states of a function replica

  1. In the first sequence we’ve had no calls made to the function, so the connection pool is not yet initialized. prepareDB() was never called.
  2. In the second sequence prepareDB() has been called and since there was no instance of a connection in memory, we create one and you see the dotted line shows the connection being established. This will then open a connection to MongoDB in the network.
  3. In the third sequence we see that subsequent calls detect a connection exists and go straight to the connection pool. We have one active connection and two shown with dotted lines which are about to be closed due to inactivity.

Hands-on video

I’ve recorded a short hands-on video that will guide you through deploying the function and testing it.

Try it out

You can try out the example for yourself with OpenFaaS deployed on Kubernetes or Docker Swarm.

Find out more about the project on our new documentation site along with upcoming events and how to join the community.

Source

Flexible Images or Using S2I for Image Configuration

Container images usually come with pre-defined tools or services with minimal or limited possibilities of further configuration. This brought us into a way of thinking of how to provide images that contain reasonable default settings but are, at the same time, easy to extend. And to make it more fun, this would be possible to achieve both on a single Linux host and in an orchestrated OpenShift environment.

Source-to-image (S2I) has been introduced three years ago to allow developers to build containerized applications by simply providing source code as an input. So why couldn’t we use it to make configuration files as an input instead? We can, of course!

Creating an Extensible Image

Creating S2I builder images was already described in an article by Maciej Szulik and creating images that are extensible and flexible enough to be adjusted with custom configuration is not much different. So let’s focus on the bits that are essential for making an image configurable.

Required Scripts

The two scripts that every builder image must provide are; assemble and run, both are included in the s2i/bin/ directory.

assemble

The assemble script defines how the application image is assembled.

Let’s look at the official Software Collections nginx S2I builder image to see its default behavior. When you open the assemble script (snippet below), you see that by default the nginx builder image looks in the nginx-cfg/ and nginx-default-cfg/ directories within the provided source code where it expects to find your configuration files used for creating a customized application image.

if [ -d ./nginx-cfg ]; then
echo “—> Copying nginx configuration files…”
if [ “$(ls -A ./nginx-cfg/*.conf)” ]; then
cp -v ./nginx-cfg/*.conf “$”
rm -rf ./nginx-cfg
fi
fi

if [ -d ./nginx-default-cfg ]; then
echo “—> Copying nginx default server configuration files…”
if [ “$(ls -A ./nginx-default-cfg/*.conf)” ]; then
cp -v ./nginx-default-cfg/*.conf “$”
rm -rf ./nginx-default-cfg
fi
fi

run

The run script is responsible for running the application container. In the nginx case, once the application container is run, the nginx server is started on the foreground.

exec /usr/sbin/nginx -g “daemon off;”

Labels

To tell s2i where it should expect the scripts, you need to define a label in the Dockerfile:

LABEL io.openshift.s2i.scripts-url=”image:///usr/libexec/s2i”

Alternatively, you can also specify custom assemble and run scripts by collocating them with your source/config files; the scripts baked in the builder image would then be overridden.

Optional Scripts

Since S2I provides quite a complex set of capabilities, you should always provide documentation on how users are expected to use your image. Test configuration (or application) might come in handy as well.

usage

This script outputs instructions on how to use the image when the container is run.

test/run and test/test-app

These scripts will test the application source code and run of the builder image.

To make the creation of these images easier, you can take advantage of the S2I container image template.

Extending an Image with Custom Configuration

Now let’s have a look at how you can use such an image in the real world.

Again, we’re going to take the above nginx image to demonstrate how to adjust it to build a containerized application with custom configuration.

One of the advantages of using source-to-image for configuration is that it can be used on any standalone Linux platform as well as in an orchestrated OpenShift environment.

On Red Hat Enterprise Linux, it is as easy as running the following command:

$ s2i build https://github.com/sclorg/nginx-container.git –context-dir=1.12/test/test-app/ registry.access.redhat.com/rhscl/nginx-112-rhel7 nginx-sample-app

The s2i build command takes the configuration files in the test/test-app/ directory and injects them in the output nginx-sample-app image.

Note that by default, s2i takes a repository as an input and looks for files in its root directory. In this case, the configuration files are in a subdirectory, hence specifying the –context-dir.

$ docker run –rm -p 8080:8080 nginx-sample-app

Running the container will then show you a website informing you that your Nginx server is working.

And similarly in OpenShift:

$ oc new-app registry.access.redhat.com/rhscl/nginx-112-rhel7~https://github.com/sclorg/nginx-container.git –context-dir=1.12/test/test-app/ –name nginx-test-app

The oc new-app command creates and deploys a new image nginx-test-app modified with the configuration provided in the test/test-app/ directory.

After creating a route, you should see the same message as above.

Advantages of Using an S2I Builder Image for Extension

To sum it up, there are a number of reasons to leverage S2I for your project.

  • Flexibility – You can customize a service to fit your needs by providing a configuration file that rewrites the values used in a container by default. And it doesn’t end there: do you want to install an additional plugin that is not included in your database image by default or install and run arbitrary commands? S2I-enabled images allow for this.
  • Any platform – You can use S2I for building standalone containers on several Linux platforms that provide the s2i RPM package, including Red Hat Enterprise Linux, CentOS, and Fedora or take advantage of the s2i binary. The S2I build strategy is one of the integrated build strategies in OpenShift, so you can easily leverage it for building containers deployed in an orchestrated environment as well.
  • Separated images and service configuration – Although having a clear distinction between images and service configuration allows you to perform adjustments that are more complex, the build reproducibility remains preserved at the same time.

Pull and Run a Flexible Image Now

The following images are now available as S2I builders from the Red Hat Container Catalog and can be easily extended as demonstrated above:

More images will appear in the Catalog soon. In the meantime, you can try out their upstream counterparts.

The source-to-image project contains extensive documentation with examples, so head over to the project’s GitHub page if you’d like to learn more.

Resources

Join the Red Hat Developer Program (it’s free) and get access to related cheat sheets, books, and product downloads.

Take advantage of your Red Hat Developers membership and download RHEL today at no cost.

Source

Debian build environment in a docker container – Own your bits

Last post, I shared a docker container for compilation in C with ccache and colorgcc included. This time, we will extend that base container for development and packaging of Debian packages.

Not only it is handy to have the environment configured and packaged, but also opens some oportunities for optimization given the nature of docker, its catching overlays and its volumes.

Finally, it makes it easy to start developing Debian packages from another distribution, such as Arch Linux.

Features

  • GCC 6
  • Debian package development tools: lintian, quilt, debuild, dh-make, fakeroot
  • quilt configured for debian patching
  • ccache for fast recompilation. Included in debuild and dpkg-buildpackage calls
  • eatmydata for faster compilation times
  • Only 192 MB uncompressed extra layer, totalling 435 MB for the whole container

If you are reading this post, you probably do not need an explanation about those tools. Look at the references section otherwise.

If you are wondering how this compares to sbuild and pbuilder, this approach is really very similar. The idea is the same: have another clean and isolated environment where compilation takes place. This solves several problems:

  • You can build for a different version of Debian, such as unstable or testing, without messing up your system with packages from those.
  • You can be sure that the dependencies are right, as the environment is minimal.

Well, docker containers can be used as a chroot in steroids, and can be regarded as an evolution of the concept using modern kernel features such as cgroups and namespaces.

Another nice benefit: it is very simple to manage docker containers. You can pull them, push them, export them and save them.

Last, a huge benefit at least for me personally is to be able to work from another Linux distribution, such as Arch.

Usage

Log into the development environment

docker run –rm -v “/workdir/path:/src” -ti ownyourbits/debiandev

We can now use the standard tools, the working directory ( /workdir/path in this example ) is an external folder accessible from the container, where you can do
apt-get source and retrieve the .deb files.

Example: cross-compile QEMU for ARM64

In my experience, not all packages are configured well enough to support cross-compilation. Specially big packages tend to fail when it comes to the
build-dep step. I found this nice exception in this post.


sudo dpkg –add-architecture arm64

sudo apt-get update

sudo apt-get build-dep -aarm64 qemu

apt-get source qemu

cd qemu-*

dpkg-buildpackage -aarm64 -b


Example: package and tweak PHP, with CCACHE cache already populated

I like to use this container as a base for each specific project. This way, I can take advantage of the catching layers of docker to speed up the process, and at the same time I end up with the building instructions compiled in the Dockerfile.

If you decide to use a docker volume, you can always remove it if you want to start from zero. This has the benefit that upon running the container, /src will be populated with the results and cache from the Dockerfile step again. A real time saver!


1

2

3

4

5

6

7

8

9

10

11

12

13

14

15

16

17

18

19

20

21

22

23

24

25

26

27

28

29

30

31

32

33

34

35

36

37

38

39

40

41

42

43

44

45

46

47

48

49

50

51

52

53

54

55

56

57

58

59

60

61

62

63

64

65

66

67


# PHP Debian build environment with GCC 6 and ccache, and all debian dev tools

#

# Copyleft 2017 by Ignacio Nunez Hernanz <nacho _a_t_ ownyourbits _d_o_t_ com>

# GPL licensed (see end of file) * Use at your own risk!

#

# Usage:

#

# docker run –rm -v “src:/src” -ti ownyourbits/phpdev

#

# Then, inside:

# cd php7.0-7.0.19

# debuild -us -uc -b

#

# Note that with this invocation command, the code resides in a persistent volume called ‘src’.

# See ‘docker volume ls’

#

# It has already been build once with CCACHE, so you can just start tweaking, and recompilation will

# be very fast. If you do ‘docker volume rm src’, then next time you run the container it will be

# populated again with the fresh build ( but you would lose your code changes ).

#

# A second option is to do ` -v “/path:/src” and use “/path” from your system, but then you have to

# do ‘apt-get source’ and ‘debuild’ yourself, because “/path” will be originally empty.

#

# Details at ownyourbits.com

FROM ownyourbits/debiandev:latest

LABEL description=”PHP build environment”

MAINTAINER Ignacio Núñez Hernanz <nacho@ownyourbits.com>

## Get source

RUN sudo apt-get update;

mkdir -p /src; cd /src;

apt-get source -t stretch php7.0-fpm;

## PHP build dependencies

RUN sudo apt-get update;

DEBIAN_FRONTEND=noninteractive sudo apt-get build-dep -y -t stretch php7.0-fpm;

sudo apt-get autoremove -y; sudo apt-get clean; sudo rm /var/lib/apt/lists/*;

sudo rm /var/log/alternatives.log /var/log/apt/* ; sudo rm /var/log/* -r; sudo rm -rf /usr/share/man/*;

## Build first

# this will build the package without testing but with the CCACHE options, so we are

# building and catching compilation artifacts

RUN cd $( find /src -maxdepth 1 -type d | grep php );

CCACHE_DIR=/src/.ccache DEB_BUILD_OPTIONS=nocheck

eatmydata debuild

–prepend-path=/usr/lib/ccache –preserve-envvar=CCACHE_* –no-lintian -us -uc;

# License

#

# This script is free software; you can redistribute it and/or modify it

# under the terms of the GNU General Public License as published by

# the Free Software Foundation; either version 2 of the License, or

# (at your option) any later version.

#

# This script is distributed in the hope that it will be useful,

# but WITHOUT ANY WARRANTY; without even the implied warranty of

# MERCHANTABILITY or FITNESS FOR A PARTICULAR PURPOSE. See the

# GNU General Public License for more details.

#

# You should have received a copy of the GNU General Public License

# along with this script; if not, write to the

# Free Software Foundation, Inc., 59 Temple Place, Suite 330,

# Boston, MA 02111-1307 USA


Code


1

2

3

4

5

6

7

8

9

10

11

12

13

14

15

16

17

18

19

20

21

22

23

24

25

26

27

28

29

30

31

32

33

34

35

36

37

38

39

40

41

42

43

44

45

46

47

48

49

50

51

52

53

54

55

56


# Debian build environment with GCC 6, ccache and all debian dev tools

#

# Copyleft 2017 by Ignacio Nunez Hernanz <nacho _a_t_ ownyourbits _d_o_t_ com>

# GPL licensed (see end of file) * Use at your own risk!

#

# Usage:

#

# docker run –rm -v “/workdir/path:/src” -ti ownyourbits/debiandev

#

# Details at https://ownyourbits.com/2017/06/24/debian-build-environment-in-a-docker-container/

FROM ownyourbits/mmake:latest

LABEL description=”Debian package development environment”

MAINTAINER Ignacio Núñez Hernanz <nacho@ownyourbits.com>

# install packages

RUN sudo sh -c “echo deb-src http://httpredir.debian.org/debian stretch main >> /etc/apt/sources.list”;

sudo apt-get update;

DEBIAN_FRONTEND=noninteractive sudo apt-get install –no-install-recommends -y dpkg-dev devscripts dh-make lintian fakeroot quilt eatmydata vim;

sudo apt-get autoremove -y; sudo apt-get clean; sudo rm /var/lib/apt/lists/*;

sudo rm /var/log/alternatives.log /var/log/apt/*; sudo rm /var/log/* -r;

# configure session

RUN echo “alias debuild=’eatmydata debuild –prepend-path=/usr/lib/ccache –preserve-envvar=CCACHE_*'” >> /home/builder/.bashrc;

echo “alias dpkg-buildpackage=’eatmydata dpkg-buildpackage'” >> /home/builder/.bashrc;

# NOTE: dpkg-buildpackage and debuild do not play well with colorgcc

echo ‘export PATH=”/usr/lib/ccache/:$PATH”‘;

sudo rm /usr/lib/colorgcc/*

COPY _quiltrc /home/builder/.quiltrc

# prepare work dir

RUN sudo mkdir -p /src; sudo chown builder:builder /src; echo ‘cd /src’ >> /home/builder/.bashrc

# remove previous entrypoint

ENTRYPOINT []

CMD [“/bin/bash”]

# License

#

# This script is free software; you can redistribute it and/or modify it

# under the terms of the GNU General Public License as published by

# the Free Software Foundation; either version 2 of the License, or

# (at your option) any later version.

#

# This script is distributed in the hope that it will be useful,

# but WITHOUT ANY WARRANTY; without even the implied warranty of

# MERCHANTABILITY or FITNESS FOR A PARTICULAR PURPOSE. See the

# GNU General Public License for more details.

#

# You should have received a copy of the GNU General Public License

# along with this script; if not, write to the

# Free Software Foundation, Inc., 59 Temple Place, Suite 330,

# Boston, MA 02111-1307 USA


References

https://www.debian.org/doc/manuals/maint-guide/build.en.html

https://www.debian.org/doc/debian-policy/ch-source.html

https://wiki.debian.org/BuildingTutorial

https://wiki.debian.org/CrossCompiling

https://wiki.debian.org/Multiarch/HOWTO

Source

Three ways to learn Serverless & OpenFaaS this season

It’s the beginning of Spring and you like many others, may be wondering what tech trend to follow next. I want to give you three practical ways to learn about Serverless with OpenFaaS so that you can think less about servers and focus on shipping your applications.

Serverless is a modern architectural pattern for designing systems which lets teams focus on shipping small reusable chunks of code which can be packaged, monitoring and scaled all in the same way. They can even be combined together to create pipelines and workflows that create new value.


Traits of Serverless Functions

When you can manage all your functions the same way then that has some advantages over traditional microservices. Microservices often differ widely and need their own custom Dockerfiles, health-checks and finely tuned web-service frameworks. The OpenFaaS framework makes use of Docker and Kubernetes to abstract as much of this away from you as you want. The framework will provide sane defaults and because the code is Open Source you have the opportunity to tweak things when you need more control.

So here are three ways for you to start learning about Serverless and how to implement it in a way that means you can use your existing open-source or enterprise Docker workflows along with the benefits provided by OpenFaaS.

1. Learn Serverless & OpenFaaS on Udemy

Nigel Poulton is a Docker Captain, author of books on Docker and Kubernetes and many related courses on PluralSight. He took a deep dive into Serverless with OpenFaaS and produced a light-weight video-course that you can take on your lunch-break and come away with all the high-level context you need.

This course is free for 7-days before going back to the regular price advertised by Udemy. It’s short so check it out today.

Introduction to Serverless by Nigel Poulton

Use the coupon: FAAS-FRIDAY2 – the first code already sold out with 1k people within several hours.

2. Take the OpenFaaS workshop

I developed the OpenFaaS workshop along with help from the community to equip developers all over the world with a working knowledge of how to build practical Serverless Functions with OpenFaaS. Within a few hours you’ll have built your own auto-responder bot for GitHub using Python.

If you’re familiar with what the project is about and want to get started this is the best place for you to begin:

https://github.com/openfaas/workshop

The workshop is made up of a series of hands-on labs which you can work through at your own pace. The community will also be leading a series of events coming up this year around the world where you can take part in a local workshop. The first of those is at Cisco’s DevNet Create event next week in Mountain View followed by OpenFaaS at Agile Peterborough 50 minutes from London/Cambridge in the UK in May. Spaces are limited so sign up if you want to attend.

This week #FaaSFriday was little early for me. Two days back, gave a talk on Serverless and @openfaas in my company to my team. Now fixing an issue with faas cli. pic.twitter.com/2sqT9SlAEt

— Vivek Kumar Singh (@viveksyngh) April 6, 2018

OpenFaaS workshop in Bangalore

3. Use OpenFaaS

The third way to learn is to use OpenFaaS. Just deploy it on your laptop or on your favourite cloud provider and start building functions in your preferred programming language. The project can support any language – even an existing binary or Docker container can be used.

Can’t get enough of #FaasFriday! Eval-as-a-service –> https://t.co/yMHgKZMgFO #OpenFaas #Docker pic.twitter.com/viVl28owZI

— Michael Herman (@MikeHerman) March 17, 2018

Pictured: an OpenFaaS “addiction”

I’ll be sharing four case-studies from the tech industry about how people are using OpenFaaS to build their applications. The next talk after DevNet Create, is at Mountain View’s Docker Meetup – so if you want to know more follow OpenFaaS on Twitter.

While you are kicking the tyres you may have some questions that are not answered in the workshop materials, so I’d encourage you to join our Slack community and to browse our new documentation site too.

https://docs.openfaas.com/

Wrapping up

There are over 11k stars on the OpenFaaS organisation, 2k commits of code to the project and dozens of events happening all over the world – all signs of a healthy community. Make this season the one where you learn how to take advantage of building Serverless Functions with Docker and Kubernetes without getting locked-in so a single provider.

Source

Containerizing SQL DB changes with Flyway, Kubernetes, and OpenShift


Containerizing SQL DB changes with Flyway, Kubernetes, and OpenShift


By Elvadas Nono January 10, 2018January 9, 2018

In DevOps projects, you are sometimes haunted by the practices inherited from the monolithic world. In a previous project, we were checking how to simply apply SQL updates and changes to a relational database management system (RDBMS) database in an OpenShift Cluster.

Micro database schema evolution patterns are perfectly described by Edson Yanaga in his brilliant free book: Migrating to Microservice Databases: From Relational Monolith to Distributed Data. A video presentation of these patterns is also available on youtube.

In this blog post series we will show a simple approach to implement the described patterns in your Continuous Integration and Continuous Delivery (CI/CD) pipelines on OpenShift. The series is split in two parts:

  • This post shows how to handle SQL update automation using Flyway, Dockerfiles, and Kubernetes on OpenShift.
  • A future post will showcase application migration patterns, including database migration stages using OpenShift Jenkins2 pipelines.

The approach uses docker containers, Flyway and Kubernetes Objects to automate SQL updates/patches on a micro database running on OpenShift.

Create your Micro Database

To keep it simple We will rely on a docker image that provides a simple Postgres database with a custom prebuilt data set, but you can build a custom database service to follow this demo.

The database is hosted on Openshift, and we assume you have a basic knowledge of Openshift, Kubernetes, and docker containers. You can install a simple Minishift/CDK Cluster using these instructions:

Once you have your OpenShift/minishift installation running, connect as admin using the oc CLI command:

$ oc login https://192.168.99.100:8443 -u developer -p developer
$ oc new-project ocp-flyway-db-migration

Grant anyuid scc to the default service account in order to run docker images

$ oc adm policy add-scc-to-user anyuid -z default
$ oc new-app –docker-image=jbossdevguidebook/beosbank_posgres_db_europa:latest –name=beosbank-posgres-db-europa

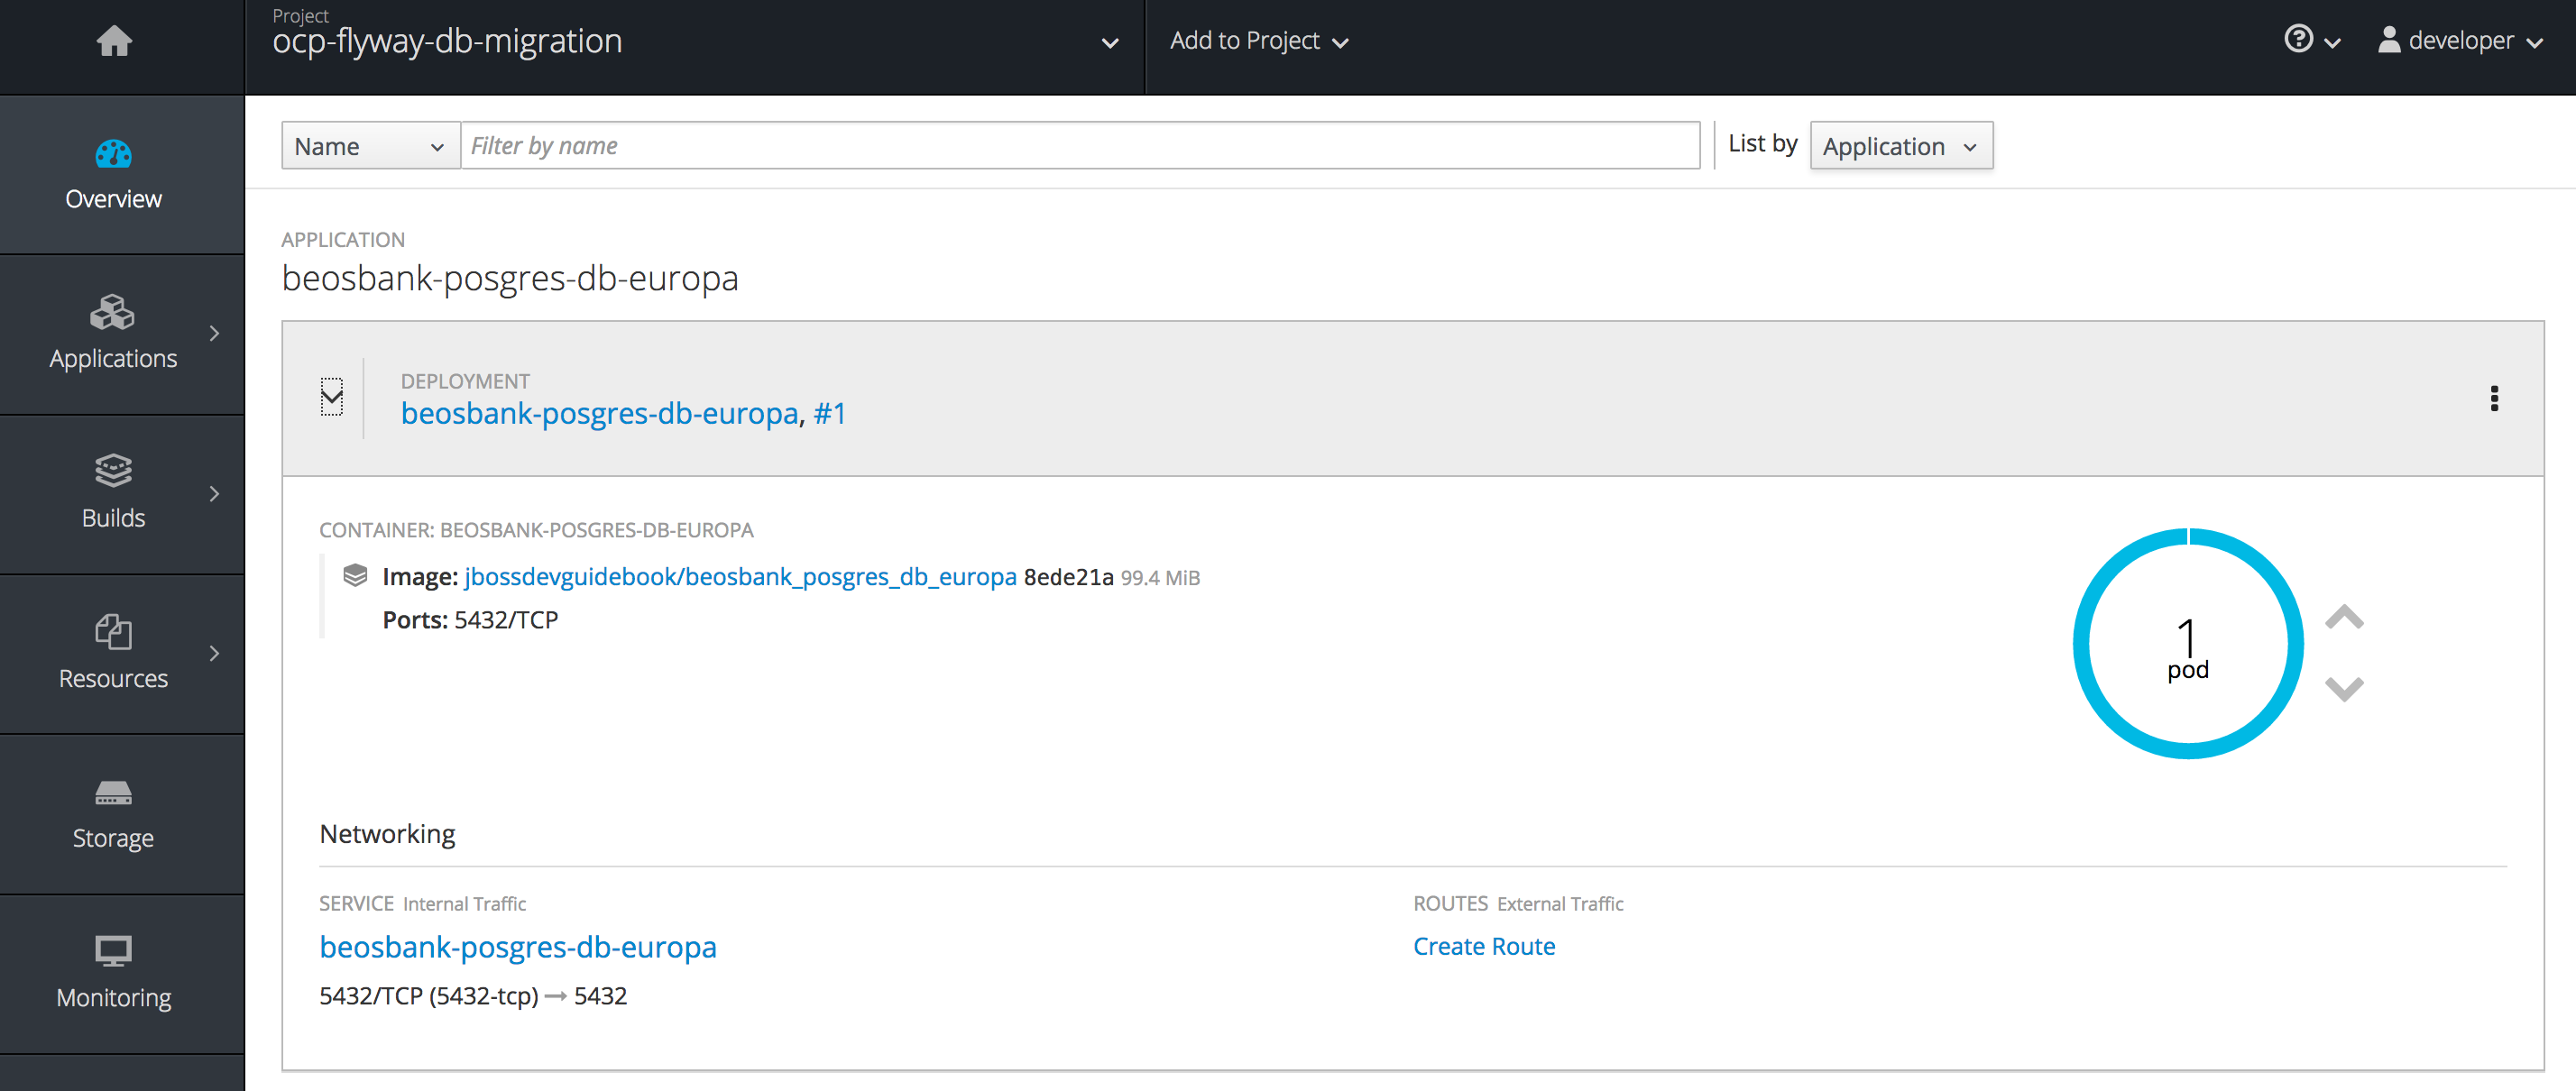
Openshift view: Beosbank pod

OpenShift view: Beosbank pod

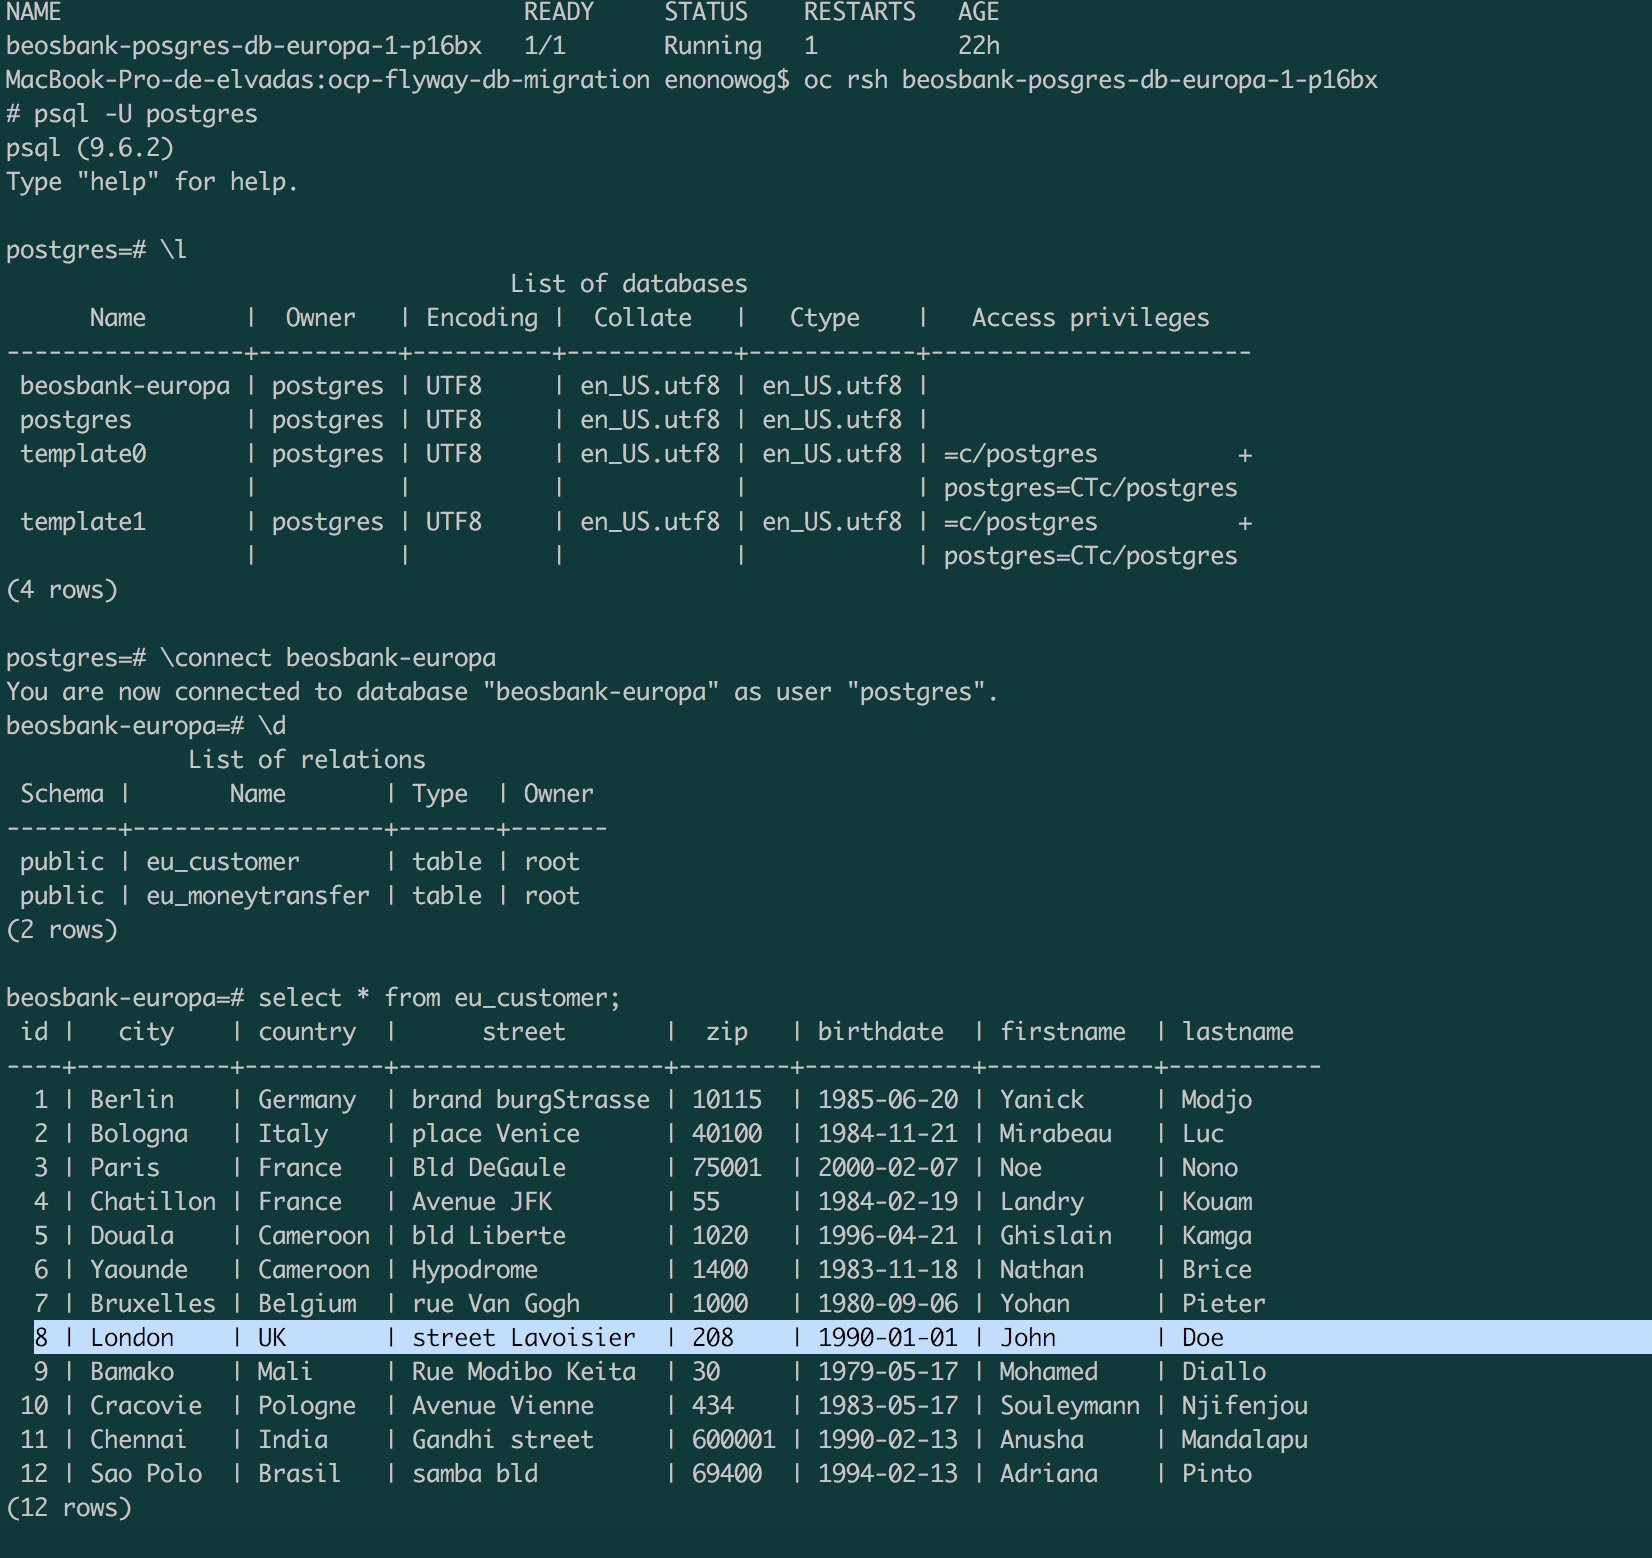
Determine the database pod name, and connect to the database.. Then you can explore the database content:

$ oc get pods
NAME READY STATUS RESTARTS AGE
beosbank-posgres-db-europa-1-p16bx 1/1 Running 1 22h

$ oc rsh beosbank-posgres-db-europa-1-p16bx
# psql -U postgres

Now that the RDBMS is up and running, we may ask how to perform automatic SQL updates on the database.

From monolithic processes, we have various options to do it, including SQL batches with Flyway runtimes. In the next section we will see how to containerize a Flyway update first, and then automate it with Kubernetes.

Containerizing SQL updates with Flyway runtimes

The purpose behind the Flyway process containerization is to provide on-the-fly a container that can connect to the database container using Java Database Connectivity (JDBC) protocol in order to perform SQL updates.

From DockerHub you can find a lot of custom images for Flyway. The following Dockerfile can be used to procure a more suitable one in the OpenShift context:

FROM alpine
MAINTAINER “Nono Elvadas”

ENV FLYWAY_VERSION=4.2.0

ENV FLYWAY_HOME=/opt/flyway/$FLYWAY_VERSION
FLYWAY_PKGS=”https://repo1.maven.org/maven2/org/flywaydb/flyway-commandline/$/flyway-commandline-$.tar.gz”

LABEL com.redhat.component=”flyway”
io.k8s.description=”Platform for upgrading database using flyway”
io.k8s.display-name=”DB Migration with flyway ”
io.openshift.tags=”builder,sql-upgrades,flyway,db,migration”

RUN apk add –update
openjdk8-jre
wget
bash

#Download flyway
RUN wget –no-check-certificate $FLYWAY_PKGS &&
mkdir -p $FLYWAY_HOME &&
mkdir -p /var/flyway/data &&
tar -xzf flyway-commandline-$FLYWAY_VERSION.tar.gz -C $FLYWAY_HOME –strip-components=1

VOLUME /var/flyway/data

ENTRYPOINT cp -f /var/flyway/data/*.sql $FLYWAY_HOME/sql/ &&
$FLYWAY_HOME/flyway baseline migrate info -user=$ -password=$ -url=$

The Dockerfile installs wget, bash and a Java runtime environment, then downloads a specific version of Flyway binaries. Flyway binaries are installed. A volume is created on /var/flyway/data to hold SQL files we want to be executed on the database.

By default, Flyway will check the SQL file in the $FLYWAY_HOME/sql/ folder.

We first copy all of the provided SQL files from the data volume to $FLYWAY_HOME/sql/ and start a migration script. Database url and credentials should be provided as environment variables.

Note: Originally the idea was to tell Flyway to read SQL files from the volume without copying or moving them to the container home directory. However, we faced an issue with this configuration:
(See flyway issue 1807 on github)
. Indeed the Flyway engine will recursively read the volume, including the hidden subfolder. There is a Request for Enhancement to customize this behavior and prevent Flyway from reading meta data files in the volume mount folder.

Build the image using the command:

$ docker build -t –no-cache jbossdevguidebook/flyway:v1.0.4-rhdblog .

2018-01-07 13:48:43 (298 KB/s) – ‘flyway-commandline-4.2.0.tar.gz’ saved [13583481/13583481]
—> 095befbd2450
Removing intermediate container 8496d11bf4ae
Step 8/9 : VOLUME /var/flyway/data
—> Running in d0e012ece342
—> 4b81dfff398b
Removing intermediate container d0e012ece342
Step 9/9 : ENTRYPOINT cp -f /var/flyway/data/*.sql $FLYWAY_HOME/sql/ && $FLYWAY_HOME/flyway baseline migrate info -user=$ -password=$ -url=$
—> Running in ff2431eb1c26
—> 0a3721ff4863
Removing intermediate container ff2431eb1c26
Successfully built 0a3721ff4863
Successfully tagged jbossdevguidebook/flyway:v1.0.4-rhdblog

The database client is now available as a docker image. In the next section, we will see how to combine Kubernetes objects in OpenShift to automate SQL updates for this database.

Kubernetes in action

Kubernetes provides various deployment objects and patterns we can rely on to apply live SQL updates from containers created on top of the “jbossdevguidebook/flyway:v1.0.4-rhdblog” image:

  • Deployment Config
  • Job
  • CronJob/ScheduledJob
  • InitContainer; Sidecar

In the following section we will illustrate how a single Kubernetes job object can be used to perform live SQL updates. SQL files will be provided to the container through a volume and a configMap.

Create a configMap from provided SQL files

$ cd ocp-flyway-db-migration/sql
$ oc create cm sql-configmap –from-file=.
configmap “sql-configmap” created

Create a Job to update the DB.

The job spec is provided. To keep it simple we are not going in deep details of the customization. Files are available on my github repo.

  • Include secrets to keep db user and password credentials
  • Manage job history limits; restart policy according to the desired policy

$ oc create -f https://raw.githubusercontent.com/nelvadas/ocp-flyway-db-migration/master/beosbank-flyway-job.yaml

Check that the job was created in OpenShift:

$ oc get jobs
NAME DESIRED SUCCESSFUL AGE
beosbank-dbupdater-job 1 1 2d

Check the pods. Once the job is created, it generates a job instance that is executed by a new pod.

$ oc get pods
NAME READY STATUS RESTARTS AGE
beosbank-dbupdater-job-wzk9q 0/1 Completed 0 2d
beosbank-posgres-db-europa-1-p16bx 1/1 Running 2 6d

The job instance completed successfully according to the log, and the migration steps have been applied.

$ oc logs beosbank-dbupdater-job-wzk9q
Flyway 4.2.0 by Boxfuse
Database: jdbc:postgresql://beosbank-posgres-db-europa/beosbank-europa (PostgreSQL 9.6)
Creating Metadata table: “public”.”schema_version”
Successfully baselined schema with version: 1
Successfully validated 5 migrations (execution time 00:00.014s)
Current version of schema “public”: 1
Migrating schema “public” to version 1.1 – UpdateCountry
Migrating schema “public” to version 2.2 – UpdateCountry2
Migrating schema “public” to version 2.3 – UpdateZip
Migrating schema “public” to version 3.0 – UpdateStreet
Successfully applied 4 migrations to schema “public” (execution time 00:00.046s).
+———+———————–+———————+———+
| Version | Description | Installed on | State |
+———+———————–+———————+———+
| 1 | << Flyway Baseline >> | 2018-01-05 04:35:16 | Baselin |
| 1.1 | UpdateCountry | 2018-01-05 04:35:16 | Success |
| 2.2 | UpdateCountry2 | 2018-01-05 04:35:16 | Success |
| 2.3 | UpdateZip | 2018-01-05 04:35:16 | Success |
| 3.0 | UpdateStreet | 2018-01-05 04:35:16 | Success |
+———+———————–+———————+———+

Check the updated DB

$ oc rsh beosbank-posgres-db-europa-1-p16bx
# psql -U postgres
psql (9.6.2)
Type “help” for help.

postgres=# connect beosbank-europa
beosbank-europa=# select * from eu_customer;
id | city | country | street | zip | birthdate |firstname | lastname
—-+————-+——————+——————-+——–+————+
1 | Berlin | Germany | brand burgStrasse | 10115 | 1985-06-20 |Yanick | Modjo
2 | Bologna | Italy | place Venice | 40100 | 1984-11-21 |Mirabeau | Luc
3 | Paris | France | Bld DeGaule | 75001 | 2000-02-07 |Noe | Nono
4 | Chatillon | France | Avenue JFK | 55 | 1984-02-19 |Landry | Kouam
5 | Douala | Cameroon | bld Liberte | 1020 | 1996-04-21 |Ghislain | Kamga
6 | Yaounde | Cameroon | Hypodrome | 1400 | 1983-11-18 |Nathan | Brice
7 | Bruxelles | Belgium | rue Van Gogh | 1000 | 1980-09-06 |Yohan | Pieter
9 | Bamako | Mali | Rue Modibo Keita | 30 | 1979-05-17 |Mohamed | Diallo
10 | Cracovie | Pologne | Avenue Vienne | 434 | 1983-05-17 |Souleymann | Njifenjou
11 | Chennai | Red Hat Training | Gandhi street | 600001 | 1990-02-13 |Anusha | Mandalapu
12 | Sao Polo | Open Source | samba bld | 75020 | 1994-02-13 |Adriana | Pinto
8 | Farnborough | UK | 200 Fowler Avenue | 208 | 1990-01-01 |John | Doe
(12 rows)

beosbank-europa=#

If the batch is rerun with same migration scripts, as the database is already aware of the modifications, a warning is displayed in your log and no update is performed:

Current version of schema “public”: 3.0
Schema “public” is up to date. No migration necessary.

This concludes the article. Hope you learn something that will help you during your container journey.

The full source is available from my Github repository:
https://github.com/nelvadas/ocp-flyway-db-migration

Source