NextCloudPi brings NC13.0.2, automatic NC upgrades, Rock64 and Banana Pi support, Armbian integration, Chinese language and more – Own your bits


The latest release of NextCloudPi is out!

The key improvement is bringing fully automating Nextcloud updates. This was the last piece of the puzzle, and finally we can leave the board just sitting there and everything will be automatically be kept up to date: Debian packages, Nextcloud and NextCloudPi itself.

Also, work has been focused on bringing NextCloudPi to more boards, making backup/restore as resiliant as possible, and of course implementing many improvements and small fixes.

On a more social note, I was interviewed by Nextcloud as a part of the community, so check it out if you would like to learn some more things about me and the project.

NextCloudPi improves everyday thanks to your feedback. Please report any problems here. Also, you can discuss anything in the forums, or hang out with us in Telegram.

Last but not least, please download through bitorrent and share it for a while to help keep hosting costs down.

Name change

Wait, didn’t we change the name to NextCloudPlus? Well, I am sad to announce that we have to move back to the original name, and here we will stay for the rest of time.

I understand this is confusing but it turns out that we are incuring into trademark issues with Nextcloud GmbH. It was my mistake to assume that we could just change names, and Nextcloud was nice to let us keep the old name so that’s exactly what we are doing.

We don’t want to harm the Nextcloud brand in any way (quite the opposite!) or any trouble, so I bought nextcloudpi.com, undid everything and just move on to more motivating issues.

Nextcloud 13.0.2

This Nextcloud minor version comes mainly with improved UI, better end-to-end encryption and small fixes. Check out the release notes for more details.

Automatic Nextcloud updates

Finally here! NCP is now capable of upgrading to the latest Nextcloud version in a safe manner. This can be done automatically or on demand, by using nc-update-nextcloud, and nc-autoupdate-nc respectively.

This means that we can just stop worrying about checking for updates, and all the box software will be up to date: Nextcloud, Debian security packages and NextCloudPi itself. We will be notified whenever this happens.

A lot of care has been taken on testing every possible situation, even sudden power loss during the update, to make sure that the system will just roll back to the previous state if anything goes wrong.

At this point, the autoupdate is not enabled by default. If we continue not to see any problems with it it well be activated by default in the future during the first run wizard.

All feedback is welcome!

Rock64

Rock64 SD card images ready to run with Nextcloud and all the NCP extra goodies are now available for download. This board is thought of as the perfect NAS solution, featuring real Gigabit Ethernet (*) and USB3, but at a very low price tag, starting at 25$.

If you want something nicer than the RPi but the Odroid HC2 is too expensive, this is a great investment.

(*) Unlike the Raspberry Pi 3B+. More on this in following posts.

Banana Pi

The first testing build for the Banana Pi is also available for download. This board is popular for its SATA port, and Gigabit Ethernet so it is also a popular low cost NAS solution, despite the bad kernel support, GPL violations and some of the questionable practices of Allwinner. Luckily we have the Linux Sunxi community to the rescue!

This is a testing release, consider it work in progress.

Potato Pi

Sooner or later we will have NCP running everywhere. Jim is still trying to make his NCPotato board boot, he keeps saying that he almost has it. Good luck Jim!

Let’s take this oportunity to announce that we need tons of help to support more boards! The machinery is in place, and we now need people to help with building / testing / improving other boards.

As long as the board is supported by Armbian, it is really not complicated to build your own SD card image with NCP on it. Please share it with us!

Armbian integration

The patches have been merged to add NCP to the Armbian software installer. This is just another way to make it easy for people to install Nextcloud. Every Armbian board will be capable of installing NCP right out of the box.

Conversations have started to do the same thing with DietPi.

Chinese web

Last but not least, initial suppot for Chinese has been added to ncp-web. Thanks Carl Hung and Yi Chi for the help!

Source

OpenFaaS @ SF / Dockercon round-up

Here are some of the top tweets about Serverless and OpenFaaS from Day 1 at Dockercon hosted in San Francisco. Docker Inc’s CEO Steve Singh opened the event and event mentioned both the Raspberry Pi and Serverless community too.

Good to see the new enterprise-focused Docker Inc acknowledging the @Raspberry_Pi community pic.twitter.com/GXRQ5ouqb1

— Alex Ellis (@alexellisuk) June 13, 2018

Holberton School fireside chat

After having met some students back in April at DevNet Create I started mentoring one of them and keeping in touch with the others. It was great to hear that some students won tickets to Dockercon in a Hackathon using OpenFaaS as part of their winning entry.

During the fireside chat the students I’d met in May interviewed me about my background in Computer Science, my new role leading Open Source in the community and for tips on public speaking.

Really enjoyed sharing with @holbertonschool this week about OSS, career and public speaking pic.twitter.com/4so3myGv8l

— Alex Ellis (@alexellisuk) June 13, 2018

For more on Holberton School and its mission read here: https://www.holbertonschool.com

OpenFaaS + GitOps

The night before the event I spoke with Stefan Prodan at the Weaveworks User Group about GitOps with Functions. When you combine GitOps and Serverless Functions you get something that looks a lot like OpenFaaS Cloud which we open-sourced in November last year.

How does @OpenFaaS cloud work? How about a demo from Silicon Valley? Demo code by @mccabejohn pic.twitter.com/PU85ZWDmAv

— Alex Ellis (@alexellisuk) June 13, 2018

I gave a demo with my mobile phone and OpenFaaS Cloud, we categorized two different images of a hotdog to show Silicon Valley’s “Hotdog, not hotdog” episode. Thanks to John Mccabe for working on this demo.

When I was speaking to a Director of Platform Engineering at a large forward-thinking bank I was told that in their perspective infrastructure is cheap compared to engineering salaries. With OpenFaaS Cloud and GitOps we make it even easier for the developer and operations team to build and deploy serverless functions at scale on any cloud.

“Infrastructure is cheap, engineer hours are expensive” #DockerCon #openfaas #gitops pic.twitter.com/qpVJw1wgqI

— Dwayne Lessner (@dlink7) June 13, 2018

Contribute and Collaborate Track

Here are some highlights from the Contribute and Collaborate Track where I gave a talk on The State of OpenFaaS.

With OpenFaaS you can: iterate faster, build your own platform, use any language, own your data, unlock your community. Great introduction from @alexellisuk #DockerCon

— Mark Jeromin (@devtty2) June 13, 2018

Here I am with Idit Levine from Solo.io and Stefan Prodan from Weaveworks who is also a core contributor to OpenFaaS.

All set to talk about serverless functions made simple in the collaborate and communicate track with @stefanprodan @Idit_Levine and @alexellisuk pic.twitter.com/nTv6yP9Qvh

— OpenFaaS (@openfaas) June 13, 2018

The global group of contributors and influencers is growing and I think it’s important to state that OpenFaaS is built by community for the Open Source Community – that means, for you.

Thanks to @alexellisuk for the call out to @monadic and @stefanprodan for our support for #OpenFaaS
Happy to help!
😸

Hailing from #DockerCon pic.twitter.com/gtYGvXkCu7

— Tamao Nakahara (@mewzherder) June 13, 2018

That sums up the highlights, and there’s much more on Twitter if you don’t want to miss out.

Get involved

Here’s three ways you can get involved with the community and project.

If you’d like to get involved then the best way is to join our Slack community:

https://docs.openfaas.com/community

Find out about OpenFaaS Cloud

Find out more about OpenFaaS Cloud and try the public demo, or install it on your own OpenFaaS cluster today:

?https://docs.openfaas.com/openfaas-cloud/intro/

Deploy OpenFaaS on Kubernetes

You can deploy OpenFaaS on Kubernetes with helm within a matter of minutes. Read the guide for helm below:

https://docs.openfaas.com/deployment/kubernetes/

Source

conu (Container utilities) – scripting containers made easy

Introducing conu – Scripting Containers Made Easier

There has been a need for a simple, easy-to-use handler for writing tests and other code around containers that would implement helpful methods and utilities. For this we introduce conu, a low-level Python library.

This project has been driven from the start by the requirements of container maintainers and testers. In addition to basic image and container management methods, it provides other often used functions, such as container mount, shortcut methods for getting an IP address, exposed ports, logs, name, image extending using source-to-image, and many others.

conu aims for stable engine-agnostic APIs that would be implemented by several container runtime back-ends. Switching between two different container engines should require only minimum effort. When used for testing, one set of tests could be executed for multiple back-ends.

Hello world

In the following example there is a snippet of code in which we run a container from a specified image, check its output, and gracefully delete.

We have decided our desired container runtime would be docker (now the only fully implemented container runtime). The image is run with an instance of DockerRunBuilder, which is the way to set additional options and custom commands for the docker container run command.

import conu, logging

def check_output(image, message):
command_build = conu.DockerRunBuilder(command=[‘echo’, message])
container = image.run_via_binary(command_build)

try:
# check_output
assert container.logs_unicode() == message + ‘n’
finally:
#cleanup
container.stop()
container.delete()

if __name__ == ‘__main__’:
with conu.DockerBackend(logging_level=logging.DEBUG) as backend:
image = backend.ImageClass(‘registry.access.redhat.com/rhscl/httpd-24-rhel7′)
check_output(image, message=’Hello World!’)

Get http response

When dealing with containers that run as services, the container state ‘Running’ is often not enough. We need to check that its port is open and ready to serve, and also to send custom requests to it.

def check_container_port(image):
“””
run container and wait for successful
response from the service exposed via port 8080
“””
port=8080
container = image.run_via_binary()
container.wait_for_port(port)

# check httpd runs
http_response = container.http_request(port=port)
assert http_response.ok

# cleanup
container.delete(force=True)

Look inside the container filesystem

To check presence and content of the configuration files, conu provides a way to easily mount the container filesystem with a predefined set of useful methods. The mount is in read-only mode, but we plan to also implement read-write modes in the next releases.

def mount_container_filesystem(image):
# run httpd container
container = image.run_via_binary()

# mount container filesystem
with container.mount() as fs:
# check presence of httpd configuration file
assert fs.file_is_present(‘/etc/httpd/conf/httpd.conf’)

# check presence of default httpd index page
index_path = ‘/opt/rh/httpd24/root/usr/share/httpd/noindex/index.html’
assert fs.file_is_present(index_path)

# and its content
index_text = fs.read_file(index_path)

So why not just use docker-py?

Aside from docker, conu also aims to support other container runtimes by providing a generic API. To implement the docker back-end, conu actually uses docker-py. Conu also implements other utilities that are generally used when dealing with containers. Adopting other utilities should be also simple.

And what about container testing frameworks?

You don’t have to be limited by a specified a set of tests. When writing code with conu, you can acquire ports, sockets, and filesystems, and the only limits you have are the ones set by Python. In the cases where conu does not support certain features and you don’t want to deal with a subprocess, there is a run_cmd utility that helps you simply run the desired command.

We are reaching out to you to gather feedback and encourage contribution to conu to make scripting around containers even more efficient. We have already successfully used conu for several image tests (for example here), and it also helped while implementing clients for executing specific kinds of containers.

For more information, see conu documentation or source

Join the Red Hat Developer Program (it’s free) and get access to related cheat sheets, books, and product downloads.

Source

Container Conference Presentation | Sreenivas Makam’s Blog

This week, I did a presentation in Container Conference, Bangalore. The conference was well conducted and it was attended by 400+ quality attendees. I enjoyed some of the sessions and also had fun talking to attendees. The topic I presented was “Deep dive into Kubernetes Networking”. Other than covering Kubernetes networking basics, I also touched on Network control policy, Istio service mesh, hybrid cloud and best practises.
Demo code and Instructions: Github link
Recording of the Istio section of the demo: (the recording was not at conference)
As always, feedback is welcome.
I was out of blogging action for last 9 months as I was settling into my new Job at Google and I also had to take care of some personal stuff. Things are getting little clear now and I am hoping to start my blogging soon…
Source

Running and building ARM Docker containers in x86 – Own your bits

We already covered how Linux executes files and how to run ARM binaries “natively” in Linux in the last two posts. We ended up running a whole ARM root filesystem transparently in a chroot jail using QEMU user mode and binfmt_misc support.
Now that we have that covered, nothing prevents us from applying that to Docker containers. At the end of the day, containers are chroots in steroids, and they also share kernel with the host so all the basic mechanics remain the same.
Running ARM containers
If you haven’t yet, install QEMU user mode, by default it will install also binfmt_misc support.

# apt-get install qemu-user

Now, we only need to place the qemu-arm-static interpreter inside the container. This is as easy as mount-binding it in the container invocation and voila! We are running an armhf container in our x86 machine.

$ docker run -v /usr/bin/qemu-arm-static:/usr/bin/qemu-arm-static –rm -ti arm32v7/debian:stretch-slim
root@49176286e89e:/#

Building ARM containers

This is a bit of an uglier trick, because we need to copy the QEMU interpreter to the container. The problem is that it adds ~5MiB to the container, but the benefit of being able to build foreign containers natively is immense!

Consider the following simplified Dockerfile to create an armhf nginx container

FROM arm32v7/debian:stretch-slim

COPY qemu-arm-static /usr/bin

RUN apt-get update;

apt-get install -y nginx;

echo “ndaemon off;” >> /etc/nginx/nginx.conf

CMD [“nginx”]

We end up with a container that can be run both natively in an ARM device, and in an x86 system with a properly configured binfmt_misc support. Not bad!

We can even test it locally

docker build . -t nginx-armhf:testing

docker run –rm -ti -d -p 80:80 nginx-armhf:testing

firefox localhost

We are now running the ARM nginx web server locally.

This means that we can create a build pipeline with automated testing without requiring any ARM boards. After all automated tests are passing, we can create the production image.

FROM nginx-armhf:testing

RUN rm /usr/bin/qemu-arm-static


docker build . -t nginx-armhf:production
Reclaiming the space in Docker API 1.25+

If we really want to reclaim those extra 5MiB from qemu-arm-static, we can use the new experimental
–squash flag.

docker build –squash . -t nginx-armhf:production

Honestly, it was about time that they did something to help us keep the image size down. The piling up of layers and their refusal to add a simple
–chown argument to the COPY command made the creation of Dockerfiles a black art where you had to chain all the installation steps including the cleanup in a single RUN statement, therefore denying the benefits of caching for big blocks of code.

Thankfully, they are beginning to react and we now have not only
–chown , but also the
–squash flag for the build command. In order to use it, we need to enable experimental features. Add the following to the daemon.json file, which might not exist

Restart the Docker daemon, after this.

Reclaiming the space in Docker API <1.25

We are left with the old hacky way of flattening the images, by exporting the container

docker container create –name nginx-armhf-container nginx-armhf:production

docker export nginx-armhf-container | docker import – nginx-armhf:raw

, and finally rebuild the metadata

FROM nginx-armhf:raw

CMD [“nginx”]


docker build . -t nginx-armhf:latest


Source

Introducing the OpenFaaS Operator for Serverless on Kubernetes

This blog post introduces OpenFaaS Operator which is a CRD and Controller for OpenFaaS on Kubernetes. We started working on this in the community in October last year to enable a tighter integration with Kubernetes. The most visible way you’ll see this is by being able to type in kubectl get functions.

Brief history of Kubernetes support

OpenFaaS has worked natively with Kubernetes for well over a year. Each function you build creates a Docker image which when deployed through the OpenFaaS API creates a Deployment and Service API object and that in turn creates a number of Pods.

The original controller called faas-netes was created by the community and much of its code has been re-purposed in the new Operator created by Stefan Prodan from Weaveworks. Since the Operator was created in October there have already been several pull requests, fixes and releases.

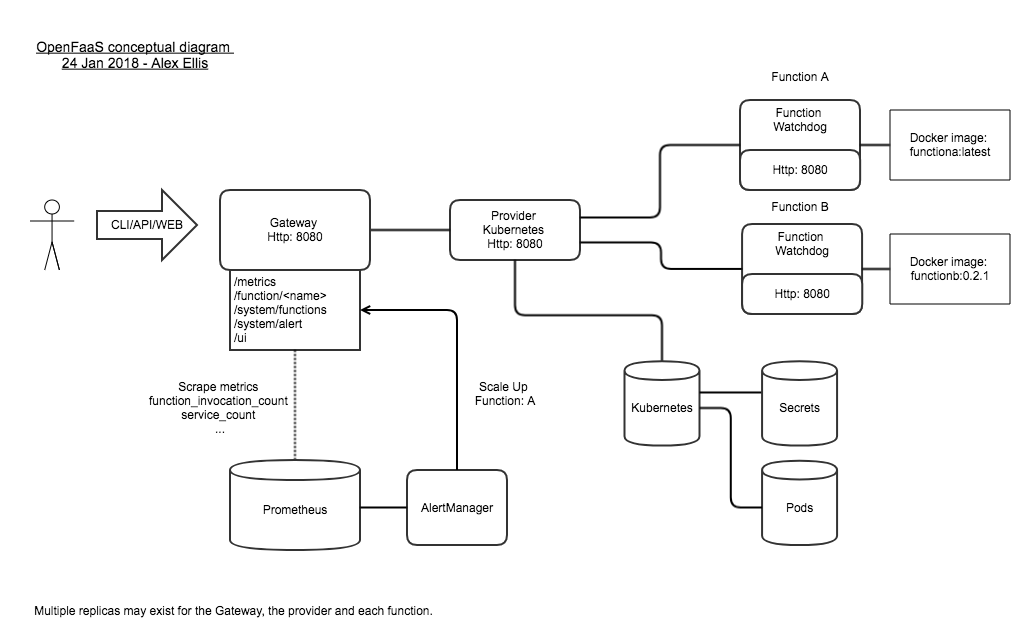
Here is a conceptual diagram from the documentation site. The Operator does not change this architecture, but changes the way it is created through listening to events.

The use of Kubernetes primitives from the beginning has meant users can use kubectl to check logs, debug and monitor OpenFaaS functions in the same way they would any other Kubernetes resources. OpenFaaS runs on all Kubernetes services such as GKE, AKS, EKS, with OpenShift or with kubeadm.

Example: Using Weave Cloud to monitor network traffic, CPU and memory usage of OpenFaaS function Pods on GKE

I’m comparing Weave Cloud’s integrated functions dashboard (CPU, memory, network, RED) for OpenFaaS with Grafana (light theme) and the community dashboard – Find out more about auto-scaling here 📈✅😀n- https://t.co/rddgNWGPkh @weaveworks @openfaas pic.twitter.com/j49k9slDC2

— Alex Ellis (@alexellisuk) May 1, 2018

The OpenFaaS Operator

This section covers the technical and conceptual details of the OpenFaaS Operator.

What is a CRD?

One of the newer extension points in Kubernetes is the Custom Resource Definition (CRD) which allows developers to create their own native abstractions and extensions within the Kubernetes API. Why is that important? On its own the CRD is useful for storing objects and state which plays nicely with other Kubernetes objects, but it comes into its own with controllers.

A controller (sometimes called an operator) exists to create objects which the CRDs represent. It can run in a loop or react to events as they happen to reconcile a desired state with the actual state of the system.

$ kubectl get crd
NAME AGE
functions.openfaas.com 41d
sealedsecrets.bitnami.com 41d

In this example I can see the new functions definition created with the Operator’s helm-chart and the SealedSecrets definition from Bitnami.

$ kubectl get -n openfaas-fn functions
NAME AGE
figlet 55m
nodeinfo 55m

Example showing the functions deployed

OpenFaaS UI with CRDs

At this point I could type in kubectl delete -n openfaas-fn functions/figlet and in a few moments we would see the figlet function, Pod and Service disappear from the OpenFaaS UI.

YAML definition

This is what a Kubernetes CRD entry for functions.openfaas.com (version v1alpha2) looks like:

apiVersion: openfaas.com/v1alpha2
kind: Function
metadata:
name: nodeinfo
namespace: openfaas-fn
spec:
name: nodeinfo
image: functions/nodeinfo:latest
labels:
com.openfaas.scale.min: “2”
com.openfaas.scale.max: “15”
environment:
write_debug: “true”
limits:
cpu: “200m”
memory: “1Gi”
requests:
cpu: “10m”
memory: “128Mi”

You may have noticed a few differences between the YAML used by the faas-cli and the YAML used by Kubernetes. You can still use your existing YAML with the faas-cli, the CRD format is only needed if you will use kubectl to create your functions.

Functions created by the faas-cli or OpenFaaS Cloud can still be managed through kubectl.

Q&A

  • Does this replace faas-netes? Will you continue to support faas-netes?

The faas-netes project has the most active use and we will continue to support it within the community. All fixes and enhancements are being applied to both through Pull Requests.

  • Who should use the new Operator?

Please try the new Operator in your development environment. The community would like your feedback on GitHub, Slack or Twitter.

Use the Operator if using CRDs is an important use-case for your project.

  • Should I use the CRD YAML or the faas-cli YAML definition?

Please continue to use the faas-cli YAML unless you have a use-case which needs to create functions via kubectl.

  • Anything else I need to know?

The way you get the logs for the operator and gateway has changed slightly. See the troubleshooting guide in the docs.

Note from Stefan: If you migrate to the Operator you should first delete all your functions, then deploy them again after the update.

So what next?

If we can now use kubectl to create functions then what does that mean for the OpenFaaS UI, CLI and the GitOps workflow with OpenFaaS Cloud?

At KubeCon in Austin Kelsey Hightower urged us not to go near kubectl as developers. His point was that we should not be operating our clusters manually with access to potentially dangerous tooling.

Access to kubectl and the function CRD gives more power to those who need it and opens new extension points for future work and ideas. All the existing tooling is compatible, but it really becomes powerful when coupled with a “git push” GitOps CI/CD pipeline like OpenFaaS Cloud.

Try it out!

  • Please try out the OpenFaaS Operator and let us know what you think

The helm chart has been re-published so follow the brief README here to get installed and upgraded today: https://github.com/openfaas/faas-netes/tree/master/chart/openfaas

Join the community

Within the OpenFaaS Slack community there are several key channels that are great for working with Kubernetes such as #kubernetes.

Here are some of the channels you could join after signing-up:

In OpenFaaS any programming language or binary is supported, but templates make them easy to consume via faas cli new, so join #templates and help us build the next set of templates for JVM-based languages.

#arm-and-pi

Building a cool Raspberry Pi Cluster or just struggling? Join this channel for help from the community and to share ideas and photos of your inventions.

Join #contributors to start giving back to Open Source and to become a part of the project. Get started here

Source

Deploying a Spring Boot App with MySQL on OpenShift

This article shows how to take an existing Spring Boot standalone project that uses MySQL and deploy it on Red Hat OpenShift, In the process, we’ll create docker images which can be deployed to most container/cloud platforms. I’ll discuss creating a Dockerfile, pushing the container image to an OpenShift registry, and finally creating running pods with the Spring Boot app deployed.

To develop and test using OpenShift on my local machine, I used Red Hat Container Development Kit (CDK), which provides a single-node OpenShift cluster running in a Red Hat Enterprise Linux VM, based on minishift. You can run CDK on top of Windows, macOS, or Red Hat Enterprise Linux. For testing, I used Red Hat Enterprise Linux Workstation release 7.3. It should work on macOS too.

To create the Spring Boot app I used this article as a guide. I’m using an existing openshift/mysql-56-centos7 docker image to deploy MySQL to OpenShift.

You can download the code used in this article from my personal github repo. In this article, I’ll be building container images locally, so you’ll need to be able to build the project locally with Maven. This example exposes a rest service using: com.sample.app.MainController.java.

In the repository, you’ll find a Dockerfile in src/main/docker-files/. The dockerfile_springboot_mysql file creates a docker image, having the Spring Boot application based on java8 docker image as a base . While this is ok for testing, for production deployment you’d want to use images that are based on Red Hat Enterprise Linux.

Building the application:

1. Use mvn clean install to build the project.

2. Copy the generated jar in the target folder to src/main/docker-files. When creating the docker image, the application jar can be found at the same location.

3. Set the database username, password, and URL in src/main/resources/application.properties. Note: For OpenShift, it is recommended to pass these parameters into the container as environment variables.

Now start the CDK VM to get your local OpenShift cluster running.

1. Start the CDK VM using minishift start:

$ minishift start

2. Set your local environment for docker and the oc CLI:

$ eval $(minishift oc-env)
$ eval $(minishift docker-env)

Note: the above eval commands will not work on Windows. See the CDK documentation for more information.

3. Login to OpenShift and Docker using the developer account:

$ oc login
$ docker login -u developer -p $(oc whoami -t) $(minishift openshift registry)

Now we’ll build the container images.

1. Change the directory location to src/main/docker-files within the project. Then, execute the following commands to build the container images. Note: The period (.) is required at the end of the docker build command to indicate the current directory:

$ docker build -t springboot_mysql -f ./dockerfile_springboot_mysql .

Use the following command to view the container images that were created:

$ docker images

2. Add the tag springboot_mysql to the image, and push it to the OpenShift registry:

$ docker tag springboot_mysql $(minishift openshift registry)/myproject/springboot_mysql
$ docker push $(minishift openshift registry)/myproject/springboot_mysql

3. Next, pull the OpenShift MySQL image, and create it as an OpenShift application which will initialize and run it. Refer to the documentation for more information:

docker pull openshift/mysql-56-centos7
oc new-app -e MYSQL_USER=root -e MYSQL_PASSWORD=root -e MYSQL_DATABASE=test openshift/mysql-56-centos7

4. Wait for the pod running MySQL to be ready. You can check the status with oc get pods:

$ oc get pods
NAME READY STATUS RESTARTS AGE
mysql-56-centos7-1-nvth9 1/1 Running 0 3m

5. Next, ssh to the mysql pod and create a MySQL root user with full privileges:

$ oc rsh mysql-56-centos7-1-nvth9
sh-4.2$ mysql -u root
CREATE USER ‘root’@’%’ IDENTIFIED BY ‘root’;
Query OK, 0 rows affected (0.00 sec)

GRANT ALL PRIVILEGES ON *.* TO ‘root’@’%’ WITH GRANT OPTION;
Query OK, 0 rows affected (0.00 sec)

FLUSH PRIVILEGES;
Query OK, 0 rows affected (0.00 sec)

exit

6. Finally, initialize the Spring Boot app using imagestream springboot_mysql:

$ oc get svc
NAME CLUSTER-IP EXTERNAL-IP PORT(S) AGE
mysql-56-centos7 172.30.145.88 none 3306/TCP 8m

$ oc new-app -e spring_datasource_url=jdbc:mysql://172.30.145.88:3306/test springboot_mysql
$ oc get pods
NAME READY STATUS RESTARTS AGE
mysql-56-centos7-1-nvth9 1/1 Running 0 12m
springbootmysql-1-5ngv4 1/1 Running 0 9m

7. Check the pod logs:

oc logs -f springbootmysql-1-5ngv4

8. Next, expose the service as route:

$ oc get svc
NAME CLUSTER-IP EXTERNAL-IP PORT(S) AGE
mysql-56-centos7 172.30.242.225 none 3306/TCP 14m
springbootmysql 172.30.207.116 none 8080/TCP 1m

$ oc expose svc springbootmysql
route “springbootmysql” exposed

$ oc get route
NAME HOST/PORT PATH SERVICES PORT TERMINATION WILDCARD
springbootmysql springbootmysql-myproject.192.168.42.182.nip.io springbootmysql 8080-tcp None

9. Test the application using curl. You should see a list of all entries in the database table:

$ curl -v http://springbootmysql-myproject.192.168.42.182.nip.io/demo/all

10. Next, use curl to create an entry in the db:

$ curl http://springbootmysql-myproject.192.168.42.182.nip.io/demo/add?name=SpringBootMysqlTest
Saved

11. View the updated list of entries in the database:

$ curl http://springbootmysql-myproject.192.168.42.182.nip.io/demo/all

[{“name”:”UBUNTU 17.10 LTS”,”lastaudit”:1502409600000,”id”:1},{“name”:”RHEL 7″,”lastaudit”:1500595200000,”id”:2},{“name”:”Solaris 11″,”lastaudit”:1502582400000,”id”:3},{“name”:”SpringBootTest”,”lastaudit”:1519603200000,”id”:4},{“name”:”SpringBootMysqlTest”,”lastaudit”:1519603200000,”id”:5}

That’s it!

I hope this article is helpful to you for migrating an existing spring-boot application to OpenShift. Just a note, in production environments, one should use Red Hat Supportable Images. This document is intended for development purposes only. It should assist you in creating spring-boot applications that run in containers; and in how to set up MySQL connectivity for spring-boot in OpenShift.

Source

Devops with Kubernetes | Sreenivas Makam’s Blog

September 20, 2018Containers, devops, Docker, KubernetesSreenivas Makam

I did the following presentation “Devops with Kubernetes” in Kubernetes Sri Lanka inaugural meetup earlier this week. Kubernetes is one of the most popular open source projects in the IT industry currently. Kubernetes abstractions, design patterns, integrations and extensions make it very elegant for Devops. The slides delve little deep on these topics.

Advertisements

← NEXT 100 Webinar – Top 3 reasons why you should run your enterprise workloads on GKE

Leave a Reply Cancel reply

Enter your comment here…

Fill in your details below or click an icon to log in:

Gravatar

Email (required) (Address never made public)

Name (required)

Website

WordPress.com Logo

You are commenting using your WordPress.com account.
( Log Out /
Change )

Google+ photo

You are commenting using your Google+ account.
( Log Out /
Change )

Twitter picture

You are commenting using your Twitter account.
( Log Out /
Change )

Facebook photo

You are commenting using your Facebook account.
( Log Out /
Change )

Cancel

Connecting to %s

Notify me of new comments via email.

Notify me of new posts via email.

Source

NextCloudPi upgraded to NC14.0.1 and PHP7.2 – Own your bits


The latest release of NextCloudPi is out!

This release brings the latest major version of Nextcloud, as well as an important performance boost due to the jump to PHP7.2.

Remember that we are looking at people to help us support more boards. If you own a BananaPi, OrangePi, Pine64 or any other not yet supported board talk to us. We only need some of your time to perform a quick test in the new images every few months.

We are also in need translators, more automated testing, and some web devs to take on the web interface and improve the user experience.

NextCloudPi improves everyday thanks to your feedback. Please report any problems here. Also, you can discuss anything in the forums, or hang out with us in Telegram.

Last but not least, please download through bitorrent and share it for a while to help keep hosting costs down.

Nextcloud 14.0.1

Nextcloud 14 is this yearly new major release. It comes with Video Verification, Signal/Telegram 2FA support, Improved Collaboration and GDPR compliance. See the release announcement for more details.

In order to upgrade, please use
ncp-update-nextcloud rather than the Nextcloud builtin installer. The NextCloudPi installer will save you some headaches related to missing database indices, app integrity checks and others.

Better yet, enable
ncp-autoupdate-nc and recieve Nextcloud upgrades automatically after they have been tested and verified for NCP.

PHP 7.2

Image taken from Phoronix

PHP7.2 is now fully supported by Nextcloud. This new version shows around a 25% performance increase over PHP7.0. Sweet!

nc-previews

This is a simple launcher to generate thumbnails for the Gallery app. Personal clouds are very commonly used to browse pictures and the performance of the Gallery is really bad on low end systems, because there is just no computing power available to do all the image processing for a big collection in real time as the user navigates.

The preview generator app will allow you to pre-compute this so that things go fast when you open the Gallery. This operation will use many resources, and can even take days for a Raspberry Pi with really big collections, so be aware of this.

nc-previews will scan the whole gallery on demand, generating previews where they are missing, so it best suited to be used when we first install the preview generator app in order to process the existing collection, or if somehow copy the collection externally.

Soon we will include another app that will generate only the new additions silently overnight, so they are available next time we want to browse them.

nc-prettyURL

Traditionally, NCP has decided not to apply pretty URLs, to squeeze every little performance possible from Nextcloud on low end devices. This means that the URLs look pretty ugly, because the include the index.php part.

Because we now support a variety of platforms, we decided to leave this as a configurable option.

Compare this

to this

Thanks TomTurnschuh for this contribution.


Source

Create an IoT sensor with NodeMCU and Lua

In this post I want to show you how to create your own IoT sensor with the NodeMCU and the Lua programming language. The device called the NodeMCU makes it easy to start reading sensor data, sending it back to another location for processing or aggregation, such as the cloud. We’ll also compare the NodeMCU to the Raspberry Pi and talk about the pros/cons of each for an IoT sensor.

Introduction

Picture Wikipedia Creative Commons

NodeMCU is an open source IoT platform. It includes firmware which runs on the ESP8266 Wi-Fi SoC from Espressif Systems, and hardware which is based on the ESP-12 module.

via Wikipedia

The device looks similar to an Arduino or Raspberry Pi Zero featuring a USB port for power or programming and features a dedicated chip for communicating over WiFi. Several firmwares are available (similar to an Operating System) for programming the device in Lua, C (with the Arduino IDE) or even MicroPython. Cursory reading showed the Lua firmware to support the most amount of modules/functionality including HTTP, MQTT and popular sensors such as the BME280.

The documentation for the NodeMCU with Lua is detailed and thorough giving good examples and I found it easy to work with. In my opinion the Lua language feels similar to Node.js, but may take some getting used to. Fortunately it’s easy to install Lua locally to learn about flow control, loops, functions and other constructs.

NodeMCU vs Raspberry Pi

The Raspberry Pi Zero runs a whole Operating System which is usually Linux and is capable of acting as a desktop PC, but the NodeMCU runs a firmware with a much more limited remit. A Raspberry Pi Zero can be a good basis for an IoT sensor, but also is rather over-qualified for the task. The possibilities it brings come at a cost, such as relatively high power consumption and unreliable flash storage, which can become corrupted over time.

Its power consumption with WiFi enabled could be anything up to 120 mA even with HDMI and LEDs disabled. In contrast the NodeMCU runs a much more specialised chip with power-saving features such as a deep sleep mode that can make the board run for up to a year with a standard 2500mAh LiPo battery.

Here’s my take:

I’m a big fan of the Raspberry Pi and own more than anyone else I know (maybe you have more?), but it does need maintenance such as OS upgrades, package updates and the configuration to set up I2c or similar can be time-consuming. For IoT sensors, if you are willing to learn some Lua the NodeMCU can send readings over HTTP or MQTT and is low-powered and low hassle at the same time.

If you already have a Raspberry Pi and can’t wait to get your NodeMCU then you can follow my tutorial with InfluxDB here.

yep, saw your @pimoroni EnviroPhat piece and thought it was Grafana to start with-this is my version pic.twitter.com/YlRjuLMfBk

— Alex Ellis (@alexellisuk) 2 September 2016

Tutorial overview

  • Bill of materials
  • Create a firmware
  • Flash firmware to NodeMCU
  • Test the REPL
  • Connect to WiFi
  • Connect and test the BME280 sensor
  • Upload init.lua
  • Upload sensor readings to MQTT
  • Observe reported MQTT readings on PC/Laptop

The finished IoT sensor:
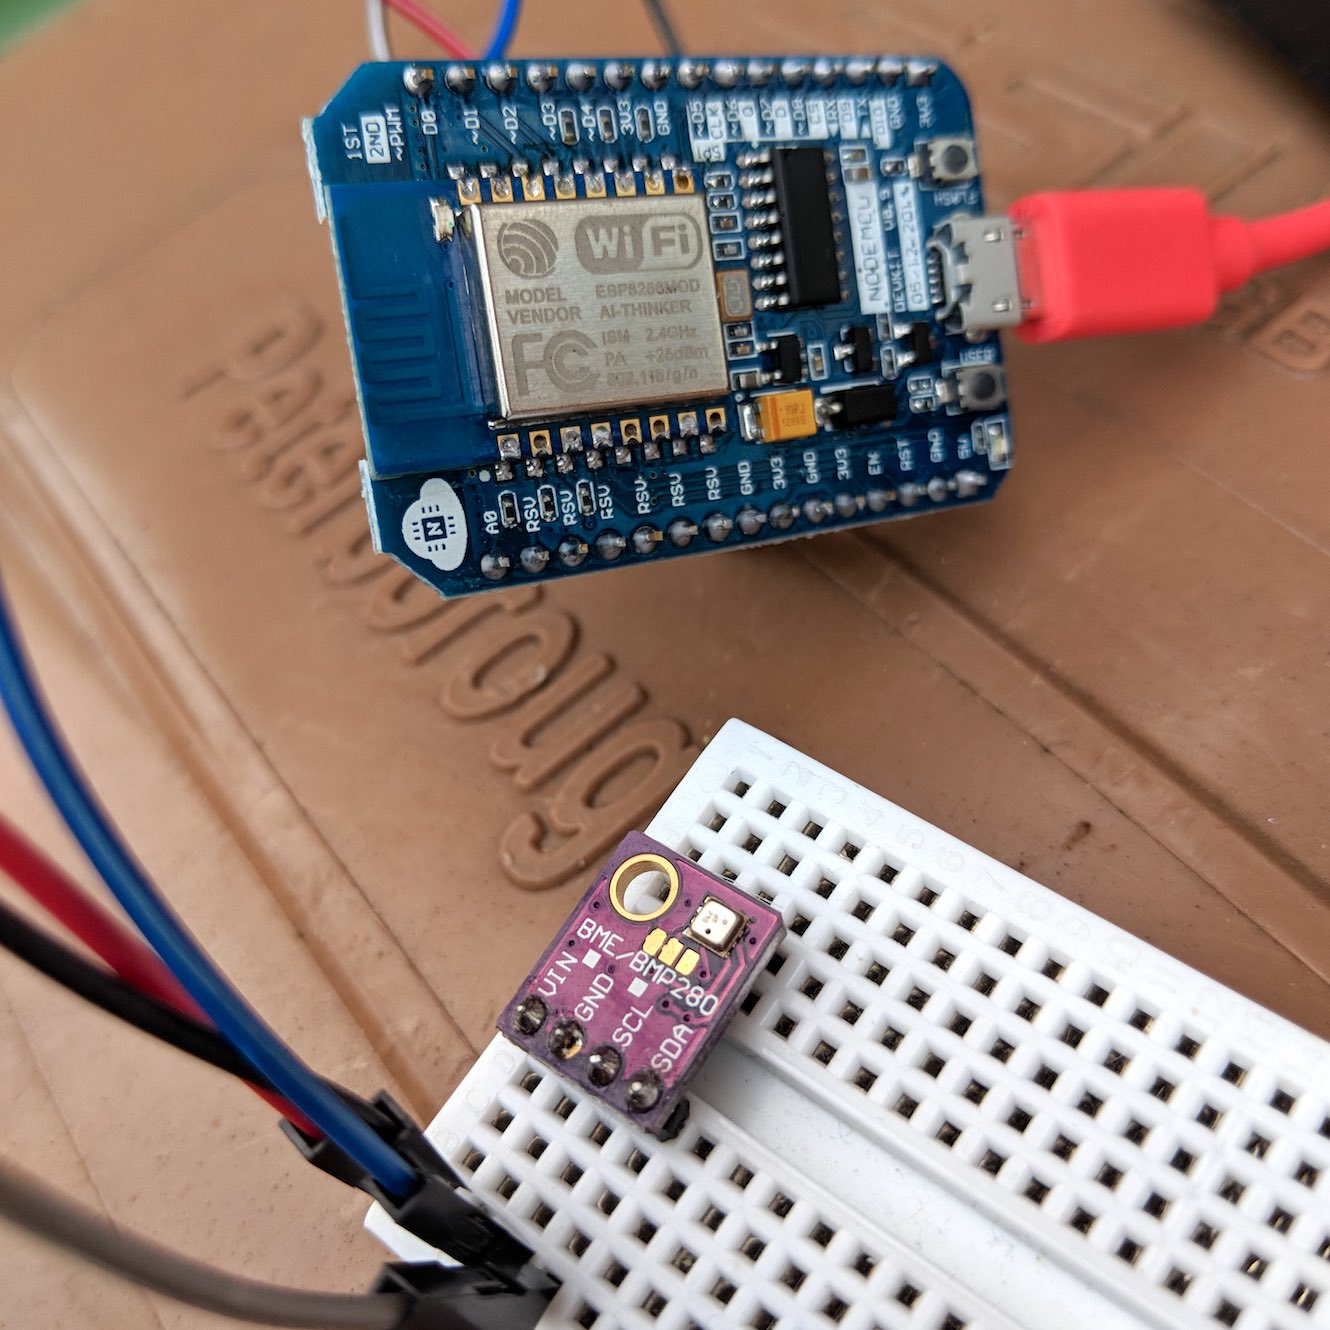
mcu_setup

Bill of materials

  • NodeMCU

You will need to purchase a NodeMCU board. I recommend buying that on eBay, with pre-soldered pins. Aim to spend 4-6 USD.

I buy these for 3-5 USD on eBay, branded versions are much more expensive.

  • Short male-to-male and male-to-female jumpers
  • Small bread-board

Create a firmware

The NodeMCU chip is capable of supporting dozens of different firmware modules, but has limited space, so we will create a firmware using a free cloud service and then upload to the chip.

  • Head over to https://nodemcu-build.com/
  • Select the stable 1.5 firmware version
  • Pick the following modules: adc, bme280, cjson, file, gpio, http, i2c, mqtt, net, node pwm, tmr, uart, wifi.

You will receive an email with a link to download the firmware.

Flash the firmware

You will need to install a Python script to flash the firmware over the USB serial port. There are various options available and I used esptool.py on a Linux box.

https://nodemcu.readthedocs.io/en/master/en/flash/

This means I typed in:

$ sudo ./esptool/esptool.py -p /dev/ttyUSB0 write_flash 0x00000 nodemcu-1.5.4.1-final-15-modules-2018-07-01-20-30-09-float.bin

final-12-modules-2018-07-01-19-38-04-float.bin
esptool.py v2.4.1
Serial port /dev/ttyUSB0
Connecting….
Detecting chip type… ESP8266
Chip is ESP8266EX
Features: WiFi
MAC: 18:fe:34:a2:8b:0d
Uploading stub…
Running stub…
Stub running…
Configuring flash size…
Auto-detected Flash size: 4MB
Flash params set to 0x0040
Compressed 480100 bytes to 313202…
Wrote 480100 bytes (313202 compressed) at 0x00000000 in 27.6 seconds (effective 139.0 kbit/s)…
Hash of data verified.

Leaving…
Hard resetting via RTS pin…

Test the REPL

Now that the NodeMCU has the Lua firmware flashed you can connect with Linux or Mac to the device in a terminal to enter commands on the REPL.

The device starts off at a baud rate of 115200 which is not useable for typing.

sudo screen -L /dev/ttyUSB0 115200

> uart.setup(0,9600,8,0,1,1)

Now type in Control + A + : then type in quit

Next you can connect at the lower speed and try out a few commands from the docs.

sudo screen -L /dev/ttyUSB0 9600

> print(“Hello world”)
Hello world
>

Keep the screen session open, you can suspend it at any time by typing Control A + D and resume with screen -r.

Connect to WiFi

Next let’s try to connect to the WiFi network and get an I.P. address so that we can access the web.

ssid=”SSID”
key=”key”

wifi.setmode(wifi.STATION)
wifi.sta.config(ssid, key)
wifi.sta.connect()
tmr.delay(1000000)

print(string.format(“IP: %s”,wifi.sta.getip()))

IP: 192.168.0.52

Now that you have the device IP you should be able to ping it with ping -c 3 192.168.0.52

Since we built-in the HTTP stack we can now access a web-page.

Go to https://requestbin.fullcontact.com/ and create a “Request Bin”

Now type in the code below changing the URL to the one provided to you by the website. When you refresh the web-page, you should see the data appear on the page showing the WiFi signal “RSSI”.

binURL=”http://requestbin.fullcontact.com/13651yq1″
http.post(binURL,
‘Content-Type: application/json’,
string.format(‘{“rssi”: %d}’, wifi.sta.getrssi()),
function(code, data)
if (code < 0) then
print(“HTTP request failed”)
else
print(code, data)
end
end)

In my example I saw the data {“rssi”: -64} appear on the UI showing a good/low noise level due to proximity to my access point.

Connect and test the BME280 sensor

According to mqtt.org, MQTT is:

.. a machine-to-machine (M2M)/”Internet of Things” connectivity protocol. It was designed as an extremely lightweight publish/subscribe messaging transport. It is useful for connections with remote locations where a small code footprint is required and/or network bandwidth is at a premium.

If you’ve ever used a message queue before then this will be familiar territory, but if it’s new then you can either publish messages or subscribe to them for a given topic.

Example: a base station subscribes to a topic called “sensor-readings” and a series of NodeMCU / IoT devices publish sensor readings to the “sensor-readings” topic. This de-couples the base-station/receiver from the IoT devices which broadcast their sensor readings as they become available.

We can use the public Mosquitto test MQTT server called test.mosquitto.com – all readings will be publicly available, but you can run your own Mosquitto MQTT server with Docker or Linux later on.

Now power off the device by unplugging the USB cable and connect the BME280 sensor.

I suggest making all these connections via the breadboard, but you could also connect them directly:

  • Connect positive on the BME280 to 3v3 on the NodeMCU
  • Connect GND on the BME280 to GND on the NodeMCU
  • Connect SDA on the BME280 to to pin D3 on the NodeMCU
  • Connect SDC on the BME280 to to pin D3 on the NodeMCU

Now power up and get into 9600 baud again, opening the screen and REPL so we can test the sensor.

sda, scl = 3, 4
mode = bme280.init(sda, scl)
print(mode)
tmr.delay(1000000)
H, T = bme280.humi()
t = T / 100
h = H / 1000
ip = wifi.sta.getip()
if ip == nil then
ip = “127.0.0.1”
end
RSSI=wifi.sta.getrssi()
if RSSI == nil then
RSSI=-1
end

msg = string.format(‘{“sensor”: “s1”, “humidity”: “%.2f”, “temp”: “%.3f”, “ip”: “%s”, “rssi”: %d}’, h, t, ip, RSSI)
print(msg)

If the connections were made correctly then you will now see a JSON message on the console.

Upload init.lua

Download init.lua from my GitHub Gist and then update the WiFi SSID (mySsid) and Password settings (myKey).

https://gist.github.com/alexellis/6a4309b316a1bc650e212d6d4f47deea

Find a compatible tool to upload the init.lua file, or on Linux use the same tool I used:

sudo nodemcu-uploader –port=/dev/ttyUSB0 upload ./init.lua

Various tools are available to upload code: https://nodemcu.readthedocs.io/en/dev/en/upload/

Upload sensor readings to MQTT

Now unplug your NodeMCU and find a small USB power pack or phone charger and plug the device in. It will run init.lua and start transmitting messages to test.mosquitto.com over MQTT.

Observe reported MQTT readings on PC/Laptop

Install an MQTT client on Linux or find a desktop application for MacOS/Windows.

On Debian/Ubuntu/RPi you can run: sudo apt-get install mosquitto-clients

Then listen to the server on the topic “sensor-readings”:

mosquitto_sub -h test.mosquitto.org -p 1883 -t sensor-readings -d

Example of data coming in from my sensor in my garden:

Subscribed (mid: 1): 0

Client mosqsub/19950-alexellis received PUBLISH (d0, q0, r0, m0, ‘sensor-readings’, … (108 bytes))
{“sensor”: “s1”, “humidity”: “58.38”, “temp”: “24.730”, “ip”: “192.168.0.51”, “vdd33”: “65535”, “rssi”: -75}
Client mosqsub/19950-alexellis received PUBLISH (d0, q0, r0, m0, ‘sensor-readings’, … (108 bytes))
{“sensor”: “s1”, “humidity”: “57.96”, “temp”: “24.950”, “ip”: “192.168.0.51”, “vdd33”: “65535”, “rssi”: -75}

Wrapping up

You’ve now built a robust IoT sensor that can connect over your WiFi network to broadcast sensor readings around the world.

Take it further by trying some of these ideas:

  • Add WiFi re-connection code
  • Use deep sleep to save power between readings
  • Aggregate the readings in a time-series database, or CSV file for plotting charts – try my environmental monitoring dashboard
  • Run your own MQTT server/broker
  • Try another sensor such as an LDR to measure light
  • Build an external enclosure and run the device in your garden

If you liked this tutorial or have questions then follow me @alexellisuk on Twitter.

Create an IoT environmental sensor with NodeMCU and Lua https://t.co/esgaeqrKwq pic.twitter.com/hm7sWIi3AF

— Alex Ellis (@alexellisuk) July 9, 2018

Source