What’s New in Kubernetes 1.13

Banner

As the year comes to a close, Kubernetes contributors, our engineers included, have been hard at work to bring you the final release of 2018: Kubernetes 1.13. In recognition of the achievements the community has made this year, and the looming holiday season, we shift our focuses towards presenting this work to the world at large. KubeCon Shanghai was merely weeks ago and KubeCon NA (Seattle) kicks off next week!

That said, the Kubernetes 1.13 release cycle has been significantly shorter. Given the condensed timeline to plan, document, and deliver enhancements to the Kubernetes ecosystem, efforts were dedicated to minimizing new functionality and instead optimizing existing APIs, graduating major features, improving documentation, and strengthening the test suites within core Kubernetes and the associated components. So yet again, the common theme is stability. Let’s dive into some of the highlights of the release!

Storage

One of the major highlights in this release is CSI (Container Storage Interface), which was first introduced as alpha in January. CSI support in Kubernetes is now Generally Available.

In its infancy, Kubernetes was primarily geared towards running stateless applications. Since then, we’ve seen the evolution of constructs like PetSets evolve into StatefulSets, to build more robust support for running stateful applications. In keeping with that evolution, the Storage Special Interest Group (SIG) has made consistent improvements to the way Kubernetes interfaces with storage subsystems. These developments strengthen the community’s ability to provide storage guarantees to applications running within Kubernetes, which is of paramount importance, especially for Enterprise customers using technologies like Ceph and Gluster.

Making Declarative Changes Safer

At the risk of providing a simplistic explanation, Kubernetes is a set of APIs that receive declarative information from operators / other systems, process and store that information in a key-value store (etcd), and then query and act on the stored information to achieve some desired state. There are then reconciliation loops spread across multiple controllers to enable that the desired state is always maintained. It is important that the changes made to these systems are made in a safe way, as consequences can ripple out to multiples places in a Kubernetes environment.

To that end, we’d like to highlight two enhancements: APIServer DryRun and kubectl diff.

If flags like –dry-run or –apply=false in CLI tools sound familiar, then APIServer DryRun will too. APIServer DryRun is an enhancement which allows cluster operators to understand what would’ve happened with common operations (POST, PUT, PATCH, DELETE) on Kubernetes objects, without persisting the data of the proposed change. This brings an opportunity to better introspect on desired changes, without the burden of having to potentially rollback errors. DryRun has moved to beta in Kubernetes 1.13.

Similarly, kubectl diff provides a similar experience to using the diff utility. Prior to the introduction of this enhancement, operators would have to carefully compare objects to interpolate what the results of the change would be. Moving to beta in Kubernetes 1.13, users can now inspect a local declared Kubernetes object and compare that to the state of a running in-cluster object, or a previously applied object, or what the merging of two objects would result in.

Plugin Systems

As the Kubernetes ecosystem expands, the community has embraced separating the core codebase into new projects, which improve developer velocity, as well as help to minimize the size of the binaries that are delivered. A direct effect of this has been the requirement to extend the way Kubernetes core discovers and gains visibility into external components. This can include a wide gamut of components, like CRI (Container Runtime Interface) and GPU-enabled devices.

To make this happen, an enhancement called Kubelet Device Plugin Registration was introduced in 1.11 and graduates to GA in Kubernetes 1.13. Device plugin registration provides a common and consistent interface which plugins can register against in the kubelet.

Once new device plugins are integrated into the system, it becomes yet another vector that we want to gain visibility into. Third-party device monitoring is now in alpha for Kubernetes 1.13, and it seeks to solve that need. With this new enhancement, third-party device makers can route their custom information to the Kubernetes monitoring systems. This means GPU compute can now be monitored in a similar way as standard cluster resources like RAM and CPU are already monitored.

Collaboration is Key

The community has worked hard on this release, and it caps off a year that could best be summed up by a single word: Cooperation. More consistent, open source tools have emerged, like CNI, CRI, CSI, kubeadm, and CoreDNS to name a few.

Expect 2019 to see a continued push to enable the community through better interfaces, APIs and plugins.

To get started with the latest Kubernetes release you can find it on GitHub at https://github.com/kubernetes/kubernetes/releases.

Source

Kubernetes 1.13: Simplified Cluster Management with Kubeadm, Container Storage Interface (CSI), and CoreDNS as Default DNS are Now Generally Available

Kubernetes 1.13: Simplified Cluster Management with Kubeadm, Container Storage Interface (CSI), and CoreDNS as Default DNS are Now Generally Available

Author: The 1.13 Release Team

We’re pleased to announce the delivery of Kubernetes 1.13, our fourth and final release of 2018!

Kubernetes 1.13 has been one of the shortest releases to date at 10 weeks. This release continues to focus on stability and extensibility of Kubernetes with three major features graduating to general availability this cycle in the areas of Storage and Cluster Lifecycle. Notable features graduating in this release include: simplified cluster management with kubeadm, Container Storage Interface (CSI), and CoreDNS as the default DNS.

These stable graduations are an important milestone for users and operators in terms of setting support expectations. In addition, there’s a continual and steady stream of internal improvements and new alpha features that are made available to the community in this release. These features are discussed in the “additional notable features” section below.

Let’s dive into the key features of this release:

Simplified Kubernetes Cluster Management with kubeadm in GA

Most people who have gotten hands-on with Kubernetes have at some point been hands-on with kubeadm. It’s an essential tool for managing the cluster lifecycle, from creation to configuration to upgrade; and now kubeadm is officially GA. kubeadm handles the bootstrapping of production clusters on existing hardware and configuring the core Kubernetes components in a best-practice-manner to providing a secure yet easy joining flow for new nodes and supporting easy upgrades. What’s notable about this GA release are the now graduated advanced features, specifically around pluggability and configurability. The scope of kubeadm is to be a toolbox for both admins and automated, higher-level system and this release is a significant step in that direction.

Container Storage Interface (CSI) Goes GA

The Container Storage Interface (CSI) is now GA after being introduced as alpha in v1.9 and beta in v1.10. With CSI, the Kubernetes volume layer becomes truly extensible. This provides an opportunity for third party storage providers to write plugins that interoperate with Kubernetes without having to touch the core code. The specification itself has also reached a 1.0 status.

With CSI now stable, plugin authors are developing storage plugins out of core, at their own pace. You can find a list of sample and production drivers in the CSI Documentation.

CoreDNS is Now the Default DNS Server for Kubernetes

In 1.11, we announced CoreDNS had reached General Availability for DNS-based service discovery. In 1.13, CoreDNS is now replacing kube-dns as the default DNS server for Kubernetes. CoreDNS is a general-purpose, authoritative DNS server that provides a backwards-compatible, but extensible, integration with Kubernetes. CoreDNS has fewer moving parts than the previous DNS server, since it’s a single executable and a single process, and supports flexible use cases by creating custom DNS entries. It’s also written in Go making it memory-safe.

CoreDNS is now the recommended DNS solution for Kubernetes 1.13+. The project has switched the common test infrastructure to use CoreDNS by default and we recommend users switching as well. KubeDNS will still be supported for at least one more release, but it’s time to start planning your migration. Many OSS installer tools have already made the switch, including Kubeadm in 1.11. If you use a hosted solution, please work with your vendor to understand how this will impact you.

Additional Notable Feature Updates

Support for 3rd party device monitoring plugins has been introduced as an alpha feature. This removes current device-specific knowledge from the kubelet to enable future use-cases requiring device-specific knowledge to be out-of-tree.

Kubelet Device Plugin Registration is graduating to stable. This creates a common Kubelet plugin discovery model that can be used by different types of node-level plugins, such as device plugins, CSI and CNI, to establish communication channels with Kubelet.

Topology Aware Volume Scheduling is now stable. This make the scheduler aware of a Pod’s volume’s topology constraints, such as zone or node.

APIServer DryRun is graduating to beta. This moves “apply” and declarative object management from kubectl to the apiserver in order to fix many of the existing bugs that can’t be fixed today.

Kubectl Diff is graduating to beta. This allows users to run a kubectl command to view the difference between a locally declared object configuration and the current state of a live object.

Raw block device using persistent volume source is graduating to beta. This makes raw block devices (non-networked) available for consumption via a Persistent Volume Source.

Each Special Interest Group (SIG) within the community continues to deliver the most-requested enhancements, fixes, and functionality for their respective specialty areas. For a complete list of inclusions by SIG, please visit the release notes.

Availability

Kubernetes 1.13 is available for download on GitHub. To get started with Kubernetes, check out these interactive tutorials. You can also easily install 1.13 using kubeadm.

Features Blog Series

If you’re interested in exploring these features more in depth, check back tomorrow for our 5 Days of Kubernetes series where we’ll highlight detailed walkthroughs of the following features:

  • Day 1 – Simplified Kubernetes Cluster Creation with Kubeadm
  • Day 2 – Out-of-tree CSI Volume Plugins
  • Day 3 – Switch default DNS plugin to CoreDNS
  • Day 4 – New CLI Tips and Tricks (Kubectl Diff and APIServer Dry run)
  • Day 5 – Raw Block Volume

Release team

This release is made possible through the effort of hundreds of individuals who contributed both technical and non-technical content. Special thanks to the release team led by Aishwarya Sundar, Software Engineer at Google. The 39 individuals on the release team coordinate many aspects of the release, from documentation to testing, validation, and feature completeness.

As the Kubernetes community has grown, our release process represents an amazing demonstration of collaboration in open source software development. Kubernetes continues to gain new users at a rapid clip. This growth creates a positive feedback cycle where more contributors commit code creating a more vibrant ecosystem. Kubernetes has over 25,000 individual contributors to date and an active community of more than 51,000 people.

Project Velocity

The CNCF has continued refining DevStats, an ambitious project to visualize the myriad contributions that go into the project. K8s DevStats illustrates the breakdown of contributions from major company contributors, as well as an impressive set of preconfigured reports on everything from individual contributors to pull request lifecycle times. On average over the past year, 347 different companies and over 2,372 individuals contribute to Kubernetes each month. Check out DevStats to learn more about the overall velocity of the Kubernetes project and community.

User Highlights

Established, global organizations are using Kubernetes in production at massive scale. Recently published user stories from the community include:

Is Kubernetes helping your team? Share your story with the community.

Ecosystem Updates

  • CNCF recently released the findings of their bi-annual CNCF survey in Mandarin, finding that cloud usage in Asia has grown 135% since March 2018.
  • CNCF expanded its certification offerings to include a Certified Kubernetes Application Developer exam. The CKAD exam certifies an individual’s ability to design, build, configure, and expose cloud native applications for Kubernetes. More information can be found here.
  • CNCF added a new partner category, Kubernetes Training Partners (KTP). KTPs are a tier of vetted training providers who have deep experience in cloud native technology training. View partners and learn more here.
  • CNCF also offers online training that teaches the skills needed to create and configure a real-world Kubernetes cluster.
  • Kubernetes documentation now features user journeys: specific pathways for learning based on who readers are and what readers want to do. Learning Kubernetes is easier than ever for beginners, and more experienced users can find task journeys specific to cluster admins and application developers.

KubeCon

The world’s largest Kubernetes gathering, KubeCon + CloudNativeCon is coming to Seattle from December 10-13, 2018 and Barcelona from May 20-23, 2019. This conference will feature technical sessions, case studies, developer deep dives, salons, and more. Registration will open up in early 2019.

Webinar

Join members of the Kubernetes 1.13 release team on January 10th at 9am PDT to learn about the major features in this release. Register here.

Get Involved

The simplest way to get involved with Kubernetes is by joining one of the many Special Interest Groups (SIGs) that align with your interests. Have something you’d like to broadcast to the Kubernetes community? Share your voice at our weekly community meeting, and through the channels below.

Thank you for your continued feedback and support.

Source

Continuous Delivery of Everything with Rancher, Drone, and Terraform

It’s 8:00 PM. I just deployed to production, but nothing’s working.
Oh, wait. the production Kinesis stream doesn’t exist, because the
CloudFormation template for production wasn’t updated.
Okay, fix that.
9:00 PM. Redeploy. Still broken. Oh, wait. The production config file
wasn’t updated to use the new database.
Okay, fix that. Finally, it
works, and it’s time to go home. Ever been there? How about the late
night when your provisioning scripts work for updating existing servers,
but not for creating a brand new environment? Or, a manual deployment
step missing from a task list? Or, a config file pointing to a resource
from another environment? Each of these problems stems from separating
the activity of provisioning infrastructure from that of deploying
software, whether by choice, or limitation of tools. The impact of
deploying should be to allow customers to benefit from added value or
validate a business hypothesis. In order to accomplish this,
infrastructure and software are both needed, and they normally change
together. Thus, a deployment can be defined as:

  • reconciling the infrastructure needed with the infrastructure that
    already exists; and
  • reconciling the software that we want to run with the software that
    is already running.

With Rancher, Terraform, and Drone, you can build a continuous delivery
pipeline that lets you deploy this way. Let’s look at a sample system:
This simple
architecture has a server running two microservices,
[happy-service]
and
[glad-service].
When a deployment is triggered, you want the ecosystem to match this
picture, regardless of what its current state is. Terraform is a tool
that allows you to predictably create and change infrastructure and
software. You describe individual resources, like servers and Rancher
stacks, and it will create a plan to make the world match the resources
you describe. Let’s create a Terraform configuration that creates a
Rancher environment for our production deployment:

provider “rancher” {
api_url = “$”
}

resource “rancher_environment” “production” {
name = “production”
description = “Production environment”
orchestration = “cattle”
}

resource “rancher_registration_token” “production_token” {
environment_id = “$”
name = “production-token”
description = “Host registration token for Production environment”
}

Terraform has the ability to preview what it’ll do before applying
changes. Let’s run terraform plan.

+ rancher_environment.production
description: “Production environment”

+ rancher_registration_token.production_token
command: “<computed>”

The pluses and green text indicate that the resource needs to be
created. Terraform knows that these resources haven’t been created yet,
so it will try to create them. Running terraform apply creates the
environment in Rancher. You can log into Rancher to see it. Now let’s
add an AWS EC2 server to the environment:

# A look up for rancheros_ami by region
variable “rancheros_amis” {
default = {
“ap-south-1” = “ami-3576085a”
“eu-west-2” = “ami-4806102c”
“eu-west-1” = “ami-64b2a802”
“ap-northeast-2” = “ami-9d03dcf3”
“ap-northeast-1” = “ami-8bb1a7ec”
“sa-east-1” = “ami-ae1b71c2”
“ca-central-1” = “ami-4fa7182b”
“ap-southeast-1” = “ami-4f921c2c”
“ap-southeast-2” = “ami-d64c5fb5”
“eu-central-1” = “ami-8c52f4e3”
“us-east-1” = “ami-067c4a10”
“us-east-2” = “ami-b74b6ad2”
“us-west-1” = “ami-04351964”
“us-west-2” = “ami-bed0c7c7”
}
type = “map”
}

# this creates a cloud-init script that registers the server
# as a rancher agent when it starts up
resource “template_file” “user_data” {
template = <<EOF
#cloud-config
write_files:
– path: /etc/rc.local
permissions: “0755”
owner: root
content: |
#!/bin/bash
for i in
do
docker info && break
sleep 1
done
sudo docker run -d –privileged -v /var/run/docker.sock:/var/run/docker.sock -v /var/lib/rancher:/var/lib/rancher rancher/agent:v1.2.1 $$
EOF

vars {
registration_url = “$”
}
}

# AWS ec2 launch configuration for a production rancher agent
resource “aws_launch_configuration” “launch_configuration” {
provider = “aws”
name = “rancher agent”
image_id = “$”
instance_type = “t2.micro”
key_name = “$”
user_data = “$”

security_groups = [ “$”]
associate_public_ip_address = true
}

# Creates an autoscaling group of 1 server that will be a rancher agent
resource “aws_autoscaling_group” “autoscaling” {
availability_zones = [“$”]
name = “Production servers”
max_size = “1”
min_size = “1”
health_check_grace_period = 3600
health_check_type = “ELB”
desired_capacity = “1”
force_delete = true
launch_configuration = “$”
vpc_zone_identifier = [“$”]
}

We’ll put these in the same directory as environment.tf, and run
terraform plan again:

+ aws_autoscaling_group.autoscaling
arn: “”

+ aws_launch_configuration.launch_configuration
associate_public_ip_address: “true”

+ template_file.user_data

This time, you’ll see that rancher_environment resources is missing.
That’s because it’s already created, and Rancher knows that it
doesn’t have to create it again. Run terraform apply, and after a few
minutes, you should see a server show up in Rancher. Finally, we want to
deploy the happy-service and glad-service onto this server:

resource “rancher_stack” “happy” {
name = “happy”
description = “A service that’s always happy”
start_on_create = true
environment_id = “$”

docker_compose = <<EOF
version: ‘2’
services:
happy:
image: peloton/happy-service
stdin_open: true
tty: true
ports:
– 8000:80/tcp
labels:
io.rancher.container.pull_image: always
io.rancher.scheduler.global: ‘true’
started: $STARTED
EOF

rancher_compose = <<EOF
version: ‘2’
services:
happy:
start_on_create: true
EOF

finish_upgrade = true
environment {
STARTED = “$”
}
}

resource “rancher_stack” “glad” {
name = “glad”
description = “A service that’s always glad”
start_on_create = true
environment_id = “$”

docker_compose = <<EOF
version: ‘2’
services:
glad:
image: peloton/glad-service
stdin_open: true
tty: true
ports:
– 8000:80/tcp
labels:
io.rancher.container.pull_image: always
io.rancher.scheduler.global: ‘true’
started: $STARTED
EOF

rancher_compose = <<EOF
version: ‘2’
services:
glad:
start_on_create: true
EOF

finish_upgrade = true
environment {
STARTED = “$”
}
}

This will create two new Rancher stacks; one for the happy service and
one for the glad service. Running terraform plan once more will show
the two Rancher stacks:

+ rancher_stack.glad
description: “A service that’s always glad”

+ rancher_stack.happy
description: “A service that’s always happy”

And running terraform apply will create them. Once this is done,
you’ll have your two microservices deployed onto a host automatically
on Rancher. You can hit your host on port 8000 or on port 8001 to see
the response from the services:
We’ve created each
piece of the infrastructure along the way in a piecemeal fashion. But
Terraform can easily do everything from scratch, too. Try issuing a
terraform destroy, followed by terraform apply, and the entire
system will be recreated. This is what makes deploying with Terraform
and Rancher so powerful – Terraform will reconcile the desired
infrastructure with the existing infrastructure, whether those resources
exist, don’t exist, or require modification. Using Terraform and
Rancher, you can now create the infrastructure and the software that
runs on the infrastructure together. They can be changed and versioned
together, too. In the future blog entries, we’ll look at how to
automate this process on git push with Drone. Be sure to check out the
code for the Terraform configuration are hosted on
[github].
The
[happy-service]
and
[glad-service]
are simple nginx docker containers. Bryce Covert is an engineer at
pelotech. By day, he helps teams accelerate
engineering by teaching them functional programming, stateless
microservices, and immutable infrastructure. By night, he hacks away,
creating point and click adventure games. You can find pelotech on
Twitter at @pelotechnology.

Source

Microservices Made Easier Using Istio


Expert Training in Kubernetes and Rancher

Join our free online training sessions to learn how to manage Kubernetes workloads with Rancher.

Sign up here

Update: This tutorial on Istio was updated for Rancher 2.0 here.

One of the recent open source initiatives that has caught our interest
at Rancher Labs is Istio, the micro-services
development framework. It’s a great technology, combining some of the
latest ideas in distributed services architecture in an easy-to-use
abstraction. Istio does several things for you. Sometimes referred to as
a “service mesh“, it has facilities for API
authentication/authorization, service routing, service discovery,
request monitoring, request rate-limiting, and more. It’s made up of a
few modular components that can be consumed separately or as a whole.
Some of the concepts such as “circuit breakers” are so sensible I
wonder how we ever got by without them.

Circuit breakers
are a solution to the problem where a service fails and incoming
requests cannot be handled. This causes the dependent services making
those calls to exhaust all their connections/resources, either waiting
for connections to timeout or allocating memory/threads to create new
ones. The circuit breaker protects the dependent services by
“tripping” when there are too many failures in a some interval of
time, and then only after some cool-down period, allowing some
connections to retry (effectively testing the waters to see if the
upstream service is ready to handle normal traffic again).

Istio is
built with Kubernetes in mind. Kubernetes is a
great foundation as it’s one of the fastest growing platforms for
running container systems, and has extensive community support as well
as a wide variety of tools. Kubernetes is also built for scale, giving
you a foundation that can grow with your application.

Deploying Istio with Helm

Rancher includes and enterprise Kubernetes distribution makes it easy to
run Istio. First, fire up a Kubernetes environment on Rancher (watch
this
demo
or see our quickstart
guide
for
help). Next, use the helm chart from the Kubernetes Incubator for
deploying Istio to start the framework’s components. You’ll need to
install helm, which you can do by following this
guide
.
Once you have helm installed, you can add the helm chart repo from
Google to your helm client:

helm repo add incubator http://storage.googleapis.com/kubernetes-charts-incubator

Then you can simply run:

helm install -n istio incubator/istio


A view in kube dash of the microservices that makeup Istio
This will deploy a few micro-services that provide the functionality of
Istio. Istio gives you a framework for exchanging messages between
services. The advantage of using it over building your own is you don’t
have to implement as much “boiler-plate” code before actually writing
the business logic of your application. For instance, do you need to
implement auth or ACLs between services? It’s quite possible that your
needs are the same as most other developers trying to do the same, and
Istio offers a well-written solution that just works. Its also has a
community of developers whose focus is to make this one thing work
really well, and as you build your application around this framework, it
will continue to benefit from this innovation with minimal effort on
your part.

Deploying an Istio Application

OK, so lets try this thing out. So far all we have is plumbing. To
actually see it do something you’ll want to deploy an Istio
application. The Istio team have put together a nice sample application
they call ”BookInfo” to
demonstrate how it works. To work with Istio applications we’ll need
two things: the Istio command line client, istioctl, and the Istio
application templates. The istioctl client works in conjunction with
kubectl to deploy Istio applications. In this basic example,
istioctl serves as a preprocessor for kubectl, so we can dynamically
inject information that is particular to our Istio deployment.
Therefore, in many ways, you are working with normal Kubernetes resource
YAML files, just with some hooks where special Istio stuff can be
injected. To make it easier to get started, you can get both istioctl
and the needed application templates from this repo:
https://github.com/wjimenez5271/rancher-istio. Just clone it on your
local machine. This also assumes you have kubectl installed and
configured. If you need help installing that see our
docs.
Now
that you’ve cloned the above repo, “cd” into the directory and run:

kubectl apply -f <(istioctl kube-inject -f samples/apps/bookinfo/bookinfo.yaml)

This deploys the kubernetes resources using kubectl while injecting some
istio specific values. It will deploy new services to K8 that will serve
the “BookInfo” application, but it will leverage the Istio services
we’ve already deployed. Once the BookInfo services finish deploying we
should be able to view the UI of the web app. We’ll need to get the
address first, we can do that by running

kubectl get services istio-ingress -o wide

This should show you the IP address of the istio ingress (under the
EXTERNAL-IP column). We’ll use this IP address to construct the URL to
access the application. For example, my output with my local Rancher
install looks like:
Example output of kubectl get services istio-ingress -o wide
The istio ingress is shared amongst your applications, and routes to the
correct service based on a URI pattern. Our application route is at
/productpage so our request URL would be:

http://$EXTERNAL_IP/productpage

Try loading that in your browser. If everything worked you should see
a page like this:
Sample application “BookInfo“, built on Istio

Built-in metrics system

Now that we’ve got our application working we can check out the built
in metrics system to see how its behaving. As you can see, Istio has
instrumented our transactions automatically just by using their
framework. Its using the Prometheus metrics collection engine, but they
set it up for you out of the box. We can visualize the metrics using
Grafana. Using the helm chart in this article, accessing the endpoint of
the Grafana pod will require setting up a local kubectl port forward
rule:

export POD_NAME=$(kubectl get pods –namespace default -l “component=istio-istio-grafana” -o jsonpath=”{.items[0].metadata.name}”)

kubectl port-forward $POD_NAME 3000:3000 –namespace default

You can then access Grafana at:
http://127.0.0.1:3000/dashboard/db/istio-dashboard
The Grafana Dashboard with the included Istio template that highlights
useful metrics Have you developed something cool with Istio
on Rancher? If so, we’d love to hear about it. Feel free to drop us a
line on twitter @Rancher_Labs, or
on our user slack.

Source

Deploying Rancher from the AWS Marketplace


A Detailed Overview of Rancher’s Architecture

This newly-updated, in-depth guidebook provides a detailed overview of the features and functionality of the new Rancher: an open-source enterprise Kubernetes platform.

Get the eBook

A step-by-step guide

Rancher is now available for easy deployment from the Amazon Web
Services (AWS)
Marketplace
.
While Rancher has always been easy to install, availability in the
marketplace makes installing Rancher faster and easier than ever. In
the article below, I provide a step-by-step guide to deploying a working
Rancher environment on AWS. The process involves two distinct parts:

  • In part I I step through the process of installing a Rancher
    management node from the AWS Marketplace
  • In **part II **I deploy a Kubernetes cluster in AWS using the
    Rancher management node deployed in part I

From my own experience, it is often small details missed that can lead
to trouble. In this guide I attempt to point out some potential pitfalls
to help ensure a smooth installation.

Before you get started

If you’re a regular AWS user you’ll find this process straightforward.
Before you get started you’ll need:

  • An Amazon EC2 account – If you don’t already have an account,
    you can visit AWS EC2 (https://aws.amazon.com/ec2/) and select
    Get started with Amazon EC2 and follow the process there to
    create a new account.
  • An AWS Keypair – If you’re not familiar with Key Pairs, you can
    save yourself a little grief by familiarizing yourself with the
    topic. You’ll need a Key Pair to connect via ssh to the machine you
    create on AWS. Although most users will probably never have a need
    to ssh to the management host, the installation process still
    requires that a Key Pair exist. From within the Network & Security
    heading in your AWS account select Key Pairs. You can create a Key
    Pair, give it a name, and the AWS console will download a PEM file
    (a ASCII vase64 X.509 certificate) that you should keep on your
    local machine. This will hold the RSA Private Key that you’ll need
    to access the machine via ssh or scp. It’s important that you
    save the key file, because if you lose it, it can’t be replaced and
    you’ll need to create a new one. The marketplace installation
    process for Rancher will assume you already have a Key Pair file.
    You can more read about Key Pairs in the AWS on-line
    documentation
    .
  • Setup AWS Identity and Access Management – If you’re new to
    AWS, this will seem a little tedious, but you’ll want to create an
    IAM users account at some point through the AWS console. You don’t
    need to do this to install Rancher from the AWS Marketplace, but
    you’ll need these credentials to use the Cloud Installer to add
    extra hosts to your Rancher cluster as described in part II of this
    article. You can follow the instructions to Create your Identity
    and Access Management
    Credentials
    .

With these setup items out of the way, we’re ready to get started.

Step 1: Select a Rancher offering from the marketplace

There are three different offerings in the Marketplace as shown below.

  • Rancher on
    RancherOS

    – This is the option we’ll use in this example. This is a single
    container implementation of the Rancher environment running on
    RancherOS, a lightweight Linux optimized for container environments
  • RancherOS –
    HVM

    This marketplace offering installs the RancherOS micro Linux
    distribution only without the Rancher environment. You might use
    this as the basis to package your own containerized application on
    RancherOS. HVM refers to the type of Linux AMI used – you can
    learn more about Linux AMI Virtualization Types
    here
    .
  • RancherOS – HVM – ECS
    Enabled

    – This marketplace offering is a variant of the RancherOS offering
    above intended for use with Amazon’s EC2 Container Service
    (ECS)
    .

We’ll select the first option – Rancher on RancherOS:
** **
After you select Rancher on RancherOS you’ll see additional
informational including pricing details. There is no charge for the use
of the software itself, but you’ll be charged for machine hours and
other fees like EBS magnetic volumes and data transfer at standard AWS
rates. Press Continue once you’ve reviewed the details and the
pricing.

** ** Step2: Select an installation type and provide installation
details The next step is to select an installation method and provide
required settings that AWS will need to provision your machine running
Rancher. There are three installation types:

  1. Click Launch – this is the fastest and easiest approach. Our
    example below assumes this method of installation.
  2. Manual Launch – this installation method will guide you through
    the process of installing Rancher OS using the EC2 Console, API
    or CLI.
  3. Service Catalog – you can also copy versions of Rancher on
    RancherOS to a Service Catalog specific to a region and assign users
    and roles. You can learn more about AWS Service Catalogs
    here.

Select Click Launch and provides installation options as shown:

  • Version – select a version of Rancher to install. By default
    the latest is selected.
  • Region – select the AWS region where you will deploy the
    software. You’ll want to make a note of this because the AWS EC2
    dashboard segments machines by Region (pull-down at the top right of
    the AWS EC2 dashboard). You will need to have the correct region
    selected to see your machines. Also, as you add additional Rancher
    hosts, you’ll want to install them in the same Region, Availability
    Group and Subnet as the management host.
  • EC2 Instance Type – t2.medium is the default (a machine with 4GB
    of RAM and 2 virtual cores). This is inexpensive and OK for
    testing, but you’ll want to use larger machines to actually run
    workloads.
  • VPC Settings (Virtual Private Cloud) – You can specify a
    virtual private cloud and subnet or create your own. Accept the
    default here unless you have reason to select a particular cloud.
  • Security Group – If you have an appropriate Security Group
    already setup in the AWS console you can specify it here. Otherwise
    the installer will create one for you that ensures needed ports are
    open including port 22 (to allow ssh access to the host) and port
    8080 (where the Rancher UI will be exposed).
  • Key Pair – As mentioned at the outset, select a previously
    created Key Pair for which you’ve already saved the private key (the
    X.509 PEM file). You will need this file in case you need to connect
    to your provisioned VM using ssh or scp. To connect using ssh you
    would use a command like this: ssh -i key-pair-name.pem
    <public-ip-address>

When you’ve entered these values select “Launch with 1-click“

Once you launch Rancher,you’ll see the screen below confirming details
of your installation. You’ll receive an e-mail as well. This will
provide you with convenient links to:

  • Your EC2 console – that you can visit anytime by visiting
    http://aws.amazon.com/ec2
  • Your Software page, that provides information about your various
    AWS Marketplace subscriptions

Step 3: Watch as the machine is provisioned

From this point on, Rancher should install by itself. You can monitor
progress by visiting the AWS EC2 Console. Visit
http://aws.amazon.com, login with your AWS credentials, and select EC2
under AWS services. You should see the new AWS t2.medium machine
instance initializing as shown below. Note the pull-down in the top
right of “North Virginia”. This provides us with visibility to machines
in the US East region selected in the previous step.

Step 4: Connect to the Rancher UI

The Rancher machine will take a few minutes to provision, but once
complete, you should be able to connect to the external IP address for
the host (shown in the EC2 console above) on port 8080. Your IP address
will be different but in our case the Public IP address was
54.174.92.13, so we pointed a browser to the URL
http://54.174.92.13:8080. It may take a few minutes for Rancher UI to
become available but you should see the screen below.

Congratulations! If you’ve gotten this far you’ve successfully
deployed Rancher in the AWS cloud! ** **

Having the Rancher UI up and running is nice, but there’s not a lot you
can do with Rancher until you have cluster nodes up and running. In
this section I’ll look at how to deploy a Kubernetes cluster using the
Rancher management node that I deployed from the marketplace in Part I.

Step 1 – Setting up Access Control

You’ll notice when the Rancher UI is first provisioned, there is no
access control. This means that anyone can connect to the web
interface. You’ll be prompted with a warning indicating that you should
setup Authentication before proceeding. Select Access Control under
the ADMIN menu in the Rancher UI. Rancher exposes multiple
authentication options as shown including the use of external Access
Control providers. DevOps teams will often store their projects in a
GitHub repository, so using GitHub for authentication is a popular
choice. We’ll use GitHub in this example. For details on using other
Access Control methods, you can consult the Rancher
Documentation
.

GitHub users should follow the directions, and click on the link
provided in the Rancher UI to setup an OAuth application in GitHub.
You’ll be prompted to provide your GitHub credentials. Once logged into
GitHub, you should see a screen listing any OAuth applications and
inviting you to Register a new application. We’re going to setup
Rancher for Authentication with Git Hub.

Click the Register a new application button in Git Hub, and
provide details about your Rancher installation on AWS. You’ll need the
Public IP address or fully qualified host name for your Rancher
management host.

Once you’ve supplied details about the Rancher application to Git Hub
and clicked Register application, Git Hub will provide you with a
Client ID and a Client Secret for the Rancher application as
shown below.

Copy and paste the Client ID and the Client Secret that appears in Git
Hub into the Rancher Access Control setup screen, and save these values.

Once these values are saved, click Authorize to allow Git Hub
authentication to be used with your Rancher instance.

If you’ve completed these steps successfully, you should see a message
that Git Hub authentication has been setup. You can invite additional
Git Hub users or organizations to access your Rancher instance as shown
below.

Step 2 – Add a new Rancher environment

When Rancher is deployed, there is a single Default environment that
uses Rancher’s native orchestration engine called Cattle. Since
we’re going to install a Rancher managed Kubernetes cluster, we’ll need
to add a new environment for Kubernetes. Under the environment selection
menu on the left labelled Default, select Add Environment.
Provide a name and description for the environment as shown, and select
Kubernetes as the environment template. Selecting the Kubernetes
framework means that Kubernetes will be used for Orchestration, and
additional Rancher frameworks will be used including Network Services,
Healthcheck Services and Rancher IPsec as the software-defined network
environment in Kubernetes.

Once you add the new environment, Rancher will immediately begin trying
to setup a Kubernetes environment. Before Rancher can proceed however a
Docker host needs to be added.

Step 3 – Adding Kubernetes cluster hosts

To add a host in Rancher, click on Add a host on the warning message
that appears at the top of the screen or select the Add Host option
under the Infrastructure -> Hosts menu. Rancher provides multiple
ways to add hosts. You can add an existing Docker host on-premises or in
the cloud, or you can automatically add hosts using a cloud-provider
specific machine driver as shown below. Since our Rancher management
host is running on Amazon EC2, we’ll select the Amazon EC2 machine
driver to auto-provision additional cluster hosts. You’ll want to select
the same AWS region where your Rancher management host resides and
you’ll need your AWS provided Access key and Secret key. If you
don’t have an AWS Access key and Secret key, the AWS
documentation

explains how you can obtain one. You’ll need to provide your AWS
credentials to Rancher as shown so that it can provision machines on
your behalf.

After you’ve provided your AWS credentials, select the AWS Virtual
private cloud and subnet. We’ve selected the same VPC where our Rancher
management node was installed from the AWS marketplace.

Security groups in AWS EC2 express a set of inbound and outbound
security rules. You can choose a security group already setup in your
AWS account, but it is easier to just let Rancher use the existing
rancher-machine group to ensure the network ports that Rancher needs
open are configured appropriately.

After setting up the security group, you can set your instance options
for the additional cluster nodes. You can add multiple hosts at a time.
We add five hosts in this example. We can give the hosts a name. We use
k8shost as our prefix, and Rancher will append a number to the
prefix naming our hosts k8shost1 through k8shost5. You can
select the type of AWS host you’d like for your Kubernetes cluster. For
testing, a t2.medium instance is adequate (2 cores and 4GB of RAM)
however if you are running real workloads, a larger node would be
better. Accept the default 16GB root directory size. If you leave the
AMI blank, Rancher will provision the machine using an Ubuntu AMI. Note
that the ssh username will be ubuntu for this machine type. You
can leave the other settings alone in case you want to change the
defaults.

Once you click Create, Rancher will use your AWS credentials to
provision the hosts using your selected options in your AWS cloud
account. You can monitor the creation of the new hosts from the EC2
dashboard as shown.

Progress will also be shown from within Rancher. Rancher will
automatically provision the AWS host, install the appropriate version of
Docker on the host, provide credentials, start a rancher Agent, and once
the agent is present Rancher will orchestrate the installation of
Kubernetes pulling the appropriate rancher components from the Docker
registry to each cluster host.

You can also monitor the step-by-step provisioning process by
selecting Hosts as shown below under the Infrastructure menu.
This view shows our five node Kubernetes cluster at different stages of
provisioning.

It will take a few minutes before the environment is provisioned and up
and running, but when the dust settles, the Infrastructure Stacks
view should show that the Rancher stacks comprising the Kubernetes
environment are all up and running and healthy.

Under the Kubernetes pull-down, you can launch a Kubernetes shell and
issue kubectl commands. Remember that Kubernetes has the notion of
namespaces, so to see the Pods and Services used by Kubernetes itself,
you’ll need to query the kube-system namespace. This same screen also
provides guidance for installing the kubectl CLI on your own local host.

Rancher also provides access to the Kubernetes Dashboard following the
automated installation under the Kubernetes pull-down.

Congratulations! If you’ve gotten this far, give yourself a pat on the
back. You’re now a Rancher on AWS expert!

Source

Local Kubernetes for Mac– MiniKube vs Docker Desktop

In the previous articles of the series, we have seen the local Kubernetes solutions for Windows and Linux. In this article, we talk about MacOS and take a look at Docker Desktop and Minikube.

Similar to the Windows version, Docker for Mac provides an out of the box solution using a native virtualization system. Docker for Mac is very easy to install, but it also comes with limited configuration options.

On the other hand, Minikube has more complete Kubernetes support with multiple add-ons and driver support (e.g. VirtualBox) at the cost of a more complicated configuration.

Docker on Mac with Kubernetes support

Kubernetes is available in Docker for Mac for 18.06 Stable or higher and includes a Kubernetes server and client, as well as integration with the Docker executable. The Kubernetes server runs locally within your Docker instance and it is similar to the Docker on Windows solution. Notice that Docker on Mac uses a native MacOS virtualization system called Hyperkit.

When Kubernetes support is enabled, you can deploy new workloads not only on Kubernetes but also on Swarm and as standalone containers, without affecting any of your existing workloads.

Installation

As mentioned already, Kubernetes is included in the Docker on Mac binary so it installed automatically with it. You can download and install Docker for Mac from the Docker Store.

Installing Docker DesktopInstalling Docker Desktop

Note: If you already use a previous version of Docker (e.g. docker toolbox ), or an older version of Docker on Mac, we strongly recommend upgrading to the newer version, instead of having multiple docker installations versions active. If for some reason you cannot upgrade, you should be able to use Minikube instead.

After a successful installation, you need to explicitly enable Kubernetes support. Click the Docker icon in the status bar, go to “Preferences”, and on the “Kubernetes” tab check “Enable Kubernetes” as shown in the figure below.

Docker Desktop preferences

This will start a single node Kubernetes cluster for you and install the kubectl command line utility as well. This might take a while, but the dialog will let you know once the Kubernetes cluster is ready.

Enabling KubernetesEnabling Kubernetes

Management

Now you are ready to deploy your workloads similar to Windows. If you are working with multiple Kubernetes clusters and different environments you should already be familiar with switching contexts. You can view contexts using the kubectl config command:

kubectl config get-contexts

Set the context to use as docker-for-desktop:

kubectl config use-context docker-for-desktop

Unfortunately, (as was the case with the Windows version), the bundled Kubernetes distribution does not come with its dashboard enabled. You need to enable it with the following command:

kubectl apply -f https://raw.githubusercontent.com/kubernetes/dashboard/master/src/deploy/alternative/kubernetes-dashboard.yaml

To view the dashboard in your web browser run:

And navigate to your Kubernetes Dashboard at: http://localhost:8001/api/v1/namespaces/kube-system/services/kubernetes-dashboard/proxy

Deployment

Deploying an application it is very straightforward. In the following example, we install a cluster of nginx servers using the commands:

kubectl run nginx –image nginx

kubectl expose deployment nginx –port 80 –target-port 80 –name nginx

Once Kubernetes completed downloading the containers, you can see the containers running by using the command:

You can view the dashboard, as mentioned before, to verify that nginx was indeed installed and your cluster is in working mode.

Kubernetes on Mac using Minikube

As another alternative to Docker-for-Mac, we can also use Minikube to set up and operate a single node Kubernetes cluster as a local development environment. Minikube for Mac supports multiple hypervisors such as VirtualBox, VMWare, and Hyperkit. In this tutorial, we are talking about the installation mode that uses VirtualBox. (If Hyperkit is available then Docker-for-Mac is easier to install.)

Installation

Instead of manually installing all the needed packages for Minikube, it is easier to install all prerequisites using the Homebrew package manager. If you don’t have the Homebrew package manager already installed, you can easily install it using the following command in the terminal application:

/usr/bin/ruby -e “$(curl -fsSL https://raw.githubusercontent.com/Homebrew/install/master/install)”

This will also include prerequisites such as Xcode command line tools.
To install Minikube itself including the prerequisites, we execute the following command:

brew update && brew install kubectl && brew cask install docker minikube virtualbox

After completion, the following packages will be installed in your machine:

docker –version # Docker version 18.06.1-ce, build e68fc7a

docker-compose –version # docker-compose version 1.22.0, build f46880f

docker-machine –version # docker-machine version 0.15.0, build b48dc28d

minikube version # minikube version: v0.30.0

kubectl version –client # Client Version: version.Info{Major:”1″, …..

Management

After successful installation, you can start Minikube by executing the following command in your terminal:

Now Minikube is started and you have created a Kubernetes context called “minikube”, which is set by default during startup. You can switch between contexts using the command:

kubectl config use-context minikube

Furthermore, to access the Kubernetes dashboard, you need to execute/run the following command:

Additional information, on how to configure and manage the Kubernetes cluster can be found in the official documentation.

Deployment

Deploying an application is the same for all drivers supported in Minikube. For example, you can deploy, expose, and scale a service using the usual kubectl commands, as provided in the Minikube Tutorial.

kubectl run my-nginx –image=nginx –port=80

kubectl expose deployment my-nginx –type=NodePort

Kubectl scale –replicas=3 deployment/my-nginx

You can view the workloads of your Minikube cluster either through the Kubernetes dashboard or using the command line interface – kubectl. For example, to see the deployed pods you can use the command:

Conclusion

After looking at both solutions, here are our results…

Minikube is a mature solution available for all major operating systems. Its main advantage is that it provides a unified way of working with a local Kubernetes cluster regardless of the operating system. It is perfect for people that are using multiple OS machines and have some basic familiarity with Kubernetes and Docker.

Pros:

  • Mature solution
  • Works on Windows (any version and edition), Mac, and Linux
  • Multiple drivers that can match any environment
  • Installs several plugins (such as dashboard) by default
  • Very flexible on installation requirements and upgrades

Cons:

  • Installation and removal not as streamlined as other solutions
  • Does not integrate into the MacOS UI

Docker Desktoop for Mac is a very user-friendly solution with good integration for the MacOS UI.

Pros:

  • Very easy installation for beginners
  • All-in-one Docker and Kubernetes solution
  • Configurable via UI

Cons:

  • Relatively new, possibly unstable
  • Limited configuration options (i.e. driver support)

Let us know in the comments which local Kubernetes solution you are using and why.

Source

Announcing Ark v0.10, with greater support for hybrid and multi-cloud deployments

We’re excited to announce the release of Heptio Ark v0.10! This release includes features that give you greater flexibility in migrating applications and organizing cluster backups, along with some usability improvements. Most critically, Ark v0.10 introduces the ability to specify multiple volume snapshot locations, so that if you’re using more than one provider for volume storage within a cluster, you can now snapshot and fully back up every volume.

We know that today, most Ark users tend to have one volume provider within a cluster, like Portworx or Amazon EBS. However, this can pose challenges for application portability, or if you need faster access speeds for certain workloads. Being able to specify more than one location for backing up data volumes gives you more flexibility within a cluster and, in particular, makes it easier to migrate more complex applications from one Kubernetes environment to another.

Down the road, this feature will also become critical for supporting full backup replication. Imagine a world where you could define a replication policy that specifies the additional locations for where you can replicate a backup or a volume snapshot, easily solving for redundancy and cluster restoration across regions.

Read on for more details about this feature and other benefits of Ark v0.10.

Support for multiple volume snapshot locations from multiple providers

In Ark versions prior to v0.10, you can snapshot volumes only from a single provider. For example, if you are running on AWS and using EBS and Rook, you could snapshot volumes from only one of those two persistent volume providers. With Ark v0.10 you can now specify multiple volume snapshot locations from multiple providers..

Let’s say you have an application that you have deployed all in one pod. It has a database, which is kept on an Amazon EBS volume. It also holds user uploaded photos on a Portworx volume. There’s a third volume for generated reports, also stored in Portworx. You can now snapshot all three.

Every persistent volume to be backed up needs to be created with one associated volume snapshot location. This is also a two-step process: first, you create the VolumeSnapshotLocation CRDs for the locations you want (this only needs to be done once). Then, when creating a backup with a persistent volume, you select the location where you want the volume to be stored, by using the –snapshot-location flag and the name of one of the locations you created with the CRD.

Note that even though multiple volume snapshot locations can be created for each provider, when you create the backup, only one volume snapshot location per provider per backup can be used.

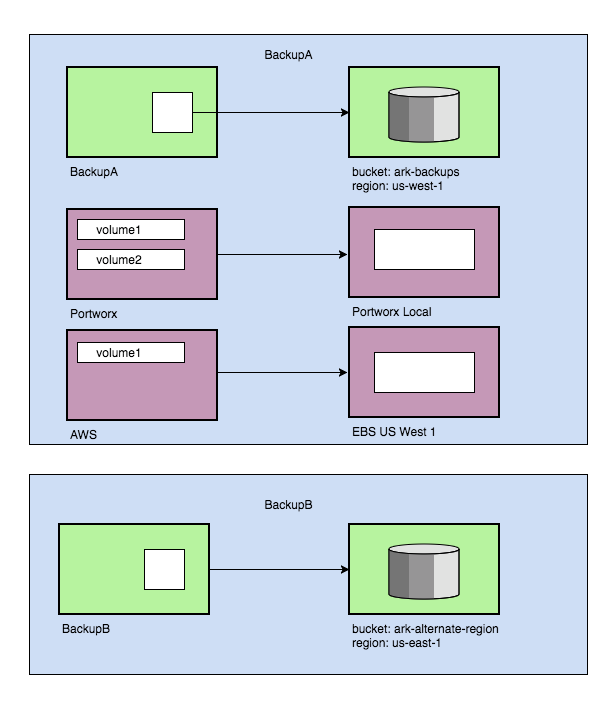
Multiple Volume Snapshots

As with regular backup storage locations, the volume snapshot locations can have a default associated with each of them so at backup creation time you don’t have to specify it. Unlike regular backups, however, the names of those locations must be specified as flags to the Ark server. They are not set up front.

Also as with the new BackupStorageLocation, the new VolumeSnapshotLocation CRD takes the place of the persistent volume setting in the previous Config CRD.

Ability to specify multiple backup locations

Backups now can be stored in different locations. You might want some backups to go for example to a bucket named full-cluster-backups in us-east-1, and other backups to be stored in a bucket named namespace-backups in us-east-2. As you can see, backup locations can now be in different regions.

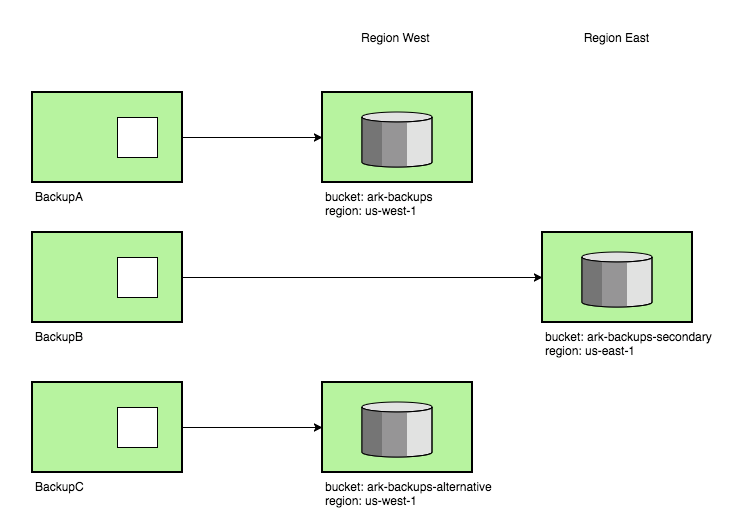
Multiple backup locations

Every backup now needs to be created with one associated backup storage location. This is a two-step process: first, you create the BackupStorageLocation CRDs for the locations you want. Then, when creating a backup, you select the location where you want the backup to be stored by using the –backup-location flag and the name of one of the locations you created with the CRD.

The exception to having to specify the name of a backup storage location is if you want to use the default location feature. In this case, you create the BackupStorageLocation CRD as expected, with the name default. Then, when you create a backup and don’t specify a location, the backup is stored in the default location. You can also rename the default location when you create the CRD, but you must then be sure to specify the –default-backup-storage-location flag when you create the Ark server deployment.

The BackupStorageLocation CRD replaces the previous Config CRD (now deprecated), which was where you defined the name of your backup, bucket and region

Streamlined backup storage

This version also introduces the ability to store backups under prefixes in an object storage bucket. Prior to v0.10, Ark stored all backups from a cluster at the root of the bucket. This meant if you wanted to organize the backup of each of your clusters separately, you’d have to create a bucket for each. As of version 0.10, you can organize backups from each cluster in the same bucket, using different prefixes. The new storage layout and instructions for migrating can be found in our documentation.

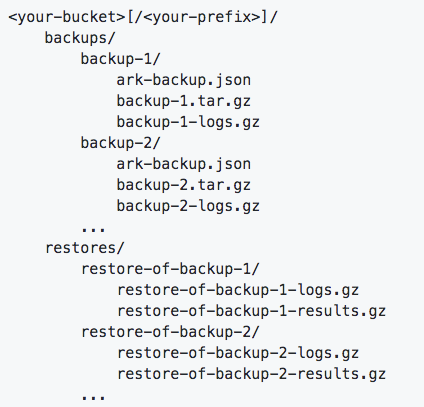
New backup storage organization

Stronger plugin system

Ark’s plugin system has been significantly refactored to improve robustness and ease of development:

  • Plugin processes are now automatically restarted if they unexpectedly terminate.
  • Plugin binaries can now contain more than one plugin implementation (for example, an object store and a block store, or many backup item actions).
  • Prefixes in object storage are now supported.

Plugin authors must update their code to be compatible with v0.10. Plugin users will need to update the plugin image tags and/or image pull policy to ensure they have the latest plugins.

For details, see the GitHub repository for plugins. We’ve updated it with new examples for v0.10, and we continue to provide a v0.9.x branch that refers to the older APIs.

The Ark team would like to thank plugin authors who have been collaborating with us leading up to the v0.10 launch. The following community Ark Plugins have already been updated to use the new plugin system:

Additional usability improvements

  • The sync process, which ensures that Backup custom resources exist for each backup in object storage, has been revamped to run much more frequently (once per minute rather than once per hour), to use significantly fewer cloud provider API calls, and to not generate spurious Kubernetes API errors.
  • Restic backup data is now automatically stored in the same bucket/prefix as the rest of the Ark data. A separate bucket is no longer required (or allowed).
  • Ark resources (backups, restores, schedules) can now be bulk-deleted with the Ark CLI, using the –all or –selector flags, or by specifying multiple resource names as arguments to the delete commands.
  • The Ark CLI now supports waiting for backups and restores to complete, with the–wait flag for –ark backup create and –ark restore create.
  • Restores can be created directly from the most recent backup for a schedule, using –ark restore create –from-schedule SCHEDULE_NAME.

Get involved!

We are in a phase of evaluating the implementation for replication and would love to have input from the community, especially about how to handle provider-specific issues.

With this in mind, we have started holding Heptio Ark design sessions. These are public meetings (open to all!) focused on a technical design discussion around whatever Ark feature the team is working on at that moment.

The next design session will be live streamed here: https://www.youtube.com/watch?v=Ml5lN4cV1Yk

If you’d like to request that we cover a particular feature feel free to make that request in our Ark Community repo. Video recording of all our sessions can be found under our Heptio Ark YouTube playlist.

Other than that, you can also reach us through these channels:

Ark on Kubernetes Slack
Google Groups

Source

Create Rancher Environments with Ansible

Attention, Ansible users! We’ve released the first version of our
Ansible playbooks for Rancher. Ansible is a configuration management system that allows you to write instruction manuals it uses to manage local and remote systems. These playbooks give full control over the installation and
configuration of Rancher server and agent nodes, with features that
include:

  • Static inventory
  • Dynamic inventory via EC2 tags
  • Detection of multiple servers and automatic configuration of HA
  • Support for local, bind-mount, and external databases
  • Optional, local HAProxy with SSL termination for single-server
    deployments
  • Ansible Vault for secure storage of secrets

This first release is for Ubuntu and Debian, and it targets EC2 as a
provider. Upcoming releases will support yum-based systems (RHEL,
CentOS, and Fedora) and will add support for other providers for whom
dynamic inventory modules exist. To get started, visit our Ansible
playbooks repository
on GitHub. There you will find instructions for general
installation 
and setting up EC2.

Source

Setting up the Kubernetes AWS Cloud Provider – Heptio

The AWS cloud provider for Kubernetes enables a couple of key integration points for Kubernetes running on AWS; namely, dynamic provisioning of Elastic Block Store (EBS) volumes, and dynamic provisioning/configuration of Elastic Load Balancers (ELBs) for exposing Kubernetes Service objects. Unfortunately, the documentation surrounding how to set up the AWS cloud provider with Kubernetes is woefully inadequate. This article is an attempt to help address that shortcoming.

More details are provided below, but at a high-level here’s what you’ll need to make the AWS cloud provider in Kubernetes work:

  • You’ll need the hostname of each node to match EC2’s private DNS entry for that node
  • You’ll need an IAM role and policy that EC2 instances can assume as an instance profile
  • You’ll need some Kubernetes-specific tags applied to the AWS resources used by the cluster
  • You’ll add some particular command-line flags to the Kubernetes API server, Kubernetes controller manager, and the Kubelet

Let’s dig into these requirements in a bit more detail.

Node Hostname

It’s important that the name of the Node object in Kubernetes matches the private DNS entry for the instance in EC2. You can use hostnamectl or a configuration management tool (take your pick) to set the instance’s hostname to the FQDN that matches the EC2 private DNS entry. This typically looks something like ip-10–15–30–45.us-west-1.compute.internal, where 10–15–30–45 is the private IP address and us-west-1 is the region where the instance was launched.

If you’re unsure what it is, or if you’re looking for a programmatic way to retrieve the FQDN, just curl the AWS metadata server:

curl http://169.254.169.254/latest/meta-data/local-hostname

Make sure you set the hostname before attempting to bootstrap the Kubernetes cluster, or you’ll end up with nodes whose name in Kubernetes doesn’t match up, and you’ll see various “permission denied”/”unable to enumerate” errors in the logs. For what it’s worth, preliminary testing indicates that this step — setting the hostname to the FQDN — is necessary for Ubuntu but may not be needed for CentOS/RHEL.

IAM Role and Policy

Because the AWS cloud provider performs some tasks on behalf of the operator — like creating an ELB or an EBS volume — the instances need IAM permissions to perform these tasks. Thus, you need to have an IAM instance profile assigned to the instances that give them permissions.

The exact permissions that are needed are best documented in this GitHub repository for the future out-of-tree AWS cloud provider. Separate permissions are needed for the control plane nodes versus the worker nodes; the control plane nodes need more permissions than the worker nodes. This means you’ll end up with two IAM instance profiles: one for the control plane nodes with a broader set of permissions, and one for the worker nodes with a more restrictive set of permissions.

AWS Tags

The AWS cloud provider needs a specific tag to be present on almost all the AWS resources that a Kubernetes cluster needs. The tag key is kubernetes.io/cluster/cluster-name where cluster-name is an arbitrary name for the cluster; the value of the tag is immaterial (this tag replaces an older KubernetesCluster tag you may see referenced). Note that Kubernetes itself will also use this tag on things that it creates, and it will use a value of “owned”. This value does not need to be used on resources that Kubernetes itself did not create. Most of the documentation I’ve seen indicates that the tag is needed on all instances and on exactly one security group (this is the security group that will be modified to allow ELBs to access the nodes, so the worker nodes should be a part of this security group). However, I’ve also found it necessary to make sure the kubernetes.io/cluster/cluster-name tag is present on subnets and route tables in order for the integration to work as expected.

Kubernetes Configuration

On the Kubernetes side of the house, you’ll need to make sure that the –cloud-provider=aws command-line flag is present for the API server, controller manager, and every Kubelet in the cluster.

If you’re using kubeadm to set up your cluster, you can have kubeadm add the flags to the API server and controller manager by using the apiServerExtraArgs and controllerManagerExtraArgs sections in a configuration file, like this:

apiServerExtraArgs:
cloud-provider: aws
controllerManagerExtraArgs:
cloud-provider: aws

Likewise, you can use the nodeRegistration section of a kubeadm configuration file to pass extra arguments to the Kubelet, like this:

nodeRegistration:
kubeletExtraArgs:
cloud-provider: aws

I’d probably also recommend setting the name of the Kubelet to the node’s private DNS entry in EC2 (this ensures it matches the hostname, as described earlier in this article). Thus, the full nodeRegistration section might look like this:

nodeRegistration:
name: ip-10–15–30–45.us-west-1.compute.internal
kubeletExtraArgs:
cloud-provider: aws

You would need to substitute the correct fully-qualified domain name for each instance, of course.

Finally, for dynamic provisioning of Persistent Volumes you’ll need to create a default Storage Class (read about Storage Classes here). The AWS cloud provider has one, but it doesn’t get created automatically. Use this command to define the default Storage Class:

kubectl apply -f https://raw.githubusercontent.com/kubernetes/kubernetes/master/cluster/addons/storage-class/aws/default.yaml

This will create a Storage Class named “gp2” that has the necessary annotation to make it the default Storage Class (see here). Once this Storage Class is defined, dynamic provisioning of Persistent Volumes should work as expected.

Troubleshooting

Troubleshooting is notoriously difficult, as most errors seem to be “transparently swallowed” instead of exposed to the user/operator. Here are a few notes that may be helpful:

  • You _must_ have the –cloud-provider=aws flag added to the Kubelet before adding the node to the cluster. Key to the AWS integration is a particular field on the Node object — the .spec.providerID field — and that field will only get populated if the flag is present when the node is first added to the cluster. If you add a node to the cluster and then add the command-line flag afterward, this field/value won’t get populated and the integration won’t work as expected. No error is surfaced in this situation (at least, not that I’ve been able to find).
  • If you do find yourself with a missing .spec.providerID field on the Node object, you can add it with a kubectl edit node command. The format of the value for this field is aws:///<az-of-instance>/<instance-id>.
  • Missing AWS tags on resources will cause odd behaviors, like failing to create an ELB for a LoadBalancer-type Service. I haven’t had time to test all the different failure scenarios, but if the cloud provider integration isn’t working as expected I’d double-check that the Kubernetes-specific tags are present on all the AWS resources.

Hopefully, the information in this article helps remove some of the confusion and lack of clarity around getting the AWS cloud provider working with your Kubernetes cluster. I’ll do my best to keep this document updated as I discover additional failure scenarios or find more detailed documentation. If you have questions, feel free to hit me on Twitter or find me in the Kubernetes Slack community. (If you’re an expert in the AWS cloud provider code and can help flesh out the details of this post, please contact me as well!) Have fun out there, fellow Kubernauts!

Source

Containers vs. Serverless Computing | Rancher Labs

A Detailed Overview of Rancher’s Architecture

This newly-updated, in-depth guidebook provides a detailed overview of the features and functionality of the new Rancher: an open-source enterprise Kubernetes platform.

Get the eBook

Serverless computing is a hot topic right now—perhaps even hotter than
Docker containers. Is that because serverless computing is a replacement
for containers? Or is it just another popular technology that can be
used alongside containers? In this post, I take a look at what you need
to know about serverless computing, and how it should figure into your
IT strategy.

Serverless Is Not Server-less

But first, let’s clear up one point: As you may already know,
serverless computing does not mean that there are no servers involved.
It’s a cloud-based service, and just like everything else in the cloud,
it runs on servers. That said, serverless is called serverless because
the service provider handles all of the server-side IT. All you need to
do is write code and deploy it. The serverless computing provider takes
care of just about everything else. So your experience is serverless,
even if the underlying infrastructure is not.

How Serverless Works

How does it work? One of the most popular serverless platforms is AWS
Lambda. To use it, you write code (in C#, Java, Node.js, or Python),
set a few simple configuration parameters, and upload everything (along
with required dependencies) to Lambda. In Lambda terminology, the
package that you’ve uploaded is called a function. You can run the
function by calling it from an application running on an AWS service
such as S3 or EC2. Lambda then deploys your function in a container,
which persists until your function has done its job, then disappears.
The key point to keep in mind is that Lambda takes care of provisioning,
deploying, and managing the container. All you do is provide the code
that runs in the container. Everything else goes on behind the scenes.

A Serverless World?

Does this mean that we now live in a world where software developers and
IT teams no longer need to deal directly with containers, or with
nuts-and-bolts backend IT at all? Will you be able to just write code,
toss it to Lambda, and let AWS take care of everything else? If that
sounds too good to be true, it’s for a very good reason—It is too
good to be true. Serverless computing of the type represented by AWS
Lambda can be an extremely valuable resource, and if it isn’t already
part of your DevOps delivery chain, it probably should be. The key word,
however, is “part.” Serverless computing is very well suited to a
variety of tasks, but it is far from being an all-around substitute for
deploying and managing your own containers. Serverless computing is
really designed to work with containers, rather than replacing them.

What Serverless Computing Does Well

What, then, are the advantages of serverless computing? When used for
the kinds of services which it was designed to host, serverless
computing can be:

Inexpensive

With serverless, you typically pay only for the actual time and volume
of traffic used. Lambda, for example, breaks its time-based pricing down
into increments of 100 milliseconds. The actual cost is generally quite
low as well, in part because serverless functions are small, perform
relatively simple tasks, and run in generic containers with very little
overhead.

Low maintenance

The list of things that you don’t need to do when you deploy a function
on a serverless platform is much longer than the list of things that you
do need to do. Among other things, you don’t need to provision
containers, set system policies and availability levels, or handle any
backend server tasks, for that matter. You can use automatic scaling, or
manually scale use by means of some simple capacity-based settings, if
you want to.

Simple

The standardized programming environment and the lack of server and
container-deployment overhead means that you can focus on writing code.
From the point of view of your main application, the serverless function
is basically an external service which doesn’t need to be closely
integrated into the application’s container ecosystem.

Serverless Use Cases

When would you use serverless computing? Consider these possibilities:

  • Handling backend tasks for a website or mobile application. A
    serverless function can take a request (for information from a user
    database or an external source, for example) from the site or
    application frontend, retrieve the information, and hand it back to
    the frontend. It’s a quick and relatively simple task that can be
    performed as needed, with very little use of frontend time or
    resources—billing only for the actual duration of the backend
    task.
  • Processing real-time data streams and uploads. A serverless function
    can clean up, parse, and filter incoming data streams, process
    uploaded files, manage input from real-time devices, and take care
    of other workhorse tasks associated with intermittent or
    high-throughput data streams. Using serverless functions moves
    resource-intensive real-time processes out of the main application.
  • Taking care of high-volume background processes. You can use
    serverless functions to move data to long-term storage, and to
    convert, process, and analyze data, and forward metrics to an
    analytics service. In a point-of-sale system, for example,
    serverless functions could coordinate inventory, customer, order,
    and transaction databases, as well as intermittent tasks such as
    restocking and flagging variances.

network
image

The Limits of Serverless Computing

But serverless computing has some very definite limits. Lambda, for
example, has built-in restrictions on size, memory use, and time
available for a function to run. These, along with the limited list of
natively supported programming languages, are not necessarily intrinsic
to serverless computing at a fundamental level, but they reflect the
practical constraints of the system. It is important, for example, to
keep functions small and prevent them from taking up too much of the
system’s resources in order to prevent a relatively small number of
high-demand users from locking everyone else out, or overloading the
system. There are also some built-in limits that arise out of the basic
nature of serverless computing. For instance, it may be difficult or
impossible to use most monitoring tools with serverless functions, since
you typically have no access to the function’s container or
container-management system. Debugging and performance analysis may thus
be restricted to fairly primitive or indirect methods. Speed and
response time can also be uneven; these limits, along with the
constraints on size, memory, and duration, are likely to limit its use
in situations where performance is important.

What Containers Can Do Better

The list of things that containers can do better than serverless
functions is probably too long and detailed to present in a single
article. What we’ll do here is simply point out some of the main areas
where serverless functions cannot and should not be expected to replace
container-based applications.

You Can Go Big

A container-based application can be as large and as complex as you need
it to be. You can, for example, refactor a very large and complicated
monolithic application into container-based microservices, tailoring the
new architecture entirely to the requirements of the redesigned system.
If you tried to refactor the same application to run on a serverless
platform, you would encounter multiple bottlenecks based on size and
memory constraints. The resulting application would probably be composed
of extremely fragmented microservices, with a high degree of uncertainty
about availability and latency time for each fragment.

You Have Full Control

Container-based deployment gives you full control over both the
individual containers and the overall container system, as well as the
virtualized infrastructure on which it runs. This allows you to set
policies, allocate and manage resources, have fine-grained control over
security, and make full use of container-management and migration
services. With serverless computing, on the other hand, you have no
choice but to rely on the kindness of strangers.

You Have the Power to Debug, Test, and Monitor

With full control over the container environment comes full power to
look at what goes on both inside and outside of containers. This allows
effective, comprehensive debugging and testing using a full range of
resources, as well as in-depth performance monitoring at all levels. You
can identify and analyze performance problems, and fine-tune performance
on a microservice-by-microservice basis to meet the specific performance
needs of your system. Monitoring access at the system,
container-management, and container levels also makes it possible to
implement full analytics at all of these levels, with drill-down.

Working Together

The truth is that serverless computing and containers work best when
they work together, with each platform doing what it does well. A
container-based application, combined with a full-featured system for
managing and deploying containers, is the best choice by far for
large-scale and complex applications and application suites,
particularly in an enterprise or Internet environment. Serverless
computing, on the other hand, is often best for individual tasks that
can easily be run in the background or accessed as outside services.
Container-based systems can hand off such tasks to serverless
applications without tying up the resources of the main program.
Serverless applications, for their part, can provide services to
multiple clients, and can be updated, upgraded, or switched out with
other serverless applications entirely independently of the container
systems that use their services.

Conclusion

Are serverless computing services and containers competing platforms?
Hardly. Container-based and serverless computing are mutually supporting
parts of the ever-evolving world of contemporary cloud- and continuous
delivery-based software.

Source