Local Kubernetes for Mac– MiniKube vs Docker Desktop

In the previous articles of the series, we have seen the local Kubernetes solutions for Windows and Linux. In this article, we talk about MacOS and take a look at Docker Desktop and Minikube.

Similar to the Windows version, Docker for Mac provides an out of the box solution using a native virtualization system. Docker for Mac is very easy to install, but it also comes with limited configuration options.

On the other hand, Minikube has more complete Kubernetes support with multiple add-ons and driver support (e.g. VirtualBox) at the cost of a more complicated configuration.

Docker on Mac with Kubernetes support

Kubernetes is available in Docker for Mac for 18.06 Stable or higher and includes a Kubernetes server and client, as well as integration with the Docker executable. The Kubernetes server runs locally within your Docker instance and it is similar to the Docker on Windows solution. Notice that Docker on Mac uses a native MacOS virtualization system called Hyperkit.

When Kubernetes support is enabled, you can deploy new workloads not only on Kubernetes but also on Swarm and as standalone containers, without affecting any of your existing workloads.

Installation

As mentioned already, Kubernetes is included in the Docker on Mac binary so it installed automatically with it. You can download and install Docker for Mac from the Docker Store.

Installing Docker DesktopInstalling Docker Desktop

Note: If you already use a previous version of Docker (e.g. docker toolbox ), or an older version of Docker on Mac, we strongly recommend upgrading to the newer version, instead of having multiple docker installations versions active. If for some reason you cannot upgrade, you should be able to use Minikube instead.

After a successful installation, you need to explicitly enable Kubernetes support. Click the Docker icon in the status bar, go to “Preferences”, and on the “Kubernetes” tab check “Enable Kubernetes” as shown in the figure below.

Docker Desktop preferences

This will start a single node Kubernetes cluster for you and install the kubectl command line utility as well. This might take a while, but the dialog will let you know once the Kubernetes cluster is ready.

Enabling KubernetesEnabling Kubernetes

Management

Now you are ready to deploy your workloads similar to Windows. If you are working with multiple Kubernetes clusters and different environments you should already be familiar with switching contexts. You can view contexts using the kubectl config command:

kubectl config get-contexts

Set the context to use as docker-for-desktop:

kubectl config use-context docker-for-desktop

Unfortunately, (as was the case with the Windows version), the bundled Kubernetes distribution does not come with its dashboard enabled. You need to enable it with the following command:

kubectl apply -f https://raw.githubusercontent.com/kubernetes/dashboard/master/src/deploy/alternative/kubernetes-dashboard.yaml

To view the dashboard in your web browser run:

And navigate to your Kubernetes Dashboard at: http://localhost:8001/api/v1/namespaces/kube-system/services/kubernetes-dashboard/proxy

Deployment

Deploying an application it is very straightforward. In the following example, we install a cluster of nginx servers using the commands:

kubectl run nginx –image nginx

kubectl expose deployment nginx –port 80 –target-port 80 –name nginx

Once Kubernetes completed downloading the containers, you can see the containers running by using the command:

You can view the dashboard, as mentioned before, to verify that nginx was indeed installed and your cluster is in working mode.

Kubernetes on Mac using Minikube

As another alternative to Docker-for-Mac, we can also use Minikube to set up and operate a single node Kubernetes cluster as a local development environment. Minikube for Mac supports multiple hypervisors such as VirtualBox, VMWare, and Hyperkit. In this tutorial, we are talking about the installation mode that uses VirtualBox. (If Hyperkit is available then Docker-for-Mac is easier to install.)

Installation

Instead of manually installing all the needed packages for Minikube, it is easier to install all prerequisites using the Homebrew package manager. If you don’t have the Homebrew package manager already installed, you can easily install it using the following command in the terminal application:

/usr/bin/ruby -e “$(curl -fsSL https://raw.githubusercontent.com/Homebrew/install/master/install)”

This will also include prerequisites such as Xcode command line tools.
To install Minikube itself including the prerequisites, we execute the following command:

brew update && brew install kubectl && brew cask install docker minikube virtualbox

After completion, the following packages will be installed in your machine:

docker –version # Docker version 18.06.1-ce, build e68fc7a

docker-compose –version # docker-compose version 1.22.0, build f46880f

docker-machine –version # docker-machine version 0.15.0, build b48dc28d

minikube version # minikube version: v0.30.0

kubectl version –client # Client Version: version.Info{Major:”1″, …..

Management

After successful installation, you can start Minikube by executing the following command in your terminal:

Now Minikube is started and you have created a Kubernetes context called “minikube”, which is set by default during startup. You can switch between contexts using the command:

kubectl config use-context minikube

Furthermore, to access the Kubernetes dashboard, you need to execute/run the following command:

Additional information, on how to configure and manage the Kubernetes cluster can be found in the official documentation.

Deployment

Deploying an application is the same for all drivers supported in Minikube. For example, you can deploy, expose, and scale a service using the usual kubectl commands, as provided in the Minikube Tutorial.

kubectl run my-nginx –image=nginx –port=80

kubectl expose deployment my-nginx –type=NodePort

Kubectl scale –replicas=3 deployment/my-nginx

You can view the workloads of your Minikube cluster either through the Kubernetes dashboard or using the command line interface – kubectl. For example, to see the deployed pods you can use the command:

Conclusion

After looking at both solutions, here are our results…

Minikube is a mature solution available for all major operating systems. Its main advantage is that it provides a unified way of working with a local Kubernetes cluster regardless of the operating system. It is perfect for people that are using multiple OS machines and have some basic familiarity with Kubernetes and Docker.

Pros:

  • Mature solution
  • Works on Windows (any version and edition), Mac, and Linux
  • Multiple drivers that can match any environment
  • Installs several plugins (such as dashboard) by default
  • Very flexible on installation requirements and upgrades

Cons:

  • Installation and removal not as streamlined as other solutions
  • Does not integrate into the MacOS UI

Docker Desktoop for Mac is a very user-friendly solution with good integration for the MacOS UI.

Pros:

  • Very easy installation for beginners
  • All-in-one Docker and Kubernetes solution
  • Configurable via UI

Cons:

  • Relatively new, possibly unstable
  • Limited configuration options (i.e. driver support)

Let us know in the comments which local Kubernetes solution you are using and why.

Source

DockerCon Hallway Track Is Back – Schedule One Today

The Hallway Track is coming back to DockerCon Europe in Barcelona. DockerCon Hallway Track is an innovative platform that helps you find like-minded people to meet one-on-one and schedule knowledge sharing conversations based on shared topics of interest. We’ve partnered with e180 to provide the next level of conference attendee networking. Together, we believe that some of the most valuable conversations can come from hallway encounters, and that we can unlock greatness by learning from each other. After the success at past DockerCons, we’re happy to grow this idea further in Barcelona.

DockerCon is all about learning new things and connecting with the community. The Hallway Track will help you meet and share knowledge with Docker Staff, other attendees, Speakers, and Docker Captains through structured networking.

Source

Docker and MuleSoft Partner to Accelerate Innovation for Enterprises

A convergence of forces in SaaS, IoT, cloud, and mobile have placed unprecedented requirements on businesses to accelerate innovation to meet those rapidly changing preferences. The big don’t eat the small, the fast eat the slow.

The industry has offered several solutions to this acceleration problem – from working harder to outsourcing and devops, but none of those solutions have really offered the levels of acceleration needed. The reason: there is too much friction slowing the art of the possible.

Docker and MuleSoft remove friction in the innovation process, from ideation all the way to deployment. MuleSoft provides a tops down architectural approach, with API-first design and implementation. The Docker approach is bottoms up from the perspective of the application workload with containerization, to both modernize traditional applications and create of new applications.

Marrying those two approaches combined with the platform, tools and methodology, enable both organizations to help your business accelerate faster than ever before. Docker and MuleSoft bridge the chasm between infrastructure and services in a way never before achieved in the industry.

Together, Docker and MuleSoft accelerate legacy application modernization and new application delivery while reducing IT complexity and costs.

  • Modernize traditional applications quickly without code changes with the Docker Enterprise container platform methodology and tooling to containerize legacy applications. Then, you can instantly extend the business logic and data to new applications by leveraging MuleSoft API gateway and Anypoint Platform.
  • Accelerate time to market of new applications by enhancing developer productivity and collaboration and enabling greater reuse of application services. Anypoint Studio lets you define API contracts and decouple consumers and producers of microservices, so line of business developers who consume the API can start creating new experiences such as a mobile application right away with Anypoint mock service. Docker Desktop is used today by millions of developers to develop microservices using any language and any framework: microservice developers can leverage Docker Desktop to implement the APIs using the best tool for the job, and focus on implementing the business logic with a clear specification defined in Anypoint Platform, letting Anypoint Platform provide one more layer of security, observability and manageability at the API level.
  • Improve overall application security, manageability and observability by using Docker Enterprise to manage container workloads and MuleSoft Anypoint Platform to run and manage the application network.

Only Docker and MuleSoft can bring you the complete solution, tools, methodology and know-how, to execute a multi-pronged approach to transforming your business today. And we’re going to work together to make the experience even more pleasurable. There is a saying in IT that between speed, cost, and quality you have to pick two. With Docker and MuleSoft together, you can have all three.

Source

Announcing Ark v0.10, with greater support for hybrid and multi-cloud deployments

We’re excited to announce the release of Heptio Ark v0.10! This release includes features that give you greater flexibility in migrating applications and organizing cluster backups, along with some usability improvements. Most critically, Ark v0.10 introduces the ability to specify multiple volume snapshot locations, so that if you’re using more than one provider for volume storage within a cluster, you can now snapshot and fully back up every volume.

We know that today, most Ark users tend to have one volume provider within a cluster, like Portworx or Amazon EBS. However, this can pose challenges for application portability, or if you need faster access speeds for certain workloads. Being able to specify more than one location for backing up data volumes gives you more flexibility within a cluster and, in particular, makes it easier to migrate more complex applications from one Kubernetes environment to another.

Down the road, this feature will also become critical for supporting full backup replication. Imagine a world where you could define a replication policy that specifies the additional locations for where you can replicate a backup or a volume snapshot, easily solving for redundancy and cluster restoration across regions.

Read on for more details about this feature and other benefits of Ark v0.10.

Support for multiple volume snapshot locations from multiple providers

In Ark versions prior to v0.10, you can snapshot volumes only from a single provider. For example, if you are running on AWS and using EBS and Rook, you could snapshot volumes from only one of those two persistent volume providers. With Ark v0.10 you can now specify multiple volume snapshot locations from multiple providers..

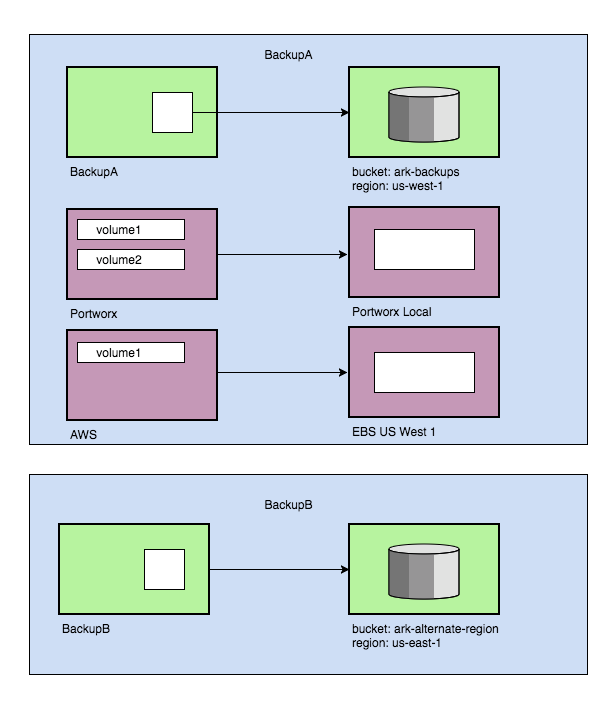
Let’s say you have an application that you have deployed all in one pod. It has a database, which is kept on an Amazon EBS volume. It also holds user uploaded photos on a Portworx volume. There’s a third volume for generated reports, also stored in Portworx. You can now snapshot all three.

Every persistent volume to be backed up needs to be created with one associated volume snapshot location. This is also a two-step process: first, you create the VolumeSnapshotLocation CRDs for the locations you want (this only needs to be done once). Then, when creating a backup with a persistent volume, you select the location where you want the volume to be stored, by using the –snapshot-location flag and the name of one of the locations you created with the CRD.

Note that even though multiple volume snapshot locations can be created for each provider, when you create the backup, only one volume snapshot location per provider per backup can be used.

Multiple Volume Snapshots

As with regular backup storage locations, the volume snapshot locations can have a default associated with each of them so at backup creation time you don’t have to specify it. Unlike regular backups, however, the names of those locations must be specified as flags to the Ark server. They are not set up front.

Also as with the new BackupStorageLocation, the new VolumeSnapshotLocation CRD takes the place of the persistent volume setting in the previous Config CRD.

Ability to specify multiple backup locations

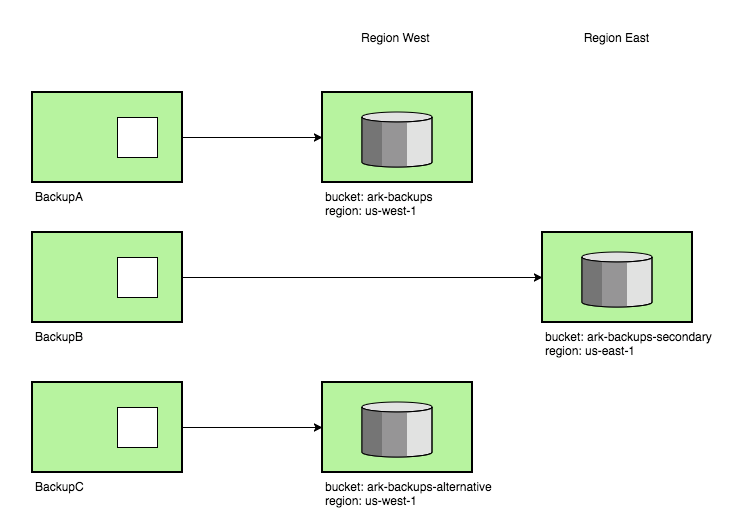
Backups now can be stored in different locations. You might want some backups to go for example to a bucket named full-cluster-backups in us-east-1, and other backups to be stored in a bucket named namespace-backups in us-east-2. As you can see, backup locations can now be in different regions.

Multiple backup locations

Every backup now needs to be created with one associated backup storage location. This is a two-step process: first, you create the BackupStorageLocation CRDs for the locations you want. Then, when creating a backup, you select the location where you want the backup to be stored by using the –backup-location flag and the name of one of the locations you created with the CRD.

The exception to having to specify the name of a backup storage location is if you want to use the default location feature. In this case, you create the BackupStorageLocation CRD as expected, with the name default. Then, when you create a backup and don’t specify a location, the backup is stored in the default location. You can also rename the default location when you create the CRD, but you must then be sure to specify the –default-backup-storage-location flag when you create the Ark server deployment.

The BackupStorageLocation CRD replaces the previous Config CRD (now deprecated), which was where you defined the name of your backup, bucket and region

Streamlined backup storage

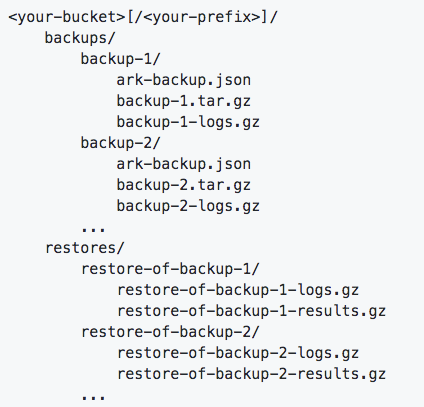
This version also introduces the ability to store backups under prefixes in an object storage bucket. Prior to v0.10, Ark stored all backups from a cluster at the root of the bucket. This meant if you wanted to organize the backup of each of your clusters separately, you’d have to create a bucket for each. As of version 0.10, you can organize backups from each cluster in the same bucket, using different prefixes. The new storage layout and instructions for migrating can be found in our documentation.

New backup storage organization
Stronger plugin system

Ark’s plugin system has been significantly refactored to improve robustness and ease of development:

  • Plugin processes are now automatically restarted if they unexpectedly terminate.
  • Plugin binaries can now contain more than one plugin implementation (for example, an object store and a block store, or many backup item actions).
  • Prefixes in object storage are now supported.

Plugin authors must update their code to be compatible with v0.10. Plugin users will need to update the plugin image tags and/or image pull policy to ensure they have the latest plugins.

For details, see the GitHub repository for plugins. We’ve updated it with new examples for v0.10, and we continue to provide a v0.9.x branch that refers to the older APIs.

The Ark team would like to thank plugin authors who have been collaborating with us leading up to the v0.10 launch. The following community Ark Plugins have already been updated to use the new plugin system:

Additional usability improvements

  • The sync process, which ensures that Backup custom resources exist for each backup in object storage, has been revamped to run much more frequently (once per minute rather than once per hour), to use significantly fewer cloud provider API calls, and to not generate spurious Kubernetes API errors.
  • Restic backup data is now automatically stored in the same bucket/prefix as the rest of the Ark data. A separate bucket is no longer required (or allowed).
  • Ark resources (backups, restores, schedules) can now be bulk-deleted with the Ark CLI, using the –all or –selector flags, or by specifying multiple resource names as arguments to the delete commands.
  • The Ark CLI now supports waiting for backups and restores to complete, with the–wait flag for –ark backup create and –ark restore create.
  • Restores can be created directly from the most recent backup for a schedule, using –ark restore create –from-schedule SCHEDULE_NAME.

Get involved!

We are in a phase of evaluating the implementation for replication and would love to have input from the community, especially about how to handle provider-specific issues.

With this in mind, we have started holding Heptio Ark design sessions. These are public meetings (open to all!) focused on a technical design discussion around whatever Ark feature the team is working on at that moment.

The next design session will be live streamed here: https://www.youtube.com/watch?v=Ml5lN4cV1Yk

If you’d like to request that we cover a particular feature feel free to make that request in our Ark Community repo. Video recording of all our sessions can be found under our Heptio Ark YouTube playlist.

Other than that, you can also reach us through these channels:

Ark on Kubernetes Slack
Google Groups

Source

Create Rancher Environments with Ansible

Attention, Ansible users! We’ve released the first version of our
Ansible playbooks for Rancher. Ansible is a configuration management system that allows you to write instruction manuals it uses to manage local and remote systems. These playbooks give full control over the installation and
configuration of Rancher server and agent nodes, with features that
include:

  • Static inventory
  • Dynamic inventory via EC2 tags
  • Detection of multiple servers and automatic configuration of HA
  • Support for local, bind-mount, and external databases
  • Optional, local HAProxy with SSL termination for single-server
    deployments
  • Ansible Vault for secure storage of secrets

This first release is for Ubuntu and Debian, and it targets EC2 as a
provider. Upcoming releases will support yum-based systems (RHEL,
CentOS, and Fedora) and will add support for other providers for whom
dynamic inventory modules exist. To get started, visit our Ansible
playbooks repository
on GitHub. There you will find instructions for general
installation 
and setting up EC2.

Source

Introducing Docker Engine 18.09 – Docker Blog

Docker Engine Diagram

Last week, we launched Docker Enterprise 2.1 – advancing our leadership in the enterprise container platform market. That platform is built on Docker Engine 18.09 which was also released last week for both Community and Enterprise users. Docker Engine 18.09 represents a significant advancement of the world’s leading container engine, introducing new architectures and features that improve container performance and accelerate adoption for every type of Docker user – whether you’re a developer, an IT admin, working at a startup or at a large, established company.

Built on containerd

Docker Engine – Community and Docker Engine – Enterprise both ship with containerd 1.2. Donated and maintained by Docker and under the auspices of the Cloud Native Computing Foundation (CNCF), containerd is being adopted as the primary container runtime across multiple platforms and clouds, while progressing towards Graduation in CNCF.

BuildKit Improvements

Docker Engine 18.09 also includes the option to leverage BuildKit. This is a new Build architecture that improves performance, storage management, and extensibility while also adding some great new features:

  • Performance improvements: BuildKit includes a re-designed concurrency and caching model that makes it much faster, more precise and portable. When tested against the github.com/moby/moby Dockerfile, we saw 2x to 9.5x faster builds. This new implementation also supports these new operational models:
    • Parallel build stages
    • Skip unused stages and unused context files
    • Incremental context transfer between builds
  • Build-time secrets: Integrate secrets in your Dockerfile and pass them along in a safe way. These secrets do not end up stored in the final image nor are they included in the build cache calculations to avoid anyone from using the cache metadata to reconstruct the secret.
  • SSH forwarding: Connect to private repositories by forwarding your existing SSH agent connection or a key to the builder instead of transferring the key data.
  • Build cache pruning and configurable garbage collection: Build cache can be managed separately from images and cleaned up with a new command ‘docker builder prune`. You can also set policies around when to clear build caches.
  • Extensibility: Create extensions for Dockerfile parsing by using the new #syntax directive:
    # syntax = registry/user/repo:tag

New Enterprise Features

With this architecture shift and alignment, we’ve also made it much easier to upgrade from the Community engine to the Enterprise engine with a simple license activation. For current Community engine users, that means unlocking many enterprise security features and getting access to Docker’s enterprise-class support and extended maintenance policies. Some of the Enterprise specific features include:

  • FIPS 140-2 validation: Enable FIPS mode to leverage cryptographic modules that have been validated by the National Institute of Standards and Technology (NIST). This is important to the public sector and many regulated industries as it is referenced in FISMA, PCI, and HIPAA/HITECH among others. This is supported for both Linux and Windows Server 2016+.
  • Enforcement of signed images: By enabling engine signature verification in the Docker daemon configuration file, you can verify that the integrity of the container is not compromised from development to execution.

Docker Engine 18.09 is now available for both Community and Enterprise users. Next week, we’ll highlight more of the differences in the Enterprise engine and why some of our existing Community users may want to upgrade to Enterprise.

Source

Setting up the Kubernetes AWS Cloud Provider – Heptio

The AWS cloud provider for Kubernetes enables a couple of key integration points for Kubernetes running on AWS; namely, dynamic provisioning of Elastic Block Store (EBS) volumes, and dynamic provisioning/configuration of Elastic Load Balancers (ELBs) for exposing Kubernetes Service objects. Unfortunately, the documentation surrounding how to set up the AWS cloud provider with Kubernetes is woefully inadequate. This article is an attempt to help address that shortcoming.

More details are provided below, but at a high-level here’s what you’ll need to make the AWS cloud provider in Kubernetes work:

  • You’ll need the hostname of each node to match EC2’s private DNS entry for that node
  • You’ll need an IAM role and policy that EC2 instances can assume as an instance profile
  • You’ll need some Kubernetes-specific tags applied to the AWS resources used by the cluster
  • You’ll add some particular command-line flags to the Kubernetes API server, Kubernetes controller manager, and the Kubelet

Let’s dig into these requirements in a bit more detail.

Node Hostname

It’s important that the name of the Node object in Kubernetes matches the private DNS entry for the instance in EC2. You can use hostnamectl or a configuration management tool (take your pick) to set the instance’s hostname to the FQDN that matches the EC2 private DNS entry. This typically looks something like ip-10–15–30–45.us-west-1.compute.internal, where 10–15–30–45 is the private IP address and us-west-1 is the region where the instance was launched.

If you’re unsure what it is, or if you’re looking for a programmatic way to retrieve the FQDN, just curl the AWS metadata server:

curl http://169.254.169.254/latest/meta-data/local-hostname

Make sure you set the hostname before attempting to bootstrap the Kubernetes cluster, or you’ll end up with nodes whose name in Kubernetes doesn’t match up, and you’ll see various “permission denied”/”unable to enumerate” errors in the logs. For what it’s worth, preliminary testing indicates that this step — setting the hostname to the FQDN — is necessary for Ubuntu but may not be needed for CentOS/RHEL.

IAM Role and Policy

Because the AWS cloud provider performs some tasks on behalf of the operator — like creating an ELB or an EBS volume — the instances need IAM permissions to perform these tasks. Thus, you need to have an IAM instance profile assigned to the instances that give them permissions.

The exact permissions that are needed are best documented in this GitHub repository for the future out-of-tree AWS cloud provider. Separate permissions are needed for the control plane nodes versus the worker nodes; the control plane nodes need more permissions than the worker nodes. This means you’ll end up with two IAM instance profiles: one for the control plane nodes with a broader set of permissions, and one for the worker nodes with a more restrictive set of permissions.

AWS Tags

The AWS cloud provider needs a specific tag to be present on almost all the AWS resources that a Kubernetes cluster needs. The tag key is kubernetes.io/cluster/cluster-name where cluster-name is an arbitrary name for the cluster; the value of the tag is immaterial (this tag replaces an older KubernetesCluster tag you may see referenced). Note that Kubernetes itself will also use this tag on things that it creates, and it will use a value of “owned”. This value does not need to be used on resources that Kubernetes itself did not create. Most of the documentation I’ve seen indicates that the tag is needed on all instances and on exactly one security group (this is the security group that will be modified to allow ELBs to access the nodes, so the worker nodes should be a part of this security group). However, I’ve also found it necessary to make sure the kubernetes.io/cluster/cluster-name tag is present on subnets and route tables in order for the integration to work as expected.

Kubernetes Configuration

On the Kubernetes side of the house, you’ll need to make sure that the –cloud-provider=aws command-line flag is present for the API server, controller manager, and every Kubelet in the cluster.

If you’re using kubeadm to set up your cluster, you can have kubeadm add the flags to the API server and controller manager by using the apiServerExtraArgs and controllerManagerExtraArgs sections in a configuration file, like this:

apiServerExtraArgs:
cloud-provider: aws
controllerManagerExtraArgs:
cloud-provider: aws

Likewise, you can use the nodeRegistration section of a kubeadm configuration file to pass extra arguments to the Kubelet, like this:

nodeRegistration:
kubeletExtraArgs:
cloud-provider: aws

I’d probably also recommend setting the name of the Kubelet to the node’s private DNS entry in EC2 (this ensures it matches the hostname, as described earlier in this article). Thus, the full nodeRegistration section might look like this:

nodeRegistration:
name: ip-10–15–30–45.us-west-1.compute.internal
kubeletExtraArgs:
cloud-provider: aws

You would need to substitute the correct fully-qualified domain name for each instance, of course.

Finally, for dynamic provisioning of Persistent Volumes you’ll need to create a default Storage Class (read about Storage Classes here). The AWS cloud provider has one, but it doesn’t get created automatically. Use this command to define the default Storage Class:

kubectl apply -f https://raw.githubusercontent.com/kubernetes/kubernetes/master/cluster/addons/storage-class/aws/default.yaml

This will create a Storage Class named “gp2” that has the necessary annotation to make it the default Storage Class (see here). Once this Storage Class is defined, dynamic provisioning of Persistent Volumes should work as expected.

Troubleshooting

Troubleshooting is notoriously difficult, as most errors seem to be “transparently swallowed” instead of exposed to the user/operator. Here are a few notes that may be helpful:

  • You _must_ have the –cloud-provider=aws flag added to the Kubelet before adding the node to the cluster. Key to the AWS integration is a particular field on the Node object — the .spec.providerID field — and that field will only get populated if the flag is present when the node is first added to the cluster. If you add a node to the cluster and then add the command-line flag afterward, this field/value won’t get populated and the integration won’t work as expected. No error is surfaced in this situation (at least, not that I’ve been able to find).
  • If you do find yourself with a missing .spec.providerID field on the Node object, you can add it with a kubectl edit node command. The format of the value for this field is aws:///<az-of-instance>/<instance-id>.
  • Missing AWS tags on resources will cause odd behaviors, like failing to create an ELB for a LoadBalancer-type Service. I haven’t had time to test all the different failure scenarios, but if the cloud provider integration isn’t working as expected I’d double-check that the Kubernetes-specific tags are present on all the AWS resources.

Hopefully, the information in this article helps remove some of the confusion and lack of clarity around getting the AWS cloud provider working with your Kubernetes cluster. I’ll do my best to keep this document updated as I discover additional failure scenarios or find more detailed documentation. If you have questions, feel free to hit me on Twitter or find me in the Kubernetes Slack community. (If you’re an expert in the AWS cloud provider code and can help flesh out the details of this post, please contact me as well!) Have fun out there, fellow Kubernauts!

Source

Containers vs. Serverless Computing | Rancher Labs

A Detailed Overview of Rancher’s Architecture

This newly-updated, in-depth guidebook provides a detailed overview of the features and functionality of the new Rancher: an open-source enterprise Kubernetes platform.

Get the eBook

Serverless computing is a hot topic right now—perhaps even hotter than
Docker containers. Is that because serverless computing is a replacement
for containers? Or is it just another popular technology that can be
used alongside containers? In this post, I take a look at what you need
to know about serverless computing, and how it should figure into your
IT strategy.

Serverless Is Not Server-less

But first, let’s clear up one point: As you may already know,
serverless computing does not mean that there are no servers involved.
It’s a cloud-based service, and just like everything else in the cloud,
it runs on servers. That said, serverless is called serverless because
the service provider handles all of the server-side IT. All you need to
do is write code and deploy it. The serverless computing provider takes
care of just about everything else. So your experience is serverless,
even if the underlying infrastructure is not.

How Serverless Works

How does it work? One of the most popular serverless platforms is AWS
Lambda. To use it, you write code (in C#, Java, Node.js, or Python),
set a few simple configuration parameters, and upload everything (along
with required dependencies) to Lambda. In Lambda terminology, the
package that you’ve uploaded is called a function. You can run the
function by calling it from an application running on an AWS service
such as S3 or EC2. Lambda then deploys your function in a container,
which persists until your function has done its job, then disappears.
The key point to keep in mind is that Lambda takes care of provisioning,
deploying, and managing the container. All you do is provide the code
that runs in the container. Everything else goes on behind the scenes.

A Serverless World?

Does this mean that we now live in a world where software developers and
IT teams no longer need to deal directly with containers, or with
nuts-and-bolts backend IT at all? Will you be able to just write code,
toss it to Lambda, and let AWS take care of everything else? If that
sounds too good to be true, it’s for a very good reason—It is too
good to be true. Serverless computing of the type represented by AWS
Lambda can be an extremely valuable resource, and if it isn’t already
part of your DevOps delivery chain, it probably should be. The key word,
however, is “part.” Serverless computing is very well suited to a
variety of tasks, but it is far from being an all-around substitute for
deploying and managing your own containers. Serverless computing is
really designed to work with containers, rather than replacing them.

What Serverless Computing Does Well

What, then, are the advantages of serverless computing? When used for
the kinds of services which it was designed to host, serverless
computing can be:

Inexpensive

With serverless, you typically pay only for the actual time and volume
of traffic used. Lambda, for example, breaks its time-based pricing down
into increments of 100 milliseconds. The actual cost is generally quite
low as well, in part because serverless functions are small, perform
relatively simple tasks, and run in generic containers with very little
overhead.

Low maintenance

The list of things that you don’t need to do when you deploy a function
on a serverless platform is much longer than the list of things that you
do need to do. Among other things, you don’t need to provision
containers, set system policies and availability levels, or handle any
backend server tasks, for that matter. You can use automatic scaling, or
manually scale use by means of some simple capacity-based settings, if
you want to.

Simple

The standardized programming environment and the lack of server and
container-deployment overhead means that you can focus on writing code.
From the point of view of your main application, the serverless function
is basically an external service which doesn’t need to be closely
integrated into the application’s container ecosystem.

Serverless Use Cases

When would you use serverless computing? Consider these possibilities:

  • Handling backend tasks for a website or mobile application. A
    serverless function can take a request (for information from a user
    database or an external source, for example) from the site or
    application frontend, retrieve the information, and hand it back to
    the frontend. It’s a quick and relatively simple task that can be
    performed as needed, with very little use of frontend time or
    resources—billing only for the actual duration of the backend
    task.
  • Processing real-time data streams and uploads. A serverless function
    can clean up, parse, and filter incoming data streams, process
    uploaded files, manage input from real-time devices, and take care
    of other workhorse tasks associated with intermittent or
    high-throughput data streams. Using serverless functions moves
    resource-intensive real-time processes out of the main application.
  • Taking care of high-volume background processes. You can use
    serverless functions to move data to long-term storage, and to
    convert, process, and analyze data, and forward metrics to an
    analytics service. In a point-of-sale system, for example,
    serverless functions could coordinate inventory, customer, order,
    and transaction databases, as well as intermittent tasks such as
    restocking and flagging variances.

network
image

The Limits of Serverless Computing

But serverless computing has some very definite limits. Lambda, for
example, has built-in restrictions on size, memory use, and time
available for a function to run. These, along with the limited list of
natively supported programming languages, are not necessarily intrinsic
to serverless computing at a fundamental level, but they reflect the
practical constraints of the system. It is important, for example, to
keep functions small and prevent them from taking up too much of the
system’s resources in order to prevent a relatively small number of
high-demand users from locking everyone else out, or overloading the
system. There are also some built-in limits that arise out of the basic
nature of serverless computing. For instance, it may be difficult or
impossible to use most monitoring tools with serverless functions, since
you typically have no access to the function’s container or
container-management system. Debugging and performance analysis may thus
be restricted to fairly primitive or indirect methods. Speed and
response time can also be uneven; these limits, along with the
constraints on size, memory, and duration, are likely to limit its use
in situations where performance is important.

What Containers Can Do Better

The list of things that containers can do better than serverless
functions is probably too long and detailed to present in a single
article. What we’ll do here is simply point out some of the main areas
where serverless functions cannot and should not be expected to replace
container-based applications.

You Can Go Big

A container-based application can be as large and as complex as you need
it to be. You can, for example, refactor a very large and complicated
monolithic application into container-based microservices, tailoring the
new architecture entirely to the requirements of the redesigned system.
If you tried to refactor the same application to run on a serverless
platform, you would encounter multiple bottlenecks based on size and
memory constraints. The resulting application would probably be composed
of extremely fragmented microservices, with a high degree of uncertainty
about availability and latency time for each fragment.

You Have Full Control

Container-based deployment gives you full control over both the
individual containers and the overall container system, as well as the
virtualized infrastructure on which it runs. This allows you to set
policies, allocate and manage resources, have fine-grained control over
security, and make full use of container-management and migration
services. With serverless computing, on the other hand, you have no
choice but to rely on the kindness of strangers.

You Have the Power to Debug, Test, and Monitor

With full control over the container environment comes full power to
look at what goes on both inside and outside of containers. This allows
effective, comprehensive debugging and testing using a full range of
resources, as well as in-depth performance monitoring at all levels. You
can identify and analyze performance problems, and fine-tune performance
on a microservice-by-microservice basis to meet the specific performance
needs of your system. Monitoring access at the system,
container-management, and container levels also makes it possible to
implement full analytics at all of these levels, with drill-down.

Working Together

The truth is that serverless computing and containers work best when
they work together, with each platform doing what it does well. A
container-based application, combined with a full-featured system for
managing and deploying containers, is the best choice by far for
large-scale and complex applications and application suites,
particularly in an enterprise or Internet environment. Serverless
computing, on the other hand, is often best for individual tasks that
can easily be run in the background or accessed as outside services.
Container-based systems can hand off such tasks to serverless
applications without tying up the resources of the main program.
Serverless applications, for their part, can provide services to
multiple clients, and can be updated, upgraded, or switched out with
other serverless applications entirely independently of the container
systems that use their services.

Conclusion

Are serverless computing services and containers competing platforms?
Hardly. Container-based and serverless computing are mutually supporting
parts of the ever-evolving world of contemporary cloud- and continuous
delivery-based software.

Source

Introducing Docker’s Windows Server Application Migration Program

Last week, we announced the Docker Windows Server Application Migration Program, designed to help companies quickly and easily migrate and modernize legacy Windows Server 2008 applications while driving continuous innovation across any application, anywhere.

We recognize that Windows Server 2008 is one of the most widely used operating systems today and the coming end-of-support in January 2020 leaves IT organizations with few viable options to cost-effectively secure their legacy applications and data. The Docker Windows Server Application Migration Program represents the best and only way to containerize and secure legacy Windows Server applications while enabling software-driven business transformation. With this new program, customers get:

  • Docker Enterprise: Leading Container Platform and only one for Windows Server applications.
    Docker Enterprise is the leading container platform in the industry– familiar to millions of developers and IT professionals. It’s also the only one that runs Windows Server applications, with support for Windows Server 2016, 1709, 1803 and soon, 2019 (in addition to multiple Linux distributions.) Organizations routinely save 50% or more through higher server consolidation and reduced hardware and licensing costs when they containerize their existing applications with Docker Enterprise.
  • Industry-proven tools & services: Easily discover, containerize, and migrate with immediate results.Only Docker delivers immediate results with industry-proven services that leverage purpose-built tools for the successful containerization of Windows Server applications in the enterprise. This new service offering is based on proven methodologies from Docker’s extensive experience working with hundreds of enterprises to modernize traditional applications. To accelerate migration of legacy applications, Docker leverages a purpose-built tool, called Docker Application Converter, to automatically scan systems for specific applications and speed up the containerization process by automatically creating Docker artifacts. Similarly, Docker Certified Infrastructure accelerates customers’ ability to operationalize the Docker Enterprise container platform. Docker Certified Infrastructure includes configuration best practices, automation tools and validated solution guides for integrating containers into enterprise IT infrastructure like VMware vSphere, Microsoft Azure and Amazon Web Services.
  • Foundation for continuous innovation: Software-driven transformation that enables continuous innovation across any application, anywhereDocker’s platform and methodologies enable organizations to both modernize existing applications and adopt new technologies to meet business needs. This enables transformation to be driven by business and not technical dependencies. Customers can easily integrate new technology stacks and architecture without friction, including: cloud-native apps, microservices, data science, edge computing, and AI.

But don’t just take our word for it. Tele2, a European telecommunications company, is rolling out Docker Enterprise to containerize their legacy Windows Applications at scale.

“We have a vision to ‘cloudify’ everything and transform how we do business as a telecom provider. Docker Enterprise is a key part of that vision. With Docker Enterprise, we have already containerized over half of our application portfolio and accelerated deployment cycles. We are looking forward to getting the advanced Windows Server support features in Docker Enterprise 2.1 into production.”

— Gregory Bohcke, Technical Architect, Tele2

By containerizing legacy applications and their dependencies with the Docker Enterprise container platform, businesses can be moved to Windows Server 2016 (and later OS) without code changes, saving millions in development costs. And because containerized applications run independently of the underlying operating system, they break the cycle of extensive, dependency-ridden upgrades, creating a future-proof architecture that makes it easy to always stay current on the latest OS.

Source

gRPC Load Balancing on Kubernetes without Tears

gRPC Load Balancing on Kubernetes without Tears

Many new gRPC users are surprised to find that Kubernetes’s default load
balancing often doesn’t work out of the box with gRPC. For example, here’s what
happens when you take a simple gRPC Node.js microservices
app
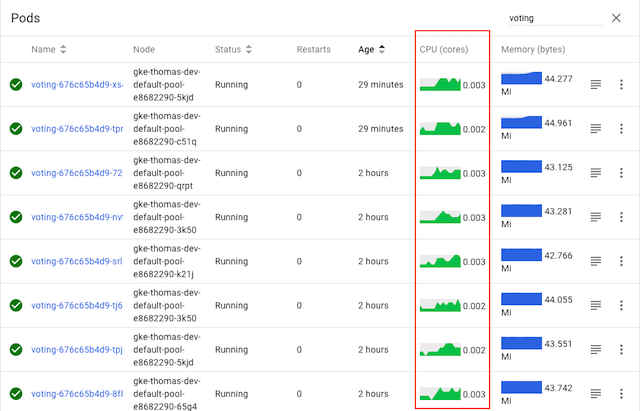
and deploy it on Kubernetes:

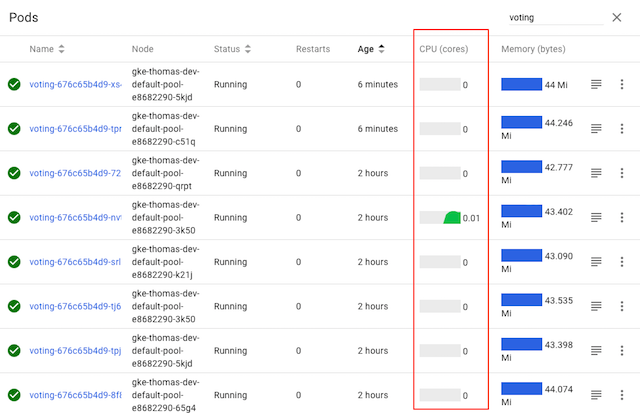
While the voting service displayed here has several pods, it’s clear from
Kubernetes’s CPU graphs that only one of the pods is actually doing any
work—because only one of the pods is receiving any traffic. Why?

In this blog post, we describe why this happens, and how you can easily fix it
by adding gRPC load balancing to any Kubernetes app with
Linkerd, a CNCF service mesh and service sidecar.

First, let’s understand why we need to do something special for gRPC.

gRPC is an increasingly common choice for application developers. Compared to
alternative protocols such as JSON-over-HTTP, gRPC can provide some significant
benefits, including dramatically lower (de)serialization costs, automatic type
checking, formalized APIs, and less TCP management overhead.

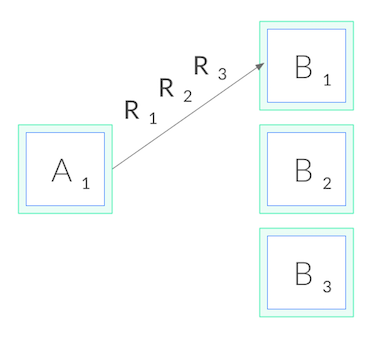
However, gRPC also breaks the standard connection-level load balancing,
including what’s provided by Kubernetes. This is because gRPC is built on
HTTP/2, and HTTP/2 is designed to have a single long-lived TCP connection,
across which all requests are multiplexed—meaning multiple requests can be
active on the same connection at any point in time. Normally, this is great, as
it reduces the overhead of connection management. However, it also means that
(as you might imagine) connection-level balancing isn’t very useful. Once the
connection is established, there’s no more balancing to be done. All requests
will get pinned to a single destination pod, as shown below:

The reason why this problem doesn’t occur in HTTP/1.1, which also has the
concept of long-lived connections, is because HTTP/1.1 has several features
that naturally result in cycling of TCP connections. Because of this,
connection-level balancing is “good enough”, and for most HTTP/1.1 apps we
don’t need to do anything more.

To understand why, let’s take a deeper look at HTTP/1.1. In contrast to HTTP/2,
HTTP/1.1 cannot multiplex requests. Only one HTTP request can be active at a
time per TCP connection. The client makes a request, e.g. GET /foo, and then
waits until the server responds. While that request-response cycle is
happening, no other requests can be issued on that connection.

Usually, we want lots of requests happening in parallel. Therefore, to have
concurrent HTTP/1.1 requests, we need to make multiple HTTP/1.1 connections,
and issue our requests across all of them. Additionally, long-lived HTTP/1.1
connections typically expire after some time, and are torn down by the client
(or server). These two factors combined mean that HTTP/1.1 requests typically
cycle across multiple TCP connections, and so connection-level balancing works.

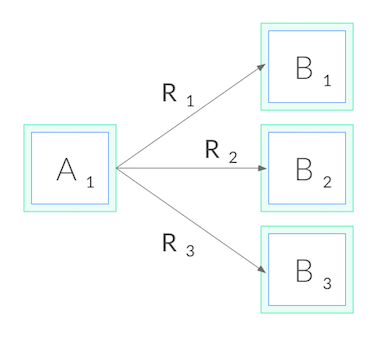
Now back to gRPC. Since we can’t balance at the connection level, in order to
do gRPC load balancing, we need to shift from connection balancing to request
balancing. In other words, we need to open an HTTP/2 connection to each
destination, and balance requests across these connections, as shown below:

In network terms, this means we need to make decisions at L5/L7 rather than
L3/L4, i.e. we need to understand the protocol sent over the TCP connections.

How do we accomplish this? There are a couple options. First, our application
code could manually maintain its own load balancing pool of destinations, and
we could configure our gRPC client to use this load balancing
pool
. This approach gives
us the most control, but it can be very complex in environments like Kubernetes
where the pool changes over time as Kubernetes reschedules pods. Our
application would have to watch the Kubernetes API and keep itself up to date
with the pods.

Alternatively, in Kubernetes, we could deploy our app as headless
services
.
In this case, Kubernetes will create multiple A
records

in the DNS entry for the service. If our gRPC client is sufficiently advanced,
it can automatically maintain the load balancing pool from those DNS entries.
But this approach restricts us to certain gRPC clients, and it’s rarely
possible to only use headless services.

Finally, we can take a third approach: use a lightweight proxy.

Linkerd is a CNCF-hosted service
mesh
for Kubernetes. Most relevant to our purposes, Linkerd also functions as
a service sidecar, where it can be applied to a single service—even without
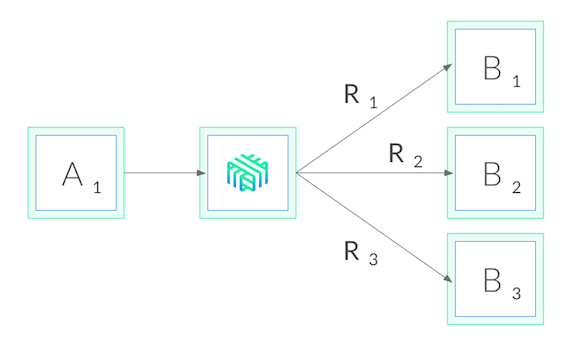
cluster-wide permissions. What this means is that when we add Linkerd to our
service, it adds a tiny, ultra-fast proxy to each pod, and these proxies watch
the Kubernetes API and do gRPC load balancing automatically. Our deployment
then looks like this:

Using Linkerd has a couple advantages. First, it works with services written in
any language, with any gRPC client, and any deployment model (headless or not).
Because Linkerd’s proxies are completely transparent, they auto-detect HTTP/2
and HTTP/1.x and do L7 load balancing, and they pass through all other traffic
as pure TCP. This means that everything will just work.

Second, Linkerd’s load balancing is very sophisticated. Not only does Linkerd
maintain a watch on the Kubernetes API and automatically update the load
balancing pool as pods get rescheduled, Linkerd uses an exponentially-weighted
moving average
of response latencies to automatically send requests to the
fastest pods. If one pod is slowing down, even momentarily, Linkerd will shift
traffic away from it. This can reduce end-to-end tail latencies.

Finally, Linkerd’s Rust-based proxies are incredibly fast and small. They
introduce <1ms of p99 latency and require <10mb of RSS per pod, meaning that
the impact on system performance will be negligible.

Linkerd is very easy to try. Just follow the steps in the Linkerd Getting
Started Instructions
—install the
CLI on your laptop, install the control plane on your cluster, and “mesh” your
service (inject the proxies into each pod). You’ll have Linkerd running on your
service in no time, and should see proper gRPC balancing immediately.

Let’s take a look at our sample voting service again, this time after
installing Linkerd:

As we can see, the CPU graphs for all pods are active, indicating that all pods
are now taking traffic—without having to change a line of code. Voila,
gRPC load balancing as if by magic!

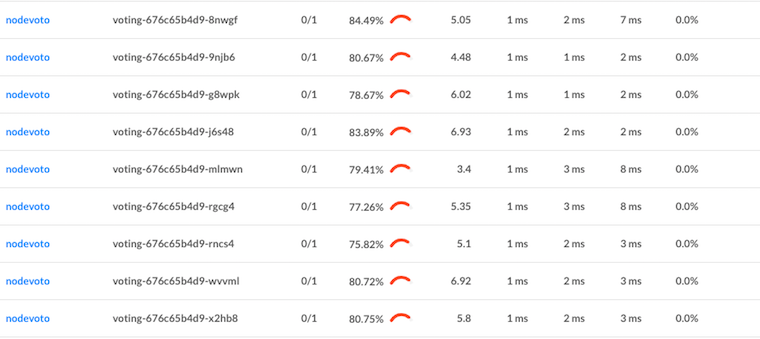
Linkerd also gives us built-in traffic-level dashboards, so we don’t even need
to guess what’s happening from CPU charts any more. Here’s a Linkerd graph
that’s showing the success rate, request volume, and latency percentiles of
each pod:

We can see that each pod is getting around 5 RPS. We can also see that, while
we’ve solved our load balancing problem, we still have some work to do on our
success rate for this service. (The demo app is built with an intentional
failure—as an exercise to the reader, see if you can figure it out by
using the Linkerd dashboard!)

If you’re interested in a dead simple way to add gRPC load balancing to your
Kubernetes services, regardless of what language it’s written in, what gRPC
client you’re using, or how it’s deployed, you can use Linkerd to add gRPC load
balancing in a few commands.

There’s a lot more to Linkerd, including security, reliability, and debugging
and diagnostics features, but those are topics for future blog posts.

Want to learn more? We’d love to have you join our rapidly-growing community!
Linkerd is a CNCF project, hosted on GitHub, and has a thriving community
on Slack, Twitter, and the mailing lists. Come and join the fun!

Source