Installing and Configuring Django Web Framework with Virtual Environments in CentOS/Debian

Some 20 years ago when the World Wide Web was still in its infancy, having a personal or business web site was almost a rare luxury. With the subsequent development of several web technologies and the introduction of dynamic content provided by the combination of server-side programs and databases, companies could no longer be satisfied with having a static web site.

Setup Django Web Framework in CentOS Debian

Install and Configure Django in CentOS and Debian – Part 1

Thus, web applications became a reality – programs in the full sense of the word running on top of a web server and accessible through a web browser.

To make development easier and more effective, web frameworks were designed to aid programmers in their efforts to create applications. In short, a web framework takes care of common core functionalities in the development process such as dealing with user session management, interaction with databases, and the good practice of keeping business logic separate from display logic, to name a few examples.

In this 3-article Django series, we will introduce you to Django, a popular web framework based on Python. For that reason, at least a little familiarity with this programming language is suggested but if you have little to no experience with it, we’ll also walk you through the basics.

Part 1Installing and Configuring Django Web Framework with Virtual Environments in CentOS/Debian

Installing Django in CentOS and Debian Servers

Although you can install Django from both the Debian (v1.7.7: extended support will be discontinued on December 2015) and Fedora EPEL (v1.6.11: extended support was discontinued on April 2015) repositories, the available version is not the latest stable LTS (Long Term Support) release (v1.8.13, as of May 2016).

In this tutorial we will show you how to install Django v1.8.13 since its extended support is guaranteed until at least April of 2018.

The recommended method to install Django is through pip, a popular tool for managing Python packages. Also, in order to create isolated Python environments and avoid conflicts between projects that may require different versions of software dependencies, the use of virtual environments is highly encouraged.

The tools that are used to create and manage virtual Python environments is called virtualenv.

Follow these steps to perform the installation:

1. For Fedora-based distributions (except in Fedora itself), enable the EPEL repository first:

# yum update && yum install epel-release

2. Install pip and virtualenv:

Fedora-based distros:
# yum install python-pip python-virtualenv
OR 
# dnf install python-pip python-virtualenv
Debian and derivatives:
# aptitude update && aptitude install python-pip virtualenv

3. Create a directory to store your initial project.

# mkdir ~/myfirstdjangoenv
# cd ~/myfirstdjangoenv

4. Create and activate a virtual environment:

# virtualenv myfirstdjangoenv

The above command creates a bunch of files and subdirectories into ~/myfirstdjangoenv and basically installs a local copy of Python and pip within the current working directory. Next, we need to activate the virtual environment we just created:

# source myfirstdjangoenv/bin/activate

5. Notice how the command prompt changes after the last command. It’s now time to install Django:

Note that the below screenshot was taken during a previous version of this tutorial, but the expected output is the same when installing Django 1.8.13):

# pip install Django==1.8.13

Install Django in Linux

Install Django in Linux: CentOS and Debian

You can check the Django version by launching a Python shell from your current working directory:

# python
>>> import django
>>> print(django.get_version())

(Again, the above command should return 1.8.13 when checking the current Django version).

To exit the Python prompt, type:

>>> exit() 

and press Enter. Next, turn off the virtual environment:

# deactivate

Deactive Django Virtual Environment

Deactive Django Virtual Environment

Please note that while the virtual environment remains deactivated, Django is not available:

Django Error

Django Error

How to Create a First Project in Django

To create a project within the virtual environment we created earlier, it needs to be activated:

# source myfirstdjangoenv/bin/activate

Next, the framework will create the entire directory structure to store your project. To do this, you will need to run.

# django-admin startproject myfirstdjangoproject

The above command will create a directory named myfirstdjangoproject inside your current working directory.

where you will find a file named manage.py (an utility that will help you manage your project later on) and another subdirectory (~/myfirstdjangoenv/myfirstdjangoproject/myfirstdjangoproject). This last subdirectory will serve as the container for the project files.

While the rest of the files will make real sense after we have reviewed some Python to start writing a real web application, it is worth and well to take note of the key files that will be found inside a project container directory:

  1. myfirstdjangoproject/__init__.py: This empty file tells Python that this directory should be considered a Python package.
  2. myfirstdjangoproject/settings.py: Specific settings for this Django project.
  3. myfirstdjangoproject/urls.py: a TOC (Table Of Contents) of your Django-powered site.
  4. myfirstdjangoproject/wsgi.py: An entry-point for WSGI-compatible web servers to serve your project.
# ls 
# ls -l myfirstdjangoproject
# ls -l myfirstdjangoproject/myfirstdjangoproject

Create Django Project

Create Django Project

In addition, Django has a lightweight built-in web server (written in Python similar to Python SimpleHTTP, what else?) that can be used to test your applications during the development process without having to deal with the task of setting a web server at this particular stage.

However, you need to know that this is not suitable for a production environment – just for development. To launch your newly created project, change your current working directory to the container directory for your project (~/myfirstdjangoenv/myfirstdjangoproject) and run:

# python manage.py runserver 0.0.0.0:8000

If you run into the following error:

You have unapplied migrations; your app may not work properly until they are applied.
Run 'python manage.py migrate' to apply them.

Do what it says:

# python manage.py migrate

and then start the server again:

# python manage.py runserver 0.0.0.0:8000

We will cover the concept of migrations in the next articles of this series, so you can disregard the error message for the time being.

In any event, you can change the default port where the built-in web server will be listening. By using 0.0.0.0 as the network interface to listen on, we allow other computers in the same network to access the project user interface (if you use 127.0.0.1 instead, you will only be able to access the UI from localhost).

You can also change the port to another one of your choosing, but you’ll also need to make sure that traffic through such port is allowed through your firewall:

# firewall-cmd --add-port=8000/tcp
# firewall-cmd --permanent --add-port=8000/tcp

Of course, it goes without saying that you will need to update the allowed port if you choose to use a different one while launching the lightweight web server.

You should see the following output in your terminal:

# python manage.py runserver 0.0.0.0:8000

Start Django HTTP Server

Start Django HTTP Server

At this point, you can open your favorite web browser and navigate to the IP address of the machine where you installed Django followed by the port number. In my case, it is a Debian Jessie box with IP 192.168.0.25 and listening on port 8000:

http://192.168.0.25:8000

Django HTTP Server

Django HTTP Server

While it’s a great thing that we were able to complete the initial setup of a project, there is still much work left to do, as indicated in the message above.

Summary

In this guide we have explained how to install and configure a virtual environment for Django, a versatile open source web framework based on Python.

Regardless of whether you are an application developer or a system administrator, you will want to bookmark this article and the rest of this series because chances are that at some point or another you will need to consider the need of such tool for your daily tasks.

In the following articles of this series we will discuss how to build on what we have already accomplished to create a simple, yet functional, web application using Django and Python.

As we briefly commented on the last article of this series, Django is a free and open source web framework that turns application development into a faster task done in a more effective way – from the programmer’s point of view.

 Installing and Configuring Django Web Framework with Virtual Environments – Part 1

Create Web Applications Using Django

Create Web Applications Using Django – Part 2

To do so, Django follows the MVC (Model – View – Controller) design pattern, or as their FAQs state, it can better be described as a MTV (Model – Template – View) framework.

In Django, a “view” describes which data is presented to the user, whereas a template describes how the data is presented. Finally, the model is the source of information about data in the application.

In this article we will review some Python basics and explain how to prepare your environment to create a simple web application in the next tutorial.

Learn Some Python Basics

As an object-oriented programming language, Python organizes things into a collection of objects with properties (also known as attributes) and methods (also known as actions). This allows us to define an object once and then to create multiple instances of such objects with the same structure of properties and methods without having to write everything from scratch every time. Objects are thus defined by classes that represent them.

For example, a Person object could be defined as follows:

Properties:
  1. Person.height
  2. Person.weight
  3. Person.age
  4. Person.ethniticity
Methods:
  1. Person.eat()
  2. Person.sleep()
  3. Person.walk()

As in most programming languages, a property is defined by the object’s name followed by a dot and the attribute’s name, whereas a method is indicated in the same fashion but also followed by a pair of parentheses (which may be empty or not – in the latter case, it may contain a variable upon whose value the method will act, such as Person.eat(cake) or Person.sleep(now), to name a few examples).

To define methods in Python, you will use the def keyword, followed by the method’s name and a set of parentheses, with an optional object as you will see in a minute.

All of this will become much clearer during the next section where we will dive into a real example.

Creating the structure of a web application

As you may recall from Part 1 of this Django series, we said that a web application requires a database to store data. When you create an app, Django automatically sets up a Sqlite database that works just fine for small to middle size applications, and is what we will use in this case to store data for a classic first-time web app: a blog.

To start a new application inside of a project (by the way, you can think of a project as a collection of web applications), run the following command after activating the virtual environment we set up in Part 1 of this series.

# cd ~/myfirstdjangoenv/
# source myfirstdjangoenv/bin/activate
# cd ~/myfirstdjangoenv/myfirstdjangoproject
# python manage.py startapp myblog

Create Web Application Project in Django

Create Web Application Project in Django

Note that you can change the app’s name (myblog) for a name of your choosing – this is only an identifier for the application (please note that all management tasks are invoked using the manage.py script via the python binary – feel free to explore its source code if you have a minute):

Now let’s go inside the inner myfirstdjangoproject directory and find the file settings.py, where we will tell Django to use myblog as an application:

# cd ~/myfirstdjangoenv/myfirstdjangoproject/myfirstdjangoproject

My Django Web Project

My Django Web Project

Look for the INSTALLED_APPS section and add myblog inside single quotes as shown below:

INSTALLED_APPS = (
    'django.contrib.admin',
    'django.contrib.auth',
    'django.contrib.contenttypes',
    'django.contrib.sessions',
    'django.contrib.messages',
    'django.contrib.staticfiles',
    'myblog'
)

(By the way, the lines beginning with django above represent other Django applications that are activated in the current project automatically when it is first created and are supposed to aid the developer in writing code related to administration, authentication, content type declarations, and so on, in his / her application).

Thus, myblog will become activated, along with the other built-in applications, in this Django instance.

Understanding about Django models

Up to this point, you have the basic directory structure of a web application but we still need to create the models (each model will be a separate class that represents an object in our application).

Another thing that you need to know about Django models is that every attribute represents a database field where the corresponding value will be stored.

Now, return to the myblog directory and edit the file models.py, where we will define the objects for our application:

# cd /myfirstdjangoenv/myfirstdjangoproject/myblog

Configure Django Models

Configure Django Models

It is VERY important that you pay close attention to indentation in .py files. Since this is Python, the models will not work if the indentation is not set evenly and properly. Please refer to the comments below for further clarification on what we’re doing:

  1. Lines starting with the from keyword indicate that we are importing modules (or predefined objects) from an existing file or library (django.db and django.utils, in this case, are located inside /root/myfirstdjangoenv/myfirstdjangoenv/lib/python2.7/site-packages/django/db and utils, respectively.
  2. Each model is defined through a class that derives from django.db.models.Model, which tells Django that it should be saved in the database.
  3. Following the class declaration, you will find the properties of each Post object and then the def keyword that defines the methods for the object.
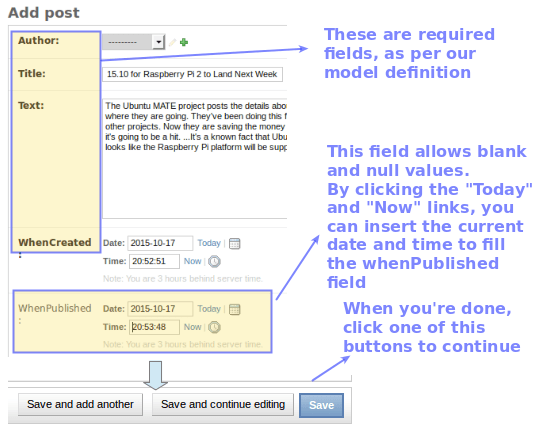
  4. The blank=False and null=False directives in a field declaration indicate that such fields are required.
  5. ForeignKey indicates that the author of a post must have been created previously using the auth.Usermodule (we will show you how to do that in the next article of this series).
  6. Finally, the self keyword refers to the current object and represents a shortcut to accessing its properties and methods.

You can read more about model field declarations in the docs.

So here’s our models.py:

from django.db import models
from django.utils import timezone
# Create your models here.
class Post(models.Model):
        author = models.ForeignKey('auth.User')
        title = models.CharField(max_length=200, blank=False, null=False)
        text = models.TextField(blank=False, null=False)
        whenCreated = models.DateTimeField(default=timezone.now)
        whenPublished = models.DateTimeField(blank=True, null=True)

        def publish(self):
                self.whenPublished = timezone.now()
                self.save()

        def __str__(self):
                return self.title

Creating Django Database and Admin User

As we mentioned earlier, the Post model must be migrated to the database in order to store the data associated with each instance of it. If you make changes to your model later, you will need to repeat this step:

# cd ~/myfirstdjangoenv/myfirstdjangoproject
# python manage.py makemigrations myblog
# python manage.py migrate myblog

Create Django Database

Create Django Database

To create an administrative user for your application (this will allow us to manage our application using a web interface), do:

# python manage.py createsuperuser

and enter the required information when prompted to do so:

Create Django Web Admin User

Create Django Web Admin User

However, in order for our application to be managed through the admin interface, it needs to be registered in ~/myfirstdjangoenv/myfirstdjangoproject/myblog/admin.py:

from django.contrib import admin
from .models import Post
# Register your models here.
admin.site.register(Post)

Now go ahead and start the server:

# cd ~/myfirstdjangoenv/myfirstdjangoproject
# python manage.py runserver 0.0.0.0:8000

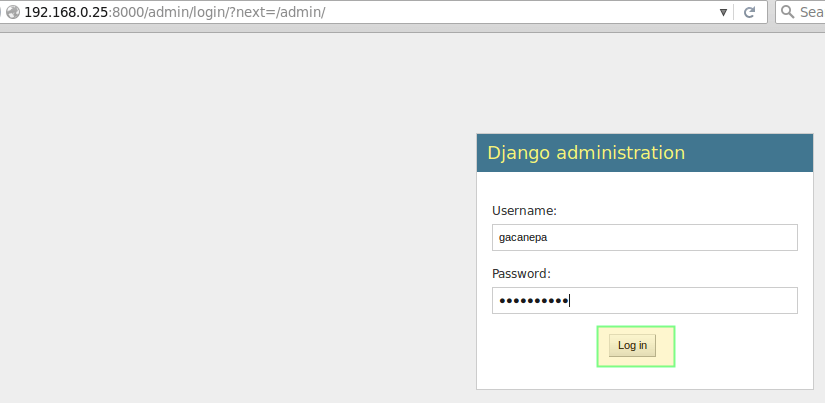
and point your web browser to 192.168.0.25:8000/admin. Enter the user credentials created earlier to log on:

Django Web Administration

Django Web Administration

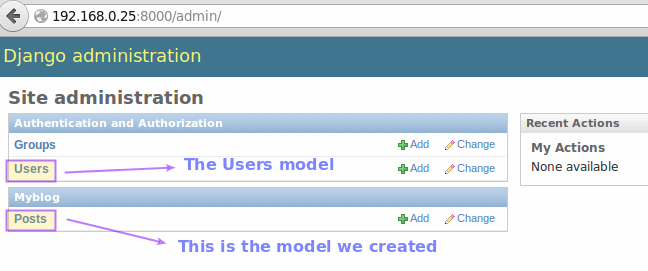
If you followed the steps outlined above, you will be taken to the Django admin interface. Pay particular attention to the Users module, which we will use to create the objects required to define the post authors in our blog:

Django User Module

Django User Module

We will use this administration area to create objects of type User and Post in the next article. By now, you can stop the web server by pressing Ctrl + C in the same terminal window where you started it.

Important Points to remember

Through the use of models, we can create objects for our application and migrate them easily to the underlying database. Thanks to the fact that Django takes care of creating the directory structure and the files that require minimum editing we can focus in the programming side of things, which translates into time savings and equates to a happier developer.

Summary

In this tutorial we have discussed some basic concepts of object-oriented programming in Python and explained how to create the directory structure for our web application using Django.

In the next (and final) guide of this series, we will make use of the Post model to create objects and work on the frontend of our application to display the posts in our blog in a mobile-friendly format.

In Part 1 of this series you learned how to install and configure Django in a virtual environment and you created the skeleton of your first project.

Then in Part 2 we created an application and a model for Post objects, which we later migrated to the database. Finally, we showed you how to integrate your newly created application to the Django administration user interface.

These articles are part of Django series:

 Installing and Configuring Django Web Framework with Virtual Environments – Part 1

 Reviewing Python Basics and Creating Your First Web Application with Django – Part 2

Creating Mobile Friendly Web Application with Django

Creating Mobile Friendly Web Application with Django – Part 3

In this final guide we will discuss how to access the application using the UI and how to make it mobile-friendly for all kind of devices. That said, let’s get started.

Creating objects via the Django admin interface

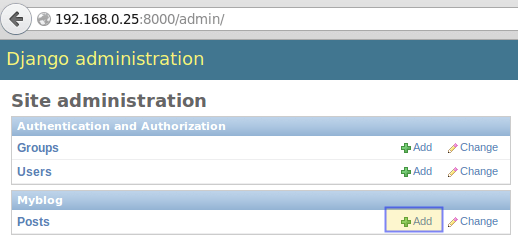
To create objects of type Post (remember that is the model we defined in Part 2 of this series), we will use the Django admin interface.

Make sure the Django built-in web server is running on port 8000 (or another one of your choosing) by running the following command from the outer myfirstdjangoproject directory:

# cd ~/myfirstdjangoenv/myfirstdjangoproject
# python manage.py runserver 0.0.0.0:8000

Now open your web browser and point to http://ip-address:8000/admin, then log on using the credentials you set up in the previous article and start writing a post (which, again, will create an object of type Post and insert the associated data into the underlying database):

Django Administration

Django Administration

Repeat the process 2 or 3 times:

Create Object in Django

Create Object in Django

After we have created a couple of posts, let’s see what we need to do in order to display them using our web browser.

Our initial view

Our first view (~/myfirstdjangoenv/myfirstdjangoproject/myblog/views.py) will be in charge of filtering all Postobjects and returning those where the value of whenPublished is less than or equal to the current date and time (whenPublished__lte=timezone.now()) ordered by descending whenPublished, which is the same as saying “latest first“.

These objects are saved into a variable conveniently named posts, and are returned (identified as allposts) to be embedded in the HTML, as we will see in the next section:

from django.shortcuts import render
from .models import Post
from django.utils import timezone
def posts(request):
        posts = Post.objects.filter(whenPublished__lte=timezone.now()).order_by('-whenPublished')
        return render(request, 'myblog/posts.html', {'allposts': posts})

Finally, the double underscore in whenPublished__lte above is used to separate a database field (whenPublished) from a filter or an operation (lte = less than or equal).

Once we have defined our initial view, let’s work on the associated template.

Create Template for our first Project

Following the directives and paths given in the previous section, we will store our initial template inside myblog/templates/myblog. This means you will need to create a directory named templates and a subdirectory called myblog:

# cd ~/myfirstdjangoenv/myfirstdjangoproject/myblog
# mkdir -p templates/myblog

We will call the template posts.html and insert the following code in it. You will notice that we are adding online references to jQueryBootstrap, FontAwesome, and Google fonts.

In addition, we have enclosed Python code inside curly brackets inside the HTML. Please note that for every object of type Post we will show its title, its published date and author, and finally its text. Finally, in red you will see that we make a reference to the objects returned via myblog/views.py:

Ok, here’s the posts.html file:

<!DOCTYPE html>
<html lang="en">
<head>
<meta charset="utf-8"/>
<link rel="stylesheet" href="https://maxcdn.bootstrapcdn.com/bootstrap/3.3.5/css/bootstrap.min.css">
<link href='https://fonts.googleapis.com/css?family=Indie+Flower' rel='stylesheet' type='text/css'>
<link href='https://fonts.googleapis.com/css?family=Pacifico' rel='stylesheet' type='text/css'>
<link href="https://maxcdn.bootstrapcdn.com/font-awesome/4.4.0/css/font-awesome.min.css" rel="stylesheet" type='text/css'">
<script src="https://code.jquery.com/jquery-2.1.4.min.js">
</script>
    <style>
      .title {
        font-family: 'Indie Flower', serif;
        font-size: 30px;
        color: #1E90FF;
      }
      h1 {
        font-family: 'Pacifico', serif;
        font-size: 45px;
        color: #1E90FF;
      }
    </style>
</head>
<body>
<div class="container"><h1>My blog</h1><br>
{% for post in allposts %}
    <div>
        <div class="title">{{ post.title }}</div>
        <strong>Published on {{ post.whenPublished }} by {{ post.author }}.</strong>
        <p>{{ post.text|linebreaks }}</p>
    </div>
{% endfor %}
</div>
</body>
</html>

In the above template, the linebreaks filter is used to replace line breaks in plain text with the corresponding HTML equivalent (<br /> or </p>) to format each post properly with paragraph separation.

Next, we need to set up a mapping between URLs in our application and the corresponding views that return the data. To do so, create a file named urls.py inside myblog with the following content:

from django.conf.urls import url
from . import views
urlpatterns = [
    url(r'^$', views.posts, name='posts'),
]

The r'^$' deserves a little more explanation. The leading r instructs Django to treat the string inside single quotes as a regular expression.

In particular, r'^$' represents an empty string so that when we point our browser to http://ip-address:8000 (and nothing else), the data returned by the variable posts inside views.py (refer to the previous section) will be presented in our home page:

Last, but not least, we will include the urls.py file of our blog application (~/myfirstdjangoenv/myfirstdjangoproject/myblog/urls.py) into the urls.py of our main project (~/myfirstdjangoenv/myfirstdjangoproject/myfirstdjangoproject/urls.py):

from django.conf.urls import include, url
from django.contrib import admin

urlpatterns = [
    url(r'^admin/', include(admin.site.urls)),
    url(r'', include('myblog.urls')),
]

Then let’s start the web server:

# cd ~/myfirstdjangoenv/myfirstdjangoproject
# python manage.py runserver 0.0.0.0:8000

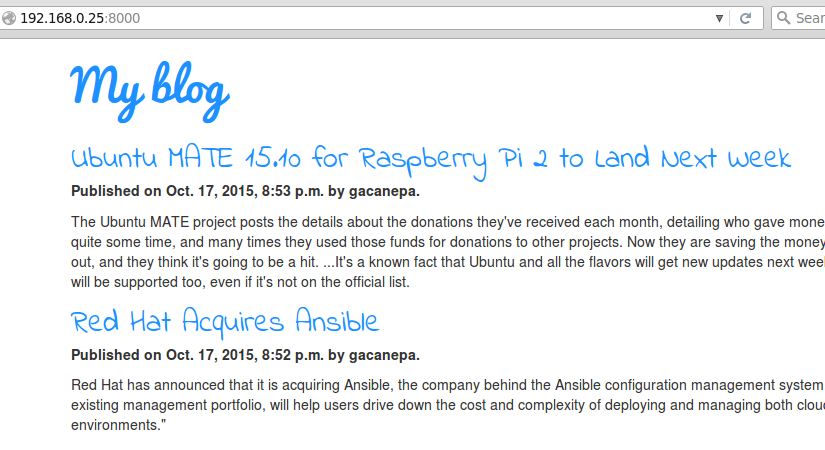
We should now be able to see the lists of posts we created earlier:

Check My Django Web Project

Check My Django Web Project

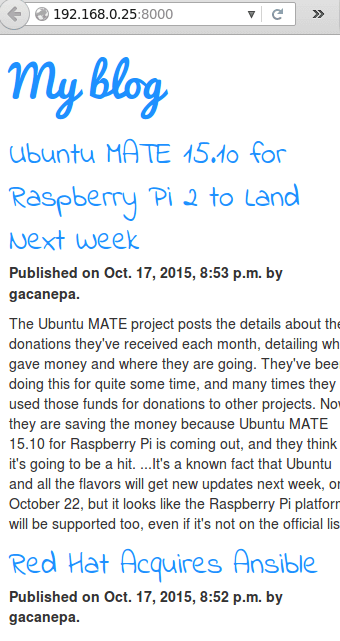
Thanks to Bootstrap, you can still have an excellent visualization in a smaller device:

Mobile Responsive Look of My Project

Mobile Responsive Look of My Project

Summing Up

Let’s now review the concepts that we have covered in this article and throughout this series:

1. Each model defines an object and maps to a database table, whose fields in turn map to the properties of that object. On the other hand, a template defines the user interface where the data returned by the view will be displayed.

Let’s say we want to modify our model by adding a field named summary to the Post object, where we will store an optional brief description of each post. Let’s add the following line in myblog/models.py:

summary = models.CharField(max_length=350, blank=True, null=True)

As we learned in the previous article, we need to migrate the changes to the database:

# python manage.py makemigrations myblog
# python manage.py migrate myblog

Django: Migrate Changes to Database

Django: Migrate Changes to Database

Then use the admin interface to edit the posts and add a brief summary to each post. Finally, replace the following line in the template (posts.html):

<p>{{ post.text|linebreaks }}</p>

with

<p>{{ post.summary }}</p>

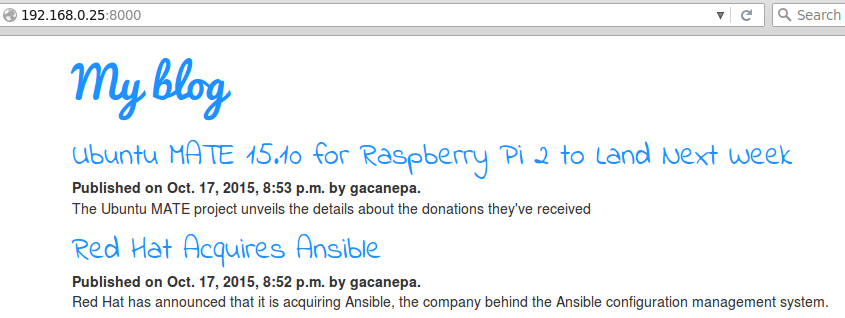
Refresh the home page to see the changes:

Django: Verify Changes to Web Project

Django: Verify Changes to Web Project

2. A view function takes a HTTP request and returns a HTTP response. In this article, def posts(request) in views.py makes a call to the underlying database to retrieve all posts. If we want to retrieve all posts with the word ansible in the title, we should replace.

posts = Post.objects.filter(whenPublished__lte=timezone.now()).order_by('-whenPublished')

with

posts = Post.objects.filter(title__icontains="ansible").order_by('-whenPublished')

By separating the user interface from the application logic in web applications, Django facilitates the tasks of maintaining and escalating apps.

3. If you followed the instructions provided in this series, the structure of your project should be as follows:

myfirstdjangoenv/myfirstdjangoproject
├── db.sqlite3
├── manage.py
├── myblog
│   ├── admin.py
│   ├── admin.pyc
│   ├── __init__.py
│   ├── __init__.pyc
│   ├── migrations
│   │   ├── 0001_initial.py
│   │   ├── 0001_initial.pyc
│   │   ├── __init__.py
│   │   └── __init__.pyc
│   ├── models.py
│   ├── models.pyc
│   ├── templates
│   │   └── myblog
│   │       └── posts.html
│   ├── tests.py
│   ├── urls.py
│   ├── urls.pyc
│   ├── views.py
│   └── views.pyc
└── myfirstdjangoproject
    ├── __init__.py
    ├── __init__.pyc
    ├── settings.py
    ├── settings.pyc
    ├── urls.py
    ├── urls.pyc
    ├── wsgi.py
    └── wsgi.pyc

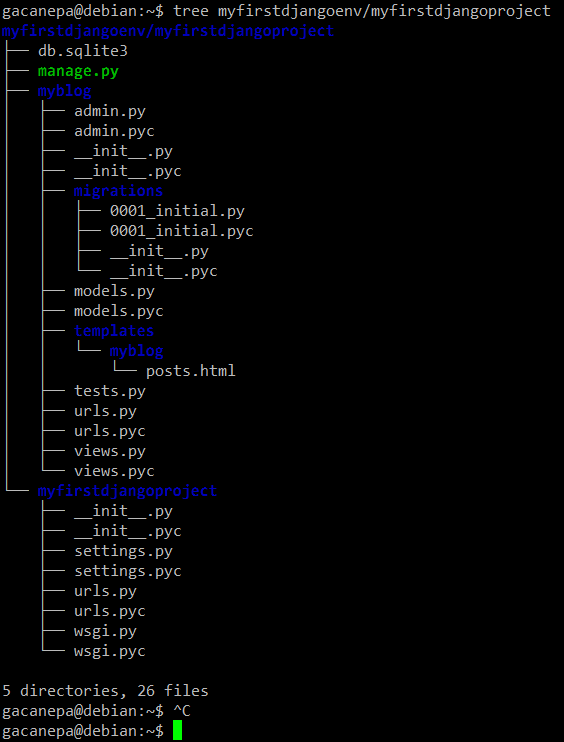
In case the above list does not display correctly in your browser, here’s a screenshot of the output of the following command:

# tree myfirstdjangoenv/myfirstdjangoproject

My Django Protect Tree

My Django Protect Tree

Summary

Although all of these concepts may seem a little intimidating at first, I can assure you Django is well worth all the efforts necessary to become acquainted with it

I hope that the example that we have used in this series to introduce you to this outstanding web framework will motivate you to learn more. If so, the official Django documentation (which is constantly kept up to date) is the best place to start.

I can assure you that there is a whole lot more to Django than we can adequately cover in a series of articles, so feel free to explore it and learn by doing!


Source

Introduction to Clusters in Linux

Hi all, this time I decided to share my knowledge about Linux clustering with you as a series of guides titled “Linux Clustering For a Failover Scenario“.

What is Clustering in Linux

What is Clustering in Linux and Advantages/Disadvantages – Part 1

Following are the 4-article series about Clustering in Linux:

Part 1Introduction to Linux Clustering and Advantages/Disadvanges of Clustering

First of all, you will need to know what clustering is, how it is used in industry and what kind of advantages and drawbacks it has etc.

What is Clustering

Clustering is establishing connectivity among two or more servers in order to make it work like one. Clustering is a very popular technic among Sys-Engineers that they can cluster servers as a failover system, a load balance system or a parallel processing unit.

By this series of guide, I hope to guide you to create a Linux cluster with two nodes on RedHat/CentOS for a failover scenario.

Since now you have a basic idea of what clustering is, let’s find out what it means when it comes to failover clustering. A failover cluster is a set of servers that works together to maintain the high availability of applications and services.

For an example, if a server fails at some point, another node (server) will take over the load and gives end user no experience of down time. For this kind of scenario, we need at least 2 or 3 servers to make the proper configurations.

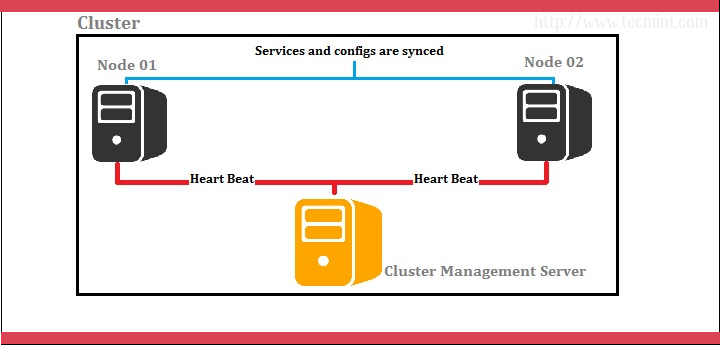
I prefer we use 3 servers; one server as the red hat cluster enabled server and others as nodes (back end servers). Let’s look at below diagram for better understanding.

Cluster Server: 172.16.1.250
Hostname: clserver.test.net

node01: 172.16.1.222
Hostname: nd01server.test.net

node02: 172.16.1.223
Hostname: nd02server.test.net   

Clustering Diagram

Clustering Diagram

In above scenario, cluster management is done by a separate server and it handles two nodes as shown by the diagram. Cluster management server constantly sends heartbeat signals to both nodes to check whether if anyone is failing. If anyone has failed, the other node takes over the load.

Advantages of Clustering Servers

  1. Clustering servers is completely a scalable solution. You can add resources to the cluster afterwards.
  2. If a server in the cluster needs any maintenance, you can do it by stopping it while handing the load over to other servers.
  3. Among high availability options, clustering takes a special place since it is reliable and easy to configure. In case of a server is having a problem providing the services furthermore, other servers in the cluster can take the load.

Disadvantages of Clustering Servers

  1. Cost is high. Since the cluster needs good hardware and a design, it will be costly comparing to a non-clustered server management design. Being not cost effective is a main disadvantage of this particular design.
  2. Since clustering needs more servers and hardware to establish one, monitoring and maintenance is hard. Thus increase the infrastructure.

Now let’s see what kind of packages/installations we need to configure this setup successfully. The following packages/RPMs can be downloaded by rpmfind.net.

  1. Ricci (ricci-0.16.2-75.el6.x86_64.rpm)
  2. Luci (luci-0.26.0-63.el6.centos.x86_64.rpm)
  3. Mod_cluster (modcluster-0.16.2-29.el6.x86_64.rpm)
  4. CCS (ccs-0.16.2-75.el6_6.2.x86_64.rpm)
  5. CMAN(cman-3.0.12.1-68.el6.x86_64.rpm)
  6. Clusterlib (clusterlib-3.0.12.1-68.el6.x86_64.rpm)

Let’s see what each installation does for us and their meanings.

  1. Ricci is a daemon which used for cluster management and configurations. It distributes/dispatches receiving messages to the nodes configured.
  2. Luci is a server that runs on the cluster management server and communicates with other multiple nodes. It provides a web interface to make things easier.
  3. Mod_cluster is a load balancer utility based on httpd services and here it is used to communicate the incoming requests with the underlying nodes.
  4. CCS is used to create and modify the cluster configuration on remote nodes through ricci. It is also used to start and stop the cluster services.
  5. CMAN is one of the primary utilities other than ricci and luci for this particular setup, since this acts as the cluster manager. Actually, cman stands for CLUSTER MANAGER. It is a high-availability add-on for RedHat which is distributed among the nodes in the cluster.

Read the article, understand the scenario we’re going to create the solution to, and set the pre-requisites for the implementation. Let’s meet with the Part 2, in our upcoming article, where we learn How to install and create the cluster for the given scenario.

References:

  1. ch-cman Documentation
  2. Mod Cluster Documentation

Keep connected with Tecmint for handy and latest How To’s. Stay Tuned up for the part 02 (Linux Servers clustering with 2 Nodes for a failover scenario on RedHAT/CentOS – Creating the cluster) soon.

Hi all. Before we start the second part, let’s review about what we have done in Part 01. In Part 01 of this clustering series, we’ve discussed about clustering technique and in which cases it can be used along with the advantages and disadvantages of clustering. And also we have covered the pre-requisites for this setup and what each package will do after we configured the kind of a setup.

Setup Cluster with Multi Nodes

Setup Cluster with Multi Nodes – Part 2

You can review Part 01 and Part 03 from below links.

  1. What is Clustering and Advantages/Disadvantages of Clustering
  2. Fencing and Adding a Failover to Cluster – Part 3

As I said in my last article, that we prefer 3 servers for this setup; one server act as a cluster server and others as nodes.

Cluster Server: 172.16.1.250
Hostname: clserver.test.net

node01: 172.16.1.222
Hostname: nd01server.test.net

node02: 172.16.1.223
Hostname: nd02server.test.net   

In today’s Part 2, we will see how to install and configure clustering on Linux. For this we need to install below packages in all three servers.

  1. Ricci (ricci-0.16.2-75.el6.x86_64.rpm)
  2. Luci (luci-0.26.0-63.el6.centos.x86_64.rpm)
  3. Mod_cluster (modcluster-0.16.2-29.el6.x86_64.rpm)
  4. CCS (ccs-0.16.2-75.el6_6.2.x86_64.rpm)
  5. CMAN(cman-3.0.12.1-68.el6.x86_64.rpm)
  6. Clusterlib (clusterlib-3.0.12.1-68.el6.x86_64.rpm)

Step 1: Installing Clustering in Linux

So let’s start installing these packages in all three servers. You can easily install all these packages using yumpackage manager.

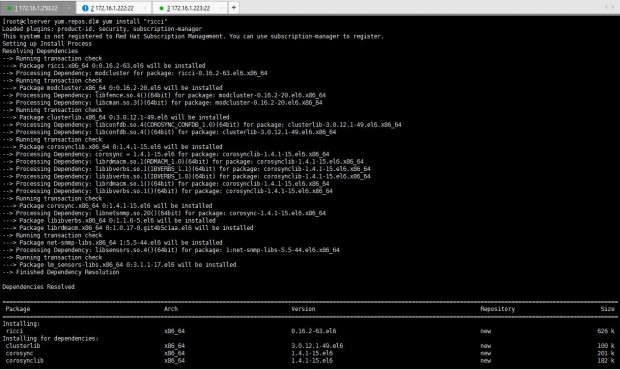
I will start by installing “ricci” package on all these three servers.

# yum install “ricci”

Install Ricci Package

Install Ricci Package

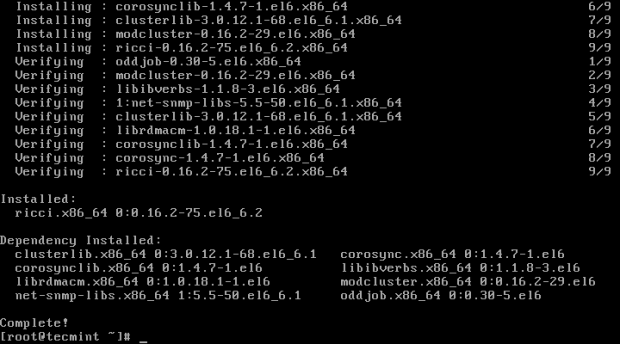
After ricci installation is done, we can see it has installed mod_cluster and cluster lib as its dependencies.

Ricci Installed Summary

Ricci Installed Summary

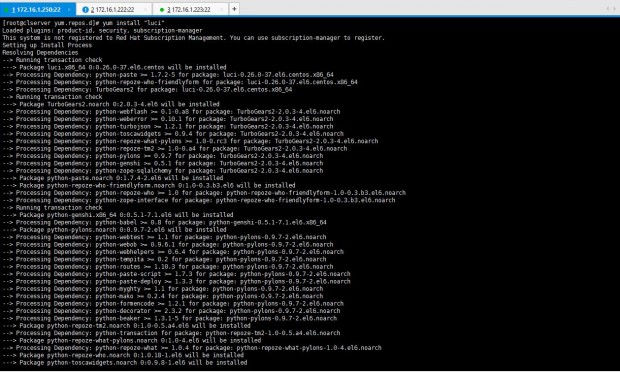
Next I’m installing luci using yum install “luci” command.

# yum install "luci"

Install Luci Package

Install Luci Package

After the installation of luci, you can see it has installed the dependencies it needed.

Luci Package Installed Summary

Luci Package Installed Summary

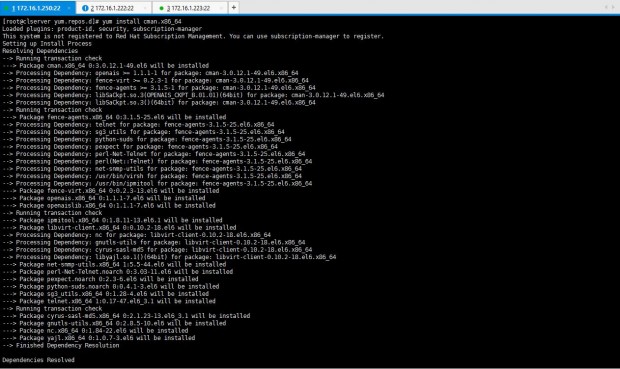
Now, let’s install ccs package in the servers. For that I entered yum install ccs.x86_64 which is shown in the list when I issued yum list |grep “ccs” or else you can simply issue yum install “ccs”.

# yum install “ccs”

Install CSS Package

Install CSS Package

Let’s install cman as the last requirement for this particular setup. The command is yum install “cman” or yum install cman.x86_64 as shown in the yum list as I mentioned earlier.

# yum install “cman”

Install CMAN Package

Install CMAN Package

We need to confirm the installations are in place. Issue below command to see whether the packages we needed are installed properly in all three servers.

# rpm -qa | egrep "ricci|luci|modc|cluster|ccs|cman"

All Packages Installed

All Packages Installed

Perfect all the packages are installed and all we need to do is configuring the setup.

Step 2: Configure Cluster in Linux

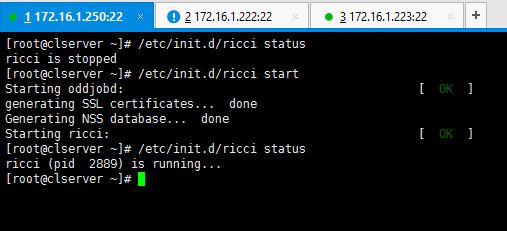
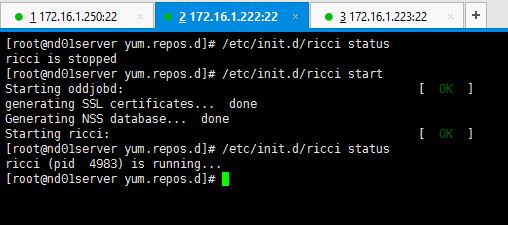
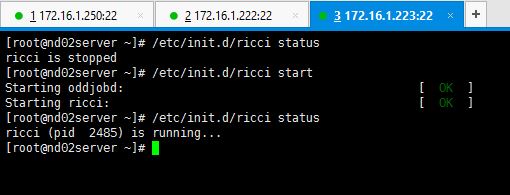
1. As the first step for setting up the cluster, you need to start the ricci service on all three servers.

# service ricci start 
OR
# /etc/init.d/ricci start 

Start Ricci Service on Cluster Server

Start Ricci Service on Cluster Server

Start Ricci On Node 01

Start Ricci On Node 01

Start Ricci On Node 02

Start Ricci On Node 02

2. Since ricci is started in all servers, now it’s time to create the cluster. This is where ccs package comes to our help when configuring the cluster.

If you don’t want to use ccs commands then you will have to edit the “cluster.conf” file for adding the nodes and do other configs. I guess easiest way is to use following commands. Let’s have a look.

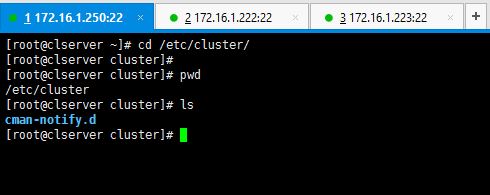
Since I haven’t created the cluster yet, there’s no cluster.conf file created in /etc/cluster location yet as shown below.

# cd /etc/cluster
# pwd
# ls

Check Cluster Configuration File

Check Cluster Configuration File

In my case, I do this in 172.16.1.250 which is dedicated for cluster management. Now onwards, everytime we try to use ricci server, it will ask for ricci’s password. So you will have to set the password of ricci user in all servers.

Enter passwords for ricci user.

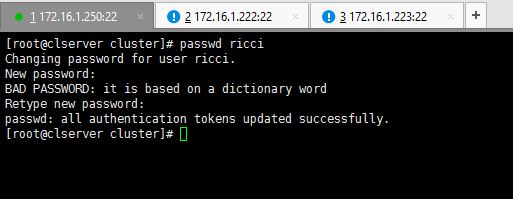
# passwd ricci

Set Ricci Password

Set Ricci Password

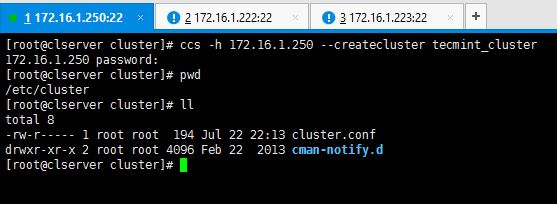
Now enter the command as shown below.

# ccs -h 172.16.1.250 --createcluster tecmint_cluster

You can see after entering above command, cluster.conf file is created in /etc/cluster directory.

Create Cluster Configuration

Create Cluster Configuration

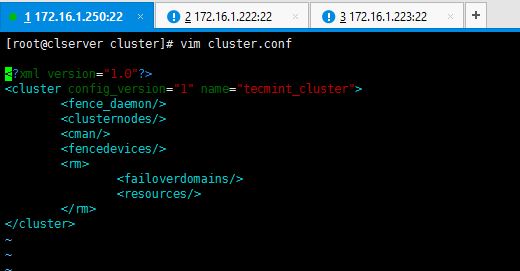
This is how my default cluster.conf looks like before I do the configs.

Cluster Configuration

Cluster Configuration

3. Now let’s add the two nodes to the system. In here also we use ccs commands to make the configurations. I’m not going to manually edit the cluster.conf file but use the following syntax.

# ccs -h 172.16.1.250 --addnode 172.16.1.222

Add Nodes to Cluster

Add Nodes to Cluster

Add the other node too.

# ccs -h 172.16.1.250 --addnode 172.16.1.223

Add Second Node to Cluster

Add Second Node to Cluster

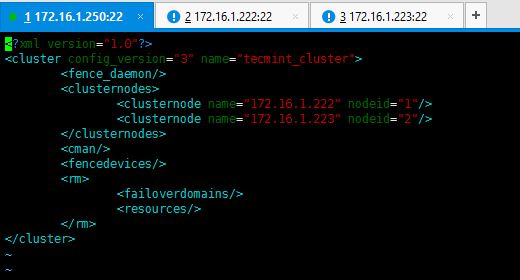
This is how cluster.conf file looks like after adding the node servers.

Cluster Configuration with Nodes

Cluster Configuration with Nodes

You also can enter below command to verify node details.

# ccs –h 172.16.1.250 --lsnodes

Confirm Cluster Node Details

Confirm Cluster Node Details

Perfect. You have successfully created the cluster yourself and added two nodes. For further details about ccscommand options, enter ccs –help command and study the details. Since now you know how to create the cluster and add nodes to it, I will post Part 03 soon for you.

In the previous two guides, we’ve discussed how to install cluster, creating a cluster and adding nodes to the cluster, also we’ve studied how cluster.conf appears to be after the necessary configurations are done.

Today, in this third part of clustering series, we are going to discuss about what is fencing, failover and how to configure them in our setup.

Fencing and Add Failover to Cluster

Fencing and Add Failover to Cluster – Part 3

First of all let’s see what is meant by Fencing and Failover.

What is Fencing?

If we think of a setup with more than one nodes, it is possible that one or more nodes can be failed at some point of time. So in this case fencing is isolating the malfunctioning server from the cluster in order to protect and secure the synced resources. Therefore we can add a fence to protect the resources shared within the cluster.

What is Failover?

Imagine a scenario, where a server has important data for an organization which the stakeholders need the organization to keep the server up and running without any down time experienced. In this case we can duplicate the data to another server (now there are two servers with identical data and specs) which we can use as the fail-over.

By any chance, one of the servers goes down, the other server which we have configured as the fail-over will take over the load and provides the services which were given by the first server. In this method, users will not be experienced the down time period which was caused to the primary server.

You can go through the Part 01 and Part 02 of this clustering series here:

  1. What is Clustering and Advantages/Disadvantages – Part 1
  2. Setup Cluster with Two Nodes in Linux – Part 2

As we’ve already discussed about our testing environment setup in last two articles, that we’re using three servers for this setup, the first server act as a Cluster server and other two as nodes.

Cluster Server: 172.16.1.250
Hostname: clserver.test.net

node01: 172.16.1.222
Hostname: nd01server.test.net

node02: 172.16.1.223
Hostname: nd02server.test.net   

Step 1: How to Add Fencing to Cluster Server

1. First we have to enable fencing on the cluster server, for this I will use below two commands.

# ccs -h 172.16.1.250 --setfencedaemon post_fail_delay=0
# ccs -h 172.16.1.250 --setfencedaemon post_join_delay=10

Enable Fencing on Cluster

Enable Fencing on Cluster

As you can see we use ccs command to add the configurations to cluster. Following are definitions of the options I have used in the command.

  1. -h: Cluster host IP address.
  2. –setfencedaemon: Applies the changes to the fencing daemon.
  3. post_fail_delay: Time in seconds which the daemon waits before fencing a victim server when a node has been failed.
  4. post_join_delay: Time in seconds which the daemon waits before fencing victim server when a node has joined the cluster.

2. Now let’s add a fence device for our cluster, execute below command to add a fence device.

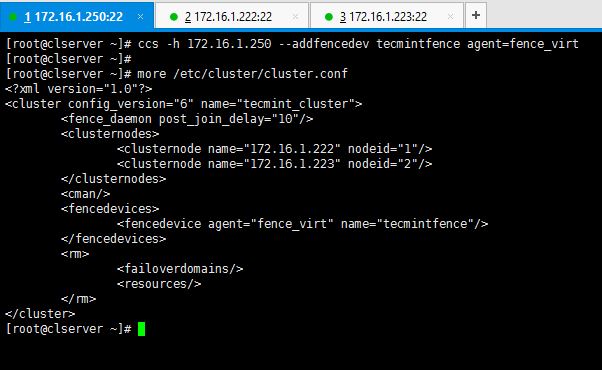
# ccs -h 172.16.1.250 --addfencedev tecmintfence agent=fence_virt

This is how I executed the command and how the cluster.conf file looks like after adding a fence device.

Add Fencing Device in Cluster

Add Fencing Device in Cluster

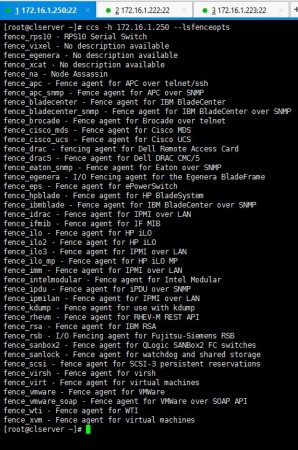
You can execute below command to see what kind of fence options you can use to create a fence device. I used fence_virt since I use VMs for my setup.

# ccs -h 172.16.1.250 --lsfenceopts

Fence Options

Fence Options

Step 2: Add Two Nodes to Fence Device

3. Now I’m going to add a method to the created fence device and add hosts in to it.

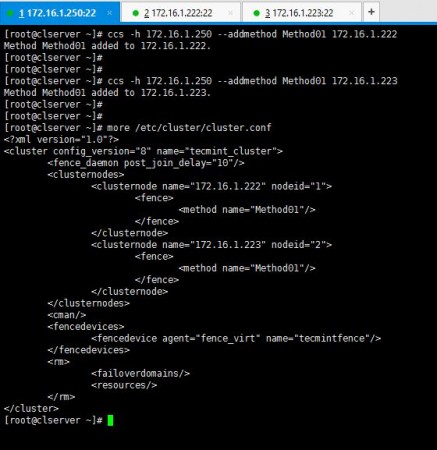
# ccs -h 172.16.1.250 --addmethod Method01 172.16.1.222
# ccs -h 172.16.1.250 --addmethod Method01 172.16.1.223

You have to add the methods you have created while ago for the both nodes you have in your setup. Following is how I added methods and my cluster.conf.

Add Nodes to Fence Device

Add Nodes to Fence Device

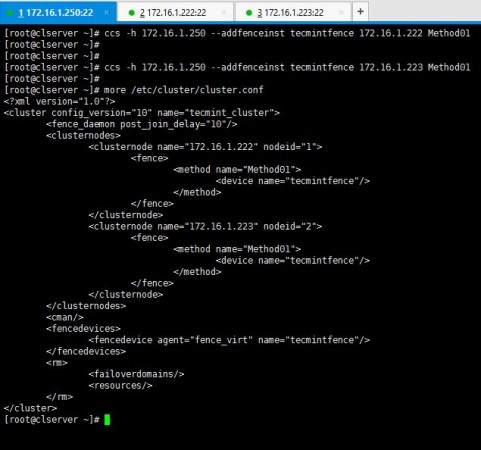
4. As the next step, you will have to add the fence methods you created for the both nodes, to the fence device we created namely “tecmintfence”.

# ccs -h 172.16.1.250 --addfenceinst tecmintfence 172.16.1.222 Method01
# ccs -h 172.16.1.250 --addfenceinst tecmintfence 172.16.1.223 Method01

I have successfully associated my methods with the fence device and this is how my cluster.conf looks like now.

Add Fence to Nodes

Add Fence to Nodes

Now you have successfully configured fence device, methods and added your nodes to it. As the last step of part 03, I will now show you how to add a failover to the setup.

Step 3: Add Failover to Cluster Server

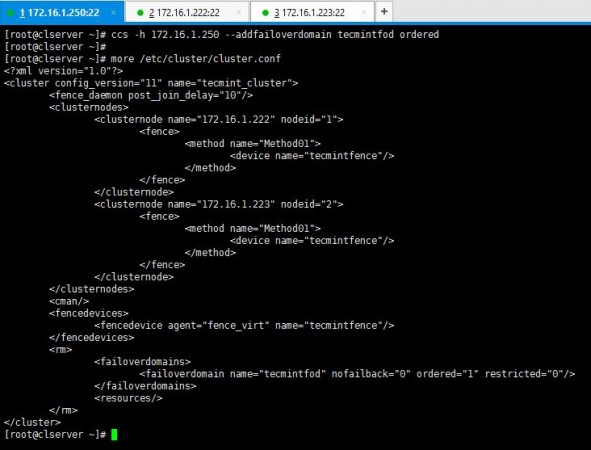
5. I use below syntax of commands to create my fail-over to the cluster setup.

# ccs -h 172.16.1.250 --addfailoverdomain tecmintfod ordered

Add Failover to Cluster

Add Failover to Cluster

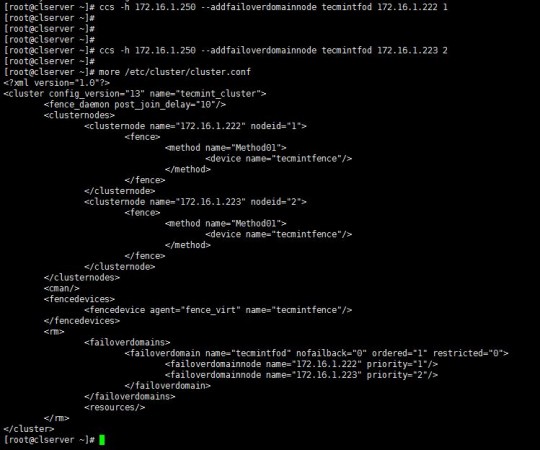
6. As you have created the fail-over domain, now you can add two nodes to it.

# ccs -h 172.16.1.250 --addfailoverdomainnode tecmintfod 172.16.1.222 1
# ccs -h 172.16.1.250 --addfailoverdomainnode tecmintfod 172.16.1.223 2

Add Nodes to Cluster Failover

Add Nodes to Cluster Failover

As it is shown above, you can see cluster.conf bears all the configurations I have added for the fail-over domain.

Hope you have enjoyed the Part 3 of this series. Last part of the Clustering guide series will be posted soon which will teach you to add resources to the cluster, sync them and start-up the cluster.

Hello folks. First of all, my apologies for the delay of the last part of this cluster series. Let’s get on to work without getting any more delayed.

As we many of you have completed all three previous parts, I will brief you what we have completed so far. Now we already have enough knowledge to install and configure cluster packages for two nodes and enable fencing and failover in a clustered environment.

Sync Cluster Configuration and Verify FailOver

Sync Cluster Configuration and Verify FailOver – Part 4

You can refer my previous parts if you don’t remember since it took a little longer to post the last part.

 Introduction to Linux Clustering and Advantages/Disadvanges of Clustering – Part 1

 How to Install and Configure Cluster with Two Nodes in Linux – Part 2

 Fencing and Adding a Failover to Clustering – Part 3

We will start by adding resources to the cluster. In this case we can add a file system or a web service as your need. Now I have /dev/sda3 partition mounted to /x01 which I wish to add as a file system resource.

1. I use below command to add a file system as a resource:

# ccs -h 172.16.1.250 --addresource fs name=my_fs device=/dev/mapper/tecminttest_lv_vol01 mountpoint=/x01 fstype=ext3

Add Filesystem to Cluster

Add Filesystem to Cluster

Additionally, if you want to add a service also, you can by using below methodology. Issue the following command.

# ccs -h 172.16.1.250 --addservice my_web domain=testdomain recovery=relocate autostart=1

You can verify it by viewing the cluster.conf file as we did in previous lessons.

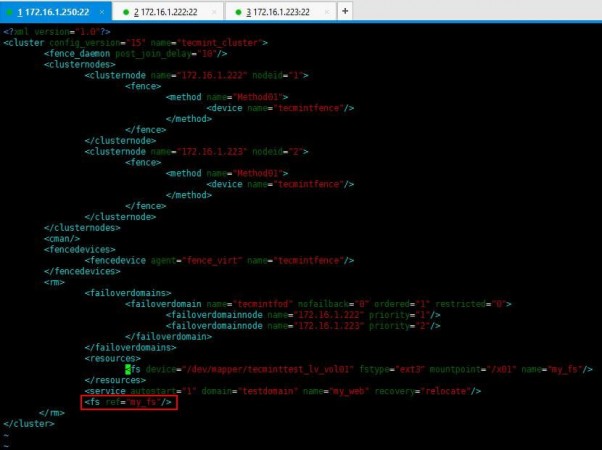
2. Now enter following entry in cluster.conf file to add a reference tag to the service.

<fs ref="my_fs"/>

Add Service to Cluster

Add Service to Cluster

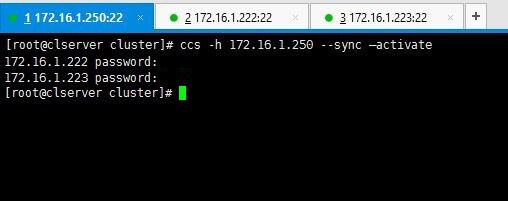
3. All set. No we will see how we can sync the configurations we made to cluster among the 2 nodes we have. Following command will do the needful.

# ccs -h 172.16.1.250 --sync --activate

Sync Cluster Configuration

Sync Cluster Configuration

Note: Enter passwords we set for ricci in the early stages when we were installing packages.

You can verify your configurations by using below command.

# ccs -h 172.16.1.250 --checkconf

Verify Cluster Configuration

Verify Cluster Configuration

4. Now it’s time to start the things up. You can use one of below commands as you prefer.

To start only one node use the command with relevant IP.

# ccs -h 172.16.1.222 start

Or if you want to start all nodes use --startall option as follows.

# ccs -h 172.16.1.250 –startall

You can use stop or --stopall if you needed to stop the cluster.

In a scenario like if you wanted to start the cluster without enabling the resources (resources will automatically be enabled when the cluster is started), like a situation where you have intentionally disabled the resources in a particular node in order to disable fencing loops, you don’t want to enable those resources when the cluster is starting.

For that purpose you can use below command which starts the cluster but does not enable the resources.

# ccs -h 172.16.1.250 --startall --noenable 

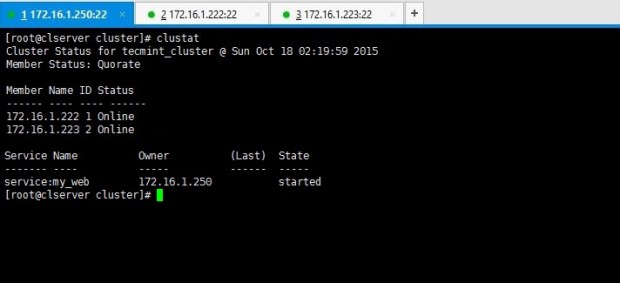
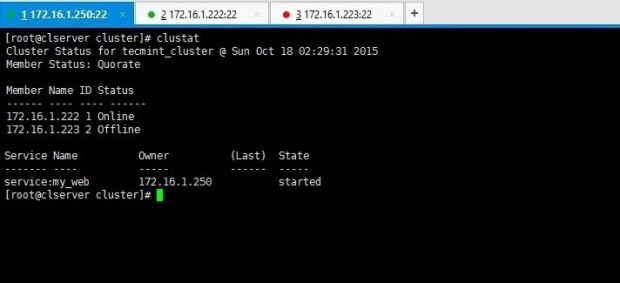
5. After the cluster has been started up, you can view the stats by issuing clustat command.

# clustat

Check Cluster Status

Check Cluster Status

Above output says there are two nodes in the cluster and both are up and running at the moment.

6. You can remember we have added a failover mechanism in our previous lessons. Want to check it works? This is how you do it. Force shutdown one node and look for cluster stats using clustat command for the results of failover.

I have shut down my node02server(172.16.1.223) using shutdown -h now command. Then executed clustatcommand from my cluster_server(172.16.1.250).

Check Cluster FailOver

Check Cluster FailOver

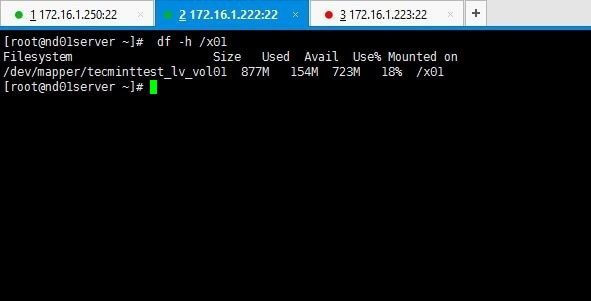
Above output clarifies you that node 1 is online while node 2 has gone offline as we shut it down. Yet service and the file system we shared are still online as you can see if you check it on node01 which is online.

# df -h /x01

Verify Cluster Node

Verify Cluster Node

Refer the cluster.conf file with whole config set relevant to our setup used for tecmint.

<?xml version="1.0"?>
<cluster config_version="15" name="tecmint_cluster">
        <fence_daemon post_join_delay="10"/>
        <clusternodes>
                <clusternode name="172.16.1.222" nodeid="1">
                        <fence>
                                <method name="Method01">
                                        <device name="tecmintfence"/>
                                </method>
                        </fence>
                </clusternode>
                <clusternode name="172.16.1.223" nodeid="2">
                        <fence>
                                <method name="Method01">
                                        <device name="tecmintfence"/>
                                </method>
                        </fence>
                </clusternode>
        </clusternodes>
        <cman/>
        <fencedevices>
                <fencedevice agent="fence_virt" name="tecmintfence"/>
        </fencedevices>
        <rm>
                <failoverdomains>
                        <failoverdomain name="tecmintfod" nofailback="0" ordered="1" restricted="0">
                                <failoverdomainnode name="172.16.1.222" priority="1"/>
                                <failoverdomainnode name="172.16.1.223" priority="2"/>
                        </failoverdomain>
                </failoverdomains>
                <resources>
                        <fs device="/dev/mapper/tecminttest_lv_vol01" fstype="ext3" mountpoint="/x01" name="my_fs"/>
                </resources>
                <service autostart="1" domain="testdomain" name="my_web" recovery="relocate"/>
                <fs ref="my_fs"/>
       </rm>
</cluster>

Hope you’ll enjoyed the whole series of clustering lessons.

How to Configure and Maintain High Availability/Clustering in Linux (adding nginx):

High Availability (HA) simply refers to a quality of a system to operate continuously without failure for a long period of time. HA solutions can be implemented using hardware and/or software, and one of the common solutions to implementing HA is clustering.

In computing, a cluster is made up of two or more computers (commonly known as nodes or members) that work together to perform a task. In such a setup, only one node provides the service with the secondary node(s) taking over if it fails.

Clusters fall into four major types:

  • Storage: provide a consistent file system image across servers in a cluster, allowing the servers to simultaneously read and write to a single shared file system.
  • High Availability: eliminate single points of failure and by failing over services from one cluster node to another in case a node goes becomes inoperative.
  • Load Balancing: dispatch network service requests to multiple cluster nodes to balance the request load among the cluster nodes.
  • High Performance: carry out parallel or concurrent processing, thus helping to improve performance of applications.

Another widely used solution to providing HA is replication (specifically data replications). Replication is the process by which one or more (secondary) databases can be kept in sync with a single primary (or master) database.

To setup a cluster, we need at least two servers. For the purpose of this guide, we will use two Linux servers:

  • Node1: 192.168.10.10
  • Node2: 192.168.10.11

In this article, we will demonstrate the basics of how to deploy, configure and maintain high availability/clustering in Ubuntu 16.04/18.04 and CentOS 7. We will demonstrate how to add Nginx HTTP service to the cluster.

Configuring Local DNS Settings on Each Server

In order for the two servers to communicate to each other, we need to configure the appropriate local DNS settings in the /etc/hosts file on both servers.

Open and edit the file using your favorite command line editor.

$ sudo vim /etc/hosts  

Add the following entries with actual IP addresses of your servers.

192.168.10.10	node1.example.com
192.168.10.11 	node2.example.com

Save the changes and close the file.

Installing Nginx Web Server

Now install Nginx web server using the following commands.

$ sudo apt install nginx  [On Ubuntu]
$ sudo yum install epel-release && sudo yum install nginx [On CentOS 7]

Once the installation is complete, start the Nginx service for now and enable it to auto-start at boot time, then check if it’s up and running using the systemctl command.
On Ubuntu, the service should be started automatically immediately after package pre-configuration is complete, you can simply enable it.

$ sudo systemctl enable nginx
$ sudo systemctl start nginx
$ sudo systemctl status nginx

After starting the Nginx service, we need to create custom webpages for identifying and testing operations on both servers. We will modify the contents of the default Nginx index page as shown.

$ echo "This is the default page for node1.example.com" | sudo tee /usr/share/nginx/html/index.html 	#VPS1
$ echo "This is the default page for node2.example.com" | sudo tee /usr/share/nginx/html/index.html 	#VPS2

Installing and Configuring Corosync and Pacemaker

Next, we have to install PacemakerCorosync, and Pcs on each node as follows.

$ sudo apt install corosync pacemaker pcs	#Ubuntu 
$ sudo yum install corosync pacemaker pcs	#CentOS 

Once the installation is complete, make sure that pcs daemon is running on both servers.

$ sudo systemctl enable pcsd
$ sudo systemctl start pcsd
$ sudo systemctl status pcsd

Creating the Cluster

During the installation, a system user called “hacluster” is created. So we need to set up the authentication needed for pcs. Let’s start by creating a new password for the “hacluster” user, we need to use the same password on all servers:

$ sudo passwd hacluster

Create Cluster User Password

Create Cluster User Password

Next, on one of the servers (Node1), run the following command to set up the authentication needed for pcs.

$ sudo pcs cluster auth node1.example.com node2.example.com -u hacluster -p password_here --force

Setup Authentication for PCS

Setup Authentication for PCS

Now create a cluster and populate it with some nodes (the cluster name cannot exceed 15 characters, in this example, we have used examplecluster) on Node1 server.

$ sudo pcs cluster setup --name examplecluster node1.example.com node2.example.com 

Create Cluster on Node1

Create Cluster on Node1

Now enable the cluster on boot and start the service.

$ sudo pcs cluster enable --all
$ sudo pcs cluster start --all

Enable and Start the Cluster

Enable and Start the Cluster

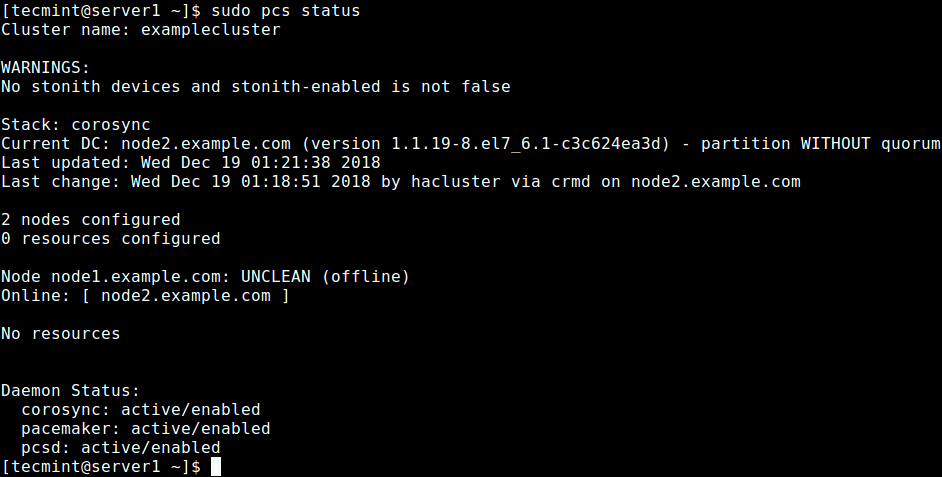
Now check if the cluster service is up and running using the following command.

$ sudo pcs status
OR
$ sudo crm_mon -1

Check Cluster Status

Check Cluster Status

From the output of the above command, you can see that there is a warning about no STONITH devices yet the STONITH is still enabled in the cluster. In addition, no cluster resources/services have been configured.

Configuring Cluster Options

The first option is to disable STONITH (or Shoot The Other Node In The Head), the fencing implementation on Pacemaker.

This component helps to protect your data from being corrupted by concurrent access. For the purpose of this guide, we will disable it since we have not configured any devices.

To turn off STONITH, run the following command:

$ sudo pcs property set stonith-enabled=false

Next, also ignore the Quorum policy by running the following command:

$ sudo pcs property set no-quorum-policy=ignore

After setting the above options, run the following command to see the property list and ensure that the above options, stonith and the quorum policy are disabled.

$ sudo pcs property list

View Cluster Properties

View Cluster Properties

Adding a Resource/Cluster Service

In this section, we will look at how to add a cluster resource. We will configure a floating IP which is the IP address that can be instantly moved from one server to another within the same network or data center. In short, a floating IP is a technical common term, used for IPs which are not bound strictly to one single interface.

In this case, it will be used to support failover in a high-availability cluster. Keep in mind that floating IPs aren’t just for failover situations, they have a few other use cases. We need to configure the cluster in such a way that only the active member of the cluster “owns” or responds to the floating IP at any given time.

We will add two cluster resources: the floating IP address resource called “floating_ip” and a resource for the Nginx web server called “http_server”.

First start by adding the floating_ip as follows. In this example, our floating IP address is 192.168.10.20.

$ sudo pcs resource create floating_ip ocf:heartbeat:IPaddr2 ip=192.168.10.20 cidr_netmask=24 op monitor interval=60s

where:

  • floating_ip: is the name of the service.
  • “ocf:heartbeat:IPaddr2”: tells Pacemaker which script to use, IPaddr2 in this case, which namespace it is in (pacemaker) and what standard it conforms to ocf.
  • op monitor interval=60s”: instructs Pacemaker to check the health of this service every one minutes by calling the agent’s monitor action.

Then add the second resource, named http_server. Here, resource agent of the service is ocf:heartbeat:nginx.

$ sudo pcs resource create http_server ocf:heartbeat:nginx configfile="/etc/nginx/nginx.conf" op monitor timeout="20s" interval="60s"

Once you have added the cluster services, issue the following command to check the status of resources.

$ sudo pcs status resources

Check Cluster Resources

Check Cluster Resources

Looking at the output of the command, the two added resources: “floating_ip” and “http_server” have been listed. The floating_ip service is off because the primary node is in operation.

If you have firewall enabled on your system, you need to allow all traffic to Nginx and all high availability services through the firewall for proper communication between nodes:

-------------- CentOS 7 -------------- 
$ sudo firewall-cmd --permanent --add-service=http
$ sudo firewall-cmd --permanent --add-service=high-availability		
$ sudo firewall-cmd --reload

-------------- Ubuntu -------------- 
$ sudo ufw allow http	
$ sudo ufw allow high-availability						
$ sudo ufw reload 

Testing High Availability/Clustering

The final and important step is to test that our high availability setup works. Open a web browser and navigate to the address 192.168.10.20 you should see the default Nginx page from the node2.example.com as shown in the screenshot.

Test Cluster Before Failure

Test Cluster Before Failure

To simulate a failure, run the following command to stop the cluster on the node2.example.com.

$ sudo pcs cluster stop http_server

Then reload the page at 192.168.10.20, you should now access the default Nginx web page from the node1.example.com.

Test Cluster After Failure

Test Cluster After Failure

Alternatively, you can simulate an error by telling the service to stop directly, without stopping the the cluster on any node, using the following command on one of the nodes:

 
$ sudo crm_resource --resource http_server --force-stop 

Then you need to run crm_mon in interactive mode (the default), within the monitor interval of 2 minutes, you should be able to see the cluster notice that http_server failed and move it to another node.

For your cluster services to run efficiently, you may need to set some constraints. You can see the pcs man page (man pcs) for a list of all usage commands.

For more information on Corosync and Pacemaker, check out: https://clusterlabs.org/

Summary

In this guide, we have shown the basics of how to deploy, configure and maintain high availability/clustering/replication in Ubuntu 16.04/18.04 and CentOS 7. We demonstrated how to add Nginx HTTP service to a cluster. If you have any thoughts to share or questions, use the feedback form below.

Source

Install C, C++ Compiler and Development (build-essential) Tools in Debian/Ubuntu

Most Linux system administrators and engineers are required to know some basic programming to help them in their daily tasks. If they want to go one step further into the development area as well (either as kernel or application programmers), then C or C++ is the best place to start.

Install C, C++ Compiler and Build Essential Tools

Install C, C++ Compiler and Build Essential Tools

Read AlsoInstall C, C++ and Development Tools in RHEL/CentOS/Fedora

In this article we will explain how to install C and C++ compilers and it’s Development Tools (build-essential) related packages such as make, libc-dev, dpkg-dev, etc. in Debian and derivatives such as Ubuntu and Linux Mint.

The build-essential software contains an informational list of software’s which are treated as important for building Debian packages including gcc compiler, make and other needed tools.

​What is a Compiler?

Simply put, a compiler is a software program that processes instructions written in a programming language and creates a binary file that the machine’s CPU can understand and execute.

In Debian-based distributions, the most well-known C and C++ compilers are gcc and g++, respectively. Both programs were developed and are still maintained by the Free Software Foundation through the GNU project.

​Installing C, C++ Compiler and Development Tools (build-essential)

If your system don’t have build-essential package installed in your system by default, you can install the latest available version from the default distribution repositories as follows:

# apt-get update && apt-get install build-essential     
OR
$ sudo get update && apt-get install build-essential

Now we’re ready to start typing C or C++ code… or almost. We’re about to show you yet another tool to boost your development toolset.

Speeding Up C and C++ Compilations

When you know you’ll need to compile a program, make changes, then recompile again it’s great to have a tool like ccache, which as you will probably guess based on its name, is a compiler cache.

It speeds up recompilation by caching previous compilations and detecting when the same compilation is being done again. Besides C and C++, it also supports Objective-C and Objective-C++. The only limitations are:

  1. Only supports caching the compilation of a single C/C++/Objective-C/Objective-C++ file. For other types of compilations (multi-file compilation, linking, to name a few examples), the process will end up running the real compiler.
  2. Some compiler flags may not supported. If such a flag is detected, ccache will silently fall back to running the real compiler.

Let’s install this tool:

# aptitude install ccache

Install CCache in Debian

Install CCache in Debian

In the next section we will see some examples of C and C++ code compilation with and without ccache.

Testing C and C++ with a sample Program

Let’s use the classical example of a very basic C program that adds two numbers. Open your favorite text editor and enter the following code, then save as sum.c:

#include<stdio.h>
int main()
{
   int a, b, c;
   printf("Enter two numbers to add, separated by a space: ");
   scanf("%d%d",&a,&b);
   c = a + b;
   printf("The sum of equals %d\n",c);
   return 0;
}

To compile the above code into an executable named sum in the current working directory use the -o switch with gcc:

# gcc sum.c -o sum

If you want to take advantage of ccache, just prepend the above command with ccache, as follows:

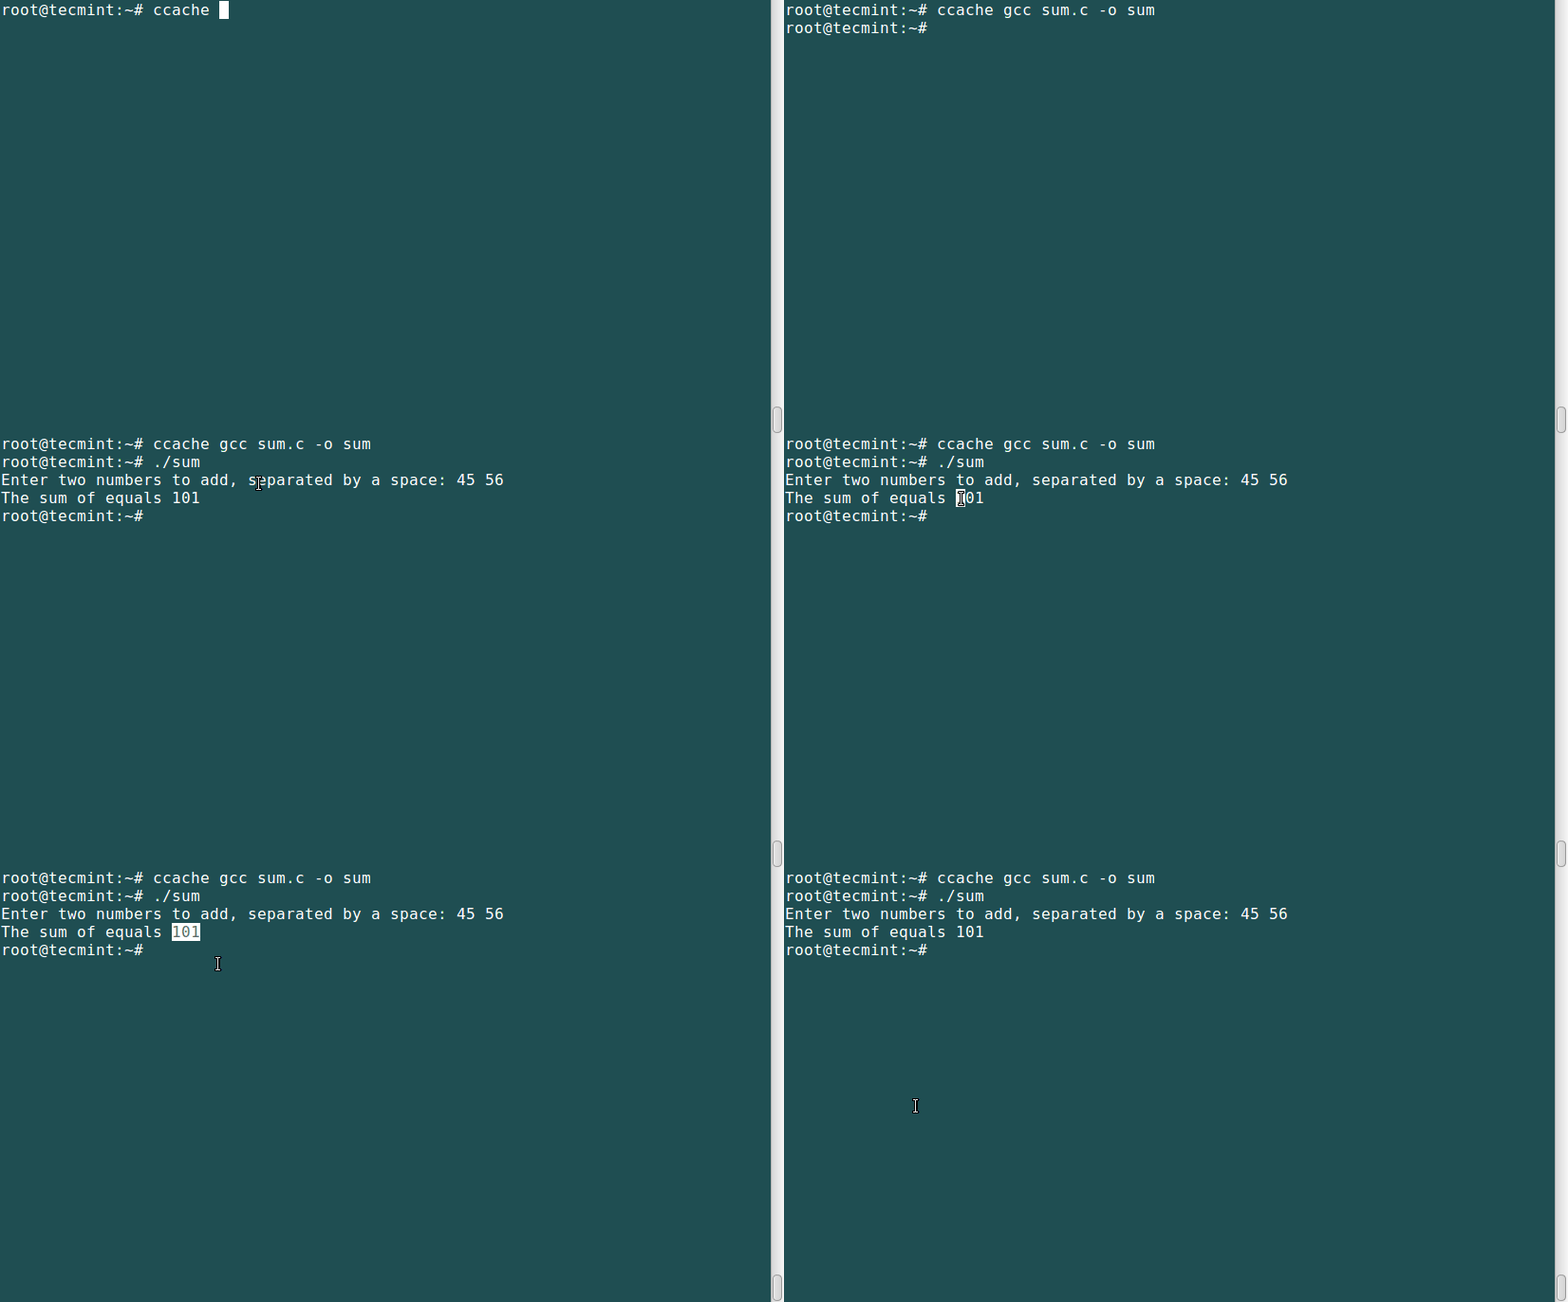
# ccache gcc sum.c -o sum

Then run the binary:

# ./sum

Compile C++ Program in Debian

Compile C++ Program in Debian

While this basic example does not allow us to see the full power of ccache, for larger programs you’ll quickly realize what a great tool it is. The same applies for C++ programs as well.

Summary

In this guide we have shown how to install and use the GNU compilers for C and C++ in Debian and derivatives. In addition, we explained how to use a compiler cache to speed up recompilations of the same code. While you can refer to the online man pages for gcc and g++ for further options and examples, don’t hesitate to drop us a note using the form below If you have any questions or comments.

Source

Install ‘PhpVirtualBox’ to Manage VirtualBox Virtual Machines via Web Browser in Linux

Image result for phpvirtualbox photo

Virtualization is one of the most discussed topic in the field of Linux and IT in general. In the list of 10 HOT IT Skills in demand Virtualization (Vmware) stands at the top of the list.

We will be taking you to a quick note of what virtualization is, several virtualization tools before a complete guide on downloading, installing and configuring Virtualbox and PhpVirtualBox which is a web based virtual box front end.

The download, installation and configuration of Virtualbox and PhpVirtualBox will follow for Debian and CentOS based Distributions.

What is Virtualization

Virtualization is the process of creating non-real (virtual) version of operating system, storage, network resource and hardware. Virtualization is achieved by creating virtual machines which powers an Operating System. A host physical server can host one or more virtual machine, which may power different OS (Windows, Linux, UNIX, BSD).

There are several virtualization tools available. A few of them are platform specific and rest of them are available to be use on any platform.

  1. Microsoft Virtual Server 2005 R2 – available for x86 and x86_64 bit platform. Support: Windows only.
  2. Q – open source virtualization tool available for windows, mac and Linux.
  3. Vmware – Available for Windows and Linux.
  4. VirtualBox – Open source application available for Windows, Mac, Linux and Solaris.
  5. Xen – Supports Windows as well as Linux distros.

What is VirtualBox

VirtualBox initially was released under proprietary License but later (2007) Oracle Corporation started releasing it under GNU General Public License. Written completely in C, C++ and Assembly Language it is available for Windows, OS X, Linux and Solaris.

VirtualBox is claimed to be the only professional virtualization solution that is freely available and is open source. It is able to support 64 bit guest OS as well as creating Snapshot of the virtual OS.

VirtualBox lets you run virtualised application along with real desktop Application. Moreover it can be configured to share host clipboards and folders. Special drivers are available for smooth switching between systems. It is available for X86 as well as X86_64 bit platform. High on feature and performance and low on resource is a big plus point of VirtualBox.

This article will walk through the installation and configuration of VirtualBox and PhpVirtualBox to manage virtual machines under RHEL/CentOS/Fedora and Debian/Ubuntu system.

Installation of VirtualBox and PhpVirtualBox in Linux

For this article, we will be using Minimal Installation of Debian and CentOS as platform of installation. All the Installation, configuration and examples are tested on Debian 8.0 and CentOS 7.1 Minimal.

1. Before installing VirtualBox and PhpVirtualBox, you need to updated system package database and install prerequisites such as ApachePHP and other needed dependencies as shown below.

On Debian based Distributions

# apt-get update && apt-get upgrade && apt-get autoremove
# apt-get install apache2
# apt-get install php5 php5-common php-soap php5-gd
# apt-get install build-essential dkms unzip wget

After installing all above required packages, you can proceed further to add one of the following VirtualBox PPA lines to /etc/apt/sources.list file, according to your Linux distribution.

deb http://download.virtualbox.org/virtualbox/debian raring contrib
deb http://download.virtualbox.org/virtualbox/debian quantal contrib
deb http://download.virtualbox.org/virtualbox/debian precise contrib
deb http://download.virtualbox.org/virtualbox/debian lucid contrib non-free
deb http://download.virtualbox.org/virtualbox/debian wheezy contrib
deb http://download.virtualbox.org/virtualbox/debian jessie contrib
deb http://download.virtualbox.org/virtualbox/debian squeeze contrib non-free

Next download and add Oracle public key using following commands.

# wget www.virtualbox.org/download/oracle_vbox.asc
# apt-key add oracle_vbox.asc

On RedHat based Distributions

# yum update && yum autoremove
# yum install httpd
# yum install php php-devel php-common php-soap php-gd
# yum groupinstall 'Development Tools' SDL kernel-devel kernel-headers dkms wget

After installing all above required packages, download Oracle public key and import into your system.

# wget www.virtualbox.org/download/oracle_vbox.asc
# rpm –import oracle_vbox.asc

2. Next, restart the Apache service with the help of following commands, as per your Linux distribution.

# /etc/init.d/apache2 restart				[On Older Debian based systems]
# /etc/init.d/httpd restart				[On Older RedHat based systems]

OR

# systemctl restart apache2.service			[On Newer Debian based systems]
# systemctl restart httpd.service			[On Newer RedHat based systems]

Point your browser to your Private IP Address or your loopback address, you should see your apache default testing page.

http://ip-address
OR
http://localhost

3. Now it’s time to install VirtualBox.

# apt-get install virtualbox-4.3		[On Debian based systems]
# yum install virtualbox-4.3   			[On RedHat based systems]

4. Next download and install PhpVirtualBox.

# wget http://sourceforge.net/projects/phpvirtualbox/files/phpvirtualbox-4.3-1.zip
# unzip phpvirtualbox-4.3-1.zip

5. Next, move the extracted ‘phpvirtualbox-4.3-1‘ folder to the default root folder of the http web server (/var/www/ or /var/www/html).

# mv phpvirtualbox-4.3-1 /var/www/html

6. Rename the directory ‘phpvirtualbox-4.3-1‘ to phpvb or anything, so that it is easy to point to them. Next there is a configuration file config.php-example under ‘phpvb‘ directory, rename it to config.php as shown below.

# mv /var/www/html/phpvb/config.php-example /var/www/html/phpvb/config.php

7. Create a new user account (or add an existing user) and add it to vboxusers group and change phpvbdirectory ownership to avi user.

# useradd avi
# passwd avi
# usermod -aG vboxusers avi
# chown -R avi:avi /var/www/html/phpvb

8. Now open ‘config.php‘ file and add newly created user and password.

# vi / var/www/html/phpvb/config.php
/* Username / Password for system user that runs VirtualBox */
var $username = 'avi';
var $password = 'avi123';

9. Now Download and install virtualbox extension.

# wget http://download.virtualbox.org/virtualbox/4.3.12/Oracle_VM_VirtualBox_Extension_Pack-4.3.12-93733.vbox-extpack
# VboxManage extpack install Oracle_VM_VirtualBox_Extension_Pack-4.3.12-93733.vbox-extpack

10. Now start Virtualbox-websrv as the user ‘avi‘ defined in config file.

$ vboxwebsrv -H 127.0.0.1

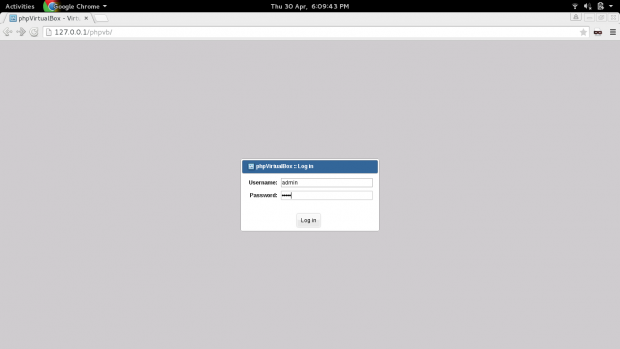
11. Now point your browser to ip_where_phpvirtualbox_is_installed/phpvb or 127.0.0.1/phpvb, if it was installed on the native server.

The default username is admin
The default pasword is admin

PHPVirtualbox Login

PHPVirtualbox Login

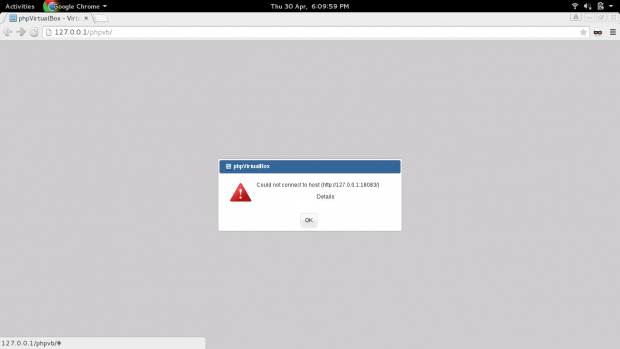
If you get error similar to the below image. You might have to start certain services.

PhpVirtualBox Login Error

PhpVirtualBox Login Error

# /etc/init.d/virtualbox start
# /etc/init.d/vboxdrv  start
# /etc/init.d/vboxweb-service start

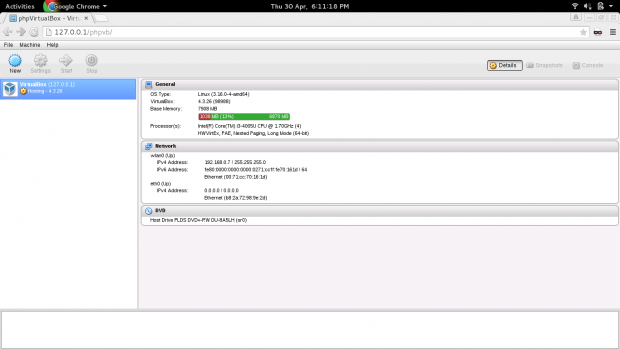
Now again try login and you will see the below interface.

PhpVirtualBox Dashboard

PhpVirtualBox Dashboard

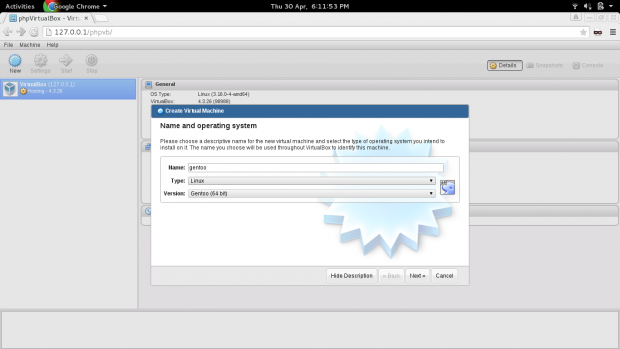
You may install any OS in Virtual box. Click on New, give name and select architecture and version.

Create New Virtual Machine

Create New Virtual Machine

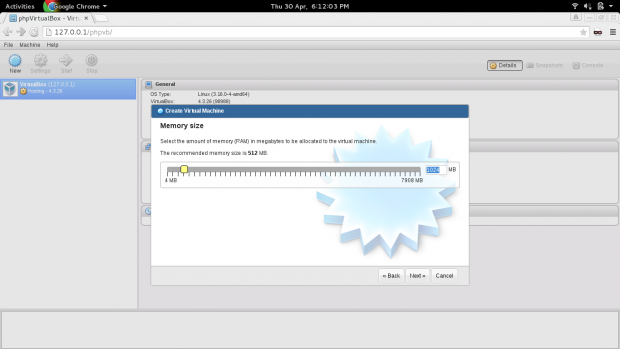
Give the amount of RAM virtual OS may use.

Add Virtual Machine RAM

Add Virtual Machine RAM

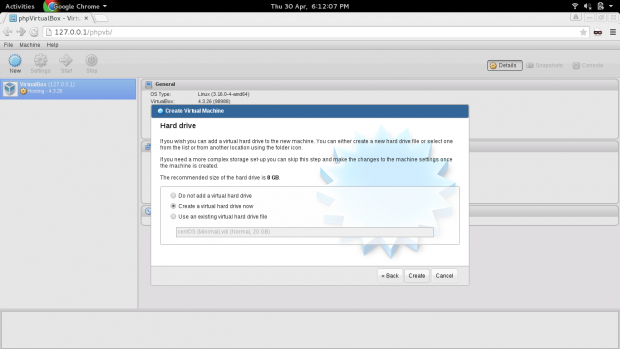
Add new virtual hard drive to new virtual machine.

Add Hard Drive to VM

Add Hard Drive to VM

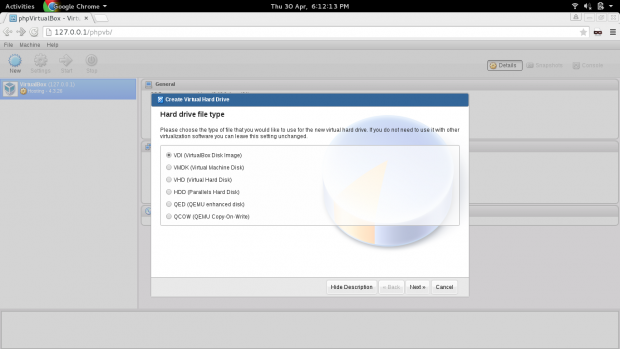
Select type of Hard Drive.

Select VM Hard Drive Type

Select VM Hard Drive Type

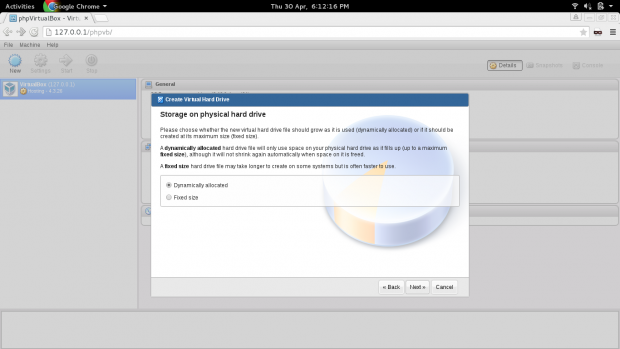
Select type of storage disk allocation.

VM Storage Disk

VM Storage Disk

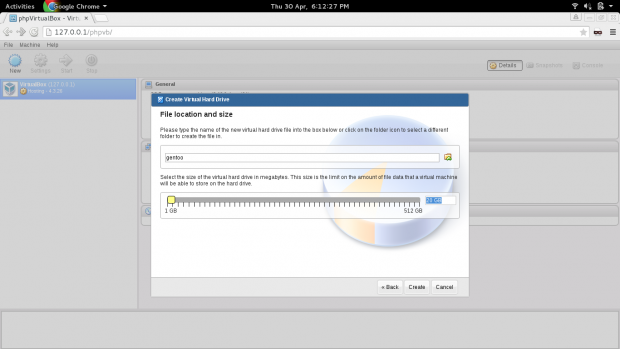
Choose size of Hard Drive and click create.

Add Virtual Machine Size

Add Virtual Machine Size

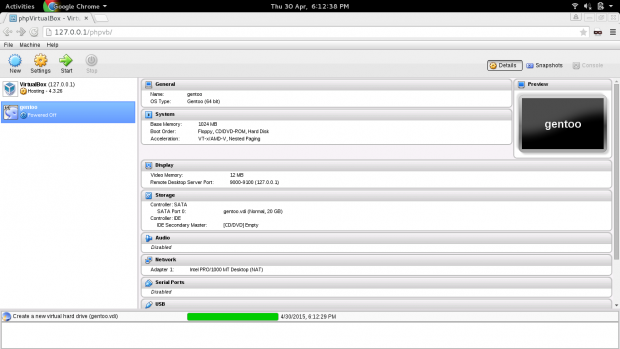
You may see your Virtual disk is created and ready to host virtual OS.

New Virtual Machine

New Virtual Machine

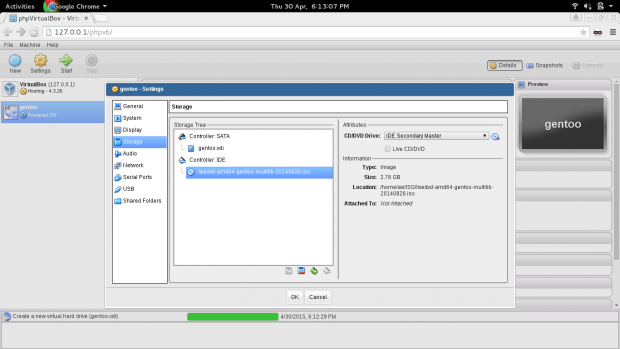
Click on storage and add virtual Image (iso), or select your machine physical CD Drive. Finally click start to start installing.

Select VM Installation Media

Select VM Installation Media

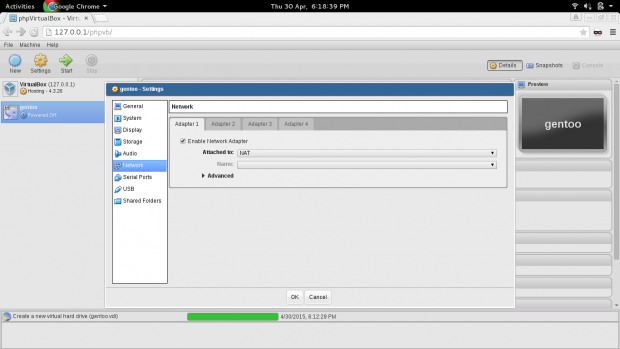
Click on Network and select correct network Adapter.

Select VM Network Adapter

Select VM Network Adapter

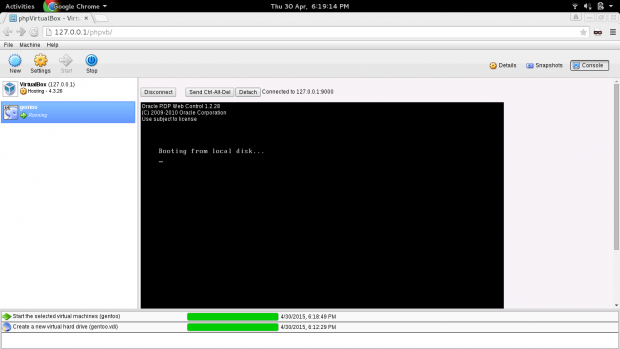
Click on console on the top right corner select desktop size and connect. If the console option is not highlighted you may have to enable it under Settings → Display → Remote Display → Enable Server and Click OK.

VM Console

VM Console

You may see the virtual OS in action.

VM Terminal in Action

VM Terminal in Action

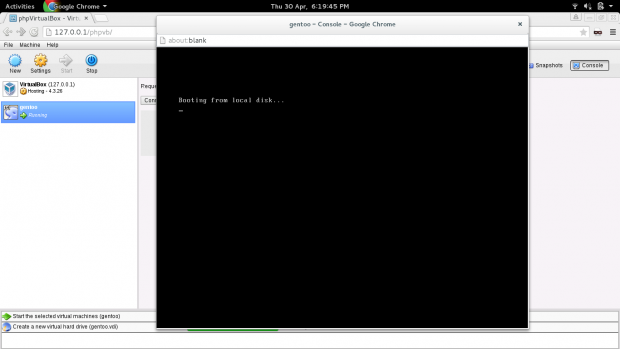
You may Detach it by clicking ‘detach‘.

Detach VM

Detach VM

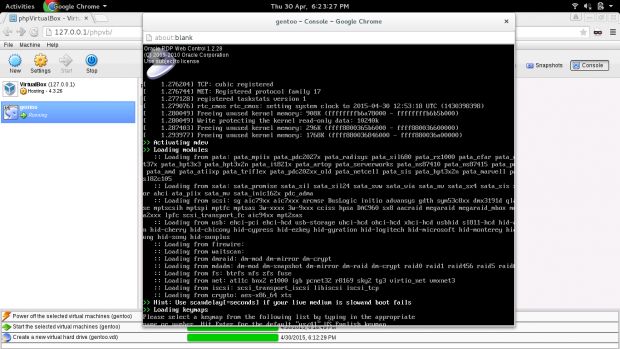
The booting and Rest of the Installation process is pretty simple as if you are installing on Local Machine.

VM Booting and Insallation

VM Booting and Insallation

Once installation is Finished, your virtual OS is ready to host anything virtually. Be it OS, Network, Device or anything else.

VM OS Information

Enjoy your local Virtual Server and Front-end PHPVirtualBox to access it. You may implement it in the production after a little more configuration.

That’s all from my side for now. Let me know if you liked the application or not also I will here to help you if you face any problem. Keep connected to tecmint. Bye!
Source

How to Setup a Simple Apache Web Server in a Docker Container

Image result for docker photo

If you are a Linux system administrator who provides support for developers, chances are you’ve heard of Docker. If not, this software solution will make your life easier beginning today by helping you reduce operating costs and accelerate deployments – among other benefits.

But it’s not magic. Docker as a platform leverages containers – packages of an application along with all the tools it needs to run to eliminate differences between environments.

In other words, containerized software will operate and can be managed consistently regardless of where it is installed. Additionally, containers are much easier to set up, start, stop, and maintain than good old virtual machines. If you’re interested in knowing more about the differences between these two technologies, the official Docker website provides a great explanation.

To illustrate, in this article we will explain how to install Docker on CentOS 7 and Ubuntu 16.04, and spin up an Apache 2.4 container from Docker Hub.

We will then use it to serve a simple web page from our home directory – all without the need to install a web server on our host.

Installing Docker on CentOS and Ubuntu

To begin, let’s install Docker using the following command. This will download and run a shell script that will add the Docker repository to our system and install the package.

# curl -fsSL https://get.docker.com | sh

Next, use systemctl command to start the main Docker service and check its status.

# systemctl start docker
# systemctl status docker

At this point we can simply execute.

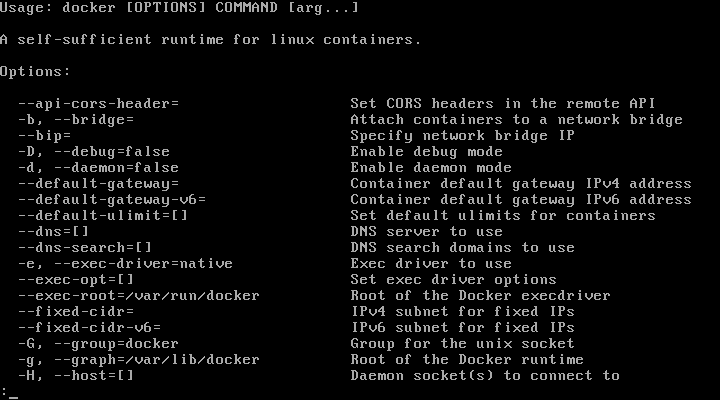
# docker

to view the list of available commands or to get help.

# docker COMMAND --help
# docker ps --help

will tell us how to list containers present on our system, whereas

# docker run --help

will print all the options that we can use to manipulate a container.

Setting Up an Apache Container

One of the amazing things about the Docker ecosystem is that there are tens of standard containers that you can easily download and use. In the following example we will instantiate an Apache 2.4 container named tecmint-web, detached from the current terminal. We will use an image called httpd:2.4 from Docker Hub.

Our plan is to have requests made to our public IP address on port 8080 be redirected to port 80 on the container. Also, instead of serving content from the container itself, we will serve a simple web page from /home/user/website.

We do this by mapping /home/user/website/ on the /usr/local/apache2/htdocs/ on the container. Note that you will need to use sudo or log in as root to proceed, and do not omit the forward slashes at the end of each directory.

# sudo docker run -dit --name tecmint-web -p 8080:80 -v /home/user/website/:/usr/local/apache2/htdocs/ httpd:2.4

At this point our Apache container should be up and running.

$ sudo docker ps

Check Apache Docker Container

Check Apache Docker Container

Now let’s create a simple web page named docker.html inside /home/user/website directory.

# vi /home/user/website/docker.html

Add the following sample HTML content to file.

<!DOCTYPE html>
<html lang="en">
<head>
    <meta charset="UTF-8">
    <title>Learn Docker at Tecmint.com</title>
</head>
<body>
    <h1>Learn Docker With Us</h1>   
</body>
</html>

Next, point your browser to AAA.BBB.CCC.DDD:8080/docker.html (where AAA.BBB.CCC.DDD is your host’s public IP address). You should be presented with the page we created previously.

Check Apache Page

Check Apache Page

If you wish, you can now stop the container.

$ sudo docker stop tecmint-web

and remove it:

$ sudo docker rm tecmint-web

To finish cleaning up, you may want to delete the image that was used in the container (omit this step if you’re planning on creating other Apache 2.4 containers soon).

$ sudo docker image remove httpd:2.4

Note that in all the above steps we never had to install the web server on our host.

Summary

In this article we explained how to install Docker and manipulate a container. Unfortunately, these are just the basics – there are entire courses, books, and certification exams that cover Dockers (and containers in general) more in depth.

If you want to learn more about Docker, we have already covered a 3-article series, that explains how to install Docker, run applications into containers and automatically build docker images with dockerfile.

  1. Install Docker and Learn Basic Container Manipulation in CentOS and RHEL 7/6
  2. How to Deploy and Run Applications into Docker Containers on CentOS/RHEL 7/6
  3. Automatically Build and Configure Docker Images with Dockerfile on CentOS/RHEL 7/6
  4. How to Remove Docker Images, Containers and Volumes

Consider this as your starting point and let us know if you have any questions or comments – we look forward to hearing from you!

Source

How to Remove Docker Images, Containers and Volumes

Related image

Docker is an open-source, powerful, secure, reliable and efficient container platform that enables realistic independence between applications and infrastructure. It is being widely adopted by IT and cloud companies out there, to easily to create, deploy, and run applications.

A container is a technology for visualizing operating systems, that enables an application to be packaged with everything needed to run it, allowing it to run independently from the operating system. A container image is a self-contained, executable package of an application that includes everything needed to run it: code, runtime, system tools and libraries, as well as configurations.

We have already covered a series on Docker, that explains how to install Docker, run applications into containers and automatically build docker images with dockerfile.

  1. Install Docker and Learn Basic Container Manipulation in CentOS and RHEL 7/6
  2. How to Deploy and Run Applications into Docker Containers on CentOS/RHEL 7/6
  3. Automatically Build and Configure Docker Images with Dockerfile on CentOS/RHEL 7/6
  4. How to Setup a Simple Apache Web Server in a Docker Container

In this article, we will explain how to remove docker images, containers and volumes via the docker command line tool in Linux systems.

How to Remove Docker Images

Before you remove any docker images, you can list all existing images on your system with the image management command.

$ docker image	        #list the most recently created images
OR
$ docker image -a 	#list all images

Looking at the output in the screenshot that follows, we have some images without a tag (showing  instead), these are referred to as “dangling images”. They no longer have any relationship to any tagged images; they are not useful anymore and only consume disk space.

List Docker Images

List Docker Images

You can remove one or more old or unused Docker images using the image ID, for example (where d65c4d6a3580 is the image ID).

$ docker rmi d65c4d6a3580 				#remove a single image
$ docker rmi 612866ff4869 e19e33310e49 abe0cd4b2ebc	#remove multiple images

You can list dangling images (untagged images) using the -f filter flag as shown.

$ docker images -f dangling=true	

List Dangling Docker Images

List Dangling Docker Images

To remove all dangling images, allowing you to reclaim wasted disk space, use any of these commands.

$ docker image prune		#interactively remove dangling images
OR
$ docker rmi $(docker images -q -f dangling=true)

Remove All Dangling Images

Remove All Dangling Images

To remove all not associated with any container, use the following command.

$ docker image prune -a 	

How to Remove Docker Containers

You can start by listing all docker containers on your system using following command.

$ docker ps
OR
$ docker ps -a  

List Docker Containers

List Docker Containers

Once you have identified the container (s) you want to delete, you can remove them using their ID, for example.

$ docker rm 0fd99ee0cb61		#remove a single container
$ docker rm 0fd99ee0cb61 0fd99ee0cb61   #remove multiple containers

If a container is running, you can first stop it and remove it as shown.

$ docker stop 0fd99ee0cb61
$ docker rm -f 0fd99ee0cb61

You can also force-remove a container while it is running by adding the --force or -f flag, this will send it a SIGKILL signal as shown.

$ docker rm -f 0fd99ee0cb61

You can remove containers using filters as well. For example to remove all exited containers, use this command.

$ docker rm $(docker ps -qa --filter "status=exited")

To stop and remove all containers, use the following commands.

$ docker stop $(docker ps -a -q)	#stop all containers
$ docker container prune		#interactively remove all stopped containers
OR
$ docker rm $(docker ps -qa)

How To Remove Docker Volumes

As before, begin by listing all docker volumes on your system with the volume management command as shown.

$ docker volume ls

To remove one or more volumes, use the following command (note that you can’t remove a volume that is in use by a container).

$ docker volume rm volume_ID 	           #remove a single volume 
$ docker volume rm volume_ID1 volume_ID2   #remove multiple volumes

Use the -f flag to force the removal of one or more volumes.

$ docker volume rm -f volume_ID

To remove dangling volumes, use the following command.

$ docker volume rm $(docker volume ls  -q --filter dangling=true)

To remove all unused local volumes, run the following command. This will remove volumes interactively.

$ docker volume prune	

How to Remove Unused or Dangling Images, Containers, Volumes, and Networks

You can delete all dangling and unreferenced data such as containers stopped, images without containers, with this single command. By default, volumes are not removed, to prevent vital data from being deleted if there is currently no container using the volume.

$ docker system prune

To prune volumes, simply add the --volumes flag to the below command as shown.

$ docker system prune --volumes

Note: In order to run the docker command line tool without the sudo command, you need to add a user to docker group, for instance.

$ sudo usermod -a -G docker aaronkilik

For more information, see the help page for the above docker object management commands.

$ docker help
$ docker image help   
$ docker container help   
$ docker volume help   

That’s all for now! In this article, we have explained how to remove docker images, containers and volumes via the docker command line tool. If you have any questions or thoughts to share, use the feedback form below to reach us.

Source

How to Name or Rename Docker Containers

Image result for docker photo

When Docker containers are created, the system automatically assign a universally unique identifier (UUID) number to each container to avoid any naming conflicts and improve automation without human involvement.

Read AlsoHow to Install Docker and Learn Basic Container Manipulation in CentOS

In this article, we will explain how to easily identify Docker containers and name or rename containers in Linux.

By default, docker uses three ways to identify a container, namely:

  • UUID long identifier e.g “21fbb152a940a37e816a442e6b09022e26b78ccd5a8eb4fcf91efeb559425c8c”.
  • UUID short identifier e.g “21fbb152a940a37”.
  • name e.g discourse_app.

Note that if no name is specified, by default, the the Docker daemon assigns containers a UUID long identifier; it generates a random string as a name.

How to Name a Docker Container

You can assign memorable names to your docker containers when you run them, using the --name flag as follows. The -d flag tells docker to run a container in detached mode, in the background and print the new container ID.

$ sudo docker run -d --name discourse_app local_discourse/app

Name Docker Container

Name Docker Container

To view a list of all your docker containers, run the following command.

$ sudo docker ps

List Docker Containers

List Docker Containers

From now on, every command that worked with a container_id can now be used with a name that you assigned, for example.

$ sudo docker restart discourse_app
$ sudo docker stop discourse_app
$ sudo docker start discourse_app

How to Rename a Docker Container

To rename a docker container, use the rename sub-command as shown, in the following example, we renaming the container discourse_app to a new name disc_app.

$ sudo docker rename discourse_app disc_app

After renaming a containers, confirm that it is now using the new name.

$ sudo docker ps

For more information, see the docker-run man page.

$ man docker-run

That’s all! In this article, we have expalined how to name and rename Docker containers. Use the comment form below to ask any questions or to add your thoughts to this guide.

Source

How to Remove Docker Images, Containers and Volumes

Docker is an open-source, powerful, secure, reliable and efficient container platform that enables realistic independence between applications and infrastructure. It is being widely adopted by IT and cloud companies out there, to easily to create, deploy, and run applications.

A container is a technology for visualizing operating systems, that enables an application to be packaged with everything needed to run it, allowing it to run independently from the operating system. A container image is a self-contained, executable package of an application that includes everything needed to run it: code, runtime, system tools and libraries, as well as configurations.

We have already covered a series on Docker, that explains how to install Docker, run applications into containers and automatically build docker images with dockerfile.

  1. Install Docker and Learn Basic Container Manipulation in CentOS and RHEL 7/6
  2. How to Deploy and Run Applications into Docker Containers on CentOS/RHEL 7/6
  3. Automatically Build and Configure Docker Images with Dockerfile on CentOS/RHEL 7/6
  4. How to Setup a Simple Apache Web Server in a Docker Container

In this article, we will explain how to remove docker images, containers and volumes via the docker command line tool in Linux systems.

How to Remove Docker Images

Before you remove any docker images, you can list all existing images on your system with the image management command.

$ docker image	        #list the most recently created images
OR
$ docker image -a 	#list all images

Looking at the output in the screenshot that follows, we have some images without a tag (showing  instead), these are referred to as “dangling images”. They no longer have any relationship to any tagged images; they are not useful anymore and only consume disk space.

List Docker Images

List Docker Images

You can remove one or more old or unused Docker images using the image ID, for example (where d65c4d6a3580 is the image ID).

$ docker rmi d65c4d6a3580 				#remove a single image
$ docker rmi 612866ff4869 e19e33310e49 abe0cd4b2ebc	#remove multiple images

You can list dangling images (untagged images) using the -f filter flag as shown.

$ docker images -f dangling=true	

List Dangling Docker Images

List Dangling Docker Images

To remove all dangling images, allowing you to reclaim wasted disk space, use any of these commands.

$ docker image prune		#interactively remove dangling images
OR
$ docker rmi $(docker images -q -f dangling=true)

Remove All Dangling Images

Remove All Dangling Images

To remove all not associated with any container, use the following command.

$ docker image prune -a 	

How to Remove Docker Containers

You can start by listing all docker containers on your system using following command.

$ docker ps
OR
$ docker ps -a  

List Docker Containers

List Docker Containers

Once you have identified the container (s) you want to delete, you can remove them using their ID, for example.

$ docker rm 0fd99ee0cb61		#remove a single container
$ docker rm 0fd99ee0cb61 0fd99ee0cb61   #remove multiple containers

If a container is running, you can first stop it and remove it as shown.

$ docker stop 0fd99ee0cb61
$ docker rm -f 0fd99ee0cb61

You can also force-remove a container while it is running by adding the --force or -f flag, this will send it a SIGKILL signal as shown.

$ docker rm -f 0fd99ee0cb61

You can remove containers using filters as well. For example to remove all exited containers, use this command.

$ docker rm $(docker ps -qa --filter "status=exited")

To stop and remove all containers, use the following commands.

$ docker stop $(docker ps -a -q)	#stop all containers
$ docker container prune		#interactively remove all stopped containers
OR
$ docker rm $(docker ps -qa)

How To Remove Docker Volumes

As before, begin by listing all docker volumes on your system with the volume management command as shown.

$ docker volume ls

To remove one or more volumes, use the following command (note that you can’t remove a volume that is in use by a container).

$ docker volume rm volume_ID 	           #remove a single volume 
$ docker volume rm volume_ID1 volume_ID2   #remove multiple volumes

Use the -f flag to force the removal of one or more volumes.

$ docker volume rm -f volume_ID

To remove dangling volumes, use the following command.

$ docker volume rm $(docker volume ls  -q --filter dangling=true)

To remove all unused local volumes, run the following command. This will remove volumes interactively.

$ docker volume prune	

How to Remove Unused or Dangling Images, Containers, Volumes, and Networks

You can delete all dangling and unreferenced data such as containers stopped, images without containers, with this single command. By default, volumes are not removed, to prevent vital data from being deleted if there is currently no container using the volume.

$ docker system prune

To prune volumes, simply add the --volumes flag to the below command as shown.

$ docker system prune --volumes

Note: In order to run the docker command line tool without the sudo command, you need to add a user to docker group, for instance.

$ sudo usermod -a -G docker aaronkilik

For more information, see the help page for the above docker object management commands.

$ docker help
$ docker image help   
$ docker container help   
$ docker volume help   

That’s all for now! In this article, we have explained how to remove docker images, containers and volumes via the docker command line tool. If you have any questions or thoughts to share, use the feedback form below to reach us.

Source

Install Docker and Learn Basic Container Manipulation in CentOS and RHEL 7/6

In this 3-article series, we will discuss about Docker, is an open-source lightweight virtualization tool which runs at top of Operating System level, allowing users to create, run and deploy applications, encapsulated into small containers.

Install Docker and Learn Basic Container Manipulation

Install Docker and Learn Basic Container Manipulation – Part 1

This type of Linux containers are proven to be fast, portable and secure. The processes that run in a Docker container are always isolated from the main host, preventing outside tampering.

Part 1Install Docker and Learn Basic Container Manipulation in CentOS and RHEL 7/6

This tutorial provides a starting point on how to install Docker, create and run Docker containers on CentOS/RHEL 7/6, but barley scratches the surface of Docker.

Step 1: Install and Configure Docker

1. Docker binaries are incorporated into RHEL/CentOS 7 extras repositories, the installation process being pretty simple. Install Docker package by issuing the following command with root privileges:

Install Docker on RHEL and CentOS 7

# yum install docker

Install Docker on CentOS and RHEL 7

Install Docker on CentOS and RHEL 7

Install Docker on RHEL and CentOS 6

To install Docker, the Epel repositories must be enabled on your system by issuing the following command:

# yum install epel-release
# yum install docker-io

Install Docker on RHEL and CentOS 6

Install Docker on RHEL and CentOS 6

2. After, Docker package has been installed, start the daemon, check its status and enable it system wide using the below commands:

On RHEL/CentOS 7

# systemctl start docker 
# systemctl status docker
# systemctl enable docker

Enable Docker on RHEL and CentOS 7

Enable Docker on RHEL and CentOS 7

On RHEL/CentOS 6

# service docker start
# service docker status
# chkconfig docker on

Enable Docker on RHEL and CentOS 6

Enable Docker on RHEL and CentOS 6

3. Finally, run a container test image to verify if Docker works properly, by issuing the following command:

# docker run hello-world

If you can see the below message, then everything is in the right place.

"Hello from Docker. This message shows that your installation appears to be working correctly."

Docker Hello World

Docker Hello World

4. Now, you can run a few basic Docker commands to get some info about Docker:

For system-wide information on Docker
# docker info

Check Docker Info

Check Docker Info

For Docker version
# docker version

Check Docker Version

Check Docker Version

5. To get a list of all available Docker commands type docker on your console.

# docker

List Docker Commands

List Docker Commands

Step 2: Download a Docker Image

6. In order to start and run a Docker container, first an image must be downloaded from Docker Hub on your host. Docker Hub offers a great deal of free images from its repositories.

To search for a Docker image, Ubuntu for instance, issue the following command:

# docker search ubuntu

Search Docker Images

Search Docker Images

7. After you decided on what image you want to run based on your needs, download it locally by running the below command (in this case an Ubuntu image is downloaded and used):

# docker pull ubuntu

Download Docker Images

Download Docker Images

8. To list all the available Docker images on your host issue the following command:

# docker images

List Docker Images

List Docker Images

9. If you don’t need a Docker image anymore and you want to remove it from the host issue the following command:

# docker rmi ubuntu

Remove Docker Image

Remove Docker Image

Step 3: Run a Docker Container

When you execute a command against an image you basically obtain a container. After the command that is executing into container ends, the container stops (you get a non-running or exited container). If you run another command into the same image again a new container is created and so on.

All the containers created will remain on the host filesystem until you choose to delete them by using the docker rm command.

10. In order to create and run a container, you need to run a command into a downloaded image, in this case Ubuntu, so a basic command would be to display the distribution version file inside the container using cat command, as in the following example:

# docker run ubuntu cat /etc/issue

Run Docker Containers

Run Docker Containers

The above command is divided as follows:

# docker run [local image] [command to run into container]

11. To run one of the containers again with the command that was executed to create it, first you must get the container ID (or the name automatically generated by Docker) by issuing the below command, which displays a list of the running and stopped (non-running) containers:

# docker ps -l 

List Running Docker Containers

List Running Docker Containers

12. Once the container ID has been obtained, you can start the container again with the command that was used to create it, by issuing the following command:

# docker start c629b7d70666

Here, the string c629b7d70666 represents the container ID.

Start Docker Containers

Start Docker Containers

13. In case the container is running state, you can get it’s ID by issuing docker ps command. To stop the running container issue docker stop command by specifying the container ID or auto-generated name.

# docker stop dreamy_mccarthy
# docker ps

Start Stop Docker Containers

Start Stop Docker Containers

14. A more elegant alternative so you don’t have to remember the container ID would be to allocate a unique name for every container you create by using the --name option on command line, as in the following example:

# docker run --name myname  ubuntu cat /etc/debian_version

Add Name to Docker Container

Add Name to Docker Container

15. Then, using the name that you allocated for the container, you can manipulate container (startstopremovetopstats) further just by addressing its name, as in the below examples:

# docker start myname
# docker stats myname
# docker top myname 

Be aware that some of the above commands might display no output if the process of command that was used to create the container finishes. When the process that runs inside the container finishes, the container stops.

Step 4: Run an Interactive Session into a Container

16. In order to interactively connect into a container shell session, and run commands as you do on any other Linux session, issue the following command:

# docker run -it ubuntu bash

Start Docker Container Interactive Shell

Start Docker Container Interactive Shell

The above command is divided as follows:

  1. -i is used to start an interactive session.
  2. -t allocates a tty and attaches stdin and stdout.
  3. ubuntu is the image that we used to create the container.
  4. bash (or /bin/bash) is the command that we are running inside the Ubuntu container.

17. To quit and return to host from the running container session you must type exit command. The exitcommand terminates all the container processes and stops it.

# exit

18. If you’re interactively logged on container terminal prompt and you need to keep the container in running state but exit from the interactive session, you can quit the console and return to host terminal by pressing Ctrl+p and Ctrl+q keys.

Keep Docker Shell Session Active

Keep Docker Shell Session Active

19. To reconnect to the running container you need the container ID or name. Issue docker ps command to get the ID or name and, then, run docker attach command by specifying container ID or name, as illustrated in the image above:

# docker attach <container id>

20. To stop a running container from the host session issue the following command:

# docker kill <container id>

That’s all for basic container manipulation. In the next tutorial we will discuss how to save, delete and run a web server into a Docker container.

Following the previous Docker article, this tutorial will discuss how to save a Docker container into a new image, remove a container and run a Nginx web server inside a container.

Install and Run Applications in Docker Containers

Install and Run Applications in Docker Containers – Part 2

Requirements

  1. Install Docker on CentOS and RHEL 7/6

How To Run and Save a Docker Container

1. In this example we will run and save an Ubuntu based Docker container where Nginx server will be installed. But before committing any changes to container, first start the container with the below command which installs Nginx daemon into Ubuntu image:

# docker run ubuntu bash -c "apt-get -y install nginx" 

Install Nginx on Ubuntu Docker Container

Install Nginx on Ubuntu Docker Container

2. Next, after Nginx package is installed, issue the command docker ps -l to get the ID or name of the running container.

# docker ps -l

Find Docker Container ID Name

Find Docker Container ID Name

And apply changes by running the below command:

# docker commit 5976e4ae287c ubuntu-nginx

Here, 5976e4ae287c represents the container ID and ubuntu-nginx represents the name of the newly image that has been saved with committed changes.

In order to view if the new image has been successfully created just run docker images command and a listing of all saved images will be shown.

# docker images

Docker Container Changes

Docker Container Changes

Chances are that the installation process inside the container finishes fast which leads to a non-running container (container is stopped). In this case the docker ps command won’t show any output because no container is running.

In order to be able to still get the container’s id run docker ps -a | head -3 to output the most recent containers and identify the container based on the command issued to create the container and the exited status.

3. Alternatively, you can actively enter container session by running docker run -it ubuntu bashcommand and execute further apt-get install nginx command. While the command is running, detach from the container using Ctrl-p + Ctrl-q keys and the container will continue running even if the Nginx installation process finishes.

# docker run -it ubuntu bash
# apt-get install nginx

Install Nginx on Docker Container

Install Nginx on Docker Container

Then, get the running container id with docker ps and commit changes. When finished, re-enter to container console using docker attach and type exit to stop container.

# docker ps
# docker attach 3378689f2069
# exit

Attach Docker Container

Attach Docker Container

4. To further test if the recently image has been committed properly (in this case Nginx service has been installed), execute the below command in order to generate a new container which will output if Nginx binary was successfully installed:

# docker run ubuntu-nginx whereis nginx

Generate New Docker Container

Generate New Docker Container

5. To remove a container use the rm command against a container ID or name, which can be obtained using docker ps -a command:

# docker ps -a
# sudo docker rm 36488523933a

Remove Docker Container

Remove Docker Container

How to Run Nginx inside Docker Container

6. In this part we will concentrate on how you can run and access a network service, such as a Nginx web server, inside Docker, using the ubuntu-nginx image created earlier where Nginx daemon was installed.

The first thing that you need to do is to create a new container, map host-container ports and enter container shell by issuing the below command:

# docker run -it -p 81:80 ubuntu-nginx /bin/bash
# nginx &

Here, the -p option exposes the host port to container port. While the host port can be arbitrary, with the condition that it should be available (no other host services should listen on it), the container port must be exactly the port that the inside daemon is listening to.

Once you’re connected to container session, start Nginx daemon in background and detach from container console by pressing Ctrl-p + Ctrl-q keys.

Run Nginx Inside Docker Container

Run Nginx Inside Docker Container

7. Now, run docker ps to get the state of your running container. You can also view host network sockets by issuing the following command:

# docker ps
OR
# netstat -tlpn 

View Docker Container Running State

View Docker Container Running State

8. In order to visit the page served by the Nginx container, open a browser from a remote location in your LAN and type the IP address of your machine using the HTTP protocol.

Verify Nginx Running under Docker Container

Verify Nginx Running under Docker Container

9. To stop the container run the following command followed by container ID or name:

# docker ps
# docker stop fervent_mccarthy
# docker ps

Stop Running Docker Container

Stop Running Docker Container

As alternative to stop the running container, enter container shell command prompt and type exit to finish process:

# docker attach fervent_mccarthy
# exit

Be aware that using this kind of containers to run web servers or other kind of services are best suited only for development purposes or tests due to the fact that the services are only active while the container is running. Exiting the container disrupts all running services or any changes made.

This tutorial will concentrate on how to build a custom Docker image based on Ubuntu with Apache service installed. The whole the process will be automated using a Dockerfile.

Build Configure Docker Images with Dockerfile

Build Configure Docker Images with Dockerfile – Part 3

Docker images can be automatically build form text files, named Dockerfiles. A Docker file contains step-by-step ordered instructions or commands used to create and configure a Docker image.

Requirements

  1. Install Docker and Learn Docker Container Manipulation – Part 1
  2. Deploy and Run Applications under Docker Containers – Part 2

Basically, a Docker file contains various instructions in order to build and configure a specific container based on your requirements. The following instructions are the most used, some of them being mandatory:

  1. FROM = Mandatory as first instruction in a Docker file. Instructs Docker to pull the base image from which you are building the new image. Use a tag to specify the exact image from which you are building:
Ex: FROM ubuntu:14.04
  1. MAINTAINER = Author of the build image
  2. RUN = This instruction can be used on multiple lines and runs any commands after Docker image has been created.
  3. CMD = Run any command when Docker image is started. Use only one CMD instruction in a Dockerfile.
  4. ENTRYPOINT = Same as CMD but used as the main command for the image.
  5. EXPOSE = Instructs the container to listen on network ports when running. The container ports are not reachable from the host by default.
  6. ENV = Set container environment variables.
  7. ADD = Copy resources (files, directories or files from URLs).

Step 1: Creating or Writing Dockerfile Repository

1. First, let’s create some kind of Dockerfile repositories in order to reuse files in future to create other images. Make an empty directory somewhere in /var partition where we will create the file with the instructions that will be used to build the newly Docker image.

# mkdir -p /var/docker/ubuntu/apache
# touch /var/docker/ubuntu/apache/Dockerfile

Create Dockerfile Repository

Create Dockerfile Repository

2. Next, start editing the file with the following instructions:

# vi /var/docker/ubuntu/apache/Dockerfile

Dokerfile excerpt:

FROM ubuntu
MAINTAINER  your_name  <user@domain.tld>
RUN apt-get -y install apache2
RUN echo “Hello Apache server on Ubuntu Docker” > /var/www/html/index.html
EXPOSE 80
CMD /usr/sbin/apache2ctl -D FOREGROUND

Dockerfile Repository

Dockerfile Repository

Now, let’s go through the file instructions:

The first line tells us that we are building from an Ubuntu image. If no tag is submitted, say 14:10 for example, the latest image from Docker Hub is used.

On the second line we’ve added the name and email of the image creator. Next two RUN lines will be executed in the container when building the image and will install Apache daemon and echo some text into default apache web page.

The EXPOSE line will instruct Docker container to listen on port 80, but the port will be not available to outside. The last line instructs the container to run Apache service in foreground after the container is started.

3. The last thing we need to do is to start creating the image by issuing the below command, which will locally create a new Docker image named ubuntu-apache based on the Dockerfile created earlier, as shown in this example:

# docker build -t ubuntu-apache /var/docker/ubuntu/apache/

Create Docker Image

Create Docker Image

4. After the image has been created by Docker, you can list all available images and identify your image by issuing the following command:

# docker images

List All Docker Images

List All Docker Images

Step 2: Run the Container and Access Apache from LAN

5. In order to run the container continuously (in background) and access the container exposed services (ports) from the host or other remote machine in your LAN, run the below command on your host terminal prompt:

# docker run -d -p 81:80 ubuntu-apache

Run Docker Container Image

Run Docker Container Image

Here, the -d option runs the ubuntu-apache container in background (as a daemon) and the -p option maps the container port 80 to your localhost port 81. Outside LAN access to Apache service can be reached through port 81 only.

Netstat command will give you an idea about what ports the host is listening to.

After the container has been started, you can also run docker ps command to view the status of the running container.

6. The webpage can be displayed on your host from command line using curl utility against your machine IP Address, localhost or docker net interface on port 81. Use ip command line to show network interface IP addresses.

# ip addr               [List nework interfaces]
# curl ip-address:81    [System Docker IP Address]
# curl localhost:81     [Localhost]

Check Docker Network Interface and IP Address

Check Docker Network Interface and IP Address

Check Docker Apache Webpage

Check Docker Apache Webpage

7. To visit the container webpage from your network, open a browser at remote location and use HTTP protocol, the IP Address of the machine where the container is running, followed by port 81 as illustrated on below image.

http://ip-address:81

Check Docker Container Apache Page

Check Docker Container Apache Page

8. To get an inside of what processes are running inside the container issue the following command:

# docker ps
# docker top <name or ID of the container>

Check Running Docker Processes

Check Running Docker Processes

9. To stop the container issue docker stop command followed by the container ID or name.

# docker stop <name or ID of the container>
# docker ps

10. In case you want to assign a descriptive name for the container use the --name option as shown in the below example:

# docker run --name my-www -d -p 81:80 ubuntu-apache
# docker ps

Give Docker Container Name

Give Docker Container Name

Now you can reference the container for manipulation (start, stop, top, stats etc) only by using the assigned name.

# docker stats my-www

Monitor Docker Container Utilization

Monitor Docker Container Utilization

Step 3: Create a System-wide Configuration File for Docker Container

11. On CentOS/RHEL 7 you can create a systemd configuration file and manage the container as you normally do for any other local service.

For instance, create a new systemd file named, let’s say, apache-docker.service using the following command:

# vi /etc/systemd/system/apache-docker.service

apache-docker.service file excerpt:

[Unit]
Description=apache container
Requires=docker.service
After=docker.service

[Service]
Restart=always
ExecStart=/usr/bin/docker start -a my-www
ExecStop=/usr/bin/docker stop -t 2 my-www

[Install]
WantedBy=local.target

12. After you finish editing the file, close it, reload the systemd daemon to reflect changes and start the container by issuing the following commands:

# systemctl daemon-reload
# systemctl start apache-docker.service
# systemctl status apache-docker.service

This was just a simple example on what you can do with a simple Dockerfile but you can pre-build some pretty sophisticated applications that you can fire-up in just a matter of seconds with minimal resources and effort.

ctop – Top-like Interface for Monitoring Docker Containers

ctop is a free open source, simple and cross-platform top-like command-line tool for monitoring container metrics in real-time. It allows you to get an overview of metrics concerning CPU, memory, network, I/O for multiple containers and also supports inspection of a specific container.

Docker Container Monitoring

Docker Container Monitoring

At the time of writing this article, it ships with built-in support for Docker (default container connector) and runC; connectors for other container and cluster platforms will be added in future releases.

How to Install ctop in Linux Systems

Installing the latest release of ctop is as easy as running the following commands to download the binary for your Linux distribution and install it under /usr/local/bin/ctop and make it executable to run it.

$ sudo wget https://github.com/bcicen/ctop/releases/download/v0.7.1/ctop-0.7.1-linux-amd64  -O /usr/local/bin/ctop
$ sudo chmod +x /usr/local/bin/ctop

Alternatively, install ctop via Docker using following command.

$ docker run --rm -ti --name=ctop -v /var/run/docker.sock:/var/run/docker.sock quay.io/vektorlab/ctop:latest

Once you have installed ctop, you can run it to list all your containers whether active or not.

$ ctop

Monitor Docker Containers

Monitor Docker Containers

You can use the Up and Down arrow keys to highlight a container and click Enter to select it. You will see a menu as shown in the following screenshot. Choose “single view” and click on it to inspect the selected container.

Monitor Single Docker Container

Monitor Single Docker Container

The following screenshot shows the single view mode for a specific container.

Inspect a Single Container

Inspect a Single Container

To display active containers only, use the -a flag.

$ ctop -a 

Check Active Docker Container

Check Active Docker Container

To display CPU as % of system total, use the -scale-cpu option.

$ ctop -scale-cpu

You can also filter containers using the -f flag, for example.

$ ctop -f app

Additionally, you can select initial container sort field using the -s flag, and see the ctop help message as shown.

 
$ ctop -h

Note that connectors for other container and cluster systems are yet to be added to ctop. You can find more information from the Ctop Github repository.

ctop is a simple top-like tool for visualizing and monitoring container metrics in real-time. In this article, we’ve expalined how to install and use ctop in Linux. You can share your thoughts or ask any questions via the comment form below.

Source

How to Install Docker and Run Docker Containers in Ubuntu

Related image

Docker is an open source and popular operating system-level virtualization (commonly known as “containerization”) technology that primarily runs on Linux and Windows. Docker makes it easier to create, deploy, and run applications by using containers.

With containers, developers (and system administrators) can package up an application with everything needed to run the application – the code, a run-time, libraries, environment variables, and configuration files, and ship it all out as one package. Yes, it’s that great!

In this article, we will show you how to install Docker CE (Community Edition), create and run Docker containers on Ubuntu distribution.

Installing Docker CE (Community Edition) in Ubuntu

1. To install Docker CE, first, you need to remove older versions of Docker were called dockerdocker.io, or docker-engine from the system using the following command.

$ sudo apt-get remove docker docker-engine docker.io containerd runc

2. Next, you need to set up the Docker repository to install and update Docker from the repository using following commands.

$ sudo apt-get update
$ curl -fsSL https://download.docker.com/linux/ubuntu/gpg | sudo apt-key add -
$ sudo add-apt-repository "deb [arch=amd64] https://download.docker.com/linux/ubuntu $(lsb_release -cs) stable"

3. Update the apt package index and install the latest version of Docker CE using following commands.

$ sudo apt-get update
$ sudo apt-get install docker-ce docker-ce-cli containerd.io
Installing Docker CE in Ubuntu
Reading package lists... Done
Building dependency tree       
Reading state information... Done
The following additional packages will be installed:
  aufs-tools cgroupfs-mount pigz
The following NEW packages will be installed:
  aufs-tools cgroupfs-mount containerd.io docker-ce docker-ce-cli pigz
0 upgraded, 6 newly installed, 0 to remove and 167 not upgraded.
Need to get 50.7 MB of archives.
After this operation, 243 MB of additional disk space will be used.
Do you want to continue? [Y/n] y
Get:1 http://archive.ubuntu.com/ubuntu bionic/universe amd64 pigz amd64 2.4-1 [57.4 kB]
Get:2 https://download.docker.com/linux/ubuntu bionic/stable amd64 containerd.io amd64 1.2.4-1 [19.9 MB]
Get:3 http://archive.ubuntu.com/ubuntu bionic/universe amd64 aufs-tools amd64 1:4.9+20170918-1ubuntu1 [104 kB]
Get:4 http://archive.ubuntu.com/ubuntu bionic/universe amd64 cgroupfs-mount all 1.4 [6,320 B]
Get:5 https://download.docker.com/linux/ubuntu bionic/stable amd64 docker-ce-cli amd64 5:18.09.3~3-0~ubuntu-bionic [13.1 MB]
Get:6 https://download.docker.com/linux/ubuntu bionic/stable amd64 docker-ce amd64 5:18.09.3~3-0~ubuntu-bionic [17.4 MB]
Fetched 50.7 MB in 7s (7,779 kB/s)                                     
...

4. After successfully installing the Docker CE package, the service should be auto-started and auto-enabled to start at system boot, you can check its status using the following command.

$ sudo systemctl status docker 
Checking Docker CE Status
● docker.service - Docker Application Container Engine
   Loaded: loaded (/lib/systemd/system/docker.service; enabled; vendor preset: enabled)
   Active: active (running) since Wed 2019-03-06 08:06:42 UTC; 2min 18s ago
     Docs: https://docs.docker.com
 Main PID: 5274 (dockerd)
    Tasks: 8
   CGroup: /system.slice/docker.service
           └─5274 /usr/bin/dockerd -H fd:// --containerd=/run/containerd/containerd.sock

Mar 06 08:06:41 tecmint dockerd[5274]: time="2019-03-06T08:06:41.562587408Z" level=warning msg="Your kernel does not support cgroup rt runtime"
Mar 06 08:06:41 tecmint dockerd[5274]: time="2019-03-06T08:06:41.562767803Z" level=warning msg="Your kernel does not support cgroup blkio weight"
Mar 06 08:06:41 tecmint dockerd[5274]: time="2019-03-06T08:06:41.562966844Z" level=warning msg="Your kernel does not support cgroup blkio weight_device"
Mar 06 08:06:41 tecmint dockerd[5274]: time="2019-03-06T08:06:41.565298457Z" level=info msg="Loading containers: start."
Mar 06 08:06:41 tecmint dockerd[5274]: time="2019-03-06T08:06:41.950942467Z" level=info msg="Default bridge (docker0) is assigned with an IP address 172.17.0.0/16. Daemon option --bip can be used to set a prefer
Mar 06 08:06:42 tecmint dockerd[5274]: time="2019-03-06T08:06:42.036964493Z" level=info msg="Loading containers: done."
Mar 06 08:06:42 tecmint dockerd[5274]: time="2019-03-06T08:06:42.156279378Z" level=info msg="Docker daemon" commit=774a1f4 graphdriver(s)=overlay2 version=18.09.3
Mar 06 08:06:42 tecmint dockerd[5274]: time="2019-03-06T08:06:42.157145045Z" level=info msg="Daemon has completed initialization"
Mar 06 08:06:42 tecmint systemd[1]: Started Docker Application Container Engine.
Mar 06 08:06:42 tecmint dockerd[5274]: time="2019-03-06T08:06:42.224229999Z" level=info msg="API listen on /var/run/docker.sock"

5. Finally, verify that Docker CE is installed properly by running the hello-world image.

$ sudo docker run hello-world
Verify Docker CE Installation
Hello from Docker!
This message shows that your installation appears to be working correctly.

To generate this message, Docker took the following steps:
 1. The Docker client contacted the Docker daemon.
 2. The Docker daemon pulled the "hello-world" image from the Docker Hub.
    (amd64)
 3. The Docker daemon created a new container from that image which runs the
    executable that produces the output you are currently reading.
 4. The Docker daemon streamed that output to the Docker client, which sent it
    to your terminal.

To try something more ambitious, you can run an Ubuntu container with:
 $ docker run -it ubuntu bash

Share images, automate workflows, and more with a free Docker ID:
 https://hub.docker.com/

For more examples and ideas, visit:
 https://docs.docker.com/get-started/

Learn Basic Docker Commands in Ubuntu

6. To get information about Docker, run the following command.

$ sudo docker info

Kernel Version: 5.0.0-050000-generic
Operating System: Ubuntu 18.04.1 LTS
OSType: linux
Architecture: x86_64
CPUs: 1
Total Memory: 1.452GiB
Name: tecmint
ID: FWSB:IRIF:DYL7:PRB5:Y66E:37MY:ISPO:HZVY:6YJO:2IYL:TO6Y:GNB7
Docker Root Dir: /var/lib/docker
Debug Mode (client): false
Debug Mode (server): false
Registry: https://index.docker.io/v1/
Labels:
Experimental: false
Insecure Registries:
 127.0.0.0/8
Live Restore Enabled: false
Product License: Community Engine

7. To get information about Docker version, run the following command.

$ sudo docker version

Client:
 Version:           18.09.3
 API version:       1.39
 Go version:        go1.10.8
 Git commit:        774a1f4
 Built:             Thu Feb 28 06:53:11 2019
 OS/Arch:           linux/amd64
 Experimental:      false

Server: Docker Engine - Community
 Engine:
  Version:          18.09.3
  API version:      1.39 (minimum version 1.12)
  Go version:       go1.10.8
  Git commit:       774a1f4
  Built:            Thu Feb 28 05:59:55 2019
  OS/Arch:          linux/amd64
  Experimental:     false

8. To get a list of all available Docker commands run docker on your terminal.

$ docker

Usage:	docker [OPTIONS] COMMAND

A self-sufficient runtime for containers

Options:
      --config string      Location of client config files (default "/home/tecmint/.docker")
  -D, --debug              Enable debug mode
  -H, --host list          Daemon socket(s) to connect to
  -l, --log-level string   Set the logging level ("debug"|"info"|"warn"|"error"|"fatal") (default "info")
      --tls                Use TLS; implied by --tlsverify
      --tlscacert string   Trust certs signed only by this CA (default "/home/tecmint/.docker/ca.pem")
      --tlscert string     Path to TLS certificate file (default "/home/tecmint/.docker/cert.pem")
      --tlskey string      Path to TLS key file (default "/home/tecmint/.docker/key.pem")
      --tlsverify          Use TLS and verify the remote
  -v, --version            Print version information and quit

Management Commands:
  builder     Manage builds
  config      Manage Docker configs
  container   Manage containers
  engine      Manage the docker engine
  image       Manage images
  network     Manage networks
  node        Manage Swarm nodes
  plugin      Manage plugins
  secret      Manage Docker secrets
  service     Manage services
  stack       Manage Docker stacks
  swarm       Manage Swarm
  system      Manage Docker
  trust       Manage trust on Docker images
  volume      Manage volumes
....

Download a Docker Image in Ubuntu

9. To run a Docker container, first, you need to download an image from Docker Hub – provides free images from its repositories.

For example, to download a Docker image called CentOS 7, issue the following command.

$ sudo docker search centos

NAME                               DESCRIPTION                                     STARS               OFFICIAL            AUTOMATED
centos                             The official build of CentOS.                   5227                [OK]                
ansible/centos7-ansible            Ansible on Centos7                              120                                     [OK]
jdeathe/centos-ssh                 CentOS-6 6.10 x86_64 / CentOS-7 7.5.1804 x86…   107                                     [OK]
consol/centos-xfce-vnc             Centos container with "headless" VNC session…   81                                      [OK]
imagine10255/centos6-lnmp-php56    centos6-lnmp-php56                              50                                      [OK]
centos/mysql-57-centos7            MySQL 5.7 SQL database server                   47                                      
tutum/centos                       Simple CentOS docker image with SSH access      43                                      
gluster/gluster-centos             Official GlusterFS Image [ CentOS-7 +  Glust…   40                                      [OK]
openshift/base-centos7             A Centos7 derived base image for Source-To-I…   39                                      
centos/postgresql-96-centos7       PostgreSQL is an advanced Object-Relational …   37                                      
centos/python-35-centos7           Platform for building and running Python 3.5…   33                                      
kinogmt/centos-ssh                 CentOS with SSH                                 26                                      [OK]
openshift/jenkins-2-centos7        A Centos7 based Jenkins v2.x image for use w…   20                                      
centos/php-56-centos7              Platform for building and running PHP 5.6 ap…   19                                      
pivotaldata/centos-gpdb-dev        CentOS image for GPDB development. Tag names…   10                                      
openshift/wildfly-101-centos7      A Centos7 based WildFly v10.1 image for use …   6                                       
openshift/jenkins-1-centos7        DEPRECATED: A Centos7 based Jenkins v1.x ima…   4                                       
darksheer/centos                   Base Centos Image -- Updated hourly             3                                       [OK]
pivotaldata/centos                 Base centos, freshened up a little with a Do…   2                                       
pivotaldata/centos-mingw           Using the mingw toolchain to cross-compile t…   2                                       
pivotaldata/centos-gcc-toolchain   CentOS with a toolchain, but unaffiliated wi…   1                                       
openshift/wildfly-81-centos7       A Centos7 based WildFly v8.1 image for use w…   1                                       
blacklabelops/centos               CentOS Base Image! Built and Updates Daily!     1                                       [OK]
smartentry/centos                  centos with smartentry                          0                                       [OK]
jameseckersall/sonarr-centos       Sonarr on CentOS 7                              0                                       [OK]

10. After you determined on what image you want to run based on your requirements, download it locally by running the below command (in this case a CentOS image is downloaded and used).

$ docker pull centos

Using default tag: latest
latest: Pulling from library/centos
a02a4930cb5d: Pull complete 
Digest: sha256:184e5f35598e333bfa7de10d8fb1cebb5ee4df5bc0f970bf2b1e7c7345136426
Status: Downloaded newer image for centos:latest

11. To list all the available Docker images on your host run the following command.

$ sudo docker images

REPOSITORY          TAG                 IMAGE ID            CREATED             SIZE
hello-world         latest              fce289e99eb9        2 months ago        1.84kB
centos              latest              1e1148e4cc2c        3 months ago        202MB

12. If you don’t want a Docker image anymore and you can remove it using the following command.

$ sudo docker rmi centos

Untagged: centos:latest
Untagged: centos@sha256:184e5f35598e333bfa7de10d8fb1cebb5ee4df5bc0f970bf2b1e7c7345136426
Deleted: sha256:1e1148e4cc2c148c6890a18e3b2d2dde41a6745ceb4e5fe94a923d811bf82ddb
Deleted: sha256:071d8bd765171080d01682844524be57ac9883e53079b6ac66707e192ea25956

Run a Docker Container in Ubuntu

13. In order to create and run a Docker container, first you need to run a command into a downloaded CentOSimage, so a basic command would be to check the distribution version file inside the container using cat command, as shown.

$ docker run centos cat /etc/issue

14. To run the containers again, first you need to get the Container ID or Name by running the following command, which will display a list of the running and stopped containers:

$ sudo docker ps -l

CONTAINER ID        IMAGE               COMMAND             CREATED              STATUS                          PORTS               NAMES
0ddfa81c5779        centos              "cat /etc/issue"    About a minute ago   Exited (0) About a minute ago                       elastic_shirley

15. Once the Container ID or Name has been acquired, you can start the container using the following command:

$ sudo docker start 0ddfa81c5779
OR
$ sudo docker start elastic_shirley

Here, the string 0ddfa81c5779 represents the container ID and elastic_shirley represents the container Name.

16. To stop the running container run docker stop command by specifying the Container ID or Name.

$ sudo docker stop 0ddfa81c5779
OR
$ sudo docker stop elastic_shirley

17. A more better way, so that you don’t have to remember the container ID would be to define a unique name for each container you create by using the --name option as shown.

$ docker run --name myname centos cat /etc/issue

18. In order to connect and run Linux commands into a container issue the following command.

$ docker run -it centos bash

[root@6213ec547863 /]# uname -a
Linux 6213ec547863 5.0.0-050000-generic #201903032031 SMP Mon Mar 4 01:33:18 UTC 2019 x86_64 x86_64 x86_64 GNU/Linux
[root@6213ec547863 /]# cat /etc/redhat-release 
CentOS Linux release 7.6.1810 (Core) 

19. To quit and back to host from the running container session you must type exit command as shown.

$ exit

That’s all for basic container manipulation. If you have any questions or comments about this article, use the feedback form below to reach us.

Source

WP2Social Auto Publish Powered By : XYZScripts.com